One of our Forum members asked us the question: “Does anybody make a good range box with cradles for cleaning at the bench?” The answer is yes — the MTM model RBMC Range Box offers slide-in plastic cradles that provide a reasonably sturdy platform for a quick clean when you’re done shooting. The RBMC box also offers plenty of storage for jags, brushes, solvents, ammo boxes and other miscellaneous gear you need for the range.
Among the many range boxes available, the MTM model RBMC Range Box leads the pack in terms of versatility. It is rugged, it has plenty of storage space, and it doubles as a handy cleaning station. This Editor has used the MTM Range Box to clean rifles and as a “range expedient” rifle holder when adjusting scopes and tensioning action screws. It’s a good product that does the job and stands up to rough handling. The MTM Shooting Range Box is in stock now for $49.99 at Midsouth (green version).
Fitted Cleaning Cradles
The key feature setting MTM’s RBMC apart from most range boxes is the rubber-coated cradle system. Wide enough to fit a 3″-wide fore-arm, the cradles slide into vertical slots on either end of the box. This allows your range box to serve as a maintenance station. The RBMC is really pretty stable in this role, and the cradles won’t mark your stock. The cradles even feature slots on each side to hold your cleaning rods. The MTM Range Box is secure enough to stay in place when you’re brushing the barrel. However, if you’re working on a carpeted bench top, keep one hand on the box when running a cleaning rod through the bore, just to ensure the box doesn’t slide.
Versatile Upper Tray with Dividers
The MTM Range Box has two major components — the box base (with cradles), and a large upper tray with hinged top and carry handle. This large upper tray clamps securely to the bottom unit for transport. The top tray has a long section that holds cleaning rod guides, long brushes, grease syringes and the like. There are two, clear-plastic fitted divider trays. These will hold your patches and jags, plus comparators, ring wrenches, and other small tools.
MTM offers a black “tactical” Range Box for $50.71 at Midsouth. This black Tactical Range Box includes a special bracket that supports AR-type rifles through the magazine well. As show at right, this is red. However, some previous production models had black magwell brackets (see below).
What Might Be Improved
Though we really like the MTM Range Box, it’s not perfect. First, we wish the box was a bit deeper, to have added carrying capacity. The dimensions of the MTM Range Box are: 25″ long x 11.5″ wide x 8.75″ high. We’d like to see it 12″ high/deep to allow larger solvent bottles to stand upright and to provide more space to carry tools and shooting muffs. However, it is deep enough to hold the large 100-round MTM cartridge boxes that are popular with many shooters (see photo at right).
While we like the twin clear plastic dividers that fit into the removable top-tray, but we wish the dividers had individual hinged tops. This would keep small items more secure.
Are you looking to have some shooting fun this holiday season — perhaps having a fun day with the kids or grand-kids? Then check out the colorful, innovative Game Series of paper targets from Action Target, a leading manufacturer of steel targets and shooting supplies. These can be used in indoor ranges or outdoors in warmer climates where there’s no winter snow on the ground.
Inspired by arcade games, tabletop gaming, circus themes, and team sports, the new Game Series paper targets are designed to be engaging — to involve the shooter in a fun process, rather than just aiming at dots on paper. The sports targets let you enjoy Baseball and Hockey. The nostalgic arcade target designs capture the fun of an amusement park. Some targets, such as ‘Alien Invasion’ (above), feature fluorescent colors that “glow” when used indoors with black lights. You can even enjoy darts and billiards targets.
The selection of games is impressive — there are currently 18 different Game Series targets — really something for everyone. NOTE: These Game Series targets are not inexpensive. A single Game Series target costs $1.59. However, if you buy at least 100 targets (one or more types), the cost per target goes down to $0.87, a 45% savings.
This video shows a variety of Game Series Targets being used at an indoor range. You can see they are large, brightly colored, and fun to shoot.
Richard Franklin’s Step-by-Step Guide to Pillar Bedding
The Art of Stress-Free Stock Bedding
by Richard Franklin
Richard Franklin prepared this article for our readers. Richard tells us: “I’m happy to do pillar-bedding work, but this is a job which many shooters can do themselves, with some practice and the right components. I do suggest you practice first on an old ‘beater stock’. When done right, you end up with a perfect fit of receiver to action, with no twisting, stretching, or compression forces being applied to the receiver through mis-alignment. That’s what I mean by ‘stress-free’.”
This article covers all the steps in the process. This bedding operation was shown in detail in a 200-minute DVD, “Stress-Free Pillar Bedding”, in which Richard showed the entire job — from start to finish — and offered many tips to help achieve perfect results. In this article Richard explains how to properly relieve the bedding area, how to make pillars, how to set up the barreled action, and how to test your work to ensure it is truly “stress-free”. In the DVD, Richard does a complete pillar bedding job on both a finished custom stock and a Remington stock.
[Editor’s Note: This article was first published a decade ago. So, some of the listed bedding materials may have been enhanced slightly, or the product names may have changed. But the procedures described by Richard are still valid and still achieve great results.]
Before You Begin — Some Comments About Inletting
Richard told us: “You can’t do a great bedding job unless you start with really good inletting. Unfortunately, many ‘inletted stocks’ really require quite a lot of work to get the inletting right. You cannot inlet a stock 100% correctly just using a stock duplicator. That’s one reason I do bedding jobs only on the stocks I make. If the inletting isn’t right, you can have a myriad of problems–such as the holes for the action bolts being in the wrong place, or the stock not having enough clearance for the barrel or the trigger hanger. So, BEFORE you start your bedding job, make sure the inletting is really right. Don’t assume the inletting is really complete (and correct) just because the manufacturer claims that to be the case. This applies to both wood and fiberglass stocks.”
Pillars For Bedding
The BAT action featured in this article has three pillars, with the middle pillar sitting under the front of the trigger guard, and the third pillar at the rear of the guard. More typical installations will use two pillars. For either system, the installation procedures are the same.
In Photo 1, you will see part A, the bottom part of the front pillar which we call the “escutcheon”. Part B, which is a 1/4″ X 28 action bolt that is slightly longer than part C which is the top part of the front pillar. The two parts of the front pillar were machined as one piece and then the escutcheon was cut off just below the shoulder that is inside. This shoulder is for the head of the action bolt to tighten up against. I’ve found that a two-piece pillar has many advantages, particularly for hunting stocks where the underside of the stock is angled (i.e. not parallel with bore axis). I make the pillars I use, machining them from cut-off stainless barrel stubs.
Part D is a 1/4″ X 28 hex-head bolt with the head turned down to 1/4″ which permits the insertion of a hex-head driver to tighten and remove the bolt. This headless bolt will be inserted in the rear tang hole of the action and part E, the rear pillar will be placed on it.
STEP ONE — Getting Started
Photo 2 shows tape on recoil lug, pillars bolted in place and putty in voids. Release agent is polished to a very thin layer. The top half of the front pillar (part C) is placed on the action receiver ring and the bolt (part B) is inserted thru the pillar and tightened against the action. This bolt must have a tapered head on the underside so that, when it is tightened, it will center the top half of the front pillar around the action bolt hole. (This is also true for the middle pillar if the action has a middle bolt.)
PHOTO 2
The headless bolt is inserted into the rear tang hole of the action and the rear pillar is slipped down on it. You will notice in Photo 3, below, that the pillars have the hole drilled oversize so that a 1/4″ bolt has a little space around it. (I like to drill the pillars with a .260″ bit inside.)
The above scenario is the placement of the pillars prior to applying the bedding compound, which I call “Mud”. Devcon 10110 is my bedding compound of choice (and the only product I use) as the mud must set up as hard as concrete and most other epoxies will not do this. Also Devcon shrinks very little if at all. My comments on other bedding compounds are in the sidebar below.
STEP TWO — Relieving the Stock Before Bedding Relieving the right amount of wood in the area to be bedded–not too much, not too little–is very important to achieving the best results. You need to create some space for the mud to fill around the action, but you don’t want to alter the inletting too much.
PHOTO 3
Photo 3 shows the wood removed from the inside of the stock bedding area. Remove enough wood everywhere except along the top sides of the stock to allow at least 1/8″ to 3/16″ of room for the mud. Remove 1/4″ of wood behind the recoil lug. I like about .012″ clearance on the top inside edges.
NOTE: Leave a small area of original wood just behind the rear tang bolt hole as this wood will determine the elevation of the bedded action in the stock.
Photo 4 shows the tang area of the stock. Note the elevation wood left at tang. Be sure to leave some original wood for the action tang to sit on. This is very important.
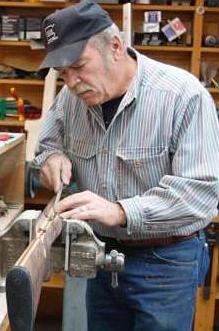
STEP THREE — Wrapping Tape on the Barrel Photo 5 shows the barreled action in the vise. It also shows black electrical tape wrapped around the barrel just behind the front of the stock forearm. Wrap enough tape to hold the front of the barreled action at the proper elevation in the stock.
The idea is that the barreled action does not touch anything except the bit of original “elevation” wood left at the rear tang (behind the pillar) and the forearm resting on the electrical tape. This is very important to obtain 100% stress-free bedding. You want the bore of the barrel to be parallel with the top edge of the stock so wrap just the right amount of tape to ensure this. The tape also centers the barrel in the fore-arm. Done right, the barreled action will be contacting just at two points (tape in front, tang in rear) and the barrel’s bore will be parallel with the top of the fore-arm’s sidewalls.
Comments on Alternative Components and Methods
Bedding Compounds
There are at least a dozen popular products used for rifle bedding. At one time or another, Richard has tried most of them. Devcon 10110 “Plastic Steel® Putty” is the only compound he currently uses and the only product he endorses whole-heartedly. “The Devcon 10110 is expensive, but it is the best bedding product I’ve found. First, it sets up extremely hard. That is very important to the performance and longevity of the bedding job. You want it to get it as hard as concrete. You need it really hard so when you tension the action screws it doesn’t squish down or migrate. Some of the brown stuff other folks use is way too soft. Marine Tex is also too soft. Many products will shrink. Any compound that shrinks is useless in my book. Devcon has absolutely near-zero shrinkage. Acra-Glass I keep in my shop, as it is useful for stock repairs. However I would never bed with Acra-Glass.
Devcon also has just the right consistency — about that of peanut butter. So, it is easy to apply but not runny. It stays in place when I turn the stock upside-down. Devcon is also relatively forgiving to mix–the proportions of the two elements are not super-critical like some other products. I know Marine-Tex can give real problems if you don’t use just the right amount of catalyst. Overall, Devcon does everything you need it to do, and does it exceptionally well. Some other smiths think it’s too expensive–and yes I’ll use $10-$15 worth of Devcon in doing a typical bedding job. But I think the customer deserves the best possible, longest-lasting bedding, and that means Devcon. Among the products I’ve used, Bisonite is my second choice, but I think Devcon will last longer.”
Release Compounds
Richard tells us: “People use all sorts of release compounds and I’ve tried many. I strongly prefer Kiwi shoe polish (neutral color). With the Kiwi, I’ve never had an action stick in the stock. It goes on easy, and you can use a paper towel to polish it very thin and that’s a big benefit. If you have a thin layer of release compound the finished bedding is that much closer to the exact dimensions of the action. I’ve heard of guys using PAM spray. I don’t trust that stuff. The Brownells release compound goes on too thick. Car wax is not a great choice either because it can separate and it gets dusty as it dries. Go with the Kiwi stuff–a little can will last for years. But be sure to use the clear (neutral) kind so you don’t stain your stock or action.”
Clamping and Tension Materials
Read a few articles on pillar bedding and you’ll see many different systems for holding the barreled action to the stock when the bedding compound cures. We’ve seen surgical tubing used, or strips of bicycle inner tube. Some writers have even advocated using mechanical clamps (a bad idea). Richard has tried various tensioning set-ups over the years, and electrical tape is his strong recommendation: “First, let me say it’s crazy to use a C-Clamp or something like that. The clamp will cause a point-load where it attaches and that is just the opposite of what you want.”
Richard has tried many materials: “Surgical tubing I’ve found to be cumbersome to use, and it tends to loosen up during the curing time. Same thing with strips of inner tube. That’s bad news because any loosening or stretching will allow the action to shift. It’s absolutely critical that the action not move one bit while the bedding cures. Once you’ve bedded the action if it dries the wrong way you’ve screwed everything up. Using the electrical tape that isn’t an issue. The tape goes on very tight, doesn’t stretch (if you use enough turns) and I have no fears that the action will shift while curing. Just follow my advice and put a strip of paper towel under the electrical tape so you don’t mar the finish of the barrel or stock.”
Contoured vs. Straight (Flat-top) Pillars
Many factory rifles come with contoured (radiused) pillars, and many gunsmiths prefer to use these. The idea is that the contour provides a better fit with the bottom of round actions. Richard has tried contoured pillars and doesn’t recommend them. He explains: “Most of the contoured pillars don’t really match the contour of the action anyway. And every action is slightly different. Even some of the most favored custom actions aren’t exactly the same from one unit to another. What happens when the contour or curve of the pillar is too narrow is that the action touches just the extended top edges of the pillar (left and right of center). That is not as solid as when the action contacts the center of the pillar where the action screw runs. (And those sharp sides of curved pillars tend to point-load and dig into your action.) Also I feel you get a better match of the Devcon to the action with flat-top pillars. What you want is the bedding compound to cradle the action all the way around. I’ve found this works best with flat-top pillars and a very strong, hard compound like Devcon that doesn’t squish down or shrink.”
STEP FOUR–Applying Release Agent and Plumbers Putty
Failure to apply release agent (and putty) properly is a recipe for disaster. One of the most common mistakes novices make when doing bedding jobs is locking in the action. This happens by not covering enough of the action with release agent, not taping off the lug correctly, and not adding putty to plug any slots or spaces into which the mud can migrate. Remember, you are doing a bedding job, not a glue-in job! When you’ve completed the process, you want to be able to pop the action loose without difficulty.
PHOTO 6 — Showing putty and release agent before polishing, tape on lug.
First, remove the trigger, bolt release and spring, and anything else from the bottom of the action. Then, clean the action and recoil lug area with brake cleaner or parts degreaser. Apply plumbers’ putty to any hole or crevice that you don’t want the mud to get into. Wrap two layers of masking tape on the outside edges of the lug and trim with a razor blade. Do not apply tape to the front or back of the lug. (Apply tape to the front of the lug only if you do not have a way to remove the hardened mud). Let this tape go right around to the top of the action. Wipe the putty smooth with the brake parts cleaner. I highly recommend neutral Kiwi shoe polish as release agent. Apply liberally to the entire action using a Q-tip to get in around the lug (including front and rear of lug), bolt handle slot and loading port edges. Let the shoe polish dry for 10 minutes and then use a paper towel and buff and polish the release agent as thin as possible. You want any release agent to be as thin as possible so as to let the action set as close as possible to your bedding. You also want to apply release agent to the rear (headless) bolt.
STEP FIVE — Installing the Pillars
Now is the time to place the pillars. Screw the top half of the front pillar and middle pillar (if the action has a middle bolt) to the action with the tapered head bolt. Screw in the headless bolt and slip the pillar down around it. Apply release agent to the area of the guard around the rear bolt hole (and to the rear headless bolt). Apply top and bottom and from the inside out. We don’t want the guard stuck to the bedding. (This guard sits on the bolt head that is secures the middle pillar to the action. We need the guard in place to align the action in the stock.)
Install the trigger guard back in place on the stock as the guard is used to align the barreled action in the stock. Now is the time to make a trial run to ensure that everything fits properly. Slip the upside-down stock down over the pillars with the headless bolt coming up through the rear bolt hole in the guard. See Photo 7. Ensure that the stock is resting on two spots only–the tape you’ve wrapped around the barrel, and the little bit of wood you left behind the tang bolt. Ensure there is room everywhere around the action to accept the mud. The barreled action cannot be touching anywhere except the tape and the tang. Not even on the top edges of the stock.
STEP SIX — Applying the Mud
Mix up a generous portion of the Devcon 10110 Mud and apply to the pillars as shown in Photo 8. Do not get mud on top of the bolt head and front pillar(s). Do apply a little mud on top of the rear pillar and if a little gets on the headless bolt that is OK as you should have applied release agent to this bolt. This will properly bed the guard to the rear pillar. The front bolt that holds the front pillar need not have release agent applied to it. Note, as shown in Photo 8, each pillar has a bolt inserted.
PHOTO 8 — Showing mud on the pillars.
You cannot use too much mud as the hydraulic action of pressing the stock down on the barreled action is going to squeeze the mud everywhere it need to go and the excess will be forced out (falling on the floor for you to step in).
PHOTO 9 — Showing mud applied to stock.
Now apply the mud very generously to the stock as shown in Photo 9 above. If I am not bedding any portion of the barrel shank I will only apply a little mud behind the recoil lug area.
STEP SEVEN — Assembly and Compression
Now slip the upside-down stock down over the pillars as you did in the trial run. Ensure the stock is bottomed-out on the tape at the front end. Squeeze slowly, pressing the rear of the stock down and squeeze out the excess mud. After pressing the stock down, the action area should appear as in Photo 10. During the compression stage, stop a few times and use Q-tips to clean off the excess mud that is squeezing out between action and stock.
PHOTO 10 — Rifle right side up, with the mud squeezed out.
Cut a piece of paper towel about two inches wide by the length of the towel. Lay this on the stock 1.5″ in front of the action. Wrap black electrical tape around the stock and barrel, running the tape over the strip of paper towel. (The towel is to protect the stock finish.) Squeeze the stock and action together while taking wraps with the tape. If you have a skinny, pencil-thin barrel don’t apply too much pressure with the tape as the weak barrel can be curved slightly. That can cause the barrel to touch the stock when everything is done (not good). If you have a big, fat barrel don’t worry about deflection. With a heavy contour tube, whatever bend you put in the barrel will spring back when the tape is removed.
STEP EIGHT — Mud Removal and Curing Time
Using Q-tips, clean up very thoroughly around the front pillar and the bolt head. You need to be able to unscrew the bolt to separate the stock from the rifle and you do not want the bedding protruding above the pillar. (The escutcheon still has to have room to fit in there without touching the end of the pillar.) Before turning the rifle right-side-up, reach under with a few Q-tips and clean off the mud hanging there as it may get inside the action.
Turn the rifle right side up in the vise and, using lots of Q-tips, clean all of the mud off of everything. Remove the excess mud every place you can see it. Use a paper towel to wipe the stock as there could be some invisible mud hiding somewhere on the stock or action. After using Q-tips, I sometimes use Butch’s Bore Shine solvent. It does a good job of removing the mud residue (other solvents with ammonia would work well also).
When you’ve cleaned off all the excess mud. It’s time to let the bedding cure. Lie the rifle upside down with the weight on the rear of the action and about where the tape is on the barrel. Let the gun sit for about 8 to 10 hours or overnight. IMPORTANT, you should remove ALL the excess mud around the action before you let the rifle cure for this time period. Photo 11 shows the rifle upside down, but you want to have the excess mud cleaned off before curing.
PHOTO 11 — Position for curing the mud–but excess should be removed first.
IMPORTANT: Avoiding Mechanical Lock During Bedding
One major problem that can arise when novices bed their own stocks is mechanical lock. This occurs when some part of the action or barrel is trapped below the bedding. Effectively, the barreled action becomes anchored in the stock and can be very difficult to remove. Richard says avoiding mechanical lock is not that difficult, but you must be careful: “Locks usually occur because the bedding is applied too far up. Never, and I repeat, never, bed above the centerline of the action (bore axis), or the widest point of the action (whichever is lower). You need to leave the edge of the bedding at least 1/16″ below the centerline of the action and centerline of the bore axis. I normally leave about 1/8th of vertical clearance. If the widest point of the action is BELOW the bore axis, you have to keep the bedding below that. The other thing to watch out for are projections and holes in the sides of the action. All holes must be filled with plumbers’ putty. All projections–anything that sticks out–need to be removed. If some little part or fixture sticks out, even if you tape it over, and it is below the top of the bedding, it can lock the action in.”
STEP NINE — Popping the Barreled Action Loose
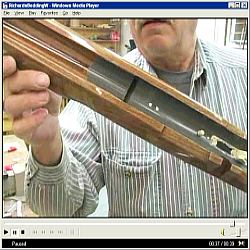
After the required curing time, you need to remove the barreled action to check the beading and fit the pillar escutcheons. If you cleaned away all the excess mud and there are no mechanical locks in the bedding, it should not be difficult to pop the stock loose. You can see how this is done in the short Video Clip from my DVD (Right-Click and “Save As” to download). Here is the procedure.
After the mud has set up and hardened, clamp the barrel in a vise with the gun upside down. The vise should camp just ahead of the forearm. Remove the bolt in the front pillar (and middle pillar) and the headless bolt. Remove the trigger guard.
With the left hand, apply upward pressure to the forearm and then with the right hand slap upward on the forearm. You will hear a crack like you might have busted the stock. Not to worry, that is just the bedding popping free. Now wiggle the stock up off the recoil lug as it is the only thing holding the stock down. [Editors Note: Here’s an older video clip that shows Richard “popping” the stock loose from the barreled action. CLICK HERE to download a 6 Meg Windows media file, or click these links for MPEG (2.3 megs), and Real Media (2.3 megs) versions.]
Remove the tape from the barrel and recoil lug and clean up the putty. Wipe the action down with brake parts cleaner. On the stock, remove the squeezed mud that went into the trigger and bolt release area. Relieve the lug area on both sides and the front. Lay the stock back on the barreled action. Be sure to check under the trigger guard to see if any cleanup of mud is required there. Then re-install the guard and insert the rear action bolt just snug (not tight).
STEP TEN — Installing the Pillar Escutcheons
Pillar escutcheons are a nice extra feature I add to my custom rifles. These are stainless, made from barrel stubs. The two-part front pillar is originally machined as one piece. I believe front pillars with the escutcheons (or outer ring) offer advantages over conventional pillars in terms of strength and alignment.
Before you actually install the escutcheons, you need to do some fit testing. Have a trial run at setting the front bolt to the proper length by placing the escutcheon in the hole and screwing in the bolt. Loosen off the back bolt to see if the bolt that is thru the escutcheon is holding the stock firmly in place. Retighten the rear bolt a wee bit.
Apply release agent to the front bolt, being careful to not get it on the escutcheon. Insert an Allen wrench into the head of the bolt so you can hold it easily. Slip the escutcheon over the bolt. Apply mud to the escutcheon and around the bolt. Photo 12 shows how much mud to put on the escutcheon. You want enough so when you tighten the bolt it will force the mud everywhere it needs to go, even though a bit will be squeezed in around the bolt. Photo 13 shows how the escutcheon should look installed, with the bolt tightened. Photo 14 (below right) shows the escutcheon after the mud has been removed–be sure to remove the excess while the Devcon is still soft.
PHOTOS 13 and 14 — Showing escutcheon before (left) and after mud clean-up (right).
Clean up the excess mud with Q-tips and paper towels. You need to do this before the mud hardens. I used Butch’s Bore Shine as a solvent, once I have removed the excess mud with Q-tips and towels. When the escutcheons are cleaned up, you’ve finished working with the mud. Now let the stock lay for another 8 hours or so to allow the escutcheons to become.
After the mud has hardened around the escutcheon clamp the rifle back in the vise. Remove the back tang bolt first then the front bolt that is through the escutcheon. The bolt will be tight in the hole and sometimes may need to be punched out with a punch unless it has threads right to the head in which case it will screw out. Go in the hole with a .260” bit and clean the mud out of the front pillar. Let the bedding harden for a day or two and then torque the bolts with about 35 inch-lbs of torque on the front bolt and maybe 25 on the tang bolt.
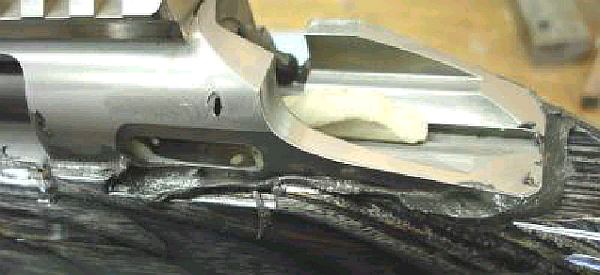
The finished result is an even coat of Devcon with no voids, air pockets, fissures, and perfect stress-free support for the action, as shown in Photo 15.
Hornady sponsored shooter Jerry Miculek — Yamil Sued Photo.
If you are considering acquiring a revolver for fun shooting, self-defense, or competition, you should definitely watch this YouTube video. In this 23-minute presentation, legendary wheelgun ace shooter Jerry Miculek puts three .357/.38 SPL wheelguns through their paces. Jerry, one of the greatest revolver shooters in history, hosts a “Revolver Showdown” with three popular wheelguns: 1) S&W L frame (3″ bbl); 2) Colt Python (6″ bbl); and 3) Ruger Speed Six (2.75″ bbl).
Smith & Wesson Model 686 Plus, L-Frame, 7-rd .357 Magnum/38 SPL, 3″ Barrel.
Testing at 10 Yards and 50 Yards
In the video, Jerry shoots all three revolvers rapid-fire, double-action at 10 yards. Then he shoots the three guns single-action, slow-fire at 50 yards (starting at time mark 7:19).
After his range session, Jerry examines nine medium frame revolvers, comparing and contrasting design features. Jerry considers these factors:
1. Accuracy
2. Balance and Handling
3. Speed and Sureness of Trigger Return (watch video at 3:45″ re Colt.)
4. Reliability
5. Barrel Twist Rate
6. Strength of Construction/Durability
Jim Borden, the very knowledgeable owner of Borden Accuracy, provided an interesting historical insight about barrel fitting and the term “blueprinting”. Jim has posted on his Borden Accuracy Facebook page an explanation of the term “blueprinting” as it originally was used with respect to barrel/shoulder/lug fitting.
Barrel/Shoulder Fit and Blue-Printing
Jim told us: “Something often overlooked on barrel installation is the shoulder fit. Many are so overly obsessed with doing a crank-on fit of threads that the shoulder contact is overlooked. Full, solid barrel shoulder to recoil lug or action face is critical to optimum accuracy and precision.
Many years ago part of the ‘blueprinting’ of an action was the use of Prussian blue to ‘blueprint’ lug fit, thread fit, and barrel shoulder fit. It was a colloquial expression that had nothing to do referring to a blueprint or drawing of the action.” Bet you didn’t know that!
About the photo below, Jim noted: “the fuzzy look on the threads is a liberal coating of Never-Seez thread lubricant.”
Look carefully to see the Prussian Blue applied to the barrel shoulder, plus Never Seez on threads.
Today’s Saturday video showcase includes multiple video reviews of some of new rifle and pistols introduced in recent months. There are some impressive new rifles, and a score of new pistols both for CCW and competition.
Ten New Guns Revealed for 2025
This video features an interesting collection of new rifles and new handguns. Rimfire rifle fans should check out the Bergara BMR .22 LR rifle, while hunters will like the fast-cycling Beretta BRX1 straight-pull rifle. Among the pistols covered in this video, the Kimber KD9SC has nice features and 1911-style ergonomics.
Notable covered guns shown in the above video:
Best New Bolt-Action Rifles in Review
If you are looking for a new affordable hunting or varmint rifle, this video is a good place to start. It features 14 bolt-action rifles from a wide variety of manufacturers including Barrett, Bergara, Browning, CVA, Ruger, Savage and more. There is good video footage showing rifle details and features.
1. Dark Mountain Arms (DMA) Stowaway
2. Bergara MG Micro Lite
3. Taurus USA Expedition
4. CVA Cascade SR-80
5. Stag Arms Pursuit
6. Barrett MRAD ELR
7. Browning X-Bolt 2 Pro McMillan
8. Bergara B14 Wilderness Sierra
9. Beretta BRX1
10. Savage Arms KLYM
11. Ruger American Rifle Gen 2
12. Bespoke Gun Phantom
13. CVA Cascade LRH
14. Best of the West Stealth
New Rifles and Shotguns
This video covers both rifles and shotguns. Featured first is the CMM BR4 semi-auto rifle that complies with state restrictions while offering AR-style functionality. This is followed by a report on the Browning X-Bolt 2 rifle with muzzle brake. Next is the SIG Sauer MCX military-style rifle, followed by a Browning A5 shotgun. There are five other featured long guns reviewed by this video for nine in total (see list below). NOTE: The video title claims 13 guns are reviewed, but there are really only 9 specific stories:
Smith & Wesson M15
HM Defense HM 50B
Beretta BRX 1
Wilson Combat AR
(multiple models)
New Handguns including CZ Shadow 2 and Taurus 608 Revolver
This video is mostly manufacture-supplied PR material but it does cover a variety of interesting new handguns: CZ Shadow 2 Target; Savage Stance XR; Kimber CDS9; Taurus 608 Competition Revolver; and Tisa PX 5.7. That CZ Shadow 2 Target pistol has attracted much attention, with some good reviews. The Firearm Blog says the new Shadow 2 Target may be the most accurate CZ pistol ever made. With a $2600 price it better be good! If you compete in action pistol matches, the CZ Shadow 2 could take you to the next level… but that price is daunting.
Best New Lever-Action Rifles for 2025
Lever-action rifles are enjoying a significant growth in popularity. For 2025 Savage has introduced the Revel Classic and Revel DLX rimfire lever-action rifles in .22 LR, .22 WMR, and .17 HMR chamberings. This video covers other new lever guns including: Bishop Firearms 1895 GBL (01:00), Smith & Wesson 1854 (02:22), POF USA Tombstone (03:54); Browning BLR (05:26); Winchester 1892 DLX Octagon (06:50); Henry Big Boy X (08:25); Marlin 1895 Dark Series (10:00).
Leading New Air Rifles for 2025
Whether you’re a hunter, target shooter, or just love high-quality air guns, this video is worth watching. The title refers to five rifles but it actually covers six notable, recently-introduced air rifles, showcasing performance, accuracy, and features. From budget-friendly options to high-end precision models, the video covers six air rifles with performance stats and real-world testing. The reviews include pros/cons and features of each model: BRK Pathfinder XR Green (00:55); FX Impact X4 (02:20); Gamo Riser Punisher (03:56); Umarex Zelos PCP (05:20); BRK Ghost Silver (06:54); and Hatsan Jet 3 (08:19).
Some years ago, Forum Member Jeff R. (“aJR”) from Australia crafted a slick, handsome cartridge holder to use with his heavy Benchrest Gun. This is a simple, elegant design that would be relatively easy to build in a home workshop. Composed of two blocks of wood with parallel metal arms, the unit adjusts for height and block angle. Jeff tells us: “This is my new cartridge dispenser I knocked up in the shed. I wanted to get the record rounds up next to the action and this is adjustable for just about any gun/port configuration, right or left.” The cartridge caddy has ten round holes (for record shots) in the top wood block, stacked in two rows. The base piece has five holes for sighters, with the holes cut at an angle for easy access.
For the blocks, Jeff used “Jarrah” wood, a deep, red hardwood native to West Australia. Jeff says he did not stain the wood–what you see is the natural color, just sprayed with acrylic lacquer. A similar wood available in the USA is Satiné, also known as “Bloodwood”.
By the way, Jeff’s 1000-yard rifle shown in the top photo is worth mentioning in its own right. The gun shot a large 30-cal magnum wildcat cartridge and 17 years ago set many Australian BR records. The rifle features a tensioned barrel system, custom Magnum drop-port action, and a metal/composite stock. Click HERE for more info. There’s even a YouTube Video showing Jeff shooting his big boomer at 1000-yard match at Brisbane QRA.
Chart created with Ammoguide’s Visual Comparison Tool. Visit Ammoguide.com to learn more.
One of our forum members was looking for a very accurate, mid-sized 6.5mm cartridge for target working and coyote hunting. There are many great options including the 6.5 Grendel, 6.5×47 Lapua, 6.5 Creedmoor, and Remington .260 (a 6.5-08). If you are considering the 6.5×47 you should read our 6.5×47 Cartridge Guide authored by the 6.5 Guys. This and other 6.5mm cartridges are covered in this introduction to 6.5 mm cartridges prepared by Eben Brown, President of Eabco.com.
Quick Guide to 6.5mm Cartridges
by Eben Brown, EABCO.com, (E. Arthur Brown Co. Inc.)
The current popularity of 6.5mm cartridges in the USA has been a long time in coming. I won’t go into my opinions on why it took so long to catch on. The important thing is that it finally HAS caught on and we’re now so fortunate to have a wide selection of 6.5mm cartridges to choose from!
6.5mm Grendel – Developed by Alexander Arms for the AR15 and military M4 family of rifles. The Grendel fits the dimensional and functional requirements of these rifles while delivering better lethality and downrange performance. [Editor: The little 6.5 Grendel delivers a lot of performance from a small package. This is one of the most accurate cartridge options for the AR15 platform.]
6.5mm BRM – Developed by E. Arthur Brown Company to give “Big Game Performance to Small Framed Rifles” — namely our Model 97D Rifle, TC Contender, and TC Encore. Velocities of 2400-2500 fps with 140gr bullets puts it just under the original 6.5×55 Swede performance.
6.5mm x 47 Lapua – Developed by Lapua specifically for international 300m shooting competitions (with some interest in long-range benchrest as well). Case capacity, body taper, shoulder angle, and small rifle primer are all features requested by top international shooters. You can expect velocities of 2500-2600+ with 140 gr bullets.
6.5mm Creedmoor – Developed by Hornady and Creedmoor Sports, the 6.5mm Creedmoor is designed for efficiency and function. Its shape reaches high velocities while maintaining standard .308 Winchester pressures and its overall length fits well with .308 Win length magazines. You can expect velocities of 2600-2700+ fps with 140gr bullets. [Editor: Yep, we know some PRS guys are loading hotter than that in bolt guns. We recommend you try the 120-130 grain bullets also with this cartridge. That may put you in a better accuracy node.]
This video reviews 6.5 Creedmoor Cartridge Brass options:
.260 Remington – Developed by Remington to compete with the 6.5mmx55 Swedish Mauser that was (finally) gaining popularity in 1996. By necking down the 7mm-08 Remington to 6.5mm (.264 cal), the .260 Remington was created. It fit the same short-action [receivers] that fit .308 Win, .243 Win, 7mm-08 Rem, etc. You can expect velocities of 2600-2700 fps with 140gr bullets in the 260 .Remington.
[Editor’s Note: In the .260 Rem, try the Lapua 120gr Scenar-Ls and/or Berger 130gr VLDs for great accuracy and impressive speeds over 2950 fps.]
6.5mm x 55 Swedish Mauser – This was the cartridge that started the 6.5mm craze in the USA. It is famous for having mild recoil, deadly lethality on even the biggest game animals, and superb accuracy potential. Original ballistics were in the 2500 fps range with 140gr bullets. Nowadays handloaders get 2600-2700+ fps.
[Editor’s Note: Tor from Scandinavia offers this bit of 6.5x55mm history: “Contrary to common belief, the 6.5×55 was not developed by Mauser, but was constructed by a joint Norwegian and Swedish military commission in 1891 and introduced as the standard military cartridge in both countries in 1894. Sweden chose to use the cartridge in a Mauser-based rifle, while Norway used the cartridge in the Krag rifles. This led to two different cartridges the 6.5×55 Krag and 6.5×55 Mauser — the only real difference being safe operating pressure.”]
6.5-284 Norma — This comes from necking the .284 Winchester down to .264 caliber. Norma standardized it for commercial ammo sales. The 6.5mm-284 was very popular for F-Class competition and High Power at 1,000 yards. However, many F-Class competitors have switched to the straight .284 Win for improved barrel life. 6.5-284 velocities run 3000-3100+ fps with 140gr bullets.
.264 Winchester Magnum – Developed by Winchester back in 1959, the .264 Win Mag never really caught on and may have delayed the ultimate acceptance of 6.5mm cartridges by US shooters (in my opinion). It missed the whole point and original advantage of 6.5 mm cartridges.
The Original 6.5mm Advantage
The special needs of long-range competition have skewed things a little. However the original advantages of 6.5mm cartridges — how deadly the 6.5mms are on game animals, how little recoil they produce, and how easy they are to shoot well — still hold true today.
The Civilian Marksmanship Program (CMP) has returned its annual Camp Perry Open match to its original winter timeslot in 2025. The 2025 Open will take place next month, January 17-19, 2025. This event will offer air rifle and air pistol competition over three days at the Gary Anderson CMP Competition Center. Registration is now open, but capacity is limited, so sign up early for this exciting and challenging event.
The 2025 Camp Perry Open includes a junior 3×20 air rifle match and 60 Shot air rifle and air pistol competitions for adults and juniors, with adaptive athletes also welcome. Additionally, an air gun clinic will provide an educational opportunity for participants. All air gun events will be held within CMP’s Gary Anderson Competition Center electronic target indoor air gun range.
In recent years, the Camp Perry Open was held in May so it could include a smallbore rifle match. However, no smallbore competition will be offered at the 2025 Camp Perry Open this year.
The Camp Perry Open Super Final will return, though without smallbore (rimfire) shooting this January. During the Super Final, top competitors from each of the day’s air rifle and air pistol qualification round meet on the firing line to compete in an intense elimination event. The Super Final is a very popular event.
Electronic Targets with Results Streamed Online
The Gary Anderson Center boasts state-of-the-art electronic targets that record scores the instant each shot is fired. Shot-by-shot feeds are then displayed online through as Live Target Images that can be viewed anywhere there is an Internet connection. CLICK HERE to See Live Target Feeds
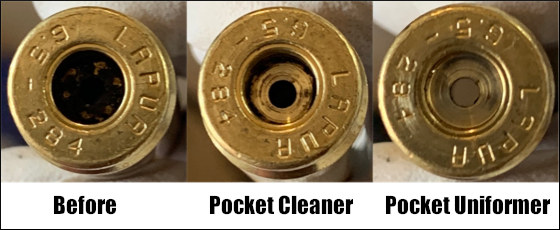
Product Review by F-Class John
Case preparation is critical for precision reloading. One must trim cases, debur/chamfer case mouths, clean necks, spruce up primer pockets and do other important tasks. Complete case prep can involve many separate processes, each requiring its own tools. With each of those tools comes additional cost as well as the need for more storage and bench space. To make case prep easier, faster, and more convenient Lyman created the Case Prep Xpress (#ad). The Case Prep Xpress, introduced a few years back, combines up to five prep stages into one well-built, stable, versatile unit. Watch this video to see the machine in action:
The Case Prep Xpress features five (5) independently-turning spindles all with the common 8/32 thread. This allows you to attach multiple tools supplied with the unit PLUS many other screw-on prep tools. For our testing we started out using a variety of the 12 included tools and found they cover the majority of case prep tasks. Lyman supplies deburr and chamfer tools, pocket uniformers, reamers and cleaners, as well as an assortment of neck brushes.
The deburr and chamfer tools worked really well, creating beautiful bevels all while leaving a nice flat edge across the top of the neck which is critical for accuracy and brass life. We found the primer pocket cleaning tool did a good job, but for truly clean pockets we recommend using the primer pocket uniforming tool, which very efficiently removes even hard residues.
The benefit of having interchangeable heads is that you can add your own accessories. We like to use a bore brush with bronze wool wrapped around it for use inside our necks. This worked perfectly once we screwed it in. In fact, we couldn’t think of any 8/32-threaded accessory that wouldn’t work well on this machine. Another great design feature is how all the accessories are oriented straight up. This allows for perfect visual alignment of your cases onto the tools which is critical — especially when performing cutting operations such as primer pocket uniforming.
Along with the five power stations there are six female-threaded storage spots on the sides where tools can be placed to ensure they don’t get lost. We like this feature since there will be more than five accessories you want to use and having them easily available is a great feature. You can keep 11 tools right on the machine (5 on top, 6 on the sides). That way you don’t have to dig through storage bins.
The Case Prep Xpress has a removable front bin to hold brass shavings, and there are two circular trays on either side of the bin. In front is a long tray that holds the provided brush. This makes it relatively easy to clean off brass shavings and other debris from case prep processes.
SUMMARY — Versatile Case Prep Xpress Is A Good Value
For the money, Lyman’s Case Prep Xpress is tough to beat. It performs multiple tasks well while being stable and easy-to-use. Yes there are some multi-spindle prep centers that offer variable or fast/slow RPM spindles while the Lyman’s spindles are all fixed RPM. (See, e.g. the RCBS Brass Boss). However those other systems don’t include all the convenient on-board storage of the Case Prep Xpress, and are typically more expensive. The Lyman Case Prep Xpress sells for about $180-$199 “street price”. It’s currently on sale for $185.85 on Amazon (#ad). This makes the Lyman Case Prep Xpress a good value — it offers great versatility while saving space and saving money compared to buying five or more separate, powered tools.
As an Amazon affiliate, this site can earn revenues through sales commissions.


 MTM offers a black “tactical” Range Box for $50.71 at Midsouth. This black Tactical Range Box includes a special bracket that supports AR-type rifles through the magazine well. As show at right, this is red. However, some previous production models had black magwell brackets (see below).
 What Might Be Improved


 by Richard Franklin
 Pillars For Bedding
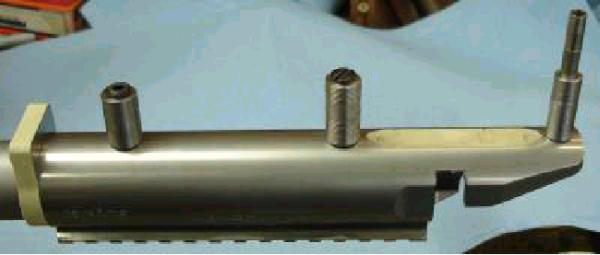

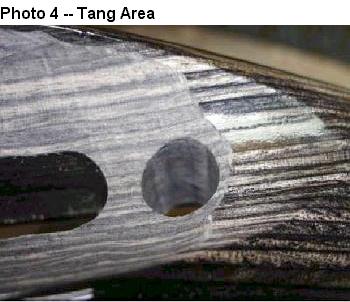 Photo 3 shows the wood removed from the inside of the stock bedding area. Remove enough wood everywhere except along the top sides of the stock to allow at least 1/8″ to 3/16″ of room for the mud. Remove 1/4″ of wood behind the recoil lug. I like about .012″ clearance on the top inside edges.
  The idea is that the barreled action does not touch anything except the bit of original “elevation” wood left at the rear tang (behind the pillar) and the forearm resting on the electrical tape. This is very important to obtain 100% stress-free bedding. You want the bore of the barrel to be parallel with the top edge of the stock so wrap just the right amount of tape to ensure this. The tape also centers the barrel in the fore-arm. Done right, the barreled action will be contacting just at two points (tape in front, tang in rear) and the barrel’s bore will be parallel with the top of the fore-arm’s sidewalls.
 Bedding Compounds
 Contoured vs. Straight (Flat-top) Pillars
 Install the trigger guard back in place on the stock as the guard is used to align the barreled action in the stock. Now is the time to make a trial run to ensure that everything fits properly. Slip the upside-down stock down over the pillars with the headless bolt coming up through the rear bolt hole in the guard. See Photo 7. Ensure that the stock is resting on two spots only–the tape you’ve wrapped around the barrel, and the little bit of wood you left behind the tang bolt. Ensure there is room everywhere around the action to accept the mud. The barreled action cannot be touching anywhere except the tape and the tang. Not even on the top edges of the stock.


 Before you actually install the escutcheons, you need to do some fit testing. Have a trial run at setting the front bolt to the proper length by placing the escutcheon in the hole and screwing in the bolt. Loosen off the back bolt to see if the bolt that is thru the escutcheon is holding the stock firmly in place. Retighten the rear bolt a wee bit.


 Testing at 10 Yards and 50 Yards
 Barrel/Shoulder Fit and Blue-Printing


 .260 Remington – Developed by Remington to compete with the 6.5mmx55 Swedish Mauser that was (finally) gaining popularity in 1996. By necking down the 7mm-08 Remington to 6.5mm (.264 cal), the .260 Remington was created. It fit the same short-action [receivers] that fit .308 Win, .243 Win, 7mm-08 Rem, etc. You can expect velocities of 2600-2700 fps with 140gr bullets in the 260 .Remington.