|
|
May 15th, 2022


This week’s featured firearm belongs to John “SnakeEye” Seibel, founder of the VarmintsForFun website. In recent years, John has become a “true believer” in the little 20-Caliber cartridges. He says this light-recoiling 20 PPC, Rampro-actioned pistol is perfect for a quick shot on a critter, taken from the front seat of his truck. John tells us: “A long-range pistol is an ideal truck gun in my opinion. It stows in a small area and doesn’t take up the room a rifle does. Just keep ear protection near by at all times! I’ve taken varmints as far as 400+ yards with this 20 PPC pistol, so why would you need a rifle?”
Perspectives on Pistols for the Varmint Hunter
by John Seibel
I decided to try my hand at shooting varmints with a pistol one day when I grew tired of wrestling a rifle around in the truck for a quick shot. Many times when traveling around on the farm you’ll spy a groundhog or fox that usually isn’t more than 200 yards away. A single-shot pistol like the Thompson Contender could fit the bill. With its compact length, around 20 inches, a long-barrel pistol can lay on the truck’s passenger seat for easy access. I usually keep my two leather brick-style sandbags laying beside the console and seat. I have a box made from hard rubber that I lay across the top of the door. I then lay the two bags on top. This makes a nice platform to rest the pistol’s forearm. I like to use a forearm that is at least two inches wide. That lets the gun lay steady—almost like you are shooting from a bench rest. For the shooting hand, I prefer a pistol grip with finger grooves and a slight overhang or flare for the web of your hand.
As for optics, I tried long-eye-relief pistol scopes but they lacked the magnification you need for long-range target shooting or varminting. Those pistol scopes have really long eye-relief because they are designed to work with the pistol held at arm’s length. When shooting at the bench or from a truck that’s not what you want. By the time you find the target and get your eye in the exact location, the varmint has moved on or died of old age! After much fiddling around with pistol-type scopes, I finally decided to use rifle scopes on my long-range pistols. The minimum I use is a 4.5-14×40. Eye relief on a Leupold 4.5-14x40mm is about 3.5 inches at 4.5 power. Field of view is better with rifle scopes too and it’s easier to acquire your target. For this type of shooting a light-recoiling caliber is essential or you will have scope-eye bad! I currently have three long-range pistols and use them to shoot 17M4, 20 PPC, 22 BR, and .223 Rem. The featured gun may be the most accurate of my pistols, and your editor thinks it’s the most handsome of the three.

The Rampro Pistol Project — Working with John Illum
A couple of years ago I called John Illum of Rampro about building the ultimate long-range pistol. It just so happens that John was a big time long-range pistol shooter. I told him that I wanted a gun that didn’t recoil badly and wouldn’t torque when fired. As I am a quadriplegic, with no grip in my hands, the gun had to handle well under recoil so I didn’t drop it. Recoil had to be straight back–no twisting.
Well Illum listened to me and came up with a gun that performs just the way I wanted. Illum suggested a rear grip stock of his own design. It has a 2.25″ wide forearm and a rear grip with a slight palm swell that fits your hand perfectly. Another nice feature is the finger grips. It has an extended overhang or “beavertail” that fits comfortably in the web of your hand. Of course it had to be walnut! I chose Rampro’s STP small action with a PPC bolt. His bolt uses a Sako-type extractor. The action is a single-shot. Being right-handed, I chose a right bolt, left port configuration. This works really well in a pistol. You can load with your left hand and see the round laying in the action–that’s what you want in a pistol without a safety.
Gun Specifications
 John Illum’s Rampro actions are chrome-moly steel. Commonly you’d see them blued, but I had him put a brushed nickel finish on the action and rings. From a few feet away it looks like stainless. The trigger is Illum’s own design set at 8 ounces, and there’s no creep that I can detect. The action has Remington barrel threads and will accept Remington type triggers. One neat thing is that the action was milled with an integral recoil lug (much like the current Surgeon Action). And the bolt is milled all in one piece–no soldered-on handles. My only gripe with this bolt handle is that it could be a tad longer, but it still is manageable for a single-shot. You’ll also note how slick and streamlined the scope rings are. Illum made those as well. His rings mount to the action via two screws from the inside of the ring, a very elegant set-up for sure. (I currently have a 6.5-20x40mm Nikon scope on this gun. If I had to do this project over again the only thing I would change would be installing a 30mm scope because I like ‘em!). John Illum’s Rampro actions are chrome-moly steel. Commonly you’d see them blued, but I had him put a brushed nickel finish on the action and rings. From a few feet away it looks like stainless. The trigger is Illum’s own design set at 8 ounces, and there’s no creep that I can detect. The action has Remington barrel threads and will accept Remington type triggers. One neat thing is that the action was milled with an integral recoil lug (much like the current Surgeon Action). And the bolt is milled all in one piece–no soldered-on handles. My only gripe with this bolt handle is that it could be a tad longer, but it still is manageable for a single-shot. You’ll also note how slick and streamlined the scope rings are. Illum made those as well. His rings mount to the action via two screws from the inside of the ring, a very elegant set-up for sure. (I currently have a 6.5-20x40mm Nikon scope on this gun. If I had to do this project over again the only thing I would change would be installing a 30mm scope because I like ‘em!).
The barrel is a PacNor Super-Match heavy taper with flutes milled by John Illum, who did all the gunsmithing on this pistol. Twist rate is 1 in 12 inches, with an 11° crown, polished to a mirror finish. The barrel was bead-blasted on the exterior to cut glare. I had Illum cut a 20 PPC minimum-spec chamber, with a .237″ neck. That way I don’t have to turn necks on the Lapua Brass (220 Russian necked down to .204). This is a varmint gun–there’s no need for turned necks. [Editor’s Note: Rampro is no longer in business. However, John tells us “I haven’t had any problems with the action so far. If I did, most competent gunsmiths could fix them easily.”]
 Handgun Handling Tips Handgun Handling Tips
If you want to shoot a long-range pistol but have never have shot this kind of gun before, try to find a mentor — someone with a gun like this who can school you a bit in the correct technique. The first thing you notice is that you have no comb or cheek piece to help align your head and neck. And getting used to the optics takes some practice. Most people fit a pistol-type (long eye-relief) scope, but these can be awkward to use, and somewhat frustrating at first — the field of view is very restricted. Move your head very slightly and you can lose the sight picture completely. You can solve that problem by using a standard rifle scope, but that will put your head very close to the eye-piece — just three to four inches. With that arrangement, if you don’t hold the gun correctly … POW instant scope-eye!
Now once you get the hang of shooting a long-range pistol you will find it can be just as accurate as a rifle. But there is a trick to shooting them. Shooting a long-range pistol is a whole new world — you need to hold it just right. If you don’t let the gun roll back a little (i.e. if you grip too hard) you will get vertical stringing. I hold my hand against the back of the grip to guide the gun but let it almost free recoil. Looking at how compact the pistol is, you might think “Hey, this would make an ideal ‘walking-around’ varminter.” Well, that’s not really the case. For real precision shooting a solid benchrest type set-up is a must. You can attach a bipod to a long-range pistol, but you would need a flat surface. A fence-post top would work pretty well without a bipod if you carry a small light bag. Overall though, this type of pistol works best as a sandbag gun. For a walking-around gun, you’d be happier with a rifle I think.
 Load Development and Accuracy Load Development and Accuracy
When I built this gun, Hornady had just released the 32gr V-Max (see footnote), a good match for my barrel’s 1:12″ twist. I choose the 20 PPC because of the very good Lapua brass (220 Russian parent case). I figured teaming Lapua brass with the little .204 bullet would offer excellent accuracy combined with very low recoil. My expectations were fulfilled. The brass proved to be excellent and the PacNor loved the little V-Max pills.
I tried quite a few different loads and most powders that I tried worked very well. These included: H322, Benchmark, AA 2460, and Reloader 7. Amazingly, with just 14″ of barrel, all of these powders delivered impressive velocities–ranging from 3914 to 4074 fps. I settled on 48 Harrell’s clicks of Accurate Arms (AA) 2460, which drives the 32gr V-Maxs to 3995 fps.
With AA 2460 the gun will shoot in the low 3s at 100 yards consistently — as long as I steer the gun right, which takes some practice. I think groups in the low 0.3″ range is excellent for a non-benchrest factory bullet. Despite having no buttstock to grab, recoil on my 20 PPC pistol is very minimal — it just rocks back into your hand. The main problem is to keep the scope from smacking you, since I used a rifle scope with short eye-relief. Muzzle flash and noise are tolerable but DO NOT shoot one of these without good ear protection. Your ears are very close to the muzzle.
I also have a 20 PPC rifle built on a BAT action with a Richard’s #008 laminated stock cut down in size. That gun’s 1:9″-twist Lilja barrel lets me shoot the Berger 50gr LTB bullets. In the wind, these perform quite a bit better than the 32s. My two favorite loads for the 50 grainers are: a) 26.0gr VV N135, CCI 450 primers, 3615 fps; and b) 27.3gr Hodgdon Varget, CCI 450s, 3595 fps. The BAT 20 PPC also shoots really well with the 40gr V-Max, pushed by N135 and Fed 205M primers.
 Pistol Action Legal Issues Pistol Action Legal Issues
One important thing to remember if you build a pistol is to make sure the receiver came from the factory as a pistol and was titled as a pistol. Rifle actions are illegal to use as a pistol. Yes, that’s a nonsensical law, but it’s still on the books. You can use factory pistol actions such as the XP 100.
If you want a new custom action such as a BAT (my favorite), you can order it as a pistol action and when you get it, register it as a pistol. Note, in some states there may be additional fees, waiting periods, or restrictions for pistol actions (as opposed to rifle actions). Check your local laws before ordering the action.
| Future Trends in Varmint Hunting — Plenty of Twenties
 I think these sub-caliber rounds, both 20s and the 17s, are the future of recreational varminting, at least out to medium distances. The Twenties offer low recoil, excellent accuracy, and components keep getting better and better. The bullet-makers are finally making high-quality bullets in appropriate weights. Compared to something like a 22-250, I’ve noticed that my 20 PPC rifle has a lot less noise, a plus when you want to be quiet around other people and varmints. I think these sub-caliber rounds, both 20s and the 17s, are the future of recreational varminting, at least out to medium distances. The Twenties offer low recoil, excellent accuracy, and components keep getting better and better. The bullet-makers are finally making high-quality bullets in appropriate weights. Compared to something like a 22-250, I’ve noticed that my 20 PPC rifle has a lot less noise, a plus when you want to be quiet around other people and varmints.
The flat trajectory is another big advantage in the field. With the 20 PPC, zeroed at 100 yards, I can pretty much hold dead center and get hits out to 300 yards or so without touching the scope to add elevation. [Editor: The same is true with the 20 Practical cartridge, basically a .223 Rem necked down to .20 Caliber. It has proven very accurate and easy to tune.]
The 20-Caliber cartridges we have now, in particular the 20 PPC and 20 BR, are very well-refined. You don’t have to do a lot of tuning or tinkering to have a very accurate, effective varmint-slayer. In fact, if I could dream up a signature “20 VFF” (Varmints For Fun) cartridge it would basically be the 20 PPC. In truth, nearly any of the popular 17- or 20-Caliber cartridges will perform well if you start with top-quality brass. The sub-calibers have less recoil and burn less powder, and there are very good components for most varmint and target-shooting applications. To me it seems that these small calibers work so well because of good components, low recoil, and efficient cartridge designs (particularly in the VarTarg and PPC cases).
|
WARNING: For your own safety, ALWAYS reduce all starting charges by 10% and work up carefully! Ambient temperature changes, powder lot variations, and differences in barrel friction can result in significantly increased pressures.
| 20 PPC LOAD MAP |
| Bullet GR |
Maker |
Powder |
Charge |
Primer |
Case |
Velocity
fps |
Barrel
Twist |
Comments |
| 32 |
Hornady
V-Max |
H322 |
27.6 |
Rem 7½ |
Lapua |
4000 |
Lilja 1:12 |
WarrenB Form Load |
| 32 |
Hornady
V-Max |
AA 2460 |
29.5 |
Rem 7½ |
Lapua |
3995 |
PacNor 1:12 |
SnakeEye
Pistol Load |
| 32 |
Hornady
V-Max |
H4198 |
25.1 |
CCI BR4 |
Lapua |
4222 |
PacNor 1:12 |
A. Boyechko Load |
| 39 |
Sierra
BlitzKing |
H322 |
26.0 |
Rem 7½ |
Lapua |
3700 |
Lilja 1:12 |
WarrenB Load |
| 39 |
Sierra
BlitzKing |
VV N540 |
28.8 |
CCI BR4 |
SAKO |
4064 |
PacNor 1:12 |
D.Moore, Low 2s |
| 40 |
Hornady
V-Max |
VV N135 |
27.8 |
Fed 205m |
Lapua |
3950 |
Lilja 1:9 |
SnakeEye Load |
| 50 |
Berger
LTB |
VV N135 |
26.0 |
CCI 450 |
Lapua |
3615 |
Lilja 1:9 |
SnakeEye Load |
| 50 |
Berger
LTB |
Varget |
27.3 |
CCI 450 |
Lapua |
3595 |
Lilja 1:9 |
SnakeEye Load |
Footnote: When first manufactured, the small Hornady 20-Caliber V-Max bullet was actually 33 grains, not 32 grains as sold currently. I still have some of the 33-grainers. I’ve observed no functional difference between the 33s and the current 32-grainers.
May 10th, 2022

Here is one of Bill Reid’s 6mmBR (6BR) rigs. Like his Sako 6 PPC, this is exceptionally accurate.
AccurateShooter Forum member Bill White (aka “CT10Ring”) is a New Yorker who relocated to Idaho in his senior years. From his Idaho home, Bill enjoys long-range target shooting. But his favorite gun pastime is varmint hunting in nearby states — the Dakotas, Montana, and Wyoming. Every year he loads up his truck and hits the road, often doing a grand circle route, visiting prairie dog havens in multiple states.
Bill has a large rifle collection, most of which see duty in the varmint fields of Montana, North Dakota, South Dakota, and Wyoming. Here are his key “take-aways” for his eight favorite varmint chamberings: .204 Ruger, .223 Rem, .22-250, .22 BR, .22-243, 6 PPC, 6mmBR, and 6-6.5×47 Lapua (aka 6×47).
Eight Great Varmint Cartridge Types — .204, .224, .243 Calibers
.204 Ruger — This delivers great velocity with the little .20-caliber bullets, with mild recoil. The .204 Ruger easily reaches out to 400 yards, but heavier winds do move the tiny bullet around. Tremendous splat factor under 250 yards. I use Sierra 39gr bullets with IMR 8208 XBR in a Sako 75. Even now, .204 Ruger ammo is relatively easy to find.

.223 Remington — Probably the most popular centerfire rifle round in the USA, the .223 Rem offers inexpensive brass, and is a great choice for AR-15 owners. If you run short on ammo, you can find it nearly everywhere. I often bring one AR-15 and one .223 Rem bolt gun on varmint safaris. My Rem 700 5R 1:9″-twist barrel likes 53gr V-Max bullets.
.22 BR — My .22 BR is my first choice for most prairie dog missions. Accuracy is superb with necked-down 6mmBR Lapua brass — quarter-MOA and blazing fast. With the right twist rate, this chambering can shoot anything from 40gr FB bullets to 80gr VLDs. Load development is easy. Below is my .22 BR ammo for another varmint trip. I use 55gr Sierra BlitzKings with Varget in my 1:12″-twist Shilen-barreled rifle. 60gr Bergers are very accurate with a fairly flat trajectory for useful distances.

.22-250 Rem — A classic varmint cartridge, the .22-250 with 50gr V-Maxs delivers spectacular hits. If three P-Dogs happen to be lined up, I’ve witnessed one .22-250 shot take ‘em all out with a triple hit. I currently have five .22-250-chambered rifles: 3 Sako 75s, one Rem 700, and a single shot Nesika that shoots tiny groups. I favor the very deadly Berger 52gr Varmint HP. Making a custom .22-250? With a 1:8″-twist barrel you can use the full weight range of .22-cal bullets, while spinning the lighter bullets fast for “red mist” effect. Remember this cartridge can be a barrel burner. Don’t shoot too many rounds too quickly.
.22-243 Win — This wildcat is even more potent than the .22-250, delivering devastating results on P-Dogs. Run a .243 Win case slowly through a full-length .22-243 die, with plenty of lube to form the brass. I start with Lapua .243 Win brass. There can be some issues necking-down the brass. Watch for donuts forming at the neck-shoulder junction. I bought my .22-243 rifle not sure how it would perform. But now I love shooting it. My .22-243 delivers half-MOA groups with 41.0 grains RL-22 and Hornady 75gr Amax bullets. With those 75-grainers, it’s great in the wind and good to 600 yards easily.
6 PPC — You may consider the 6 PPC a benchrest competition cartridge only, requiring fire-forming. However I have an original Sako 75 single-shot 6 PPC rifle that I load with Sako-headstamp 6 PPC brass (see below) so no fire-forming is required. This Sako 75 came with a test target that measured 0.113″! With my 6 PPC Sako, I found that 58gr V-Maxs, pushed by Vihtavuori N133, are potent out to 300 yards. [Editor’s NOTE: As the Sako brass is no longer available, new 6 PPC shooters will need to fire-form their brass, or try to find Norma 6 PPC brass.]

6mmBR — The 6mmBR Norma (6BR) offers a nearly unbeatable combination of accuracy, efficiency, and tunability. With the 6BR and a fast twist barrel, you can shoot everything from 40gr flat-base bullets to the latest 105-110gr match bullets. I load Lapua brass, Vihtavuori N135, and Hornady 58, 65, and 75gr bullets for my Krieger 1:14″-twist HV barrel. While this cartridge is capable of long-range accuracy, I usually limit my 6BR shots to 350-400 yards.
6-6.5×47 Lapua — I have a nice 6-6.5×47 Lapua varmint rifle, with Surgeon action and Manners stock. I Cerakoted the barreled action and then bedded the action. Shown below is 6-6.5×47 ammo I loaded for testing. Note how I separated different bullets and powder loads into multiple, labeled bags. Hodgdon H4350 is a great choice for this cartridge — 39 grains H4350 with 105gr Amax was the winner here, but 88gr Bergers also shot well. This cartridge has tremendous “critter dismantling” abilities out to 600-700 yards.

Six Tips for Novice Long Range Varmint Hunters

1. Take twice as much ammo you think you may need. The fields could be particularly rich, or, because of wind or other variables, you may have far more misses than expected.
2. When possible, set up with the wind at your back (or, alternatively, directly ahead). This will minimize the effect of cross-winds. Set up a stake with a ribbon to show wind direction.
3. Bring at least two rifles. Ideally one would be a low-recoil rifle with cheaper components for the closer shots. Then bring a rifle with higher-BC bullets for longer shots where wind is a bigger factor.
4. Check the weather before you head out. Prairie dogs like sunshine and calm conditions. If a cloudy, very blustery day is predicted, considering staying in town and cleaning the rifles.
5. Bring plenty of water on a trip. An adult male should be drinking at least 64 ounces of water (or other liquid) every day — more if it’s very hot or you are sweating a lot.
6. Preferably always hunt with a companion. If you do go out solo, have a Garmin inReach SatComm/GPS for emergencies if there is no cell coverage in your location.
March 27th, 2022

They say that a man can never have too much money or too much time. Darrell Jones would add that a man can never have too many BR-based rifles. Darrell had a fleet of BRs, in 22BR, 6mm BR, 6.5 BR, 7 BR, and 30 BR. But he was intrigued by the potential of a rifle in the .257 caliber. Could it shoot as well as a 6mm BR? Could it challenge the more popular calibers in the highly competitive 600-yard benchrest game? Through careful research and component selection, Darrell created a 25 BR rifle that proves the viability of the 25 BR as a competition round. Pushing 115gr high-BC Berger bullets at 2837 fps, Darrell’s 25 BR “Peppermint” won first place in its very first match.

The Barely Bigger BR — Exploring the .25 Caliber Option
Rifle Report by Darrell Jones
I decided to build a 25 BR after several weeks of deliberation and ruling out a .257 Ackley Improved. Part of my dilemma was that I wanted to shoot F-Class competition at 600 yards, and I was unsure about the accuracy potential of the 25 BR. However, I currently have several BRs chambered in 22 BR, 6BR, 6.5 BR, 7 BR, and 30 BR and they all shoot exceptionally well at 600 yards. This lead me to believe a 25 BR should deliver fine accuracy, just like its other BR siblings. Why wouldn’t a 25 BR shoot accurately provided that I built it with the right components? The feasibility saga began. I began searching diligently for custom 25-caliber bullets. Unfortunately, there are not many 25-caliber custom bullet makers. I actually found only two custom bulletsmiths who produce the 25s. I did look at Fowlers and then looked at Bergers. Both Jeff Fowler and Berger made 110-grain flat-base bullets when I was looking. [Editor — this 110gr bullet is no longer listed by Berger]. The Berger 110gr FB bullets (.414 ballistic coefficient) shot very well out of my 12-twist 25-06 Ackley. However, I wanted to shoot a heavier bullet if possible. Berger makes a 25-caliber 115gr VLD boat-tail with a high ballistic coefficient. This needs a 10-twist barrel.

Panda Action, McMillan Stock, Weaver T-36
As you can see, I went with a Panda polished action and a weighted McMillan BR stock painted metallic silver with red candy cane stripes thus the name “Peppermint”. This gun actually does double duty now as a 25 BR and 6 PPC switch barrel. When I want to run the gun as a 6 PPC for short range, I simply screw on the PPC barrel, then swap in a bolt (fitting the PPC bolt face) from another Panda action I own. That’s one advantage of owning custom Kelbly actions! Don’t even think about exchanging bolts between factory guns. Kelbly rings and a Weaver T-36 fixed-power scope handle the optical duties while a Jewell trigger set at one ounce takes care of the firing mechanism.
Chambering for the .25 Caliber BR Wildcat
I wanted a chamber that would let me shoot both the 110s and the 115s. I took some time surfing the net looking for rental reamers that had suitable throat dimensions. I found that Elk Ridge Reamer Rentals had a 25 BR pilot reamer available. I called and Elk Ridge faxed me a reamer diagram that indicated it was designed to tight SAMMI specs. I asked how often was the reamer used and was told “not very often”.
 I did want a minimum no-turn neck optimized for Lapua brass. The drawing indicated that the reamer would cut a .281″ neck and a throat of 1.0315″. This was very close to ideal, though I did have to turn two thousandths off the necks of Lapua 6BR brass after I necked it up. I resized using a .277″ bushing and the loaded rounds came out to be .279″. Realizing that this was in the ball park, I decided to go with the Elk Ridge Reamer and build a 25 BR that could shoot 110gr or 115gr bullets. Now the question was where to get a match-grade 25-caliber barrel. I called quite a few of the custom barrel-makers, including BlackStar Barrels in Texas (no longer operating). I have had wonderful success with the BlackStar barrel on my 6BR “Chantilly” — it delivered great accuracy and impressive velocities. Since the 25 BR was so similar, I went with another BlackStar. I ordered a 10-twist, 6-groove, 1.250″-diameter straight-contour tube. I did want a minimum no-turn neck optimized for Lapua brass. The drawing indicated that the reamer would cut a .281″ neck and a throat of 1.0315″. This was very close to ideal, though I did have to turn two thousandths off the necks of Lapua 6BR brass after I necked it up. I resized using a .277″ bushing and the loaded rounds came out to be .279″. Realizing that this was in the ball park, I decided to go with the Elk Ridge Reamer and build a 25 BR that could shoot 110gr or 115gr bullets. Now the question was where to get a match-grade 25-caliber barrel. I called quite a few of the custom barrel-makers, including BlackStar Barrels in Texas (no longer operating). I have had wonderful success with the BlackStar barrel on my 6BR “Chantilly” — it delivered great accuracy and impressive velocities. Since the 25 BR was so similar, I went with another BlackStar. I ordered a 10-twist, 6-groove, 1.250″-diameter straight-contour tube.
 After chambering, the barrel finished at 1.245″ diameter and 27.5″ inches with an 11° crown. I actually had the throat lengthened to accept both Berger 110gr and 115gr bullets. The bases of the FB 110-grainers sit flush with the neck-shoulder junction, when they are seated .010″ into the lands. With the longer 115gr VLDs, the bottom of the bearing surface (i.e. start of boat-tail) is just about even with the neck-shoulder junction. After chambering, the barrel finished at 1.245″ diameter and 27.5″ inches with an 11° crown. I actually had the throat lengthened to accept both Berger 110gr and 115gr bullets. The bases of the FB 110-grainers sit flush with the neck-shoulder junction, when they are seated .010″ into the lands. With the longer 115gr VLDs, the bottom of the bearing surface (i.e. start of boat-tail) is just about even with the neck-shoulder junction.
Accurate Load Development
The barrel broke in easily with just 10 shots, using a “shoot one and clean” process. The load I started with was 31.5 grains of Varget with CCI 450 primers. The Berger 110s and Berger 115s had the same Point of Impact (POI) at 100 yards. However, the 115s impacted two inches higher at 600 yards with the same load. That shows the benefits of a higher BC. Pushed by the CCI 450s and 31.5 grains of Varget, the 115-grainers were running about 2837 FPS. I boosted the load up to 32.0 grains but I noticed primer cratering, so I backed off, settling on 31.5 grains for the 115gr Berger VLD.
Peppermint Wins at 600 Yards
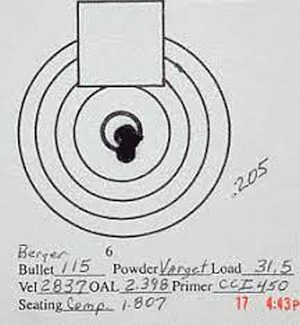 For her debut in competition, I took “Peppermint” to our local 600 yard F-class match. Shooting the Berger 115s with 31.5 grains Varget, she won with a perfect score of 200 with 14 Xs. At my club, we use a SR3 target. The X-Ring measures 3″ in diameter and the 10-Ring measures 7″. At the match there were some very good shooters with top-flight custom rifles in accurate calibers such as 6.5-284 and 22 Dasher. I was very fortunate to come out on top, but I give the credit to Peppermint’s good bench manners and outstanding accuracy. For her debut in competition, I took “Peppermint” to our local 600 yard F-class match. Shooting the Berger 115s with 31.5 grains Varget, she won with a perfect score of 200 with 14 Xs. At my club, we use a SR3 target. The X-Ring measures 3″ in diameter and the 10-Ring measures 7″. At the match there were some very good shooters with top-flight custom rifles in accurate calibers such as 6.5-284 and 22 Dasher. I was very fortunate to come out on top, but I give the credit to Peppermint’s good bench manners and outstanding accuracy.
As you can see from the target, “Peppermint” is a very accurate rifle that has proven herself in competition. It takes a good gun to finish “on top” in her very first match. So far, I’m very happy with the project, and more than satisfied with the accuracy of the 25 BR. This is definitely a worthy cartridge for Egg Shoots, 500m varmint matches, and the 600-yard F-Class game.
| BR-Based Cartridge Comparison |
| CALIBER |
22 BR |
6mm BR |
25 BR
| 6.5 BR |
7 BR
| 30 BR |
| Bullet |
80gr SMK |
107gr SMK |
115gr Berger |
107gr SMK |
130gr SMK |
118gr BIB |
| BC |
.420 |
.527 |
.522 |
.420 |
.391 |
na |
| Load Grains |
31.0 H4350 |
30.0 Varget |
31.5 Varget |
32.0 Varget |
34.0 AA2460 |
34.0 H4198 |
| Barrel Length |
27″ |
27″ |
27.5″ |
27.5″ |
28″ |
24″ |
| Velocity |
3100 fps |
2880 fps |
2837 fps |
2851 fps
| 2719 fps |
2970 fps |
Comparing the BR-Based Variants
 Now that I have several calibers in the BR cartridge family, (22 BR, 6mm BR, 6.5 BR, 7 BR, and a 30 BR), it is my humble opinion that they each have their own place. A varmint hunter’s dream, the 22 BR can push a bullet faster and more accurately than the 22-250. With an 8-Twist barrel, the 22 BR can send an 80gr SMK to 600 yards with extreme accuracy. Now that I have several calibers in the BR cartridge family, (22 BR, 6mm BR, 6.5 BR, 7 BR, and a 30 BR), it is my humble opinion that they each have their own place. A varmint hunter’s dream, the 22 BR can push a bullet faster and more accurately than the 22-250. With an 8-Twist barrel, the 22 BR can send an 80gr SMK to 600 yards with extreme accuracy.
The 6 BR can do it all. The 6mm caliber offers a wide variety of quality bullets suitable for any shooting situation. All the major custom barrel makers produce outstanding 6mm barrels in a full range of twists. Moreover, since the 6 BR cartridge is so popular, there is a great store of knowledge about reloading for the 6 BR. It is easy to find a load that will shoot superbly in any bullet weight.
The 25 BR has proved to be easily tuneable, proficient and not fickle. You can obtain extreme accuracy without great effort in load development. The 115gr Berger offers a good high-BC projectile for this caliber, making the 25 BR a viable alternative to the 6 BR. As I’ve shown, it is competitive with a 6 BR in head to head competition.
Compared to the 25 BR, the 6.5 BR has a small edge in ballistics. However, there are not many light bullet choices available, especially from custom makers. The 123gr Lapua Scenar is an excellent bullet with a .547 stated BC, but it may be a bit heavy for the case capacity.
The 7 BR was designed for silhouette shooting, and it excels at that task. The 7 BR can push a 130 grain bullet fast enough to knock over the steel silhouettes at 500 meters with real consistency.
The 30 BR is nothing less than outstanding. The 30 BR is now the dominant cartridge on the benchrest Score-shooting circuit. It is also highly accurate for group shooting at 200 yards and very capable of winning a 600-yard F-Class match. Barrel life of over 6,000 rounds is realistic.
I like all the “flavors” of BR derived from the 6mm BR Norma case. However, if I could only have one BR in my safe, give me my 8-Twist, 6 BR “Chantilly” and I will be a happy camper. The final point I would make is if a cartridge is stamped BR on the case, it will shoot extremely accurately if you can.

February 20th, 2022

The 300 Meter .22 PPC — Smaller Caliber for Less Recoil
By GS Arizona
[This article originally appeared in Precision Shooting Magazine many years ago, but we are reprising it because the .22 PPC remains a notable cartridge for many disciplines, from benchrest to silhouette.]
I’ve spent the past few years pursuing the largely solitary pastime of 300 Meter shooting in the US. While it is a hugely popular sport in Europe, with thousands of competitors in each of various countries and overflowing national championships, in the U.S., 300 Meter shooting is simply a forgotten discipline. As an example, consider that the entry at the USA Shooting 300 Meter National Championships held at Fort Benning did not reach 20 competitors in [years past]. For those not familiar with the discipline, the 300 Meter ISSF target has a 100 mm ten ring, 200 mm 9 ring and so forth. That’s a 3.9″ ten ring at 328 yards for those of you who may object to the metric system, electricity and other intrusions upon a well settled universe (which ends at the dragons). [Editor’s Note: GS Arizona was a championship-class prone shooter, in both rimfire and centerfire disciplines, who had a popular online Blog, which has been closed.]
300 Meter Basics
300 Meter matches can be either three-position (prone, standing, kneeling) or all prone. Being of that age at which limbs aren’t limber and the mid-section obscures one’s view of the toes, I shoot prone matches only and leave the 3P to those for whom the term “shooting athlete” doesn’t produce an automatic smirk from the better half.

Like most 300 Meter shooters, I shoot a 6BR as my main rifle. As used in 300 Meter shooting, the 6BR is loaded with a 105-108gr bullet, with a velocity in the 2850 fps range. There is simply no cartridge out there at this time that delivers the accuracy, low recoil and ease of loading that can be had from the 6BR. That doesn’t mean we shouldn’t embark on a quixotic adventure now and then to find something better. This article is about one such search. So, if you don’t mind spending some time learning about an uphill struggle in a forgotten corner of the shooting world, pour a hot cup of coffee, get a plate of chocolate chip cookies and read on.
Getting Started–The Concept Behind the Project
The premise for building a .22 PPC was simple — less is more. Less recoil, that is, while retaining good ballistics and accuracy, should allow for higher scores. The hard part is meeting the ballistic and accuracy standards set by the 6BR. If pressed I might also admit to a desire to do something different. I made a decision early on in the project to stick to 80-grain bullets. I believe the 80 is pushing the envelope for safe and sane pressure in a case the size of the PPC; additionally, there are a number of manufacturers of 80-grain .224″ bullets so selection and testing can be more meaningful. Barrels are another consideration and all of the better barrel makers offer a 1:8″ twist .224 barrel (unlike the limited selection of 1:6.5″ twist required for 90 grain .224″ bullets).
With the basic parameters of a full-length .22 PPC case (reformed Lapua .220 Russian to be exact) and an 80-grain bullet established, a few other details needed attention. The first of these was specifying certain dimensions for the reamer maker. I chose not to change any of the essential dimensions of the .22 PPC such as headspace, shoulder angle or body taper, but there were a couple of areas that I felt needed to be different from the typical Benchrest PPC. These were neck diameter and throat length. With the outstanding quality of the Lapua brass, I elected to go with a 0.255″ neck diameter which would allow the use of unturned brass and still leave 0.002″ clearance around the neck of a loaded cartridge. The throat was specified longer than a standard PPC to allow for the length of the 80-grain bullets and avoid having the bullet go past the neck/shoulder junction.
|
 300 Meter .22 PPC — Equipment List 300 Meter .22 PPC — Equipment List
Hardware
Action: RPA Quadlite, RPADefense.com.
Stock: Master Class Highpower Prone MasterClassStocks.com
Barrel: Broughton .224″ bore, 1:8″ twist, 30″ Palma contour
Rear Sight: Warner #1, Anschutz Iris, Warner-Tool.com
Front Sight: Gehmann Iris from Scott Riles
Trigger: Jewell 4 oz. one-stage
Bolt Knob: Keychain from 7-11 ($2.00)
Gunsmithing
Barrel fitting, sight, scope bases: Warner Tool Company.
Stock inletting, pillar bedding, and hardware: Alex Sitman,
Master Class Stocks. |
Detours Along the Way
Like Quixote stumbling his way to his dreams, I’ve made a few mistakes. That 0.255″ neck diameter turned out to be the first. Turning brass isn’t a problem, but I was so captivated by the quality of the .220 Russian brass that I planned to skip turning or just take a light (0.001″) clean-up cut. Well, that’s fine, but as it turns out, PPC die makers assume you have turned necks and using unturned brass causes problems. The Redding Competition Seater, for instance, wanted to crimp the entire length of the neck onto the bullet. Turns out it was 0.250″ in the neck diameter of the sliding sleeve. This required reaming the sleeve which wasn’t too hard as the sleeve is made of relatively soft steel. Hand turning the chambering reamer with lots of care and oil took care of that problem. This opened up the neck to 0.255″ which might be 0.001″ more than ideal but I’ll live with it.
 Sizing dies were another problem altogether. Forget using a non-bushing die with unturned brass–you’ll just overwork the neck to death. The Redding bushing dies worked well, though. Fired brass ends up at 0.254″ and is sized to 0.250″ in two steps (0.252″ and 0.250″) to maintain better concentricity. Sizing dies were another problem altogether. Forget using a non-bushing die with unturned brass–you’ll just overwork the neck to death. The Redding bushing dies worked well, though. Fired brass ends up at 0.254″ and is sized to 0.250″ in two steps (0.252″ and 0.250″) to maintain better concentricity.
I also got the throat length wrong as the base of the bullet (above the boat tail) is halfway up the neck and I want it just above the shoulder. I don’t know how I missed on that spec, but that’s what happened. As it turns out, the extra throat length hasn’t caused any problems with the Nosler 80, but it might with shorter or pointier bullets. Powder and primer choices became additional areas for demonstrating my inability to make good choices. You might think that adding a heavier bullet to an existing cartridge would be simple but it really turned into a full scale adventure.
Choice of Components and Smiths — Only the Best
Based on my previous favorable experience and that of a few friends, I ordered a Broughton barrel for the PPC, a .224″ bore 1:8″ twist, long enough to finish at 30 inches in what is generally referred to as a medium Palma taper. I haven’t been disappointed by the barrel: like all of those made by Tim North of Broughton Barrels, it is top notch. With the barrel and reamer in hand, they and the RPA Quadlite action were sent to Al Warner for barreling and then on to Alex Sitman for the stock. I can’t say enough good things about Alan’s metal work and Alex’s stock work. They have barreled and stocked many rifles for me over the years, all flawless. Alex’s Highpower Prone stock fits me like a comfortable moccasin. The trigger is a Jewell set at 4 oz., the rear sight is a Warner #1 and the front sight is a Scott Riles with a Centra aperture.
Eventually, the UPS man — purveyor of all things worth having — arrived with a long package and the real work began. Load testing and shooting can be a lot more frustrating than planning and talking to gunsmiths, but hopefully the eventual results make it worthwhile. I had a good supply of Nosler 80-grain bullets and some preconceived notions about powder and primers. Off to the loading bench.
Load Development + Accuracy Testing
 Fire-forming the .220 Russian cases to the PPC chamber was a breeze: run an expander into the neck to get them to .224″, bump the shoulder 0.002″, load a caseful of IMR 4895 (about 23 grains) and insert a Nosler 77 (leftover from another project) and fire. I shot these at 100 yards while zeroing the rifle and was very impressed with the accuracy. Fouling was minimal, off to a promising start. Fire-forming the .220 Russian cases to the PPC chamber was a breeze: run an expander into the neck to get them to .224″, bump the shoulder 0.002″, load a caseful of IMR 4895 (about 23 grains) and insert a Nosler 77 (leftover from another project) and fire. I shot these at 100 yards while zeroing the rifle and was very impressed with the accuracy. Fouling was minimal, off to a promising start.
Once formed, I loaded the brass with Varget and the 80-grain bullets. Since Varget has given such good results in the 6BR, it was a natural starting point for this project. However, it quickly became evident that it might be too slow. While accuracy was excellent, powder fouling in the barrel was very heavy even at the highest charge tried (28.5 grains) and there was soot all the way down the shoulders of the cases. Cleaning the bore felt like patching a rusty water pipe after just 20 shots. I knew I’d never make it through a 60-shot match (about 70 shots with sighters) without cleaning[.]
Putting the .22 PPC to the Test in Competition
At this point, I took the PPC to a 300 Meter match with the Varget load. While it might not look perfect, I needed to try it. The first string was a 198 and I was able to clean the rifle immediately after firing. The second string was also a 198 but I had to fire the third string without cleaning. The effects of the fouling were evident in the last score, a 194.
 While a 590 total isn’t bad for 300M, it was a bit below my average with the 6BR at this range – my home range that I knew well. More importantly, the score dropped as the group opened up in the third string when I wasn’t able to clean. At the Nationals all 60 shots are fired without a break for cleaning or additional sighters; therefore, Varget, while promising, wouldn’t work in the long run. While a 590 total isn’t bad for 300M, it was a bit below my average with the 6BR at this range – my home range that I knew well. More importantly, the score dropped as the group opened up in the third string when I wasn’t able to clean. At the Nationals all 60 shots are fired without a break for cleaning or additional sighters; therefore, Varget, while promising, wouldn’t work in the long run.
The next faster powder on my shelf was IMR 4895. I’d used it in the fire forming loads and if I had a lick of sense I would have tried it right away since the fire forming loads shot so well. However, stubbornly clinging to the preconceived notion that Varget was going to be a great powder for this combo cost me a month or so fooling with it. I then worked up loads with 4895 from 26.8 to 28.6 and saw that while 4895 was better suited to the case than Varget, it was still slow. The powder fouling was still occurring, though to a lesser degree. The shoulders still showed some soot, but less. I settled on 27.8 grains as a useful load and loaded 70 cases.
 New Load for a New Home New Load for a New Home
At this point, I moved from Florida to Arizona causing a delay of several months in testing. The move also had an effect on the load as the hotter and drier climate in Arizona turned out to be much more suitable for 4895. Of course, I still had those 70 rounds loaded with 27.8 so I shot them in practice. Everything seemed OK but one primer (Federal 205M) pierced at the edge. I didn’t pay much attention to that as there were no other pressure signs and it was the first primer failure of any sort so far in this project. Extraction was fine, primer edges were nicely radiused and base growth was under two tenths. There was an opportunity to shoot a 500-yard prone match the following day so I reloaded the cases with the same load. At the match I pierced two more primers, this time right at the edge of the firing pin, causing two craters running into the firing pin hole. As you might imagine, all subsequent shots cratered into that area, although no more pierced.
I was contemplating a switch to Hodgdon Benchmark (slightly faster than H4895) until this point. Now, repairing the bolt face and switching to a tougher primer took priority. I loaded 25 rounds with CCI BR4 primers and 25 with Remington 7.5 primers. Both of these are well known for their tougher cups which I hoped would eliminate the piercing. I like the mild flash from the Federal 205 and believe it contributes to good accuracy, but I needed a primer that holds together more than I need to cut another tenth MOA. Bearing in mind that the powder charge itself might need reworking, I took those 50 rounds to the range to test them with the 27.8 gr. IMR 4895 load as it remains best to only change one thing at a time. Temperatures were in the 100 to 110 degree range during testing as they are for a good portion of the year here in Phoenix. If the load won’t work in hot temperatures, it just won’t work at all for me.
The primer testing at 200 yards showed the CCI BR4 primers to be better suited to this load than the Remington 7.5 primers. While no primer failed out of the 50 fired, the CCI BR4 primers gave distinctly better accuracy. I fired two ten-shot groups prone (scoped) with each, the Remington-primed groups averaged just over 1 MOA and the CCI-primed groups averaged 1/2 MOA. The difference between the two was principally in the amount of elevation in the groups. Given that result, as well as previous good experience with the CCI primers in the 6BR, I settled on the CCI BR4 primers for the PPC.
Final Testing at 500 Yards–It all Comes Together
While the purpose of the 80-grain PPC is 300 Meter shooting, those matches are somewhat hard to find so I’ve done most of my testing at 200 yards on the local public range (Ben Avery Shooting Facility in Phoenix) and at 500 yards in some of the local prone matches. With the primer issue potentially resolved, I went back to the 500-yard range to make sure the load held good elevation at that distance.
 Final testing at 500 yards was a complete success. I fired one group of 24 shots from the prone position. Elevation for the bulk of the group was right at 3″ (0.6 MOA), the horizontal spread was somewhat larger as the group was fired in gusty, fast-switching conditions. The CCI BR4 primers functioned flawlessly, with no sign of pressure despite ambient temperatures over 100° F. None of this should be taken as a general statement of inadequacy of Federal primers. I have used (and continue to use) the very same lot of Federal 205M primers in my 6BR and have not experienced any problems at all. Simply stated, the 80-grain .22 PPC is an odd duck and has special requirements when fired under the conditions that prevail in my area. Final testing at 500 yards was a complete success. I fired one group of 24 shots from the prone position. Elevation for the bulk of the group was right at 3″ (0.6 MOA), the horizontal spread was somewhat larger as the group was fired in gusty, fast-switching conditions. The CCI BR4 primers functioned flawlessly, with no sign of pressure despite ambient temperatures over 100° F. None of this should be taken as a general statement of inadequacy of Federal primers. I have used (and continue to use) the very same lot of Federal 205M primers in my 6BR and have not experienced any problems at all. Simply stated, the 80-grain .22 PPC is an odd duck and has special requirements when fired under the conditions that prevail in my area.
At this point, I’ve determined that the basic premise of a .22 PPC for 300 Meter matches is perfectly viable, even if it is quite a bit more complex an undertaking than the 6BR. Recoil reduction over the 6BR was minimal, bordering on unnoticeable, but accuracy is on a par with the 6BR, perhaps slightly better. As a nice bonus, the PPC has proven to be quite useful for the 500-yard prone matches that are a regular part of the Phoenix shooting scene and it never fails to spark a good conversation with a new friend when I’m practicing or testing at the range. Future plans include testing Berger and Hornady 75 and 80-grain bullets and Hodgdon Benchmark powder. And, after conferring with your moderator, who ran some simulations in QuickLOAD, I’ll be trying Reloder 15 soon (QuickLOAD predicts RL15 allows 100% load density with good velocity). At some point I’ll also have the reamer reground for a shorter throat and tighter neck, but probably not until time comes to rebarrel.
6mmBR Norma versus .22 PPC

For the shooter who wants a superbly accurate, easy to load cartridge for 300 Meters to 600 yards, you simply can’t beat the 6BR. Everything you need, including brass, dies, reamers and knowledge are just a phone call away. The .22 PPC, by contrast, is an uphill struggle. The chambering reamer was custom ground to my specifications to allow unturned brass, as well as a longer freebore for the 75- and 80-grain bullets that are the heart of the project. The no-turn necks also meant that the Redding Competition Seater (an excellent unit) had to be reworked to allow for the thicker neck diameter. Once those hurdles were overcome I struggled to find the best powder for this combination–and I’m still searching. Unlike the 6BR where any of a half dozen or more powders will do the job (Varget, Reloder 15, N140, N540, IMR 4895, Norma 203B, etc.) the .22 PPC with heavy bullets has proven finicky with even the most accurate powders leaving fairly heavy carbon fouling.
Despite the problems, the .22 PPC offers a bit more pure accuracy than the 6BR and also a tiny bit less recoil. Both of these things can contribute to slightly higher scores in prone matches. However, to get the most out of the PPC, one must find the time to clean between 20 shot strings–a not inconsiderable effort sometimes in the mad rush of pit changes, scoring, shooting and just plain being tired.
This rifle was initially a .223 and when that cartridge proved unsatisfactory for my purposes, I had it rebuilt as the .22 PPC you see here. I like it and I enjoy the challenge, but I would not recommend this combination as someone’s primary rifle; it can get a bit frustrating. To put it into another context, the 6BR is like a 350 Chevy, it’ll just keep on doing the job forever, no matter what. The .22 PPC is like a Ferrari, it’ll scream when you do everything right, but it takes more attention to detail and a lot more maintenance. You wouldn’t want a Ferrari as your only car and likewise, you would be better off making the .22 PPC a second rifle.
|
Parting Shots — The .22 PPC vs. 6mm BR
If you’re looking for a simple, accurate and reliable cartridge for 200 to 600 yards, you probably can’t improve on the 6BR. However, if you’re someone who finds the journey as rewarding as reaching the destination, then you may very well enjoy a .22 PPC for prone shooting. While I received a great deal of help in this project from friends, gunsmiths, suppliers and parts makers far and wide, I really must acknowledge the huge debt we all owe to Ferris Pindell and Dr. Lou Palmisano. Without them there would be no PPC. We truly stand on the shoulders of giants.
Copyright © Precision Shooting Magazine and GS Arizona. Reprinted by permission.
July 18th, 2021

Many years ago, when we decided to do a story about SAKO’s TRG series of rifles, we remembered our friend Terje Fjørtoft in Norway. Terje has owned, and hunted with, both the TRG-22 (in .308 Win), and its big brother, the TRG-42 (chambered in .338 Lapua Magnum). Unlike many TRG owners in the USA, Terje has carried his “tactical hunters” into the field, and tested their effectiveness on large game in both coastal and mountain environments, in warm weather and cold. Terje tells us the TRGs have proven to be rugged and reliable. And they are accurate. The .308 Win TRG-22 delivers about 0.45 MOA groups at 420 yards shot from bipod. The .338 LM TRG-42 shoots about 0.55 – 0.7 MOA at that distance.
| A Tale of Two TRGs by Terje Fjørtoft

I live in Brattvåg, along the coast of Norway, but I hunt and shoot at the nearby island “Fjørtoft” (same as my last name) and a small island outside Fjørtoft. I grew up on Fjørtoft as a child, and we hunt seals there in the spring and fall. The large, top photo shows me with my black TRG-42 338 Lapua Mag (“LM”) during a seal hunt a couple years ago. Click on the thumbnail at right to watch a video that shows me shooting the .338 LM. Most of the photos in this story are from that hunt. Because the .338 LM was really “overkill” on the seals (and expensive to reload), I replaced that rifle with a TRG-22 in .308 Winchester.
 We hunt seals primarily for wildlife control. This is because the seals carry an internal parasite, called “Kveis”, a small worm that breeds inside the seals (after eating contaminated fish). When the seals expel the Kveis into the water, the Kveis larvae are consumed by the fish and then the fish become unfit to eat. The parasite literally eats the fish from the inside out. It’s not very pretty and it has hurt our Norwegian fishing industry. So there is an important purpose for our seal hunting. We hunt mostly from islands, targeting the seals in the water, and retrieving them with a small boat. We hunt seals primarily for wildlife control. This is because the seals carry an internal parasite, called “Kveis”, a small worm that breeds inside the seals (after eating contaminated fish). When the seals expel the Kveis into the water, the Kveis larvae are consumed by the fish and then the fish become unfit to eat. The parasite literally eats the fish from the inside out. It’s not very pretty and it has hurt our Norwegian fishing industry. So there is an important purpose for our seal hunting. We hunt mostly from islands, targeting the seals in the water, and retrieving them with a small boat.
 Because the seals spend most of their time in the water, a seal-hunter needs a very accurate rifle [to take head shots at distance]. I like the TRG-22 because it is very accurate out of the box, with a very nice bipod that works well in the field. The stock is comfortable with good adjustment range. The TRG features a 10-rd magazine and the barrel is pre-threaded for a muzzle brake or suppressor. Because the seals spend most of their time in the water, a seal-hunter needs a very accurate rifle [to take head shots at distance]. I like the TRG-22 because it is very accurate out of the box, with a very nice bipod that works well in the field. The stock is comfortable with good adjustment range. The TRG features a 10-rd magazine and the barrel is pre-threaded for a muzzle brake or suppressor.
I have also used my TRGs for hunting big game, deer and what Americans call “Elk”. You can see, further down on this page, a picture from a hunting stand taken late in the evening, in the fading light. Yes I successfully bagged a nice buck during that trip with my TRG-42. When hunting, I use a Leica 900 rangefinder, Swarovski 7×42 Habicht binoculars, and a Silva windwatch. For Optics on the TRG-22, I have a Zeiss 6-24×56 scope, in Tikka Optilock rings. To get more scope adjustment I milled 0.9 mm off the front scope base mount. The Zeiss is great for viewing small targets past 400 meters. It was very difficult to find a longer shooting place than 575 meters on this Island (Uksnøy) but I found a place where I can shoot out to 930 meters, and I’ve made an 80-cm steel gong for a target. At this range, the bullet must fly nearly all the distance over the water.

Terje Shooting the TRG-42 without suppressor. Big recoil, big flash.
 Both the TRG-22 and TRG-42 are very accurate right out of the box. The only thing I did before I first shot the TRGs was to clean the barrels very thoroughly. This is because the SAKO factory test shoots the gun without cleaning the barrel. I also adjust the cheek piece upward when shooting the rifles with a big scope. However, if you raise the cheek piece too high you can’t get the bolt out without removing the whole cheek piece. The only real modification I’ve made to my TRGs was to put rubber foot pads on the feet of the SAKO factory bipod. This gives the bipod better grip on slick surfaces such as concrete, or the rocks on the offshore islands. Both the TRG-22 and TRG-42 are very accurate right out of the box. The only thing I did before I first shot the TRGs was to clean the barrels very thoroughly. This is because the SAKO factory test shoots the gun without cleaning the barrel. I also adjust the cheek piece upward when shooting the rifles with a big scope. However, if you raise the cheek piece too high you can’t get the bolt out without removing the whole cheek piece. The only real modification I’ve made to my TRGs was to put rubber foot pads on the feet of the SAKO factory bipod. This gives the bipod better grip on slick surfaces such as concrete, or the rocks on the offshore islands.
 .338 LM vs. .308 Win — Smaller Can Be Better .338 LM vs. .308 Win — Smaller Can Be Better
A few years ago I had a black TRG-42 (338 LM), but after a year, I sold it, and ordered a TRG-22 from the SAKO factory. After a one-year wait, I got the new green TRG-22 in February this year. One main reason I changed to .308 Win was the cost of ammo. I can reload .308 Win ammo for about one-third the price that it costs to reload .338 LM. One other reason is that my usual shooting distance is about 390 meters–at that distance the .308 is more than effective enough. Also, with the .338 LM, the barrel and the suppressor heated up after only a few shots, but with my new .308, I can shoot at my own pace without this problem. After my most recent shooting trip I once again confirmed how accurate, and fun-to-shoot, the TRG-22 is. I think now the TRG-22 has become my favorite plinking gun.
Though it is fun to experience the big boom and flash of the .338 LM, I’ll admit that it is just too much rifle for most applications. The .338 LM is REAL overkill for seal hunting. Here in Norway we have a rule that the smallest caliber we can use is 6.5×55 with a 140gr (or heavier) bullet, but everyone who hunts seals knows that the seals stay mostly in the water, and therefore you must take a headshot at distance up to about 200 meters. Making the headshot with a smaller caliber is advised for two reasons. First, when a big .338 bullet hits the water, there is a danger it will skip and ricochet quite some distance. Second, if you use too powerful a load/gun/caliber and take a headshot on a swimming seal, the seal sinks like a rock.

|
 Reloading for the TRG-22 (.308 Win) Reloading for the TRG-22 (.308 Win)
With the TRG-22, I found it was easy to get an accurate load. My groups with 155gr Scenars are consistently good with a variety of different powders. I’ve tried both light and heavy bullets, but I favor the 155gr Scenars over the 185gr Scenars because the 155s fly a lot faster and drop less.
Three loads (all with Fed 210m primers) that have worked well are: 155gr Scenar with VV N150, 885m/sec; 155gr Scenar with Norma N-11, 890m/sec, and 185gr Scenar, VV N150, 770m/sec. Norma N-11 is a low-cost powder for target shooting. N-11 is similar to Norma 203B or Norma 202 but it varies quite a bit from lot to lot.
I use a RCBS Rock Chucker press, and currently use a standard RCBS full-length die kit to reload my .308 rounds. However, I recently ordered a Redding Competition 3-die set with a .335 bushing. I look forward to trying the Reddings. I have just started to test different seating depths. The 155s just “kiss” the lands at 74.10 mm. I’ve tried 74.00 mm, 74.10 mm and 73.55 mm, but so far saw no significant differences.
 Reloading for the TRG-42 (.338 LM) Reloading for the TRG-42 (.338 LM)
For the .338 LM, I started with a 250gr Scenar and 95 grains of Vihtavuori N-170. That load was very accurate at about 850 m/sec, but it produced excessive muzzle flash. And, in the winter, the muzzle velocity was inconsistent, and there was too much unburned powder. Next I tried Norma N-15, which proved very accurate at about 880 m/sec. With that load I shot my best TRG-42 group at 380 meters. I set the 250gr Scenar to touch the rifling with 93.2 mm COAL, and I used Federal 215m primers in Lapua-brand brass. Norma MPR2 and VV N-560 (860 m/sec) also were very accurate with the 250 Scenar.
My seal hunting bullet was the 200gr Nosler BT. This bullet grouped very well with 90-94 grains Norma N-15. Velocity was about 970m/sec if I remember correctly. I also tried the 300gr Sierra MK, and got 1/2″ 3-shot groups at 100 meters with 93.5 grains of VV N-170, but this combination produced terrible groups at longer range.
Loading for the .338 LM was not difficult — about the same as loading for .308 Win, except that you use nearly twice the amount of powder. I didn’t crimp the bullets in the neck, didn’t use any special tricks or neck lube. I used RCBS .338 LM full-length die. That functioned, but it would not be my first choice today. Overall, my better loads in the .338 shot in the 0.5-0.7 MOA range. My best group was four shots in 25mm (1″) at 380 meters (416 yards).

 Hunting in Norway Hunting in Norway

I’m not a competitive sport-shooter. Normally, the only time I go to a “commercial” rifle range is to take the test for my hunting license. Every year, I must re-qualify for a shooting license to hunt big game and seals.
Hunters Tested Annually
In Norway, you must pass an actual shooting test before you can hunt big game. This test requires five shots at a deer silhouette target at 100 meters. No rests are allowed–you must shoot off-hand or with a sling only. You have to place five shots inside a 30 cm circle over the front leg.
Every big game hunter that passes this test is authorized to hunt at “dusk and dawn” and in moonlight. So, we do a lot of our hunting in the twilight hours. However, no night-vision or artificial illumination (spotlights) are allowed. We usually hunt deer at dusk and dawn. In the evening, we go on post two to three hours before it is dark, and sit there waiting for the deer to show up–hopefully before it is too dark. In the morning we go to the post one hour before you see any light of the sun, and wait for the deer to show up until the daylight. But when it is full moon we sometime have enough light to hunt in the middle of the night. In the photo, you can see a deer through the scope of my TRG-42. This was very late in the evening. CLICK HERE for BIG Photo.

|
| Sound Suppressors for Hunting Rifles
Suppressors are legal to use for hunting in Norway. I have suppressors on all my rifles, even my little CZ 452 in 17 HMR. To me, shooting a rifle without a suppressor is like driving a car without an exhaust system. The suppressor reduces both noise AND recoil significantly. With a good suppressor, there is no loss of accuracy. The only “negative” in using a suppressor is extra weight on the end of the barrel.
I crafted my own home-made suppressor. It’s similar to my commercially-made TRG-22 suppressor, but the core is made from titanium to be lighter in weight and more corrosion-resistant. I used a lathe at work to craft the inside of the new suppressor. The core of the unit is built from a 27.5 cm X 40mm round bar of titanium while the outer cylinder is made from a 42mm stainless steel tube. I wanted to use titanium for the exterior cylinder as well, but I couldn’t source the right size titanium tube.

|

Commercial Suppressor on TRG-42 |
Comparing .308 Win vs. 6mmBR
 I also have a 6BR hunting rifle (compensated of course). I have a lot of field time with the 6BR rifle, and feel very confident with that gun. When I got the Krieger 6mmBR barrel on the SAKO Varminter, I fell in love with that rifle from day one, and that rifle is my first choice for small game hunting. I also have a 6BR hunting rifle (compensated of course). I have a lot of field time with the 6BR rifle, and feel very confident with that gun. When I got the Krieger 6mmBR barrel on the SAKO Varminter, I fell in love with that rifle from day one, and that rifle is my first choice for small game hunting.
I also like the TRG-22 gun very much and enjoy it more and more with each new field trip. That .308 is my big game rifle and my long-range target rifle.
I recently tested my TRG-22 rifle at 387 meters. This was just “fun shooting” at steel plates, and I didn’t measure groups. But I was happy with the results. Once I corrected for the 5 m/sec crosswind, I was able to put five successive shots on a 10 cm (4″) diameter steel target at 387 meters (423 yards).
My SAKO Varminter in 6mm BR and my TRG-22 are two very different rifles. The TRG-22 is much heavier. I guess the TRG-22 is about 6.5-7 kg while my SAKO 6BR is about 4.5-5 kg, both with suppressor, scope, and bipod. The 6BR with suppressor is much quieter than the TRG-22 with suppressor. The recoil of the 6BR is a lot softer than the TRG-22. So far my 6BR is more accurate. A typical three-shot group with the 6BR is 25-40 mm at 387 meter (423 yards), and that is with just 10X magnification from a Zeiss scope. With my TRG-22, my 3-shot groups run about 50-60 mm, shooting with bipod and beanbag. But I think with a better .308 Win reloading die and more practice, I can improve my groupings with the TRG-22.


|
SPEC SHEET
The SAKO TRG-22 and TRG-42 are built in Finland by SAKO, a subsidiary of Beretta. In America, the guns are distributed by Beretta USA. Both TRGs (22/42) are available in forest green or a matte black textured finish. A two-stage match trigger is standard.
The stock is somewhat unconventional. It is an external shell, bolted to an internal metal chassis. The action bolts directly to the chassis, without bedding. The injection-molded stock is adjustable for comb height, length of pull (with spacers), vertical butt-pad height and cast-off.
Weight TRG-22
4.7 kg (black)
4.9 kg (green)
Barrel TRG-22
660 mm (26″), hammer-forged, optional stainless or phosphate finish
Capacity
10-round Mag (TRG-22)
7-round Mag (TRG-42)
Calibers
.308 Win (TRG-22)
300WM, .338 LM (TRG-42) |
July 11th, 2021

This photograph and all images for this story are by Bill White, aka “CT10Ring” in our Forum.
 AccurateShooter Forum member Bill White (aka “CT10Ring”) is not your typical member. For 37 years, Bill worked in NYC as a studio photographer specializing in still lifes and products. A neighbor visiting Bill’s home in Connecticut with a .270 Sako inspired Bill to revive his interest (obsession?) with shooting after a 25-year drought. And he owns a few Sakos now! With his gun hobby renewed, for many years Bill drove to the Western USA to shoot long range steel and a LOT of prairie dogs in season. He loved the life of the varminter, so it made sense for him to move West after retiring. He choose Idaho as his new home. AccurateShooter Forum member Bill White (aka “CT10Ring”) is not your typical member. For 37 years, Bill worked in NYC as a studio photographer specializing in still lifes and products. A neighbor visiting Bill’s home in Connecticut with a .270 Sako inspired Bill to revive his interest (obsession?) with shooting after a 25-year drought. And he owns a few Sakos now! With his gun hobby renewed, for many years Bill drove to the Western USA to shoot long range steel and a LOT of prairie dogs in season. He loved the life of the varminter, so it made sense for him to move West after retiring. He choose Idaho as his new home.
From his Idaho base, Bill enjoys long-range target shooting. But his favorite gun pastime has been varmint hunting in nearby states — the Dakotas, Montana, and Wyoming. Bill found prairie dog shooting rewarding and mapped out a western circuit route of ranches and National Grasslands in SD, ND, MT, and WY. Every year he loads up his truck and hits the road, often doing a grand circle route, visiting prairie dog havens in multiple states. In this article we feature photos from Bill’s annual “grand circle” varmint safari.
For his many cartridge types, Bill learned about reloading methods, loads, and vendors (and more) primarily from AccurateShooter.com. We start today’s story with the biggest caliber rifle he shoots regularly, his 6.5-284 Winchester. Bill favors this rig for his long-range steel shooting. He also uses it for prairie dog shooting, but only “sparingly”, because he wants to preserve barrel life, and he has many other dedicated varmint rigs.
6.5-284 for Long Range Steel Targets (and Sometimes Varmints)

In his home state of Idaho, Bill likes to shoot steel at long range. For distance work, Bill favors his McMillan-stocked 6.5-284 Win. This rifle was crafted in 2012 by Bob Green of York, PA, using a 1:8″-twist 28″ Krieger HV barrel (.298″ neck). The trued Rem 700 action was purchased from Long Rifles in Sturgis, SD. Bill did the Cerakote and bedded the action. For his 6.5-284, Bill loads 139gr Lapua Scenars, H4831sc powder and BR2 primers. He shoots both steel and varmints with this rifle, but the varmint work is limited because the 6.5-284 cartridge tends to be a barrel burner. The photo below from an Idaho range was taken near a 500-yard target, looking back at the firing line.


In the Varmint Fields — Traveling Light

Once situated, Bill (shown above) prefers to walk to Prairie Dog towns with a shooting mat, two bipod-equipped rifles slung up, rear bag, water, and his trusty Leica 10X42 GeoVid binoculars. While he has used a portable bench, he prefers to shoot from bipod, firing down from a mound if possible. This allows him to set up a line-of-fire that minimizes cross-wind effects. Bill notes: “While I often start early, end-of-day shooting has worked worked well for me. A setting sun shows targets better, the wind is usually down, and it’s not so hot. Often you can spot the bullet trace and that’s fun.”
Eight Great Varmint Cartridge Types — .204, .224, .243 Calibers
Here is one of Bill Reid’s 6mmBR (6BR) rigs. Like his Sako 6 PPC, this is exceptionally accurate.
Bill has a large rifle collection, most of which see duty in the varmint fields of Montana, North Dakota, South Dakota, and Wyoming. Here are his key “take-aways” for his eight favorite varmint chamberings: .204 Ruger, .223 Rem, .22-250, .22 BR, .22-243, 6 PPC, 6mmBR, and 6-6.5×47 Lapua (aka 6×47).
.204 Ruger — This delivers great velocity with the little .20-caliber bullets, with mild recoil. The .204 Ruger easily reaches out to 400 yards, but heavier winds do move the tiny bullet around. Tremendous splat factor under 250 yards. I use Sierra 39gr bullets with IMR 8208 XBR in a Sako 75. Even now, .204 Ruger ammo is relatively easy to find.
.223 Remington — Probably the most popular centerfire rifle round in the USA, the .223 Rem offers inexpensive brass, and is a great choice for AR-15 owners. If you run short on ammo, you can find it nearly everywhere. I often bring one AR-15 and one .223 Rem bolt gun on varmint safaris. My Rem 700 5R 1:9″-twist barrel likes 53gr V-Max bullets.
.22 BR — My .22 BR is my first choice for most prairie dog missions. Accuracy is superb with necked-down 6mmBR Lapua brass — quarter-MOA and blazing fast. With the right twist rate, this chambering can shoot anything from 40gr FB bullets to 80gr VLDs. Load development is easy. Below is my .22 BR ammo for another varmint trip. I use 55gr Sierra BlitzKings with Varget in my 1:12″-twist Shilen-barreled rifle. 60gr Bergers are very accurate with a fairly flat trajectory for useful distances.
.22-250 Rem — A classic varmint cartridge, the .22-250 with 50gr V-Maxs delivers spectacular hits. If three P-Dogs happen to be lined up, I’ve witnessed one .22-250 shot take ‘em all out with a triple hit. I currently have five .22-250-chambered rifles: 3 Sako 75s, one Rem 700, and a single shot Nesika that shoots tiny groups. I favor the very deadly Berger 52gr Varmint HP. Making a custom .22-250? With a 1:8″-twist barrel you can use the full weight range of .22-cal bullets, while spinning the lighter bullets fast for “red mist” effect. Remember this cartridge can be a barrel burner. Don’t shoot too many rounds too quickly.
.22-243 Win — This wildcat is even more potent than the .22-250, delivering devastating results on P-Dogs. Run a .243 Win case slowly through a full-length .22-243 die, with plenty of lube to form the brass. I start with Lapua .243 Win brass. There can be some issues necking-down the brass. Watch for donuts forming at the neck-shoulder junction. I bought my .22-243 rifle not sure how it would perform. But now I love shooting it. My .22-243 delivers half-MOA groups with 41.0 grains RL-22 and Hornady 75gr Amax bullets. With those 75-grainers, it’s great in the wind and good to 600 yards easily.
6 PPC — You may consider the 6 PPC a benchrest competition cartridge only, requiring fire-forming. However I have an original Sako 75 single-shot 6 PPC rifle that I load with Sako-headstamp 6 PPC brass (see below) so no fire-forming is required. This Sako 75 came with a test target that measured 0.113″! With my 6 PPC Sako, I found that 58gr V-Maxs, pushed by Vihtavuori N133, are potent out to 300 yards.
6mmBR — The 6mmBR Norma (6BR) offers a nearly unbeatable combination of accuracy, efficiency, and tunability. With the 6BR and a fast twist barrel, you can shoot everything from 40gr flat-base bullets to the latest 105-110gr match bullets. I load Lapua brass, Vihtavuori N135, and Hornady 58, 65, and 75gr bullets for my Krieger 1:14″-twist HV barrel. While this cartridge is capable of long-range accuracy, I usually limit my 6BR shots to 350-400 yards.
6-6.5×47 Lapua — In this story’s lead photo is my 6-6.5×47 Lapua varmint rifle, with Surgeon action and Manners stock. I Cerakoted the barreled action and then bedded the action. Shown below is 6-6.5×47 ammo I loaded for recent testing. Note how I separated different bullets and powder loads into multiple, labeled bags. Hodgdon H4350 is a great choice for this cartridge — 39 grains H4350 with 105gr Amax was the winner here, but 88gr Bergers also shot well. This cartridge has tremendous “critter dismantling” abilities out to 600-700 yards.
Six Tips for Novice Long Range Varmint Hunters
1. Take twice as much ammo you think you may need. The fields could be particularly rich, or, because of wind or other variables, you may have far more misses than expected.
2. When possible, set up with the wind at your back (or, alternatively, directly ahead). This will minimize the effect of cross-winds. Set up a stake with a ribbon to show wind direction.
3. Bring at least two rifles. Ideally one would be a low-recoil rifle with cheaper components for the closer shots. Then bring a rifle with higher-BC bullets for longer shots where wind is a bigger factor.
4. Check the weather before you head out. Prairie dogs like sunshine and calm conditions. If a cloudy, very blustery day is predicted, considering staying in town and cleaning the rifles.
5. Bring plenty of water on a trip. An adult male should be drinking at least 64 ounces of water (or other liquid) every day — more if it’s very hot or you are sweating a lot.
6. Preferably always hunt with a companion. If you do go out solo, have a Garmin inReach SatComm/GPS for emergencies if there is no cell coverage in your location.
Veteran Varmint Hunter Shares his Secrets
Where to Find Abundant Prairie Dogs — Generally, black-tailed P-Dogs are found in the Western high desert, in the same states/areas where cattle are raised. You’ll find good hunting in Montana, North and South Dakota, Colorado, and Wyoming. There are good hunting grounds on private ranches, BLM tracts, and U.S. National Grasslands. To find specific locations, I’d suggest calling the USFS, BLM, and State Fish & Game. Some have lists of ranches that allow P-Dog shooting. Give the agencies a call before your trip and then check in with ranchers. IMPORTANT: You need a current hunting license in some states.
How to Connect with Ranch Owners– A good varmint adventure can begin with a local connection. Stop into the local Ag/feed store and the town breakfast spot. I bet you’ll find some retired ranchers having coffee together who may direct you to a place that needs rodents thinned out. Let’s say you’re in Roundup, Montana. Stop by a local store and ask what ranchers allow PD shooting. Keep in mind that ranchers may be wary of allowing a total stranger to sling lead on their place. Show respect and if you had a good experience, send a thank-you note. A guided shoot is worth considering — the outfitter will know where the P-Dogs are and he has arrangements with landowners. He may even supply benches. I’ve taken two guided trips, with excellent results, one near Sturgis, SD, and the other on Sioux tribal land near Rosebud, SD.
Getting Set Up — I start early in the a.m. to mitigate mirage. Plus there is usually less wind at that hour. I prefer to drive to within half mile or so of a PD town, then walk and shoot prone. Most shooters like to set up a rotating bench on a knoll. This is a tried-and-true way to shoot long distances accurately, especially if you are on top of a hill and can shoot 360 degrees. I once shot from a rotating bench, but I prefer walking now. Some country is quite stunning and that’s half the fun — being out in nature. But yes there are negatives to shooting prone — ground hazards and tall grass can impede your vision.
Equipment for a Serious P-Dog Safari — In the field, I normally carry two rifles with Harris 9-13″ bipods, backpack, a rolled-up shooting mat, at least two liters of water, food, ammo, two rear bags, and binoculars. A good laser rangefinder comes in handy. If you prefer shooting from a bench you may want to have a front rest and a spotting scope. Many guys will shoot prone from the bed of a truck. That gets you off the ground without the need to haul around a heavy bench. But some locations restrict vehicles. Before a P-Dog trip, I make a detailed pack list and check off as I load my truck and camper. I would suggest bringing waterproof rubber or muck boots. June in South Dakota can be cold and wet, and the mud there is not to be believed. Don’t attempt to drive off road in it!
It’s good insurance to bring an extra 5 gallons of fuel for your vehicle in a jerry can and 2 gallons of H20. There may be NO shade for miles and dehydration is a real possibility. Having a couple heavy duty tarps will provide a sun shade and cover your gear in a rainstorm. I bring a 16″ X 20″ plywood target backer, a stand, and paper targets. This allows me to check zero on each rifle before I head out to the Dog Town.
Western Varmint Country Vistas


Taking Photos on Shooting Adventures

 Bill knows a thing or two about taking pictures, having been a professional photographer in NYC for many decades. He uses modern digital cameras for both his outdoor and indoor work. Most photos in this story were taken with a Canon EOS 5DSR MKIV. We asked Bill for some tips on taking good photos. Here are his FIVE Top Tips for Photography: Bill knows a thing or two about taking pictures, having been a professional photographer in NYC for many decades. He uses modern digital cameras for both his outdoor and indoor work. Most photos in this story were taken with a Canon EOS 5DSR MKIV. We asked Bill for some tips on taking good photos. Here are his FIVE Top Tips for Photography:
1. Take photos in the early a.m. and later p.m. when the light has definition. Mid-day results will not be so nice.
2. Use the highest-resolution camera available that fits your budget. Yes lens quality, focus, and exposure controls make a big difference.
3. When feasible, shoot using a manual setting with the lens wide open (for shallow focus). Set the focus on the most important object/subject in the frame.
4. Photoshop is useful, especially when RAW images need to be corrected to show the scene more faithfully, or enhance it.
5. After you take a picture, before you post it on social media, learn to crop the image, straighten the horizon, and do other basic fixes. This can make a big difference.

June 27th, 2021


Shooting Prairie Dogs at extreme long range takes some highly specialized equipment. Forum Member VolDoc and his friends have taken long-range varminting to a whole new level. With his Savage-based, Hart-barreled 20 BR, VolDoc managed a verified 1,032-yard Prairie Dog kill, possibly the longest recorded with a .20-Caliber rifle. But that’s just part of VolDoc’s impressive precision varminting arsenal. Here we showcase three of VolDoc’s accurate rigs: his stunning English Walnut Diamondback 6BR/Dasher, his Nesika-actioned “Orange Crush” Dasher, and the 1K Prairie Dog-slaying 20 BR Savage.
Diamondback Switch-Barrel Rifle Specifications
The action is a Stiller Diamondback, drop-port. The custom stock is similar to a Shehane ST-1000, but crafted from 40-year-old English Walnut. [Editor’s note: the wood on this gun is gorgeous!] There are three barrels for the gun with three different chamberings: 6BR Brux 1:8″-twist HV; 6BRX Krieger 1:8″-twist HV, and 6mm Dasher Krieger 1:8.5″ twist fluted straight contour (no taper). The scope is a Nightforce 12-42x56mm, with 2DD reticle.
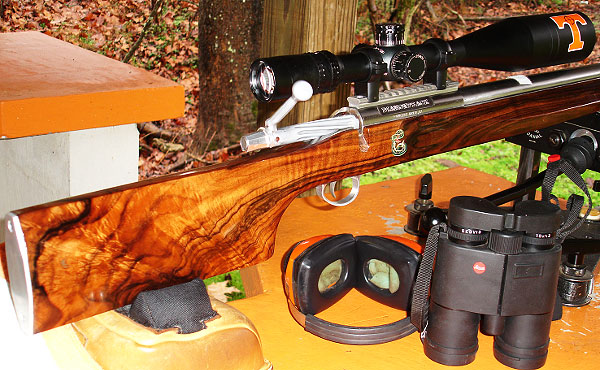
Comments: This rifle is a good study in comparison of the three different chamberings. On the same rifle platform (same stock and action), each of these barrels had killed prairie dogs over 1,000 yards. So if someone asks which is best, a 6BR, or 6BRX, or 6 Dasher, VolDoc says they are all effective. The improved cartridges will deliver higher velocities, which can be an advantage. On the other hand it is simpler to load 6mmBR brass right out of the box, and it’s easy to find an accurate load for the 6mmBR (see photo).
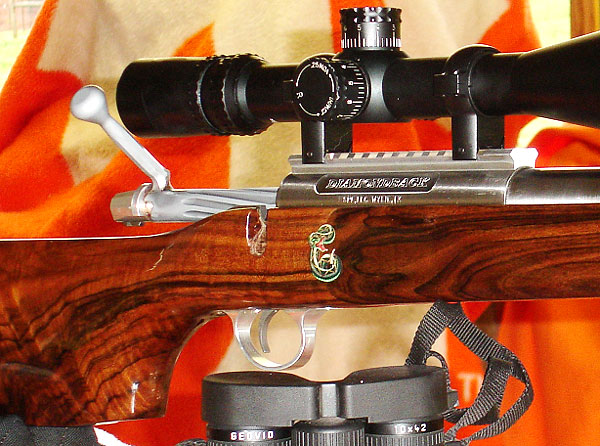
Nesika 6mmBR/Dasher Rifle Specifications
VolDoc’s “Big Orange Crush” rifle has a stainless Nesika ‘J’ action, with 2 oz. Jewell trigger, in a painted fiberglass Shehane ST-1000 stock. Originally a 6BR, the gun is now chambered as a 6mm Dasher with a .271 no-turn neck. The barrel is a 1:12″-twist Krieger fited with Vais muzzle brake. On top is a NightForce NXS 12-42x56mm scope with double-dot reticle. The double-dot gives precise aiming and lower dot can be used as an aming point, when you need a few more MOA of elevation in the field.
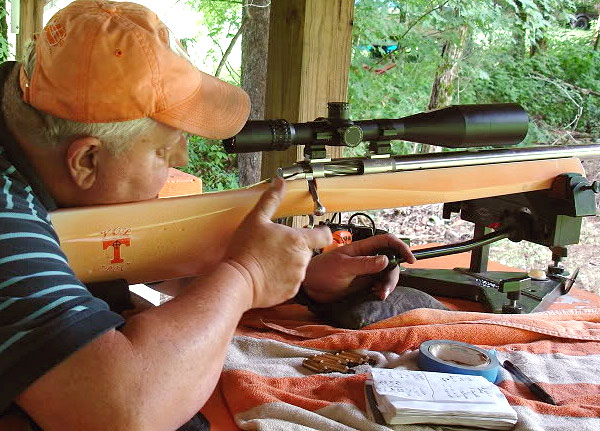
Comments: Big Orange Crush shoots 87gr V-Maxs into bugholes at 3,400 fps. VolDoc’s load with the 87s is very stout, more than 32 grains of Vihtavuori N-135 with Wolf SRM primers. Cases are full-length sized, with an 0.266″ bushing for the necks.

This 3400 fps load with the 87gr V-Maxs has accounted for hundreds of Prairie Dogs killed from 97 yards to 1,050 yards. The 87gr V-Max at this speed literally picks Prairie Dogs up and throws them 10 feet vertically and laterally. VolDoc reports: “The barrel now has more than 3,000 rounds down the tube and exhibits little throat fire-cracking and no loss of accuracy. I can’t explain why, it just hasn’t deteriorated yet. This rifle is my best-ever ‘go-to’ Prairie Dog rifle.”
Savage 20 BR Rifle Specifications
The action is a Savage Dual Port, with an aftermarket Sharp Shooter Supply (SSS) 4 oz. Evolution trigger. The stock is a modified Savage factory unit that has been pillar-bedded. The factory barrel was replaced with a 28″ Hart stainless, 1:9″ twist barrel fitted with a Rayhill muzzle brake. The gun is chambered in 20 BR with a 0.235″ no-turn neck. Kevin Rayhill did the smithing. To provide enough elevation to shoot at 1,000 yards plus, Ray fitted a +20 MOA Bench Source scope base. This +20 rail is very well-crafted, and made especially for the Savage Model 12.

Comments: VolDoc reports: “When I got the Savage back from Kevin Rayhill, it still had my 6 BR factory barrel on it, as I use it to compete in Factory-class regional matches. I put on the new 20 BR Hart barrel Kevin had chambered and quickly put in a full day of load development using the 55gr Bergers (0.381 G1 BC) and the 40gr V-Maxs. Both proved very easy to tune and I soon had my loads. My 55gr Berger load with runs about 3590 fps. Varget was very accurate with the 55s (see load dev. targets below).

The mild recoil of the 20 BR, along with a very good muzzle break (Rayhill’s design) enables me to spot every hit or miss myself. Kevin also re-contoured the underside of the Savage stock so it tracks straight back on recoil, also making seeing hits easier.”
| The 20 Caliber 1000-Yard Prairie Dog Quest |
 Making the 1032-Yard Shot with a 20 BR Making the 1032-Yard Shot with a 20 BR
by Dr. John S. (aka “VolDoc”)
This article covers my recent successful quest for a 20-caliber varmint kill past 1,000 yards. This may be a first — I couldn’t find anyone else with a confirmed 20-Cal Prairie Dog kill at 1000+. I started a thread on the Varmint section of the AccurateShooter.com Forum about building a 20 BR capable of 1,000-yard Minute of Prairie Dog accuracy and many said 20 Cal bullets just could not do it. Some came to my defense and said those that doubted had never studied the ballistics of the 20BR with the new Berger 55gr bullets now available. Well, folks, I can tell you, hitting a Prairie Dog at 1000 yards isn’t easy — but it IS possible. Here’s how it was done….
Gale-Force Winds and High Temps
After arriving at our Prairie Dog Ranch in Colorado, I soon realized my quest was going to be especially difficult because we had continual 40+ mph winds and 100° heat every day. We had a special place where Birdog and I had made many 1,000-yard+ kills in years past, so I knew the ideal location but needed a small window of opportunity either early morning or late afternoon. Based on past experience, I knew I needed about 21 MOA from my 100-yard zero to get to 1,000 yards. On the first day of the Safari, I shot the 20 BR in the 45 mph brutal winds and heat of 97°. But after about 20 shots, I connected on a dog and lifted him about three feet high. Well, that’s a start.

Winds Subside — Here’s Our Chance …
On the second day of our shoot, I had listened to the early weather forecast, so I knew that there was to be a brief period of light winds early in the morning. We were out on the Colorado prairie at daylight and the conditions were perfect. The sunrise was at my back and we had about a 10 mph tailwind. I looked through my Leica Geovid Rangefinder Binos and the Prairie Dogs were out for breakfast. I quickly ranged the targets and found a group at about 1,050 yards. The technique is to find the dogs, range them, click-up according to your ballistic chart and shoot.

My first shot was very, very close. I added about four clicks up and a couple of clicks left for windage and let another go. That shot threw dirt all over, but the dog didn’t even flinch. This is another good point to remember about long-range Prairie Dog hunting. To be successful, the dogs can’t be too skittish, because if they have been shot at even a few times, they will go down and stay down. So, you should have an agreement with those in your party as to where each member is going to be shooting and respect this boundary. Drive-by shooting style is OK if that’s your thing, it’s just not mine.
 Hitting the Mark — Dead Dog at 1032 Yards Hitting the Mark — Dead Dog at 1032 Yards
On the fourth shot, I saw the dog go belly up and kick its final throws. My quest for the 20-Caliber 1,000-yard Prairie Dog had become a reality. We confirmed the distance with our lasers at 1,032 yards. Our technique for retrieving a dead dog at that range is worth mentioning. When I killed that dog, I left it in the crosshairs of my Nightforce scope. My shooting buddy kept looking through the scope (of my gun) and guided me to the deceased dog using Motorola walkie-talkies. When I got to the dog I was jubilant. I marked it with my tripod and orange jacket, and we took some pictures. (See view through scope photo below). The 55gr Bergers require a center mass hit as they will not expand, especially at that range. I centered this dog in the head — his BAD LUCK, my GOOD.
After making the 1,032-yard kill, I shot many many other Prairie Dogs with the Savage 20 BR using the 40gr V-Maxs. The dog flights were spectacular — red mist and helicopters, counter-clockwise or clockwise on demand. I killed at least five at over 500 yards. I will not use the 55 Bergers on Prairie Dogs again since the quest is over. I will use the 40gr V-Maxs and 39gr Sierra BlitzKings for next trip’s 20 BR fodder.

CLICK HERE for More Info on Voldoc’s 20 BR Savage Varmint rifle »
November 10th, 2020
 Many visitors to the site ask us, “I’ve got a .223 and .308. What will a 6mmBR Norma (6BR) give me that I’m not getting already?” Well first you may well average somewhat smaller groups than your current .223 or .308 rifle (assuming the 6BR has a quality barrel and trigger). A good .308 Winchester can be superbly accurate, no question about that, but the lesser recoil of the 6BR works in the shooter’s favor over a long string of fire. Even with a Rem 700 or Savage action factory action, a 6BR with a benchrest stock, premium barrel, and a high-quality chambering job should deliver 5-shot groups in the high twos to mid-threes, provided you do your job. We have one 6BR rifle that shoots Lapua factory-loaded 6BR ammunition in the low twos and high ones. That’s exceptional, we admit, but it still shows how the 6BR is an inherently accurate cartridge, even with factory loads. Many visitors to the site ask us, “I’ve got a .223 and .308. What will a 6mmBR Norma (6BR) give me that I’m not getting already?” Well first you may well average somewhat smaller groups than your current .223 or .308 rifle (assuming the 6BR has a quality barrel and trigger). A good .308 Winchester can be superbly accurate, no question about that, but the lesser recoil of the 6BR works in the shooter’s favor over a long string of fire. Even with a Rem 700 or Savage action factory action, a 6BR with a benchrest stock, premium barrel, and a high-quality chambering job should deliver 5-shot groups in the high twos to mid-threes, provided you do your job. We have one 6BR rifle that shoots Lapua factory-loaded 6BR ammunition in the low twos and high ones. That’s exceptional, we admit, but it still shows how the 6BR is an inherently accurate cartridge, even with factory loads.
Compared to a .223, the 6BR offers a better selection of high-BC projectiles and small-maker match projectiles (such as Bart Sauter’s “Hammer” and the Vapor Trail line). The 6BR will also deliver considerably more power on the target. Compared to the .308 shooting 168gr MatchKings, a 6BR shooting 105-107gr bullets offers better ballistics all the way out to 1000 yards. (The story changes with .308s with very long barrels pushing the 180-210 grain projectiles). Plus, for most people, the 6BR is just easier to shoot than a .308. Recoil is less than half of the .308 Win cartridge. Both the .308 and 6BR chamberings offer good barrel life, but the 6BR uses 15-18 grains less powder, saving you money. Here’s how the 6BR stacks up vs. a number of popular calibers:

April 26th, 2020

This story first ran ten years ago. But to mark our long-standing friendships with shooter Joe Friedrich and chassis builder Gary Eliseo, we wanted to reprise the article for a new decade. Joe’s Eliseo-chassis 6BR rifle delivered some of the most stunning factory ammo accuracy we’ve ever seen, in any rifle, in any caliber.
 Amazing Accuracy from 6mmBR Tubegun Amazing Accuracy from 6mmBR Tubegun
What kind of accuracy do you think a tubegun can deliver with factory ammo — during barrel break-in? Perhaps 0.6″ at 100 yards, half-MOA if the conditions are perfect? Well you may want to change your preconceptions about tubeguns — and factory ammo. This Eliseo R5 repeater, smithed by John Pierce with a Pierce CM action and Broughton 5C barrel, shot the Lapua 90gr factory ammo into flat ONEs during the break-in session. A day later, in tricky 8-14 mph winds, the gun nailed a witnessed and software-measured 0.174″ 5-shot group using the 105gr factory ammo. That would be impressive for a “full-race” benchgun with precision handloads. For an across-the-course rifle shooting factory ammo, it’s pretty amazing.
Eliseo Tubegun Shoots in the Ones
This accurate rifle belongs to our friend (and designated expert trigger-puller) Joe Friedrich. During the initial break-in session, since his reloading dies had not yet arrived, Joe decided to start with some Lapua factory-loaded 6BR ammo he had on hand. After doing a few two-shot-and-clean cycles (with patches and nylon brush), Joe decided to try a 3-round group just to see if the Broughton barrel had some potential. To his astonishment, the Eliseo R5 put three rounds in 0.100″ (photo below left). Joe then cleaned the barrel again, shot a couple foulers and tried a 4-shot group. The results were just as stunning — 4 shots in a mere 0.104″ but three in virtually one hole (photo below right).

 
 |
Joe’s Halloween 6BR Tubegun SPECS
Chassis: Eliseo R5 Repeater, fitted with Eliseo Front Sled and Rear Bag-Rider.
Gunsmithing: Pierce Engineering Ltd..
Chambering: 6mmBR Norma, .272″ No-turn Neck, approx. 0.090″ freebore.
Action: Pierce Engineering, Rem 700 footprint, Chrome-Moly, fluted bolt.
Barrel: Broughton 5C (Canted Land), 27.5″, 1:8″ twist, Medium Palma contour.
Trigger: CG X-Treme Two-Stage.
Optics: March (Kelbly’s) 10-60x52mm.
Ammunition: Lapua 6mmbr 90gr Scenar BT (#4316045, non-moly), 105gr Scenar BT (#4316046, non-moly ). |
 You Can’t Believe How This Gun Shoots You Can’t Believe How This Gun Shoots
Joe called your Editor and said “You can’t believe how this gun shoots with factory ammo!”. So we arranged a photo session for the next afternoon, where I could verify the rifle’s accuracy. Well it turned out the conditions were way more challenging than when Joe broke in the barrel the day before. Winds were running 8-14 mph and were swinging through 180 degrees half-way down the range. Joe fired a few 90s through the Oehler chronograph at my request, then opened a box of Lapua 105gr factory ammo. It took about four rounds for the barrel to settle in after being cleaned the night before. Then Joe got serious, and with your Editor looking over his shoulder, he drilled a 0.174″ five-shot group in switching winds, doping every shot. Joe felt the gun could have shot tighter but he missed one wind call.
Serious Accuracy with a Multi-Purpose Rifle
So there you have it — a tubegun that shoots in the ones with factory ammo. Joe says that, at least with the 90s, the Elesio R5 shoots as well as his 6 PPC. Joe stressed that “steering the tubegun is hard work. You really have to concentrate compared to a purpose-built bench gun like my PPC. With the tubegun, everything has to be perfect on every shot — hand position, cheek position, stock position in the bag. If you’re off just a little bit, it’s easy to steer the gun the wrong way and send a shot out of the group.”
Accuracy Great But Fouling Heavy and ES Could Be Better
Have there been any negatives to Joe’s 6BR tubegun experiment so far? Well, the Broughton 5C barrel, while phenomenally accurate, shows signs of being a bad fouler. Copper built up pretty quickly over the first 25 rounds or so. We saw best accuracy with a recently-cleaned barrel. Hopefully the fouling will lessen as the barrel polishes in with use. And the canted land barrel is slower than average with the factory ammo. Lapua rates its 90gr naked-bullet ammo at 2950 fps with a 26″ tube. In Joe’s 27.5″ barrel we only averaged 2901 fps. With the 105gr factory ammo, which is rated at 2790 fps, we averaged just 2694 fps. That’s quite disappointing. Also the ES on the factory ammo, slightly over 50 fps for both bullet types, wasn’t particularly good. Still, the overall results were stunning. This gun shoots better than many long-range benchrest rifles running carefully-developed handloads — and it does that with factory ammo, right out of the box.

Joe Friedrich is a superb benchrest shooter, who has won many matches and set National Records in ARA rimfire benchrest competition. Here is Joe with “Sweet Pea”, his favorite .22 LR rimfire rig. With over 100,000 rounds through the Benchmark barrel, this well-worn rifle set an ARA 4-target Aggregate record! READ about Sweat Pea Record HERE.
February 12th, 2020

Every summer weekend, there are probably 400 or more club “fun matches” conducted around the country. One of the good things about these club shoots is that you don’t have to spend a fortune on equipment to have fun. But we’ve seen that many club shooters handicap themselves with a few common equipment oversights or lack of attention to detail while reloading. Here are SIX TIPS that can help you avoid these common mistakes, and build more accurate ammo for your club matches.
 1. Align Front Rest and Rear Bags. We see many shooters whose rear bag is angled left or right relative to the bore axis. This can happen when you rush your set-up. But even if you set the gun up carefully, the rear bag can twist due to recoil or the way your arm contacts the bag. After every shot, make sure your rear bag is aligned properly (this is especially important for bag squeezers who may actually pull the bag out of alignment as they squeeze). 1. Align Front Rest and Rear Bags. We see many shooters whose rear bag is angled left or right relative to the bore axis. This can happen when you rush your set-up. But even if you set the gun up carefully, the rear bag can twist due to recoil or the way your arm contacts the bag. After every shot, make sure your rear bag is aligned properly (this is especially important for bag squeezers who may actually pull the bag out of alignment as they squeeze).
Forum member ArtB adds: “To align my front rest and rear bag with the target, I use an old golf club shaft. I run it from my front rest stop through a line that crosses over my speed screw and into the slot between the two ears. I stand behind that set-up and make sure I see a straight line pointing at the target. I also tape a spot on the golf shaft that indicates how far the back end of the rear bag should be placed from the front rest stop. If you don’t have a golf shaft, use a wood dowel.
2. Avoid Contact Interference. We see three common kinds of contact or mechanical interference that can really hurt accuracy. First, if your stock has front and/or rear sling swivels make sure these do NOT contact the front or rear bags at any point of the gun’s travel. When a sling swivel digs into the front bag that can cause a shot to pop high or low. To avoid this, reposition the rifle so the swivels don’t contact the bags or simply remove the swivels before your match. Second, watch out for the rear of the stock grip area. Make sure this is not resting on the bag as you fire and that it can’t come back to contact the bag during recoil. That lip or edge at the bottom of the grip can cause problems when it contacts the rear bag. Third, watch out for the stud or arm on the front rest that limits forward stock travel. With some rests this is high enough that it can actually contact the barrel. We encountered one shooter recently who was complaining about “vertical flyers” during his match. It turns out his barrel was actually hitting the front stop! With most front rests you can either lower the stop or twist the arm to the left or right so it won’t contact the barrel.
 3. Weigh Your Charges — Every One. This may sound obvious, but many folks still rely on a powder measure. Yes we know that most short-range BR shooters throw their charges without weighing, but if you’re going to pre-load for a club match there is no reason NOT to weigh your charges. You may be surprised at how inconsistent your powder measure actually is. One of our testers was recently throwing H4198 charges from a Harrell’s measure for his 30BR. Each charge was then weighed twice with a Denver Instrument lab scale. Our tester found that thrown charges varied by up to 0.7 grains! And that’s with a premium measure. 3. Weigh Your Charges — Every One. This may sound obvious, but many folks still rely on a powder measure. Yes we know that most short-range BR shooters throw their charges without weighing, but if you’re going to pre-load for a club match there is no reason NOT to weigh your charges. You may be surprised at how inconsistent your powder measure actually is. One of our testers was recently throwing H4198 charges from a Harrell’s measure for his 30BR. Each charge was then weighed twice with a Denver Instrument lab scale. Our tester found that thrown charges varied by up to 0.7 grains! And that’s with a premium measure.
4. Measure Your Loaded Ammo — After Bullet Seating. Even if you’ve checked your brass and bullets prior to assembling your ammo, we recommend that you weigh your loaded rounds and measure them from base of case to bullet ogive using a comparator. If you find a round that is “way off” in weight or more than .005″ off your intended base to ogive length, set it aside and use that round for a fouler. (Note: if the weight is off by more than 6 or 7 grains you may want to disassemble the round and check your powder charge.) With premium, pre-sorted bullets, we’ve found that we can keep 95% of loaded rounds within a range of .002″, measuring from base (of case) to ogive. Now, with some lots of bullets, you just can’t keep things within .002″, but you should still measure each loaded match round to ensure you don’t have some cases that are way too short or way too long.
 5. Check Your Fasteners. Before a match you need to double-check your scope rings or iron sight mounts to ensure everything is tight. Likewise, you should check the tension on the screws/bolts that hold the action in place. Even on a low-recoiling rimfire rifle, action screws or scope rings can come loose during normal firing. 5. Check Your Fasteners. Before a match you need to double-check your scope rings or iron sight mounts to ensure everything is tight. Likewise, you should check the tension on the screws/bolts that hold the action in place. Even on a low-recoiling rimfire rifle, action screws or scope rings can come loose during normal firing.
6. Make a Checklist and Pack the Night Before. Ever drive 50 miles to a match then discover you have the wrong ammo or that you forgot your bolt? Well, mistakes like that happen to the best of us. You can avoid these oversights (and reduce stress at matches) by making a checklist of all the stuff you need. Organize your firearms, range kit, ammo box, and shooting accessories the night before the match. And, like a good Boy Scout, “be prepared”. Bring a jacket and hat if it might be cold. If you have windflags, bring them (even if you’re not sure the rules allow them). Bring spare batteries, and it’s wise to bring a spare rifle and ammo for it. If you have just one gun, a simple mechanical breakdown (such as a broken firing pin) can ruin your whole weekend.
|


