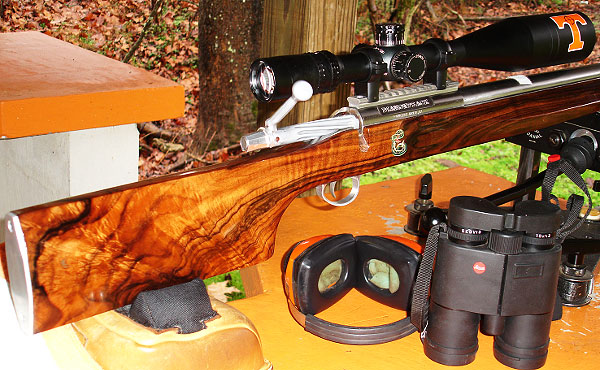
Shooting Prairie Dogs at extreme long range takes some highly specialized equipment. Forum Member VolDoc and his friends have taken long-range varminting to a whole new level. With his Savage-based, Hart-barreled 20 BR, VolDoc managed a verified 1,032-yard Prairie Dog kill, possibly the longest recorded with a .20-Caliber rifle. But that’s just part of VolDoc’s impressive precision varminting arsenal. Here we showcase three of VolDoc’s accurate rigs: his stunning English Walnut Diamondback 6BR/Dasher, his Nesika-actioned “Orange Crush” Dasher, and the 1K Prairie Dog-slaying 20 BR Savage.
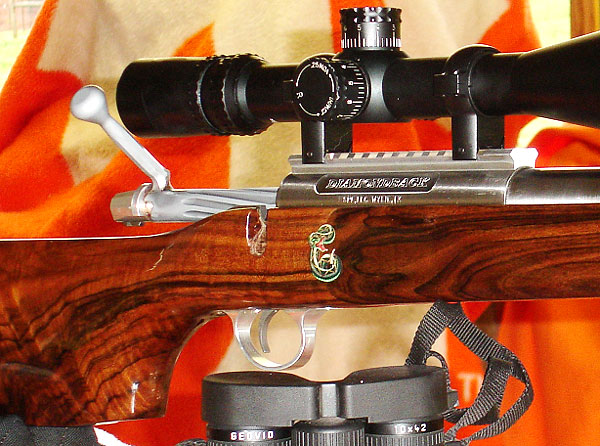
Diamondback Switch-Barrel Rifle Specifications
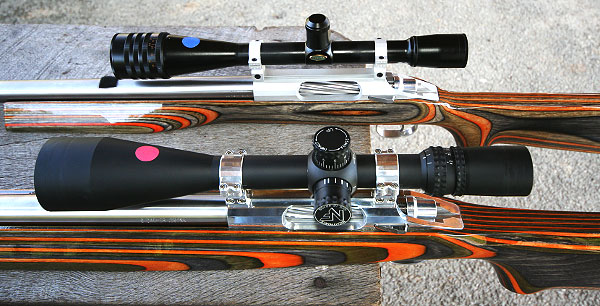
The action is a Stiller Diamondback, drop-port. The custom stock is similar to a Shehane ST-1000, but crafted from 40-year-old English Walnut. [Editor’s note: the wood on this gun is gorgeous!] There are three barrels for the gun with three different chamberings: 6BR Brux 1:8″-twist HV; 6BRX Krieger 1:8″-twist HV, and 6mm Dasher Krieger 1:8.5″ twist fluted straight contour (no taper). The scope is a Nightforce 12-42x56mm, with 2DD reticle.
Comments: This rifle is a good study in comparison of the three different chamberings. On the same rifle platform (same stock and action), each of these barrels had killed prairie dogs over 1,000 yards. So if someone asks which is best, a 6BR, or 6BRX, or 6 Dasher, VolDoc says they are all effective. The improved cartridges will deliver higher velocities, which can be an advantage. On the other hand it is simpler to load 6mmBR brass right out of the box, and it’s easy to find an accurate load for the 6mmBR (see photo).
Nesika 6mmBR/Dasher Rifle Specifications
VolDoc’s “Big Orange Crush” rifle has a stainless Nesika ‘J’ action, with 2 oz. Jewell trigger, in a painted fiberglass Shehane ST-1000 stock. Originally a 6BR, the gun is now chambered as a 6mm Dasher with a .271 no-turn neck. The barrel is a 1:12″-twist Krieger fited with Vais muzzle brake. On top is a NightForce NXS 12-42x56mm scope with double-dot reticle. The double-dot gives precise aiming and lower dot can be used as an aming point, when you need a few more MOA of elevation in the field.
Comments: Big Orange Crush shoots 87gr V-Maxs into bugholes at 3,400 fps. VolDoc’s load with the 87s is very stout, more than 32 grains of Vihtavuori N-135 with Wolf SRM primers. Cases are full-length sized, with an 0.266″ bushing for the necks.
This 3400 fps load with the 87gr V-Maxs has accounted for hundreds of Prairie Dogs killed from 97 yards to 1,050 yards. The 87gr V-Max at this speed literally picks Prairie Dogs up and throws them 10 feet vertically and laterally. VolDoc reports: “The barrel now has more than 3,000 rounds down the tube and exhibits little throat fire-cracking and no loss of accuracy. I can’t explain why, it just hasn’t deteriorated yet. This rifle is my best-ever ‘go-to’ Prairie Dog rifle.”
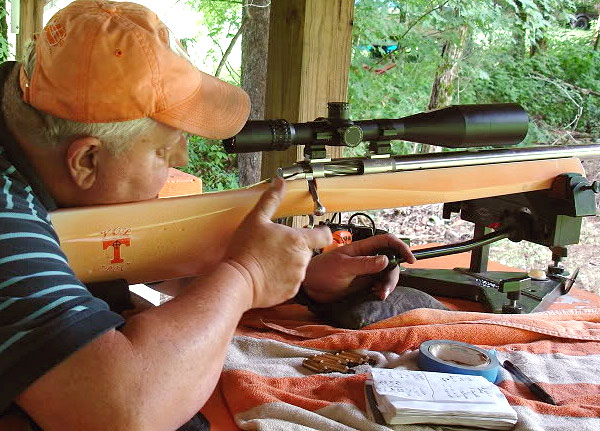
Savage 20 BR Rifle Specifications
The action is a Savage Dual Port, with an aftermarket Sharp Shooter Supply (SSS) 4 oz. Evolution trigger. The stock is a modified Savage factory unit that has been pillar-bedded. The factory barrel was replaced with a 28″ Hart stainless, 1:9″ twist barrel fitted with a Rayhill muzzle brake. The gun is chambered in 20 BR with a 0.235″ no-turn neck. Kevin Rayhill did the smithing. To provide enough elevation to shoot at 1,000 yards plus, Ray fitted a +20 MOA Bench Source scope base. This +20 rail is very well-crafted, and made especially for the Savage Model 12.
Comments: VolDoc reports: “When I got the Savage back from Kevin Rayhill, it still had my 6 BR factory barrel on it, as I use it to compete in Factory-class regional matches. I put on the new 20 BR Hart barrel Kevin had chambered and quickly put in a full day of load development using the 55gr Bergers (0.381 G1 BC) and the 40gr V-Maxs. Both proved very easy to tune and I soon had my loads. My 55gr Berger load with runs about 3590 fps. Varget was very accurate with the 55s (see load dev. targets below).
The mild recoil of the 20 BR, along with a very good muzzle break (Rayhill’s design) enables me to spot every hit or miss myself. Kevin also re-contoured the underside of the Savage stock so it tracks straight back on recoil, also making seeing hits easier.”
The 20 Caliber 1000-Yard Prairie Dog Quest
Making the 1032-Yard Shot with a 20 BR by Dr. John S. (aka “VolDoc”)
This article covers my recent successful quest for a 20-caliber varmint kill past 1,000 yards. This may be a first — I couldn’t find anyone else with a confirmed 20-Cal Prairie Dog kill at 1000+. I started a thread on the Varmint section of the AccurateShooter.com Forum about building a 20 BR capable of 1,000-yard Minute of Prairie Dog accuracy and many said 20 Cal bullets just could not do it. Some came to my defense and said those that doubted had never studied the ballistics of the 20BR with the new Berger 55gr bullets now available. Well, folks, I can tell you, hitting a Prairie Dog at 1000 yards isn’t easy — but it IS possible. Here’s how it was done….
Gale-Force Winds and High Temps
After arriving at our Prairie Dog Ranch in Colorado, I soon realized my quest was going to be especially difficult because we had continual 40+ mph winds and 100° heat every day. We had a special place where Birdog and I had made many 1,000-yard+ kills in years past, so I knew the ideal location but needed a small window of opportunity either early morning or late afternoon. Based on past experience, I knew I needed about 21 MOA from my 100-yard zero to get to 1,000 yards. On the first day of the Safari, I shot the 20 BR in the 45 mph brutal winds and heat of 97°. But after about 20 shots, I connected on a dog and lifted him about three feet high. Well, that’s a start.
Winds Subside — Here’s Our Chance …
On the second day of our shoot, I had listened to the early weather forecast, so I knew that there was to be a brief period of light winds early in the morning. We were out on the Colorado prairie at daylight and the conditions were perfect. The sunrise was at my back and we had about a 10 mph tailwind. I looked through my Leica Geovid Rangefinder Binos and the Prairie Dogs were out for breakfast. I quickly ranged the targets and found a group at about 1,050 yards. The technique is to find the dogs, range them, click-up according to your ballistic chart and shoot.
My first shot was very, very close. I added about four clicks up and a couple of clicks left for windage and let another go. That shot threw dirt all over, but the dog didn’t even flinch. This is another good point to remember about long-range Prairie Dog hunting. To be successful, the dogs can’t be too skittish, because if they have been shot at even a few times, they will go down and stay down. So, you should have an agreement with those in your party as to where each member is going to be shooting and respect this boundary. Drive-by shooting style is OK if that’s your thing, it’s just not mine.
Hitting the Mark — Dead Dog at 1032 Yards
On the fourth shot, I saw the dog go belly up and kick its final throws. My quest for the 20-Caliber 1,000-yard Prairie Dog had become a reality. We confirmed the distance with our lasers at 1,032 yards. Our technique for retrieving a dead dog at that range is worth mentioning. When I killed that dog, I left it in the crosshairs of my Nightforce scope. My shooting buddy kept looking through the scope (of my gun) and guided me to the deceased dog using Motorola walkie-talkies. When I got to the dog I was jubilant. I marked it with my tripod and orange jacket, and we took some pictures. (See view through scope photo below). The 55gr Bergers require a center mass hit as they will not expand, especially at that range. I centered this dog in the head — his BAD LUCK, my GOOD.
After making the 1,032-yard kill, I shot many many other Prairie Dogs with the Savage 20 BR using the 40gr V-Maxs. The dog flights were spectacular — red mist and helicopters, counter-clockwise or clockwise on demand. I killed at least five at over 500 yards. I will not use the 55 Bergers on Prairie Dogs again since the quest is over. I will use the 40gr V-Maxs and 39gr Sierra BlitzKings for next trip’s 20 BR fodder.
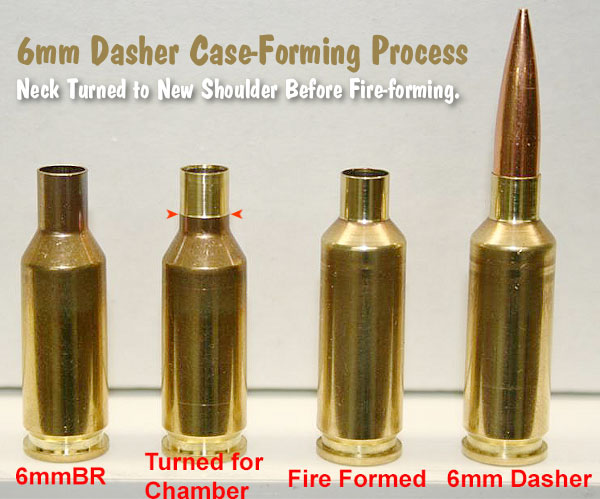
Can you form a wildcat cartridge such as the 6 Dasher without expending primer, powders, and bullets? Absolutely. Using the hydro-forming method you can form improved cases in your workshop with no firing whatsoever, so there is no wear on your precious barrel. Watch this video to see how it’s done:
6 Dasher Case Hydro-Forming Demonstration:
Forum member Wes J. (aka P1ZombieKiller) has produced a helpful video showing how to form Dasher cases use the Hornady Hydraulic forming die kit. This includes a two-part die (body and piston), and a special shell holder. To form the case, you insert a primer in your virgin brass, top the case off with with a fluid (water or alcohol), then run the case up into the Hydro-forming die. A few stout whacks with a hammer and your case is 95% formed.
This same procedure can be accomplished with a Whidden Gunworks 6mm Dasher hydraulic form die. We like the Whidden hydro-forming die for its production quality and consistent results. This Whidden system works great according to our Forum members.
Hydro-Forming Procedure Step-by-Step:
1. Insert spent primer in new 6mmBR brass case.
2. Fill with water or alcohol (Wes prefers alcohol).
3. Wipe excess fluid off case.
4. Place case in special Hornady shell-holder (no primer hole).
5. Run case up into Hydraulic forming die.
6. Smack top piston of forming die 3-4 times with rubber mallet or dead-blow hammer.
7. Inspect case, re-fill and repeat if necessary.
8. Drain alcohol (or water) into container.
9. Remove primer (and save for re-use).
10. Blow-dry formed case. Inspect and measure formed case.
Wes achieves very uniform cartridge OALs with this method. He measured ten (10) hydro-formed 6 Dasher cases and got these results: two @ 1.536″; 2 @ 1.537″; and 6 @ 1.538″.
Three or Four Whacks Produces a 95%-Formed Case
With a Whidden or Hornady hydro-forming die, hydraulic pressure does the job of blowing out the shoulders of your improved case. The process is relatively simple. Place a spent primer in the bottom of a new piece of brass. Fill the case with water, and then slip it into a special Hornady shell-holder with no hole in the middle. Then you run the case up into the forming die. Now comes the fun part. You gently insert a plunger (hydraulic ram) from the top, and give it three or four stiff whacks with a mallet (or better yet, a dead-blow hammer). Remove the plunger and you have a 95% formed case, ready to load.
Special Shell-Holder
Hornady supplies a shell holder made specifically for the hydro die; there’s no hole in the bottom of it. Just insert a spent primer into the primer pocket and you’re ready to go. The spent primer, combined with the solid shell holder, keeps the water from seeping out of the primer pocket. The primer pushes out a little bit during this process, but it’s impossible for it to come out because of the way the shell holder is designed. The shell holder has a grove which allows the case to slide out of the shell holder even when the primer protrudes a bit.
The 6mm Dasher wildcat cartridge is very popular among competitive benchrest shooters, varminters, and even PRS competitors. So this Sunday we thought we’d showcase a matched Duo of Dasher rifles belonging to a Forum member Chuck L. (aka “Ridgeway”). The 6mm Dasher began as a wildcat improved version of the 6mmBR Norma cartridge. The Dasher has been very successful in competition, and now factory Peterson 6mm Dasher brass is sold by Grafs.com. And Alpha Munitions also offers high-quality 6mm Dasher cartridge brass.
Chuck has a prize pair of 6mm Dashers for competitive benchrest and varmint matches in Pennsylvania. Both guns feature Kelbly Panda RBLP actions, Bartlein 8-twist barrels, and Shehane Laminated Tracker Stocks. However, the two rifles are not exact twins, as you can see. One, which we’ll call the Big Dasher, is built on a Shehane ST1000 Tracker stock. The other gun, the Small Dasher, sports Shehane’s “Baby Tracker” stock — a design used with great success by Richard Schatz. The Big Dasher, optimized for 1000-yard competition, has a slightly longer freebore — 0.136″ vs. 0.104″ for the Small Dasher.
Specifications for the Dasher Duo:
Small Dasher (13.5-pounder): Chambered for 6mm Dasher with approximately .104 freebore and a .264 NK. (No way of knowing exactly since its freebore was set in a separate operation by Kelbly.) Components are: Shehane Baby Tracker laminated stock, Kelbly Panda RPLB action, Bartlein 1:8″ LV barrel at 26 ¾”, Kelbly Rings, Weaver T36, Jewell trigger. The barrel was chambered by Kelblys and the stock was bedded, glued and balanced by a shooting buddy (Forum Member johara1). Chuck clear-coated the stock with auto urethane. Total weight is 13 lbs., 4 ounces.
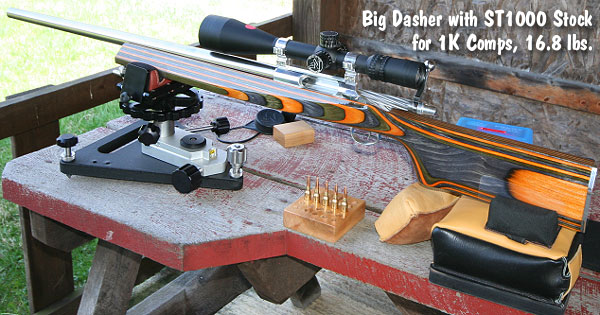
Big Dasher (1K Light Gun, 17-pounder): Chambered for 6mm Dasher with a .136 freebore and .264 neck (PTG Reamer). Components are: Shehane ST-1000 laminated stock, Kelbly Panda RPLB action, Bartlein 1:8″ HV 5R barrel at 28″, Shehane +20-MOA rings, Nightforce NXS 12-42x56mm, Jewell trigger. The barrel work, pillar installation, and bedding was done by Dave Bruno. The stock was clear-coated by Chuck with auto urethane. Chuck also made the rear butt plate and balanced the rifle. Total weight: 16 lbs., 13 ounces.
Chuck tells us: “I don’t get out shooting competition as much as I want due to time and family, but when I do compete, I shoot a Groundhog match at Southfork Rifle Club in Beaverdale, PA. Info on Southfork Club events can be found at Southforkrifleclub.com. The Southfork match is basically a 100-, 300- and 500-yard match with one sighter the entire match and 5 shots at each yardage for score. The Small Dasher, with the shorter ‘Baby Tracker’ stock, was set up for the Southfork Rifle Club’s ‘Light Unlimited’ class which has a 13.5-lb max weight.” (Editor: ‘unlimited’ is a misnomer for a weight-limited category.)
Chuck adds: “The Big Dasher with the heavy ST-1000 stock is set up for 1000-yard benchrest matches in Light Gun class. I shoot 1K matches with it at Reade Range in southwest Pennsylvania. One ironic thing is, it shoots the same load I’m shooting out of the lighter gun rather well. The only difference between the two chambers is the freebore is roughly thirty thousandths longer on the 1K gun (Large Dasher). I will also shoot this at Southfork in the ‘Heavy Unlimited’ class.”
Both Dashers Group in the Ones at 100 Yards
Chuck favors 107gr Sierra MK bullets in both Dashers. Other components are: Reloder 15 powder, Lapua cases, and CCI 450 primers. His main load for the Small Dasher is 33.0 grains of Reloder 15. This load shoots in the ones at 100 yards. For the Big Dasher Chuck reported: “I’m still working on a load, although the same 33.0 grain load shoots in the ones in the heavier gun as well. I’m still looking for more velocity and my ‘max’ node.”
Dasher Brass — Four Options
1. Buy Peterson 6mm Dasher Brass
In years past, you had to create your own Dasher brass, by fire-forming (with or without projectiles), or by hydro-forming. However, Peterson Cartridge now offers quality factory-made 6mm Dasher brass. This brass is available right now at Grafs.com.
If you do not want to waste time with fire-forming or hydro-forming, you can look for Peterson 6mm Dasher brass. This is excellent quality brass that has earned high praise from purchasers. The price — $62.99 for 50 cases at Graf’s (i.e. $1.26 per case) — is less than what you’d pay for Lapua 6mmBR brass, which is $149.99 for 100 cases or $1.50 per case. The advantage is that you save time, barrel life, and you won’t lose any cases to split necks. Peterson brass can be ordered from Grafs.com.
2. Buy Alpha Munitions 6mm Dasher Brass
Another great source for ready-to-run 6mm Dasher cartridge brass is Alpha Munitions. The made-in-USA Alpha 6mm Dasher brass is long-lasting and has been very popular with Benchrest and PRS/NRL competitors. Alpha 6mm Dasher brass costs $135.00 per hundred, or $1.35 per case. Unfortunately, as of 2/23/2025, this Alpha 6mm Dasher brass is out of stock, but it should be available later this spring.
One tip — as the capacity may vary slightly from Lapua 6mmBR brass fire-formed to 6mm Dasher, you should work up your load. Also, if you are chambering a new barrel you should get a chamber reamer that is optimized for the Alpha 6mm Dasher brass dimensions. User reviews of the Alpha 6mm Dasher brass have been highly positive: “Fantastic packaging and fantastic brass! It’s pricier than some other brands but there is a reason for that. It’s a quality product worth every penny.” — Chris Vaughn.
3. Fire-Form Dasher Brass with Bullets Hard in Lands
Chuck fireforms his Dasher brass for both rifles. Because he has a tighter-neck chamber, he neck-turns the brass first: “To fireform, I turn my cases down to fit the chamber and stop where the false shoulder makes snug contact with the chamber. Fire-forming rounds are loaded up with a 29-grain charge of H4895 or Varget and a 108gr Berger bullet seated hard into the lands about 0.020″ past initial contact with the rifling. It takes about three firings to make a nice clean Dasher case with a sharp shoulder.”
Chuck anneals his Dasher brass regularly to help maintain consistency: “I anneal about every 3-4 firings. I have many cases that have about 10+ firings on them and they are still shooting well. The primer pockets are a little looser, but still hold a primer.”
4. Have Darrell Jones Hydro-Form Your 6BR Brass to 6mm Dasher
DJ’s Brass can hydro-form a wide variety of cases for a modest fee
Fire-forming all your own 6mm Dasher brass takes time, costs money (in bullets and powder), and consumes precious barrel life. Well there IS a better solution — you can have your new brass hydro-formed by DJ’s Brass to your exact specifications for a $60.00 per hundred, which includes annealing.
DJ’s Brass Service now offers custom case hydro-forming to your exact specs. Darrell Jones offers this service for a variety of popular cartridges: 6 PPC, 30 PPC, 30 BR, 6 BRA (BR Ackley), 6mm Grinch, 6 BRDX, 6 BRX, .260 Ackley, .284 Shehane and of course the very popular 6mm Dasher. After hydro-forming your brass, Darrell can also neck-up or neck-down the cases to meet your needs. He can also turn the necks to your specs for an additional $0.60 per case.
Spring is coming soon, and that means it’s time to get ready for early varmint season. Here are eight great rifles from our Shooters’ Forum Favorite Varmint Rifles Thread. You’ll see a variety of action types and stock designs, both custom and factory. And we’ve featured a wide range of chamberings, from 17 Fireball up to a .243 Super Rock Chucker (aka 6mm-06). The common factor is serious accuracy. All these rigs are great shooters that have brought smiles to their owners while bringing doom to varmints.
1. Rem 700 in 20-222 — with Birthday Gift Barrel from Dad
This is proof that you don’t have to spend a fortune to have a great varmint rig. Forum member JDS Holler posted: “Here’s my baby, ‘Plain Jane’. I took a $500 birthday check that my Dad gave me, and ordered a great barrel from PacNor, chambered in 20-222. I got busted up in a fall, and had four months down time to accumulate the components to add to my old .222 Rem 700 donor action. I couldn’t be happier with the outcome. That old Bushnell has been replaced by a Vortex Viper, and this rifle just flat shoots.”
2. 6 BRA with Krieger Barrel from Alex Wheeler
Alex Wheeler of Wheeler Accuracy knows a thing or two about accurate rifles, having built many match-winning benchrest rifles. For varmint work he likes the 6 BRA (BR Ackley) wildcat cartridge: “My favorite varmint setup is this 6mm rifle with BAT SV action in a Nesika bay varmint stock with a 1:8″-twist Krieger HV contour barrel chambered for 6 BRA. I like the 6mmBR and variants (Dasher, BRX, 6BRA) with zero freebores.” He gets great results with 55-60 grain Sierras and Noslers with H322 powder: “I shot 55 Sierra Blitzking, 55 Nosler Ballistic Tip, and 60gr Sierra Varminter HP. H322 was the best powder. Jam ‘em 10 thou in the rifling — and of them — and man they were like magic.” Alex also feels the 6mm rifles are easier to tune than 22-caliber varmint rigs and the 6mm barrel throats last longer. He often puts an older 6mm match barrel on a varmint gun and it still holds quarter-MOA.
Alex recommends sticking with a 1:8″-twist even when shooting light 6mm bullets. The extra RPM makes the bullets MUCH more explosive on critters: “I’ve done one 1:13.5″-twist and I’ll never do that again. I’m not kidding, with the 8-twist it’s twice as energetic. It can lift those ground squirrels 20 feet in the air. With the 13.5-twist it’s not half that.”
About the Suppressor — The rifle is wearing a “can” in the photo. However, Alex tells us that he now avoids suppressors for most varmint work: “I didn’t like the suppressor — it put off so much heat that the mirage was terrible. With the heat mirage, after 5-10 shots you couldn’t see. I learned my lesson. I pulled that sucker off after the first time I shot it.”
3. 6mm Dasher in Convertible Laminated Stock
The 6mm Dasher has won many benchest matches, and it’s also an ultra-accurate varminting cartridge. This Dasher belong to Forum member MTLager who posted: “Here’s my baby — 6 Dasher with BAT SV action. First one built. Serial number PT1.” This impressive rig features a tack-driving, 1:8″-twist Brux Heavy Varmint contour barrel. This rig is “Smokin the 75gr V-Maxs” reports MTLager. The stock is very interesting. MTLager explains: “This is a Richard Franklin laminated blank made into a stock by J.T. Barber. It has a 3″-wide fore-end for varmint shooting. But I can change the front to 4″-width and a rear section can be removed.” The angled rear “toe” of the buttstock can be taken off, allowing a flat, straight bottom for benchrest competition.
4. Slick 17 Fireball with BAT Action and Stunning Stock
This rifle is almost too pretty to carry out into the varmint fields. Look at that wood! This handsome small-caliber varminter belongs to Forum member “20 TAC”. Chambered for the 17 Fireball wildcat (.221 Fireball necked down), this rig features a BAT Action, Jewell Trigger, and a custom exhibition-grade walnut stock sporting a true ebony fore-end cap. The checkering is exceptional. Owner 20 Tac report this rig “shoots 20 grain V-Max bullets with H4198 very well.” That’s a Nightforce scope on top.
5. 6mmBR in McMillan Stock with Krieger Barrel
This website stated 17 years ago as 6mmBR.com, so we had to include a classic 6mmBR Norma in today’s varmint rifle line-up. Forum member Powderbrake posted: “Here is my favorite varmint rifle — [a 6BR with] Stiller Predator V RBLP action, bedded in a McMillan stock.” This accurate varminter features a 1:8″-twist 6mm Krieger barrel and Jewell trigger. Up top is a Nightforce NXS 8-32x56mm scope. Below are the owner’s key gear items: Leica Laser-Rangefinding Binoculars, Smartphone with Applied Ballistics software, and Kestrel Weather Meter. Powderbrake told us he recently upgraded to a Model 5700 Kestrel with ballistics software and LiNK. (Editor: The $399.00 Kestrel 5700 has ballistics software, but if you want the full Applied Ballistics suite, order the $699.00 Kestrel 5700 Elite).
6. Efficient 20 Vartarg for Prairie Dog Adventures
The .20 Vartarg is based on the .221 Fireball case, necked down to .204 and slightly modified for extra capacity. This very efficient cartridge offers low recoil and great accuracy. It’s one of our first choices for ground squirrels and P-dogs out to 300 yards. 20 Vartarg here belongs to Forum Member DogBuster, an avid varminter based in Utah. He posted: “If I recall, I had a hot spot in this location — probably kilt 150+ prairie dogs that morning. The hay wagon helped too, offering added elevation.”
7. AR-10 Custom in .243 Winchester
Forum Member Urban Rifleman calls this .243 AR10-platform rifle the “Goblin Killer”. This Gen 2 DPMS rifle features a Craddock Precision Bartlein 1:8″-twist 5R barrel chambered in .243 Winchester with a Tubb assymmetrical muzzle brake. Up front is the unique Tubb Bipod which reduces hop. The buttstock is a Magpul PRS Gen 2. The scope is a Leupold VX-3i LRP 6.5-20x50mm FFP TMR. We’re told this rig “will easily shoot 1/2 MOA, sometimes much smaller”.
Urban Rifleman produces a variety of great gun accessories sold through TheUrbanRiflemanStore.com. That green grip is his Urban Rifleman/Tubb ergonomic grip.
8. Savage 20 BR Varmint Rifle with Hart Barrel
This rifle is owned by Forum member VolDoc. The action is a Savage Dual Port, with an aftermarket Sharp Shooter Supply (SSS) 4 oz. Evolution trigger. The stock is a modified Savage factory unit that has been pillar-bedded. The factory barrel was replaced with a 28″ Hart stainless, 1:9″ twist barrel fitted with a Rayhill muzzle brake. The gun is chambered in 20 BR with a 0.235″ no-turn neck. Kevin Rayhill did the smithing. To provide enough elevation to shoot at 1,000 yards plus, Ray fitted a +20 MOA Bench Source scope base. This +20 rail is very well-crafted, and made especially for the Savage Model 12. VolDoc reports: “The mild recoil of the 20 BR, along with a very good muzzle brake (Rayhill’s design) enables me to spot every hit or miss myself. Kevin also re-contoured the underside of the Savage stock so it tracks straight back on recoil, also making seeing hits easier. My 55gr Berger load with runs about 3590 fps. Varget was very accurate with the 55s.”
The 20 Caliber 1000-Yard Prairie Dog Quest
Making the 1032-Yard Shot with a 20 BR by Dr. John S. (aka “VolDoc”)
Here’s my account of a successful quest for a 20-caliber varmint kill past 1,000 yards. This may be a first — I couldn’t find anyone else with a confirmed 20-Cal Prairie Dog kill at 1000+. Well, folks, I can tell you, hitting a Prairie Dog at 1000 yards isn’t easy — but it IS possible. Here’s how it was done….
Gale-Force Winds and High Temps
At our Prairie Dog Ranch in Colorado, I soon realized my quest was going to be especially difficult because we had 40+ mph winds and 100° heat every day. We had a special place where Birdog and I had made many 1,000-yard+ kills in years past, so I knew the ideal location but needed a small window of opportunity either early morning or late afternoon. Based on past experience, I knew I needed about 21 MOA from my 100-yard zero to get to 1,000 yards. On the first day of the Safari, I shot the 20 BR in the 45 mph brutal winds and heat of 97°. But after about 20 shots, I connected on a dog and lifted him about three feet high. Well, that’s a start.
Winds Subside — Here’s Our Chance …
On the second day of our shoot, I had listened to the early weather forecast, so I knew that there was to be a brief period of light winds early in the morning. We were out on the Colorado prairie at daylight and the conditions were perfect. The sunrise was at my back and we had about a 10 mph tailwind. I looked through my Leica Geovid Rangefinder Binos and the Prairie Dogs were out for breakfast. I quickly ranged the targets and found a group at about 1,050 yards. The technique is to find the dogs, range them, click-up according to your ballistic chart and shoot.
My first shot was very, very close. I added about four clicks up and a couple of clicks left for windage and let another go. That shot threw dirt all over, but the dog didn’t even flinch. This is another good point to remember about long-range Prairie Dog hunting. To be successful, the dogs can’t be too skittish, because if they have been shot at even a few times, they will go down and stay down. So, you should have an agreement with those in your party as to where each member is going to be shooting and respect this boundary. Drive-by shooting style is OK if that’s your thing, it’s just not mine.
Hitting the Mark — Dead Dog at 1032 Yards
On the fourth shot, I saw the dog go belly up and kick its final throws. My quest for the 20-Caliber 1,000-yard Prairie Dog had become a reality. We confirmed the distance with our lasers at 1,032 yards. Our technique for retrieving a dead dog at that range is worth mentioning. When I killed that dog, I left it in the crosshairs of my Nightforce scope. My shooting buddy kept looking through the scope (of my gun) and guided me to the deceased dog using Motorola walkie-talkies.
When I got to the dog I was jubilant. I marked it with my tripod and orange jacket, and we took some pictures. The 55gr Bergers require a center mass hit as they will not expand, especially at that range. I centered this dog in the head — his BAD LUCK, my GOOD.
After making the 1,032-yard kill, I shot many many other Prairie Dogs with the Savage 20 BR using the 40gr V-Maxs. The dog flights were spectacular — red mist and helicopters, counter-clockwise or clockwise on demand. I killed at least five at over 500 yards. I will not use the 55 Bergers on Prairie Dogs again since the quest is over. I will use the 40gr V-Maxs and 39gr Sierra BlitzKings for next trip’s 20 BR fodder.
Parting Shot from Groundhog Country, SW Pennsylvania
This nice tripod with rifle mount (and Rem 40XB 22-250 on top) belongs to Forum Member Snert.
With the 6mm Dasher cartridge becoming popular with PRS/NRL competitors as well as the benchrest crowd, we thought it was time to re-visit a special rifle chambered for the 6mm Dasher wildcat. This gun has a great story behind it. Forum member Bob A. (aka “Killshot”) used his “Forum Classifieds Special” to beat all comers in the F-Class Division in the American-Canadian Match and the Long Range Regional Match in 2013 in Sacramento, CA.
Bob’s 6mm Dasher sports a blue-printed Rem 700 action. Who says you need a high-dollar custom action to run with the big dogs? In fact, this same gun, built with components sourced from AccurateShooter Forum Classified Ads, set a Sacramento F-Class range record of 200-17X a few years back. In this story, Bob talks about the build, and he explains his methods for loading ultra-accurate Dasher ammo.
Bob’s Budget-Build Dasher F-Classer
I wanted to build a proper rifle for F-Open but needed to keep it simple and, well, cheap. I found a solid “base” to build on in the form of a Dave Bruno-built, “pre-owned” 6-6.5×47 Lapua that I located in the AccurateShooter Forum classifieds in late 2011. The base action was a trued and blue-printed Remington 700 receiver circa 1971 with a spiral-fluted bolt. It was in a Shehane ST1000 stock painted sky blue and had a Jewell 1.5-oz BR trigger. I sent the bolt to Greg Tannel (Gretanrifles.com) to have the firing pin hole bushed and sleeved, the ejector removed and the hole filled and the face trued. I upgraded to Tannel’s Light Steel firing pin assembly while it was out.
Having the working bits completed, I needed a barrel. So I went to the AccurateShooter classifieds again and found a 1:8″-twist, 30″ x 1.25″ (diam.) Bartlein with a 0.236″-land bore. I called Dave Kiff and explained my pursuit and he recommended his PT&G “world record” 6 Dasher reamer (.2704″ no-turn neck and .104″ freebore). A month or so later the reamer and gauges arrived.
I had the barrel chambered by Marc Soulie of Spartan Precision Rifles (510-755-5293, Concord, CA). Marc is a great builder and I’m pleased to call him a friend.
The rifle got its good looks from a Pennsylvania artist named Kenny Prahl. His Prahl Designs shop (724-478-2538) added the white ghost-flames over the existing sky blue metallic paint.
Looks Great, Shoots Better
Fire-forming showed great promise — ten-shot groups of half an inch at 200 yards were typical. I lost only one case to a split neck and the “blow lengths” are good and consistent. This was followed up with load development which saw 100-yard, five-shot groups in the .1s and .2s as the rifle showed its preference for Reloder 15 over Varget powder, and for CCI 450s over all other primers. The bullet of choice was the ever-popular Berger 105gr Hybrid Target.
In February 2012 I began shooting the Dasher in monthly club matches at the Sacramento Valley Shooting Center, the home range of a number of excellent F-Class, Benchrest and High Power shooters. Using a Farley Coaxial rest up front (also picked up from a WTB ad on AccurateShooter’s Forum) and an Edgewood bag in the back, I gradually improved my gun-handling to the point where I could shoot a respectable score. This was very different from the bipod shooting I’d done in the past in F/TR.
Dasher Loading Tips
My chamber is set up for blue box Lapua 6mmBR brass. My case preparation is straight-forward. I fire-form with virgin cases right out of the box. I don’t size them but I will give the primer holes a good look and clean up the flash hole with a .058″ bit in a pin vise. To fire-form, I seat a Berger 108gr BT .030″ into the lands over a standard 6mmBR load of Varget.
For match loads, I use Alliant Reloder 15. While Varget is less sensitive to temp changes, RL15 has given me lower extreme spreads and better long range control. [Bob acknowledges that every barrel is unique, so a different powder, such as H4895 might work better for you.]
I clean my fired cases with stainless steel media in a Thumler’s rotary tumbler after every firing. I anneal after every other firing using a Bench-Source machine which is very well made and easy to operate. I use a Whidden full length bushing die with Redding bushings for sizing.
After sizing, I chamfer the inside of the neck with the K&M tool which has a pilot rod centered in the flash hole. Then I’ll give the neck and mouth a “once over” with some 0000 steel wool. I finish loading off with a Redding Competition Seating Die with the micrometer top.
I use a carbide ball on the expander rod of the full length sizing die. I use a .266″ TiN-coated bushing and the ball just kisses the inside walls of the sized neck. I get very consistent neck tension this way and have had no issue with split necks.
Seating Depth Considerations
With fire-formed brass, the junction of the bullet’s bearing surface and boat-tail is above the neck/shoulder junction of the case, so I have no issues with donuts. You can see how a loaded round looks in the photo at left. For occasional trimming, I use a very nice little Possum Hollow trimmer that indexes on the case shoulder.
This custom war wagon hauls varmint hunters around the Longmeadow Game Resort in Colorado.
We’re at the height of summer now — summer Solstice was on June 20, 2024. Will you be heading to the varmint fields this summer? Proper planning is key to a safe, satisfying, and productive varmint holiday. Of course you’ll be busy reloading, but you should make a check-list of all the gear and supplies you need. Bring a variety of rifles if possible — you’ll need to switch off as one barrel gets hot, and the chambering that works best for your close shots may not be ideal for those longer shots out past 400 yards.
Here are some tips from our Forum members that can help you shoot more effectively, and avoid problems on your varmint hunt. Here’s one key tip: at your shooting station, put a strip of surveyor’s tape on a tall stake to show the wind direction. Then shoot in the direction the wind blows. This will minimize the effect of cross-winds.
This photo is from a Dan Eigen TV Show video featuring a P-Dog hunt.
Varmint Safari Planning, Equipment, and Shooting Advice
From PatchHound: “The gear you bring will make or break a trip out to Prairie Dog land. A lot has to do with where you going and how far you are from [civilization]. For starters, bring lots of water. It will be hot in Wyoming in a few more weeks but it don’t hurt to bring warm clothes in case it snows. It’s best to wear leather boots unless you’re real good at dodging cactus while walking around. Good sunscreen [and a wide-brimmed hat] will save the day too. [What you need to bring] really depends on whether you’re shooting on some friendly ranch or 100 miles in the middle of [a wilderness area]. Good survival gear is a good thing to have for the latter!”
From Stoner25mkiv: “I’d suggest an adjustable bipod if you are going to do any walking. A laser rangefinder is a huge asset. Have a fanny pack or backpack for extra ammo, water, bore-snake, etc. when you go on your walkabouts. We also take a couple pivoting benches, heavy movers’ pad/blanket, sandbags (Uncle Bud’s Bulls Bag) for shooting from near the vehicle. Boonie hat for blocking the sun, sun glasses, sunscreen. High leather boots.
From CTShooter: “The .204 [Ruger] is a laser beam and good to 400 yards easy. Forget the rimfire! Do you have a portable bench that pivots? Bring bipod, binocs. Bring a LOT of water. I have a milspec sniper shooter’s mat/drag bag with shoulder straps. It is good to carry everything when you want to wander off and shoot prone with bipod. Here’s a view through my 6BR in ND.”
From RJinTexas: “In most of the locations that we’ll be shooting we’ll usually set up a minimum of 200 yards from the edge of a major dog town. We’ll start by working over the close-in dogs and shooting our way out, some of these towns may run in excess of 500/600 yards deep. [A .204 Ruger] will work well out to 300/400 yards unless the wind is blowing hard. We classify a 10-mph crosswind as a very calm day and what makes it a little more challenging is that it is usually also gusting.”
From Wes (P1ZombieKiller): “[For my first PD trip] there are so many things I was not ready for. The one thing that I did bring (that no one told me about) was a canopy. I’m glad I did. Even though the weather was [near perfect], I know that sun can humble you real fast. With my pop-up canopy, I could shoot all day without getting killed by the sun. You had to tie the canopy down real well or the wind would blow it across the pasture.
We sat on shooting benches that pivot 360°, and are fast and easy to set up. Most all shots were 175-250 yards. I just felt comfortable at that range. It was more fun for me to be able to film the hits, and the camcorder I was using just did not get good video past 350 yards. The digital zoom distorted the image too much. I knew I would only get this one chance to film my first P-dog outing, and I wanted to get it on film for [posterity].”
Bring Multiple Rifles on Your Varmint Adventures
On our P-Dog adventures, we like to have multiple rifles — a .17 HMR for close work, then maybe a .20 Practical AR for 150-250 yards, then a larger caliber such as 22 BR, 6BRA, 6 Dasher or 6-6.5×47 for those long shots. The classic .22-250 is also a wickedly effective varmint cartridge.
We like to have a Rimfire varmint rig for the closer shots, inside 150 yards. The .17 HMR or .17 WSM are good choices. With a rimfire you save on ammo costs and you don’t waste precious centerfire barrel life. This video shows a successful Prairie Dog hunt with a .17 HMR. Watch and you’ll see hits out to 160 yards (00:50), proving the effective range of the 17 HMR cartridge. The host is shooting a Savage A17 semi-auto 17 HMR rifle in a Boyds laminated stock.
.17 WSM Rimfire in Franklin Armory F17-L
What’s the ultimate rimfire varmint rifle? An AR chambered for the .17 WSM could be the answer. Eric Mayer of Varminter.com states: “The Franklin Armory F17-L in .17 Winchester Super Magnum (WSM) has a lot of firsts. It is the first semi-automatic rifle in .17 WSM now available to the general public. It is the first gas-piston system, AR-15 rimfire rifle built in partnership between Franklin Armory and Osprey Defense.”
Eric has used the .17 WSM AR shooting ground squirrels, rock squirrels, prairie dogs, and rabbits. Eric notes: “The report of the .17 WSM is nowhere near as loud as most of the centerfire [varmint] cartridges. I found that when I shot the FA-17, it did not cause the other ground squirrels… to run for cover. The lack of recoil … allowed me to see right where I hit [and] if I happened to miss, [low recoil] made for quick corrections for wind, or distance.” READ Full Report
The .17 WSM is a much larger, more powerful round than the .17 HMR. See the size difference above.
.20 Practical (20-223 Rem) AR-Platform Varminter
Here is a .20 Practical built by Robert Whitley. Whitley’s Ultimate Prairie Dog Rifle (PDR) features a 24″ Bartlein 1:11″-twist cut-rifled barrel, DPMS side-charging upper, and a Jewell trigger. It is chambered in 20 Practical, a cartridge popularized by Warren “Fireball” Brookman.
This .20 Practical cartridge is simply the .223 Remington necked down to .204. You can use your existing .223 Rem brass — no special case-forming required! The 20 Practical is accurate, flat-shooting, and has almost no recoil. The advantage over the standard .223 Remington is that, grain for grain, the bullets have a higher BC and travel at a higher velocity for more dramatic effect on a small varmint. The ultra-low recoil allows you to easily see your hits, even without a muzzle brake. The 20 Practical, launching 40-grainers at about 3750 fps, shoots flatter than a .223 Rem with 55gr hollowpoints.
.204 Ruger AR-15 (Suppressed) for Cottontail Rabbit Hunting
As a varmint hunting tool, the .204 Ruger in an AR-15 is a versatile, worthy cartridge/rifle combo for the job. This video covers a cottontail rabbit hunt. The host states that “We were contacted by a farmer who was being slammed with cottontail rabbits eating out huge portions of his alfalfa fields.” This suppressed .204 Ruger AR-15 proved seriously effective on the rabbits, driving high-velocity rounds with impressive accuracy. See more details on the Varminter.com website.
.22 BR Savage Varminter — Accuracy on a Budget
This .22 BR Savage, with upgrades from Sharpshooter Supply, is the “pride and joy” of Forum member Maynard. Note the heavy-contour custom barrel with brake. That .22 BR cartridge is a very effective choice for varmint work, as the ground hog in the photo proves. The .22 BR and .22 Dasher are capable of outstanding accuracy with a large variety of bullets and powders. A .22 Dasher can rival the ballistics of a 6mmBR out to 500+ yards, but with reduced recoil.
Avid varmint hunter Bill White (aka “CT10Ring” in our Forum) concurs about the effectiveness of the .22 BR Cartridge: “.22 BR — My .22 BR is my first choice for most prairie dog missions. Accuracy is superb with necked-down 6mmBR Lapua brass — quarter-MOA and blazing fast. With the right twist rate, this chambering can shoot anything from 40gr FB bullets to 80gr VLDs. Load development is easy. Below is my .22 BR ammo for another varmint trip. I use 55gr Sierra BlitzKings with Varget in my 1:12″-twist Shilen-barreled rifle. 60gr Bergers are very accurate with a fairly flat trajectory for useful distances.”
6mm Dasher for Voldoc’s 2024 Prairie Dog Safari
Respected Forum member Voldoc has a long thread about his 2024 Prairie Dog Safari, his 20th trip of this kind. He reported: “After the 1st day of shooting with 30+ MPH wind, we settled down on a High Point, and set up the Benches the second day for a ‘Shooting Gallery’ of non-stop shooting. PDogs were in play from 125 to 1,000 yards.” Voldoc’s rifle features these components: Nesika J RBRP action, 1:12″-twist Krieger barrel chambered by Mike Bryant for the 6 Dasher, 2 oz. Jewell trigger, Thunder Beast Suppressor, Nightforce ATACR 7-35X FFP optic. He usually shoots 87gr V-Max bullets in annealed Lapua brass pushed to 3240 FPS by Vihtavuori N135 powder. To spot critters, Voldoc uses Vortex Fury 5000 AB Rangefinding Binoculars.
More Power — 6-6.5×47 Lapua for Longer Range Varmint Shots
Soon after Lapua released the 6.5×47 cartridge, wildcatters recognized the potential of a necked-down 6mm version of the case. The 6-6.5×47 has emerged as a great, do-it-all cartridge that performs well in High Power competition, 600- and 1000-yard benchrest, and PRS tactical matches. But the 6-6.5×47 is not just for paper-punching. An efficient cartridge with great inherent accuracy, the 6-6.5×47 can be an excellent, flat-shooting, long-range varmint round. Here we feature Stan Stewart’s BAT-actioned 6-6.5×47 varminter. Fitted with a Krieger 1:10″ barrel, Stan’s rifle excels with a wide variety of varmint bullets. Whether driving 70-grainers at 3700 fps, or pushing the Berger 88gr High-BC FB bullet at 3400 fps, this 6-6.5×47 delivers half-MOA (or better) accuracy, in a well-balanced, easy-handling rifle. He has developed very accurate loads with Varget, Vihtavuori N550, and Reloder 15.
Six Tips for Novice Long Range Varmint Hunters
1. Take twice as much ammo you think you may need. The fields could be particularly rich, or, because of wind or other variables, you may have far more misses than expected.
2. When possible, set up with the wind at your back (or, alternatively, directly ahead). This will minimize the effect of cross-winds. Set up a stake with a ribbon to show wind direction.
3. Bring at least two rifles. Ideally one would be a low-recoil rifle with cheaper components for the closer shots. Then bring a rifle with higher-BC bullets for longer shots where wind is a bigger factor.
4. Check the weather before you head out. Prairie dogs like sunshine and calm conditions. If a cloudy, very blustery day is predicted, considering staying in town and cleaning the rifles.
5. Bring plenty of water on a trip. An adult male should be drinking at least 64 ounces of water (or other liquid) every day — more if it’s very hot or you are sweating a lot.
6. Preferably always hunt with a companion. If you do go out solo, have a Garmin inReach SatComm/GPS for emergencies if there is no cell coverage in your location.
How well can the little 6mm Dasher perform at 1000 yards when the conditions are good, and the shooter is riding a hot streak? Well here’s a shot-by-shot record of Scott Nix’s 4.554″ ten-shot group shot at the Deep Creek Range outside Missoula, Montana at the Northwest 1000-yard Championship a few years back. All 10 shots were centered for a 100-6X score. That’s about as good as it gets. If Scott had stopped after 5 shots, his group would have been under three inches.
Video Demonstrates Amazing 1000-Yard Accuracy
Watch the video. You can see the group form up, shot by shot. It’s pretty amazing. Scott’s first shot (at the 45-second mark of the video) was right in the X-Ring, and four of Scott’s first five shots were Xs. That’s drilling them! This video was recorded from the pits at the 1000-yard line, during record fire.
Deep Creek Range
The Deep Creek Range in Missoula, MT is one of the nicest places to shoot in the Intermountain West region. The range is located in the mountains within a few minutes drive of Missoula, and there is camping on-site. When conditions are good at Deep Creek, records get broken. To learn more about shooting at Deep Creek, contact Jamey Williams at jameydan[at]gmail.com.
Here is an aerial view of the Deep Creek Range (Drone video by David Gosnell):
You have to admire someone with serious do-it-yourself skills. Not just hammer and nail skills, but formidable design and fabrication skills. Well Forum Member Dave D. (aka “AKShooter”) has a DIY skill set that might put some trained machinists to shame. You see, “DIY Dave” crafted his own pedestal front rest from scratch, using his own design and about $100.00 in materials (not counting the Edgewood front bag). Dave estimates he put 20 hours of labor into the project, but the end result was worth it: “This Do-It-Yourself rest drives like a dream. I’ve played with the Caldwell and a Sinclair, they have nothing on this one.”
Dave tells us: “Here is my Do-It-Yourself front rest. I wanted to show other folks who are handy that a solid front rest is doable with a bit of time — and you don’t need to spend $1000.00. (You could say this is a design for shooters with more time than money.) This is for F-Class. I was originally overwhelmed by the equipment needed, so I decided to make my own rest. I didn’t have the money for a SEB or Farley Coaxial. This is what I’ll run this season (my second as an F-Class competitor).”
We asked Dave what equipment was used to make the rest. He explained: “My brother has a CNC cutter. But most water-jet outfits would do the work for $100 or less. All the plates are tapped and screwed. I found small machine screws on eBay.” Dave says there are other ways to build a front rest: “You could do the same with a welder and plate stock for base. It’s easier to do the top out of aluminum though, with all the tapping.”
Dave enjoys fabricating his own gear, but he admits the process can be time-consuming: “I’m a DIY guy. Sometimes I wrap up a project and wonder why the heck I just spent X amount of time on it.” Dave has other projects in the works: “Another option we are making for a friend is taking a cheap front rest and bolting to a 3/4″ thick, wide MDF base and adding additional adjustment screws. The hardware store is your friend!”
On the competition front, Dave is tuning up a 6mm Dasher: “My rifle last year was a .260 Rem Savage repeater. I was about middle of the pack in my group of shooters. Just went with unsorted Bergers and Lapua brass, and had a ton of fun. Now I’m in — hook, line, and sinker. I have an unfired 6 Dasher barreled action from the folks at Kelbly’s to break in. I’m cheap, so I ended up with a Do-It-Yourself stock for the Dasher.” Hopefully Dave will send us a photo of his DIY-stocked Dasher when the gun is dialed-in and “ready to rumble”.
Can you form a wildcat cartridge such as the 6 Dasher without expending primer, powders, and bullets? Absolutely. Using the hydro-forming method you can form improved cases in your workshop with no firing whatsoever, so there is no wear on your precious barrel. Watch this video to see how it’s done:
6 Dasher Case Hydro-Forming Demonstration:
Forum member Wes J. (aka P1ZombieKiller) has produced a helpful video showing how to form Dasher cases use the Hornady Hydraulic forming die kit. This includes a two-part die (body and piston), and a special shell holder. To form the case, you insert a primer in your virgin brass, top the case off with with a fluid (water or alcohol), then run the case up into the Hydro-forming die. A few stout whacks with a hammer and your case is 95% formed.
This same procedure can be accomplished with a Whidden Gunworks 6mm Dasher hydraulic form die. We like the Whidden hydro-forming die for its production quality and consistent results. This Whidden system works great according to our Forum members.
Hydro-Forming Procedure Step-by-Step:
1. Insert spent primer in new 6mmBR brass case.
2. Fill with water or alcohol (Wes prefers alcohol).
3. Wipe excess fluid off case.
4. Place case in special Hornady shell-holder (no primer hole).
5. Run case up into Hydraulic forming die.
6. Smack top piston of forming die 3-4 times with rubber mallet or dead-blow hammer.
7. Inspect case, re-fill and repeat if necessary.
8. Drain alcohol (or water) into container.
9. Remove primer (and save for re-use).
10. Blow-dry formed case. Inspect and measure formed case.
Wes achieves very uniform cartridge OALs with this method. He measured ten (10) hydro-formed 6 Dasher cases and got these results: two @ 1.536″; 2 @ 1.537″; and 6 @ 1.538″.
Three or Four Whacks Produces a 95%-Formed Case
With a Whidden or Hornady hydro-forming die, hydraulic pressure does the job of blowing out the shoulders of your improved case. The process is relatively simple. Place a spent primer in the bottom of a new piece of brass. Fill the case with water, and then slip it into a special Hornady shell-holder with no hole in the middle. Then you run the case up into the forming die. Now comes the fun part. You gently insert a plunger (hydraulic ram) from the top, and give it three or four stiff whacks with a mallet (or better yet, a dead-blow hammer). Remove the plunger and you have a 95% formed case, ready to load.
Special Shell-Holder
Hornady supplies a shell holder made specifically for the hydro die; there’s no hole in the bottom of it. Just insert a spent primer into the primer pocket and you’re ready to go. The spent primer, combined with the solid shell holder, keeps the water from seeping out of the primer pocket. The primer pushes out a little bit during this process, but it’s impossible for it to come out because of the way the shell holder is designed. The shell holder has a grove which allows the case to slide out of the shell holder even when the primer protrudes a bit.
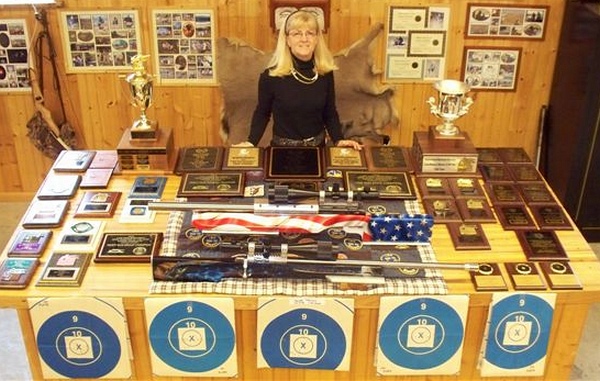
Bauer Power. Today’s Sunday Gunday story features Jim Bauer and Sally Bauer, a “power couple” in the International Benchrest Shooters (IBS) mid-range and long-range benchrest game. Jim and Sally both compete at 600 yards and 1000 yards, and both have been VERY successful. A decade ago, in 2012, Sally was the IBS 1000-yard Shooter of the Year. She had a great season, piloting her impressive Stars & Strips Heavy Gun (shown above). Sally now serves as the IBS Treasurer.
Jim Bauer has also been a top IBS performer shooting a similar, wide-forearm Maxi-Tracker Heavy Gun, with beautiful Eagle-on-black paint scheme. Jim Bauer won the IBS 2015 1000-Yard Nationals shooting a 6mm Dasher in both Light Gun and Heavy Gun classes. And Jim holds the IBS 1000-yard 20-Target Light Gun Aggregate Score Record. He set the record in 2021 with 47.15 Agg Score and 5.4171″ group average — that’s very close to half-MOA for 10-shot groups at 1000 yards!
Jim Bauer Wins 2015 1000-Yard Title with Duel Dashers
Jim Bauer won the IBS 2015 IBS 1000-Yard Nationals shooting a 6mm Dasher in both Light Gun and Heavy Gun Classes. Here’s his match-winning Heavy Gun. Smithed by Gordy Gritters, Bauer’s Heavy Gun featured a BAT action, Krieger barrel (in barrel block), Shehane HG stock, and Nightforce scope.
At the 2015 1000-Yard Nationals, Jim Bauer was both Two-Gun Champion and Overall winner. Bauer shot great in both Light Gun (LG) and Heavy Gun (HG) matches, posting Top 10 finishes in both classes. Bauer ran 6mm Dashers in both Divisions (LG and HG) with Vapor Trail bullets.
Sally Bauer Honored as 2012 IBS 1000-Yard Shooter of the Year
In 2012, Sally Bauer became the first (and only) lady to win the title of IBS 1000-yard Shooter of the Year. Sally earned that honor through hard work, dedication, and a burning desire to “be all she can be”. While helping her husband Jim rise to the top of the 1000-yard benchrest game, Sally was taking notes and working toward her turn at the top. Well friends, Sally took no prisoners in 2012 and earned Shooter of the Year honors. Sally’s handsome 67-lb Heavy Gun, “Stars & Stripes”, is painted with an American flag theme.
Sally Bauer and the IBS 1000-Yard Heavy Gun Record
A decade ago, in 2012 Sally Bauer set a then-pending International Benchrest Shooters (IBS) Score Heavy Gun (HG) record for 1000-yard competition. Her score was 100-5X with a 3.495″ tie-breaker group. Though that record has been surpassed (with a smaller tie-breaking group), Sally was the first lady ever to post a pending IBS 1000-yard benchrest record.
Sally’s Amazing 1K Group
At the end of the Heavy Gun match #10 Sally was directed by Range Officer Gordy Mitchell to leave all of her equipment and rifle setting on her bench. Sally was perplexed by Gordy Mitchell’s direction but he assured her “It is a good thing”. Rumors swirled and Dave Holland was summoned to the pits.
Dave and Gordy brought the target back to the scoring shed and had club officials and some respected competitors measure and sign the target. All agreed Sally had just shot an IBS record score. Sally’s rifle and equipment were measured and photographed and the target sent off to the IBS for final measurement and verification.
Sally’s Heavy Gun Specifications
Sally’s 67-lb Heavy Gun was originally purchased from Bill Shehane, and it uses Bill’s Maxi-Tracker stock. The gun was originally chambered for the 6-6.5×47 Lapua Improved. But the gun didn’t shoot like the Bauers wanted, so it was rechambered to 6mm Dasher by Gordy Gritters. The action is a 2″-diameter, round, chrome moly, 3-lug, 7 ½” BAT. The barrel is a 28″, 1:8″-twist Krieger, with 1.45″-diameter straight tube. The barreled action is secured in the stock with a 9″-long barrel block. The gun uses a 12-42x56mm Nightforce BR scope and a Jewel BR trigger. Gordy Gritters smithed the rifle. Jim Sauer states: “We have known Gordy for years now and trust every phase of our gun projects — all of them are mechanical works of art. When we get our guns from Gordy we know we can put our focus on brass prep and load development and don’t have to worry about the guns being right. That really helps save time.”
Editor’s NOTE: The following information was for the original 2012 load Sally ran in her IBS Heavy Gun. Load details and procedures may have changed now, a decade later.
Reloading Procedure for Sally’s “Stars & Stripes” Maxiby Jim Sauer
With every new rifle we start with new brass. The first step is to run them through a full length sizing die, then over an appropriate expander mandrel. Since we use a .270 neck on our 6 Dasher chambers, neck turning amounts to a 80% cleanup of the new Lapua brass necks. We do the normal primer pocket and flash-hole uniforming.
We fire-form two times to make sure we get nice sharp shoulder corners before competition. We then separate them according to weight using 1/10th of a grain differences for each box. Much of our loading process is geared around time savings. We look for easy-to-use, consistently good products and don’t vary from them unless we have a problem or results aren’t to our standards. We have chosen to shoot Clay Spencer’s 103gr 6mm bullets. We weight-sort and bearing-surface sort them and that’s it. I gave up trimming and tipping simply because it didn’t improve how Clay built them. We also use only one primer, the CCI 450.
We use one of four different powders. Our “go-to” powder is RL15, next we try Varget, then IMR 8208, and if that doesn’t work we try H4895. We have found that these bullets usually shoot best at 2970 fps. This is not an absolute, just what normally works best. We always try higher and lower velocities looking for that special load. Once we find the powder and quantity that works the best we play with the seating depth. Usually this is a fine-tune method and most of the time 15 thousandths into the rifling works the best. But don’t be afraid to jump the bullets as much as 0.100″. When we use this procedure we usually find a combination that will shoot nice, round ¾” groups at 400 yards.
Our reloading regimen starts with ultra-sonic cleaning our brass, then tumbling until shiny. We anneal the brass every time. We proceed to full-length resizing, repriming, and lubing the inside of the necks with graphite. We then charge with our selected powder and seat the bullets. We measure for concentricity, [shooting] the best ones for the record and the others for sighters. The load that Sally shot the record with is 33.0 grains of IMR 8208 XBR, CCI 450 primers, Spencer 103gr bullets, Lapua brass, bullet seated 15 thousandths into rifling, Velocity 2980 fps.
About Sally Bauer – In her “formative years” of competitive shooting, Sally listened to proper and basic instruction and learned at her pace. She developed her own style and discipline. Not wanting to be dependent on others Sally learned to set up her rests and carries Stars & Stripes to the bench by herself.
Jim Bauer reports: “Sally and I would like to thank the kind people we have met in this crazy frustrating game of shooting. For the most part fellow competitors have been helpful and giving of the time, experience and knowledge. Every range owner and operator we have come across has treated us like family and friend. I can think of no other sport where the participants give so freely.”
Bauer Power in Action at the 2017 IBS 600-Yard Nationals
Would you like to see this IBS “power couple” in action? Here are videos of Jim Bauer and Sally Bauer shooting at the 2017 IBS 600-yard Nationals in Memphis, Tennessee.
Jim Bauer sends 5 record rounds down range with his “Eagle” HG in Maxi-Tracker stock
Sally Bauer shoots sighter rounds with her Stars & Stripes HG in Maxi-Tracker stock
Transporting Big Heavy Guns in Style with Slide-out Carriers
The Bauers have created a very smart and clever system for transporting their rifles to matches. The Bauers have a great transport set-up, with custom, slide-out rifle carriers fitted to their van. You can see Jim’s and Sally’s Heavy Guns in the lower drawer.
And here is a close-up of the Light Gun in the Bauer’s second slide-out carrier (top in photo). The patriotic “We the People” message is welcome.


 Making the 1032-Yard Shot with a 20 BR

 Hitting the Mark — Dead Dog at 1032 Yards


 Hydro-Forming Procedure Step-by-Step:
 Special Shell-Holder
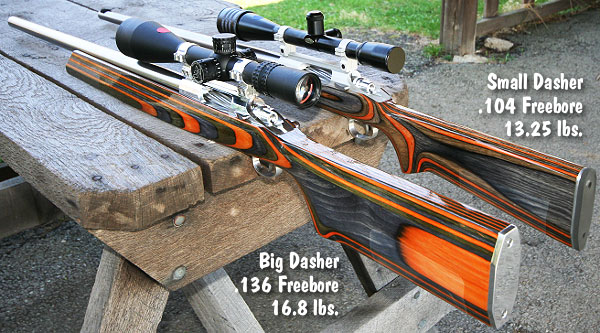


 Fire-forming all your own 6mm Dasher brass takes time, costs money (in bullets and powder), and consumes precious barrel life. Well there IS a better solution — you can have your new brass hydro-formed by DJ’s Brass to your exact specifications for a $60.00 per hundred, which includes annealing.


 Making the 1032-Yard Shot with a 20 BR
 Hitting the Mark — Dead Dog at 1032 Yards


 Dasher Loading Tips
 I use a carbide ball on the expander rod of the full length sizing die. I use a .266″ TiN-coated bushing and the ball just kisses the inside walls of the sized neck. I get very consistent neck tension this way and have had no issue with split necks.


 From Wes (P1ZombieKiller): “[For my first PD trip] there are so many things I was not ready for. The one thing that I did bring (that no one told me about) was a canopy. I’m glad I did. Even though the weather was [near perfect], I know that sun can humble you real fast. With my pop-up canopy, I could shoot all day without getting killed by the sun. You had to tie the canopy down real well or the wind would blow it across the pasture.
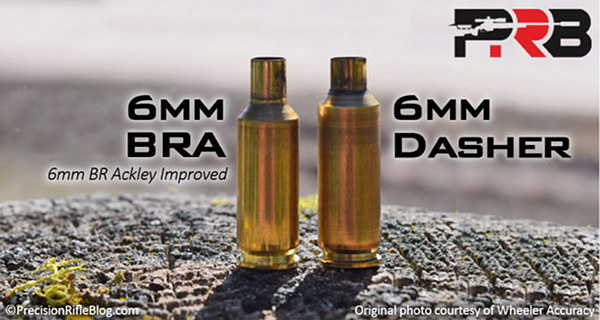


 Respected Forum member Voldoc has a long thread about his


 How well can the little 6mm Dasher perform at 1000 yards when the conditions are good, and the shooter is riding a hot streak? Well here’s a shot-by-shot record of Scott Nix’s 4.554″ ten-shot group shot at the Deep Creek Range outside Missoula, Montana at the Northwest 1000-yard Championship a few years back. All 10 shots were centered for a 100-6X score. That’s about as good as it gets. If Scott had stopped after 5 shots, his group would have been under three inches.
 You have to admire someone with serious do-it-yourself skills. Not just hammer and nail skills, but formidable design and fabrication skills. Well Forum Member Dave D. (aka “AKShooter”) has a DIY skill set that might put some trained machinists to shame. You see, “DIY Dave” crafted his own pedestal front rest from scratch, using his own design and about $100.00 in materials (not counting the Edgewood front bag). Dave estimates he put 20 hours of labor into the project, but the end result was worth it: “This Do-It-Yourself rest drives like a dream. I’ve played with the Caldwell and a Sinclair, they have nothing on this one.”


 Sally’s Amazing 1K Group


