Have you recently purchased a new scope? Then you should verify the actual click value of the turrets before you use the optic in competition (or on a long-range hunt). While a scope may have listed click values of 1/4-MOA, 1/8-MOA or 0.1 Mils, the reality may be slightly different. Many scopes have actual click values that are slightly higher or lower than the value claimed by the manufacturer. The small variance adds up when you click through a wide range of elevation.
In this video, Bryan Litz of Applied Ballistics shows how to verify your true click values using a “Tall Target Test”. The idea is to start at the bottom end of a vertical line, and then click up 30 MOA or so. Multiply the number of clicked MOA by 1.047 to get the claimed value in inches. For example, at 100 yards, 30 MOA is exactly 31.41 inches. Then measure the difference in your actual point of impact. If, for example, your point of impact is 33 inches, then you are getting more than the stated MOA with each click (assuming the target is positioned at exactly 100 yards).
How to Perform the Tall Target Test
The objective of the tall target test is to insure that your scope is giving you the proper amount of adjustment. For example, when you dial 30 MOA, are you really getting 30 MOA, or are you getting 28.5 or 31.2 MOA? The only way to be sure is to verify, don’t take it for granted! Knowing your scopes true click values insures that you can accurately apply a ballistic solution. In fact, many perceived inaccuracies of long range ballistics solutions are actually caused by the scopes not applying the intended adjustment. In order to verify your scope’s true movement and calculate a correction factor, follow the steps in the Tall Target Worksheet. This worksheet takes you thru the ‘calibration process’ including measuring true range to target and actual POI shift for a given scope adjustment. The goal is to calculate a correction factor that you can apply to a ballistic solution which accounts for the tracking error of your scope. For example, if you find your scope moves 7% more than it should, then you have to apply 7% less than the ballistic solution calls for to hit your target.
NOTE: When doing this test, don’t go for the maximum possible elevation. You don’t want to max out the elevation knob, running it to the top stop. Bryan Litz explains: “It’s good to avoid the extremes of adjustment when doing the tall target test.I don’t know how much different the clicks would be at the edges, but they’re not the same.”
Should You Perform a WIDE Target Test Too?
What about testing your windage clicks the same way, with a WIDE target test? Bryan Litz says that’s not really necessary: “The wide target test isn’t as important for a couple reasons. First, you typically don’t dial nearly as much wind as you do elevation. Second, your dialed windage is a guess to begin with; a moving average that’s different for every shot. Whereas you stand to gain a lot by nailing vertical down to the click, the same is not true of windage. If there’s a 5% error in your scope’s windage tracking, you’d never know it.”
Verifying Scope Level With Tall Target Test
Bryan says: “While setting up your Tall Target Test, you should also verify that your scope level is mounted and aligned properly. This is critical to insuring that you’ll have a long range horizontal zero when you dial on a bunch of elevation for long range shots. This is a requirement for all kinds of long range shooting. Without a properly-mounted scope level (verified on a Tall Target), you really can’t guarantee your horizontal zero at long range.”
NOTE: For ‘known-distance’ competition, this is the only mandatory part of the tall target test, since slight variations in elevation click-values are not that important once you’re centered “on target” at a known distance.
Christmas is just 5 days away. If you are looking for a great gift for a shooting buddy, books have always been popular holiday gifts. Here are some recommended titles that should please the serious shooters and firearms enthusiasts on your shopping list. For shooting clubs, books also make great end-of-season member awards. Most of us would rather have a useful book than one more piece of wood to toss in a box in the closet. Check out these ten titles — for yourself or your shooting buddies.
Here Are TEN Great BOOKS Recommended for Serious Shooters:
If you’re a serious long-range shooter, consider adding this book to your library. Relying on extensive ballistics testing, Modern Advancements, Volume II is a great successor to Volume I that contains some fascinating research results. UK gun writer Laurie Holland notes: “Volume II of the Modern Advancements series is as fascinating as Volume I and if anything even more valuable given a series of ‘mythbusters’ tests including: case fill-ratio, primer flash-hole uniforming, neck tension, annealing, and much more. The work also addresses that perennial discussion of a bullet ‘going to sleep’ and shooting smaller groups (in MOA) at longer distances than 100 yards.” The amount of testing done for this Volume II work, with a staggering amount of rounds sent downrange, makes this book unique among shooting resources. There is a ton of “hard science” in this book — not just opinions.
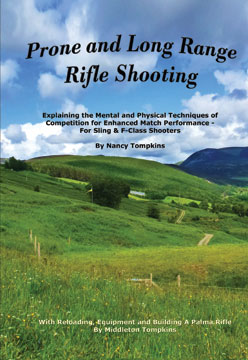
Nancy Tompkins is one of the greatest long-range shooters in American history. She has won five National Long-range Championships. Tompkins’ treatise is a must-read for serious Palma, F-Class, and High Power shooters. The revised Second edition includes F-Class equipment and techniques, and newly updated information. Color pictures. Topics include Mental & Physical training, Reading Wind & Mirage Shooting Fundamentals, International Competition, and Loading for Long Range. Nancy Tompkins is a 4-time winner of the National Long Range Championships, and has won countless other major events. Nancy has been on six Palma Teams (as both a shooter and a coach).
The lastest edition of The Wind Book was released in 2020. The updates make this very helpful 144-page book even better. The Wind Book for Rifle Shooters by Linda Miller and Keith Cunningham, first published in 2007, is a very informative resource. But you don’t have to take our word for it. If you click this link, you can read book excerpts on Amazon.com. This lets you preview the first few chapters, and see some illustrations. Other books cover wind reading in a broader discussion of ballistics or long-range shooting. But the Miller & Cunningham book is ALL about wind reading from cover to cover, and that is its strength. The book focuses on real world skills that can help you accurately gauge wind angle, wind velocity, and wind cycles. Readers have praised the book, earning it 93% 4- and 5-star reviews on Amazon.
Ryan Cleckner is noted for his ability to explain complex topics in an easy-to-comprehend manner. Now Cleckner has authored a book, the Long Range Shooting Handbook, which expands on the topics covered in Cleckner’s popular NSSF video series. The Long Range Shooting Handbook is divided into three main categories: What It Is/How It Works, Fundamentals, and How to Use It. “What It Is/How It Works” covers equipment, terminology, and basic principles. “Fundamentals” covers the theory of long range shooting. “How to Use It” gives practical advice on implementing what you’ve learned, so you can progress as a skilled, long range shooter. You can view Sample Chapters from Ryan’s Book on Amazon.com.
Visualization is a process of mental preparation that is done before you get to the range. Many of the greatest shooting champions have used this technique to get ready for big matches, and to optimize their performance during record fire. If you want to enhance your “mental game” through pre-match visualization, we strongly recommend Lanny Bassham’s book, With Winning in Mind. As a competitive smallbore 3P shooter, Bassham developed a mental management system. Using this system, Lanny Bassham won 22 world individual and team titles, set four world records, and captured an Olympic Gold Medal in Montreal in 1976. His techniques have been embraced by professional and Olympic athletes in many sports. With Winning in Mind covers a complete system of “mental management” techniques used by Olympians and elite champions.
Thinking of getting started in the Practical/Tactical shooting game? Looking for ways to be more stable when shooting from unconventional positions? Then you may want to read Marcus Blanchard’s Practical Shooter’s Guide (A How-To Approach for Unconventional Firing Positions and Training). Unlike almost every “how to shoot” book on the market, Blanchard’s work focuses on the shooting skills and positions you need to succeed in PRS matches and similar tactical competitions. Blanchard provides clear advice on shooting from barricades, from roof-tops, from steep angles. Blanchard says you need to train for these types of challenges: “I believe the largest factor in the improvement of the average shooter isn’t necessarily the gear; it’s the way the shooter approaches obstacles and how they properly train for them.”
The Rifle Shooter by G. David Tubb, $34.95 (Softcover) — $10.00 on Sale
This book by 11-time National High Power Champion David Tubb focuses on position shooting and High Power disciplines. Section One covers fundamentals: position points, natural point of aim, breathing, triggering mechanics and follow-through, sling selection and use, getting started, getting better, avoiding obstacles. Section Two covers mechanics of offhand, sitting, and prone positions. Section Three covers shooting skills, including wind reading and mental preparation. Section Four covers the technical side of shooting, with extensive discussions of rifle design, load development, reloading barrel maintenance, and rifle fitting. We consider this book a “must-read” for any sling shooter, and there is plenty of good advice for F-Class shooters too.
Another fine book for PRS/NRL shooting is Precision Rifle Marksmanship: The Fundamentals by Frank Galli, founder of SnipersHide.com. Former USMC scout-sniper Frank Galli explains techniques will benefit any PRS/NRL competitor. Along with position shooting tips, Galli offers great wind-reading advice. Published in 2020, Galli’s treatise is four years newer than Blanchard’s book, so it includes more of the latest gear and equipment. Galli’s book covers the fundamentals of precision marksmanship with easy-to-understand methodology. The book follows the same instruction process Galli uses in his live marksmanship classes. Published in 2020, this well-illustrated, 272-page book covers the latest equipment (scopes, LRFs, chassis systems, magazines, bags, bipods, tripods) favored by tactical competitors in PRS/NRL type matches.
Tony Boyer, the most successful shooter in the history of short-range benchrest competition, shares match-winning tips in this 323-page book. The book covers all aspect of the benchrest discipline: loading, windflags, rest set-up, addressing the rifle, and match strategies. This is a high-quality publication, filled with valuable insights. Every serious benchrest shooter should read Tony’s book. Boyer has dominated registered benchrest in a fashion that will never be duplicated, having amassed 142 U.S. Benchrest Hall of Fame points. The next closest shooter, Allie Euber, has 47 Hall of Fame points. This handsome, full-color book is 323 pages long, with color photos or color illustrations on nearly every page.
Cartridges of the World (17th Edition, 2022), belongs in every serious gun guy’s library. This massive 704-page reference contains illustrations and basic load data for over 1500 cartridges. If you load for a wide variety of cartridges, or are a cartridge collector, this book is a “must-have” resource. The latest edition includes dozens of new cartridges and boasts 1500+ photos. The 17th Edition of Cartridges of the World includes cartridge specs, plus tech articles on Cartridge identification, SAAMI guidelines, wildcatting, and new cartridge design trends. In scope and level of detail, Cartridges of the World is the most complete cartridge reference guide in print. Cartridges of the World now includes a full-color section with feature articles.
Every serious shooter needs to know the muzzle velocity (MV) for his load, so he can run ballistics solvers. And very consistent MV with low Extreme Spread (ES) and Standard Deviation SD is vital for consistent long-range shooting. You need good components and reloading techniques for low ES/SD. You want a good, reliable, and consistent chronograph to record your muzzle velocity — there are many good types now, including the compact Garmin Xero C1 and the handy Magnetospeed units which attach to your rifle.
Today we feature a new 55-minute video from Bryan Litz of Applied Ballistics. In this video Bryan explains how to measure muzzle velocity with various chronograph types and then explains some methods for optimizing your ES/SD. Bryan explains: “Muzzle velocity is an important variable for long range shooters. This video covers some key concepts for beginners and also goes into some advanced topics that are not normally encountered to keep it interesting for experienced shooters as well.”
This video from the manufacturer explains how to use the excellent Garmin Xero C1 radar chronograph. This popular new unit has proven to be user-friendly and very reliable. The ultra-compact size makes it easy to transport and deploy at the range.
Get a Good Ballistics App — Consider the NEW AB Quantum App
Once you have recorded your muzzle velocity successfully you can use the MV data with your known bullet BC and range altitude to plot the trajectory of bullet flight. This will tell you the correct scope elevation setting for the distance of your target. We recommend getting a good Ballistics App for your mobile device so you can run ballistics at the range.
Definitely check out the impressive new AB Quantum App from Applied Ballistics. Consumers can now download the AB Quantum App for either iOS (Apple) or Android devices. There is a free basic version, as well as an Elite subscription, which unlocks many more features for just $2.99/month or $19.99/year (see chart below). For more information visit AppliedBallisticsllc.com/ab-quantum.
Applied Ballistics has released powerful new ballistics software, the Applied Ballistics Quantum™ App. This state-of-the-art mobile App provides a complete ballistics solver plus profile management tool for long-range shooting. Featuring an all-new user interface, AB Quantum™ includes a host of new tools and features for competitive shooters and hunters.
“Ballistics can be complicated, and it is our job to simplify what’s important so that shooters can hit targets”, said Applied Ballistics Founder/Chief Ballistician Bryan Litz. “The AB Quantum platform meets this goal and more. By integrating the ballistic solver with other support tools, shooters will have a complete management system to … put rounds on target faster and easier than ever before.”
Applied Ballistics Chief Technology Officer Nick Vitalbo said that the goal was “to create the most intuitive, feature-rich ballistics application on the market, seamlessly integrating with the entire Applied Ballistics ecosystem of products. AB Quantum™ will be our flagship platform, driving the future of AB-integrated devices [and transforming] the way [customers] use their existing AB-enabled products.”
Quantum™ Ballistics App — New Features Overview
AB Quantum™ creates a new paradigm for ballistic solvers and integration with Bluetooth®-enabled devices. With a host of new features, the platform is designed to save time and add performance for users of all skill levels. The all-new user interface is designed with single-handed use in mind, putting all major features just a swipe or tap away from any screen, which allows users to rapidly obtain solutions in the field or at a match. The simplicity and versatility of the app interface creates an intuitive experience for both new and experienced users.
Two new features — AB Quantum Connect™ and AB Quantum Sync™ — enable users to quickly connect to other AB-enabled devices and sync gun profiles between them in seconds, as well as back those profiles up to an encrypted server for peace of mind and easy restoration. The new platform automatically saves changes made to rifle profiles and updates connected devices. AB Quantum™ also includes customizable Range and Multi-Target tables. After creating a range or target card, it can easily be shared via email.
AB Quantum™ platform has impressive, innovative features:
● AB Quantum™ User Interface — Take control of ballistic data and find solutions with ease using the new layout designed with one-handed operation in mind.
● New Bluetooth® Device Manager — Find and connect AB Bluetooth® devices quickly and send data
between devices using AB Quantum Connect™.
● AB Quantum Sync™ — User gun profiles are automatically uploaded to an encrypted server to allow easy access for other devices and backup, providing peace of mind and security.
● Customizable Range Card and Target Card Modes — The new expandable and customizable range and
target card modes allow users to select what data to see for each Range or Target. Use the share function to send range and data cards in just seconds.
● New Reticle Library — The AB Reticle library is hosted online and updates in AB Quantum™ automatically, providing users with up-to-date solution drawing for their favorite rifle scopes.
● Improved Truing Interface — Easy to access ballistic truing features without leaving solution screens.
● Chronograph Integration — Connect Bluetooth®-enabled chronographs – such as the Optex Systems
SpeedTracker™ – directly to the App and save the velocity data to rifle profiles.
The acclaimed Applied Ballistics Bullet Library is a good example of simplification for shooters: it includes thousands of projectile models that have been built using Doppler Radar to create a Custom Drag Model (CDM) for each bullet. This library is a core feature of the AB Quantum™ App, giving users the fastest way to create accurate and precise solutions for any environment.
Consumers can now download the AB Quantum App from iOS or Android app stores. There is a free basic version, as well as an Elite subscription, which unlocks many more features for just $2.99/month or $19.99/year (see chart below). For more information visit AppliedBallisticsllc.com/ab-quantum/.
About Applied Ballistics
Applied Ballistics provides ballistics data and software solutions for shooters, hunters and industry partners. Offering books, online training, and advanced ballistics software, Applied Ballistics is dedicated to delivering accurate, unbiased ballistics information and solutions.
In discussions of ballistics, you’ll see references to “tangent”, “secant”, and “hybrid” bullet shapes. We know that, for many readers, these terms can be confusing. To add to the confusion, bullet makers don’t always identify their projectiles as secant or tangent designs. This article provides a basic explanation of tangent, secant, and hybrid ogive bullet designs, to help you understand the characteristics of these three basic bullet shapes.
Tangent vs. Secant vs. Hybrid
Most match bullets produced today use a tangent ogive profile, but the modern VLD-style bullets employ a secant profile. To further complicate matters, the latest generation of “Hybrid” projectiles from Berger Bullets feature a blended secant + tangent profile to combine the best qualities of both nose shapes. The secant section provides reduced drag, while the tangent section makes the bullet easier to tune, i.e. less sensitive to bullet seating depth position.
Berger Bullets ballistician Bryan Litz explains tangent and secant bullet ogive designs in a glossary section of his Applied Ballistics website, which we reprint below. Bryan then explains how tangent and secant profiles can be combined in a “hybrid” design.
How Bullet Ogive Curves are Defined
While the term “ogive” is often used to describe the particular point on the bullet where the curve reaches full bullet diameter, in fact the “ogive” properly refers to the entire curve of the bullet from the tip to the full-diameter straight section — the shank.
Understanding then, that the ogive is a curve, how is that curve described?
LITZ: The ogive of a bullet is usually characterized by the length of its radius. This radius is often given in calibers instead of inches. For example, an 8 ogive 6mm bullet has an ogive that is a segment of a circular arc with a radius of 8*.243 = 1.952”. A .30-caliber bullet with an 8 ogive will be proportionally the same as the 8 ogive 6mm bullet, but the actual radius will be 2.464” for the .30 caliber bullet.
For a given nose length, if an ogive is perfectly tangent, it will have a very specific radius. Any radius longer than that will cause the ogive to be secant. Secant ogives can range from very mild (short radius) to very aggressive (long radius). The drag of a secant ogive is minimized when its radius is twice as long as a tangent ogive radius. In other words, if a tangent ogive has an 8 caliber radius, then the longest practical secant ogive radius is 16 calibers long for a given nose length.”
Bryan Litz Explains Hybrid Design and Optimal Hybrid Seating Depths
Ogive Metrics and Rt/R Ratio
LITZ: There is a number that’s used to quantify how secant an ogive is. The metric is known as the Rt/R ratio and it’s the ratio of the tangent ogive radius to the actual ogive radius for a given bullet. In the above example, the 16 caliber ogive would have an Rt/R ratio of 0.5. The number 0.5 is therefore the lowest practical value for the Rt/R ratio, and represents the minimum drag ogive for a given length. An ogive that’s perfectly tangent will have an Rt/R ratio of 1.0. Most ogives are in between an Rt/R of 1.0 and 0.5. The dimensioned drawings at the end of my Applied Ballistics book provide the bullets ogive radius in calibers, as well as the Rt/R ratio. In short, the Rt/R ratio is simply a measure of how secant an ogive is. 1.0 is not secant at all, 0.5 is as secant as it gets.
Hybrid Bullet Design — Best of Both Worlds?
Bryan Litz has developed a number of modern “Hybrid” design bullets for Berger. The objective of Bryan’s design work has been to achieve a very low drag design that is also “not finicky”. Normal (non-hybrid) secant designs, such as the Berger 105gr VLD, deliver very impressive BC values, but the bullets can be sensitive to seating depth. Montana’s Tom Mousel has set world records with the Berger 105gr VLD in his 6mm Dasher, but he tells us “seating depth is critical to the best accuracy”. Tom says a mere .003″ seating depth change “makes a difference”. In an effort to produce more forgiving high-BC bullets, Bryan Litz developed the hybrid tangent/secant bullet shape.
This article comes from the Bryan Litz Ballistics Facebook page. That page offers valuable tips on ballistics, marksmanship, and precision reloading, with updates nearly every day of the year. One recent post relates to velocity changes that can occur when traveling away from home.
Q: Is there a physical reason, other than temperature, why sometimes we see a difference in muzzle velocity when we travel to a different location?
Bryan Litz notes: “One reason we found for this is powder humidity. We put out a video on our YouTube channel called “Powder Humidity / Temperature and Storage”. Watch the video below to learn more specifics about the effects of humidity and temperature changes on your loaded ammunition.
Basically, if you develop a load at home, then travel to a dramatically different environment (drier or wetter), and your ammo isn’t hermetically sealed, it can affect the powder burn rate. This can cause muzzle velocity to change.
Humidity Field Tests with 6.5 Creedmoor and H4350
To learn more about the effects of humidity on velocity and ammo performance, we recommend another article found on the ChronoPlotter.com website. This article begins by reviewing research done by Applied Ballistics, Norma, and Vihtavuori.
Then author Michael Coppola covers his extensive experiments with Hodgdon H4350 powder stored with different relative humidity (RH) levels then loaded in 6.5 Creedmoor rounds. The results were quite dramatic: “At its lowest humidity (14.5% RH), our 41.50 gr H4350 charge clocked in at an average 2,879 fps, peaking at 2,901 fps. Its highest humidity (83.5% RH) saw an average of 2,650 fps with a lowest velocity of 2,635 fps. The entire experiment saw an Extreme Spread of 266 fps. Between the desiccated and 66.5% samples, a 10% change in RH resulted in a velocity change of about 25.6 fps. Above 66.5%, this effect nearly doubled and a 10% change in RH resulted in a change of about 57 fps.
Many barrel-makers mark the twist rate and bore dimensions on their barrel blanks.
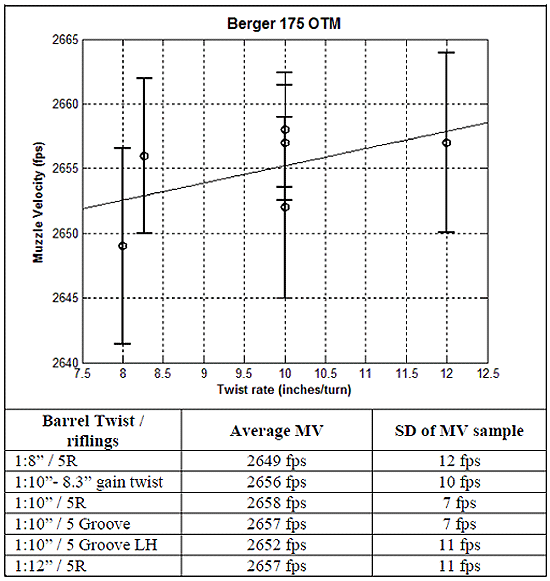
Does muzzle velocity change with faster or slower barrel twist rates? Absolutely, but much less than you might think. Faster twist rates do slow down bullets somewhat, but the speed loss is NOT that significant. With Bartlein .308 Win barrels of identical length and contour, a 1:12″-twist barrel was only 8 fps faster than a 1:8″-twist barrel. That was the result of testing by Applied Ballistics.
The Applied Ballistics team tested six (6) same-length/same-contour Bartlein barrels to observe how twist rate might affect muzzle velocity. This unique, multi-barrel test is featured in the book Modern Advancements in Long Range Shooting, Vol. 1. That book includes other fascinating field tests, including a comprehensive chronograph comparison.
Barrel Twist Rate vs. Velocity — What Tests Reveal by Bryan Litz
When considering barrel twist rates, it’s a common belief that faster twist rates will reduce muzzle velocity. The thinking is that the faster twist rate will resist forward motion of the bullet and slow it down. There are anecdotal accounts of this, such as when someone replaces a barrel of one brand/twist with a different brand and twist and observes a different muzzle velocity. But how do you know the twist rate is what affected muzzle velocity and not the barrel finish, or bore/groove dimensions? Did you use the same chronograph to measure velocity from both barrels? Do you really trust your chronograph?
Summary of Test Results
After all the smoke cleared, we found that muzzle velocity correlates to twist rate at the average rate of approximately 1.33 FPS per inch of twist. In other words, your velocity is reduced by about 5 FPS if you go from a 1:12″ twist to a 1:8″ twist. — Bryan Litz
Savage Test Rifle with Six Bartlein Barrels
Most shooters don’t have access to the equipment required to fully explore questions like this. These are exactly the kinds of things we examine in the book Modern Advancements in Long Range Shooting, Vol. 1. In that book, we present experiments conducted in the Applied Ballistics lab. Some of those experiments took on a “Myth Buster” tone as we sought to confirm (or deny) popular pre-conceptions. For example, here’s how we approached the question of barrel twist and muzzle velocity.
Six .308 Win Barrels from Bartlein — All Shot from the Same Rifle
We acquired six (6) barrels from the same manufacturer (Bartlein), all the same length and contour, and all chambered with the same reamer (SAAMI spec .308 Winchester). All these barrels were fitted to the same Savage Precision Target action, and fired from the same stock, and bench set-up. Common ammo was fired from all six barrels having different twist rates and rifling configurations. In this way, we’re truly able to compare what effect the actual twist rate has on muzzle velocity with a reasonable degree of confidence.
Prior to live fire testing, we explored the theoretical basis of the project, doing the physics. In this case, an energy balance is presented which predicts how much velocity you should expect to lose for a bullet that’s got a little more rotational energy from the faster twist. In the case of the .30 caliber 175 grain bullets, the math predicts a loss of 1.25 fps per inch-unit of barrel twist (e.g. a 1:8″ twist is predicted to be 1.25 fps slower than a 1:9″ twist).
Above, data shows relationship between Twist Rate and Muzzle Velocity (MV) for various barrel twist rates and rifling types. From fast to slow, the three 1:10″ twist barrels are: 5R (canted land), 5 Groove, 5 Groove left-hand twist.
We proceeded with testing all 6 barrels, with twist rates from 1:8″ to 1:12″. After all the smoke cleared, we found that muzzle velocity correlates to twist rate at the average rate of approximately 1.33 fps per inch of twist. In other words, your velocity is reduced by about 5 fps if you go from a 1:12″ twist to a 1:8″ twist. [Editor: That’s an average for all the lengths tested. The actual variance between 1:12″ and 1:8″ here was 8 FPS.] In this case the math prediction was pretty close, and we have to remember that there’s always uncertainty in the live fire results. Uncertainty is always considered in terms of what conclusions the results can actually support with confidence.
This is just a brief synopsis of a single test case. The coverage of twist rates in Modern Advancements in Long-Range Shooting Vol. 1 is more detailed, with multiple live fire tests. Results are extrapolated for other calibers and bullet weights. Needless to say, the question of “how twist rate affects muzzle velocity” is fully answered.
Other chapters in the book’s twist rate section include: · Stability and Drag — Supersonic
· Stability and Drag — Transonic
· Spin Rate Decay
· Effect of Twist rate on Precision
Other sections of the book include: Modern Rifles, Scopes, and Bullets as well as Advancements in Predictive Modeling. This book is sold through the Applied Ballistics online store. Modern Advancements in Long Range Shooting is also available as an eBook in Amazon Kindle format.
Want to learn more about Long Range Shooting? Check out the NSFF “Elements of Long Range Shooting” videos hosted by ballistics guru Bryan Litz of Applied Ballistics. In this multi-part series, Bryan covers a variety of topics of interest to precision shooters. For today’s Saturday at the Movies special, we feature seven of Bryan’s videos. Watch other informative Long Range Shooting and Ballistics videos with Bryan Litz on the NSSF YouTube Channel.
Atmospherics and Density Altitude
Bryan Litz explains: “An important element in calculating an accurate firing solution for long-range shooting is understanding the effects of atmospherics on a projectile.” Atmospherics include air pressure, air temperature, and humidity. Bryan notes: “Temperature, pressure, and humidity all affect the air density… that the bullet is flying through. You can combine all those factors into one variable called ‘Density Altitude’.” Density Altitude is used by the ballistic solver to account for variables that affect bullet flight.
Bullet Ballistic Coefficients
A bullet’s ballistic coefficient (BC) basically expresses how well the bullet flies through the air. Higher BC bullets have less aerodynamic drag than lower BC projectiles. You will see BCs listed as either G1 and G7 numbers. These correspond to different bullet shape models. Generally speaking, the G7 model works better for the long, boat-tail bullets used for long-range shooting. Notably, a bullet’s drag is NOT constant in flight. The true BC can vary over the course of the trajectory as the bullet velocity degrades. In other words, “BC is dynamic”. That said, you can make very accurate drop charts using the BCs provided by major bullet-makers, as plugged into solvers. However, long-range competitors may want to record “real world” drop numbers at various distances. For example, we’ve seen trajectories be higher than predicted at 500 yards, yet lower than predicted at 1000.
Transonic Range
When considering your rifle’s long-range performance, you need to understand the limit of your bullet’s supersonic range. As the bullet slows below the speed of sound, it enters the transonic zone. This can be accompanied by variations in stability as well as BC changes. Bryan explains “once your bullet slows done below supersonic and you get into transonic effects, there are a lot more considerations that come into play. The drag of the bullet becomes less certain, the stability of the bullet can be challenged, and things related to long times of flight, such as Coriolis and Spin Drift, come into play. So whenever you are shooting long range you need to where your bullet slows down to about 1340 fps.”
Ballistics Solvers — Many Options
Bryan Litz observes: “When we talk about the elements of long range shooting, obviously a very important element is a getting a fire solution, using a ballistic solver. There are a lot of ballistic solvers out there… Applied Ballistics has smartphone Apps. Applied Ballistics has integrated the ballistic solver directly into a Kestral, and the same solver runs (manually) on the Accuracy Solutions Wiz-Wheel. The point is, if it is an Applied Ballistics device it is running the same solutions across the board.”
Bullet Stability and Twist Rates
In this video, Bryan Litz talks about bullet in-flight stability and how to calculate barrel twist-rate requirements for long-range bullets. Bryan explains that bullet stability (for conventional projectiles) is basically provided by the spinning of the bullet. But this spin rate is a function of BOTH the nominal twist rate of the barrel AND the velocity of the projectile. Thus, when shooting the same bullet, a very high-speed cartridge may work with a slower barrel twist rate than is required for a lower-speed (less powerful) cartridge. For match bullets, shot at ranges to 1000 yards and beyond, Bryan recommends a twist rate that offers good stability.
Scope Tracking — Tall Target Test
Have you recently purchased a new scope? Then you should verify the actual click value of the turrets before you use the optic in competition. While a scope may have listed click values of 1/4-MOA, 1/8-MOA or 0.1 Mils, the reality may be slightly different. Many scopes have actual click values that are slightly higher or lower than the value claimed by the manufacturer. The small variance adds up when you click through a wide range of elevation. In this video, Bryan Litz shows how to verify your true click values using a “Tall Target Test”. The idea is to start at the bottom end of a vertical line, and then click up 30 MOA or so. Multiply the number of clicked MOA by 1.047 to get the claimed value in inches. For example, at 100 yards, 30 MOA is exactly 31.41 inches. Then measure the difference in your actual point of impact.
Coriolis Effect
The Coriolis Effect comes into play with extreme long-range shots. The rotation of the earth actually moves the target a small distance (in space) during the long duration of the bullet’s flight. Bryan Litz notes that, in most common shooting situations inside 1K, Coriolis is not significant. At 1000 yards, the Effect represents less than one click (for most cartridge types). Even well past 1000 yards, in windy conditions, the Coriolis Effect may well be “lost in the noise”. But in very calm conditions, when shooting at extreme ranges, Bryan says you can benefit from adjusting your ballistics solution for Coriolis: “The Coriolis Effect… has to do with the spin of the earth. The consequence of that is that, if the flight time of the bullet gets significantly long, the bullet can have an apparent drift from its intended target. The amount [of apparent drift] is very small — it depends on your latitude and azimuth of fire on the planet.”
About Bryan Litz
Bryan began his career as a rocket scientist, quite literally. He then started Applied Ballistics, the leading company focusing on ballistics science for rifle shooting. A past F-TR Long-Range National Champion and Chief Ballistician for Berger Bullets, knows his stuff. His Applied Ballistics squad was the winning team at the 2017 King of 2 Miles event, and Applied Ballistics has earned major U.S. defense contracts.
Modern binoculars and Laser Rangefinders have built-in sensors and microprocessors that can provide ballistics solutions. These work via on-board software as well as systems that talk (via Bluetooth) to a mobile device with a Ballistics App installed. Today we feature an Applied Ballistics Podcast that covers these impressive products with integrated ballistics functionality.
AB Integrated Products and Features In this podcast, Applied Ballistics Founder Bryan Litz and Product Manager Francis Colon answer some of the most common questions received from listeners. They primarily discuss the latest Applied Ballistics integrated devices and highlight their capabilities.
Along with describing the basics of optics and rangefinder products with Applied Ballistics functionality, Bryan and Francis talk about how software can tailor the ballistics output to specific applications and firearms. Francis explains Drop Scale Factor (“DSF”) — a means by which you “train” your solver to match your specific equipment.
NOTE: As we cannot embed the full 42-minute podcast here, you’ll need to go to the Applied Ballistics site to listen. CLICK HERE.
Integrated Solution — Leica LRF and Kestrel with AB Software
This video shows how to pair a Leica Rangemaster 2800.com to a Kestrel Elite 5700. The Leica Rangemaster 2800.com provides the Kestrel with the Range, Firing Direction, and Inclination angle. The Kestrel will then calculate the firing solution and provide that solution on its own display as well as feed that back to the Leica which then displays the hold-over when looking through the Rangefinder. This allows for remote, hands-free operation of the Kestrel in a mount while still being able to see the firing solution in the range finder. NOTE: This is an older video, but similar systems operate with the latest products.
Want to improve your understanding of Ballistics, Bullet Design, Bullet Pointing, and other shooting-related tech topics? Well here’s a treasure trove of gun expertise. Applied Ballistics offers dozens of FREE tech articles on its website. Curious about Coriolis? — You’ll find answers. Want to understand the difference between G1 and G7 BC? — There’s an article about that.
“Doc” Beech, technical support specialist at Applied Ballistics says these articles can help shooters working with ballistics programs: “One of the biggest issues I have seen is the misunderstanding… about a bullet’s ballistic coefficient (BC) and what it really means. Several papers on ballistic coefficient are available for shooters to review on the website.”
Credit Shooting Sports USA Editor John Parker for finding this great resource. John writes: “Our friends at Applied Ballistics have a real gold mine of articles on the science of accurate shooting on their website. This is a fantastic source for precision shooting information[.] Topics presented are wide-ranging — from ballistic coefficients to bullet analysis.”
Here are six (6) of our favorite Applied Ballistics articles, available for FREE to read online. There are dozens more, all available on the Applied Ballistics Education Webpage. After Clicking link, select Plus (+) Symbol for “White Papers”, then find the article(s) you want in the list. For each selection, then click “Download” in the right column. This will send a PDF version to your device.


 Verifying Scope Level With Tall Target Test


 Hybrid Bullet Design — Best of Both Worlds?


 In this podcast, Applied Ballistics Founder Bryan Litz and Product Manager Francis Colon answer some of the most common questions received from listeners. They primarily discuss the latest Applied Ballistics integrated devices and highlight their capabilities.


