Eurooptic vortex burris nightforce sale


teslong borescope digital camera barrel monitor


As an Amazon Associate, this site earns a commission from Amazon sales.


March 25th, 2008

Inspection Method for Your Barrel Crown

The last half-inch or so of your barrel is absolutely critical. Any damage (or abnormal wear) near the crown will cause a significant drop-off in accuracy. Here are ways you can check the end of your barrel, using a common Q-Tip.

Use Q-Tip for Barrel Inspection
To find out if you have a burr or damage to your crown, you can use an ordinary Q-tip cotton swab. Check the edges of the crown by pulling the Q-tip gently out past the edge of the crown. If you have a burr, it will “grab” the cotton and leave strands behind.

Larry Willis has another way to use a Q-Tip: “Here’s a neat trick that will surprise you with how well it works…

Just insert a Q-Tip into your barrel (like the picture below), and it will reflect enough light so that you can get a real good look at the last half inch of rifling and the crown of your barrel. In most cases you’ll find that this works much better than a flashlight. Since then, I’ve used this method about a jillion times. Q-Tips are handy to keep in your cleaning supplies anyway. This is a good way to judge approximately how well you are cleaning your barrel when you’re at the range. It’s also the best way to examine your barrel when you’re in the field.”
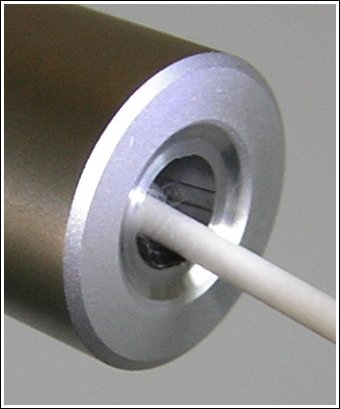
Larry Willis is the inventor of the unique Innovative Technologies Belted Magnum Collet Resizing Die. Larry explains how this die works, and offers many other useful reloading tips on his website, LarryWillis.com.

Permalink Tech Tip No Comments »
January 2nd, 2008

Barrel Throat Erosion — Reality Revealed

So what does a “worn-out” barrel really look like? Tom Myers answered that question when he removed a 6.5-284 barrel and cut it down the middle to reveal throat wear. As you can see, there is a gap of about 5mm before the lands begin and you can see how the lands have thinned at the ends. (Note: even in a new barrel, there would be a section of freebore, so not all the 5mm gap represents wear.) There is actually just about 2mm of lands worn away. Tom notes: “Since I started out, I’ve chased the lands, moving out the seating depth .086″ (2.18 mm). I always seat to touch. My final touch dimension was 2.440″ with a Stoney Point .26 cal collet.”

Except for the 2mm of wear, the rifling otherwise looks decent, suggesting that setting back and rechambering this barrel could extend its useful life. Tom reports: “This was something I just thought I’d share if anyone was interested. I recently had to re-barrel my favorite prone rifle after its scores at 1,000 started to slip. I only ever shot Sierra 142gr MatchKings with VV N165 out of this barrel. It is a Hart and of course is button-rifled. I documented every round through the gun and got 2,300 over 4 years. Since I have the facilities, I used wire EDM (Electro Discharge Machining) to section the shot-out barrel in half. It was in amazingly good shape upon close inspection.”

Tom could have had this barrel set back, but he observed, “Lately I have had to increase powder charge to maintain 2,950 fps muzzle velocity. So to set it back would have only increased that problem. [And] I had a brand new 30″ Krieger all ready to screw on. I figured it was unlikely I’d get another full season on the old barrel, so I took it off.”

Permalink Gunsmithing, Tech Tip No Comments »
November 13th, 2007

Magnum Drop Port from Oz

There was a lot of interest in Jeff Rogers’ Heavy Gun, featured in yesterday’s Daily Bulletin. Jeff is a race-car mechanic and engine builder in Australia, and you’ll find many innovative mechanical features on this rifle.

1. Drop Port for Magnum Case
Jeff reports: “The action is home-made. My shooting buddy Tony Z was the magician here–without his extensive machining experience, the action would still be on the drawing board. As you can see it is a Right Bolt, Left (loading) Port design. What makes it unique is the big gravity port, perhaps the only Drop Port ever made for a case of this size. The port will work will cases up to 2.850″ in length, with a .550″ max rim diameter.” The action is constructed from Swedish 709m chrome-moly steel measuring 2.00″ diameter x 10″ in length. It has roller-assist extraction to help with the high pressure loads Jeff runs. The action is both conventionally bedded and glued into the stock.

2. Removeable Aluminum Side Pods
The two alloy “side pods” were milled from 6061 T6 billet. Given airline weight limit of 32 kg per piece, Jeff made the pods modular (they are through-bolted), so the gun can be air-transported in two sections. Concerning the dual side-pod design, Jeff observed: “[This] is unconventional… but I wanted was something that was true [when bolted together]. Milling the thing up on every surface insured this and the pods are installed with dail indicators on assembly.”

3. Tension Barrel System
The Broughton barrel sits inside a threaded barrel sleeve that holds the barrel in tension. Tensioned barrels have been used on Heavy Guns before, but few have been as successful in competition as Jeff’s rig. Jeff tells us: “The 30-cal barrel is a 1.500″-diameter, 1:13 twist, 32″ Broughton. It is straight for 6″ then tapers to 1.250″ at 32″. The tension tube is 6061 T6 alloy 2.0″ outside diameter with a .187″ wall thickness. At the chamber end, a 431 stainless adaptor is fitted to the barrel, about 1.5″ long, stepped to a slip fit inside the tube for another 1.5 inches. This allows the main heat area of the chamber to sink into the tube. The tension tube is all jointed with a CAT high-temp anti-seize. On the muzzle end is a left hand 1.250x16tpi thread to take the tension nut. We have tried various tensions and found torque settings do not matter to the groups as long as the nut does not come loose. Because I can really rattle down those 10-shot groups with the Drop Port action, remember that the barrel grows in length before it gets a chance to transfer heat to the outer tube. If you shot the gun at pedestrian pace, then only 50 ft/lbs of tension is needed.”

Permalink Gear Review, Tech Tip No Comments »