|
|
December 12th, 2025
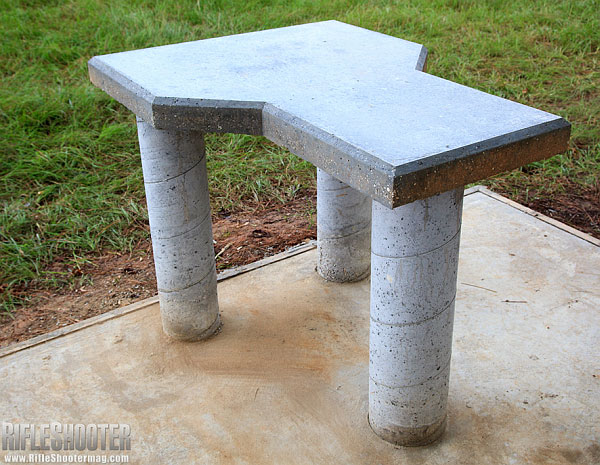
Who hasn’t dreamed of having a professional-quality, permanent shooting bench on their own property? Well here’s an article that can help you make that dream come true. This “how-to” feature from the archives of RifleShooter Magazine shows how to build a quality concrete shooting bench step-by-step.

All aspects of the construction process are illustrated and explained. The author, Keith Wood explains: “Construction happened in three phases — first creating the slab foundation, then the support pillars (legs), and finally the table.”
Click image below to load article with slide show.

Each step in the process is illustrated with a large photo and descriptive paragraph. Starting with framing the foundation (Step 1), the article illustrates and explains the 15 Steps that produce the finished, all-concrete bench (see top photo).
December 3rd, 2022

Who hasn’t dreamed of having a professional-quality, permanent shooting bench on their own property? Well here’s an article that can help you make that dream come true. This “how-to” feature from the archives of RifleShooter Magazine shows how to build a quality concrete shooting bench step-by-step.

All aspects of the construction process are illustrated and explained. The author, Keith Wood explains: “Construction happened in three phases — first creating the slab foundation, then the support pillars (legs), and finally the table.”
Click image below to load article with slide show.

Each step in the process is illustrated with a large photo and descriptive paragraph. Starting with framing the foundation (Step 1), the article illustrates and explains the 15 Steps that produce the finished, all-concrete bench (see top photo).
August 8th, 2019
 
Do you like the Chris Byrne bench at left? For more details, CLICK HERE.
FREE Bench Plans on the Web
Building your own portable shooting bench is a great do-it-yourself project. You can build a sturdy bench for well under $100 in materials. Compare that to some deluxe factory-built benches which may cost $600.00 or more. You’ll find a wide assortment of home-built shooting bench designs (both portable and fixed) on the internet. Renovation Headquarters has links to FREE Plans and building instructions for fourteen (14) different shooting benches. There are all-wood shooting bench designs as well as benches that combine a wood top with a metal sub-frame or legs.
Among Renovation HQ’s fourteen featured shooting benches, here are five designs we liked:
Heavy Wood Bench That Converts to Three Sections for Transport
In addition to the fourteen benches mentioned above, here is an interesting break-down bench design. Call it a “semi-portable” bench. The legs and frame are made from stout 4×4 post segments so the bench is fairly heavy. However, this bench can break down into three (3) sections for easier transport to and from the range. Dado-cut channels assure proper top alignment. This might be a good choice if you plan a multi-day excursion to a location without fixed benches. This three-leg bench design can be made from easy-to-locate materials. Note: The dimensions of this bench are are larger than typical fixed benches to accommodate 50 BMGs and other big rifles. CLICK HERE for more details.

March 22nd, 2017

Who hasn’t dreamed of having a professional-quality, permanent shooting bench on their own property? Well here’s an article that can help you make that dream come true. This “how-to” feature from the archives of RifleShooter Magazine shows how to build a quality concrete shooting bench step-by-step.

All aspects of the construction process are illustrated and explained. The author, Keith Wood explains: “Construction happened in three phases — first creating the slab foundation, then the support pillars (legs), and finally the table.”
Click image below to load article with slide show.

Each step in the process is illustrated with a large photo and descriptive paragraph. Starting with framing the foundation (Step 1), the article illustrates and explains the 15 Steps that produce the finished, all-concrete bench (see top photo).
December 12th, 2015
 A while back, we featured a portable reloading bench built on a Black & Decker Workmate. That proved a VERY popular do-it-yourself project so we’re showing it again, in case you missed it the first time. A while back, we featured a portable reloading bench built on a Black & Decker Workmate. That proved a VERY popular do-it-yourself project so we’re showing it again, in case you missed it the first time.
Texan Robert Lewis made himself a great portable reloading bench from plywood mounted to a Black & Decker Workmate. The bench, roughly 22″ x 19″ on top, folds up to fit easily in your car’s trunk or behind the seats in a pick-up truck cab. Four recessed bolts hold the wood top section to the collapsible B&D Workmate.The sides and back of the unit are attached to the base with small nails. There is a small shelf (also nailed in place) which can be used to clamp a powder measure or hold a scale. Shown in the photo is a Harrell’s Benchrest measure and Harrell’s single-stage “C” press.
Click for Detail of Top.

The whole unit can be built for about $65.00 with pine, or $80.00 with oak (as shown). Robert explained: “The Workmate was $40. If someone bought a 2’x4′ sheet of 3/4″ oak plywood, I think it is around $30. Using pine plywood would be about half that. Fasteners were $3. Spar Urethane would be $5.”
Robert told us: “I used a couple ideas I found on the web. The Larry Willis website gave me the idea to use the Black and Decker Workmate as a base. I found the Workmate on sale for $40 and the top is made from oak plywood I had in my shop. I sealed the wood with three coats of Spar Urethane. The whole thing folds into a nice package for transportation to and from the range.”
Editor’s NOTE: In the time that’s transpired since we first ran this story, the price of a Black & Decker workmate has gone up. However you can still pick a WM225 Workmate for under $65.00. Target is currently selling WM225 Workmates for $64.99.
Click HERE for FREE WORKBENCH PLANS.

May 4th, 2015
 
Building your own portable shooting bench is a great do-it-yourself project. You can build a sturdy bench for well under $100 in materials. Compare that to some deluxe factory-built benches which may cost $500.00 or more.
FREE Bench Plans on the Web
You’ll find a wide assortment of home-built shooting bench designs (both portable and fixed) on the internet. Renovation Headquarters has links to FREE Plans and building instructions for fourteen (14) different shooting benches. There are all-wood shooting bench designs as well as benches that combine a wood top with a metal sub-frame or legs.
CLICK HERE for Shooting Bench FREE Plans.
March 28th, 2014
Serious shooters spend lots of time in the reloading room. If you want to produce great ammo, start with a good, solid bench with a very rigid working surface and plenty of storage space. Here we present three sets of FREE workbench plans. Any one of these bench designs can be a good summer do-it-yourself project for those with basic word-working skills.
Easy-to-Build Basic Bench
Simpson, maker of Strong-Tie fasteners, offers FREE Workbench Plans for a sturdy, 48″-wide bench with a pegboard backing and both upper and lower shelves. A complete list of fasteners and cut lengths is provided. For use as a loading bench with mounted presses, double-up the bench-top for extra ridigity. Without much difficulty, the plans can be adapted to build a wider bench if you prefer. The same downloadable document also contains plans for an 80″-high 6-shelf unit, a 72″-high heavy-duty shelving unit (with 4 shelves), and a 48″-wide heavy-duty table.

FREE Strongtie Bench Plans (.pdf file).
Corner Bench with Swinging Doors
The next design is rather unique — a corner bench with swing-out cabinets. This reloading bench is based on plans by M. L. McPherson as published in the October 1993 American Rifleman. The compact footprint that makes good use of corner space that is usually poorly utilized. This set of plans originally came from Ray-Vin.com. The folks who started Ray-Vin have retired.
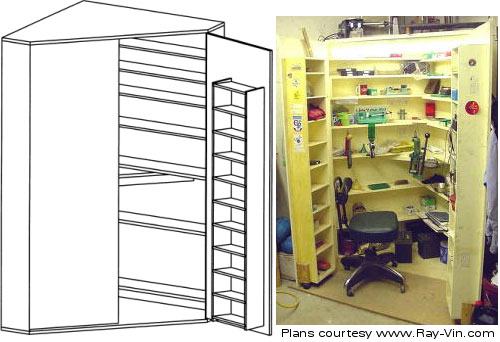
FREE Corner Bench Plans (330kb .pdf file)
Classic NRMA Bench with Cabinets
The last bench design is a large, versatile bench with a full set of enclosed overhead cabinets. A National Reloading Manufacturers Association (NRMA) design, this bench requires many hours to build, but it will house all your reloading gear and provide a very stable platform for your presses.This bench was designed to be as versatile as possible to meet the needs of most reloaders. However, the bench design can easily be customized. For instance, it can be made larger or smaller to meet space requirements or quantities of equipment and components. As it is currently designed, the work area is about waist-high for a 6’2″ person. This can be adjusted to fit your height simply by making the legs longer or shorter.

FREE NRMA Reloading Bench Plans (2.42 megabyte .pdf file).
November 23rd, 2013
Roy Bertalotto is an author, precision shooter, varmint hunter and part-time gunsmith. On his website, RVBPrecision.com, you’ll find many interesting feature stories, including “how-to” articles. One project that caught our eye was Roy’s clever rotating-top shooting bench. Simple to build from low-cost components, Roy’s bench design features a raised center section that traverses on rollers. This allows you to move your rifle through a wide arc without having to move your front rest or rear sand bag. Roy’s bench can be built for a fraction of the cost of the big, heavy carousel-style varmint benches. This would make a nice, winter project for anyone handy with simple tools. For a set of plans and list of materials, send email to Robert: RVB100 [at] comcast.net.
This picture shows a conventional front pedestal rest used with a benchrest type rifle. As you can see, the top swivels, allowing a tremendous sweep of the varmint fields.

CLICK HERE to see MORE PHOTOS (16 total.)
The swiveling top moves on metal rollers. These roller devices are available from Trend Lines, or Woodworkers warehouse. Two are required at the front of the movable top.

Below is a close-up of the pivot point.

A conventional folding table leg (from Woodworkers Warehouse) is used in the front. In the rear, Roy’s table uses a single leg fabricated from tubing and aluminum angle iron. This creates a tripod. The three-legged design provides more room for the shooter, and is easier to set up on uneven ground.

Photos courtesy Roy Bertalotto.
August 22nd, 2013
 Building your own portable shooting bench is a great do-it-yourself project. You can build a sturdy bench for well under $100 in materials. Compare that to some deluxe factory-built benches which may cost $500.00 or more. Building your own portable shooting bench is a great do-it-yourself project. You can build a sturdy bench for well under $100 in materials. Compare that to some deluxe factory-built benches which may cost $500.00 or more.
FREE Bench Plans on the Web
You’ll find a wide assortment of home-built shooting bench designs (both portable and fixed) on the internet. Renovation Headquarters has links to FREE Plans and building instructions for fourteen (14) different shooting benches. There are all-wood shooting bench designs as well as benches that combine a wood top with a metal sub-frame or legs.
CLICK HERE for Shooting Bench FREE Plans Webpage
Among Renovation HQ’s fourteen featured shooting benches, here are five designs we liked:
Reader Jim Jewell has used the eHow bench design shown above. He recommends it highly. Jim reports: “A colleague and I built two of the eHow permanent wood, sturdy benches for our Pt. Phillips Rod and Gun Club in PA, which had outdated benches. I want to tell you that these benches are very stable and a real bargain. The benches cost precisely $100.00 each using the bill of materials and pressure treated wood. The bill of materials, with careful cutting, using a Chop saw, resulted in almost no scrap wood if carefully measured and cut. The plans are terrific and the benches are great platforms for bench-rest shooting. I made only one modification — I left a 6″ wing on both sides of the table to mount a spotting scope. Further we added a base of dry QuickCrete or similar fast setting concrete mix material. Add it dry, make sure the table is level and fill in the 6″ hole. The hole and QuickCrete add maximum stability. The QuickCrete sucks moisture from the ground, hardens in situ, and adds stability to the bench.
I can’t recommend this design highly enough. It is dirt cheap for clubs on a budget, goes together quickly, the table is very stable and there is no waste if you make precise measurements and cuts. A bag of QuickCrete is enough for two tables adding about $2.00 to the cost of each table. We plan on building new tables for the whole club for under $1000. After about a year, with a completely water-free wood in the bench I recommend a coat of Thompson’s Water Seal and these benches should last a long time.”
Heavy Wood Bench That Converts to Three Sections for Transport
In addition to the fourteen benches mentioned above, here is an interesting break-down bench design. Call it a “semi-portable” bench. The legs and frame are made from stout 4×4 post segments so the bench is fairly heavy. However, this bench can break down into three (3) sections for easier transport to and from the range. Dado-cut channels assure proper top alignment. This might be a good choice if you plan a multi-day excursion to a location without fixed benches. This three-leg bench design can be made from easy-to-locate materials. Note: The dimensions of this bench are are larger than typical fixed benches to accommodate 50 BMGs and other big rifles. CLICK HERE for more details.

Do you like the bench in the illustration at the beginning of this story (top right)? This is a prototype design by Chris Byrne of the Anarchangel Blog. For more details, CLICK HERE.
December 22nd, 2012
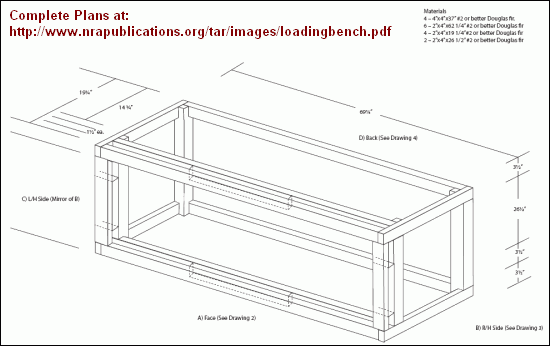
The NRA’s American Rifleman Online website has an excellent article showing how to construct a rock-solid Reloading Bench. There are plenty of photos, and a detailed set of Bench Blueprints showing all dimensions and listing all needed materials. This bench is very well designed, with many deluxe features, such as an upper drawer with fitted slots for die boxes, and large lower drawers with 100-lb rated slides to store heavy materials or tools. If you have good wood-working skills this would be an excellent project.
CLICK HERE to Download Article with Photos | CLICK HERE for Bench Blueprints

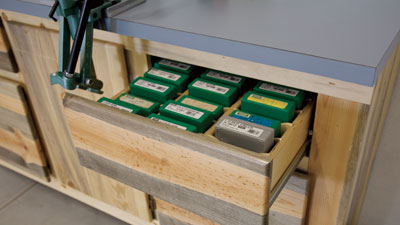
The author, Dave Campbell, offers good advice on building the bench top: “I ripped a sheet of 3/4″ AC plywood into two 24″ wide pieces and cut them to 72″ long. Then I glued them together to form a 72″ long, 1 1/24″ thick top. The trick here is to keep the edges smooth and flat so that the laminate will adhere properly and without voids. I chose a light grey laminate finish for the top because it’s easier to see what I am working on and keep clean. If you have never worked with laminate, remember it’s prudent to glue and rout the edges flush before gluing on the top. The top was attached to the carcass with eight steel L-shaped angle brackets and No. 10×1 1/4″ wood screws.”
Photos Copyright © 2008 The National Rifle Association, used by permission
|




 A while back, we featured a portable reloading bench built on a Black & Decker Workmate. That proved a VERY popular do-it-yourself project so we’re showing it again, in case you missed it the first time.


