|
|
December 2nd, 2013
Forum member Jonathan L. (aka ‘Quest-QC’) was a member of the Canadian F-TR team at the F-Class World Championships in Raton, NM this fall. His handsome .308 Winchester rifle features some interesting hardware and a stunning African Padauk-wood stock stiffened with carbon fiber layers. We were impressed by the innovative, adjustable bag-rider assembly Jonathan fitted to the rear of his stock (scroll down for photo). With an Allen wrench, the vertical height and the slope (i.e. fore/aft angle) of the V-shaped bag-rider can be changed easily. This has many advantages. First, Jonathan can set his rifle to the most comfortable height (for his prone position) without using “lifters” under the rear bag. The system also gives him some gross elevation adjustment separate from the bipod. In addition, the angle adjustment allows the bag-rider to better match the geometry of the rear bag. Last but not least, by setting up the bag-rider with some drop (higher in front, lower in back), Jonathan can fine-tune his elevation (while aiming the gun) by simply sliding the rifle fore and aft.

Jonathan says: “This year was my second year shooting at 1000 yards and I managed to find a spot on Team Canada for the FCWC at Raton. Here is the rifle that brought me there…”

The rifle features a Kelbly Panda F-Class RB-LP action, 34″ Bartlein 1:11″-twist, Heavy Palma contour barrel. Fitted to the red-toned Padauk-wood stock is a 23.2 oz., StarShooter CF-SS light weight bipod with custom bench feet. On top is a March 8-80x56mm scope in Kelbly rings. Total weight of the rifle is 18 pounds, 1 oz., complete with the 24 oz. adjustable brass bag-rider at the back. The bag-rider block was modeled in 3D, then machined afterwards to use up the remaining weight available after all the other components. CLICK for StarShooter CF-SS Bipod Video.
African Padauk Wood is Very Stiff
Jonathan chose the red-toned African Padauk Wood because it is stiff for its weight: “The reason for choosing African Padauk is that the weight of the wood is the same as Maple but 45% more rigid.” The downside of Padauk, as Forum member Gstaylorg notes, is that it is a “very oily wood, which can make it somewhat difficult to finish with something like polyurethane. [Padauk] can generate a lot of bubbles and cause cracking problems around joints and/or seams.” Jonathan did note that he has observed a few bubbles in the auto clear coat on his stock. He plans to refinish the stock in the off-season.

Gun Is Extremely Accurate with Berger 200gr Hybrids
Jonathan says this rig was very accurate, at least until his barrel gave up the ghost. He says he has put 15 successive shots in about 1/4 MOA: “I managed to make it twice (1/4 MOA for 15) by taking my time between shots. You don’t want to overheat this barrel. I needed to provide a very strong effort (mentally) to be able to achieve such precision as the rifle is way better than me.” Jonathan shoots Berger 200gr Hybrid bullets (in the lands) with Hodgdon Varget powder, and Federal 205M primers, loaded into neck-turned Lapua .308 Win brass. He has also had good luck with Vihtavuori N150 powder in the past.

In compliance with F-Class rules, the adjustable bag-rider system would not be adjusted “on the fly” during record fire. The bag-rider’s vertical rise and fore/aft slope would be optimized before shooting, then locked in place. The bottom photo offers a good view of the V-shaped profile of the metal bag-rider. We have found that this kind of V-profile, closely matching the triangular profile of the rear ears, makes a rifle more secure in the rear bag and often allows the gun to track better.


October 12th, 2013
Harris swivel-model bipods allow you to adjust the cant of your rifle. This is useful if you are shooting on side-sloping ground. But what if you want to traverse from side to side, say to switch from one critter to another during a prairie dog safari? Well normally you would have to pick up the entire rifle and reposition it to the left or to the right. Now you have an option. The Upriser Arms Bipod Swivel Mount allows you to traverse your rifle left to right, without moving the bipod legs.
Video Shows How Traversing Bipod Mount Works, with Locking Plunger Knob:
 This rugged, machined-aluminum bipod mount lets you swing your aim point from side to side without having to reposition the bipod. The rubber-padded Upriser Arms Bipod Mount accepts any bipod that attaches to a forward sling swivel stud. There is also a version that fits on tactical rails. This rugged, machined-aluminum bipod mount lets you swing your aim point from side to side without having to reposition the bipod. The rubber-padded Upriser Arms Bipod Mount accepts any bipod that attaches to a forward sling swivel stud. There is also a version that fits on tactical rails.
It is easy to engage or disengage traversing capability via the plunger knob on the front of the unit. When you pull down on the plunger (and twist to lock in “down” position), the rifle can swing smoothly on an internal, precision-bearing pivot. To go back to non-traverse mode, simply center the fore-arm and then twist and release the knob so the plunger pops up, securing the bipod in the “dead-center” position. Note: This unit adds approximately 1¼” to bipod height.


This $69.99 bipod mount comes with a 100% satisfaction guarantee when purchased through Brownells or Sinclair Int’l. User feedback has been positive. One purchaser wrote: “I take this [traversing bipod mount] on all my hunts and it has impressed me immensely. The part is built strong and has improved my shooting. It is really smooth, easy to use, and helps me stay on scope when my game is on the move instead of having a shaky swivel or having to move the whole bipod. I have recommended this product to all of my friends[.] — Adam, Missoula, MT
October 4th, 2013
 Many styles of bipods were used by F-TR shooters at the F-Class U.S. Nationals and World Championships recently held in Raton, NM. Most featured angled arms — either left/right arms or parallel pairs of arms on either side. With such designs, vertical height is controlled by adjusting the angle of the arms (and hence the distance between the feet). Widen the track and the gun goes down; narrow the track and the gun goes up. One bipod design, Dan Pohlabel’s FLEX Bipod, was very different than the norm. On the FLEX, there are no angled arms — the main blade is a solid piece of metal. Each leg has independent control for height via adjustable “feet” on either ends of the main piece. A ratcheting locking lever controls the cant. Many styles of bipods were used by F-TR shooters at the F-Class U.S. Nationals and World Championships recently held in Raton, NM. Most featured angled arms — either left/right arms or parallel pairs of arms on either side. With such designs, vertical height is controlled by adjusting the angle of the arms (and hence the distance between the feet). Widen the track and the gun goes down; narrow the track and the gun goes up. One bipod design, Dan Pohlabel’s FLEX Bipod, was very different than the norm. On the FLEX, there are no angled arms — the main blade is a solid piece of metal. Each leg has independent control for height via adjustable “feet” on either ends of the main piece. A ratcheting locking lever controls the cant.

Click photo below for full-screen version

Monte Milanuk, who tested an early version of the FLEX Bipod, explains: “The FLEX bipod is a very simple design — no Mariner’s wheel for vertical adjustment, no joystick head, no changing width as it goes up and down. And the FLEX bipod is very light (as are most, these days), but also very durable. An added bonus is that it breaks down very flat for airline travel. Once I take the feet off, remove the ratchet lever (with screw), the whole bipod nestles very nicely in the bottom layer of foam in my gun case (with cuts for the head etc. in the foam). If someone bashes the case hard enough to damage what is essentially a plate of spring steel, then I’ve got bigger worries.”

Monte likes the FLEX Bipod, but notes that it works best if you lean into the gun when shooting: “Not everyone wants a bipod that slides around like a hog on ice. Some people manage to get things tracking straight back and forth, almost like it was constrained by a front rest. Personally, I have a hard time doing that in a repeatable fashion. While the FLEX Bipod shoots quite well with a [loose] hold, it was designed for those of us who like to ‘lean’ into the gun a bit. Quite literally, the idea is that you get the feet to dig in slightly, and push against the rifle butt with your shoulder and the bipod will ‘flex’ or bow forward slightly. It is one of those things that sounds wonky until you try it. It may take a few times to get a feel for it, but once you do, it is surprisingly repeatable.”
The FLEX bipod’s designer, Dan Pohlabel, offers these instructions:
The bipod feet are shipped loose. Note there is a left foot and a right foot. Determine the balance point of your rifle and mount the bipod approximately two inches forward of that point. You may want to move it further forward after shooting. Experiment with its placement to minimize movement of the bipod. When setting up, first grab each foot and ‘dig’ them in to the shooting surface, dirt, gravel, grass, carpet — it doesn’t matter. After making sure each foot has a hold, raise or lower the bipod to your target and use the cant adjustment to level your rifle. Loading the bipod with your shoulder is the preferred method of position. For more info, visit Kreativ-Solutions.com or email flex-bipods [at] kreativ-solutions.com .


April 28th, 2013

It was Christmas in April this weekend, as our new GEN II Joystick Bipod system arrived — thanks to Sebastian (Seb) Lambang of SEB Coaxial. We’re anxious to try this sophisticated new system on a variety of rifles, both small-bore and big-bore. Designed for F-TR shooters, we think the new Joystick bipod (aka “Joy-Pod”) may also prove popular with tactical shooters and varmint hunters who need a lightweight, yet easily-adjustable front support. Like his coaxial front rests, Lambang’s Joystick Bipod controls both horizontal (windage) and vertical (elevation) with a single control arm. In addition, the GEN II “Joy-Pod” offers cant adjustment with its tilting head.
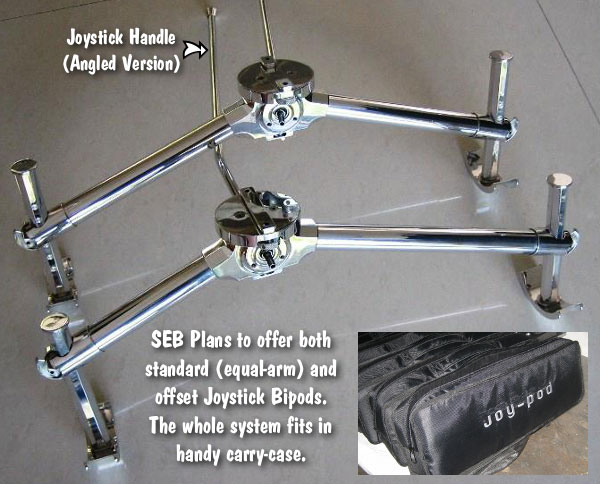
Gross height can be easily adjusted on the vertical legs, both of which feature a column of precision-machined teeth (like on a jack), with a positive quick-adjust locking mechanism. The whole Joy-Pod system weighs about 21 ounces, and SEB even provides a handy nylon storage case.

We’ll be field-testing our new Joy-Pod in the near future and we’ll let you know how it works. SEB is not soliciting advance orders just yet — as there may be some final mods on the production version. Price hasn’t been set yet, but it should be competitive with the popular F-TR wide-base bipods on the market. If you’re intrigued, you’ll find many more hi-rez product photos on Seb Lambang’s Facebook Page.


April 26th, 2013
Following our story on the Sinclair Int’l East Coast Fullbore Nationals, folks wanted to know about the bipods used by the winning F-TR squad, Team Sinclair. Some sharp-eyed readers noticed that three out of four Team Sinclair shooters were sporting a compact, parallel-arm bipod. This nice piece of kit is the ultra-light-weight (17 oz.) Rorer Spec Bipod produced by Duplin Rifles in North Carolina. The Rorer Spec Bipod is sturdy and easily-adjusted, yet it is one of the lightest wide-track bipods on the market.
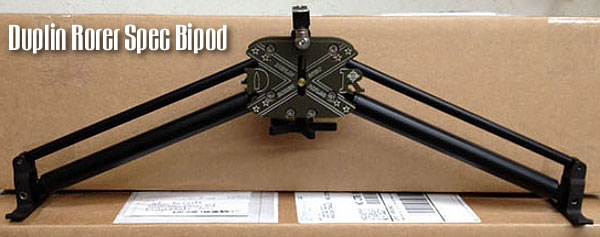
Duplin Rifles — Rorer Spec Bipod
Weight: 1 pound, 1 oz. (17 oz.) | Finish: Clear- or black-Anodized Aluminum
Price: $350.00 delivered in USA | Options: Custom faceplates; Custom mount engraving ($35)

For more information, or to place an order, contact Duplin’s main man, Clint Cooper. You can send email to clint [at] duplinrifles.com or call 910-289-8217.
Duplin Rifles
4527 Hwy 117 South
Rose Hill, NC 28458
April 11th, 2013
Report by Richard King (King’s Armory, Texas; ‘Kings X’ on our Forum)
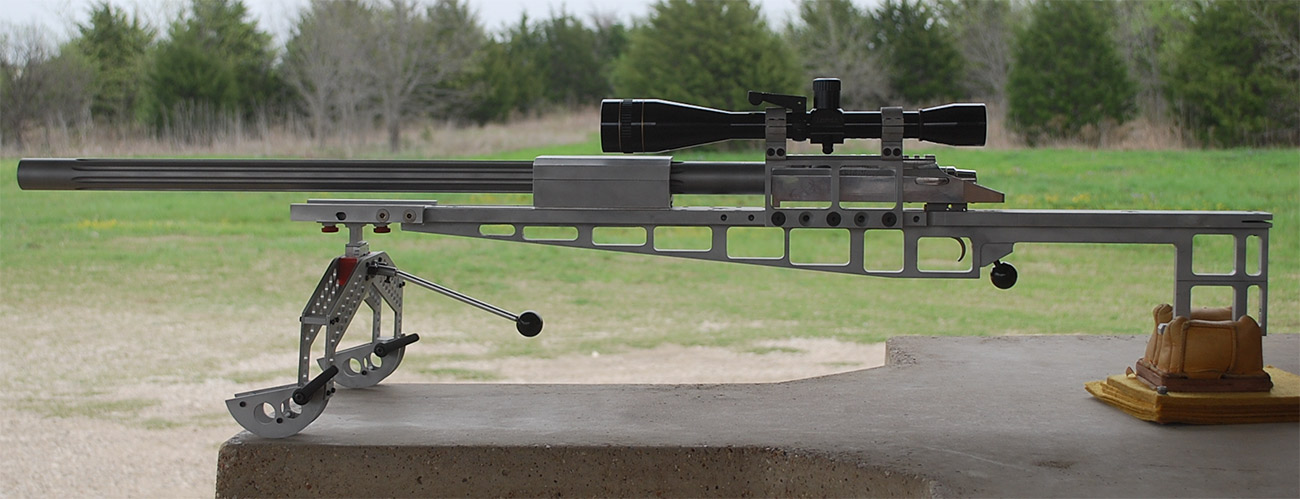
With all the talk from Vince Bottomley in the April issue of Target Shooter about aluminum stocks, I thought you might like to see my latest project. This is my personal gun, built the way I wanted it. I know it’s radical and some may not care for it. But it works.


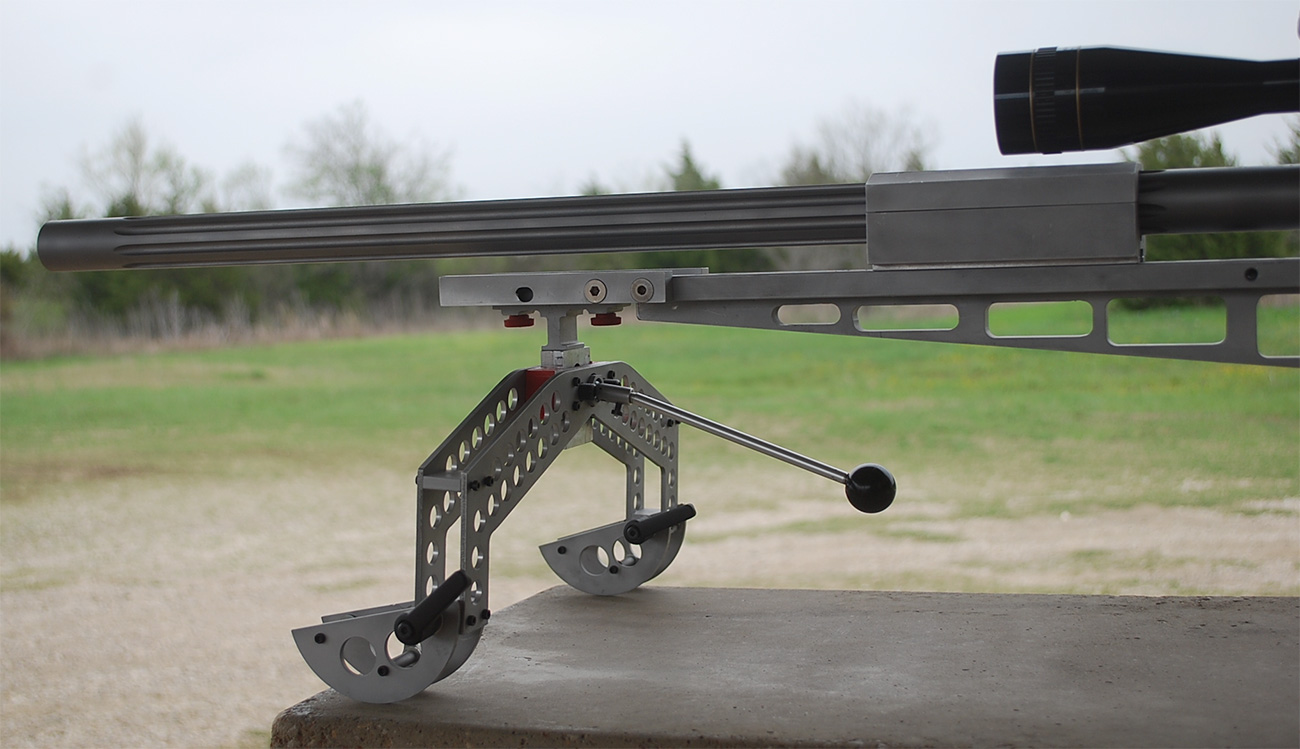
This is pretty much an all-aluminum rifle. The action is a Kelbly F-Class with a Shilen stainless steel competition trigger. The scope is a 1″-tube Leupold 36X with a Tucker Conversion set in Jewell spherical bearing rings. The .223 barrel is Pac-Nor 3-groove, 1:6.5″-twist mounted in a “V”-type barrel block. The bipod has vertical adjustment only via a dovetail slide activated by a stick handle. It works like a joy-stick, but for vertical only. I adjust for windage by moving the rear sandbag.
The 30″ barrel is 1.250″ in diameter. With the barrel block forward, the vibrations should be at a low frequency. Instead of one long rod whipping, I now have two short rods (barrel haves) being dampened. This is my fourth barrel block gun. They work, but so does a good pillar-bedded action. I just do stuff a little different.

The vertical “keel” down the bottom of the stock stops the “spring” of a flat-bar stock. There is little, if any, noticeable flex before or during recoil. The long length of the stock, the fat barrel, and the forward-mounted barrel block work together to keep the gun from rising off the ground. BUT, remember this is a .223 Rem rifle. A .308 Win version might act very differently. I may try a .308-barreled action soon, just to see what happens. But I will stick with the .223 Rem as my choice for match shooting.
 The offset scope idea came from a benchrest “rail” gun. In truth, the whole concept came from a rail gun — just adapted to being shot off a bipod. Sure it isn’t directly over the bore. It is about 1.5″ over to the left. So if you want the scope to be zeroed on the center of the target, you have to adjust for the offset. At 100 yards that is 1.5 MOA. But at 300 it is only 0.5 MOA, at 600 only a ¼-MOA, and at 1000 about 1 click on my scope. The offset scope idea came from a benchrest “rail” gun. In truth, the whole concept came from a rail gun — just adapted to being shot off a bipod. Sure it isn’t directly over the bore. It is about 1.5″ over to the left. So if you want the scope to be zeroed on the center of the target, you have to adjust for the offset. At 100 yards that is 1.5 MOA. But at 300 it is only 0.5 MOA, at 600 only a ¼-MOA, and at 1000 about 1 click on my scope.
What the offset DOES do for me is eliminate any cheek pressure. My cheek never touches the stock. Since this is only a .223 Rem, I don’t put and shoulder pressure behind it. And I don’t have a pistol grip to hang on to, but I do put my thumb behind the trigger guard and “pinch” the two-ounce trigger.
The offset scope placement could interfere with loading a dual-port action from the left. That’s not a problem for me as I set my spotting scope up on the left side very close to the rifle. I have plenty of time to reload from the right side while the target is in the pits being scored.
Again — this is my rifle. It is designed for my style of shooting. It is not meant to be a universal “fit all” for the general public. However, I will say the design is adaptable. I can easily convert the system to run in F-Open Class. I would drop a big-bore barreled action into the “V” block, slide on a heavier pre-zeroed scope and rings, add plates on the sides up front to bring the width to 3”, and maybe a recoil pad. It might be interesting to offset the wings up from to counter torque of the big bullets. But I would also have to offset the rear bag rider to get the gun to recoil straight back.
How the Gun Performs
I have had “T” to the range only twice for load development. It groups like my present barrel-blocked 223 F-TR gun. But it’s much easier to shoot and it only moves about 3/4” — straight back. I tried to build am omni-directional joy-stick bipod but I could not get all the side-to-side wiggle out of it. So I have set it up so it only moves up and down (horizontal movement is locked-out). As it works now, the joystick on the bipod lets me set elevation on the target quickly (with up/down adjustment). Then, to adjust for windage, I slide my rear bag side-to-side as needed. Once set, I just tickle the trigger and smile.
Gun Handling — Shoot It Like a Bench-Gun
I basically shoot the gun with no cheek or body contact. I don’t grip it, other than maybe a pinch on the trigger guard. The scope was offset to the left to help the shooter move off the gun and avoid the possibility of head/cheek contact with the stock.
Listen to Richard King Explain How He Shoots his ‘Texas-T’ Rifle:
[haiku url=”http://accurateshooter.net/Video/RichKingTalks.mp3″ Title=”Richard King Talks”]
CLICK PHOTOS to See Big Size
March 3rd, 2013
The MidwayUSA Pro Series Competition Shooting Mat is now on sale for just $49.99, through the end of March, 2013. That’s 51% off the regular $102.99 price. This mat is bigger and better than MidwayUSA’s original shooting mat, with many enhancements. The Pro Series mat measures a full 73.5″ x 35.5″ and the padding is thicker. There is a zippered pocket on the front extension flap to hold ammo or log book. The rubberized contact areas are tan now (rather than black) so they don’t get so hot in the sun. And the designers added webbing “pockets” for bipod feet so you can pre-load the ‘pod with forward pressure. MidwayUSA has done a good job improving a mat that was already a good deal for the money. At $49.99 on sale (through 3/31/2013), this Pro Series mat is a great deal.


MidwayUSA Buyer Reviews:
Five Stars: Great upgrades to the original. It’s bigger in every direction, and the padding is twice as thick. The new knee and elbow pads won’t get as hot as the black material on the old one did, and the new material is “grippier” than the old stuff too. The bi-pod stop is a nice touch if you shoot F-T/R. — Bob M., Missouri, 10/6/2010.
Five Stars: As a competitive shooter my mat is important. The mat I replaced had been with me for about twenty years. It had been with me through the famous weather at Camp Perry, the winds and sand of Grayling 1000 yard matches. My Midway mat arrived shiny and new, full of stuffing, stiff and green. At my next match I found I liked the feel of the mat, it has handles! The rocks and sand on the firing line were not as sharp. The rubber is well-placed. It has proven to be rugged and quite up to the task. I am seeing more Midway mats at matches. A good thing. — Tom, Michigan, 12/26/2012.
Four Stars: I purchased this mat for a 2-day Appleseed event this fall. Good overall quality and more than wide and long enough for my frame. The only drawback and reason for me giving it 4 stars instead of 5 is that the padding is insufficient when placed on top of a rocky surface. I wasn’t looking for a sleeping mat mind you, but you feel every single rock underneath the mat when shooting prone (especially on the elbows), kneeling and when transitioning between positions. Best to use another pad underneath if you are using it on a rocky surface. Most of the other mats out there have the same drawbacks so this is still a great choice at a very decent price. — Chris S., Illinois, 1/6/2013.
Five Stars: This is a great mat for the money. It’s larger, thicker, and stickier than my old one. I could use larger knee area friction pads, but that’s the only complaint. The elbow area is huge and that’s what’s best. Much cooler in the sun, too. Rolls up and rolls out easy. The double-adjustable carry strap has built in loops I use for carrying a rolled up foul weather cover. The fold-out front fly is large and useful. This is a good looking, hard working mat. — Steve R., Illinois, 10/11/2010
This product has 4.3 star average with 53 user reviews.
February 8th, 2013
Report by Monte Milanuk
With the proliferation of wide bipods for competitive F-TR shooting, we’ve seen a lot of cool gear hitting the market. Whatever you can imagine, someone is either building now, or working on prototype plans. One new design that seems to have stayed under the radar thus far is the FLEX bipod by Dan Pohlabel.
The FLEX bipod’s designer, Dan Pohlabel, offers these instructions:
The bipod feet are shipped loose. Note there is a left foot and a right foot. Mount them as shown in the diagram above. Determine the balance point of your rifle and mount the bipod approximately two inches forward of that point. You may want to move it further forward after shooting. Experiment with its placement to minimize movement of the bipod. When setting up, first grab each foot and ‘dig’ them in to the shooting surface, dirt, gravel, grass, carpet — it doesn’t matter. After making sure each foot has a hold, raise or lower the bipod to your target and use the cant adjustment to level your rifle. Loading the bipod with your shoulder is the preferred method of position. Contact me with any FLEX bipod questions you may have: danielp123 [at] earthlink.net.
The FLEX bipod is a very simple design — no Mariner’s wheel for vertical adjustment, no joystick head, no changing width as it goes up and down. And the FLEX bipod is very light (as are most, these days), but also very durable. I haven’t actively tried to destructively test it, but so far it’s held up to being tossed in the back of the truck, hauled around to the range and everywhere else in between. It definitely has not been ‘babied’ in any way, and it’s not noticeably any worse for wear. An added bonus is that it breaks down very flat for airline travel. Once I take the feet off, remove the ratchet lever (with screw), the whole bipod nestles very nicely in the bottom layer of foam in my gun case (with cuts for the head etc. in the foam). I’m definitely not worried about it in there. If someone bashes the case hard enough to damage what is essentially a plate of spring steel, then I’ve got bigger worries.

This view (below) shows a bit of the adjustment controls. Each leg has independent control for height, and there is a ratcheting locking lever that controls the cant. Instead of being directly centered like most other designs I’ve seen, this one is off-set a little, allowing a fair amount of movement without allowing it to completely ‘flop’ over to one side. (By contrast, using other bipod designs, I’ve had guns literally flip over as they tipped over too far.) Also having the tilt control relatively close/tight to the bore of the gun helps with the stability as well.

Inventor Dan Pohlebel developed the FLEX bipod for use in his native Ohio, where apparently grassy firing lines are the norm. Here in the Pacific Northwest, I seem to encounter concrete or gravel more often, which is why I usually place a mat under the bipod to keep it from sinking in too far. On Dan’s newest models, the “feet” have teeth to give better traction on hard surfaces such as the hard-pack clay/dirt (beneath a skim layer of gravel) that you’ll find at Raton, NM.
Why would you want more traction? Well, not everyone wants a bipod that slides around like a hog on ice. Some people manage to get things tracking straight back and forth, almost like it was constrained by a front rest. Personally, I have a hard time doing that in a repeatable fashion. While the FLEX Bipod shoots quite well with a [loose] hold, it was designed for those of us who like to ‘lean’ into the gun a bit. Quite literally, the idea is that you get the feet to dig in slightly, and push against the rifle butt with your shoulder and the bipod will ‘flex’ or bow forward slightly. It is one of those things that sounds wonky until you try it. It may take a few times to get a feel for it, but once you do, it is surprisingly repeatable.

The system does have a few quirks to it. Personally, I wish the rail attachment had a ratchet lever like the pivot control. Currently you need a separate tool to take the bipod on/off the gun. Also, the FLEX bipod seems to work better mounted somewhat further back than other designs. Some experimenting may be necessary to find what works best. Then again, we all need more trigger time….
February 7th, 2013
How Easy it is to Have Fun with Rifles and Equipment You Probably Already Have….
Forum member Rod Vigstol (aka Nodak7mm) has written a great Introduction to F-Class for shooters getting started in this rewarding discipline. Rod’s article, which appears in German Salazar’s Rifleman’s Journal website, covers F-Class basics and addresses concerns that “newbies” may have when trying a new shooting sport. Rod stresses that most guys who own a varmint-hunting or tactical rig likely have nearly all the gear they need to give F-Class competition a try.

CLICK HERE to read Rod Vigstol’s ‘Getting Started in F-Class’ article on Rifleman’s Journal.com
Rod explains: “If you’re reading this, you have more than just a general interest in the shooting sports and in the awesome rifles that shoot tiny groups at insane distances. You probably even have friends that enjoy shooting as much as you do. The quandary you may find yourself in is your friends haven’t quite jumped into it head-first like you have and they haven’t spent a lot of money and time obtaining the equipment you have to go shoot these matches. But you know what? Your prairie-dog shooting buddy or coyote-hunter friend can attend these matches and shoot alongside with you. He or she more than likely already has the basic equipment needed to shoot a match.” Most varmint shooters already have a suitable, accurate rifle and the following equipment:
• A variable-power scope in the 4.5-14x range or higher.
• A front bipod like the trusty old Harris 9″-13″, or maybe even a basic pedestal front rest.
• A rear sand-bag or similar sand-sock to rest the butt stock.
• A basic shooting mat from Midway or at least a piece of carpet or canvas to lay on.

Rod also provides a handy checklist of items to bring to the range. These include: Canvas or carpet strip (to set under bipod), Notebook, Kitchen Timer, Cleaning Rod, Camp Chair, Elbow Pads, Shooting Hat, and Open Bolt Indicator (OBI). Along with rifle, bipod (or front rest), rear bag, and ammo, that’s pretty much all you need.

Rod encourages all shooters to give F-Class a try — even novices. Rod explains: “We have all been rookies, newbies, new kids on the block or whatever. So we all have a good idea of what may be going on in your mind, the questions and concerns you may have. I’m telling you this sport is full of fantastic people who deep down find it far more fulfilling to help a new shooter get started than running a clean target. You just have to take the first step to get involved.”
CLICK HERE To read the entire article on Rifleman’s Journal.com. We’ve only provided a small sample of Rod’s article; it is definitely worth reading in its entirety.
January 13th, 2013
Following shoulder surgery, our Contributing Editor German Salazar moved to F-TR shooting, replacing his sling and iron sights with bipod and scope. German has done remarkably well for an F-TR newbie, winning his first two 500-yard matches (in F-TR class) at Phoenix-area ranges. German has been shooting his “old Palma rifle with a scope and bipod attached”. This rig features a Gilkes-Ross action in a Robertson/Sitman Highpower Prone stock with an Anschütz 5020 trigger and 30″ 1:11″-twist Krieger barrel. The rifle is fitted with a Canadian-made Rempel “Ski” bipod and a Leupold BR 24X scope.
On his Riflemans’ Journal website, German has crafted a helpful article with advice for “sling shooters contemplating a busman’s holiday into F-Class.” Even seasoned F-Class shooters can learn something from German’s observations in his F-TR: Scoping it Out article. Here are some highlights from the article:
Carpet Under the Bipod
“I quickly learned that a piece of carpet was an essential component under the bipod. Without the carpet, [on dirt surfaces] the bipod tends to dig into the dirt with every shot, resulting in odd elevation shots. On the concrete it isn’t quite as essential, but it smooths the recoil movement appreciably and is worthwhile. [I used] a short-nap carpet remnant for this, but my car floor mat also worked well.”

Clicking vs. Holding Off
“I’ve been shooting iron sights and clicking sight knobs for most of my life; trying to hold off made me very uncomfortable and the reflex pull of the trigger just wasn’t there. Once I returned to holding center and clicking, I was more comfortable and was able to execute my shots more quickly and cleanly. By zeroing the windage knob I can also easily return to a previous setting when conditions warrant.”
Reading Mirage with Spotting Scope
“In conversations with other F-Class shooters in our club, I found that few were using a spotting scope to see mirage; they were largely relying on the rifle scope. However, the rifle scope is focused on the target, as it must be to eliminate parallax, and thus cannot show mirage with the same clarity as a spotting scope that is focused roughly halfway down the range.”

Positioning Your Spotting Scope
“I position the spotting scope in the same manner as I did when shooting from the sling. It is very close to me and can be used without moving the head from the cheekpiece. The object, as always, is to minimize movement in order to maintain a consistent position and to minimize the time lost between the last glance at the mirage and breaking the shot.”
CLICK HERE to Read Full F-TR Article by German Salazar
German’s F-TR article first appeared in 2011. Since then German has had another shoulder surgery, but he is progressing well.
|