Applied Ballistics Founder Bryan Litz and Former USAMU and Team USA coach Emil Praslick III share their wisdom in an informative Guns Magazine Podcast. Along with being a true ballistics guru, Bryan Litz is an outstanding competitive shooter, having won F-TR National Championships, and both Sling and F-TR divisions at the Berger SW Nationals, along with many other matches. Emil is considered one of the world’s great wind-readers and team coaches, having coached 20+ championship teams.
Guns Magazine podcast host Brent Wheat asks Bryan and Emil about multiple topics including: exterior ballistics, bullet design, wind reading, ballistic solvers, BC myths, and more.
Brent reports: “Together, Bryan and Emil understand what happens from the time a bullet leaves the muzzle until it impacts the target, including the atmospheric affects along the way. Grab a pencil, listen in, and get ready to take notes.”
This Long Range Grad School podcast features Berger’s Chief Ballistician, Bryan Litz, and Berger’s Emil Praslick. Both have extensive long range competitive shooting experience, with championship titles (as shooter and/or coach) in a multitude of long range disciplines. CLICK arrow below to start podcast audio:
Emil Praslick (left) confers with Bryan Litz (right) at King of 2 Miles ELR Event.
In this Video Emil Praslick explains his methods for determining wind direction.
Bryan Litz coaching Team USA in Canada using a WIND PLOT.
The 2026 Southwest Nationals (SWN) start today, 2/11/2026, at the Ben Avery Range outside Phoenix, AZ. The big event starts with a 600-yard Mid-Range Match. Many of the nation’s most talented F-Class and sling shooters will be there. But no matter what your skill level, it is still possible to make major mistakes that can spoil the day and/or put you out of the running for the entire match. This article aims to help competitors avoid the big errors/oversights/failures, aka “train wrecks”, that can ruin a match.
Photo by Sherri Jo Gallagher.
In any shooting competition, you must try to avoid major screw-ups that can ruin your day (or your match). In this article, past F-TR National Mid-Range and Long Range Champion Bryan Litz talks about “Train Wrecks”, i.e. those big disasters (such as equipment failures) that can ruin a whole match. Bryan illustrates the types of “train wrecks” that commonly befall competitors, and he explains how to avoid these “unmitigated disasters”.
Urban Dictionary “Train Wreck” Definition: “A total @#$&! disaster … the kind that makes you want to shake your head.”
Success in long range competition depends on many things. Those who aspire to be competitive are usually detail-oriented, and focused on all the small things that might give them an edge. Unfortunately it’s common for shooters lose sight of the big picture — missing the forest for the trees, so to speak.
Consistency is one of the universal principles of successful shooting. The tournament champion is the shooter with the highest average performance over several days, often times not winning a single match. While you can win tournaments without an isolated stellar performance, you cannot win tournaments if you have a single train wreck performance. And this is why it’s important for the detail-oriented shooter to keep an eye out for potential “big picture” problems that can derail the train of success!
Train wrecks can be defined differently by shooters of various skill levels and categories. Anything from problems causing a miss, to problems causing a 3/4-MOA shift in wind zero can manifest as a train wreck, depending on the kind of shooting you’re doing.
Below is a list of common Shooting Match Train Wrecks, and suggestions for avoiding them.
1. Cross-Firing. The fastest and most common way to destroy your score (and any hopes of winning a tournament) is to cross-fire. The cure is obviously basic awareness of your target number on each shot, but you can stack the odds in your favor if you’re smart. For sling shooters, establish your Natural Point of Aim (NPA) and monitor that it doesn’t shift during your course of fire. If you’re doing this right, you’ll always come back on your target naturally, without deliberately checking each time. You should be doing this anyway, but avoiding cross-fires is another incentive for monitoring this important fundamental. In F-Class shooting, pay attention to how the rifle recoils, and where the crosshairs settle. If the crosshairs always settle to the right, either make an adjustment to your bipod, hold, or simply make sure to move back each shot. Also consider your scope. Running super high magnification can leave the number board out of the scope’s field view. That can really increase the risk of cross-firing.
2. Equipment Failure. There are a wide variety of equipment failures you may encounter at a match, from loose sight fasteners, to broken bipods, to high-round-count barrels that that suddenly “go south” (just to mention a few possibilities). Mechanical components can and do fail. The best policy is to put some thought into what the critical failure points are, monitor wear of these parts, and have spares ready. This is where an ounce of prevention can prevent a ton of train wreck. On this note, if you like running hot loads, consider whether that extra 20 fps is worth blowing up a bullet (10 points), sticking a bolt (DNF), or worse yet, causing injury to yourself or someone nearby.
3. Scoring/Pit Malfunction. Although not related to your shooting technique, doing things to insure you get at least fair treatment from your scorer and pit puller is a good idea. Try to meet the others on your target so they can associate a face with the shooter for whom they’re pulling. If you learn your scorer is a Democrat, it’s probably best not to tell Obama jokes before you go for record. If your pit puller is elderly, it may be unwise to shoot very rapidly and risk a shot being missed (by the pit worker), or having to call for a mark. Slowing down a second or two between shots might prevent a 5-minute delay and possibly an undeserved miss.
Photo by Sherri Jo Gallagher.
4. Wind Issues. Tricky winds derail many trains. A lot can be written about wind strategies, but here’s a simple tip about how to take the edge off a worse case scenario. You don’t have to start blazing away on the command of “Commence fire”. If the wind is blowing like a bastard when your time starts, just wait! You’re allotted 30 minutes to fire your string in long range slow fire. With average pit service, it might take you 10 minutes if you hustle, less in F-Class. Point being, you have about three times longer than you need. So let everyone else shoot through the storm and look for a window (or windows) of time which are not so adverse. Of course this is a risk, conditions might get worse if you wait. This is where judgment comes in. Just know you have options for managing time and keep an eye on the clock. Saving rounds in a slow fire match is a costly and embarrassing train wreck.
5. Mind Your Physical Health. While traveling for shooting matches, most shooters break their normal patterns of diet, sleep, alcohol consumption, etc. These disruptions to the norm can have detrimental effects on your body and your ability to shoot and even think clearly. If you’re used to an indoor job and eating salads in air-conditioned break rooms and you travel to a week-long rifle match which keeps you on your feet all day in 90-degree heat and high humidity, while eating greasy restaurant food, drinking beer and getting little sleep, then you might as well plan on daily train wrecks. If the match is four hours away, rather than leaving at 3:00 am and drinking five cups of coffee on the morning drive, arrive the night before and get a good night’s sleep.”
Keep focused on the important stuff. You never want to lose sight of the big picture. Keep the important, common sense things in mind as well as the minutia of meplat trimming, weighing powder to the kernel, and cleaning your barrel ’til it’s squeaky clean. Remember, all the little enhancements can’t make up for one big train wreck!
Here’s a smart tip from Bryan Litz, explaining how damage to a bullet jacket can harm the projectile’s Ballistic Coefficient (BC). This tip is posted on Bryan’s new Bryan Litz Ballistics Facebook page. We recommend you subscribe to that page to access Bryan’s latest informative posts.
Bryan notes: “If the case mouth scratches the bullet when you seat it, the damage can cause the BC to be inconsistent, which shows up as vertical dispersion at long range.”
We see this sometimes when running Doppler Radar for competitors at Applied Ballistics Mobile Lab events. If someone is shooting a bullet that typically has a very consistent BC (1% or less) but they’re seeing a higher BC variation, it can be due to the bullets being damaged in the loading process.”
The lead photo above shows the badly-scratched jacket of a bullet seated in a rough-mouthed case. To prevent such jacket damage, one should chamfer, deburr, and smooth case mouths after trimming.
Below is a recorded Doppler radar result showing excessive BC variation. Such variation can increase vertical dispersion at long range. This can result in larger group sizes and lower scores.
“Shoot Like a Champion”. Bryan Litz, author of Applied Ballistics for Long-Range Shooting, says he often sees notes like this tucked in shooter’s gear (or taped to an ammo box) at matches. What “marksmanship mantras” do you use? Do you have a favorite quote that you keep in mind during competition?
On the Applied Ballistics Facebook Page, Bryan invited other shooters to post the motivating words (and little reminders) they use in competition. Here are some of the best responses:
“Shoot 10s and No One Can Catch You…” — James Crofts
“You Can’t Miss Fast Enough to Win.” — G. Smith
“Forget the last shot. Shoot what you see!” — P. Kelley
“Breathe, relax, you’ve got this, just don’t [mess] up.” — S. Wolf
“It ain’t over ’til the fat lady sings.” — J. McEwen
“Keep calm and shoot V-Bull.” — R. Fortier
“Be still and know that I am God[.]” (PS 46:10) — D.J. Meyer
“Work Hard, Stay Humble.” — J. Snyder
“Shoot with your mind.” — K. Skarphedinsson
“The flags are lying.” — R. Cumbus
“Relax and Breathe.” — T. Fox
“Zero Excuses.” — M. Johnson
“SLOW DOWN!” — T. Shelton
“Aim Small.” — K. Buster
“Don’t Forget the Ammo!” (Taped on Gun Case) — Anonymous
PARTING SHOT: It’s not really a mantra, but Rick Jensen said his favorite quote was by gunsmith Stick Starks: “Them boys drove a long ways to suck”. Rick adds: “I don’t want to be that guy”, i.e. the subject of that remark.
Q: What’s more important — wind speed, or direction?
A: Obviously they both matter, but they do trade dominance based on direction. For example, a 10 mph wind between 2:30 and 3:30 is only changing its value from 9.7 to 10 to 9.7 mph (bracket of 0.3 mph). However a 10 mph wind between 11:30 and 12:30 is changing its cross wind component value from 2.6 mph left to zero to 2.6 mph right (bracket of 5.2 mph). There is the same 30° change in direction, but this results in a massively different bracket.
Point being, in this case, a direction change is far more critical if it’s near 6 or 12 o’clock. A small direction change when it’s close to 3 or 9 o’clock is negligible.
On the contrary, a change in wind SPEED when it’s near 3 or 9 affects your crosswind component directly. But for a near head or tail wind, a fluctuation in wind speed only causes a small fraction of a change to the crosswind component.
SUMMARY: If you’re in a near full-value wind, pay more attention to wind SPEED. If you’re closer to a head- or tail-wind, nailing the exact DIRECTION will be more important.
Get More Tips on Bryan Litz Ballistics Facebook Page
This post is from the new Bryan Litz Ballistics Facebook Page. FB users should check that page regularly for more tips from Bryan, American’s leading ballistics expert and founder of Applied Ballistics LLC.
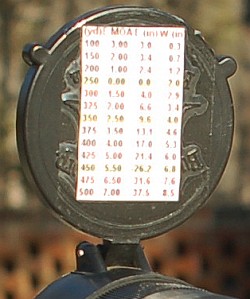
When shooting any match that requires moving back and forth between multiple target distances it is very handy to have your ballistics data, i.e. your “come-ups”, placed within easy view. That way you can instantly see your elevation for various target distances in seconds. This can really help a PRS/NRL competitor on timed stages. And having a convenient “Dope” display of elevation at various distances can also benefit varminters who are shooting critters. In our varmint hunters we targeted p-dogs from about 80 yards out to 500+.
PRC DOPE Roller QD Ballistic Data Turret
The PRC DOPE Roller QD Ballistic Data Turret provides a handy, low profile display of windage and elevation data. You can see your “dope” without breaking position from behind the rifle. Then simply rotate the knob to display data from various distances. The ballistic data is placed by wrapping a simple 1″ x 3″ adhesive address label around the outside surface of the DOPE Roller. This handy quick-detach roller retails for $64.95 from Precision Rifle Components.
MDT M-LOK Data Card Holder
The MDT M-LOK Data Card Holder has an adjustable neck allowing you to easily position your ballistics data for optimal viewing. Data entries are written on on a reusable card that attaches with Velcro. The Data Card Holder Kit comes with hardware to mount to any M-Lok rail. In addition the card holder fits directly to an MDT ACC chassis attachment point. This MDT kit includes: M-LOK Data Card Holder, Wet Erase Data Card, Wet Erase Marker, and installation hardware. NOTE: The Card Holder sticks out about 6.7″ when fully extended, but arm links can be removed to make the arm shorter. The unit folds flat for storage. This complete kit is $59.95 at Creedmoor Sports.
Warne Universal Data Card Holder
The Warne Universal Data Card Holder easily attaches to the scope tube, in left or right configurations, for a universal fit. Data is displayed in a convenient location to make quick and accurate target transitions, and the articulating arm allows for low profile storage while not in use. The Warne Universal Data Card Holder retails for $88.49 at Warnescopemounts.com. Three ring sizes are offered: 30mm, 34mm, 35mm. A 50-pack of Warne Data Card label refills is currently $16.99 from Warne.
Scope-Cover Mounted Ballistics Table
Another option is to place your ballistics card on the back of the front flip-up scope cover. This set-up is used by Forum member Greg C. (aka “Rem40X”).
With your ‘come-up’ table on the flip-up cover you can check your windage and elevation drops easily without having to move out of shooting position.
Greg tells us: “Placing my trajectory table on the front scope cover has worked well for me for a couple of years and thought I’d share. It’s in plain view and not under my armpit. And the table is far enough away that my aging eyes can read it easily. To apply, just use clear tape on the front objective cover.”
Cheap But Effective — Tape on the Stock with Ballistics Data
At the 2021 Nightforce ELR Steel Challenge, Applied Ballistics guru Bryan Litz wrote his come-ups on blue masking tape applied to his stock. He did this based on a tip from Chase Stroud. With the tape applied behind the action, the numbers are easily visible. This “cheap trick” does work apparently — Bryan won the match with a convincing victory over 220 other shooters. READ Match Report.
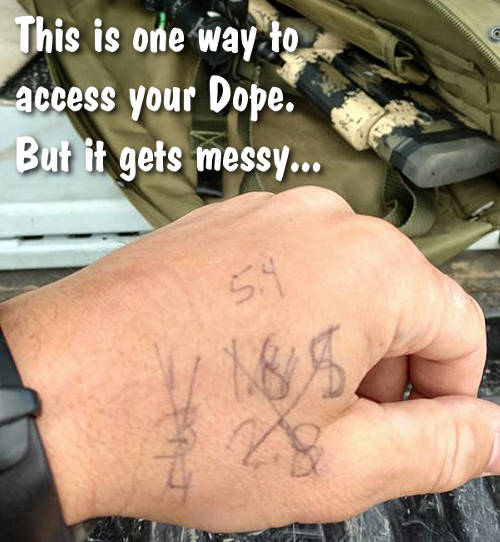
Cheap But NOT So Effective — Numbers on Hand
Many of us have scribbled some come-ups on the back of a hand or on our forearm using a marking pen. That can work if you only have a couple distances to deal with — say 100 and 300 yards. But if you want a more complete Come-up table, get one of the card-holders shown above. Writing numbers on the skin is generally not such a good idea….
Photo shows Bryan Litz (on right) and tester Mitchell Fitzpatrick. Bryan said: “Only 2,445 rounds to go! We’re testing over 50 ammo types in five different twist barrels… science can be exhausting!”
Do you know the actual BC (Ballistic Coefficient) of your rimfire ammunition? Well Applied Ballistics has the data, thanks to a comprehensive, marathon ammo testing session. Some years back, in an effort to determine the “real world” BCs of various rimfire ammo types, Bryan Litz and his team at Applied Ballistics did an extraordinary, in-depth shooting test. Litz and company tested over fifty types of .22 LR ammo, using five different twist-rate barrels. This was one of the most comprehensive and through rimfire ammo tests ever done.
Bryan tolds us: “We tested many types of .22 rimfire ammo for the 2nd Edition of the Ballistic Performance of Rifle Bullets book. We used a pair of Oehler chronographs to measure velocity at the muzzle (MV) and velocity at 100 yards.” With these numbers (average and SD) Bryan can calculate G1 BCs for all the 50+ types of rimfire ammo. What’s more, because every sample is shot through five different barrels (each with a different twist rate) Bryan can also determine how velocity is affected by twist rate.
The tests are primarily to determine velocities for BC calculations — this was not an accuracy test. Bryan explains: “Our tests are not really looking at accuracy, mainly because that’s so subjective to different rifles. Our testing is primarily focused on measuring the BC of rimfire rounds from different twist-rate barrels. The MVs and BCs from the different twist test barrels was then published by Applied Ballistics in print books. Bryan Litz told us: “The .22 LR Rimfire data was originally published in Ballistic Performance of Rifle Bullets, 2nd Edition, which is now out of print. The 3rd Edition of that book doesn’t have rimfire data. The rimfire testing results and data were re-published in Modern Advancements in Long Range Shooting – Volume II (along with many other topics).
Bringing Science to the Rimfire World
Bryan’s goal with this project was to increase the rimfire knowledge base: “We hope to give the world of .22 LR rimfire a good dose of science. How is the BC of .22 rimfire ammo affected by barrel twist? Do subsonic rounds have more consistent BCs than supersonic or transonic rounds? What brands have the highest BCs? What brands have the most consistent MVs?”
Data from two Oehler chronographs is recorded in a computer. Ammo samples were tested in five (5) different barrels (of varying twist rates). Give credit to Dane Hobbs who supplied a test rifle, multiple barrels, and most of the ammo types for the test.
.22 LR at 300 Yards?
Bryan also conducted some longer range rimfire tests. His interesting findings have appeared in the Modern Advancements in Long Range Shooting book series. Bryan notes: “While .22 rimfire isn’t typically considered ‘long range’, we were able to consistently hit a two-MOA steel target at 300 yards with the trajectory predicted by AB software and the measured BC of some standard .22 LR rimfire ammo. The info we’’re generating may make it possible to push the range of target engagement for a round that’s not seen much advancement in many decades.”
Figure 1. When the bullet is seated farther out of the case, there is more volume available for powder. This enables the cartridge to generate higher muzzle velocity with the same pressure.
Effects Of Cartridge Over All Length (COAL) And Cartridge Base To Ogive (CBTO) – Part 1 by Bryan Litz forBerger Bullets.
Many shooters are not aware of the dramatic effects that bullet seating depth can have on the pressure and velocity generated by a rifle cartridge. Cartridge Overall Length (COAL) is also a variable that can be used to fine-tune accuracy. It’s also an important consideration for rifles that need to feed rounds through a magazine. In this article, we’ll explore the various effects of COAL, and what choices a shooter can make to maximize the effectiveness of their hand loads.
Sporting Arms and Ammunition Manufacturers’ Institute (SAAMI)
Most loading manuals (including the Berger Manual), present loading data according to SAAMI (Sporting Arms and Ammunition Manufacturers’ Institute) standards. SAAMI provides max pressure, COAL and many other specifications for commercial cartridges so that rifle makers, ammo makers, and hand loaders can standardize their products so they all work together. As we’ll see later in this article, these SAAMI standards are in many cases outdated and can dramatically restrict the performance potential of a cartridge.
Bullet seating depth is an important variable in the accuracy equation. In many cases, the SAAMI-specified COAL is shorter than what a hand loader wants to load their rounds to for accuracy purposes. In the case where a hand loader seats the bullets longer than SAAMI specified COAL, there are some internal ballistic effects that take place which are important to understand.
Effects of Seating Depth / COAL on Pressure and Velocity
The primary effect of loading a cartridge long is that it leaves more internal volume inside the cartridge. This extra internal volume has a well known effect; for a given powder charge, there will be less pressure and less velocity produced because of the extra empty space. Another way to look at this is you have to use more powder to achieve the same pressure and velocity when the bullet is seated out long. In fact, the extra powder you can add to a cartridge with the bullet seated long will allow you to achieve greater velocity at the same pressure than a cartridge with a bullet seated short.
When you think about it, it makes good sense. After all, when you seat the bullet out longer and leave more internal case volume for powder, you’re effectively making the cartridge into a bigger cartridge by increasing the size of the combustion chamber. Figure 1 illustrates the extra volume that’s available for powder when the bullet is seated out long.
Before concluding that it’s a good idea to start seating your bullets longer than SAAMI spec length, there are a few things to consider.
Geometry of a Chamber Throat
The chamber in a rifle will have a certain throat length which will dictate how long a bullet can be loaded. The throat is the forward portion of the chamber that has no rifling. The portion of the bullet’s bearing surface that projects out of the case occupies the throat (see Figure 2).
The length of the throat determines how much of the bullet can stick out of the case. When a cartridge is chambered and the bullet encounters the beginning of the rifling, known as the lands, it’s met with hard resistance. This COAL marks the maximum length that a bullet can be seated. When a bullet is seated out to contact the lands, its initial forward motion during ignition is immediately resisted by an engraving force.
Seating a bullet against the lands causes pressures to be elevated noticeably higher than if the bullet were seated just a few thousandths of an inch off the lands.
A very common practice in precision reloading is to establish the COAL for a bullet that’s seated to touch the lands. This is a reference length that the hand loader works from when searching for the optimal seating depth for precision. Many times, the best seating depth is with the bullet touching or very near the lands. However, in some rifles, the best seating depth might be 0.100″ or more off the lands. This is simply a variable the hand loader uses to tune the precision of a rifle.
Bryan Litz and The Science of Accuracy Academy have released a Podcast with vital information for all handloaders. This Podcast examines the effects of humidity variances on powder. Bryan notes: “If you want to know how much this can matter, we’re talking up to 200 fps difference for the same load of H4350 in 6.5 Creedmoor” at opposite extremes of humidity.
Bryan adds that “Most shooters don’t realize what a big deal this can be — it overshadows many of our efforts to make consistent velocity and hit targets. This can happen in loaded rounds not just for hand loading where you expose powder to ambient humidity. This is especially important for hunters considering the range of environments hunting ammo goes through.”
Subscriptions for Applied Ballistics The Science of Accuracy Academy Podcasts
If you like this podcast, and want to learn more from Brian Litz and his Applied Ballistics team, you can order a subscription to the Academy. Priced at $9.95/mo, this subscription will allow you to access all podcasts, exclusive videos, learning resources, and bullet data sheets.
The USAMU has published a “how-to” article about bullet sorting. While many of us may sort bullets by base-to-ogive length (and/or weight), the USAMU story explores the “how and why” of sorting bullets by Overall Length (OAL). Read the article highlights below, and make your own decision as to whether OAL sorting is worth the time and effort. Bryan Litz of Applied Ballistics says that sorting by OAL is not a bad idea, but base-to-ogive bullet sorting probably represents a better investment of your time.
Bullet Sorting by Overall Length
We’d like to share a specialized handloading technique which we’ve long found beneficial to our long-range (600 yards and beyond) accuracy. Sorting of bullets for extreme long range (LR) accuracy is not difficult to do, but some background in theory is needed.
Here at USAMU’s Handloading Shop, we only sort individual bullets for the most demanding Long-Range applications and important competitions. Only the most accurate rifles and shooters can fully exploit the benefits of this technique. The basic sorting process involves measuring the Overall Length (OAL) of the bullets, and grouping them in 0.001″ increments. It’s not unusual to find lots of match bullets that vary as much as 0.015″-0.020″ in length throughout the lot, although lots with much less variation are seen as well. Even in bullet lots with 0.015″ OAL variation, the bullet base-to-ogive length will show much less variation. Hence, our basic sort is by bullet OAL. One obvious benefit of sorting is easily seen in the attached photo. The few bullets that are VERY different from the average are culled out, reducing probable fliers.
How does one know what OAL increments to use when sorting? The answer is simple. As each lot of bullets is unique in its OAL distribution, it’s best to sample your bullet lot and see how they are distributed. In the attached photo, you will see a set of loading trays with a strip of masking tape running along the bottom. Each vertical row of holes is numbered in 0.001″ increments corresponding to the bullets’ OAL. A digital caliper makes this task much easier. As each bullet is measured, it is placed in the line of holes for its’ OAL, and gradually, a roughly bell-shaped curve begins to form.
Note that near the center, bullets are much more plentiful than near the edges. At the extreme edges, there are a few that differ markedly from the average, and these make great chronograph or sighting-in fodder. We recommend using a sample of 200 bullets from your lot, and 300 is even better. Some bullet lots are very consistent, with a tall, narrow band of highly-uniform bullets clustered together over just a few thousandths spread. Other lots will show a long, relatively flat curve (less uniform), and you may also see curves with 2 or more “spikes” separated by several 0.001″ OAL increments.
Bullet Sorting — OAL vs. Base-to-Ogive vs. Weight
Expert advice from Bryan Litz, Applied Ballistics
I’m often asked what is a the best measure to sort bullets by, and the answer (to this and many other questions in ballistics) is: it depends.
Choosing to sort by overall length (OAL), base to ogive (BTO), bearing surface, weight, etc. can get overwhelming. Shooters typically look for something they can measure, which shows a variation and sort by that. It’s common for dimensional variations to correlate. For example, bullets which are longer in OAL are typically also shorter in BTO, and have longer noses. All these are symptoms of a bullet that was pushed a little further into the pointing die, or possibly had more than average lube while being swaged. So in essence, if you sort by BTO, you’re measuring one symptom which can indicate a pattern in the bullets shape.
So, the question still stands — what should you measure? You’ll always see more variation in OAL than BTO, so it’s easier to sort by OAL. But sometimes the bullet tips can be jagged and have small burrs which can be misleading. Measuring BTO will result in a lower spread, but is a more direct measure of bullet uniformity.
Then there’s the question of; how much variation is too much, or, how many bins should you sort into? Shooters who see 0.025” variation in BTO may choose to sort into 5 bins of 0.005”. But if you have only 0.005” variation in the box, you’ll still sort into 5 bins of 0.001”. What’s correct? You have to shoot to know. Live fire testing will answer more questions, and answer them more decisively than any amount of discussion on the subject. The test I recommend is to identify bullets on the extreme short end of the spectrum, and some on the extreme long end. Load at least 10 rounds of each, and take turns shooting 5-shot groups with them. If there is a difference, it will be evident. The results of the testing will answer your question of: should I sort based on X, Y, or Z?”
You can read more discussions on this and other similar subjects in our Accurateshooter.com Shooters’ Forum. Here’s a link to a thread discussing bullet sorting: Bullet Sorting Thread


 Train Wrecks (and How to Avoid Them)


 4. Wind Issues. Tricky winds derail many trains. A lot can be written about wind strategies, but here’s a simple tip about how to take the edge off a worse case scenario. You don’t have to start blazing away on the command of “Commence fire”. If the wind is blowing like a bastard when your time starts, just wait! You’re allotted 30 minutes to fire your string in long range slow fire. With average pit service, it might take you 10 minutes if you hustle, less in F-Class. Point being, you have about three times longer than you need. So let everyone else shoot through the storm and look for a window (or windows) of time which are not so adverse. Of course this is a risk, conditions might get worse if you wait. This is where judgment comes in. Just know you have options for managing time and keep an eye on the clock. Saving rounds in a slow fire match is a costly and embarrassing train wreck.


 “Shoot Like a Champion”. Bryan Litz, author of


 Scope-Cover Mounted Ballistics Table


 Bryan tolds us: “We tested many types of .22 rimfire ammo for the 2nd Edition of the

 Effects Of Cartridge Over All Length (COAL) And Cartridge Base To Ogive (CBTO) – Part 1