Applied Ballistics Founder Bryan Litz and Former USAMU and Team USA coach Emil Praslick III share their wisdom in an informative Guns Magazine Podcast. Along with being a true ballistics guru, Bryan Litz is an outstanding competitive shooter, having won F-TR National Championships, and both Sling and F-TR divisions at the Berger SW Nationals, along with many other matches. Emil is considered one of the world’s great wind-readers and team coaches, having coached 20+ championship teams.
Guns Magazine podcast host Brent Wheat asks Bryan and Emil about multiple topics including: exterior ballistics, bullet design, wind reading, ballistic solvers, BC myths, and more.
Brent reports: “Together, Bryan and Emil understand what happens from the time a bullet leaves the muzzle until it impacts the target, including the atmospheric affects along the way. Grab a pencil, listen in, and get ready to take notes.”
This Long Range Grad School podcast features Berger’s Chief Ballistician, Bryan Litz, and Berger’s Emil Praslick. Both have extensive long range competitive shooting experience, with championship titles (as shooter and/or coach) in a multitude of long range disciplines. CLICK arrow below to start podcast audio:
Emil Praslick (left) confers with Bryan Litz (right) at King of 2 Miles ELR Event.
In this Video Emil Praslick explains his methods for determining wind direction.
Bryan Litz coaching Team USA in Canada using a WIND PLOT.
Figure 1. When the bullet is seated farther out of the case, there is more volume available for powder. This enables the cartridge to generate higher muzzle velocity with the same pressure.
Effects Of Cartridge Over All Length (COAL) And Cartridge Base To Ogive (CBTO) – Part 1 by Bryan Litz forBerger Bullets.
Many shooters are not aware of the dramatic effects that bullet seating depth can have on the pressure and velocity generated by a rifle cartridge. Cartridge Overall Length (COAL) is also a variable that can be used to fine-tune accuracy. It’s also an important consideration for rifles that need to feed rounds through a magazine. In this article, we’ll explore the various effects of COAL, and what choices a shooter can make to maximize the effectiveness of their hand loads.
Sporting Arms and Ammunition Manufacturers’ Institute (SAAMI)
Most loading manuals (including the Berger Manual), present loading data according to SAAMI (Sporting Arms and Ammunition Manufacturers’ Institute) standards. SAAMI provides max pressure, COAL and many other specifications for commercial cartridges so that rifle makers, ammo makers, and hand loaders can standardize their products so they all work together. As we’ll see later in this article, these SAAMI standards are in many cases outdated and can dramatically restrict the performance potential of a cartridge.
Bullet seating depth is an important variable in the accuracy equation. In many cases, the SAAMI-specified COAL is shorter than what a hand loader wants to load their rounds to for accuracy purposes. In the case where a hand loader seats the bullets longer than SAAMI specified COAL, there are some internal ballistic effects that take place which are important to understand.
Effects of Seating Depth / COAL on Pressure and Velocity
The primary effect of loading a cartridge long is that it leaves more internal volume inside the cartridge. This extra internal volume has a well known effect; for a given powder charge, there will be less pressure and less velocity produced because of the extra empty space. Another way to look at this is you have to use more powder to achieve the same pressure and velocity when the bullet is seated out long. In fact, the extra powder you can add to a cartridge with the bullet seated long will allow you to achieve greater velocity at the same pressure than a cartridge with a bullet seated short.
When you think about it, it makes good sense. After all, when you seat the bullet out longer and leave more internal case volume for powder, you’re effectively making the cartridge into a bigger cartridge by increasing the size of the combustion chamber. Figure 1 illustrates the extra volume that’s available for powder when the bullet is seated out long.
Before concluding that it’s a good idea to start seating your bullets longer than SAAMI spec length, there are a few things to consider.
Geometry of a Chamber Throat
The chamber in a rifle will have a certain throat length which will dictate how long a bullet can be loaded. The throat is the forward portion of the chamber that has no rifling. The portion of the bullet’s bearing surface that projects out of the case occupies the throat (see Figure 2).
The length of the throat determines how much of the bullet can stick out of the case. When a cartridge is chambered and the bullet encounters the beginning of the rifling, known as the lands, it’s met with hard resistance. This COAL marks the maximum length that a bullet can be seated. When a bullet is seated out to contact the lands, its initial forward motion during ignition is immediately resisted by an engraving force.
Seating a bullet against the lands causes pressures to be elevated noticeably higher than if the bullet were seated just a few thousandths of an inch off the lands.
A very common practice in precision reloading is to establish the COAL for a bullet that’s seated to touch the lands. This is a reference length that the hand loader works from when searching for the optimal seating depth for precision. Many times, the best seating depth is with the bullet touching or very near the lands. However, in some rifles, the best seating depth might be 0.100″ or more off the lands. This is simply a variable the hand loader uses to tune the precision of a rifle.
This is one of the very best books ever published about Long Range shooting. Based on sophisticated testing and research, this 356-page hardcover from Applied Ballistics offers important insights you won’t find anywhere else. Modern Advancements in Long Range Shooting – Volume II, a major treatise from Bryan Litz, is chock full of information, much of it derived through sophisticated field testing. As Chief Ballistician for Berger Bullets (and a trained rocket scientist), author Bryan Litz is uniquely qualified. Bryan is also an ace sling shooter and a past F-TR National Champion. Moreover, Bryan’s company, Applied Ballistics, has been a leader in the Extreme Long Range (ELR) discipline.
AUDIO FILE: Bryan Litz Talks about Modern Advancements in Long Range Shooting, Volume 2. (Sound file loads when you click button).
Volume II of Modern Advancements in Long Range Shooting ($44.95) contains all-new content derived from research by Applied Ballistics. Author Bryan Litz along with contributing authors Nick Vitalbo and Cal Zant use the scientific method and careful testing to answer important questions faced by long range shooters. In particular, this volume explores the subject of bullet dispersion including group convergence. Advanced hand-loading subjects are covered such as: bullet pointing and trimming, powder measurement, flash hole deburring, neck tension, and fill ratio.
Each topic is explored with extensive live fire testing, and the resulting information helps to guide hand loaders in a deliberate path to success. The current bullet library of measured G1 and G7 ballistic coefficients is included as an appendix. This library currently has data on 533 bullets in common use by long range shooters.
Bryan tells us that one purpose of this book is to dispel myths and correct commonly-held misconceptions: “Modern Advancements in Long Range Shooting aims to end the misinformation which is so prevalent in long range shooting. By applying the scientific method and taking a Myth Buster approach, the state of the art is advanced….”
Bullet Dispersion and Group Convergence
Part 1 of this Volume is focused on the details of rifle bullet dispersion. Chapter 1 builds a discussion of dispersion and precision that every shooter will benefit from in terms of understanding how it impacts their particular shooting application. How many shots should you shoot in a group? What kind of 5-shot 100 yard groups correlate to average or winning precision levels in 1000 yard F-Class shooting?
Chapter 2 presents a very detailed investigation of the mysterious concept of group convergence, which is the common idea that some guns can shoot smaller (MOA) groups at longer ranges. This concept is thoroughly tested with extensive live fire, and the results answer a very important question that has baffled shooters for many generations.
Part 2 of this Volume is focused on various aspects of advanced hand-loading. Modern Advancements (Vol. II) employs live fire testing to answer the important questions that precision hand loaders are asking. What are the best ways to achieve MVs with low ES and SD? Do flash hole deburring, neck tension, primer selection, and fill ratio and powder scales sensitivity make a difference and how much? All of these questions are explored in detail with a clear explanation of test results.
One of the important chapters of Part 2 examines bullet pointing and trimming. Applied Ballistics tested 39 different bullet types from .224 through .338 caliber. Ten samples of each bullet were tested for BC in each of the following configurations: original out of the box, pointed, trimmed, pointed and trimmed. The effect on the average BC as well as the uniformity in BC was measured and tabulated, revealing what works best.
Part 3 covers a variety of general research topics. Contributing author Nick Vitalbo, a laser technology expert, tested 22 different laser rangefinders. Nick’s material on rangefinder performance is a landmark piece of work. Nick shows how shooters can determine the performance of a rangefinder under various lighting conditions, target sizes, and reflectivities.
Chapter 9 is a thorough analysis of rimfire ammunition. Ballistic Performance of Rifle Bullets, 2nd Edition presented live fire data on 95 different types of .22 rimfire ammunition, each tested in five different barrels having various lengths and twist rates. Where that book just presented the data, Chapter 9 of this book offers detailed analysis of all the test results and shows what properties of rimfire ammunition are favorable, and how the BCs, muzzle velocities and consistency of the ammo are affected by the different barrels.
Chapter 10 is a discussion of aerodynamic drag as it relates to ballistic trajectory modeling. You will learn from the ground up: what an aerodynamic drag model is, how it’s measure and used to predict trajectories. Analysis is presented which shows how the best trajectory models compare to actual measured drop in the real world.
Finally, contributing author Cal Zant of the Precision Rifle Blog presents a study of modern carbon fiber-wrapped barrels in Chapter 11. The science and technology of these modern rifle barrels is discussed, and then everything from point of impact shift to group sizes are compared for several samples of each type of barrel including standard steel barrels.
Many guys getting started in long range shooting are confused about what kind of scope they should buy — specifically whether it should have MIL-based clicks or MOA-based clicks. Before you can make that decision, you need to understand the terminology. This article, with a video by Bryan Litz, explains MILS and MOA so you can choose the right type of scope for your intended application.
You probably know that MOA stands for “Minute of Angle” (or more precisely “minute of arc”), but could you define the terms “Milrad” or “MIL”? In a helpful video, Bryan Litz of Applied Ballitics explains MOA and MILs (short for “milliradians”). Bryan defines those terms and explains how they are used. One MOA is an angular measurement (1/60th of one degree) that subtends 1.047″ at 100 yards. One MIL (i.e. one milliradian) subtends 1/10th meter at 100 meters; that means that 0.1 Mil is one centimeter (1 cm) at 100 meters. Is one angular measurement system better than another? Not necessarily… Bryan explains that Mildot scopes may be handy for ranging, but scopes with MOA-based clicks work just fine for precision work at known distances. Also because one MOA is almost exactly one inch at 100 yards, the MOA system is convenient for expressing a rifle’s accuracy. By common parlance, a “half-MOA” rifle can shoot groups that are 1/2-inch (or smaller) at 100 yards.
What is a “Minute” of Angle?
When talking about angular degrees, a “minute” is simply 1/60th. So a “Minute of Angle” is simply 1/60th of one degree of a central angle, measured either up and down (for elevation) or side to side (for windage). At 100 yards, 1 MOA equals 1.047″ on the target. This is often rounded to one inch for simplicity. Say, for example, you click up 1 MOA (four clicks on a 1/4-MOA scope). That is roughly 1 inch at 100 yards, or roughly 4 inches at 400 yards, since the target area measured by an MOA subtension increases with the distance.
MIL vs. MOA for Target Ranging
MIL or MOA — which angular measuring system is better for target ranging (and hold-offs)? In a recent article on his PrecisionRifleBlog.com website, Cal Zant tackles that question. Analyzing the pros and cons of each, Zant concludes that both systems work well, provided you have compatible click values on your scope. Zant does note that a 1/4 MOA division is “slightly more precise” than 1/10th mil, but that’s really not a big deal: “Technically, 1/4 MOA clicks provide a little finer adjustments than 1/10 MIL. This difference is very slight… it only equates to 0.1″ difference in adjustments at 100 yards or 1″ at 1,000 yards[.]” Zant adds that, in practical terms, both 1/4-MOA clicks and 1/10th-MIL clicks work well in the field: “Most shooters agree that 1/4 MOA or 1/10 MIL are both right around that sweet spot.”
Today is Friday the 13th. For those of you who are superstitious — maybe you should avoid climbing ladders, playing the stock market, or using power tools today.
When it comes to shooting, there are many things that shooters chalk up to “bad luck”. In fact, most of these instances of “bad fortune” just come from a failure to anticipate problems. When you have a major, critical problem at a shooting match, i.e. a “train wreck”, this can be the end of your weekend. In this article, Ballistics Guru Bryan Litz talks about “train wrecks” and how to avoid them, even if you are shooting on Friday the 13th. As Bryan told us: “I don’t believe in superstition — we make our own luck!”
How to Avoid “Train Wrecks” In Competition
In any shooting competition, you must try to avoid major screw-ups that can ruin your day (or your match). In this article, past F-TR National Mid-Range and Long Range Champion Bryan Litz talks about “Train Wrecks”, i.e. those big disasters (such as equipment failures) that can ruin a whole match. Bryan illustrates the types of “train wrecks” that commonly befall competitors, and he explains how to avoid these “unmitigated disasters”.
Urban Dictionary “Train Wreck” Definition: “A total @#$&! disaster … the kind that makes you want to shake your head.”
Success in long range competition depends on many things. Those who aspire to be competitive are usually detail-oriented, and focused on all the small things that might give them an edge. Unfortunately it’s common for shooters lose sight of the big picture — missing the forest for the trees, so to speak.
Consistency is one of the universal principles of successful shooting. The tournament champion is the shooter with the highest average performance over several days, often times not winning a single match. While you can win tournaments without an isolated stellar performance, you cannot win tournaments if you have a single train wreck performance. And this is why it’s important for the detail-oriented shooter to keep an eye out for potential “big picture” problems that can derail the train of success!
Train wrecks can be defined differently by shooters of various skill levels and categories. Anything from problems causing a miss, to problems causing a 3/4-MOA shift in wind zero can manifest as a train wreck, depending on the kind of shooting you’re doing.
Below is a list of common Shooting Match Train Wrecks, and suggestions for avoiding them.
1. Cross-Firing. The fastest and most common way to destroy your score (and any hopes of winning a tournament) is to cross-fire. The cure is obviously basic awareness of your target number on each shot, but you can stack the odds in your favor if you’re smart. For sling shooters, establish your Natural Point of Aim (NPA) and monitor that it doesn’t shift during your course of fire. If you’re doing this right, you’ll always come back on your target naturally, without deliberately checking each time. You should be doing this anyway, but avoiding cross-fires is another incentive for monitoring this important fundamental. In F-Class shooting, pay attention to how the rifle recoils, and where the crosshairs settle. If the crosshairs always settle to the right, either make an adjustment to your bipod, hold, or simply make sure to move back each shot. Also consider your scope. Running super high magnification can leave the number board out of the scope’s field view. That can really increase the risk of cross-firing.
2. Equipment Failure. There are a wide variety of equipment failures you may encounter at a match, from loose sight fasteners, to broken bipods, to high-round-count barrels that that suddenly “go south” (just to mention a few possibilities). Mechanical components can and do fail. The best policy is to put some thought into what the critical failure points are, monitor wear of these parts, and have spares ready. This is where an ounce of prevention can prevent a ton of train wreck. On this note, if you like running hot loads, consider whether that extra 20 fps is worth blowing up a bullet (10 points), sticking a bolt (DNF), or worse yet, causing injury to yourself or someone nearby.
[Editor’s Note: The 2016 F-Class Nationals will employ electronic targets so conventional pit duties won’t be required. However, the following advice does apply for matches with conventional targets.]
3. Scoring/Pit Malfunction. Although not related to your shooting technique, doing things to insure you get at least fair treatment from your scorer and pit puller is a good idea. Try to meet the others on your target so they can associate a face with the shooter for whom they’re pulling. If you learn your scorer is a Democrat, it’s probably best not to tell Obama jokes before you go for record. If your pit puller is elderly, it may be unwise to shoot very rapidly and risk a shot being missed (by the pit worker), or having to call for a mark. Slowing down a second or two between shots might prevent a 5-minute delay and possibly an undeserved miss.
4. Wind Issues. Tricky winds derail many trains. A lot can be written about wind strategies, but here’s a simple tip about how to take the edge off a worse case scenario. You don’t have to start blazing away on the command of “Commence fire”. If the wind is blowing like a bastard when your time starts, just wait! You’re allotted 30 minutes to fire your string in long range slow fire. With average pit service, it might take you 10 minutes if you hustle, less in F-Class. Point being, you have about three times longer than you need. So let everyone else shoot through the storm and look for a window (or windows) of time which are not so adverse. Of course this is a risk, conditions might get worse if you wait. This is where judgment comes in. Just know you have options for managing time and keep an eye on the clock. Saving rounds in a slow fire match is a costly and embarrassing train wreck.
5. Mind Your Physical Health. While traveling for shooting matches, most shooters break their normal patterns of diet, sleep, alcohol consumption, etc. These disruptions to the norm can have detrimental effects on your body and your ability to shoot and even think clearly. If you’re used to an indoor job and eating salads in air-conditioned break rooms and you travel to a week-long rifle match which keeps you on your feet all day in 90-degree heat and high humidity, while eating greasy restaurant food, drinking beer and getting little sleep, then you might as well plan on daily train wrecks. If the match is four hours away, rather than leaving at 3:00 am and drinking five cups of coffee on the morning drive, arrive the night before and get a good night’s sleep.”
Keep focused on the important stuff. You never want to lose sight of the big picture. Keep the important, common sense things in mind as well as the minutia of meplat trimming, weighing powder to the kernel, and cleaning your barrel ’til it’s squeaky clean. Remember, all the little enhancements can’t make up for one big train wreck!
Here are two different bullet types, seated to the same CBTO length, but different COAL. Note the shiny scratches on the bullets made by the comparator tool which indicates a point on the bullet ogive near where the ogive will engage the rifling.
Effects Of Cartridge Over All Length (COAL) And Cartridge Base To Ogive (CBTO) – Part 2 by Bryan Litz forBerger Bullets. Part One of this series focused on the importance of COAL in terms of SAAMI standards, magazine lengths, seating depths, and pressure levels. Another measure of length for loaded ammunition is highly important to precision, namely Cartridge Base to Bullet Ogive Length (CBTO).
Figure 2. Chamber throat geometry showing the bullet jump to the rifling or lands.
Look at Figure 2. Suppose the bullet was seated out of the case to the point where the base of the bullet’s nose (ogive) just contacted the beginning of the riflings (the lands) when the bolt was closed. This bullet seating configuration is referred to as touching the lands, or touching the riflings and is a very important measurement to understand for precision hand-loading. Due to the complex dynamics of internal ballistics which happen in the blink of an eye, the distance a bullet moves out of the case before it engages the riflings is highly critical to precision potential. Therefore, in order to systematically optimize the precision of his handloads, it’s critically important that the precision hand-loader understands how to alter bullet seating depth in relation to the barrel rifling. Part of the required knowledge is understanding how to accurately and repeatably measure the Cartridge Base To Ogive (CBTO) dimension. This is explained in the FULL ARTICLE.
Bryan Litz offers an extended discussion on how to measure CBTO using different tools and methods, including the Hornady OAL gauge. You can read this discussion in the full article found on the Berger Bullets website. CLICK HERE to Read Full Article.
Why Not Use CBTO as a SAAMI Standard?
If CBTO is so important to rifle accuracy, you might ask, “Why is it not listed as the SAAMI spec standard in addition to COAL?” There is one primary reason why it is not listed in the standard. This is the lack of uniformity in bullet nose shapes and measuring devices used to determine CBTO.
Benefits of Having a Uniform CBTO
There is another aspect to knowing your CBTO when checking your COAL as it pertains to performance. With good bullets, tooling, and carefully-prepared cases you can easily achieve a CBTO that varies less than +/- .001″ but your COAL can vary as much as .025″ extreme spread (or more with other brands). This is not necessarily bad and it is much better than the other way around. If you have a CBTO dimension that varies but your COAL dimension is tight (within +/- .002″) then it is most likely that your bullet is bottoming out inside the seater cone on the bullet tip. This is very bad and is to be avoided. It is normal for bullets to have precisely the same nose shape and it is also normal for these same bullets to have nose lengths that can vary as much as .025″.
Summary of Cartridge Base To Ogive (CBTO) Discussion
Here are four important considerations regarding bullet seating depth as it relates to CBTO:
1. CBTO is a critical measurement to understand for handloaders because it’s directly related to precision potential, and you control it by simply setting bullet seating depth.
2. Tools and methods for measuring CBTO vary. Most of the measurement techniques have pitfalls (which may give rise to inconsistent results) that you should understand before starting out.
3. A CBTO that produces the best precision in your rifle may not produce the best precision in someone else’s rifle. Even if you have the same rifle, same bullets, same model of comparator gauges, etc. It’s possible that the gauges are not actually the same, and measurements from one don’t translate to the same dimension for another.
4. Once you find the CBTO that produces the best precision in your rifle, it’s important to allow minimal variation in that dimension when producing quality handloads. This is achieved by using quality bullets, tooling, and properly preparing case mouths and necks for consistent seating.
Many barrel-makers mark the twist rate and bore dimensions on their barrel blanks.
Does muzzle velocity change with faster or slower barrel twist rates? Absolutely, but much less than you might think. Faster twist rates do slow down bullets somewhat, but the speed loss is NOT that significant. With Bartlein .308 Win barrels of identical length and contour, a 1:12″-twist barrel was only 8 fps faster than a 1:8″-twist barrel. That was the result of testing by Applied Ballistics.
The Applied Ballistics team tested six (6) same-length/same-contour Bartlein barrels to observe how twist rate might affect muzzle velocity. This unique, multi-barrel test is featured in the book Modern Advancements in Long Range Shooting, Vol. 1. That book includes other fascinating field tests, including a comprehensive chronograph comparison.
Barrel Twist Rate vs. Velocity — What Tests Reveal by Bryan Litz
When considering barrel twist rates, it’s a common belief that faster twist rates will reduce muzzle velocity. The thinking is that the faster twist rate will resist forward motion of the bullet and slow it down. There are anecdotal accounts of this, such as when someone replaces a barrel of one brand/twist with a different brand and twist and observes a different muzzle velocity. But how do you know the twist rate is what affected muzzle velocity and not the barrel finish, or bore/groove dimensions? Did you use the same chronograph to measure velocity from both barrels? Do you really trust your chronograph?
Summary of Test Results
After all the smoke cleared, we found that muzzle velocity correlates to twist rate at the average rate of approximately 1.33 FPS per inch of twist. In other words, your velocity is reduced by about 5 FPS if you go from a 1:12″ twist to a 1:8″ twist. — Bryan Litz
Savage Test Rifle with Six Bartlein Barrels
Most shooters don’t have access to the equipment required to fully explore questions like this. These are exactly the kinds of things we examine in the book Modern Advancements in Long Range Shooting, Vol. 1. In that book, we present experiments conducted in the Applied Ballistics lab. Some of those experiments took on a “Myth Buster” tone as we sought to confirm (or deny) popular pre-conceptions. For example, here’s how we approached the question of barrel twist and muzzle velocity.
Six .308 Win Barrels from Bartlein — All Shot from the Same Rifle
We acquired six (6) barrels from the same manufacturer (Bartlein), all the same length and contour, and all chambered with the same reamer (SAAMI spec .308 Winchester). All these barrels were fitted to the same Savage Precision Target action, and fired from the same stock, and bench set-up. Common ammo was fired from all six barrels having different twist rates and rifling configurations. In this way, we’re truly able to compare what effect the actual twist rate has on muzzle velocity with a reasonable degree of confidence.
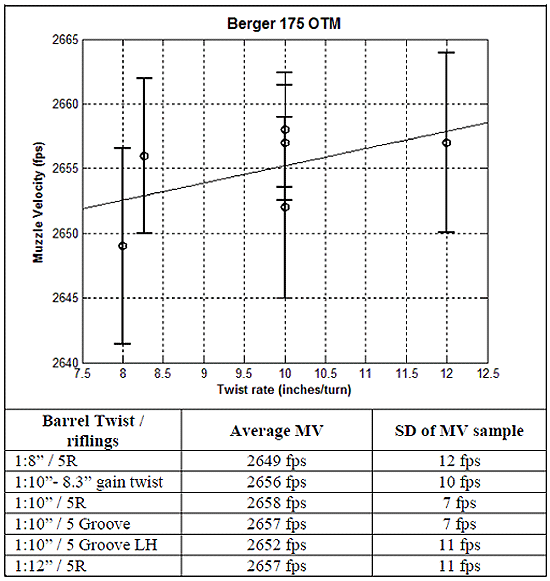
Prior to live fire testing, we explored the theoretical basis of the project, doing the physics. In this case, an energy balance is presented which predicts how much velocity you should expect to lose for a bullet that’s got a little more rotational energy from the faster twist. In the case of the .30 caliber 175 grain bullets, the math predicts a loss of 1.25 fps per inch-unit of barrel twist (e.g. a 1:8″ twist is predicted to be 1.25 fps slower than a 1:9″ twist).
Above, data shows relationship between Twist Rate and Muzzle Velocity (MV) for various barrel twist rates and rifling types. From fast to slow, the three 1:10″ twist barrels are: 5R (canted land), 5 Groove, 5 Groove left-hand twist.
We proceeded with testing all 6 barrels, with twist rates from 1:8″ to 1:12″. After all the smoke cleared, we found that muzzle velocity correlates to twist rate at the average rate of approximately 1.33 fps per inch of twist. In other words, your velocity is reduced by about 5 fps if you go from a 1:12″ twist to a 1:8″ twist. [Editor: That’s an average for all the lengths tested. The actual variance between 1:12″ and 1:8″ here was 8 FPS.] In this case the math prediction was pretty close, and we have to remember that there’s always uncertainty in the live fire results. Uncertainty is always considered in terms of what conclusions the results can actually support with confidence.
This is just a brief synopsis of a single test case. The coverage of twist rates in Modern Advancements in Long-Range Shooting Vol. 1 is more detailed, with multiple live fire tests. Results are extrapolated for other calibers and bullet weights. Needless to say, the question of “how twist rate affects muzzle velocity” is fully answered.
Other chapters in the book’s twist rate section include: · Stability and Drag — Supersonic
· Stability and Drag — Transonic
· Spin Rate Decay
· Effect of Twist rate on Precision
Other sections of the book include: Modern Rifles, Scopes, and Bullets as well as Advancements in Predictive Modeling. This book is sold through the Applied Ballistics online store. Modern Advancements in Long Range Shooting is also available as an eBook in Amazon Kindle format.
Tech Tip by Doc Beech, Applied Ballistics Support Team
I am going to hit on some key points when it comes to bullet pointing. How much pointing and trimming needed is going to depend on the bullet itself. Specifically how bad the bullets are to begin with. Starting out with better-quality projectiles such as Bergers is going to mean two things. First that you don’t need to do as much correction to the meplat, but also that the improvement is going to be less. NOTE: We recommend you DO NOT POINT hunting bullets. Pointing can affect terminal performance in a bad way.
NOTE the change in the bullet tip shape and hollowpoint size after pointing:
Don’t Over-Point Your Bullets
What is important here is that you never want to over-point. It is far better to be safe, and under-point, rather than over-point and crush the tips even the slightest bit. To quote Bryan Litz exactly: “Best practice is to leave a tiny air gap in the tip so you’re sure not to compress the metal together which will result in crushing. Most of the gain in pointing is taking the bullet tip down to this point. Going a little further doesn’t show on target”. So in essence you are only bringing the tip down a small amount… and you want to make sure you leave an air gap at the tip.
Also keep in mind, bullet pointing is one of those procedures with variable returns. If you only shoot at 100-200 yards, bullet pointing will likely not benefit you. To see the benefits, which can run from 2 to 10% (possibly more with poorly designed bullets), you need be shooting at long range. Bryan says: “Typically, with pointing, you’ll see 3-4% increase in BC on average. If the nose is long and pointy (VLD shape) with a large meplat, that’s where pointing has the biggest effect; up to 8% or 10%. If the meplat is tight on a short tangent nose, the increase can be as small as 1 or 2%.” For example, If you point a Berger .308-caliber 185gr Juggernaut expect to only get a 2% increase in BC.
Should You Trim after Pointing?
Sometimes you can see tiny imperfections after pointing, but to say you “need” to trim after pointing is to say that the small imperfections make a difference. Bryan Litz advises: “If your goal is to make bullets that fly uniformly at the highest levels, it may not be necessary to trim them.” In fact Bryan states: “I’ve never trimmed a bullet tip, before or after pointing”. So in the end it is up to you to decide.
Pointing is Easy with the Right Tools
The process of pointing in itself is very simple. It takes about as much effort to point bullets as it does to seat bullets. We are simply making the air gap on the tip of the bullet ever-so smaller. Don’t rush the job — go slow. Use smooth and steady pressure on the press when pointing bullets. You don’t want to trap air in the die and damage the bullet tip. You can use most any press, with a caliber-specific sleeve and correct die insert. The Whidden pointing die has a micrometer top so making adjustments is very easy.
Bryan Litz actually helped design the Whidden Bullet Pointing Die System available from Whidden Gunsworks. When ordering, make sure that you pick up the correct caliber sleeve(s) and appropriate insert(s). The Whidden Bullet Pointing Die System comes with the die, one tipping insert, and one caliber-specific sleeve. To see which insert(s) you need for your bullet type(s), click this link:
Based on the questions we get on a daily basis on our 800 (Customer Support) line, twist is one of the most misunderstood subjects in the gun field. So let’s look deeper into this mystery and get a better understanding of what twist really means.
When you see the term 1:14″ (1-14) or 1:9″ twist, just exactly what does this mean? A rifle having a 1:14″ twist means the bullet will rotate one complete revolution every fourteen inches of the barrel. Naturally a 1:9″ turns one time every nine inches that it travels down the barrel. Now, here’s something that some people have trouble with. I’ve had calls from shooters thinking that a 1:14″ twist was faster than a 1:9″ because the number was higher with the 1:14″. The easiest way to remember this is the higher the number, the slower the twist rate is.
Now, the biggest misconception is that if a shooter has a .223 with a 1:8″ twist, his rifle won’t stabilize a 55gr bullet or anything lighter. So let’s look at what is required. The longer a bullet is for its diameter, the faster the twist has to be to stabilize it. In the case of the .223 with a 1:8″ twist, this was designed to stabilize 80gr bullets in this diameter. In truth the opposite is true. A 1:8″ will spin a 55gr faster than what is required in order to stabilize that length of bullet. If you have a bullet with good concentricity in its jacket, over-spinning it will not [normally] hurt its accuracy potential. [Editor’s Note: In addition, the faster twist rate will not, normally, decrease velocity significantly. That’s been confirmed by testing done by Bryan Litz’s Applied Ballistics Labs. There may be some minor speed loss.]
Many barrel-makers mark the twist rate and bore dimensions on their barrel blanks.
Think of it like tires on your truck. If you have a new set of tires put on your truck, and they balance them proper at the tire shop, you can drive down a street in town at 35 MPH and they spin perfect. You can get out on the highway and drive 65 MPH and they still spin perfect. A bullet acts the same way.
Once I loaded some 35gr HP bullets in a 22-250 Ackley with a 1:8″ twist. After putting three shots down range, the average velocity was 4584 FPS with an RPM level of 412,560. The group measured .750″ at 100 yards. This is a clear example that it is hard to over-stabilize a good bullet.
Twist-rate illustration by Erik Dahlberg courtesy FireArmsID.com. Krieger barrel photo courtesy GS Arizona.
Over the past 12 months, this article was one of the TOP TEN most-read Daily Bulletin features. We’re reprising it today for those who may have missed it the first time. The above diagram comes from a TiborasurasRex YouTube Video comparing G1 and G7 BC models. CLICK HERE to watch the video.
The better, up-to-date ballistics programs let you select either G1 or G7 Ballistic Coefficient (BC) values when calculating a trajectory. The ballistic coefficient (BC) of a body is a measure of its ability to overcome air resistance in flight. You’ve probably seen that G7 values are numerically lower than G1 values for the same bullet (typically). But that doesn’t mean you should select a G1 value simply because it is higher.
Some readers are not quite sure about the difference between G1 and G7 models. One forum member wrote us: “I went on the JBM Ballistics website to use the web-based Trajectory Calculator and when I got to the part that gives you a choice to choose between G1 and G7 BC, I was stumped. What determines how, or which one to use?”
The simple answer is the G1 value normally works better for shorter flat-based bullets, while the G7 value should work better for longer, boat-tailed bullets.
G1 vs. G7 Ballistic Coefficients — Which Is Right for You?
G1 and G7 refer both refer to aerodynamic drag models based on particular “standard projectile” shapes. The G1 shape looks like a flat-based bullet. The G7 shape is quite different, and better approximates the geometry of a modern long-range bullet. So, when choosing your drag model, G1 is preferable for flat-based bullets, while G7 is ordinarily a “better fit” for longer, boat-tailed bullets.
Drag Models — G7 is better than G1 for Long-Range Bullets
Many ballistics programs still offer only the default G1 drag model. Bryan Litz, author of Applied Ballistics for Long Range Shooting, believes the G7 standard is preferable for long-range, low-drag bullets: “Part of the reason there is so much ‘slop’ in advertised BCs is because they’re referenced to the G1 standard which is very speed sensitive. The G7 standard is more appropriate for long range bullets. Here’s the results of my testing on two low-drag, long-range boat-tail bullets, so you can see how the G1 and G7 Ballistic coefficients compare:
G1 BCs, averaged between 1500 fps and 3000 fps:
Berger 180 VLD: 0.659 lb/in²
JLK 180: 0.645 lb/in²
The reason the BC for the JLK is less is mostly because the meplat was significantly larger on the particular lot that I tested (0.075″ vs 0.059″; see attached drawings).
For bullets like these, it’s much better to use the G7 standard. The following BCs are referenced to the G7 standard, and are constant for all speeds.
Many modern ballistics programs, including the free online JBM Ballistics Program, are able to use BCs referenced to G7 standards. When available, these BCs are more appropriate for long range bullets, according to Bryan.
[Editor’s NOTE: BCs are normally reported simply as an 0.XXX number. The lb/in² tag applies to all BCs, but is commonly left off for simplicity.]


 Effects Of Cartridge Over All Length (COAL) And Cartridge Base To Ogive (CBTO) – Part 1


 Part 2 of this Volume is focused on various aspects of advanced hand-loading. Modern Advancements (Vol. II) employs live fire testing to answer the important questions that precision hand loaders are asking. What are the best ways to achieve MVs with low ES and SD? Do flash hole deburring, neck tension, primer selection, and fill ratio and powder scales sensitivity make a difference and how much? All of these questions are explored in detail with a clear explanation of test results.


 Train Wrecks (and How to Avoid Them)
 4. Wind Issues. Tricky winds derail many trains. A lot can be written about wind strategies, but here’s a simple tip about how to take the edge off a worse case scenario. You don’t have to start blazing away on the command of “Commence fire”. If the wind is blowing like a bastard when your time starts, just wait! You’re allotted 30 minutes to fire your string in long range slow fire. With average pit service, it might take you 10 minutes if you hustle, less in F-Class. Point being, you have about three times longer than you need. So let everyone else shoot through the storm and look for a window (or windows) of time which are not so adverse. Of course this is a risk, conditions might get worse if you wait. This is where judgment comes in. Just know you have options for managing time and keep an eye on the clock. Saving rounds in a slow fire match is a costly and embarrassing train wreck.


 The better, up-to-date ballistics programs let you select either G1 or G7 Ballistic Coefficient (BC) values when calculating a trajectory. The ballistic coefficient (BC) of a body is a measure of its ability to overcome air resistance in flight. You’ve probably seen that G7 values are numerically lower than G1 values for the same bullet (typically). But that doesn’t mean you should select a G1 value simply because it is higher.
 Drag Models — G7 is better than G1 for Long-Range Bullets


