Close-up view of a sectioned case. This one here was “fixin’ to pop”, observed Glen Zediker.
Here are highlights from an article Glen Zediker wrote for the Midsouth Blog. In that article Glen, who sadly passed away in 2020, focused on cartridge brass. Glen identified the most common failures that appear with brass that has been shot multiple times, or which has been fired at excessive pressures. Glen explained some simple ways to check your cartridge brass to detect “early warning signs” of case failure, particularly case head separation, which can be very dangerous.
How Cases Degrade with Multiple Firings By Glen Zediker
This article explains when, and then how, to check after the progress of changes commencing with the firing on a new case. It’s the “progress of degeneration,” in a way of looking at it because the concern is getting a handle on when enough change in the brass has come about to require attention. Or abandonment. As said then, for me that’s 4 firings. That, as said last time, is when I might see changes that need attention. Also as said, that figure didn’t come out of a hat, but from my own notes in running my competition NRA High Power Rifle loads. [Editor’s Note: With Lapua brass, using moderate loads, in bolt-action rifles, we typically get about 10 good (match-worthy) firings. But if you anneal your Lapua brass, and run modest pressures, Lapua brass can perform well for 20 or more load cycles.]
The areas most affected are the case neck and case head area. Case neck walls get thicker [but] the case head area body walls get thinner. Primer pockets get shallower and larger diameter.
This case shows a cracked neck AND a crack (separation) above the case head. Zediker says it is “rare to see one case with both of the most common failures. [This case] was attacked by an M14.”
Case Head — Causes of Separation and Cracking
When a case is under pressure during firing, the brass, like water, flows where it can, where it’s more free to move. Of course, the chamber steel limits the amount it can expand. The case shoulder blows fully forward and the case base is slammed back against the bolt face. There is, therefore and in effect, a tug on both ends — it gets stretched. The shoulder area is relatively free to expand to conform to the chamber, but the other end, the case head area, is not. Since that’s the area of the case with the thickest walls, it doesn’t expand “out” much at all. What it does is stretch. The “case head area,” as I refer to it here, is the portion of the case above the web, which is just above the taper that leads in to the extractor groove. The “area” extends approximately an eighth-inch up the case body.
Here’s a “pressure ring.” You’ll see this after firing, if you see it. And, if you see it, that case is done. The bright ring indicates excessive stretching, which indicates excessive thinning. If you see a ring circling the case, noticeable because it’s lighter color than the case body, and it’s in this area, I’d say that case is done. And that’s right where a “head separation” occurs. It can crack and also blow slap in two, and that’s the “separation” part of case head separation.
Photo courtesy GS Arizona.
This is a spot to keep close watch on as cases age. It is also the area that is more “protected” by sizing with less case shoulder set-back. That is, pretty much, where the freedom for the stretching movement in this area comes from (the case shoulder creates a gap). If you’re seeing a sign that a head separation [might happen with relatively few firings], chances are the shoulder set-back is excessive, and also… the load pressure level.
Bent Paper Clip Case-Wall Gauge
Editor: You can use a bent paper clip to detect potential case wall problems. Slide the paper clip inside your case to check for thin spots. GS Arizona explains: “This simple little tool (bent paper clip) will let you check the inside of cases before you reload them. The thin spot will be immediately apparent as you run the clip up the inside of the case. If you’re seeing a shiny line on the outside and the clip is really hitting a thin spot inside, it’s time to retire the case.” Photo by GS Arizona.
Monitor Primer Pocket Dimensional Changes
Another case-head-area and pressure-related check is the primer pocket. As said, the primer pocket will get larger in diameter and shallower in depth each firing. As with many such things, the questions are “when” and “how much,” and the main thing, “how much?”
If the pocket gets excessively shallow, and that’s judged by a primer that seats fully but isn’t at least a tick below flush with the case base, there could be function issues. There’s a risk of a “slam-fire” with a semi-auto that uses a floating firing pin, and, if there is actual protrusion, that has the same effect as insufficient headspace. A primer pocket uniformer can reset the depth of a shallowed primer pocket to what it should be, but the real test for me is how easily the next primer seats into it. If it’s significantly less resistance, I’ll say that case is done. Shallower can be refurbished. That’s a primary function of a primer pocket uniformer. Larger diameter, though, can’t be fixed. I’ve mentioned in another article or two that, any more at least, my main gauge of load pressure has become how much primer pocket expansion there’s been.
Guys — honestly, if you do anything today on this site, watch this video. You won’t be disappointed. Guaranteed. This is a very informative (and surprisingly entertaining) video. Every serious hand-loader should watch this video to see how cartridge cases are made. Your Editor has watched the video 5 times now and I still find it fascinating. The camera work and editing are excellent — there are many close-ups revealing key processes such as annealing and head-stamping.
VERY Informative Video Show Cartridge Brass and Ammunition Production:
Norma has released a fascinating video showing how bullet, brass, and ammunition are produced at the Norma Precision AB factory which first opened in 1902. You can see how cartridges are made starting with brass disks, then formed into shape through a series of processes, including “hitting [the cup] with a 30-ton hammer”. After annealing (shown at 0:08″), samples from every batch of brass are analyzed (at multiple points along the case length) to check metal grain structure and hardness. Before packing, each case is visually inspected by a human being (3:27″ time-mark).
The video also shows how bullets are made from jackets and lead cores. Finally, you can watch the loading machines that fill cases with powder, seat the bullets, and then transport the loaded rounds to the packing system. In his enthusiasm, the reporter/narrator does sometimes confuse the term “bullets” and “rounds” (5:00″), but you can figure out what he means. We definitely recommend watching this video. It’s fascinating to see 110-year-old sorting devices on the assembly line right next to state-of-the art, digitally-controlled production machinery.
Video tip by EdLongrange. We welcome reader submissions.
Here’a useful article by Sierra Bullets Media Relations Manager Carroll Pilant. This story, which originally appeared in the Sierra Bullets Blog, covers some of the more common ammo problems that afflict hand-loaders. Some of those issues are: excessive OAL, high primers, and improperly-sized cases. Here Mr. Pilant explains how to avoid these common problems that lead to “headaches at the range.
I had some gentlemen at my house last fall getting rifle zeros for an upcoming elk hunt. One was using one of the .300 short mags and every 3rd or 4th round would not chamber. Examination of the case showed a bulge right at the body/shoulder junction. These were new cases he had loaded for this trip. The seating die had been screwed down until it just touched the shoulder and then backed up just slightly. Some of the cases were apparently slightly longer from the base to the datum line and the shoulder was hitting inside the seating die and putting the bulge on the shoulder. I got to thinking about all the gun malfunctions that I see each week at matches and the biggest percentage stem from improper handloading techniques.
One: Check Your Cases with a Chamber Gage
Since I shoot a lot of 3-gun matches, I see a lot of AR problems which result in the shooter banging the butt stock on the ground or nearest solid object while pulling on the charging handle at the same time. I like my rifles too well to treat them that way (I cringe every time I see someone doing that). When I ask them if they ran the ammo through a chamber gage, I usually get the answer, “No, but I need to get one” or “I didn’t have time to do it” or other excuses. The few minutes it takes to check your ammo can mean the difference between a nightmare and a smooth running firearm.
A Chamber Gauge Quickly Reveals Long or Short Cases
Size Your Cases Properly
Another problem is caused sizing the case itself. If you will lube the inside of the neck, the expander ball will come out a lot easier. If you hear a squeak as the expander ball comes out of a case neck, that expander ball is trying to pull the case neck/shoulder up (sometimes several thousandths). That is enough that if you don’t put a bulge on the shoulder when seating the bullet … it can still jam into the chamber like a big cork. If the rifle is set up correctly, the gun will not go into battery and won’t fire but the round is jammed into the chamber where it won’t extract and they are back to banging it on the ground again (with a loaded round stuck in the chamber). A chamber gage would have caught this also.
Oversizing cases also causes problems because the firing pin doesn’t have the length to reach the primer solid enough to ignite it 100% of the time. When you have one that is oversized, you usually have a bunch, since you usually do several cases at a time on that die setting. If the die isn’t readjusted, the problem will continue on the next batch of cases also. They will either not fire at all or you will have a lot of misfires. In a bolt action, a lot of time the extractor will hold the case against the face of the breech enough that it will fire. The case gets driven forward and the thinner part of the brass expands, holding to the chamber wall and the thicker part of the case doesn’t expand as much and stretches back to the bolt face. If it doesn’t separate that time, it will the next time. When it does separate, it leaves the front portion of the case in the chamber and pulls the case head off. Then when it tries to chamber the next round, you have a nasty jam. Quite often range brass is the culprit of this because you never know how many times it has been fired/sized and in what firearm. Back to beating it on the ground again till you figure out that you have to get the forward part of the case out.
Just a quick tip — To extract the partial case, an oversized brush on a cleaning rod [inserted] and then pulled backward will often remove the case. The bristles when pushed forward and then pulled back act like barbs inside the case. If you have a bunch of oversized case that have been fired, I would dispose of them to keep from having future problems. There are a few tricks you can use to salvage them if they haven’t been fired though. Once again, a case gage would have helped.
Two: Double Check Your Primers
Another thing I see fairly often is a high primer, backwards primer, or no primer at all. The high primers are bad because you can have either a slam fire or a misfire from the firing pin seating the primer but using up its energy doing so. So, as a precaution to make sure my rifle ammo will work 100% of the time, I check it in a case gage, then put it in an ammo box with the primer up and when the box is full, I run my finger across all the primers to make sure they are all seated to the correct depth and you can visually check to make sure none are in backwards or missing.
Three: Check Your Overall Cartridge Length
Trying to load the ammo as long as possible can cause problems also. Be sure to leave yourself enough clearance between the tip of the bullet and the front of the magazine where the rounds will feed up 100%. Several times over the years, I have heard of hunters getting their rifle ready for a hunt. When they would go to the range to sight in, they loaded each round single shot without putting any ammo in the magazine. On getting to elk or deer camp, they find out the ammo is to long to fit in the magazine. At least they have a single shot, it could be worse. I have had hunters that their buddies loaded the ammo for them and then met them in hunting camp only to find out the ammo wouldn’t chamber from either the bullet seated to long or the case sized improperly, then they just have a club.
Four: Confirm All Cases Contain Powder
No powder in the case doesn’t seem to happen as much in rifle cartridges as in handgun cartridges. This is probably due to more handgun ammo being loaded on progressive presses and usually in larger quantities. There are probably more rifle cartridges that don’t have powder in them than you realize though. Since the pistol case is so much smaller internal capacity, when you try to fire it without powder, it usually dislodges the bullet just enough to stick in the barrel. On a rifle, you have more internal capacity and usually a better grip on the bullet, since it is smaller diameter and longer bearing surface. Like on a .223, often a case without powder won’t dislodge the bullet out of the case and just gets ejected from the rifle, thinking it was a bad primer or some little quirk.
For rifle cases loaded on a single-stage press, I put them in a reloading block and always dump my powder in a certain order. Then I do a visual inspection and any case that the powder doesn’t look the same level as the rest, I pull it and the one I charged before and the one I charged after it. I inspect the one case to see if there is anything visual inside. Then I recharge all 3 cases. That way if a case had powder hang up and dump in the next case, you have corrected the problem.
On progressive presses, I try to use a powder that fills the case up to about the base of the bullet. That way you can usually see the powder as the shell rotates and if you might have dumped a partial or double charge, you will notice as you start to seat the bullet if not before. On a progressive, if I don’t load a cartridge in one smooth stroke (say a bullet tipped over sideways and I raised the ram slightly to reset it) Some presses actually back the charge back adding more powder if it has already dumped some so you have a full charge plus a partial charge. When I don’t complete the procedure with one stroke, I pull the case that just had powder dumped into it and check the powder charge or just dump the powder back into the measure and run the case through later.
Many shooters prefer to deprime their brass before resizing. That way they can tumble cases or keep primer debris off their main press. To deprime cases before sizing or cleaning you can use a Decapping Die. This pushes out the spent primer without changing the neck or body of a case. Such decapping dies work fine, but they do require the use of a press. Here is a handy alternative — a cool tool that allows you to deprime brass anywhere — no press needed.
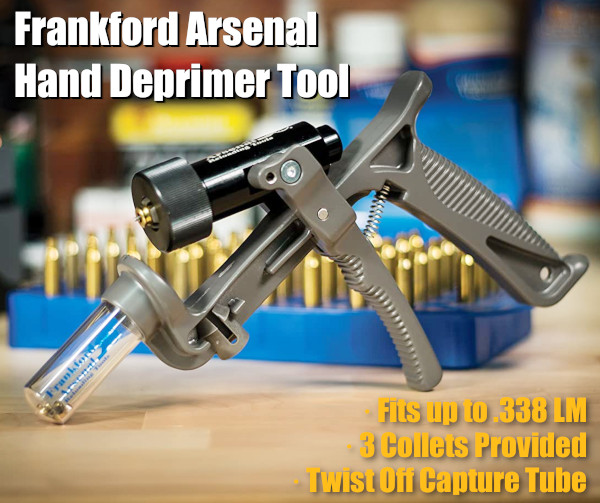
Handheld Primer Removal Tool From Frankford Arsenal
This cleverly-designed Hand Deprimer Tool allows you to deprime cartridge cases without a press. This hand-tool from Frankford Arsenal will deprime brass and capture primers conveniently. You can deprime your cases while watching TV or relaxing in your favorite chair.
This device lets you remove spent primers anywhere — no press needed and all the mess (cups/anvils/residue) stays in the capture chamber. This tool comes works with nearly all common case types up to .338 Lapua Magnum. With good leverage, this tool does the job quickly and efficiently. Forum members have praised this handy tool, but recommend wearing a thick glove if doing more than 100 cases in a session.
How to Adapt Tool for Small Flash Hole Brass
The Frankford Arsenal Deprimer Tool was designed for LARGE flash-hole brass. To deprime brass with small (1.5mm/0.59″) small flash-holes, as found on Lapua .220 Russian and 6mmBR cases, you will need to reduce the pin diameter. Frankford Arsenal currently recommends purchasing a replacement pin and “sanding it down” to the smaller diameter. NOTE: This is NOT difficult — simply spin the stock pin in some sandpaper.
This handy depriming tool is very versatile. With a universal, cylinder-style cartridge-holder, the tool can deprime a wide variety of cartridge types from .20 caliber up to .338 caliber. Three different plastic collets are provided to handle for different diameter cases. Spent primers are captured in a removable spent primer catch tube. Simply twist off the clear catch tube to dump the spent primers. With die-cast metal construction, this tool should last through many thousands of depriming cycles. MSRP is $54.99. Right now it is $52.00 on Amazon with 81% 5-star ratings.
User Modifications — Grip Padding and High-Volume Capture
Many users recommended putting some kind of padding on the grip and front lever to reduce pressure on the fingers. This can be done with a wrap or a rubber covering. In addition, users have adapted the unit with an attached hose and large primer capture jug. If you depriming hundreds of cases at a time, this hose conversion may make sense.
Review from actual owner: “I have owned one of these for about eight years and deprimed over 10,000 cases with this tool. I have never had to replace a single part on it. You will have to adjust the return spring every so often, but that is a very easy task. If you are depriming a LOT of brass, the handle can tear up your hand a bit. Solution: Wear a Mechanics Glove. Easy Peasy! You will NOT regret this purchase.”
Here’s a very useful product that should please shooters who wet-tumble their brass with stainless media, or use ultrasonic cleaning machines to clean cartridge brass (and gun parts). Employing forced hot air circulation, the Lyman Cyclone Case Dryer will dry a large quantity of brass in under two hours. Internal racks provide five drying levels. With “street price” under $80.00, the Cyclone Case Dryer is an affordable and effective addition to an ultrasonic or rotary-tumbler cleaning system.
The Lyman Cyclone Case Dryer works fast. No need to wait overnight (or longer) to air-dry your brass. Lyman states that “The forced heated air circulation of the Cyclone will dry your brass inside and out within an hour or two, with no unsightly water spots.” The handy individual trays keep different types of brass separate. The dryer can also be used for gun parts that have been ultrasonically cleaned.
Lyman Cyclone Case Dryer Features:
• Holds up to 1000 .223 Rem cases or 2000 9x19mm Luger cases
• Works with cartridge brass cases or gun parts
• Fast drying time — Typically 1 to 2 hours
• Timer control can be set up to 3 hours
• Durable ABS trays with recessed handles
Watch How Cyclone Case Dryer Functions with both Cartridge Brass and Gun Parts
Cyclone Case Dryer 115V (Part #7631560) MSRP: $94.95
Cyclone Case Dryer 220V (Part #7631561) MSRP: $112.00
Have you ever expanded a .22 or 6mm cartridge all the way up to .30-caliber? If so, you know this can be a difficult procedure that stresses the case necks and neck-shoulder junction. A significant neck-size expansion done in one big jump can increase run-out, cause doughnuts, or worse yet, even split the brass. Therefore you want to proceed in increments, increasing the neck diameter in stages. One smart way to do that is to use a Progressive Press. This article explains how…
The most successful short-range benchrest-for-score cartridge is the 30 BR. That cartridge, as well as 30 BR variants such as the 30 BRX, all start with the 6mmBR Norma parent cartridge, typically with Lapua 6mmBR brass. To get a nice 30 BR case you want to expand in stages, increasing the inside neck diameter incrementally from .243 to .308.
Darrell Jones of DJ’s Brass Service creates thousands of 30 BR cases each year. He has found a clever way to speed up the process — Darrell uses a Progressive Press. He runs his 6BR brass through four (4) separate Hornady neck-sizing dies with expander mandrels. First there is a .257 die, followed by .264 (6.5mm), .284 (7mm), and then .308. Then a fifth and final K&M die provides one last, slight expansion so the newly-fashioned 30 BR cases perfectly fit the arbor of Darrell’s neck-turning tool.
So to repeat, the case starts as .243 (6mm), then moves in up stages .257, .264, .284, and .308, with a final “finishing” step prior to neck-turning. You can see the expansion in this video, which starts with 6mmBR brass that was first hydro-formed to 6 BRX:
Watch 6mm Cases Expanded to 30-Caliber (6BRX to 30 BRX)
For this demo video, Darrell expands just one case at a time. However, he can also put multiple cases in the progressive — one per station. This takes a little more effort, Darrell says, but the results are still excellent. Darrell tells us: “I do put multiple cases in the progressive to save time. The results are the same — I just wanted to show a single-step process and how it reduces run-out by not stressing the shoulder with one big expansion from 6mm straight to 30 caliber. Doing the operation in multiple stages avoids binds and helps keep the shoulders concentric.”
This same multi-stage procedure can be use to expand other cartridge types. For example you could take .221 Fireball brass in stages up to .308 to create 300 Blackout brass.
Darrell uses caliber-specific, Hornady neck-sizing-only dies with elliptical expanders. Darrell tells us: “The Hornady elliptical expander has a reduced bearing surface that puts less strain on the brass when expanding the necks to the next size.” The fitting at the bottom of the die is the Lock-N-Load die bushing that allows fast die changes.
These particular cases used in the video were first hydro-formed to 6BRX then expanded to 30 BRX before neck turning. DJ’s Brass offers hydro-forming for many popular wildcat cartridges such as 6 PPC, 6mm Dasher, and .284 Shehane.
Precision Benchrest and F-Class shooters favor premium brass from Lapua, Norma, Peterson, or RWS. (Lake City also makes quality brass in military calibers.) Premium brass delivers better accuracy, more consistent velocities, and longer life. Shooters understand the importance of good brass, but many of us have no idea how cartridge cases are actually made. Here’s how it’s done.
The process starts with a brass disk stamped from strips of metal. Then, through a series of stages, the brass is extruded or drawn into a cylindrical shape. In the extrusion process the brass is squeezed through a die under tremendous pressure. This is repeated two or three times typically. In the more traditional “draw” process, the case is progressively stretched longer, in 3 to 5 stages, using a series of high-pressure rams forcing the brass into a form die. While extrusion may be more common today, RWS, which makes some of the most uniform brass in the world, still uses the draw process: “It starts with cup drawing after the bands have been punched out. RWS cases are drawn in three ‘stages’ and after each draw they are annealed, pickled, rinsed and subjected to further quality improvement measures. This achieves specific hardening of the brass cases and increases their resistance to extraordinary stresses.” FYI, Lapua also uses a traditional draw process to manufacture most of its cartridge brass (although Lapua employs some proprietary steps that are different from RWS’s methods).
After the cases are extruded or drawn to max length, the cases are trimmed and the neck/shoulder are formed. Then the extractor groove (on rimless cases) is formed or machined, and the primer pocket is created in the base. One way to form the primer pocket is to use a hardened steel plug called a “bunter”. In the photos below you see the stages for forming a 20mm cannon case (courtesy OldAmmo.com), along with bunters used for Lake City rifle brass. This illustrates the draw process (as opposed to extrusion). The process of draw-forming rifle brass is that same as for this 20mm shell, just on a smaller scale.
River Valley Ordnance explains: “When a case is being made, it is drawn to its final draw length, with the diameter being slightly smaller than needed. At this point in its life, the head of the draw is slightly rounded, and there are no provisions for a primer. So the final drawn cases are trimmed to length, then run into the head bunter. A punch, ground to the intended contours for the inside of the case, pushes the draw into a cylindrical die and holds it in place while another punch rams into the case from the other end, mashing the bottom flat. That secondary ram holds the headstamp bunter punch.
This video employs DEFORM-2D software to show the draw process for brass casings.
The headstamp bunter punch has a protrusion on the end to make the primer pocket, and has raised lettering around the face to form the headstamp writing. This is, of course, all a mirror image of the finished case head. Small cases, such as 5.56×45, can be headed with a single strike. Larger cases, like 7.62×51 and 50 BMG, need to be struck once to form a dent for the primer pocket, then a second strike to finish the pocket, flatten the head, and imprint the writing. This second strike works the brass to harden it so it will support the pressure of firing.”
Thanks to Guy Hildebrand, of the Cartridge Collectors’ Exchange, OldAmmo.com, for providing this 20mm Draw Set photo. Bunter photo from River Valley Ordnance.
Tumblers and walnut/corncob media are old school. These days many shooters prefer processing brass rapidly with an ultrasonic cleaning machine. When used with the proper solution, a good ultrasonic cleaning machine can quickly remove remove dust, carbon, oil, and powder residue from your cartridge brass. The ultrasonic process will clean the inside of the cases, and even the primer pockets. Tumbling works well too, but for really dirty brass, ultrasonic cleaning may be a wise choice.
Our friend Gavin Gear has evaluated an RCBS Ultrasonic cleaning machine using RCBS Ultrasonic Case Cleaning Solution (RCBS #87058). To provide a real challenge, Gavin used some very dull and greasy milsurp brass: “I bought a huge lot of military once-fired 7.52x51mm brass (fired in a machine gun) that I’ve been slowly prepping for my DPMS LR-308B AR-10 style rifle. Some of this brass was fully prepped (sized/de-primed, trimmed, case mouths chamfered, primer pockets reamed) but it was gunked up with lube and looking dingy.”
UltimateReloader.com Case Cleaning Video (7.5 minutes):
Gavin describes the cleaning exercise step-by-step on UltimateReloader.com. Read Gavin’s Cartridge Cleaning Article to learn how he mixed the solution, activated the heater, and cycled the machine for 30 minutes. As you can see in the video above, the results were impressive. If you have never cleaned brass with ultrasound before, you should definitely watch Gavin’s 7.5-minute video — it provides many useful tips and shows the cleaning operation in progress from start to finish.
Ultra Dry Necks After Ultrasonic Cleaning — Some Suggestions
The Ultrasonic cleaning process gets cartridge brass so “squeaky clean” that increased force may be required to seat your bullets, or they may “grab” as they go in the necks. To reduce bullet-seating effort, you may benefit from adding a little dry case lube inside the case-neck before loading (use a nylon brush). Another trick is adding a teaspoon of Ballistol lube to the cleaning solution. That provides a trace lubricant inside the necks, but does not interfere with powder ignition in any way.
The latest Gen2 RCBS ultrasonic cleaning machine has a large 6.3-quart capacity. That’s nearly 100% larger than the first generation machine in Gavin’s video. The Gen2 machine, $434.52 on Amazon, features a second ceramic heater and transducer to better clean brass cases and firearm parts. The LED is easily programmable, and the timer can be set for up to 30 minutes of cleaning. The original 3.2 quart-capacity RCBS ultrasonic machine, as shown in Gavin’s video, is still available for $213.99 at Midsouth Shooters.
We are re-publishing this article at the request of Forum members who found the information very valuable. If you haven’t read this Safety Tip before, take a moment to learn how you can inspect your fired brass to determine if there may be a potential for case separation. A case separation can be dangerous, potentially causing serious injury.
On the highly-respected Riflemans’ Journal blog, created by our late, dear friend German Salazar*, there was an excellent article about Cartridge Case-Head Separation. In this important article, Salazar (aka GS Arizona) examined the causes of this serious problem and explained the ways you can inspect your brass to minimize the risk of a case-head separation. As cases get fired multiple times and then resized during reloading, the cases can stretch. Typically, there is a point in the lower section of the case where the case-walls thin out. This is your “danger zone” and you need to watch for tell-tale signs of weakening.
The photo below shows a case sectioned so that you can see where the case wall becomes thinner near the web. You can see a little arrow into the soot inside the case pointing to the thinned area. This case hadn’t split yet, but it most likely would do so after one or two more firings.
Paper Clip Hack for Detecting Problems
The article provided a great, easy tip for detecting potential problems. You can use a bent paper clip to detect potential case wall problems. Slide the paper clip inside your case to check for thin spots. GS Arizona explains: “This simple little tool (bent paper clip) will let you check the inside of cases before you reload them. The thin spot will be immediately apparent as you run the clip up the inside of the case. If you’re seeing a shiny line on the outside and the clip is really hitting a thin spot inside, it’s time to retire the case. If you do this every time you reload, on at least 15% of your cases, you’ll develop a good feel for what the thin spot feels like and how it gets worse as the case is reloaded more times. And if you’re loading the night before a match and feel pressured for time — don’t skip this step!”
* Sadly, German Salazar passed away unexpectedly on June 21, 2022 at age 62. German was a great inspiration to this site who helped guide the creation of the AccurateShooter Forum. A brilliant man, expert attorney, and top-tier marksman, German will be sorely missed in the shooting sports world.
Close-up view of a sectioned case. This one here was “fixin’ to pop”, observed Glen Zediker.
Here are highlights from an article Glen Zediker wrote for the Midsouth Blog. In that article Glen, who sadly passed away in 2020, focused on cartridge brass. Glen identified the most common failures that appear with brass that has been shot multiple times, or which has been fired at excessive pressures. Glen explained some simple ways to check your cartridge brass to detect “early warning signs” of case failure, particularly case head separation, which can be very dangerous.
How Cases Degrade with Multiple Firings By Glen Zediker
This article explains when, and then how, to check after the progress of changes commencing with the firing on a new case. It’s the “progress of degeneration,” in a way of looking at it because the concern is getting a handle on when enough change in the brass has come about to require attention. Or abandonment. As said then, for me that’s 4 firings. That, as said last time, is when I might see changes that need attention. Also as said, that figure didn’t come out of a hat, but from my own notes in running my competition NRA High Power Rifle loads. [Editor’s Note: With Lapua brass, using moderate loads, in bolt-action rifles, we typically get about 10 good (match-worthy) firings. But if you anneal your Lapua brass, and run modest pressures, Lapua brass can perform well for 20 or more load cycles.]
The areas most affected are the case neck and case head area. Case neck walls get thicker [but] the case head area body walls get thinner. Primer pockets get shallower and larger diameter.
This case shows a cracked neck AND a crack (separation) above the case head. Zediker says it is “rare to see one case with both of the most common failures. [This case] was attacked by an M14.”
Case Head — Causes of Separation and Cracking
When a case is under pressure during firing, the brass, like water, flows where it can, where it’s more free to move. Of course, the chamber steel limits the amount it can expand. The case shoulder blows fully forward and the case base is slammed back against the bolt face. There is, therefore and in effect, a tug on both ends — it gets stretched. The shoulder area is relatively free to expand to conform to the chamber, but the other end, the case head area, is not. Since that’s the area of the case with the thickest walls, it doesn’t expand “out” much at all. What it does is stretch. The “case head area,” as I refer to it here, is the portion of the case above the web, which is just above the taper that leads in to the extractor groove. The “area” extends approximately an eighth-inch up the case body.
Here’s a “pressure ring.” You’ll see this after firing, if you see it. And, if you see it, that case is done. The bright ring indicates excessive stretching, which indicates excessive thinning. If you see a ring circling the case, noticeable because it’s lighter color than the case body, and it’s in this area, I’d say that case is done. And that’s right where a “head separation” occurs. It can crack and also blow slap in two, and that’s the “separation” part of case head separation.
Photo courtesy GS Arizona.
This is a spot to keep close watch on as cases age. It is also the area that is more “protected” by sizing with less case shoulder set-back. That is, pretty much, where the freedom for the stretching movement in this area comes from (the case shoulder creates a gap). If you’re seeing a sign that a head separation [might happen with relatively few firings], chances are the shoulder set-back is excessive, and also… the load pressure level.
Bent Paper Clip Case-Wall Gauge
Editor: You can use a bent paper clip to detect potential case wall problems. Slide the paper clip inside your case to check for thin spots. GS Arizona explains: “This simple little tool (bent paper clip) will let you check the inside of cases before you reload them. The thin spot will be immediately apparent as you run the clip up the inside of the case. If you’re seeing a shiny line on the outside and the clip is really hitting a thin spot inside, it’s time to retire the case.” Photo by GS Arizona.
Monitor Primer Pocket Dimensional Changes
Another case-head-area and pressure-related check is the primer pocket. As said, the primer pocket will get larger in diameter and shallower in depth each firing. As with many such things, the questions are “when” and “how much,” and the main thing, “how much?”
If the pocket gets excessively shallow, and that’s judged by a primer that seats fully but isn’t at least a tick below flush with the case base, there could be function issues. There’s a risk of a “slam-fire” with a semi-auto that uses a floating firing pin, and, if there is actual protrusion, that has the same effect as insufficient headspace. A primer pocket uniformer can reset the depth of a shallowed primer pocket to what it should be, but the real test for me is how easily the next primer seats into it. If it’s significantly less resistance, I’ll say that case is done. Shallower can be refurbished. That’s a primary function of a primer pocket uniformer. Larger diameter, though, can’t be fixed. I’ve mentioned in another article or two that, any more at least, my main gauge of load pressure has become how much primer pocket expansion there’s been.


 Norma has released a fascinating video showing how bullet, brass, and ammunition are produced at the


 Oversizing cases also causes problems because the firing pin doesn’t have the length to reach the primer solid enough to ignite it 100% of the time. When you have one that is oversized, you usually have a bunch, since you usually do several cases at a time on that die setting. If the die isn’t readjusted, the problem will continue on the next batch of cases also. They will either not fire at all or you will have a lot of misfires. In a bolt action, a lot of time the extractor will hold the case against the face of the breech enough that it will fire. The case gets driven forward and the thinner part of the brass expands, holding to the chamber wall and the thicker part of the case doesn’t expand as much and stretches back to the bolt face. If it doesn’t separate that time, it will the next time. When it does separate, it leaves the front portion of the case in the chamber and pulls the case head off. Then when it tries to chamber the next round, you have a nasty jam. Quite often range brass is the culprit of this because you never know how many times it has been fired/sized and in what firearm. Back to beating it on the ground again till you figure out that you have to get the forward part of the case out.


 Precision Benchrest and F-Class shooters favor premium brass from


 The headstamp bunter punch has a protrusion on the end to make the primer pocket, and has raised lettering around the face to form the headstamp writing. This is, of course, all a mirror image of the finished case head. Small cases, such as 5.56×45, can be headed with a single strike. Larger cases, like 7.62×51 and 50 BMG, need to be struck once to form a dent for the primer pocket, then a second strike to finish the pocket, flatten the head, and imprint the writing. This second strike works the brass to harden it so it will support the pressure of firing.”
 On the highly-respected Riflemans’ Journal blog, created by our late, dear friend German Salazar*, there was an excellent article about Cartridge Case-Head Separation. In this important article, Salazar (aka GS Arizona) examined the causes of this serious problem and explained the ways you can inspect your brass to minimize the risk of a case-head separation. As cases get fired multiple times and then resized during reloading, the cases can stretch. Typically, there is a point in the lower section of the case where the case-walls thin out. This is your “danger zone” and you need to watch for tell-tale signs of weakening.


