Here’s a smart tip from Bryan Litz, explaining how damage to a bullet jacket can harm the projectile’s Ballistic Coefficient (BC). This tip is posted on Bryan’s new Bryan Litz Ballistics Facebook page. We recommend you subscribe to that page to access Bryan’s latest informative posts.
Bryan notes: “If the case mouth scratches the bullet when you seat it, the damage can cause the BC to be inconsistent, which shows up as vertical dispersion at long range.”
We see this sometimes when running Doppler Radar for competitors at Applied Ballistics Mobile Lab events. If someone is shooting a bullet that typically has a very consistent BC (1% or less) but they’re seeing a higher BC variation, it can be due to the bullets being damaged in the loading process.”
The lead photo above shows the badly-scratched jacket of a bullet seated in a rough-mouthed case. To prevent such jacket damage, one should chamfer, deburr, and smooth case mouths after trimming.
Below is a recorded Doppler radar result showing excessive BC variation. Such variation can increase vertical dispersion at long range. This can result in larger group sizes and lower scores.
RCBS has a good successor to the venerable RCBS Trim Mate. The RCBS Brass Boss features six rotating stations that handle all your brass neck-brushing, chamfering, deburring, and pocket uniforming chores. The RCBS Brass Boss includes tools for all six stations: inside VLD chamfering tool, outside deburring tool, primer pocket cleaners (small/large), military crimp removers (small/large), primer pocket uniformers (small/large), case neck brushes (four diameters), and a tub of dry case neck lubricant. MSRP for the Brass Boss, RCBS Item 90390, is $219.99. The best price we found is $169.99 at Natchez — a very good deal.
This machine has two different rotation speeds for the toolheads. Four stations run at 350 rpm, while the two other stations run 57% faster, at 550 rpm. That give you a choice of spin speeds. You can work fast for tougher chores like military crimp removal, and slow down for inside-neck chamfering, which should be done carefully.
Larger and taller than the older RCBS Trim Mate, the Brass Boss has one more station (six vs. five), plus a more powerful motor. This should make the Brass Boss more competitive with the popular Lyman Case Prep Express, $168.59 on Amazon.
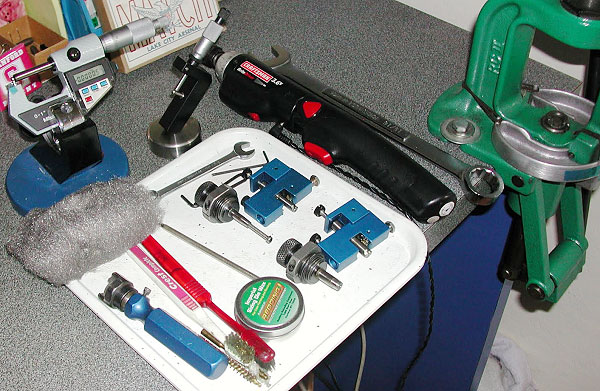
On our main AccurateShooter.com site, you’ll find a good article by GS Arizona on the Basics of Neck Turning. If you’re new to the neck-turning game, or are just looking for good tips on improving your neck-turning procedures, you should read that article. Below we offer some highlights and photos from the article, but you’ll need to read the whole story to view all the illustrations and follow all the procedures step by step.
Why Should You Consider Neck Turning?
Let’s assume that your rifle doesn’t have a tight neck chamber that requires neck turning; if you have a tight neck chamber, of course, the answer to the question is “because you have to”. For the rest of us, and that includes the vast majority of Highpower shooters, neck turning isn’t a requirement, but it can be a useful way to bring your ammunition a small but meaningful step closer to that pot of gold at the end of the rainbow: perfection. I’m not talking about a theoretical improvement, but a real one, an improvement that lies in equalizing and optimizing the neck tension of your loaded rounds. Inconsistent neck tension is a real contributor to increased muzzle velocity variance which itself is a significant factor in increased elevation dispersion at long range. So there’s our basic reason for neck turning: to equalize and optimize neck tension in order to reduce elevation dispersion.
The Tools of the Trade
Here you see everything I use and a bit more. The press, a cordless screwdriver (always plugged in, turning is tough on the old battery), a couple of K&M neck turners (one set up for 6mm, the other for .30 caliber) an expander for each size, some Imperial lube, an old toothbrush or two to keep the cutter clean, a handle with a caseholder (for those emergencies when the screwdriver dies and there’s just one more case to go!), steel wool and a tubing micrometer finish the list of tools. Hey, I left the dial calipers out of the picture! They’re always handy, keep them around, but they are useless for measuring neck thickness, so don’t try. I usually use an Optivisor magnifier while I turn necks, very handy for a clear view of what’s happening on the neck.
Expanding the Neck
Put some lube on the inside of the case neck and run it into the expander. Really, this isn’t hard. I prefer to expand each case immediately before turning it as opposed to expanding all the cases and then turning them. Brass is somewhat springy and will tend to go back toward its original size; therefore, by expanding and turning immediately, you are more likely to have all cases fit the mandrel with the same degree of tightness and to get a more consistent depth of cut.
Cutter Adjustment for Cut Depth and Length
All the tools I’ve seen have pretty good adjustment instructions. The only thing they don’t tell you is that you should have five to ten spare cases to get it right initially. Anything of the right diameter will do while you learn, for instance, just use that cheap surplus .308 brass to do initial setup and save the precious .30-06 for when you know what you’re doing. Be patient and make your adjustments slowly; you’ll need to set the cutter for thickness as well as length of cut (just into the shoulder). The depth of cut (brass thickness) takes a bit of fiddling, the length of the cut is generally easy to set.
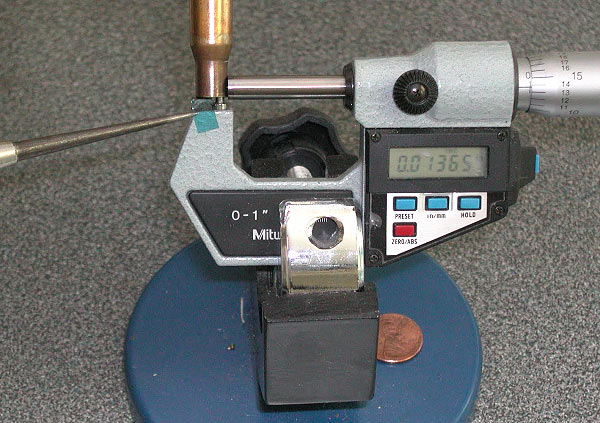
The Finished Product — A Perfectly Uniform Neck
If you read the whole article, and follow the procedures using quality tools, you should get very good results — with a little practice. To demonstrate, here’s an example of my finished, neck-turned brass. You’ll see there is a perfect, 0.0125″ thick neck. It’s very uniform around the circumference, usually I only see 1 or 2 ten-thousandths variance. Now, with the necks uniformed like this, we can select the bushing size that will give us our preferred neck tension and experiment with various levels of tension, secure in the knowledge that all of the cases will actually have the desired neck tension.
About the author — “GS Arizona” was the writing handle for German Salazar, a top-tier rifleman and gun writer. Sadly, German passed from a medical condition in 2022. German was instrumental in helping this website and our Forum get started, and we remember him as a very dear, valued friend.
German was a great individual, and a great asset to the sport. An attorney by trade, with an engineering background, German was one of the very best gun writers, who had high master shooting skills to match his writing abilities.
A while back, Sinclair International’s Reloading Press Blog featured a “round-table” discussion of reloading techniques. Sinclair’s team of tech staffers were asked: “What do you feel is the one-most crucial step in precision reloading?”
Here are their responses (along with comments from our Editors):
Phil Hoham: “I feel that when working up a load do not go too high or too low in your powder charge. Stay away from ‘suggested loads’ you hear at the range, or on the internet. Always be sure to use a published reloading manual that presents not only minimums and maximums, but also pressure, velocity, and a proper range of powders used. Do not get distracted in the reloading process, and remain focused at all times during each step involved.”
AccurateShooter.com: Some loads presented on the Internet are OK as a starting point, but it is absolutely critical to understand that pressure maximums will vary considerably from one rifle to another (of the same chambering). For example, one 6mmBR rifle shooting 105gr bullets can max out with 30.0 grains of Varget powder, while another rifle, with the same chamber dimensions, but a different barrel, could tolerate (and perform better) with half a grain more powder. You need to adjust recommended loads to your particular rifle and barrel.
Pete Petros: “This could be a very broad topic, but if I were to pick one, it would be making sure to pay close attention, and weigh each and every powder charge to ensure that each load is exact and consistent. This is important not only for accuracy, but also for safety reasons.”
AccurateShooter.com: If you’re shooting beyond 200 yards, it is critical to weigh your loads with an accurate scale or automated system such as the AutoTrickler V3/V4. Loads that are uniform (within a few kernels) will exhibit lower Extreme Spread and Standard Deviation. And remember, even if you stick with the same powder, when you get a new powder lot, you may have to adjust your load quite a bit. For example, .308 Palma shooters have learned they may need to adjust Varget loads by up to a full grain from one lot of Varget to the next.
Ron Dague: “I feel that the most important step(s) in reloading for accuracy are in the initial case prep. Uniforming the primer pocket to the same depth to ensure consistency in primer seating is a crucial step. Additionally de-burring the flash holes, each in the same way to clean up and chamfer the inside is important. It ensures that the ignition from the primer is uniform and flows out in the same consistent pattern. Doing so will create uniform powder ignition and tighten up your velocity Extreme Spread.”
AccurateShooter.com: With some brands of brass, primer pocket uniforming and flash-hole deburring is useful. However, with the best Lapua, Norma, and RWS brass it may be unnecessary, or worse, counter-productive. So long as your Lapua brass flash-holes are not obstructed or smaller than spec, it may be best to leave them alone. This is particularly true with the small flash holes in 220 Russian, 6BR, and 6.5×47 cases. MOST of the flash-hole reaming tools on the market have cutting bits that vary in size because of manufacturing tolerances. We’ve found tools with an advertised diameter of .0625″ (1/16″) that actually cut an 0.068″ hole. In addition, we are wary of flash-hole deburring tools that cut an aggressive inside chamfer on the flash-holes. The reason is that it is very difficult to control the amount of chamfer precisely, even with tools that have a depth stop.
Rod Green: “I feel that bullet seating is the most important step. If you had focused on making sure all prior steps (case prep, powder charge, etc.) of the process have been carefully taken to ensure uniformity, bullet seating is the last step, and can mean all the difference in the world in terms of consistency. Making sure that the bullet is seated to the same depth each time, and time is taken to ensure that true aligned seating can make the load.”
Bob Blaine: “I agree with Rod. I strongly feel that consistent bullet seating depth is the most important step in creating the most accurate hand loads. I have seen the results in both my bench and long range rifles. Taking the time to ensure exactness in the seating process is by far, the number one most important step in my book.”
AccurateShooter.com: Agreed. When loading match ammo, after bullet seating, we check every loaded round for base of case to ogive length. If it varies by more than 3 thousandths, that round is segregated or we attempt to re-seat the bullet. We measure base of case to bullet ogive with a comparator mounted on one jaw of our calipers. You may have to pre-sort your bullets to hold the case-base to ogive measurement (of loaded rounds) within .003″.
Even with high-quality brass from Lapua, Peterson, Norma, Alpha and RWS, occasionally you may find one or two cases per box which have a small flake or obstruction in the flash-hole. This will appear like a thin crescent on one side of the flash hole (see photo). You should inspect ALL new brass before loading to identify any pieces with a partially-obstructed flash hole. It’s a good idea to remove any flake or thin crescent left as an artifact of the flash-hole forming process. Because the flash-hole itself is normally centered and of the correct diameter, it is not necessary to ream the flash-hole to a larger diameter. All you really need to do is remove the small obstruction(s). This can be done quickly with inexpensive tools.
Use a Small Pin Vise to Remove Flash-Hole Obstructions
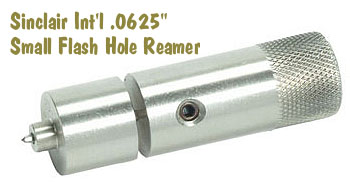
Folks have asked if there is a tool that can remove obstructions from a Lapua small, BR-sized flash hole without opening the hole size. The Lapua PPC/BR flash hole is spec’d at 1.5mm, which works out to 0.059055″. Most of the PPC/BR flash-hole uniforming tools on the market use a 1/16″ bit which is nominally 0.0625″, but these often run oversize — up to 0.066″.
If you want to just clear out any obstructions in the flash hole, without increasing the flash hole diameter, you can use an inexpensive “pin vise” with an appropriate drill bit. For $5.39, Amazon sells a 10-piece set of cobalt steel 1.5mm drill bits, that matches the Lapua flash hole exactly. Other vendors offer a #53 pin vise drill bit that measures .0595″ or .060″ (depending or source). An 0.0595″ bit is close enough. You can find pin vises and these small-diameter drill bits at hobby stores.
For quite some time, Sinclair Int’l has sold a similar device for small (PPC and BR-size) flash holes. Like the 07-3081 unit for large flash holes, the 073000 Reamer for small flash holes works from the outside, so it can index off the primer pocket. It reams to .0625″, and also costs $29.99. The standard dimension for Lapua 220 Russian and 6mmBR flash holes is 1.5mm or .0590″. This tool will permit standard-size decapping rods with .0625″ tips to work without binding. However, note that both Forster and Redding normally supply .057″ decapping pins with their PPC and BR dies. So, it is NOT necessary to ream your Lapua BR/PPC flashholes, unless you prefer to do so for uniformity. It IS, however, a good idea to check BR/PPC flash holes for burrs before loading the first time.
NOTE: If you purchase either the 073081 or 073000 Sinclair Flash Hole Reamer tools, we recommend you mic the cutter tip before you process a bunch of cases. Sometimes a tip comes through that is oversize. This will ream the flash holes larger than you may intend.
On our main AccurateShooter.com site, you’ll find a good article by GS Arizona on the Basics of Neck Turning. If you’re new to the neck-turning game, or are just looking for good tips on improving your neck-turning procedures, you should read that article. Below we offer some highlights and photos from the article, but you’ll need to read the whole story to view all the illustrations and follow all the procedures step by step.
Why Should You Consider Neck Turning?
Let’s assume that your rifle doesn’t have a tight neck chamber that requires neck turning; if you have a tight neck chamber, of course, the answer to the question is “because you have to”. For the rest of us, and that includes the vast majority of Highpower shooters, neck turning isn’t a requirement, but it can be a useful way to bring your ammunition a small but meaningful step closer to that pot of gold at the end of the rainbow: perfection. I’m not talking about a theoretical improvement, but a real one, an improvement that lies in equalizing and optimizing the neck tension of your loaded rounds. Inconsistent neck tension is a real contributor to increased muzzle velocity variance which itself is a significant factor in increased elevation dispersion at long range. So there’s our basic reason for neck turning: to equalize and optimize neck tension in order to reduce elevation dispersion.
The Tools of the Trade
Here you see everything I use and a bit more. The press, a cordless screwdriver (always plugged in, turning is tough on the old battery), a couple of K&M neck turners (one set up for 6mm, the other for .30 caliber) an expander for each size, some Imperial lube, an old toothbrush or two to keep the cutter clean, a handle with a caseholder (for those emergencies when the screwdriver dies and there’s just one more case to go!), steel wool and a tubing micrometer finish the list of tools. Hey, I left the dial calipers out of the picture! They’re always handy, keep them around, but they are useless for measuring neck thickness, so don’t try. I usually use an Optivisor magnifier while I turn necks, very handy for a clear view of what’s happening on the neck.
Expanding the Neck
Put some lube on the inside of the case neck and run it into the expander. Really, this isn’t hard. I prefer to expand each case immediately before turning it as opposed to expanding all the cases and then turning them. Brass is somewhat springy and will tend to go back toward its original size; therefore, by expanding and turning immediately, you are more likely to have all cases fit the mandrel with the same degree of tightness and to get a more consistent depth of cut.
Cutter Adjustment for Cut Depth and Length
All the tools I’ve seen have pretty good adjustment instructions. The only thing they don’t tell you is that you should have five to ten spare cases to get it right initially. Anything of the right diameter will do while you learn, for instance, just use that cheap surplus .308 brass to do initial setup and save the precious .30-06 for when you know what you’re doing. Be patient and make your adjustments slowly; you’ll need to set the cutter for thickness as well as length of cut (just into the shoulder). The depth of cut (brass thickness) takes a bit of fiddling, the length of the cut is generally easy to set.
The Finished Product — A Perfectly Uniform Neck
If you read the whole article, and follow the procedures using quality tools, you should get very good results — with a little practice. To demonstrate, here’s an example of my finished, neck-turned brass. You’ll see there is a perfect, 0.0125″ thick neck. It’s very uniform around the circumference, usually I only see 1 or 2 ten-thousandths variance. Now, with the necks uniformed like this, we can select the bushing size that will give us our preferred neck tension and experiment with various levels of tension, secure in the knowledge that all of the cases will actually have the desired neck tension.
About the author — “GS Arizona” was the writing handle for German Salazar, a top-tier rifleman and gun writer. Sadly, German passed from a medical condition in 2022. German was instrumental in helping this website and our Forum get started, and we remember him as a very dear, valued friend.
German was a great individual, and a great asset to the sport. An attorney by trade, with an engineering background, German was one of the very best gun writers, who had high master shooting skills to match his writing abilities.
Readers who have just recently discovered the Daily Bulletin may not realize that AccurateShooter.com has hundreds of reference articles in our archives. These authoritative articles are divided into multiple categories, so you can easily view stories by topic (such as competition, tactical, rimfire, optics, shooting skills etc.). One of the most popular categories is our Technical Articles Collection. On a handy index page (with thumbnails for every story), you’ll find over 120 articles covering technical and gunsmithing topics. These articles can help you with major projects (such as stock painting), and they can also help you build more accurate ammo. Here are five popular selections from our Technical Articles archive.
Stress-Free Pillar Bedding. Richard Franklin explains how to do a top-quality bedding job, start to finish.
OnTarget Software Review. Our Editors test free software that measures shot groups with great precision. We explain how to use the program and configure advanced features.
Savage Action Tuning. Top F-TR shooter Stan Pate explains how to enhance the performance of your Savage rifle by optimizing the torque settings of the action screws.
Complete Precision Case Prep. Jake Gottfredson covers the complete case prep process, including brass weight sorting, case trimming, primer pocket uniforming, neck-sizing, and, case-neck turning.
Stock Painting Instructions. Step-by-step guide for stock painting by expert Mike Ricklefs. Mike shows both simple coverage and fancy effects.
Even with high-quality brass from Lapua, Peterson, Norma, Alpha and RWS, occasionally you may find one or two cases per box which have a small flake or obstruction in the flash-hole. This will appear like a thin crescent on one side of the flash hole (see photo). You should inspect ALL new brass before loading to identify any pieces with a partially-obstructed flash hole. It’s a good idea to remove any flake or thin crescent left as an artifact of the flash-hole forming process. Because the flash-hole itself is normally centered and of the correct diameter, it is not necessary to ream the flash-hole to a larger diameter. All you really need to do is remove the small obstruction(s). This can be done quickly with inexpensive tools.
Use a Small Pin Vise to Remove Flash-Hole Obstructions
Folks have asked if there is a tool that can remove obstructions from a Lapua small, BR-sized flash hole without opening the hole size. The Lapua PPC/BR flash hole is spec’d at 1.5mm, which works out to 0.059055″. Most of the PPC/BR flash-hole uniforming tools on the market use a 1/16″ bit which is nominally 0.0625″, but these often run oversize — up to 0.066″.
If you want to just clear out any obstructions in the flash hole, without increasing the flash hole diameter, you can use an inexpensive “pin vise” with an appropriate drill bit. For $0.99 ($0.50 on sale), eHobbyTools.com sells a 1.5mm drill bit, item 79186, that matches the Lapua flash hole exactly. Other vendors offer a #53 pin vise drill bit that measures .0595″ or .060″ (depending or source). An 0.0595″ bit is close enough. You can find pin vises and these small-diameter drill bits at hobby stores.
For quite some time, Sinclair Int’l has sold a similar device for small (PPC and BR-size) flash holes. Like the 07-3081 unit for large flash holes, the 073000 Reamer for small flash holes works from the outside, so it can index off the primer pocket. It reams to .0625″, and also costs $29.99. The standard dimension for Lapua 220 Russian and 6mmBR flash holes is 1.5mm or .0590″. This tool will permit standard-size decapping rods with .0625″ tips to work without binding. However, note that both Forster and Redding normally supply .057″ decapping pins with their PPC and BR dies. So, it is NOT necessary to ream your Lapua BR/PPC flashholes, unless you prefer to do so for uniformity. It IS, however, a good idea to check BR/PPC flash holes for burrs before loading the first time.
NOTE: If you purchase either the 073081 or 073000 Sinclair Flash Hole Reamer tools, we recommend you mic the cutter tip before you process a bunch of cases. Sometimes a tip comes through that is oversize. This will ream the flash holes larger than you may intend.
A while back, Sinclair International’s Reloading Press Blog featured a “round-table” discussion of reloading techniques. Sinclair’s team of tech staffers were asked: “What do you feel is the one-most crucial step in precision reloading?”
Here are their responses (along with comments from our Editors):
Phil Hoham: “I feel that when working up a load do not go too high or too low in your powder charge. Stay away from ‘suggested loads’ you hear at the range, or on the internet. Always be sure to use a published reloading manual that presents not only minimums and maximums, but also pressure, velocity, and a proper range of powders used. Do not get distracted in the reloading process, and remain focused at all times during each step involved.”
AccurateShooter.com: Some loads presented on the Internet are OK as a starting point, but it is absolutely critical to understand that pressure maximums will vary considerably from one rifle to another (of the same chambering). For example, one 6mmBR rifle shooting 105gr bullets can max out with 30.0 grains of Varget powder, while another rifle, with the same chamber dimensions, but a different barrel, could tolerate (and perform better) with half a grain more powder. You need to adjust recommended loads to your particular rifle and barrel.
Pete Petros: “This could be a very broad topic, but if I were to pick one, it would be making sure to pay close attention, and weigh each and every powder charge to ensure that each load is exact and consistent. This is important not only for accuracy, but also for safety reasons.”
AccurateShooter.com: If you’re shooting beyond 200 yards, it is critical to weigh your loads with an accurate scale or automated system such as the AutoTrickler V3/V4. Loads that are uniform (within a few kernels) will exhibit lower Extreme Spread and Standard Deviation. And remember, even if you stick with the same powder, when you get a new powder lot, you may have to adjust your load quite a bit. For example, .308 Palma shooters have learned they may need to adjust Varget loads by up to a full grain from one lot of Varget to the next.
Ron Dague: “I feel that the most important step(s) in reloading for accuracy are in the initial case prep. Uniforming the primer pocket to the same depth to ensure consistency in primer seating is a crucial step. Additionally de-burring the flash holes, each in the same way to clean up and chamfer the inside is important. It ensures that the ignition from the primer is uniform and flows out in the same consistent pattern. Doing so will create uniform powder ignition and tighten up your velocity Extreme Spread.”
AccurateShooter.com: With some brands of brass, primer pocket uniforming and flash-hole deburring is useful. However, with the best Lapua, Norma, and RWS brass it may be unnecessary, or worse, counter-productive. So long as your Lapua brass flash-holes are not obstructed or smaller than spec, it may be best to leave them alone. This is particularly true with the small flash holes in 220 Russian, 6BR, and 6.5×47 cases. MOST of the flash-hole reaming tools on the market have cutting bits that vary in size because of manufacturing tolerances. We’ve found tools with an advertised diameter of .0625″ (1/16″) that actually cut an 0.068″ hole. In addition, we are wary of flash-hole deburring tools that cut an aggressive inside chamfer on the flash-holes. The reason is that it is very difficult to control the amount of chamfer precisely, even with tools that have a depth stop.
Rod Green: “I feel that bullet seating is the most important step. If you had focused on making sure all prior steps (case prep, powder charge, etc.) of the process have been carefully taken to ensure uniformity, bullet seating is the last step, and can mean all the difference in the world in terms of consistency. Making sure that the bullet is seated to the same depth each time, and time is taken to ensure that true aligned seating can make the load.”
Bob Blaine: “I agree with Rod. I strongly feel that consistent bullet seating depth is the most important step in creating the most accurate hand loads. I have seen the results in both my bench and long range rifles. Taking the time to ensure exactness in the seating process is by far, the number one most important step in my book.”
AccurateShooter.com: Agreed. When loading match ammo, after bullet seating, we check every loaded round for base of case to ogive length. If it varies by more than 3 thousandths, that round is segregated or we attempt to re-seat the bullet. We measure base of case to bullet ogive with a comparator mounted on one jaw of our calipers. You may have to pre-sort your bullets to hold the case-base to ogive measurement (of loaded rounds) within .003″.
Readers who have just recently discovered the Daily Bulletin may not realize that AccurateShooter.com has hundreds of reference articles in our archives. These authoritative articles are divided into multiple categories, so you can easily view stories by topic (such as competition, tactical, rimfire, optics, shooting skills etc.). One of the most popular categories is our Technical Articles Collection. On a handy index page (with thumbnails for every story), you’ll find over 100 articles covering technical and gunsmithing topics. These articles can help you with major projects (such as stock painting), and they can also help you build more accurate ammo. Here are five popular selections from our Technical Articles archive.
Stress-Free Pillar Bedding. Richard Franklin explains how to do a top-quality bedding job, start to finish.
OnTarget Software Review. Our Editors test free software that measures shot groups with great precision. We explain how to use the program and configure advanced features.
Savage Action Tuning. Top F-TR shooter Stan Pate explains how to enhance the performance of your Savage rifle by optimizing the torque settings of the action screws.
Complete Precision Case Prep. Jake Gottfredson covers the complete case prep process, including brass weight sorting, case trimming, primer pocket uniforming, neck-sizing, and, case-neck turning.
Stock Painting Instructions. Step-by-step guide for stock painting by expert Mike Ricklefs. Mike shows both simple coverage and fancy effects.


 This machine has two different rotation speeds for the toolheads. Four stations run at 350 rpm, while the two other stations run 57% faster, at 550 rpm. That give you a choice of spin speeds. You can work fast for tougher chores like military crimp removal, and slow down for inside-neck chamfering, which should be done carefully.


 A while back, Sinclair International’s Reloading Press Blog featured a “round-table” discussion of reloading techniques. Sinclair’s team of tech staffers were asked: “What do you feel is the one-most crucial step in precision reloading?”