|
|
July 23rd, 2017
This article originally appeared in the Sinclair International Reloading Press.
We have all been there…..you place a piece of tumbled brass in the shell-holder of your press, raise it into the die, and suddenly it is like somebody hit the brakes. The case is stuck in the die. Your first instinct is to reverse it out. You crank on the handle, and BANG! The rim rips off the case head and you are looking at a piece of brass stuck in the die.
 A stuck case is one of the boo-boos that all of us reloaders have faced from time to time. If proper lubrication is applied, then it should not be a problem. No matter if you are a seasoned reloader or new to it, this situation can happen. Take your time, use the proper procedures, and you will be back in business in no time! This article explains how to avoid stuck cases (through proper lubrication) and how to use a stuck case removal system. A stuck case is one of the boo-boos that all of us reloaders have faced from time to time. If proper lubrication is applied, then it should not be a problem. No matter if you are a seasoned reloader or new to it, this situation can happen. Take your time, use the proper procedures, and you will be back in business in no time! This article explains how to avoid stuck cases (through proper lubrication) and how to use a stuck case removal system.
What Causes Stuck Cases
One of the first common mistakes reloaders face is the stuck case. It can be caused by too much or too little lube. Too much and a vacuum can be formed causing the case to become suctioned into the die. Too little lube and friction is the culprit. So what is the cure? There is no exact cure, but the best lube that we have found so far is just a dab of Imperial Sizing Die Wax on your fingers and applied in a thin coat on the body of the case, not the shoulder or neck. Too much of this wax can cause the vacuum effect, or can eventually load your die up with gobs of residue. If it is applied to the shoulder area, or the leftover wax moves up into the shoulder region of the die, you will see dents or dimples in the shoulder. [AccurateShooter.com Editor’s Note: For normal full-length sizing of small cases such as 220 Russian/PPC, 6mmBR, 6.5 Grendel, or 6.5×47 Lapua we recommend Ballistol (aerosol) lube. It is very slippery, goes on very thin, and does not gum up the die.]
A great way to ensure that your dies are clean is to use a simple chamber mop with a dab of your favorite solvent on it and clean out the die. Be sure all of the solvent is out after cleaning by spraying the die out with Quickscrub III or use a clean chamber mop. If you are storing your dies, you can apply a thin coat of a good oil to protect the steel such as TM oil or Starrett M1 Spray.
Using a Stuck Case Removal Kit
If you do stick a case in your die there are a few good stuck case removal kits available. Each one works in a similar fashion. I have found the Hornady kit very effective and easy to use.

Basically what you do is remove the die from the press. Unscrew the decapping assembly and pull it out as far as you can. You then need to drill/tap threads into the stuck case head (this is why it is suggested to unscrew the decapping assembly as far as you can to get it clear of the drill bits). Once this is done screw the die back into the press. You then install the included shellholder attachment on the shellholder ram, and thread it into the case via a small wrench. With some elbow grease you can reverse the stuck case out of the die with the leverage of the press, and not damage the die.
However if the case is stuck….REALLY stuck, you may pull out the threads on the case and you are still left with a stuck case in the die without any way to pull it out. If the case is really difficult to remove even with the use of a stuck case removal kit, do not try to be Hercules with the press ram. Here is a trick that may work. Take the die with the stuck case and place it in your freezer for a couple of hours. Then repeat the removal with the cold die. The freezing temperatures may cause the brass to contract, and make removal easier. If this does not work it is recommended to send it to the die manufacturer. They will be able to remove the case without damaging the die.
Another fix if you can remove the decapping assembly completely is to use a tap hammer and a punch or small wooden dowel to knock the stuck case out. This isn’t the best way since it is very possible that you will damage the die internally or externally on the threads, or both. Send the die to the manufacturer to have this done properly. You will be happier in the long run.
This article appears courtesy Sinclair International. It first appeared in Sinclair’s Reloading Press Blog.
June 11th, 2017

Wouldn’t it be great if your rifle case could do double-duty as a shooting mat? You’d have one less gear item to haul to the range. Well there is such a product — Uncle Mike’s Long Range Tactical Bag quickly and easily converts to a 78″ shooting mat. Measuring 50″ in length, with a 15″-tall main compartment, this bag is big enough to handle most tactical and F-TR rifles with optics and Harris-type bipods attached. A 30″ flip-out forward section includes a front load strap that allows shooters to pre-load the bipod legs while shooting prone.

The Long Range Shooting bag has four self-adjusting magazine pockets, which will hold magazine sizes from .223/5.56mm to .308/7.62mm. Conveniently, this new 50″-long soft case will fit inside the popular Pelican model 1750 hard case (for those situations where you need greater protection).

- Fits Long-Range and Tactical rifles up to 49″ in length
- Fold out front section has bi-pod front load strap
- Four self-adjusting magazine pockets
- Fits inside a Pelican 1750 hard case
- Tough 1000D nylon with waterproof backing
- Opens up into 30″ x 78″ shooting mat
|
|
April 5th, 2017

Can you form a wildcat cartridge such as the 6 Dasher without expending primer, powders, and bullets? Absolutely. Using the hydro-forming method you can form improved cases in your workshop with no firing whatsoever, so there is no wear on your precious barrel. Watch this video to see how it’s done:
6 Dasher Case Hydro-Forming Demonstration:
Forum member Wes J. (aka P1ZombieKiller) has produced a helpful video showing how to form Dasher cases use the Hornady Hydraulic forming die kit. This includes a two-part die (body and piston), and a special shell holder. To form the case, you insert a primer in your virgin brass, top the case off with with a fluid (water or alcohol), then run the case up into the Hydro-forming die. A few stout whacks with a hammer and your case is 95% formed.
 Hydro-Forming Procedure Step-by-Step: Hydro-Forming Procedure Step-by-Step:
1. Insert spent primer in new 6mmBR brass case.
2. Fill with water or alcohol (Wes prefers alcohol).
3. Wipe excess fluid off case.
4. Place case in special Hornady shell-holder (no primer hole).
5. Run case up into Hydraulic forming die.
6. Smack top piston of forming die 3-4 times with rubber mallet or dead-blow hammer.
7. Inspect case, re-fill and repeat if necessary.
8. Drain alcohol (or water) into container.
9. Remove primer (and save for re-use).
10. Blow-dry formed case. Inspect and measure formed case.
Wes achieves very uniform cartridge OALs with this method. He measured ten (10) hydro-formed 6 Dasher cases and got these results: two @ 1.536″; 2 @ 1.537″; and 6 @ 1.538″.
Three or Four Whacks Produces a 95%-Formed Case
With a Hornady hydro-forming die, hydraulic pressure does the job of blowing out the shoulders of your improved case. The process is relatively simple. Place a spent primer in the bottom of a new piece of brass. Fill the case with water, and then slip it into a special Hornady shell-holder with no hole in the middle. Then you run the case up into the forming die. Now comes the fun part. You gently insert a plunger (hydraulic ram) from the top, and give it three or four stiff whacks with a mallet (or better yet, a dead-blow hammer). Remove the plunger and you have a 95% formed case, ready to load.
 Hornady supplies a shell holder made specifically for the hydro die; there’s no hole in the bottom of it. Just insert a spent primer into the primer pocket and you’re ready to go. The spent primer combined with the solid shell holder, keeps the water from seeping out of the primer pocket. The primer pushes out a little bit during this process, but it’s impossible for it to come out because of the way the shell holder is designed. The shell holder has a grove which allows the case to slide out of the shell holder even when the primer protrudes a bit. Hornady supplies a shell holder made specifically for the hydro die; there’s no hole in the bottom of it. Just insert a spent primer into the primer pocket and you’re ready to go. The spent primer combined with the solid shell holder, keeps the water from seeping out of the primer pocket. The primer pushes out a little bit during this process, but it’s impossible for it to come out because of the way the shell holder is designed. The shell holder has a grove which allows the case to slide out of the shell holder even when the primer protrudes a bit.
Story tip from Boyd Allen. We welcome reader submissions.
February 24th, 2017

To err is human… Sooner or later you’ll probably get a case stuck in a die. This “fix-it” article, which originally appeared in the Western Powders Blog, explains the procedure for removing a firmly stuck cartridge case using an RCBS kit. This isn’t rocket science, but you do want to follow the directions carefully, step-by-step. Visit the Western Powders Blog for other helpful Tech Tips.

Curing the Stuck Case Blues
 Sticking a case in the sizer die is a rite of passage for the beginning handloader. If you haven’t done it yet, that’s great, but it probably will eventually happen. When it does, fixing the problem requires a bit of ingenuity or a nice little kit like the one we got from RCBS. Sticking a case in the sizer die is a rite of passage for the beginning handloader. If you haven’t done it yet, that’s great, but it probably will eventually happen. When it does, fixing the problem requires a bit of ingenuity or a nice little kit like the one we got from RCBS.
The first step is to clear the de-capping pin from the flash hole. Just unscrew the de-capping assembly to move it as far as possible from the primer pocket and flash hole (photo at right). Don’t try to pull it all the way out. It won’t come. Just unscrew it and open as much space as possible inside the case.
Place the die upside down in the padded jaws of a vise and clamp it firmly into place. Using the supplied #7 bit, drill through the primer pocket. Be careful not to go too deeply inside the cartridge once the hole has opened up. It is important to be aware that the de-capping pin and expander ball are still in there and can be damaged by the bit.
Drill and Tap the Stuck Case
 
Once the cartridge head has been drilled, a ¼ – 20 is tap is used to cut threads into the pocket. Brass is relatively soft compared to a hardened tap, so no lube is needed for the tapping process. RCBS says that a drill can be used for this step, but it seems like a bit of overkill in a project of this nature. A wrench (photo above right) makes short work of the project.
RCBS supplies a part they call the “Stuck Case Remover Body” for the next step. If you are a do-it-yourselfer and have the bit and tap, this piece is easily replicated by a length of electrical conduit of the proper diameter and some washers. In either case, this tool provides a standoff for the screw that will do the actual pulling.
 
With an Allen Wrench, Finish the Job
Run the screw through the standoff and into the tapped case head. With a wrench, tighten the screw which hopefully pulls the case free. Once the case is free, clamp the case in a vice and pull it free of the de-capping pin. There is tension here because the sizing ball is oversized to the neck dimension as part of the sizing process. It doesn’t take much force, but be aware there is still this last little hurdle to clear before you get back to loading. Don’t feel bad, everyone does this. Just use more lube next time!
 
Article find by EdLongrange. We welcome reader submissions.
November 4th, 2016

Deep-Draw Ram Illustration from Demsey Mfg.
When we first ran this story a while back, it generated great interest among readers. By popular request, we’re reprinting this story, in case you missed it the first time around. — Editor
 Precision shooters favor premium brass from Lapua, Norma, or RWS. (Lake City also makes quality brass in military calibers.) Premium brass delivers better accuracy, more consistent velocities, and longer life. Shooters understand the importance of good brass, but many of us have no idea how cartridge cases are actually made. Here’s how it’s done. Precision shooters favor premium brass from Lapua, Norma, or RWS. (Lake City also makes quality brass in military calibers.) Premium brass delivers better accuracy, more consistent velocities, and longer life. Shooters understand the importance of good brass, but many of us have no idea how cartridge cases are actually made. Here’s how it’s done.
The process starts with a brass disk stamped from strips of metal. Then, through a series of stages, the brass is extruded or drawn into a cylindrical shape. In the extrusion process the brass is squeezed through a die under tremendous pressure. This is repeated two or three times typically. In the more traditional “draw” process, the case is progressively stretched longer, in 3 to 5 stages, using a series of high-pressure rams forcing the brass into a form die. While extrusion may be more common today, RWS, which makes some of the most uniform brass in the world, still uses the draw process: “It starts with cup drawing after the bands have been punched out. RWS cases are drawn in three ‘stages’ and after each draw they are annealed, pickled, rinsed and subjected to further quality improvement measures. This achieves specific hardening of the brass cases and increases their resistance to extraordinary stresses.” FYI, Lapua also uses a traditional draw process to manufacture most of its cartridge brass (although Lapua employs some proprietary steps that are different from RWS’s methods).

After the cases are extruded or drawn to max length, the cases are trimmed and the neck/shoulder are formed. Then the extractor groove (on rimless cases) is formed or machined, and the primer pocket is created in the base. One way to form the primer pocket is to use a hardened steel plug called a “bunter”. In the photos below you see the stages for forming a 20mm cannon case (courtesy OldAmmo.com), along with bunters used for Lake City rifle brass. This illustrates the draw process (as opposed to extrusion). The process of draw-forming rifle brass is that same as for this 20mm shell, just on a smaller scale.


River Valley Ordnance explains: “When a case is being made, it is drawn to its final draw length, with the diameter being slightly smaller than needed. At this point in its life, the head of the draw is slightly rounded, and there are no provisions for a primer. So the final drawn cases are trimmed to length, then run into the head bunter. A punch, ground to the intended contours for the inside of the case, pushes the draw into a cylindrical die and holds it in place while another punch rams into the case from the other end, mashing the bottom flat. That secondary ram holds the headstamp bunter punch.

The headstamp bunter punch has a protrusion on the end to make the primer pocket, and has raised lettering around the face to form the headstamp writing. This is, of course, all a mirror image of the finished case head. Small cases, such as 5.56×45, can be headed with a single strike. Larger cases, like 7.62×51 and 50 BMG, need to be struck once to form a dent for the primer pocket, then a second strike to finish the pocket, flatten the head, and imprint the writing. This second strike works the brass to harden it so it will support the pressure of firing.”
Thanks to Guy Hildebrand, of the Cartridge Collectors’ Exchange, OldAmmo.com, for providing this 20mm Draw Set photo. Bunter photo from River Valley Ordnance.
July 8th, 2016

A California company, CaseCruzer, makes the nicest multi-pistol hard cases we’ve ever seen. With capacities from 3 pistols to 6 pistols, these lockable range cases hold handguns securely in angled “quick-draw” slots. In addition to the molded pistol carriers, there are slots for magazines together with a separate compartment for muffs, ammo, and other accessories. Starting at $240.00 MSRP for the Quick Draw 3-Pack, these boxes are expensive, but they offer great protection with great usability. Water-tight and dust-proof, CaseCruzer cases are airline approved (ATA 300).
4-Gun Case

The smart design of the “Quick Draw” CaseCruzer cases lets you keep your pistol locks in place during transport. There is enough clearance to stow the pistols securely even with bulky trigger-guard locks.
March 26th, 2016
 
What is “Overbore”? That’s a question rifle shooters can debate to no end. This article from our archives proposes one way to identify “overbore cartridges”. We think the approach outlined here is quite useful, but we know that there are other ways to define cartridges with “overbore” properties. Whenever we run this article, it stimulates a healthy debate among our readers — and that is probably a good thing.
Forum Member John L. has been intrigued by the question of “overbore” cartridges. People generally agree that overbore designs can be “barrel burners”, but is there a way to predict barrel life based on how radically a case is “overbore”? John notes that there is no generally accepted definition of “overbore”. Based on analyses of a wide variety of cartridges, John hoped to create a comparative index to determine whether a cartridge is more or less “overbore”. This, in turn, might help us predict barrel life and maybe even predict the cartridge’s accuracy potential.
John tells us: “I have read countless discussions about overbore cartridges for years. There seemed to be some widely accepted, general rules of thumb as to what makes a case ‘overbore’. In the simplest terms, a very big case pushing a relatively small diameter bullet is acknowledged as the classic overbore design. But it’s not just large powder capacity that creates an overbore situation — it is the relationship between powder capacity and barrel bore diameter. Looking at those two factors, we can express the ‘Overbore Index’ as a mathematical formula — the case capacity in grains of water divided by the area (in square inches) of the bore cross-section. This gives us an Index which lets us compare various cartridge designs.”
OVERBORE INDEX Chart
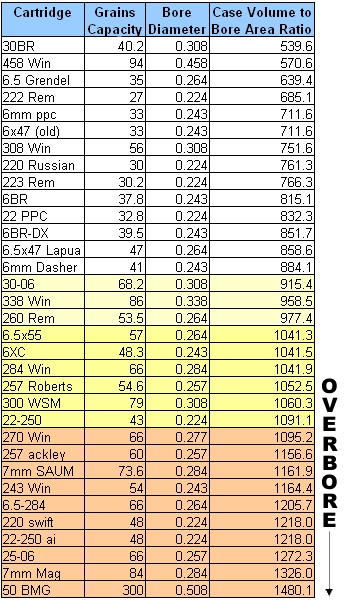
So what do these numbers mean? John says: “My own conclusion from much reading and analysis is that cartridges with case volume to bore area ratio less than 900 are most likely easy on barrels and those greater than 1000 are hard on barrels.” John acknowledges, however, that these numbers are just for comparison purposes. One can’t simply use the Index number, by itself, to predict barrel life. For example, one cannot conclude that a 600 Index number cartridge will necessarily give twice the barrel life of a 1200 Index cartridge. However, John says, a lower index number “seems to be a good predictor of barrel life”.
John’s system, while not perfect, does give us a benchmark to compare various cartridge designs. If, for example, you’re trying to decide between a 6.5-284 and a 260 Remington, it makes sense to compare the “Overbore Index” number for both cartridges. Then, of course, you have to consider other factors such as powder type, pressure, velocity, bullet weight, and barrel hardness.
Overbore Cases and Accuracy
Barrel life may not be the only thing predicted by the ratio of powder capacity to bore cross-section area. John thinks that if we look at our most accurate cartridges, such as the 6 PPC, and 30 BR, there’s some indication that lower Index numbers are associated with greater inherent accuracy. This is only a theory. John notes: “While I do not have the facilities to validate the hypothesis that the case capacity to bore area ratio is a good predictor of accuracy — along with other well-known factors — it seems to be one important factor.”
September 14th, 2015

Our friend Grant Guess recently had a “close encounter” with a bad primer. An apparently defective primer caused part of the casehead on one of his rounds to blow out. This, in turn, allowed high pressure gas to vent through the damaged primer pocket. Take a good look, boys and girls. This is yet another very good reason to wear safety glasses. The cartridge was a 6.5-06, handloaded in necked-down Winchester-headstamp .270 Win brass. Grant reports:
“I had a blow through between the primer and the primer pocket today. The action was really smoking and I got a face full of gas. This was a reasonably light charge. Thank God for safety glasses.
I should also mention that it appears there is a 3/64 hole that is halfway between the primer and the primer pocket. Like it burned a small jet hole through both of them.”
Could this happen to you? It just might. On seeing this damaged case, one of Grant’s Facebook friends, Chris D., observed: “Search the internet, you will see a lot of these pin hole ‘in the corner’ failures. Obviously Winchester has some issues with the LR primers.”
Careful Examination Reveals Apparent Primer Defect
After this incident, Grant examined the damaged case: “I pinned the flash hole and it is not over-sized or under-sized. The primer clearly has an area where it had a defect. At [50,000 CUP], it doesn’t take much of a defect to cause issues. There was a slight bit of pucker-factor on the next shot….”

September 5th, 2015

German Salazar has written a very thorough guide to measuring nearly all the critical dimensions of cartridge brass. In his Measuring the Case article, on his Rifleman’s Journal website, German reviews the tools and techniques required to measure everything from case overall length to case neck concentricity. Step-by-step, German shows how to measure: Case Length, Case Body length (below neck), Neck Diameter, Headspace, Base Diameter, Neck Thickness, and Case Neck Concentricity.

If you are an “advanced reloader” or want to be, you should read German’s article. Not only does German explain the most common measuring procedures, he highlights some alternative methods you might not have tried yet. The article also links to related discussions of more complex measurement tasts, such as determining case body wall thickness variation.
Even if you’re not a competitive shooter, measuring your brass can provide important safety benefits. As German explains in the conclusion of his article: “There are obviously a lot of measurements that can be taken on the cartridge case and in some cases, more than one way to take them. However, the first two that any new reloader must learn are case length and neck clearance, these two are safety concerns and if overlooked can results in serious damage to the rifle and injury to you.”
German’s article first appeared in RiflemansJournal.com in 2010.
February 5th, 2013
 Most of our readers know that MTM Case-Gard offers a vast selection of ammo boxes for pistol, rifle, and shotgun ammunition. However, with such a wide inventory of box styles and sizes, it can be difficult, at first, to select the right box for your particular cartridge and carrying needs. MTM has now simplified that task by publishing comprehensive Ammo Box Charts on its website. Just log on to the Box Charts Page, and select Rifle, Handgun, or Shotshell boxes. That will open a large chart listing cartridge types, small to large, in the left column. Pick your cartridge and you will see all the storage options. MTM even codes the entries so you can see if a box allows Tip Up AND Tip Down storage, Tip Down only, or Tip Up only. For most popular rifle cartridges, there are 20-round, 50-round, and 100-round cases. Below is the first part of the Rifle Ammo Box Chart. The entire chart is four pages long. Most of our readers know that MTM Case-Gard offers a vast selection of ammo boxes for pistol, rifle, and shotgun ammunition. However, with such a wide inventory of box styles and sizes, it can be difficult, at first, to select the right box for your particular cartridge and carrying needs. MTM has now simplified that task by publishing comprehensive Ammo Box Charts on its website. Just log on to the Box Charts Page, and select Rifle, Handgun, or Shotshell boxes. That will open a large chart listing cartridge types, small to large, in the left column. Pick your cartridge and you will see all the storage options. MTM even codes the entries so you can see if a box allows Tip Up AND Tip Down storage, Tip Down only, or Tip Up only. For most popular rifle cartridges, there are 20-round, 50-round, and 100-round cases. Below is the first part of the Rifle Ammo Box Chart. The entire chart is four pages long.
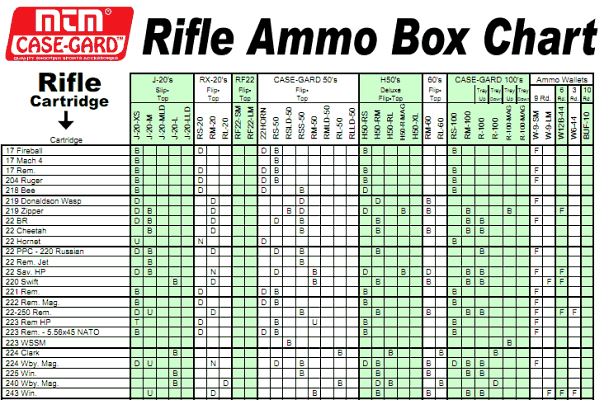
Rifle Ammo Box Chart (All) PDF | Handgun Ammo Box Chart (All) PDF | Shotshell Box Chart (All)
 New MTM Ammo Belt Pouch New MTM Ammo Belt Pouch
MTM has also introduced a handy product that should work great for rimfire shooters. The new MTM Ammo Belt Pouch conveniently holds 100 rounds (two boxes) of .22LR rimfire ammo. With a sturdy snap latch and heavy-duty belt clip, all you have to do is pour out the ammo, then clip the pouch on your belt or jeans pocket. The Belt Pouch is also handy for saving fired centerfire brass.
Suggested retail for MTM’s Ammo Belt Pouch is a modest $4.95. However, Grafs.com currently sells the item for $3.59 (Prod. #MTMABP). Designed to hold a 100 rounds of 22 long rifles. Holds: .22 Long rifle, 22 Magnum, 22 Short, 17 Win Super Mag, 17 HMR, 17 Mach 2, Pellets, and BBs.

|


