Editor’s NOTE: Shelley Davidson passed away in 2008 after a courageous battle with cancer. He was one of the great innovators in benchrest rifle design. This article, written before Shelley died, showcases Shelley’s creative talents at their best. His “Tinker Toy” design will always be a tribute to Shelley’s fabricating skills and imagination.
Shelley Davidson — a brilliant innovator. R.I.P. Shelley — you will not be forgotten.
Shelley Davidson’s peers called his radical rifle the “Tinker Toy” gun. We call it revolutionary. Even now, 14 years after its creation, there’s nothing quite like it. This innovative, skeleton design threw conventional wisdom to the winds. Shelley readily concedes he “broke the rules” of benchrest rifle building. But this was inspired rule-breaking, because Davidson’s rifle shot like a house on fire. The Tinker Toy gun won its first matches, both for Score AND for Group. And this rifle also delivered many “zero groups” in Gene Begg’s Texas Tunnel. Hats off to Shelley for conceiving and building a truly radical rifle that was also wicked accurate and successful in competition.
Tinker Toy 30 BR — Radical As It Gets
Report by Shelley Davidson
Although I’m not big on naming rifles, my shooting buddies have christened the gun “Tinker Toy.” I can live with that as it does kind of look as if it was made with a Tinker Toy set.
Origins of the Project
This project began with some wild ideas I had in the fall of 2006 about using magnets to tune a barrel. My idea was to use one magnet on the barrel and another on the stock so they pushed against each other to counter gravity-induced barrel sag (and possibly) tame barrel vibration in a beneficial manner. The only way to test these ideas was to build the device and mount it on a gun. That meant I had to build a new rifle because there was no place to mount a magnet on the stock of a conventional benchrest rig. I had a Kelbly-stocked heavy varmint stock with a Michael Kavanaugh paint job on it. I didn’t think Kav would ever forgive me if I started drilling holes in one of his works of art. My light varmint was in a carbon fiber Scoville stock that costs about a grand. Drilling into the Scoville for an experiment just smacked of bad judgment. So, the magnet thing was my first motivation for designing a new stock. As long as I was building from scratch I decided to offset the barrel and action 0.75″ to the right to counteract the spin/torque from the bullet.
Although there’s nothing new here, my second motivation was to build a 30BR that could shoot in the 10.5 lb light varmint class in NBRSA. The magnetic tuner will automatically make this gun illegal in the IBS. The IBS has declared all barrel attachments un-safe and have outlawed them. I personally feel that the IBS really outlawed all barrel attachments to prevent experimentation and innovation. But at least we have NBRSA matches.
Designing the New Gun — Thinking “Outside the Box”
Once I’d decided to build a lightweight stock that could support experimental devices out near the muzzle, I started drawing up some rough plans. I also took a trip to Jerry Stiller’s shop in Wylie, Texas for a brainstorming session with Jerry, the maker of Viper and other Benchrest actions. Jerry is a school-trained mechanical engineer and thinks differently than I do. I came away from Stiller’s shop with my design roughed out and sketched on paper. The design violated several covenants of conventional wisdom for building competition BR rifles. For instance, two-piece stocks stress the action. Stress reduction is why most BR rifles are glued into the stock. Another myth is that metal stocks vibrate too much so wood or foam-filled fiberglass or carbon fiber are used.
Tinker Toy Rifle DESIGN FEATURES
Shelly Davidson’s Rifle was so innovative, that almost every feature, except the bare action, is very different than you’ll find on most Benchrest rigs. Accordingly we felt it would be useful to isolate and describe the key design features, from stem to stern. Click thumbnails to view FULL-SIZE PHOTOS.
Front Bracket with Magnetic Tuner
The tuner consists of one rare earth magnet attached to the stock and another attached to a barrel sleeve with the magnets oriented so as to make the magnetic force repel each other. The purpose is to counter “barrel droop” and, hopefully, dampen barrel vibration. The lower magnet is carried on a threaded shaft (with lock ring), allowing the magnet to be raised up and down to adjust the “up push” on the barrel.
Tubular Fore-Arm Supported by Brackets
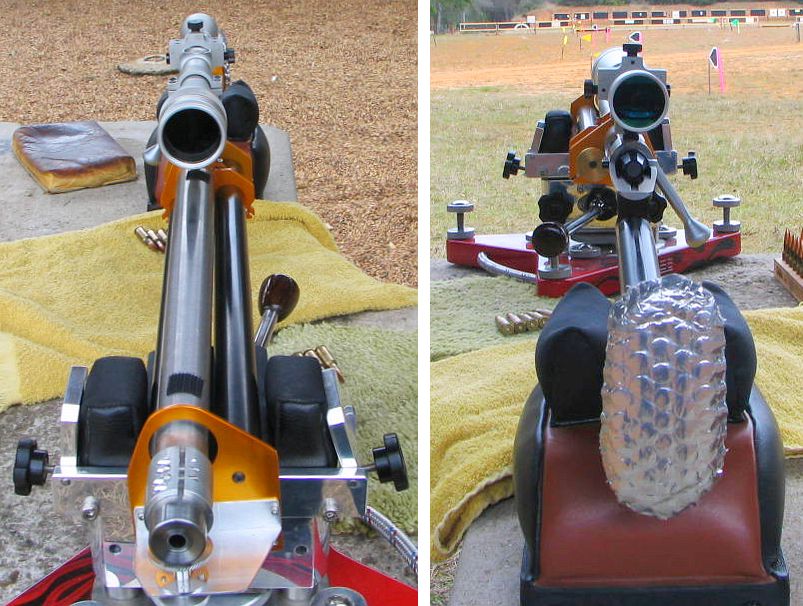
Three brackets support two tubes, one on either side of the barrel. The rear-most bracket is sandwiched between the barrel and the action. Four inches forward (max distance allowed for barrel blocks) a second bracket grips the barrel. Near the muzzle a third bracket secures the ends of the tubes and holds the magnetic tuner. To allow barrel offset, the left tube is 1″ diameter tube while the right tube is 5/8″ diameter.
Offset Barrel The rifle rests on a 3″ wide plate attached to the underside of the two fore-end tubes. With the plate centered in the front sandbag, the barreled action is actually offset 0.75″ to the right (looking forward from the breech). The purpose of this offset is to keep more weight on the right side to counter the tendency of the rifle to torque counter-clockwise. Two different diameter tubes allow for the built-in offset.
Floating Action without Sub-Support or Bedding
On the Tinker Toy gun, the action serves as a load-bearing assembly, holding the barrel in the front, and the skeleton buttstock (or “keel”) in the rear. Shelley was told that accuracy would suffer if you stressed a benchrest action in this manner but that proved untrue. It is a very simple solution to building a rifle, and it eliminates the need to bed the action. The forearm attaches to the action via a bracket installed like a recoil lug.
Skeleton Rear “Keel” Affixed Directly to Action
Davidson’s Tinker Toy does not have a conventional rear buttstock. Instead there is low-profile, v-shaped metal “keel”, as Davidson calls it, that rides the rear bag. The keel is supported by a tubular backbone that attaches at the rear of the Diamondback action. At the butt end is an aluminum plate covered with bubble wrap that serves as a butt pad. The skeletonized rear section helps the rifle maintain a very low center of gravity.
Locked Scope with External Windage and Elevation Adjustment
Shelley ran an older Leupold 36X Benchrest Scope with front-adjusting objective. To eliminate slop or loose tolerances in the erector mechanism that could cause changes in point of impact, the internals have been locked up by Jackie Schmidt. To move the cross-hairs relative to the bore axis, Shelley has a special Jewell/Foster rear ring that allows a limited amount of lateral and vertical movement of the entire scope body.
TINKER TOY SPECIFICATIONS
Action: Stiller SS Diamondback Drop-Port (1/2″ short), with .308 Bolt Face.
Barrel: Shilen .308 caliber, 17-twist, HV.
Chambering: 30BR, .330″ neck, Pacific Tool & Gauge Robinett Reamer.
Stock: Davidson Custom Tubular Stock with 0.75″ Offset Barreled Action.
Tube Construction: 6061 Aluminum, 1″ diameter (left), 5/8″ diameter (right).
Load: H4198 powder and 118gr Ronnie Cheek bullets. Loaded to 2980 fps.
Trigger: Jewell, 2 ounce BR.
Tuner: Custom, Adjustable with Opposing Magnets.
Optics: Leupold 36X (locked by J. Schmidt).
Rings: Jewell Foster External Adjusting Rings.
Stiller Diamondback Action and Shilen 17-Twist Barrel
I had wanted to use an aluminum Stiller Cobra drop port with a 6mmBR bolt face but Jerry had none in stock and he estimated it would be a year before one was available. Although I’ve waited for up to a year for an action in the past, I wanted to build this rifle during the fall of 2006 while the weather was pleasant enough to work in my unheated and un-air-conditioned garage shop. Jerry did have a 1/2″ short stainless steel Diamondback in stock so I purchased it even though it would add 3 ounces to the gun compared to the aluminum Cobra. Three ounces is a lot of weight when you’re working with a 10.5-lb limit. I had a heavy varmint contour Shilen 17-twist barrel that would work nicely and I had a Jewell trigger on a rifle that I wasn’t using at the time. I also decided to use my Leupold 36X (locked-up by Jackie Schmidt) with the Jewell/Foster adjustable rings.
Building the Tube Fore-Arm and Brackets
I took a wild guess as to tubing thickness and settled on .035″ for the 1″ left fore-arm tube and .058″ for the 5/8″ right fore-arm tube. All of the flat stock and tubes are 6061 Aluminum. I did the lathe work and the mill work and every evening I’d put the parts together and think about the proper way to proceed.
When the parts were mostly made, I started thinking that this was a truly ugly rifle. I thought about painting it but that wasn’t a good option as many of the parts are designed to slide over others and glue together. Anodizing was the best answer so while looking on the Internet for local anodizing shops I Googled “Home Anodizing”. Sure enough there were a few sites that told about how to anodize at home. I picked up some battery acid from NAPA Auto Supply, some Rit Clothes Dye from Wal-Mart, and a bunch of distilled water from the grocery store. Using an old battery charger as my dc power supply I started anodizing and dying the eighteen parts that went into the stock. Although I had to strip and re-anodize some of the parts, the work turned out acceptable.
Putting it All Together–Lug-Mounting the Fore-Arm and Lots of Epoxy
The barrel contour had to be modified to work with the stock which attaches by way of a rear plate which mounts like a recoil lug and a plate that ties the barrel and the stock tubes together 4″ forward of the bolt face. The four-inch maximum distance is a NBRSA rule concerning barrel blocks.
The recoil lug-style stock mount is probably the only truly innovative thing I did other than the opposing-magnet tuner. Basically, the rear bracket is sandwiched between the receiver face and the barrel shoulder–positioned where a conventional recoil lug would go. I also added a brass ring (visible in photo) between the anodized bracket and the barrel. This was done to distribute loads over a wider surface area. (I was concerned that the bracket material was fairly soft and I didn’t want to crush it as I torqued the barrel in place.) After fitting the barrel and plates I glued the entire gun together using epoxy and various LocTite adhesives. The rest of the parts were assembled but I did not Loctite the scope bases since I thought I’d be disassembling the rifle for re-work after the first trials. That came back to bite me during later testing when the gun started shooting erratically and I went down a couple of blind alleys before finding the loose bases.
Range Testing–Results Are Very Positive
The first range session was a real shocker. Even though the wind was up to 10mph and twitchy, the rifle showed promise from the very first shot. I really didn’t expect that kind of performance without, at least, some rework. After sighting in, I shot five, 5-shot groups that, when averaged together, measured .223″. That’s good enough to win some benchrest group matches. But I wasn’t finished with the gun yet–I still wanted to try out my magnetic tuner concept.
The Magnetic Tuner
Next, I built the magnetic tuner. The tuner consists of one rare earth magnet attached to the stock and another attached to a barrel sleeve with the magnets oriented so the magnetic forces repel each other. In order to test the magnets and to determine if the rifle really shot as well as it seemed to, I took it to Gene Beggs’s shooting tunnel in Odessa, Texas. I spent two days at the tunnel testing loads and then installed the magnetic tuner. The gun shoots well with the magnets and shoots well without them. I suppose I can’t make any claims as to how much, if any, improvement the magnets make. Gene said that my gun was the most accurate rifle to be tested at his one-year-old shooting facility: “Shelley Davidson brought one of the most unusual rifles I had ever seen; he called it his ‘Tube Gun.’ And boy, did it ever shoot! It still holds the record in the tunnel as the rifle that shot more zeros than any other to date.” I definitely recommend Gene’s facility for testing and refining shooting techniques and loads.
Competition — Tinker Toy Won Both Score and Group Matches
Finally the big day arrived when I’d shoot the first match with my new gun. The North Texas Shooters Association was holding its first club match of the 2007 season. At the Denton, Texas matches we shoot a Score Match in the morning and a Group Match in the afternoon. The March event was at 100 yards and the April match will be at 200 yards and so on alternating throughout the benchrest season.
Match One–Tinker Toy Wins Score with a 250 – 17X
Since the gun is chambered in 30BR and that chambering is almost immune to tuning woes, I preloaded 130 rounds with H4198 powder and 118gr Cheek bullets. I used my SEB front rest and rear bag which are made by Sebastian Lambang in Indonesia. Everything came together, and Tinker Toy demonstrated that the accuracy it showed in the tunnel was no fluke. The gun shot great and I won the morning match with a 250, 17X. The day was quite windy and the next best shooter scored a 250, 15X. So I’d chalked up my first win.
Match Two–Tinker Toy Wins Group with a .2282″ Agg Tinker Toy won the afternoon group match I entered with a five-group Aggregate of .2282″. (The second place score was .2568″.) My groups were .149″, .197″, .243″, .302″ (oops), and .250″. You know how some folks say a 30BR can’t be competitive with a PPC? Well that .2282″ Agg won’t break any records, but it is good enough to win some regional registered BR matches. So this rifle has demonstrated an ability to win in both Score and Group matches. Obviously I have a very good Shilen barrel, great Cheek bullets and the rest of the components are doing their jobs as well. But, the stock is also working well.
Score Shooting vs. Group Shooting–The Rules
In a score match, the shooter shoots one bullet at each of five record targets, which are clustered on one target sheet. The Aggregate score of five of these targets determines the winner. If the shooter touches the 10 ring on all of his 25 targets he can score a “clean” 250 score. Usually there will be more than one shooter who scores a 250 so the winner is determined by the X-count. The 1/2″ 10-point ring has a 1/16″ dot in its center. Touching the X dot adds to the shooters X count. In short-range group matches, the shooter must try to put five bullets through the same hole. At each distance (100 or 200), five, 5-shot matches are scored, the group sizes are added together (MOA equivalent at 200) and the total is divided by five to arrive at an Aggregate score.
Most of our readers are rifle guys, but it’s fun to shoot a pistol match now and then. You don’t need a lot of equipment, and if you shoot IDPA (Int’l Defensive Pistol Assn.) matches, you can really win with a $400 pistol and $20.00 worth of bulk 9mm ammo. That’s a bargain compared to what you’ll spend on a competitive PRS or F-Class rig and custom hand-loads.
If you want to get into the IDPA game, Shooting Sports USA has a good article that explains the basic rules and classifications. IDPA is not your grandad’s bullseye pistol match. There is movement and action. Stages are timed, and competitors engage targets from cover if available. Singled-handed shooting is sometimes required, as is shooting while moving. You can compete with pretty much any handgun suitable for self-defense — but no $4000 Raceguns with fancy optics. The fact that you can be 100% competitive without spending a ton of money is what makes IDPA so popular.
Shooting Sports USA polled IDPA shooters at the 2016 IDPA Nationals to determine their favorite gun brands and models. The #1 choice was the 9mm Glock 34 for the SSP (Standard Service Pistol) and ESP (Enhanced Service Pistol) Classes. Next most popular was the Smith & Wesson M&P Pro.
Along with SSP and ESP, there are three other main IDPA classes: Custom Defensive Pistol (CDP) for .45 ACPs (mostly 1911 types), Concealed Carry Pistol (CCP), and Revolver (REV). All classes have a minimum power factor. Scores are based on time and shot placement on the IDPA target.
IDPA Scoring System
The official IDPA Target (right) has multiple scoring zones. If you don’t hit the target’s center mass zone or head zone (both appear green in illustration), you drop one or three points. Here’s the formula: Score (in seconds) = Time + Points Down + Penalties. In IDPA, “points down” (and penalties) are added to your time. If you hit the outer edge of the target, you get 3 points down. Nearer center can be 1 point down. Center hit or head shot is 0 points down. See IDPA Scoring for Dummies.
Five Tips for New IDPA Shooters
This Editor got his start in competitive shooting with local IDPA matches. I shot a 9mm Glock 34, and a 9mm SIG Sauer P226, and even did one match with a .38 Spl S&W Snubbie. I eventually settled on the SIG P226, as it fit my hand better than the Glock, was more accurate, and was every bit as reliable. The P226 also pointed better than the Glock for me — something that helps with target acquisition. Here are FIVE TIPS for new IDPA competitors:
F-Class shooting (both F-Open and F-TR) is one of the fastest-growing forms of rifle competition. Each season many new shooters hit the line and attendance at the big matches increases every year. But if you’re new to the game, you may ask “Where can I shoot an F-Class match?”. Well, Forum member Rod V. (aka Nodak7mm) has compiled a useful list of 112 ranges throughout the USA where F-Class matches are held. With venues from Alabama to Wyoming — you should find an F-Class program not too far from home. The list, in Excel spreadsheet format, provides range locations and weblinks (where available). Click the link below to download the F-Class Range List (.xls file):
Note — this list, now in its 20th Revision, is a treasure trove for F-Class shooters. No claim is made that the list is comprehensive. But it still covers the the lion’s share of the important F-Class venues nationwide. If you know of a range that should be added to the list, please post the location on our F-Class Range List Forum thread. Rod will update the list as new range info is received. Rod writes: “Range information is wanted and welcomed. I would like your help on collecting specific info on Clubs/Ranges where known F-Class matches are held.” Here’s a partial sample from Rod’s list:
Shoot Better by Maintaining Physical Fitness
Even at age 68, Vera Koo was one of the top female shooters in the action pistol game. An 8-time Bianchi Cup Women’s Champion, Vera knows what it takes to win. She credits her success not just to dedicated practice, but also dedication to personal health. Vera has always regarded personal fitness as a key priority that helps her achieve competitive success. In this video, Vera explains the benefits of fitness training. Shooting practice combined with physical fitness training can bring your performance to the next level, says Vera. And Vera adds that shooting sports (or any competitive activity), provides key motivation to exercise — which will provide long-term health benefits.
“You cannot perform your best, if you are not AT your best. Stick with an exercise program that you enjoy, and see your strength and stamina develop. And then see your scores go up!
I noticed all the top shooters are in great physical condition. Since I entered the sport at a rather late age — at 47 — I took up weight lifting and aerobic excercise. My exercise programs have helped me gain strength and stamina that allows me to focus and shoot well.” — Vera Koo
The Competitive Mindset — Focus on the Victories
Along with physical fitness, mental “fitness”, i.e. having the proper competitive mindset, is also important to success in the shooting sports. In this second video, 8-Time Bianchi Cup Lady’s Winner Vera Koo explains how she works to develop focus, calmness, and self-confidence when she competes. Vera explains one needs to adopt a “Warrior Mindset”.
“Champions spend hours practicing for the smallest improvements. Even when they are good, they strive to be great. The common characteristic among [all Champions] is that they are all strong of heart — they are all warriors.” — Vera Koo
Learning from Vera Koo, video host Gabby Franco concludes: “Our mind is one of the most powerful tools we have to achieve our goals”.
Whether it’s getting involved in competitive shooting or firing a gun for the very first time, Vera Koo has overcome the fears that come along with new experiences. True champions are those who, like committed warriors, never give up. Vera encourages shooters to focus on each victory — no matter how small — in order to keep growing and improving.
Precision rifle shooters don’t have to hit a big-league fastball, or launch a top-fuel dragster in the blink of an eye. Nonetheless, reaction times are important in our sport — both for competitive shooters and hunters. Want to catch that prairie dog before he slips down his hole? You’ll need to be quick. Want to win at short-range benchrest? Then you’ll need to watch your windflags and respond quickly to a change. Miss a major wind-shift and you could ruin your whole weekend.
Here’s a fun test of reaction times from HumanBenchmark.com. The way it works is that, after clicking “Start”, you wait until the background color changes from red to green. The instant you see green, immediately click your mouse. The average (median) reaction time is 215 milliseconds. Hint: If you keep your finger “preloaded” in contact with your mouse button you can shave some milliseconds — but don’t “jump the gun”.
Tips for Faster Times
Here are three tips to speed up your reaction times:
1) Respond to the color change (by itself), rather than wait to read the word “CLICK!” after the box shifts to green.
2) Try focusing at the corner of the box, rather than the center. This may help you react “without thinking”.
3) Have your index finger “poised and ready” over the left button–you can shave milliseconds by very slightly depressing the button before you actually click.
The AccurateShooter.com Shooters’ Forum hit another membership milestone. We’ve surpassed 36,000 registered members. Now we hope to reach 40,000 members in the next year. If you have considered joining our Forum, but haven’t done so yet, there’s no better time than now. We have fast, “mobile-friendly” Forum software that works great with smart phones and tablets. You can now stay in touch when you’re on the go. Log in with your iPhone or Android phone. Our advanced Forum software also makes it easy to add photos to your posts and classified adverts.
As a Forum member, you’ll be part of an active community of serious shooters. You can get valuable advice on shooting and reloading from top shooters such as newly crowned King of 2 Miles Derek Rogers and National Champions Tom Mousel, Larry Bartholome, and Sam Hall. As well, many top experts visit the Forum, such as Bryan Litz (Applied Ballistics), Shiraz Balolia (Bullets.com), Frank Green (Bartlein Barrels), and John Perkins (21st Century Shooting).
Visit Forum.AccurateShooter.com to check out our Forum features. You’ll find a wealth of information shared by thousands of knowledgeable members. The boards are tightly moderated to prevent the ego battles common to some other internet forums. Our Shooters’ Forum maintains a high “signal to noise ratio”, with courteous and respectful exchange of ideas.
Sell Your Gear with Six FREE Classifieds
Along with our Forum discussion areas, we offer FREE CLASSIFIEDS for all registered Forum members. You’ll find great bargains in the Classifieds, and we provide a feedback system for buyers and sellers. Published feedback helps you buy and sell with greater confidence. Each Forum Member gets six (6) free classifieds per year. Then you can upgrade your membership to Silver or Gold to get Unlimited Classifieds for 12 months. Silver membership costs just $20 per year (a mere $1.67 per month).
In response to many requests from Forum members who shoot F-Class, we are republishing this informative interview, which first appeared last summer. You’ll find many “solid good” tips that can help any long-range rifle competitor.
Dan Pohlabel is a member of the all-conquering Team Sinclair F-TR squad. This talented group of shooters hasn’t lost a team match in years. What’s the secret of Team Sinclair’s success? Well there is not one single factor. These guys have very accurate rifles, they work hard on load development, and they practice in all conditions. In this interview, Dan Pohlabel talks about F-TR competition, reviewing the hardware (and skill set) it takes to win. He offers some great tips on developing loads. You’ll find a longer version of this interview on the Sinclair Int’l website. CLICK HERE to Read Full Interview.
Q: What do you find most challenging in F-TR Shooting?
It has to be keeping up with the competition, our sport has grown so quickly with new talented shooters. Staying at the top requires having a laser of a rifle, perfect loads, near perfect wind reading, and, of course, breaking good shots.
Q: How can novice shooters improve their game?
Seek out the local F-TR shooters and go to matches with them, listen and learn. Attend team matches and offer to score for one of the teams. As a scorer, you will sit close enough to hear the coach make wind calls and see the results on the target. Through the spotting scope you will see changes in mirage and it’s the quickest way to learn the basics of wind reading. Choosing and buying equipment is relatively easy, learning to read the wind is a journey.
Q: What’s in your range bag for match days?
Rear bag, towel, shooting glasses, canned air, ear protection, data book, pen, rifle rain cover, hat, rifle tools, timer, ammo, and bug spray.
Q: What specialized gear can you not live without?
1. A good set of elbow pads. It’s hard to keep concentrating on shooting when your elbows are rubbed raw from days of competing on them.
2. Good bug spray. We shoot from the ground but our shooting mats aren’t that big. It’s hard to concentrate with bugs crawling or chewing on you.
Q: Load Development — How do you work up a load?
First, I call Derek Rodgers and get his load data, he is the best load development shooter I know! Otherwise, here is the procedure I recommend. Measure throat length with bullet of your choice, to determine how much room is left in the case. The above measurement determines what powders you can use. We use only Hodgdon Extreme powders. Shoot a ladder test, five rounds each in 0.2 grain increments, to find the accuracy node for that bullet/powder combination. Take the best two loads and do a jump test with five rounds each, test at .005″, .025″, .060″ jump. One of these groups will be significantly better than the rest, now you can tweak that measurement +/- .002” or .005” to get the best accuracy.
Test at least three different primers to determine which offers a little better ignition for your load, a 5-shot test will usually tell you which is the best. Go back and test the two best combinations in a 10-shot test at least twice, pick a cool overcast day and also a hot sunny day and compare results. Take your final “best load” back and do a “simulated match”, 20 shots, waiting at least 20 seconds between shots. If you like those results it’s probably a reliable and accurate load.
Q: What rear bag do you use?
I use a two-bag system, large bag on bottom with a smaller bag on top. I had the bags made of marine canvas, zippered and filled with plastic beads. I can adjust the amount of fill to make them a perfect height for my shooting position. Teammate Jeff Rorer uses a similar system and mine is nearly a copy of his rear bags.
Q: How often do you practice and how many rounds do you shoot per year?
In good weather I practice a couple times a week at the local range, a couple more dry-firing practices/week at home. I typically shoot between 2,000-2,500 rounds per year.
Q: How do you prepare mentally before a match?
[I do] lots of visualization — run the video in my head of what I expect to see and of my performance. I think about the correct strategy for the conditions, staying disciplined to the strategy.
Q: What do you avoid before a shoot?
No late nights or excessive alcohol. Very little caffeine in the morning. Leave your cell turned off. Avoid emotional people.
Q: What’s your procedure on a Match day?
I arrive early, get squadding card, move gear, watch wind speed/direction, check over rifle and gear, sit and relax, visualize and focus on the most important goal of the day. Most days we shoot three relays of 20 shots. It’s important to eat and hydrate continually all day. My focus and concentration are better when I snack all day with fruit and energy bars, and lots of water. While taking my turn in the pits, I try to relax and only focus on what is ahead of me and [not] what’s already happened.
Q: What is your favorite reloading product?
My favorite reloading product is the Sinclair Premium Neck Turning Tool with Handle, I also use the expander mandrels provided by Sinclair for sizing the brass in preparation for the turning process. Correct and repeatable neck tension begins with turning necks to a uniform thickness. Sinclair also has mandrels to size the necks after neck turning that accurately size the necks for a specific neck tension.
Q: What is your preferred scope?
The scope I find the most useful is the Nightforce Competition Scope. This scope is very light-weight, has 15-55X magnification, world-class quality glass, 10 MOA per revolution on the turrets, 1/8 moa adjustments. It’s perfect for F-Class competition.
Q: What advice do you have for someone wanting to get into the sport?
Find a local club with some F-TR shooters and ask for their help. Most shooters will be happy to take you with them to a match, listen and learn while you’re there. You may find out it’s not what you thought, or you may be hooked. If you decide to jump in, start with an inexpensive rifle. This sport is expensive and you don’t need a $5000 rifle to learn good wind-reading skills. Start with a used Savage F-TR rifle and learn the basics, shoot for a year at least before making a larger investment. The money you saved buying a used Savage rifle will help pay for your divorce lawyer, LOL.
Q: What training drills do you use?
Dry-firing the rifle at home is a good way to practice when you can’t get to the range and shoot. It allows me to practice set-up, rifle handling, and position. When I can practice at a local range, I also dry-fire between shots to increase the amount of repetitions and increase the time spent in position.
Q: Who has been your biggest influence in shooting?
Eric Bair, 2006 F-Open National Champion helped me get started and gave me great advice. Most of the shooters on Team USA and Team Sinclair help each other, nobody knows all the answers but we share what we have learned. Danny Biggs, 2008 and 2009 F-TR National Champion also helped me when I was struggling to learn some of the ranges. I learned a lot from Danny.
Harold Seagroves’ 3-time Hickory Ground Hog Match-Winning Rifle
At clubs across the country, varmint fun shoots (also known as “groundhog matches”) are becoming more popular every year. In these matches, usually shot from the bench, you engage paper targets, clay pigeons, steel “critter” silhouettes, or some combination of paper and reactive targets. Shooters like these matches because you can shoot a wide variety of rifles, you don’t have to spend a fortune to be competitive, and there is fun for the whole family. Rules are inclusive — you won’t be turned away because your rifle is two ounces overweight. A large percentage of the match fees usually go back to shooters in the form of cash prizes. And the level of camaraderie is high.
Inclusive Rules Welcome All Shooters
Forum member Danny Reever has explained the appeal of groundhog matches: “We don’t have a governing organization, or have to pay $50 a year membership just to compete in matches. Sure the rules vary from club to club, but you adapt. You build your rifle (or even pistol) to fall within the rules of either the clubs you shoot, or to fit all the clubs rules. If not there still is a class for you to compete in. If your factory rifle doesn’t conform to the rules, it can shoot in a custom class. If your custom doesn’t make weight for Light Custom (usually 17 pounds and under), you shoot it in heavy custom class. If you want to try your Tactical rifle or F-Class rig, bring it out there’s a class you can shoot it in. If you don’t like one club’s rules, you just don’t shoot there. It’s no big deal.
There are no National records, or Hall of Fame points — just individual range records. If you want to shoot in BIG matches (with big prizes), there is the Hickory Ground Hog Shoot among others. If competition isn’t your bag, many clubs offer mid-week fun matches that you can shoot just for fun. You shoot the same targets but with a more relaxed atmosphere with no time limits.
The best part is you don’t have to shoot perfect at every yardage. You always have a chance because in this sport it really isn’t over until the last shot is fired. Typically ALL the entry money goes to the host club, with much of the cash returned back to the shooters via prizes. Junior shooters often shoot for free, or at a reduced rate. That lessens the burden on the family’s wallet (not a small thing in these economic times). The low entry cost also encourages young guys to get involved who don’t have $4000 custom rifles or the money to buy them.
More Fun, Fewer Complications
There isn’t a sea of wind flags to shoot over or to put up and take down. If the range has a couple of flags so much the better, but after all it is a varmint match. No pits to spot shots and slow things down either. If you can’t see your hits through your rifle scope or spotting scope well you are in the same boat as everybody else. That’s what makes it interesting/ sometimes frustrating!
As for calibers, I’ve seen everything from .223 Rem to .338 Lapua and everything in between. Our range record at my club is held by Bill Slattery, who shot a 147 out of a possible 150 with a 22BR 13 months ago. That’s on a target with a 1.250 ten ring at 200/300/500 meters. That record will stand for awhile, and shows you that some very good shooting is done at groundhog matches.
The best part is it’s laid back, everyone gets along, there is no place for big egos here. We who shoot the Ground Hog Matches don’t begrudge the other organizations and shooting disciplines, or those that shoot in them, heck some of us cross over and compete in registered benchrest matches too. Life’s too short, live and let live is our motto so just come out and have fun!”
Fellow Forum members chimed in:
FdShuster: “I’ve competed in our local ground hog matches for several years now, have introduced a number of others to them, and we all enjoy them and more importantly, continue to learn from them. Distances are as close as 100 yards, (with a 5/8″ 10 ring) to as far as 500 meters. With a 2″ 10 ring. Wind, mirage, bullet trajectories, all make them a challenge, and unlike shooting for group, where the group can be anywhere on the paper, in this game they must be very small, but also in the 10 ring. With the different classes — Custom, Factory, Hunter — almost any rifle will fit in somewhere. And Danny is correct about the friendly attitudes. I’ve seen competitors go out of their way, and jeopardize their chances of winning, to help someone else who may have a problem on the line.”
Mike C: “Here in Texas, our version of groundhog matches involves shooting at clay pigeons at 400 yards. We use 60mm, 90mm, and 108mm clay pigeons attached to target boards. You have 10 shots to break 8 clays, with a seven-minute time limit. We have developed a good following at these matches. In past years, a Shooter of the Year Award was given based on the Aggregate score for three of our matches, which are held in Utopia, San Angelo, and Huntsville.”
40X Guy: “I would have to say upon finishing my first year ever of groundhog matches, that the average Joe can grab his Swift, or his 25-06, or his 22-250 and go rip some holes in paper. Everybody is having a good time and its a gathering of like-minded people who have all shot chucks at some point or another. Even if one does not win the match, you can look at your target and say “darn that chuck target has five holes in him at 400 yards and he’s dead” just as well as the next guy shooting a custom bench rifle. Everybody fits in and everybody, 8 to 80, is having fun! It is addictive and will drive you to spend your hard-earned currency for sure!”
Do you shoot with a SEB joystick-equipped bipod, or are you considering acquiring a “Joy-Pod” for your F-TR rifle? Then you should read this article. Here Sebastian (“Seb”) Lambang, the inventor and builder of the SEB joystick bipod, offers tips on shooting with this impressive piece of engineering. Seb explains some techniques that can help with tracking and getting back on target. You can ask SEB questions about his Joy-Pod in this Shooter’s Forum Thread.
Joy-Pod Shooting Tipsby Seb Lambang
1. Be sure that the rear bag is settled before starting to shoot. Tap your stock into the bag. Then move your rifle back and forth, while checking your reticle. If it tracks straight, vertically perfect, and comes back to the original point of aim, it’s fine. If not, re-adjust.
2. If you use the Pod-Pad, be sure it is fully settled before starting to shoot. Tap the top where the feet rides on using your palm — you wan to create a flat top. To be sure the Pod-Pad does not move or slide, remove any gravel or pebbles under the pad — these can act as roller bearings.
3. Be sure your shooting mat is NOT springy or spongy. This is very important. Use a proper mat, or cut it if possible so your rear bag rests directly on the ground. Use a heavy rear bag. You can use a sand-filled doughnut (not a rigid spacer) to stabilize the bag on uneven ground. These doughnuts are relatively inexpensive and really work.
4. Be sure your whole body position is correct, so your shoulder is square. “Follow” the recoil with your shoulder, don’t push “against” it. Don’t move too much. Don’t make unimportant movements during your shooting string. Always be as consistent as you can in all things — how you hold the rifle, even how you breathe before taking the shot.
This young lady shooter is using a first generation Joy-Pod. The newer versions have flat, ski-like feet.
5. Be sure your rifle and rear bag are aligned. You want the slot between the ears of the bag perfectly aligned with your barrel. (You can use a yardstick or a piece of string to help with the alignment).
6. Use a heavy rear bag. The heavier and the more stable, the better.
7. It does not matter (from my own experience) whether you light-hold the joystick or leave the joystick in the air when you shoot (see Darrell Buell video — he shoots “hands off”). I believe the bullet already exits the muzzle before the joystick moves in your fingers. I lightly hold the joystick myself, just as I would hold a billiard stick.
Watch Darrell Buell shooting his .375 CheyTac equipped with a counter-balanced Joy-Pod. Note how the gun comes straight back, and how Darrell can release the joystick before breaking the shot.
SUMMARY — When It All Comes Together
If everything is set up right, and done correctly, your rifle will track beautifully straight and your reticle will come back or very close to the original point of aim, every time. If you have to change the Joy-Pod, rear bag, or your body position after a shot, there could still be something wrong with your set-up, alignment, or body position. When everything is right, you can also see your own score in the scope after every shot you make (after initial recoil). You also should not have to change the bipod’s setting, the height, the cant etc., at all. You only need to adjust for the current condition with the joystick, the joystick will do it all. That’s why we call our bipod the JOY-Pod.
SEB JOY-POD Joystick Bipod, and POD-PAD
Weighing in at just 18 ounces (510 grams), the Gen 2 Joy-Pod is unlike any other bipod on the market. Designed specifically for weight-restricted shooting classes, the Joy-Pod offers smooth and precise joystick-controlled aiming. The Gen 2 model offers up to 14 degrees of cant and an improved design that functions with up to 50 pounds of rifle weight. Each Joy-Pod comes with a Weaver rail adapter. The optional Pod-Pad accessory is designed expressly for the Joy-Pod. It works filled or unfilled with the Joy-Pod’s sleds to bring you back to your shooting position easily. CLICK HERE for more information, or visit SebRests.com.
.308 Win Tactical Rifle fitted with Joy-Pod on Pod-Pad. CLICK HERE for Video.
The Individual Palma Match kicked off Friday at the Berger Southwest Nationals. While still mostly calm, conditions were more variable and tricky. James Crofts told us that you had to watch both the mirage AND the flags, because sometimes a change appeared on the flags before you could see anything in the mirage. The top shooters were scanning the range constantly for any velocity or angle change. If you don’t pay attention to the flags, James said, “you’ll be out in the nine ring”.
Watch Video with Highlights from Day 3 of Berger SWN, including James Crofts Interview:
Our good friend John Whidden, a past National Long-Range Champion, brought his “A Game” Friday, topping the Sling Division with 449-33X. Competition was fierce with five sling shooters finishing with the same 449 points, separated only by X-Count: Whidden (33X), Oliver Milanovic (31X), Rick Hunt (25X), Michael Barlow (25X), and Steven Powell (22X).
John Whidden file photo from 2015
In F-Open, the top three shooters for the day were: Ken Padilla (448-25X), John Myers (447-32X), and Kenny Adams (447-24X). In F-TR Dan Lentz topped the Field with 447-24X, followed by Derek Rodgers and Justin Bertino (both at 445-23X). Ryan Pierce noted that Dan Lentz’s performance for the day beat all but three of the F-Open shooters: “Extremely impressive is Dan Lentz 447-24X F-TR score [which] tied Kenny Adams’s third-place F-Open Aggregate. Shooting .308 Win off a bipod and keeping up with the 7mms and 30 Cal magnums is outstanding. Good shooting Dan.”
Interesting Hardware
New Speedy F-Open Stock (Jeff Reed, owner)
F-Open competitor Jeff Reed has a new F-Open rig with the brand new Speedy Gonzales laminated stock. Jeff says he loves the stock, saying it “tracks like a dream”. Jeff also likes the recoil-reduction system fitted at the rear of the stock. This really makes a difference for the big calibers says Jeff. If you’re curious, that’s an IOR Valdada 12-52x56mm scope with a 40mm main tube on top of Jeff’s rifle. It features 25 MOA of elevation in one rotation of the turret.
Spotting Scope Mounted to Front Rest
Gunsmith Richard King of Texas has mounted his spotting scope directly to his Farley front rest. Very clever. This puts the spotter eyepiece just a few inches from his riflescope eyepiece so he can move easily from one optic to the other. This set-up also reduces the amount of gear Richard carries to the line. No separate spotting scope base, stand or horizontal mounting arm is required. This is a simple, elegant solution. We bet, with a little tinkering and design work, a similar system could be mounted to a SEB or Bald Eagle front rest. Note, it may appear that the lens is obscured by the front clamp, but that’s just the camera angle. We looked through the spotting scope and everything is clear.


 Front Bracket with Magnetic Tuner
 Tubular Fore-Arm Supported by Brackets
 Offset Barrel
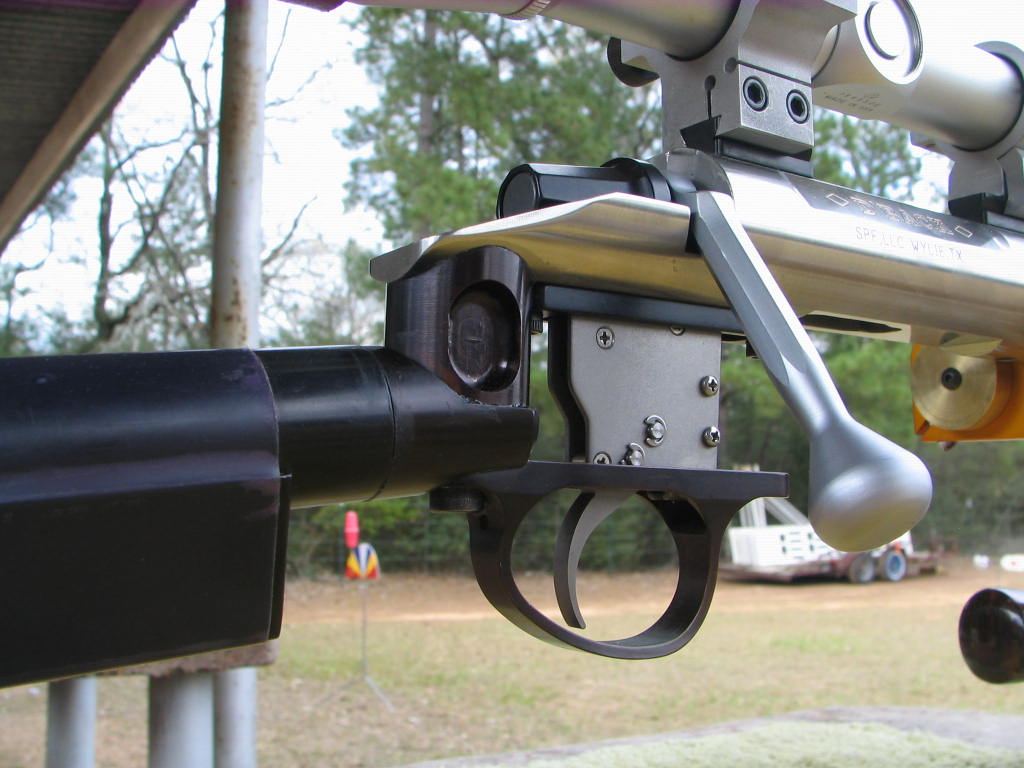 Floating Action without Sub-Support or Bedding
 Skeleton Rear “Keel” Affixed Directly to Action
 Locked Scope with External Windage and Elevation Adjustment


 The recoil lug-style stock mount is probably the only truly innovative thing I did other than the opposing-magnet tuner. Basically, the rear bracket is sandwiched between the receiver face and the barrel shoulder–positioned where a conventional recoil lug would go. I also added a brass ring (visible in photo) between the anodized bracket and the barrel. This was done to distribute loads over a wider surface area. (I was concerned that the bracket material was fairly soft and I didn’t want to crush it as I torqued the barrel in place.) After fitting the barrel and plates I glued the entire gun together using epoxy and various LocTite adhesives. The rest of the parts were assembled but I did not Loctite the scope bases since I thought I’d be disassembling the rifle for re-work after the first trials. That came back to bite me during later testing when the gun started shooting erratically and I went down a couple of blind alleys before finding the loose bases.

 Match One–Tinker Toy Wins Score with a 250 – 17X

 Along with SSP and ESP, there are three other main IDPA classes: Custom Defensive Pistol (CDP) for .45 ACPs (mostly 1911 types), Concealed Carry Pistol (CCP), and Revolver (REV). All classes have a minimum power factor. Scores are based on time and shot placement on the IDPA target.


 Visit
Visit 


 Inclusive Rules Welcome All Shooters
 More Fun, Fewer Complications
 Mike C: “Here in Texas, our version of groundhog matches involves shooting at clay pigeons at 400 yards. We use 60mm, 90mm, and 108mm clay pigeons attached to target boards. You have 10 shots to break 8 clays, with a seven-minute time limit. We have developed a good following at these matches. In past years, a Shooter of the Year Award was given based on the Aggregate score for three of our matches, which are held in Utopia, San Angelo, and Huntsville.”


