|
|
May 14th, 2026

by Sierra Bullets Ballistic Technician Paul Box
One thing that plays a major role in building an accuracy load is neck tension. I think a lot of reloaders pretty much take this for granted and don’t give that enough thought.
So, how much neck tension is enough?

Thru the years and shooting both a wide variety of calibers and burn rates of powder, I’ve had the best accuracy overall with .002″ of neck tension. Naturally you will run into a rifle now and then that will do its best with something different like .001″ or even .003″, but .002″ has worked very well for me. So how do we control the neck tension? Let’s take a look at that.
First of all, if you’re running a standard sizing die with an expander ball, just pull your decapping rod assembly out of your die and measure the expander ball. What I prefer is to have an expander ball that [can give] you .002″ in neck tension [meaning the inside neck diameter is about .002″ smaller than the bullet diameter after passing the expander through]. If you want to take the expander ball down in diameter, just chuck up your decapping rod assembly in a drill and turn it down with some emery cloth. When you have the diameter you need, polish it with three ought or four ought steel wool. This will give it a mirror finish and less drag coming through your case neck after sizing.
Tips for Dies With Interchangeable Neck Bushings
If you’re using a bushing die, I measure across the neck of eight or ten loaded rounds, then take an average on these and go .003″ under that measurement. There are other methods to determine bushing size, but this system has worked well for me.

Proper Annealing Can Deliver More Uniform Neck Tension
Another thing I want to mention is annealing. When brass is the correct softness, it will take a “set” coming out of the sizing die far better than brass that has become to hard. When brass has been work hardened to a point, it will be more springy when it comes out of a sizing die and neck tension will vary. Have you ever noticed how some bullets seated harder than others? That is why.

Paying closer attention to neck tension will give you both better accuracy and more consistent groups.
October 29th, 2015

K&M Precision Shooting Products has a very handy tool few hand-loaders know about. This brilliantly simple device lets you actually SEE your case necks as you expand them. This tool can benefit anyone who necks-up brass or who uses an expander to smooth out necks (or reduce tension) before loading.
 K&M Expand Mandrel Window Riser K&M Expand Mandrel Window Riser
This is a simple threaded extension placed between your expander die body (K&M Expand Iron) and the top of your press. It carries the expander mandrel higher, above the press, and has a cut-out view port so you can see the mandrel as it passes through the neck. Smart, eh? This provides visual feedback during the process of expanding your brass. The patent-pending view riser costs $20.00. Will it expand necks faster, or reduce run-out? We doubt it, but we still would like to have one, if only to eyeball the mandrel to control the neck-entry rate more consistently from case to case.
Installation: Thread the Expand Mandrel Window Riser into the top of your loading press, then thread the K&M Expand-Iron (Expander Die Body) fully into the top of the window riser and adjust each so you can stroke out the press completely without driving the case mouth into the press adapter. This allows you to view the expanding operation which is typically blind under the press. The riser also eliminates the need for the stop screw in the expander mandrel. LINK: Expand Window Riser Instructions (PDF).
September 9th, 2015

 On our main AccurateShooter.com site, you’ll find a good article by G. Salazar on the Basics of Neck Turning. If you’re new to the neck-turning game, or are just looking for good tips on improving your neck-turning procedures, you should read German’s article. Below we offer some highlights and photos from the article, but you’ll need to read the whole story to view all the illustrations and follow all the procedures step by step. On our main AccurateShooter.com site, you’ll find a good article by G. Salazar on the Basics of Neck Turning. If you’re new to the neck-turning game, or are just looking for good tips on improving your neck-turning procedures, you should read German’s article. Below we offer some highlights and photos from the article, but you’ll need to read the whole story to view all the illustrations and follow all the procedures step by step.
Why Should You Consider Neck Turning?
Let’s assume that your rifle doesn’t have a tight neck chamber that requires neck turning; if you have a tight neck chamber, of course, the answer to the question is “because you have to”. For the rest of us, and that includes the vast majority of Highpower shooters, neck turning isn’t a requirement, but it can be a useful way to bring your ammunition a small but meaningful step closer to that pot of gold at the end of the rainbow: perfection. I’m not talking about a theoretical improvement, but a real one, an improvement that lies in equalizing and optimizing the neck tension of your loaded rounds. Inconsistent neck tension is a real contributor to increased muzzle velocity variance which itself is a significant factor in increased elevation dispersion at long range. So there’s our basic reason for neck turning: to equalize and optimize neck tension in order to reduce elevation dispersion.
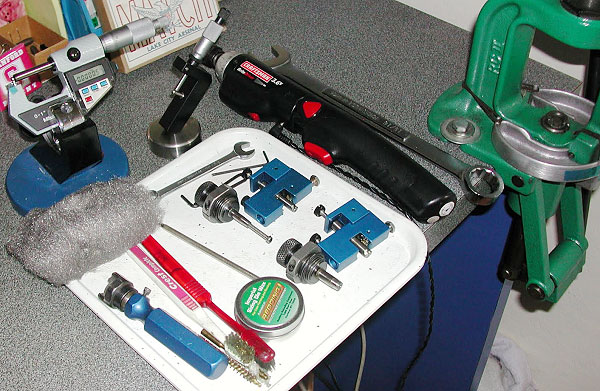
The Tools of the Trade
Here you see everything I use and a bit more. The press, a cordless screwdriver (always plugged in, turning is tough on the old battery), a couple of K&M neck turners (one set up for 6mm, the other for .30 caliber) an expander for each size, some Imperial lube, an old toothbrush or two to keep the cutter clean, a handle with a caseholder (for those emergencies when the screwdriver dies and there’s just one more case to go!), steel wool and a tubing micrometer finish the list of tools. Hey, I left the dial calipers out of the picture! They’re always handy, keep them around, but they are useless for measuring neck thickness, so don’t try. I usually use an Optivisor magnifier while I turn necks, very handy for a clear view of what’s happening on the neck.
Expanding the Neck
Put some lube on the inside of the case neck and run it into the expander. Really, this isn’t hard. I prefer to expand each case immediately before turning it as opposed to expanding all the cases and then turning them. Brass is somewhat springy and will tend to go back toward its original size; therefore, by expanding and turning immediately, you are more likely to have all cases fit the mandrel with the same degree of tightness and to get a more consistent depth of cut.
Cutter Adjustment for Cut Depth and Length
All the tools I’ve seen have pretty good adjustment instructions. The only thing they don’t tell you is that you should have five to ten spare cases to get it right initially. Anything of the right diameter will do while you learn, for instance, just use that cheap surplus .308 brass to do initial setup and save the precious .30-06 for when you know what you’re doing. Be patient and make your adjustments slowly; you’ll need to set the cutter for thickness as well as length of cut (just into the shoulder). The depth of cut (brass thickness) takes a bit of fiddling, the length of the cut is generally easy to set.
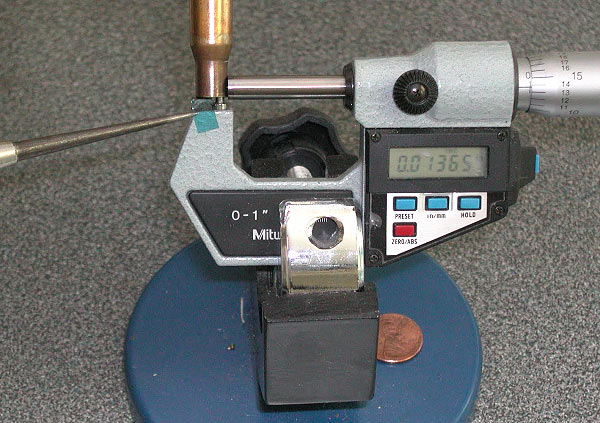
The Finished Product — A Perfectly Uniform Neck
If you read the whole article, and follow the procedures using quality tools, you should get very good results — with a little practice. To demonstrate, here’s an example of my finished, neck-turned brass. You’ll see there is a perfect, 0.0125″ thick neck. It’s very uniform around the circumference, usually I only see 1 or 2 ten-thousandths variance. Now, with the necks uniformed like this, we can select the bushing size that will give us our preferred neck tension and experiment with various levels of tension, secure in the knowledge that all of the cases will actually have the desired neck tension.
January 26th, 2014
Responding to customer requests, PMA Tool is now offering carbide expander mandrels in popular calibers. These carbide mandrels are listed as .22, .24, .26, .28, and .30 calibers, but they are sized for popular chamberings in .223, .243 (6mm), .264 (6.5mm), .284 (7mm), and .308 (7.62mm). PMA’s new carbide expander mandrels will cost $56.95 per item.
PMA’s tool-makers tell us: “Over the past several months we have received many requests to make expanding mandrels from carbide. Due to this popular demand we are now offering expanding mandrels from carbide. Carbide reduces galling and scratching both on the inside of the case neck and the mandrel itself. We still recommend the use of lubricant when expanding case necks to make the operation easier. These mandrels are ground from a 3/8” solid carbide blank and sized properly to expand case necks, preparing them for neck-turning. They can also be used to iron out dings and flat spots on new brass not destined to be neck turned, preparing them for loading and bullet seating.”
PMA Dual Taper Non-Carbide Expanders are Just $8.95
PMA also makes regular steel expander mandrels at a much lower price — $8.95. These regular Expanding Mandrels are designed to fit both the 21st Century Shooting and Sinclair Expander Dies. PMA states: “Our mandrels are longer than other expanding mandrels and feature a special dual taper which expands both on the up and down stroke of the press to more uniformly expand and straighten case necks.” These regular expanders are offered for all popular calibers, from .17 all the way to .338.

PMA Specialized Necking-Up Mandrels for 30 BR and 6 PPC
Last but not least, PMA makes specialized “long-taper” expanders designed to expand 6mmBR brass to 30 BR brass, or expand 220 Russian brass to 6mm (for the 6 PPC). Priced at $9.95, these handy, effective tools make it easy to neck-up your brass for 30BR or 6 PPC.

PMA explains: “So you want to make 30BR brass quick? Here’s the mandrel for you. A while back, while forming some 30BR brass for a customer’s rifle we noticed that after necking 6mm up to 30cal the neck fit on the turning mandrel was a lot tighter than we wanted. Regardless of how many steps we took to get there we had to run the case necks over the final expander repeatedly to get the fit right. After that experience we decided to set out and make a mandrel with optimum taper and diameter to neck 6mm up to 30 caliber in one step. We think is the best way to expand the necks of 6BR Lapua brass [for the 30 BR]. Remember to always use plenty of lubricant when necking.”
Product Tip from EdLongrange. We welcome reader submissions.
February 9th, 2011
Gear Review: 21st Century Neck Turner
by Germán A. Salazar
A new neck-turning tool with easy adjustments, super-high quality of manufacturing and an ergonomic design sounds like a good thing to me. If you also like good tools and like to keep up with developments in the field, read on (most of the pictures can be enlarged by clicking on them).

I recently received the new Neck-Turning Tool made by John at 21st Century Shooting. I always enjoy seeing John’s work because he really has a good grasp on how a tool should be designed to work effectively and this tool certainly fits that mold. The basic requirements of a good neck turner are: (a) accurate adjustments, (b) good blade design, (c) ergonomic design and (d) a well thought-out system of ancillary items. Let’s look at each of those areas and give the tool a test drive.
 Handy Cut-Depth Adjustment Dial Handy Cut-Depth Adjustment Dial
The 21st Century neck turner has a unique dial adjustment for the depth of the cut which makes small adjustments simple and fast. Each full number represents 0.001″ of cutter movement, and the fine lines in between let you zero in on the exact neck wall thickness that you need. The dial is simply turned in until the desired neck thickness is reached. If you go too far, it’s best to turn it out a full turn, then back in once again; this reduces the effect of any backlash that might exist in the threads. I found the dial easy to use and had no trouble getting to my usual thickness setting of 0.0125″.
 Excellent Carbide Cutter Blade Design Excellent Carbide Cutter Blade Design
At its core, a neck turner is a cutting tool and good blade design is what sets any good cutting tool apart from the competition. Here, John really shows his ability as a designer and manufacturer. The blade supplied on my tool is carbide and cuts brass effortlessly, however, that’s not the real point of interest. Many neck turners have blades with less than ideal nose radius and create a “threading” effect on the neck unless the tool is fed over the brass at a very slow rate. The 21st Century blade has a good radius at the transition to the shoulder angle which allows for a smooth cut with a reasonable feed rate.
The shoulder angle is another well thought-out feature as it is a very close match to the actual shoulder angle of the case. This allows you to bring the cutter a bit further into the shoulder without weakening it and definitely avoid the subsequent occurrence of the donut of thick brass at the base of the neck. (When ordering, 21st Century lets you specify one of four (4) different cutter shoulder angles to match your particular cartridge: 20°, 30°, 35°, and 40°.) The photo of the case in the cutter shows the cutter making solid contact with the shoulder after a substantial cut on the neck, yet the shoulder was really just lightly touched. I backed the cutter off a bit from this setting for the final adjustment. If you tend to use heavy bullets which extend below the base of the neck, this feature alone makes John’s tool worthwhile.

 Turning necks is tedious, especially if you’re turning a large number of cases as High Power shooters generally do. Accordingly, a design that takes ergonomics into consideration is highly appreciated. Note the slight hourglass shape of the tool, that really lets your hand take a grip that counters the natural tendency of the tool to turn with the rotation of the case, especially when turning with a power case driver. The size of the tool itself also helps; if you’ve used one of the smaller tools on the market, you know just how tired your hand can get from trying to hold on to it after a while! I turned 70 case necks in two sessions with the 21st Century tool and my hand and fingers remained comfortable throughout. Turning necks is tedious, especially if you’re turning a large number of cases as High Power shooters generally do. Accordingly, a design that takes ergonomics into consideration is highly appreciated. Note the slight hourglass shape of the tool, that really lets your hand take a grip that counters the natural tendency of the tool to turn with the rotation of the case, especially when turning with a power case driver. The size of the tool itself also helps; if you’ve used one of the smaller tools on the market, you know just how tired your hand can get from trying to hold on to it after a while! I turned 70 case necks in two sessions with the 21st Century tool and my hand and fingers remained comfortable throughout.
However good the turner may be, it doesn’t work alone. Any neck turner needs a matching expander. The 21st Century expander is a nicely designed unit that allows you to change expander sizes with no tools by simply unscrewing the cap of the die body and dropping in the appropriate expander.
 K&M Arbor Adapters Available K&M Arbor Adapters Available
I’ve been using a K&M turner for some years now and have accumulated turning arbors (mandrels) in various sizes. John knows that’s the case for many of us, so he makes affordable adapter bushings for his tool that allow the use of K&M turner arbors. That’s a nice feature that will allow me to save the price of a few arbors and expanders. The adapter for K&M arbors costs $12.00.
Although I use a cordless screwdriver to turn the case, I still like to have a manual option for case turning. Sometimes the cordless driver dies with just a few cases left to go in a session and I know that, one day, when I most need it, it’ll just quit altogether. John’s case handle for manual case turning is another well-designed, ergonomic piece that shows his careful, thoughtful approach to tool design. He even makes a version of it for the .50 BMG if your tastes in cartridges run on the large side!

Neck-Turning Tool and Accessory Order Information
Order the Neck Turner and accessories through www.21stCenturyShooting.com, or call (260) 273-9909. The 21st Century neck-turning tool, by itself, costs $78.00, including a carbide cutter (standard size). You can chose among four different cutter shoulder angles, to match your particular cartridge: 20°, 30°, 35°, and 40°. Additional carbide cutters cost $26.00-$28.00. Caliber-specific turning arbors and expander mandrels are priced at $7.95 each. The standard size Universal Case-Holding Handle (photo above), costs $16.95.
 You can also purchase a complete Neck-Turning Tool Kit from 21st Century. This $112.99 package includes everything you need: You can also purchase a complete Neck-Turning Tool Kit from 21st Century. This $112.99 package includes everything you need:
Neck Turning Tool w/cutter
Turning Arbor
Expander Mandrel
Expander Die Body
Loading Die Locking Ring
Neck Turning Universal Handle
Disclosure: 21st Century Shooting, an advertiser on this website, provided a neck turner tool and accessories to German Salazar for testing and evaluation.
|


