Tumblers and walnut/corncob media are old school. These days many shooters prefer processing brass rapidly with an ultrasonic cleaning machine. When used with the proper solution, a good ultrasonic cleaning machine can quickly remove remove dust, carbon, oil, and powder residue from your cartridge brass. The ultrasonic process will clean the inside of the cases, and even the primer pockets. Tumbling works well too, but for really dirty brass, ultrasonic cleaning may be a wise choice.
Our friend Gavin Gear has evaluated an RCBS Ultrasonic cleaning machine using RCBS Ultrasonic Case Cleaning Solution (RCBS #87058). To provide a real challenge, Gavin used some very dull and greasy milsurp brass: “I bought a huge lot of military once-fired 7.52x51mm brass (fired in a machine gun) that I’ve been slowly prepping for my DPMS LR-308B AR-10 style rifle. Some of this brass was fully prepped (sized/de-primed, trimmed, case mouths chamfered, primer pockets reamed) but it was gunked up with lube and looking dingy.”
UltimateReloader.com Case Cleaning Video (7.5 minutes):
Gavin describes the cleaning exercise step-by-step on UltimateReloader.com. Read Gavin’s Cartridge Cleaning Article to learn how he mixed the solution, activated the heater, and cycled the machine for 30 minutes. As you can see in the video above, the results were impressive. If you have never cleaned brass with ultrasound before, you should definitely watch Gavin’s 7.5-minute video — it provides many useful tips and shows the cleaning operation in progress from start to finish.
Ultra Dry Necks After Ultrasonic Cleaning — Some Suggestions
The Ultrasonic cleaning process gets cartridge brass so “squeaky clean” that increased force may be required to seat your bullets, or they may “grab” as they go in the necks. To reduce bullet-seating effort, you may benefit from adding a little dry case lube inside the case-neck before loading (use a nylon brush). Another trick is adding a teaspoon of Ballistol lube to the cleaning solution. That provides a trace lubricant inside the necks, but does not interfere with powder ignition in any way.
The latest Gen2 RCBS ultrasonic cleaning machine has a large 6.3-quart capacity. That’s nearly 100% larger than the first generation machine in Gavin’s video. The bigger Gen2 machine, $419.99 at Precision Reloading (with FREE shipping), features a second ceramic heater and transducer to better clean brass cases and firearm parts. The LED is easily programmable, and the timer can be set for up to 30 minutes of cleaning. The original 3.2 quart-capacity RCBS ultrasonic machine, as shown in Gavin’s video, is still available for $197.99 at Midsouth Shooters. There is also another good 6-liter multi-mode ultrasonic cleaning machine, with stainless steel tank, available for $199.99 on Amazon.
Do you have some ammo that got loaded incorrectly, perhaps with the wrong powder? Then you’ll want to disassemble the ammo for safety’s sake. You can use an impact puller to do this task, but if you have more than a dozen rounds or so, you may prefer to use a collet-style bullet puller. These work very quickly and positively, making quick work of big jobs. The efficiency of the collet-style puller is worth the investment if you frequently disassemble ammo. These devices retail for under $35.00 (collets sold separately). Normally, you’ll need a specific collet for each bullet diameter. But collets are not that costly, so this isn’t a big deal, particularly if you only load a few calibers, such as .223, 6mm, and .308.
Hornady and RCBS use different mechanisms to tighten the collet around the bullet. On the red lever Hornady Cam-Lock Bullet Puller, a lever-arm on the top of the bullet puller serves to tighten the collet around the bullet. Simply rotate the lever from the vertical to the horizontal position to grab the bullet. Lower the ram to remove the case. The bullet will drop out when you return the lever arm to the vertical position. This is demonstrated in the video below:
Hornady Cam-Lock Bullet Puller Demonstrated
Collet bullet-pullers resemble a loading die with a lever or handle on the top. They screw into a standard reloading press. Hornady and RCBS both make collet-style bullet pullers. They use the same basic principle — the device tightens a collet around the bullet, and then the bullet is separated from the case by lowering the press ram. NOTE: Collet pullers may leave small marks on your bullets, unlike impact (kinetic) pullers.*
Like the Hornady tool, the RCBS Bullet Puller employs a collet to grab the bullet. However, the RCBS tool tightens the collet in a different way. The head of the RCBS tool is threaded internally. By rotating the lever arm clockwise in a horizontal circle you squeeze the collet around the bullet. To remove the bullet, after lowering the press ram, simply spin the lever arm back in the opposite direction. The use of the RCBS tool is demonstrated in these two videos:
RCBS Collet Bullet Puller Demonstrated:
WARNING: When removing bullets from loaded cartridges, always make sure there are no obstructions or debris in your shell-holder or under the loaded round. NEVER engage a primer seating accessory on your press when working with loaded rounds. You can cause a round to discharge by contacting the primer! Also, we recommend you keep your head and torso away from the bullet puller tool at all times.
*By contrast, impact pullers rarely mark bullets, particularly if you put a little bit of foam or paper wadding in the closed end of your impact puller. When dismantling loaded rounds, powder kernels can get trapped in the wadding, so you should remove and replace the wadding before changing to cartridges loaded with a different powder type (assuming you intend to save the powder).
Progressive reloading presses offer shooters speed and efficiency in producing custom-tailored rifle and pistol ammunition. However, there is a wide choice of Progressive Presses and a bewildering array of options to consider. In this video, the 6.5 Guys and UltimateReloader.com’s Gavin Gear provide an overview of the leading Progressive Presses on the market along with key considerations for precision rifle shooters. If you are considering getting a Progressive for rifle ammo reloading, you should watch this informative, 25-minute video.
10 Tips for Reloading Rifle Ammo on a Progressive Press:
1. Make sure the brass is very clean. Don’t mix old range pick-up brass with newer brass.
2. Apply a thin, spray lube to all cases before the sizing/loading cycle.
3. Consider priming your brass separately (with a hand or bench tool) before the operation. Then inspect the primers before loading powder and bullets.
4. Always wear eye protection when loading with the Progressive, particularly if you are priming cases.
5. With masking tape, mark the powder measure/dropper with the powder type and cartridge charge weight. Check the charge mass multiple times (see below).
6. Cycle a few cases, sizing and adding powder but NOT seating bullets. Weigh the powder charges to ensure the powder measure is dispensing the correct charge. Sometimes this will change a couple tenths as it “settles down” after the first few charges.
7. Check the brass for shoulder bump and bullet seating depth carefully for the first few rounds, then check again periodically.
8. Try to maintain a steady pace and operate the handle the same way every time.
9. Visually inspect the powder charge in each case (before bullet seating), and use a lock-out die if your Progressive Press has enough stations.
10. Never, ever mix pistol and rifle powders! If you have previously loaded pistol ammo with your Progressive, make sure ALL the powder (every flake and kernel) is removed from all parts of the powder-dropping system before you add rifle powder.
Visit these sites for more Reloading and Precision Shooting Videos:
UltimateReloader.com offers some of the most thorough firearms and reloading tool tests on the internet. And the Ultimate Reloader YouTube Channel now has over 1300 videos that showcase reloading tools, accurate firearms, precision optics, gunsmithing methods, and top-tier reloading components. For today’s Saturday at the Movies feature, we showcase ten videos created by Gavin Gear and his UltimateReloader team. These videos feature ELR Rifles, Peterson and Lapua brass, a brand new RCBS trimmer system, BAT actions, a handsome 6x47L Custom Rifle, the Athlon Rangecraft Chronograph, and Ultimate Reloader’s impressive new RifleBuilderPro Software System. Enjoy this Saturday Video Showcase.
Extreme Long Range — One Mile Shooting
In this video, Gavin meets with Paul Phillips, an ELR “King of Two Miles” past Champion. Paul explains the features in his .375-caliber rifle designed to shoot to one mile and beyond. Along with a big action to hold the very long cartridge, an ELR rifle needs a special high-angle optics rail to allow the needed elevation. In addition, a long-wheelbase chassis is optimal for greater stability and balance. Recoil is very significant so Paul’s rifle boasts a massive 6-port muzzle brake on the very long barrel (ELR barrels can run 34-36″). For his projectiles, Paul is running Berger’s impressive new 410gr .375 caliber Hybrid Target Bullet (6:25 time-mark).
Peterson Cartridge — How High-Quality Brass is Crafted
Ever wondered how modern, top-quality rifle brass is made? Then watch this informative video from start to finish. It shows how the brass cases are drawn (lengthened) in stages, how the primer pockets and rims are formed, how the shoulders and case necks are crafted, and then how the brass cases are machine-annealed for consistent strength and neck tension.
6x47L Rifle Build with BAT Action & Woox Furiosa Ultra Chassis
Gavin Gear has completed many impressive custom rifles. This handsome rifle is one of Gavin’s best efforts. Chambered for the 6-6.5×47 Lapua wildcat cartridge (aka 6x47L), this rifle has show great accuracy. It boast a handsome black BAT Hammerhead action and a wood/metal composite WOOX Furiosa Ultra chassis. This high-tech hybrid stock/chassis combines wood sections over a full-length, aerospace-grade aluminum skeleton chassis, giving it the “feel” of a wood stock with the strength and stability of a metal stock. Gavin likes the way the stock feels on the trigger hand in particular and the smooth wood cheekpiece is also very nice. Made in Italy, the Furiosa is offered in three versions all with wood sections on the forearm, grip area, and cheekpiece. Choose natural Walnut Brown, Micarta Black, or Midnight Grey.
NEW RCBS MatchMaster Precision Case Trimmer System
At SHOT Show 2026, RCBS introduced the new MatchMaster Precision Case Trimmer system. Developed with Henderson Precision, this is a high-speed, motorized system that trims, deburrs, and chamfers .22 to .30 caliber brass in one step. With a $699.99 MSRP, the MatchMaster trimmer features a 3-way carbide cutter, micrometer adjustment for 0.001″ accuracy, and a brass shavings catcher. It is designed for high-volume reloaders, offering fast, consistent, and automatic case prep. In this video, Gavin shows the features of this new RCBS power tool.
BAT Actions — Insider Look at Manufacturing
Full Story:https://bit.ly/3hD2d11 BAT Machine Co. makes some of the finest custom actions you can buy. Numerous national and world records have been set with BAT actions. To create this 31-minute video, Gavin traveled to Idaho to visit the BAT Machine production center in Post Falls, ID. Gavin talked with BAT’s founder Bruce Thom. The video features extensive footage of advanced CNC machines used to produce the superb BAT actions.
New 6GT Cartridge Brass from Lapua
It’s great that Lapua is now offering 6GT brass. Developed by George Gardner of G.A. Precision and Tom Jacobs of Vapor Trail Bullets, the 6GT was designed to have the efficiency of a 6mm Dasher without the need for case forming. It was also designed with a longer case body so it feeds better from magazines.
Even with the added capacity, the 6GT is still very efficient, and can achieve good velocities with less powder than a 6mm Creedmoor. With outstanding brass now being offered by Lapua, the 6GT becomes a very good choice for PRS/NRL competition, and even mid-range F-class competition. It’s longer than a Dasher case so it runs better in magazines, but it’s still more efficient than a 6mm Creedmoor or .243 Win.
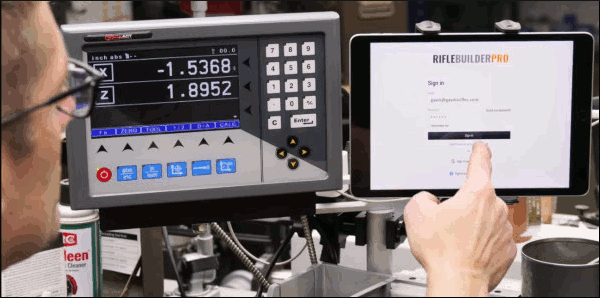
RifleBuilderPro Gunsmithing Program Unveiled
At SHOT Show 2026 Gavin Gear introduced an impressive new software/info system for gunsmiths and gun-building operations. Rifle Builder Pro provides key specifications and data for smithing operations. But it is more than just about machine controls — Rifle Builder PRO will be a subscription-based companion and digital reference library for Precision Rifle Gunsmiths, designed to help them achieve great results in less time. Subscribers will also automatically join an online community full of exclusive resources and support to improve their craft.
Rifle Builder PRO is currently targeted towards precision rifle gunsmiths working on bolt-action rifles but there are expansion plans to include additional types of rifle gunsmithing. At this time Rifle Builder Pro is still in development with a public Beta coming later this year. Sign up for email updates at RifleBuilderPro.com.
Athlon RangeCraft Chronograph (Two Videos)
Athlon’s Rangecraft Velocity PRO Doppler Radar Chronograph is a genuine rival to the popular Garmin. These two UltimateReloader vidoes cover the AThlon’s features, specs, and hardware. Then the video covers the testing process. The new Athlon Rangecraft Velocity Pro Radar Chronograph is an impressive and very affordable compact chrono, selling for $399.99 at most vendors. This employs Doppler radar allowing ultra-accurate velocity readings. Since the unit isn’t triggered by a muzzle blast, it can work with suppressors, muzzle brakes, and other muzzle devices.
The Rangecraft Vel Pro reads velocities between 65 FPS and 5000 FPS. So far field tests have shown that the Athlon Rangecraft chrono is reliable and picks up all shots fired with all types of rifles and pistols (even airguns). However the listed velocities may be a few FPS different than a Magnetospeed or Labradar. The unit includes a compact tripod.
BONUS: .223 Rem vs. 5.56x45mm — Ultimate Reloader’s Most Popular Video EVER with 7.8 Million Views
This video explains essential facts and corrects common misconceptions related to both .223/5.56 ammunition, as well as .223/5.56 rifles. Gavin provides insight on chamber specs, pressure levels, barrel twist rates, military 5.56 crimped brass, and other important topics. If you are new to the AR world, this video is definitely worth watching. And that’s why it now has garnered over 7.7 MILLION YouTube views, making it one of the most popular gun-related videos ever. Full Story:CLICK HERE for full written analysis of .223 Rem vs. 5.56x45mm with graphs and data.
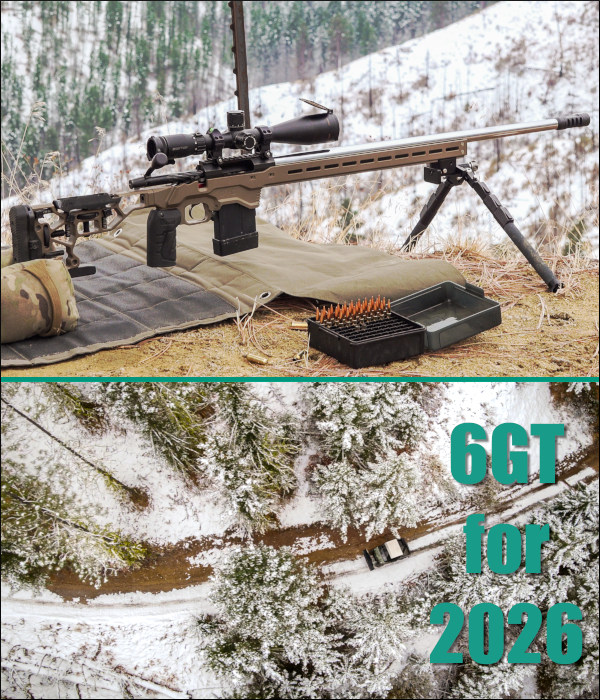
For the very first day of 2026 we present a precision rifle built with a modern 6mm cartridge — the 6GT. Developed by George Gardner of G.A. Precision and Tom Jacobs of Vapor Trail Bullets, the 6GT was designed to have the efficiency of a 6mm Dasher without the need for case forming. It was also designed with a longer case body so it feeds better from magazines. Even with the added capacity, the 6GT is still very efficient, and can achieve good velocities with less powder than a 6mm Creedmoor.
Today’s feature rifle was smithed and tested by Gavin Gear of UltimateReloader.com. Gavin did all the gunsmithing — chambering the barrel, fitting the muzzle brake, and even laser engraving the barrel. In building this 6GT rifle, Gavin used top-tier components: BAT TR action, Krieger 28″ 1:7.5″-twist 4-groove 6mm barrel, TriggerTech Diamond Rem 700-compatible trigger, and Area 419 Hellfire Muzzle Brake. The barreled action was then fitted in a handsome and rugged MDT ACC Chassis. On top is a Zero Tech 4.5-27×50mm FFP Trace Advanced scope in 30mm Hawkins Precision high rings.
We recommend you watch the video above — it covers the rifle build, load development, and then features some remarkable shooting sequences across snowy hills in the Pacific Northwest. Gavin’s team actually used a drone to capture overhead footage of the location.
After developing a promising load with Berger 109gr LRHT bullets, Varget powder, and Alpha brass, Gavin literally headed for the hills to test his new rifle at longer ranges, shooting from bipod. His load had shot well under half-MOA at 100 yards in testing so he was hoping he could hit multiple steel targets positioned at 340 yards, 760 yards, and 1000 yards. Indeed he did, proving the rifle’s great accuracy and Gavin’s fine trigger-pulling skills. You can see the hits at these time points in the above video:
340 Yards — 18:15 time | 760 Yards — 19:00 time | 1000 Yards — 19:54 Time
Gavin’s 6GT Hit Highlights on Steel out to 1000 Yards
Building Gavin’s 6GT Precision Rifle
Gavin Gear did all the gunsmithing on this project, using his own Precision Matthews TL-1660 lathe for the chambering with an Alpha carbide 6GT reamer. The barrel work took about four hours total. Shown below is the reamer cutting the chamber, which was finished with a 0.170″ freebore and 0.270″ neck diameter. For other brands of brass you might want the chamber to have a larger 0.272″ neck diameter.
Chambering the Krieger barrel with Alpha carbide 6GT reamer, 0.170” freebore, .270″ neck diameter.
This project when smoothly, with Gavin able to install the barreled action in the MDT Chassis and fit the buttstock in an hour or so. So total build time was about five hours. One nice “finishing touch” on the project was laser engraving the 28″ Krieger barrel — a process you can see in the video below.
Laser engraving of Krieger 28″ barrel.
About the 6GT — Sort of a 6 Dasher on Steroids
6GT Cartridge Design Features
The 6GT was designed to have an optimal length and capacity for mag-fed PRS/NRL tactical rifles. The 6GT is longer than a 6mmBR and 6 Dasher, but shorter than a 6mm Creedmoor and 6.5×47 Lapua. That gives the 6GT ample case body length to feed reliably from a magazine, while the case capacity is sufficient to run popular powders at reasonable pressures. It has a 35-degree shoulder angle.
On paper the 6GT seemed like the perfect cartridge for PRS- and NRL-style centerfire competition. It has the low recoil of a 6 Dasher, with good feeding and mag compatibility. With the 6GT, a competitor can push 6mm 105gr bullets at 3000+ FPS or run heavier bullets at ~2950 FPS. With this 28″ Krieger barrel, Gavin actually achieved 3004 FPS running 109gr Bergers.
Gavin started with quality Alpha Munitions brass. The cases were then annealed with an AMP Annealer and trimmed to length with a Henderson powered trimmer (see video below). After sizing with a Forster Co-Ax press, Federal SR Primers were seated using a Primal Rights competition seater. Next the powder was measured with an A&D FX120i force restoration scale. Finally, the Berger 109gr LR Hybrid Target bullets were seated with a Forster Micrometer die, again using the smooth Forster Co-Ax press.
Initial Load Testing with Berger and Hornady Projectiles
Before it got cold and snowy, Gavin did load development, shooting from a bench with a Sinclair front rest. The Krieger cut-rifled barrel was accurate right from the start and Hodgdon Varget powder proved to be a very good choice for the 6GT.
Gavin’s 6GT boasts a MDT ACC short action chassis with SRS-X Elite buttstock, vertical grip, and MDT CKYE-POD Bipod.
Gavin did initial load testing with both Hornady 110gr A-Tip Match and Berger 109gr Long Range Hybrid Target bullets. The Berger 109gr LRHT bullets were the most promising. A variety of charge weights were tested, with Gavin settling on 34.6 grains of Varget. This delivered fine accuracy with a 3004 FPS muzzle velocity. Group size measurements with this load are shown in the chart. At 100 yards, four three-shot groups averaged 0.361 MOA, and the rifle produced a nice 0.387 MOA (0.405″) five-shot group.
———————————————— Winter Wonderland for Shooters ———————————————–
When you make a reloading mistake, you may need to “pull down” assembled ammo. The embedded UltimateReloader.com video demonstrates how to use the Hornady Cam-Lock bullet pulling system.
When Reloading Goes Bad — The Danger of Over-Charging
Our friend Gavin Gear of UltimateReloader.com was recently reloading some 9mm pistol ammo with his Hornady progressive press. As part of his reloading procedure, he visually checks the cases — and he noticed that the charges seemed high. Sure enough, his most recently-produced rounds were about two grains over spec. He diagnosed the issue: “I was using a powder measure without a baffle. What happened was, over the course of the loading session, things settled in, and the charge level increased.”
Not knowing just when his powder measure started delivering too much powder, Gavin decided, for safety’s sake, to pull down all the ammo he had just reloaded. Yes that’s time-consuming, but it’s better than the alternative — having a dangerous Kaboom while shooting. With fast-burning pistol powders, a two-grain over-charge could cause a blown case, damaged firearm, and/or serious injury.
Watch Cam-Lock Bullet Puller Used to Remove Bullets from Loaded Ammo:
Use of Bullet Puller starts 4:00 minutes into video.
Gavin says it is vitally important to perform safety checks during the reloading process: “You’ve got to do it — check every single round to make sure there IS powder, and that there’s not too MUCH powder. Double, Triple, Quadruple check your components… and your powder charges. You can’t be too careful.”
To pull down a loaded round, first place the cartridge in the shellholder on your press ram. Then raise the round up into the bullet puller device installed where a die would go. The Hornady Cam-lock bullet puller works by clamping the bullet in a collet when you flip down the red-coated lever. Then, with the case held by the rim in the shell-holder, the bullet exits the cartridge as the press ram is lowered. It takes time, but it’s pretty fool-proof once you get the hang of it. This entire process is illustrated in Gavin’s video, starting near the four-minute mark.
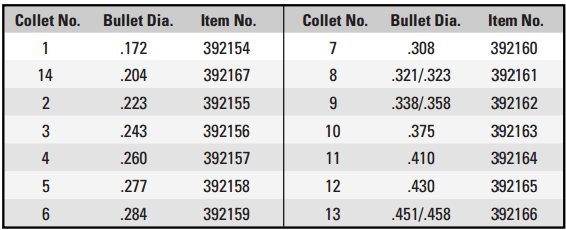
The Hornady Cam Lock Bullet Puller has four (4) key components: 1. Cam-Lock die body; 2. Cam-Lock lever; 3. Stem; and 4. Collet (Caliber-specific).
NOTE: In order to use this tool, you’ll need the appropriate collet for each diameter range of bullets you intend to pull. For example use collet #3 for 6mm, collect #6 for 7mm, and collet #7 for .308 Caliber.
RCBS Lock-Out Die
A good safety option for users with progressive presses is the RCBS Lock-Out Die. This has a charge detection rod that dips into each case after powder has dropped. You adjust the die to the proper charge height for your desired load. If the actual dispensed charge is too high or too low, the Lock-Out Die senses the problem and stops the press from advancing to the next case (it does this by preventing the ram/shellplate from fully elevating). We’ve used the Lock-out die with success for both pistol and rifle cartridges. It’s sensitive to about one-half grain with pistol powders.
This Lock-Out Die works with Hornady and Dillon progressives as well as with RCBS progressives. It does take up one die station on the press.
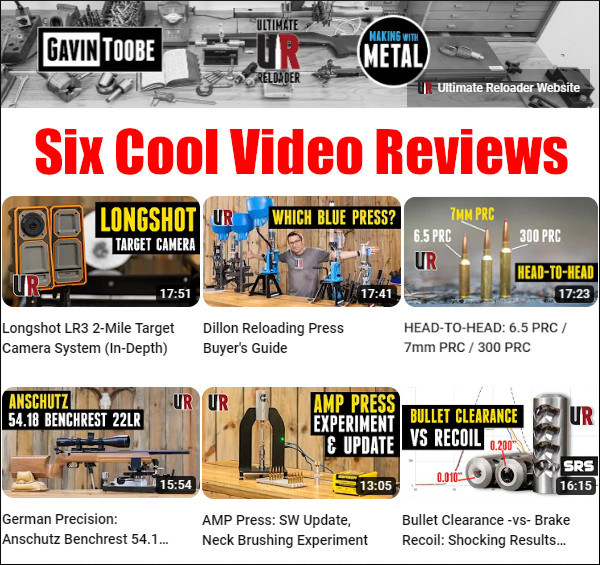
UltimateReloader.com offers some of the most thorough firearms and reloading tool tests on the internet. And UltimateReloader’s YouTube Channel has hundreds of great videos that showcase reloading tools, accurate firearms, precision optics, gunsmithing methods, and top-tier reloading components. For today’s Saturday at the Movies feature, we showcase six great videos recently created by Gavin Gear and his UltimateReloader team. These videos highlight a superb Long-Range Target Camera, the remarkable AMP Press, the new Hornady PRC cartridges, and other interesting topics. On this final day of 2022, enjoy our Saturday Video Showcase.
With the high price of centerfire powders, bullets, and brass, everyone should have an accurate .22 LR rimfire rifle for marksmanship training and competition at 25 to 200 yards. In this video, Ultimate Reloader’s Gavin Gear tests the impressive Anschutz 54.18 BR50-U7 match rifle using a quality Sinclair Int’l front rest. Anschutz offers several versions of the 54.18 and BR-50. There are two barreled actions available: 20″ threaded and 25.9″ non-threaded. Gavin tested the 20″ threaded model with the U7 stock. In this video, Gavin tested the trigger with a sophisticated TriggerScan TS-11. The trigger was superbly repeatable at a measured 3.8 ounces. Gavin also did a bore examination. He then tested the Anschutz with a variety of premium ammo. In this rifle, Lapua Midas+ producing the smallest groups. FULL STORY HERE.
This video features the impressive, high-tech AMP Bullet Seating Press. The AMP Press combines a motor driven ram, a distance sensor, and a load cell to deliver extremely accurate and precise force/distance bullet seating measurements. The AMP Press offers unrivaled consistency in the bullet seating process. And as the AMP Press is linked to a computer, seating data can be stored and you can chart variations in seating resistance. A wealth of precise data is collected during the bullet seating process. This helps you optimize your brass prep and annealing for the best, most consistent results. FULL STORY HERE.
Past 400 yards or so, it can be difficult to see bullet holes on paper, even with spotting scopes. That’s why we recommend a high-quality wireless target camera. The best long-range target cameras on the market are produced by Longshot Camera Systems. The Longshot Target Cam provides a live WiFi camera feed. This comes back to your shooting station and you can view the image with a laptop or mobile device. You don’t need internet coverage and no separate tall antennas are required. Simply place the camera unit next to your target and the receiver unit close to your rifle or bench. The Longshot system is completely self-contained. Longshot produces a variety of cameras starting at $449.00 for the LongShot Marksman. We recommend the $899.00 LR-3 unit which works out to two miles! In this video Gavin Gear of UltimateReloader tests the LR-3 at long range. PRODUCT INFO HERE.
This video examines how muzzle brakes reduce recoil. Just how important is bore clearance for a muzzle brake? Should you have an exit diameter that’s just slightly larger than bullet diameter, or will a larger diameter work well also? Along with no brake at all (bare muzzle), Ultimate Reloader tested multiple different brake bore clearances on a 6.5 Creedmoor rifle: 0.010″ over bullet diameter, 0.020″, 0.030″, 0.050″, 0.100″, and 0.200″. The testers expected to get the best recoil reduction with the tightest fit. Surprisingly, this wasn’t quite the case.
Using all brake configurations (all bore clearances) Ultimate Reloader saw a significant reduction in recoil, almost half, as compared to a bare muzzle: “What we didn’t expect was how close together the rest of the clearances would cluster. All of the clearances that we tested had good recoil reduction.” FULL STORY HERE.
Dillon Precision continues to be the leader among progressive press makers. Dillon offers the largest variety of progressives, the most accessories, and legendary customer service. In this video, Gavin Gear of Ultimate Reloader looks at a variety of Dillon machines to help buyers decide which progressive best suits their needs. Featured Dillon progressives include: Square Deal B, Xl750, and RL1100. Along with basic press feature, Gavin shows the operation of Dillon’s automated bullet feeder and case feeder accessories. The video also provides pricing summaries with various configurations. FULL STORY HERE.
Hornady’s PRC (Precision Rifle Cartridge) family of cartridges are becoming quite popular. The 6.5 PRC fits in a short action, while the 7mm PRC and 300 PRC both require a long action. The 7mm PRC is a long-action centerfire hunting cartridge designed to shoot 180gr bullets at 2950+ FPS. The 6.5 PRC is a good hunting cartridge that can fit a standard-length action. And, a number of top F-Open shooters are necking up the 6.5 PRC for 7mm bullets. This 7-6.5 PRC wildcat has shown excellent F-Class accuracy with a higher velocity node than the .284 Winchester. Along with these two cartridges, Hornady has a 300 PRC that can shoot the big .308-caliber bullets. In this video, Ultimate Reloader analyzes and compares each of the three PRC cartridge types. FULL STORY HERE.
If you shoot high quantities of ammunition in pistol or rifle competition, you should consider acquiring a good progressive press. Because multiple operations (sizing, powder dropping, bullet seating etc.) take place with a single pull of a lever, a progressive press can produce way more ammo in a given period of time than any single stage press. With a progressive, on the ram up-stroke, the multiple stations can simultaneously remove spent primer, full-length size case, drop powder, seat bullet, and crimp (if desired). Most progressives are also set up to prime cases with the ram in the lower position — though some guys prefer to prime manually.
Progressive presses aren’t just for high-output pistol ammo or bulk rifle ammunition. Good progressives can be adapted to do certain reloading tasks for top-on-the line match ammo. You might use a progressive for decapping, priming, and sizing, then throw powder and/or seat bullets separately. Some Champion shooters do use progressives to load their match ammo! For example 5-Time National Long Range Champion John Whidden and 2020 Berger SWN F-Open Champion Jay Christopherson both use progessive presses for some (but not all) operations.
To help you get started with progressive presses, here are six videos from UltimateReloader.com that cover seven popular machines, from the elite Mark 7 Evolution to the affordable Lee Loadmaster. With many of these machines you can add separate vertical bullet feeder systems that further increase loading efficiency. Machines Covered: Lyman Mark 7, Dillon XL-650, Dillon XL-750, Dillon RL-550c, RCBS Pro Chucker 7, Hornady Lock-N-Load AP, and Lee Load Master.
Mark 7 Evolution Press — Distributed by Lyman
Dillon XL-650 vs. Dillon XL-750
RCBS Pro Chucker 7 with Bullet Feeder
Dillon 550C with 6mm Creedmoor and 9x19mm
Hornady Lock-N-Load AP Progressive
Lee Load-Master Features and Loading 9mm
SAFETY BONUS — Why You Need a Lock-Out Die
The RCBS Lock-Out Die can also be used with some Dillon and Hornady progressive presses.
If you load pistol or rifle ammo with a progressive press, we strongly recommend you get a Lock-Out Die from RCBS. This unique reloading die will prevent your progressive press from advancing if the dispensed powder charge is more or less than about 0.3 grains too high or too low. The Lock-Out Die really works.
The Lock-Out Die works by using a central die detection rod that sets its vertical position based on the height of the powder column in the case. Through an ingenious design, if the powder column height is too low or too high, the rod locks in place as you start to pull the press handle. This halts the press before the ram can lift and the cartridge plate can advance. Unlike a beeping alarm system (which can be ignored or defeated), the Lock-Out Die physically stops the movement of the press ram and prevents a bullet being seated in the “problem” case.
It takes a bit of tweaking to get the Lock-Out Die detection rod setting just right, but once it is correctly positioned, the Lock-Out Die works smoothly in the background. The Lock-Out Die won’t interfere with the loading process unless it detects a high or low charge — and then it positively stops the progressive loading cycle.
While crafted for use in RCBS progressive presses, the RCBS Lock-Out Die can also be used on a Dillon XL Progressive or Hornady Lock-N-Load progressive — though it does take up one station which could otherwise be used for a final crimp die (after the seating die). This Editor has used the RCBS Lock-out die very successfully on an RCBS 2000 progressive press for many years.
Our friend Gavin Gear has just released an excellent video showing how to make a threaded Modified Case for use with the Hornady Lock-N-Load Overall Length Gauge. You can watch Gavin make a Modified Case start to finish in the video below:
Video Shows How to Drill and Tap Modified Case
Gavin has some clever tricks. First he uses a sizing die to hold the cartridge case during the threading process. Second he uses two drill bits in sequence — a smaller bit to ream out the primer pocket, and then a larger “M” bit to increase the hole diameter before threading the brass. Finally he leaves the threading tap IN the brass, locks the tailstock, and then “gently pulls on the quill” to remove the brass from the die held in his lathe (See 5:46 timemark).
Get the Correct 5/16″-36 RH Tap
Unfortunately, Hornady has selected an uncommon thread type for OAL Gauges. You probably won’t be able to buy the correct 5/16″ – 36 RH HSS Tap at your local hardware store. However you CAN order this special tap from Amazon for $9.99.
Modified Case Q & A — TECH TIPS
Why do I need a Modified Case?
Every serious reloader should have a Modified Case for each cartridge type they shoot. The reason is that this allows you to get very precise measurements of the length-to-lands in your chamber. When used with the Hornady OAL Gauge, with some practice, you should be able to get repeatable length-to-lands measurements within about 0.0015″. We generally do 4-5 measurements with the OAL Gauge and usually 3 or 4 will be “on the money”. NOTE: We recommend a gentle, easy pressure on the plastic pusher rod. Don’t push too hard or you will jam the bullet hard into the lands, which produces inconsistent results.
Can’t I Just Buy a Modified Case?
Hornady makes a variety of Modified Cases sold on Amazon and through retailers such as Midsouth. While Hornady makes modified cases for many standard cartridges, if you shoot a wildcat such as the 6mm Dasher or .284 Shehane, you’ll need to create a custom modified case. And even if you shoot a standard cartridge such as the .308 Win, you can get more consistent measurements with a custom Modified Case.
If you do decide to make your own modified case, you’ll want to start with a case that’s been fired in your rifle. That way you get the best fit to YOUR chamber. Also, you won’t need to expand the neck to provide bullet clearance. Then you need to drill out the primer pocket and tap the base of the case to match the threads on the Hornady OAL Gauge tool. Make at least two modified cases, as you’ll probably misplace one at some point.
MORE INFORMATION: Want to learn more? We published a much longer story in which Erik Cortina explains in greater detail how to made the Modified Case. That article illustrates the 5/16″ – 36 RH HSS Tap required and shows how to set up the lathe to drill and tap your case. If you are serious about making your own Modified Cases, you should Read the Full Article.
Examples of Guns & Gear Videos from GunTalk YouTube Channel Guns & Gear is a leading gun-centric resource with hundreds of informative videos. Produced by Tom Gresham, Ryan Gresham, and the Gun Talk team, Guns & Gear showcases new products in the firearms industry. Each episode features interviews with industry experts/instructors, range demonstrations, tips, and training techniques. Guns & Gear content is all FREE — you can watch hundreds of videos from Guns & Gear past seasons via the Guns & Gear Archive on GunTalkTV.com. And there are 900+ Guns & Gear videos on YouTube as part of the GunTalk Media YouTube Channel.
Savage 110 Precision Field Test and Review — 6.5 Creedmoor
Looking for an accurate, value-priced chassis rifle for PRS/NRL production class competition? Or would you like to shoot a big magnum in ELR matches? The Savage Arms 110 Precision is a good choice. These Savage 110 chassis rifles show excellent accuracy, and the barrel nut system allows easy installation of pre-fit barrels. Priced at $1649 MSRP, the Savage 110 Precision features an aluminum MDT LSS XL Cerakoted chassis and a 24″ barrel with factory muzzle brake. Chamberings offered are: 6.5 Creedmoor, .308 Win, .300 PRC, .330 Win Mag, and .338 Lapua Magnum.
Colt King Cobra Target .22 LR Rimfire Revolver
We think all serious shooters should have a .22 LR rimfire pistol in their collection, and a rimfire revolver is a smart choice, offering great accuracy and reliability. Colt relaunched the .357 Magnum King Cobra in 2019, and Colt later launched the .22 LR King Cobra Target family of rimfire revolvers. The King Cobra Target rimfire series includes 2″, 3″, 4.25″ and 6″ barrel versions. In this video, Justin Baldini joins Guns & Gear’s Kevin “KJ” Jarnagin reviews the features of the rimfire King Cobra Target. Then Team Colt’s Jalise Williams joins Guns & Gear’s Chris Cerino for a range demo.
Reloading Basics with Gavin Gear of UltimateReloader.com
In this Range Ready Tip, Gavin Gear of UltimateReloader.com explains the basic equipment one needs to reload rifle cartridges. Whether you’re an experienced reloader, or aspire to be one, you’ll find Gavin’s explanations helpful. He covers the key procedures — case sizing, priming, powder dispensing, and bullet seating. This Range Ready Tip features Hodgdon powders and Nosler bullets, with Lyman reloading presses and tools.
How to Improve Organization of Your Gun Safe
Many gun owners can benefit from this video which shows how to arrange the long guns and handguns in your gun safe. The video shows how to use rifle rods and handgun hangers to organize your gun safe contents in the most efficient manner. This can both make it easier to access your guns and can also help protect your valuable firearms from scraping and contact damage. Note: We recommend you put both rifles and pistols in rust-blocking sleeves for long-term storage.
Best Tripods for Hunting and Precision Shooting
This video explains how to select the best tripod for your hunting mode/match discipline and gun type. This video compares tripods from BOG, Two Vets, and Tricer. 1. The BOG DeathGrip (aluminum & carbon versions is good for hunting blinds, but is heavy and not ideal for mobility. 2. The Budget Spotting Scope Tripod is conveniently light but optimized for glassing, not for rifle support. 3. The Two Vets Recon V2 is a match-grade tripod ideal for long-range and precision shooters. 4. The Tricer HK Kit is a lightweight, inverted design with ball head and gun clamp. This may be the best all-around option for both hunting and tactical matches.
Guns & Gear Goes to GAP Grind — Leading Pro/Am PRS Match
For this video, Gun Talk’s Kevin “KJ” Jarnagin attended the Bushnell GAP Grind, a huge PRO-AM PRS match held annually in Tennessee. The GAP Grind, the largest, most popular PRS match in the world, draws nearly 400 amateur and pro shooters. Recognized as the premier PRO-AM precision rifle match with both individual and team competition, the GAP Grind has introduced thousands of new shooters to the sport since its inception. This 2-day, multi-stage PRS match is known for being very challenging.
Popperpalooza — Shooting 100 Steel Popper Targets with AR15
This fun video shows the ability of a modern sporting rifle (MSR) to drill a host of reactive steel targets with speed and efficiency. Using a Springfield Armory Saint AR-15, top action shooter Rob Leatham takes on “Popperpalooza” — a set-up with multiple rows of 100 steel “popper” targets. Shooting reactive targets is fun because you get instant gratification with the sound of the hit and the movement of the target as it falls down, swings, or spins.
Optics — Angled and Straight Spotting Scope Designs Compared
Spotting scopes come in two basic styles — straight and angled. The angled version is the most common because it can be used from all shooting positions — even prone (just rotate the spotter around its centerline). If you are spotting from a sitting or standing position, with the spotting scope on a tripod, a straight spotter may work best. That way your head/neck/torso is not bent down and you can instantly see a full view ahead just by moving your head slightly away from the lens. In this video, Gun Talk’s Kevin “KJ” Jarnagin covers the pros and cons of Straight vs. Angled spotting scopes. KJ uses Leupold SX-4 Pro Guide HD15-45x65mm spotting scopes in both straight and angled configurations.
Below are links to five past Guns & Gear shows we recommend. These feature some impressive rifles and pistols, notable new optics, and good travel advice for gun owners. Click a link below to open the show list for a particular season. Seasonal show previews will then display top to bottom in numerical order. Then look for the particular show number and click on it.
Season 13, Episode 7: Colt Anaconda, Frankford Arsenal X-10 Progressive Press, SIG Sauer Red Dot optics


 Like the Hornady tool, the

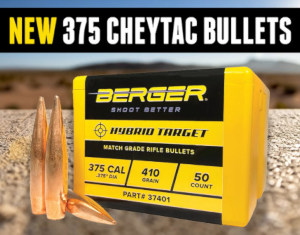 In this video, Gavin meets with Paul Phillips, an ELR “King of Two Miles” past Champion. Paul explains the features in his .375-caliber rifle designed to shoot to one mile and beyond. Along with a big action to hold the very long cartridge, an ELR rifle needs a special high-angle optics rail to allow the needed elevation. In addition, a long-wheelbase chassis is optimal for greater stability and balance. Recoil is very significant so Paul’s rifle boasts a massive 6-port muzzle brake on the very long barrel (ELR barrels can run 34-36″). For his projectiles, Paul is running Berger’s impressive new 410gr .375 caliber Hybrid Target Bullet (6:25 time-mark).
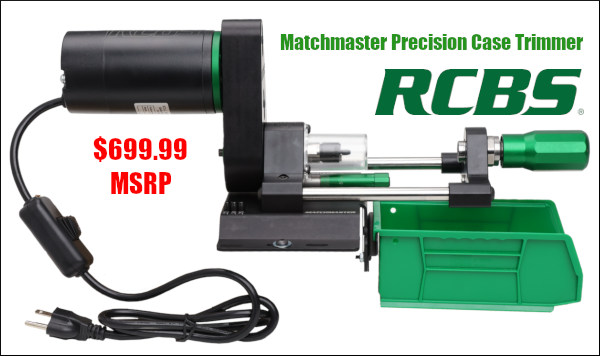


 RCBS Lock-Out Die