Probably the most popular centerfire rifle round in the Western Hemisphere is the .223 Remington and its metric match, the 5.56x45mm. Though many folks use “.223 Rem” and “5.56×45″ interchangeably, there are some meaningful differences in specifications for the original .223 Rem and the 5.56x45mm cartridge, as adopted by the U.S. military and NATO armies. The default chamber throats are slightly different and the .223 Rem is rated at 55,000 PSI vs. 62,366 PSI for the 5.56x45mm.*
.223 Rem vs 5.56x45mm — Key Differences
There is a truly outstanding, very thorough article on the subject, published by LuckyGunner.com.** This involved extensive testing, with pressure monitors, of 5.56x45mm ammo in .223 Rem chambers. Those tests revealed the peak pressures. Here is one of the ammo test charts:
NOTE: “The observed chamber pressure for Federal XM855 5.56mm ammunition in a .223 Rem chamber exceeded .223 maximum pressures, but not by a massive amount. The ninth shot (the red line) was an underpowered cartridge which exhibited significantly lower velocity and pressure than the other rounds, so it was excluded from the average velocity and pressure numbers for this chamber.”
And if you’re curious, LuckyGunner also fired .223 Rem ammo in a 5.56x45mm NATO-chambered AR15 rifle. As you would expect, the peak pressures were significantly lower, but the .223 Rem ammo still cycled the semi-auto AR-platform rifle perfectly well:
UltimateReloader.com Explains .223 Rem vs. 5.56x45mm
To explain the key differences between the .223 Rem and 5.56x45mm cartridges our friend Gavin Gear of UltimateReloader.com has created a very thorough 12-minute video. This covers the cartridge specifications and explains key considerations for hand-loaders. Gavin also addresses the oft-asked question “Can I shoot 5.56x45mm ammo in my .223 Rem chamber?” Gavin’s video is definitely worth watching. In fact, this is one of the most popular videos Gavin has ever created — it has been watched over 300,000 times on YouTube.
What Exactly Is the 5.56x45mm NATO Cartridge?
The 5.56×45mm NATO is a rimless bottle-necked intermediate cartridge family standardized by NATO with development work by FN Herstal. It consists of the SS109, SS110, and SS111 cartridges. Under STANAG 4172, it is a standard cartridge for NATO forces as well as many non-NATO countries.
Bullet diameter: 5.70 mm (0.224 in)
Maximum pressure (EPVAT): 430.00 MPa (62,366 psi)
Maximum pressure (SCATP 5.56): 380.00 MPa (55,114 psi)
Case length: 44.70 mm (1.760 in)
Rifling twist: 178 mm or 229 mm (1 in 7 in)
Parent case: .223 Remington (M193)
Ammo-Maker Federal Premium Compares .223 Rem and 5.56x45mm
Here is a video from ammo-maker Federal Premium explaining the difference between .223 Remington and 5.56x45mm NATO. Federal states that you may experience excessive pressures when firing a 5.56x45mm in a standard .223 Remington chamber:
One leading gunwriter has addressed the question of shooting 5.56x45mm ammo in .223 Rem chambers. He advocates caution (for more info, SEE pressure tests by LuckyGunner.com):
“I have received a slew of questions — many from first time AR-type rifle buyers — about the .223 Rem and the 5.56×45 mm NATO cartridges. Can I shoot 5.56×45 mm NATO in my .223 and vice-versa? Are these the same cartridge?
Externally, the two cartridge cases are identical. The main differences are that 5.56×45 mm NATO operates at a higher chamber pressure (about 60,000 PSI versus 55,000 PSI on the .223 Rem.) and the 5.56’s chamber is slightly larger than that of the .223 Rem. Also, the throat or leade is longer in the 5.56×45 mm chamber. What does this mean? You should not shoot 5.56×45 mm NATO out of a rifle that is chambered in .223 Rem. And be aware that some .223 Rem. ammunition will not reliably cycle through some AR-style .223 Rem. rifles, but it usually does. As a matter of fact, I have not encountered any difficulty with current .223 Rem. loads cycling through a 5.56 mm AR-style rifle.” – Mark Keefe, Editor, American Rifleman
* According to the official NATO proofing guidelines, the 5.56×45mm NATO case can handle up to 430.0 MPa (62,366 psi) piezo service pressure. The U.S. SAAMI lists Maximum Average Pressure (MAP) for the .223 Remington cartridge as 55,000 psi (379.2 MPa) piezo pressure with deviation of up to 58,000 psi (399.9 MPa). The chamber for military 5.56×45mm NATO has a longer throat prior to the bullet contacting the rifling which results in lower pressures when firing 5.56×45mm NATO ammunition. If 5.56×45mm NATO is used in rifles chambered for .223 Remington the bullet will be engraving the rifling when chambered. which can increase pressures past SAAMI Max levels. NOTE: The C.I.P. standards for the C.I.P. civilian .223 Remington chamber are much closer to the military 5.56×45mm NATO chamber.
** The full-length LuckyGunner article is well worth reading. It even provides specifications for a number of .223 Rem reamer types, and compares the original .223 Rem, the 5.56x45mm NATO, and the modern .223 Wylde chamberings.
MagnetoSpeed’s technology has completely changed the market for firearms chronographs. With a MagnetoSpeed barrel-mounted chrono you can quickly and easily record muzzle velocity (MV) without having to set up tripods or walk down-range. The compact MagnetoSpeed chronos are easy to set up and transport. With the full-featured V3 model, everything you need comes in a small fitted case. In the top photo are the components used with the MagnetoSpeed V3 Kit:
1. V3 Bayonet sensor
2. Display and control unit
3. Bayonet spacers (plastic and rubber)
4. Cords and mounting hardware (left), suppressor heat shield (right)
5. Alignment rod (square cross-section)
6. Rail adapter (sold separately)
Our friend Gavin Gear of UltimateReloader.com recently reviewed the MagnetoSpeed V3 and came away impressed. Gavin explains the a good chrono is essential: “If you want to load and shoot precision ammunition, you need the tools that will produce and validate the precision of your loads. A good chronograph is one of those tools! In this post I’m going to introduce you to the MagnetoSpeed V3 chonograph, the high-end electromagnetic chronograph which fills out the top slot in MagnetoSpeed’s equipment portfolio.”
In this 11-minute video Gavin reviews MagnetoSpeed’s top-of-the-line V3 Chronograph. He shows what ships with the unit, how to set it up for both rifles and pistols, and then he puts it through its paces showing how it captures velocity data. Gavin says he will follow-up with future videos showing how to link the MagnetoSpeed V3 to your mobile phone and how to log velocity data for future reference. To learn more about this high-tech chrono, visit UltimateReloader.com.
Midsouth Shooters Supply is running a big sale right on Lyman’s impressive new Brass Smith line of reloading presses. There are three models, each offering great performance and value for its class. You can save quite a bit of cash with this Midsouth Lyman Press sale. If you haven’t tried orange yet, we think you’ll be impressed. The little C-Frame is a steal at $69.99.
Lyman’s New Victory Single Stage Press competes with the RCBS Rock Chucker Press. If you like to prime on a press, this Victory has a priming system that’s much easier to use than the Rock Chucker system. With beefy Cast-Iron construction, strength and leverage is on a par with the Rock Chucker.
With a cast-iron frame, the Ideal C-Frame (open-front) press is stiffer than other small presses in this class. It is an excellent choice as an affordable, secondary press for your loading room, or a press to use at the range.
The new All American 8-Station Turret press sets a new capacity standard in a turret press. You get EIGHT stations, compared to 7 for a Redding turret and 6 for an RCBS turret. Lyman has also included a rear support that increase rigidity, reducing turret vertical displacement during loading. That helps load consistency.
NOTE: Along with the three individual presses, Lyman offers complete reloading kits combining the presses with powder measures, scales, and reloading tools. These kits are also on sale now at Midsouth.
Check Out New Lyman Presses in UltimateReloader.com Video
In this video, our friend Gavin Gear of UltimateReloader.com reviews all three new Lyman Brass Smith presses. He gives a quick over-view of their notable features. Gavin has loaded ammo on all three presses, and has tips on set up and installation. Check it out:
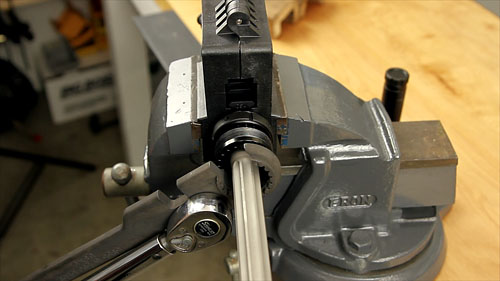
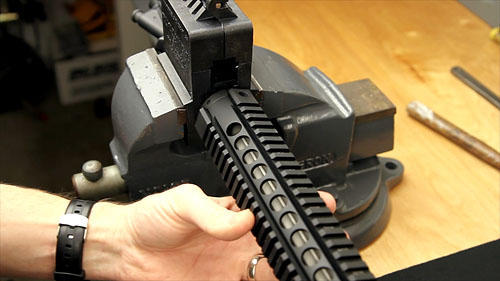
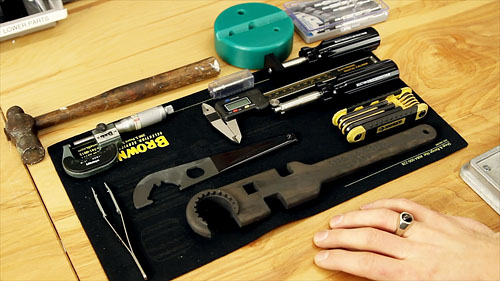
Here are the main tools you’ll need to assemble an AR-platform rifle
Planning to put together an AR-platform rifle? Or are you looking to upgrade your AR with a new barrel, stock, or trigger group? Then you should check out the AR-15 Rifle Build DVD from our friends at UltimateReloader.com. This DVD covers all the details of a custom build, using high-resolution video sequences, and helpful supporting graphics.
In this DVD, Ultimate Reloader’s Gavin Gear guides you through the entire process including selecting components, acquiring and using the necessary tools, assembly steps and details for each component, and even mounting a scope. Building an AR-15 can be overwhelming, but with the right guidance and help it’s not difficult and can be very rewarding. With this DVD you’ll be able to build your AR-15 with confidence.
Upper: Barrel / Gas Block / Gas Tube
Upper: Handguard Installation
UltimateReloader.com’s AR-15 Build DVD is available just $9.90 (plus $3.80 shipping/handling). This DVD can pay for itself many times over by showing you how to do your own gunsmithing (and get quality AR components at attractive prices).
Gavin in Action — Seven-minute AR-15 Build
To preview the AR Build DVD, check out this YouTube video from UltimateReloader.com. This 12-minute video shows the basics of assembling a standard AR15 with Del-ton components. Gavin shows how to install the AR trigger group and other parts in an AR-15 lower. You’ll also see the basics of barrel and handguard installation. This video covers the highlights, but we strongly recommend you buy the full DVD before starting your first AR-15 build.
Everyone needs a serious, full-size single-stage press such as the RCBS Rock Chucker for heavy-duty reloading tasks. But’s it’s also wise to have a smaller, more compact press for lighter duties such as decapping (primer removal), neck-sizing, and bullet seating. The new Lyman Brass Smith Ideal press fits that role perfectly, at an affordable price — about $80.00 retail.
With an $80 street price, Lyman’s new C-Frame press is an exceptional value. With beefy cast-iron construction, it is much stiffer than other presses in this compact category. The compound linkage is smooth. The base is big enough to provide good stability. For someone looking for a second press, or a smaller press to take to the range, the new Lyman Ideal may be the smart solution.
The Lyman Ideal press just started shipping. Our fiend Gavin Gear of UltimateReloader.com got one of the very first. Gavin has created a helpful video showcasing the features of this compact press. Gavin was impressed, finding the Ideal press operated smoothly with plenty of power for most tasks. (We would still use a bigger press with more leverage for heavy case-forming duties). Here is Gavin’s video. The first 7 minutes cover unboxing and assembly. Starting at the 8-minute mark, Gavin uses the Ideal press to load 6.5 Creedmoor cases:
Lyman Ideal Press
The Lyman Brass Smith Ideal Press is a budget-friendly, cast iron single-stage reloading press built right here in the USA. Here’s the official info and specs:
The large opening and C frame design allows you to access the shell holder without hitting the support bar on other types of presses. Changing shell holders is a breeze and the press holds standard 7/8″x14 TPI dies from any manufacturer. The high quality steel ram is one inch in diameter and the 3 7/8″ opening allows you to reload cartridges up to 3.7 inches tall. The Brass Smith is a true ambidextrous press that can be accessed from either side and mounted the same.
Lyman Brass Smith Ideal Press — Specifications and Features:
Rugged Cast Iron Frame
Ambidextrous Design
Handles Cartridges Up To 3.7″ Long
Durable Powder Coat Finish
Compound Linkage and 1″ Diameter Ram
Accepts Standard 7/8″X14 Dies and Standard Shell Holders
Weight: 12.6 Lbs.
Stay Tuned — Lyman will be sending an Ideal Press to AccurateShooter.com. In the weeks ahead we will test this affordable C-Frame press both in the workshop and at the range…
Our friend Gavin of UltimateReloader.com has a new tool — the second generation Lyman Borecam. This upgraded version features higher-resolution 300K output so you can better see details inside your barrel. This digital borescope can also be used to inspect the interior of dies and other tools. Illumination, via LED, is adjustable. Record still images with the push of a button. The screen resolution for the latest Lyman Borecam is now 640×480, roughly 300,000 pixels (300K).
Gavin created a very thorough 15-minute video putting the Lyman Borecam through its paces. He uses it to scope a number of firearm barrels as well as some reloading dies. If you are considering buying a Borecam or other borescoping device, you should definitely watch this video. We have included time references to make it easier to “fast forward” to the subjects you want to see:
Lyman Borecam Video Timeline
1. 1:15 — Lyman Borecam Unboxing (All Components)
2. 4:00 — Shilen Match Barrel Blank Inspection (Brand New Barrel)
3. 6:16 — Thompson Center Compass .223 Rem Barrel Inspection (Used Barrel)
4. 9:08 — Smith & Wesson 686 .357 Mag Barrel Inspection (Used Barrel)
5. 10:30 — Glock 20 Polygonal Rifling Barrel Inspectino (Used Barrel)
6. 11:45 — M1911 Barrel Inspection (Defective Barrel with Bulge in Chamber)
7. 13:12 — Sizing Die Internal Inspections (Lee .223 Rem, Redding 300 BLK)
The Lyman Borecam comes complete with everything you need. Shown in photo are:
1. Borecam Wand (includes handle, rod, mirror, and digital lens/camera) with length indication scale. An inch scale runs the full length of the rod. That tells you where the lens is positioned inside the bore. Note the wand scale marks when recording screen captures. 2. Borecam Digital Display. The 600×480 display can record stills with included 128MB SD Card. A USB SD Card adapter is included. 3. Borecam Mirror Protector and cleaning kit. 4. AC Power Adapter (not shown, international plug adapters included).
UltimateReloader offers three key tips for the Lyman Borecam:
— First, before you start, make sure the mirror is clear and free of dirt, lint, or solvents.
— Use the Up and Down Arrows to adjust the illumination to suit your barrel.
— Experiment with how close you hold the mirror to the wall of the bore. This affects both brightness and focus.
YouTube Viewer Comments on UltimateReloader Lyman Borecam Video:
“Great review, Gavin. Your video capture of the display looks better than what they show in Lyman’s own product video.”
“Price is getting low enough to think I need one on the short ‘To Buy’ list. Have some milsurp rifles with horrid bores that should be very interesting to view. Don’t waste $$ on those $20 things on Amazon, I did and thoroughly wasted my money.”
Here are the main tools you’ll need to assemble an AR-platform rifle
Planning to put together an AR-platform rifle? Or are you looking to upgrade your AR with a new barrel, stock, or trigger group? Then you should check out the AR-15 Rifle Build DVD from our friends at UltimateReloader.com. This DVD covers all the details of a custom build, using high-resolution video sequences, and helpful supporting graphics.
In this DVD, Gavin Gear guides you through the entire process including selecting components, acquiring and using the necessary tools, assembly steps and details for each component, and even mounting a scope. Building an AR-15 can be overwhelming, but with the right guidance and help it’s not difficult and can be very rewarding. With this DVD you’ll be able to build your AR-15 with confidence.
Upper: Barrel / Gas Block / Gas Tube
Upper: Handguard Installation
UltimateReloader.com’s AR-15 Build DVD is available just $9.90 (plus $3.80 shipping/handling). This DVD can pay for itself many times over by showing you how to do your own gunsmithing (and get quality AR components at attractive prices).
See Parts Installed in See-Through AR-15 Lower
This isn’t part of UltimateReloader.com DVD, but this YouTube video shows how to install the AR trigger group and other parts in an AR-15 lower. A transparent, see-through Tennessee Arms Company lower receiver was chosen to make it easier to see how the parts are installed.
Thinking of trying out the Precision Rifle Series, starting off with a gas gun? Well Gavin Gear of UltimateReloader.com did just that, competing in his first-ever PRS match up in Washington State. With its timed stages (some just 90 seconds long), Gavin learned that PRS is about speed as well as accuracy. As a PRS newbie, Gavin found the competition fun but challenging. Gavin’s account of his experiences, set forth in two articles with accompanying videos, will help other novice PRS competitors prepare for PRS-type matches and assemble the right equipment.
What PRS is All About
PRS is all about pushing your rifle skills to edge. You may have to hit targets at four different distances in 90 seconds- and dial in your dope between each shot. These kinds of challenges are super-difficult, but with enough experience and practice, it’s amazing what you can do. I saw guys that were so smooth, steady, fast, and accurate, it was mind blowing! It doesn’t come easy, and the guys at the top of the heap are super-dedicated. — Gavin Gear
This video has cool Aerial Drone footage, and in-depth explanation of stages:
Gavin’s First PRS Match: The Experience
By: Ultimate Reloader
Gavin told us that he’s wanted to try out the PRS game: “For a long time I’ve talked with friends about trying out a PRS-style match. Life has been busy, but when the right opportunity came, I decided to give it a try. My friend and shooting partner Jim Findlay offered to help me prepare, and told me it would be ‘fun to shoot gas guns together’. I decided I would shoot an AR-15, and thought that would be an ideal opportunity to try something new — the 22 Nosler. I wasn’t sure exactly what I was getting myself into, but that’s typically the way things happen when you’re really trying something new. It was a great experience, and it taught me a lot about shooting. I also made some great connections and friends during the match. If you are at all interested in PRS (Precision Rifle Series, or just Precision Rifle in general) I would suggest you enter and compete in a match. You most likely won’t regret it.”
Gavin enjoyed his first match: “Overall, the match was more fun and more laid back than I thought it would be. The guys in our squad were all really helpful, and even loaned me gear to try out when they noticed my gear wasn’t right for a particular shooting activity. One such case was when Ken Gustafson (of KYL Gear) offered to loan me one of the bags he had made. Below you can see me shooting off the infamous unstable tippy tank trap with a KYL Gear bag, and I’ll have to say [the bag] was amazing. It helped me lock down my rifle and get on target. What a great feeling!”
Gavin did experience issues with his “stout” 22 Nosler loads: “I did run into some trouble — I had loaded my 22 Nosler rounds to max charge weight with Varget powder and experienced some failure-to-feed issues during the match. Initially I thought my bolt needed more lubrication, but [it was] between 96 – 100°F during the hottest part of the Match day.” With the ultra-high ambient temperatures, Gavin experienced over-pressure. Word to the wise — “Test everything you plan to use on match day, and take into account things like weather conditions as well”.
Gear Choices and Selection
Gavin tells us: “In order to be successful in a PRS match, you need a rifle that is accurate enough, extremely reliable, has great ergonomics, handles well, and fits your budget.”
22 Nosler AR-15 rifle used by Gavin in the PRS match
18″ 1:8-twist 22 Nosler Upper
Two Stage Match Trigger – .154″ Hi-Speed DMR (GEISSELE AUTOMATICS)
Hogue AR-15 rubber grip
Magpul PRS stock
Harris S-BRM 6-9″ bipod
Vortex Viper HS-T 6-24x50mm scope
Action Type — Bolt vs. Semi: While most PRS competitors use bolt-action rifles, there are classes of competition that specifically call for semi-automatic actions to be used. Even so, in Open Class where you can pick which action type you’d like to use, there’s a split between the two for various reasons. I used an AR-15 in my first match, and for comparison, I think I’ll use a bolt-action rifle in my next match!
Support — Bipods and Bags: I think the first thing I said when trying to shoot from a barricade was: ‘You have to be kidding’. For someone used to prone shots from a bipod (when shooting long-range) this new challenge seemed impossible. My reticle was literally all over the place trying to shoot a target at 400 yards. But over time things improved drastically! Part of this improvement came from practice and technique, and part came from using the right support systems, such as the Game Changer Bag from Armaggedon Gear:
Photo Courtesy Accurate Ordnance.
All the Gear Items You Need — Bags, Bipods, Optics and More
UltimateReloader.com’s PRS Gear Summary covers Rifle Choice (gas gun vs. bolt-action), chambering options, optics, support systems (bipods and bags), dope cards, accessories and much more. Both novice and experienced PRS competitors will find this article well worth reading.
MagnetoSpeed’s technology has completely changed the market for firearms chronographs. With a MagnetoSpeed barrel-mounted chrono you can quickly and easily record muzzle velocity (MV) without having to set up tripods or walk down-range. The compact MagnetoSpeed chronos are easy to set up and transport. With the full-featured V3 model, everything you need comes in a small fitted case. In the top photo are the components used with the MagnetoSpeed V3 Kit:
1. V3 Bayonet sensor
2. Display and control unit
3. Bayonet spacers (plastic and rubber)
4. Cords and mounting hardware (left), suppressor heat shield (right)
5. Alignment rod (square cross-section)
6. Rail adapter (sold separately)
Our friend Gavin Gear of UltimateReloader.com recently reviewed the MagnetoSpeed V3 and came away impressed. Gavin explains the a good chrono is essential: “If you want to load and shoot precision ammunition, you need the tools that will produce and validate the precision of your loads. A good chronograph is one of those tools! In this post I’m going to introduce you to the MagnetoSpeed V3 chonograph, the high-end electromagnetic chronograph which fills out the top slot in MagnetoSpeed’s equipment portfolio.”
In this 11-minute video Gavin reviews MagnetoSpeed’s top-of-the-line V3 Chronograph. He shows what ships with the unit, how to set it up for both rifles and pistols, and then he puts it through its paces showing how it captures velocity data. Gavin says he will follow-up with future videos showing how to link the MagnetoSpeed V3 to your mobile phone and how to log velocity data for future reference. To learn more about this high-tech chrono, visit UltimateReloader.com.
Do your hands/wrists get tired when prepping scores of cartridge cases? There’s an alternative to the big, costly case prep centers that occupy lots of space on your reloading bench. Little Crow Gunworks has developed a $29.95 hand tool that makes chamfering by hand much easier. You’ve got to watch this Precision Prep Tool in action — click on the VIDEO below to see Gavin Gear of UltimateReloader.com demonstrate how it works.
See How Tool Head Spins With Arm Movement — Very Clever!
With this tool, a natural motion of the forearm translates into rotary motion of the tool head (watch the video!). The tool-head holds four (4) tools: inside and outside neck chamfer tools, plus large and small primer pocket reamers. A hex adapter lets you use the primer pocket reamers with a power drill to remove the crimps on military brass.
Gavin Gear was impressed with this innovative device: “I’ll admit, I didn’t know how this tool worked until I tried it out, and it’s pretty amazing how something so simple can make such a big impact on a chore like brass prep. I’ve tried a lot of brass prep tools, and this is one smooth setup. I think the Precision Prep Tool is a good option for case prep chores, especially if you want to trim on the go, or sitting in your recliner watching TV.”
This is the first manually-operated case prep tool that puts four tools at your fingertips. Other single-head inline tools require the user to twist their wrist or rotate the tool in their hand. The PPT consists of a knurled solid aluminum handle with a bearing-mounted aluminum tool head. The tool head has four 8-32 tapped holes which accept case prep tools manufactured by most reloading companies. To use the tool, simply rotate your forearm in a clockwise motion to chamfer, deburr, or clean the primer pocket. Priced at $29.95, the tool comes in five (5) colors: Red, Blue, Green, Silver, and Black.