Some folks say you haven’t really mastered marksmanship unless you can hit a target when standing tall ‘on your own hind legs’. Of all the shooting positions, standing can be the most challenging because you have no horizontally-solid resting point for your forward arm/elbow. Here 10-time National High Power Champ Carl Bernosky explains how to make the standing shot.
Carl Bernosky is one of the greatest marksmen in history. A multi-time National High Power Champion, Carl has won ten (10) National High Power Championships in his storied shooting career, most recently in 2012. In this article, Carl provides step-by-step strategies to help High Power shooters improve their standing scores. When Carl talks about standing techniques, shooters should listen. Among his peers, Carl is regard as one of the very best standing shooters in the history of High Power shooting. Carl rarely puts pen to paper, but he was kind enough to share his techniques with AccurateShooter.com’s readers.
If you are position shooter, or aspire to be one some day, read this article word for word, and then read it again. We guarantee you’ll learn some techniques (and strategies) that can improve your shooting and boost your scores. This stuff is gold folks, read and learn…
How to Shoot Standing by Carl Bernosky
Shooting consistently good standing stages is a matter of getting rounds down range, with thoughtfully-executed goals. But first, your hold will determine the success you will have.
1. Your hold has to be 10 Ring to shoot 10s. This means that there should be a reasonable amount of time (enough to get a shot off) that your sights are within your best hold. No attention should be paid to the sights when they are not in the middle — that’s wasted energy. My best hold is within 5 seconds after I first look though my sights. I’m ready to shoot the shot at that time. If the gun doesn’t stop, I don’t shoot. I start over.
2. The shot has to be executed with the gun sitting still within your hold. If the gun is moving, it’s most likely moving out, and you’ve missed the best part of your hold.
3. Recognizing that the gun is sitting still and within your hold will initiate you firing the shot. Lots of dry fire or live fire training will help you acquire awareness of the gun sitting still. It’s not subconscious to me, but it’s close.
4. Don’t disturb the gun when you shoot the shot. That being said, I don’t believe in using ball or dummy rounds with the object of being surprised when the shot goes off. I consciously shoot every shot. Sometimes there is a mistake and I over-hold. But the more I train the less of these I get. If I get a dud round my gun will dip.* I don’t believe you can learn to ignore recoil. You must be consistent in your reaction to it.
5. Know your hold and shoot within it. The best part of my hold is about 4 inches. When I get things rolling, I recognize a still gun within my hold and execute the shot. I train to do this every shot. Close 10s are acceptable. Mid-ring 10s are not. If my hold was 8 inches I would train the same way. Shoot the shot when it is still within the hold, and accept the occasional 9. But don’t accept the shots out of the hold.
6. Practice makes perfect. The number of rounds you put down range matter. I shudder to think the amount of rounds I’ve fired standing in my life, and it still takes a month of shooting standing before Perry to be in my comfort zone. That month before Perry I shoot about 2000 rounds standing, 22 shots at a time. It peaks me at just about the right time.
This summarizes what I believe it takes to shoot good standing stages. I hope it provides some insight, understanding, and a roadmap to your own success shooting standing.
— Good Shooting, Carl
* This is very noticeable to me when shooting pistol. I can shoot bullet holes at 25 yards, but if I’ve miscounted the rounds I’ve fired out of my magazine, my pistol will dip noticeably. So do the pistols of the best pistol shooters I’ve watched and shot with. One might call this a “jerk”, I call it “controlled aggressive execution”, executed consistently.
NRA Media offers a series of 40 informative videos about the Science of Shooting, covering a wide range of topics, from eye dominance to long-range ballistics. These videos feature high production values, with super-slow motion segments, as well as helpful computer graphics to illustrate the principles covered.
The videos are narrated by Jessie Duff, a top action pistol shooter (and the first women ever to achieve USPSA Grand Master status). Jessie is assisted by talented shooters such as Top Shot Season 4 Champion Chris Cheng. There are forty videos in the Firearm Science Video Series. Here are five NRA videos, with links to others below. You’ll find all 40 NRA Firearm Science Videos HERE.
Eye Dominance — How to Determine Which Eye is Dominant
Host Jessie Duff and longtime shooter Krystie Messenger demonstrate how eye dominance affects aim and teach you how to determine your dominant eye in this edition of Firearm Science. There are very simple tests you can do to determine your eye dominance. This Editor is right-handed but left-eye dominant. All competitive shooters should check for eye dominance. If you are cross-dominant, you can alter your head position or put a paper patch on one frame of your shooting glasses.
Eye Protection — Effect of Different Color Lenses
No matter what you’re shooting, eye protection should always be worn. But with so many choices, what should you wear? In this edition of Firearm Science, two-time Olympic trap shooter Corey Cogdell explains lens color options for protective eyewear. Different colors may be selected according to the light conditions and the sport. For most rifle shooters using magnified scopes, clear lenses are probably the best choice, except on very bright summer days.
Iron Sights vs. Optics
Host Jessie Duff and shooter Krystie Messenger demonstrate the benefits and drawbacks of using iron sights and optics in this edition of Firearm Science. For AR-type rifles, choosing the right option depends on the intended use of the rifle and the rules of competition. For example, a “Standard military Rifle” for CMP competition must have iron sights. But current NRA service rifle competition (and CMP unlimited military rifle class) allows scopes. Olympic smallbore shooters and Palma shooters have shown that extreme accuracy IS possible with sophisticated target sights. Below is the iron-sights Palma rifle with which John Whidden (Whidden Gunworks) won NRA Long-Range National Championships.
Some folks say you haven’t really mastered marksmanship unless you can hit a target when standing tall ‘on your own hind legs’. Of all the shooting positions, standing can be the most challenging because you have no horizontally-solid resting point for your forward arm/elbow. Here 10-time National High Power Champ Carl Bernosky explains how to make the standing shot.
Carl Bernosky is one of the greatest marksmen in history. A multi-time National High Power Champion, Carl has won ten (10) National High Power Championships in his storied shooting career, most recently in 2012. In this article, Carl provides step-by-step strategies to help High Power shooters improve their standing scores. When Carl talks about standing techniques, shooters should listen. Among his peers, Carl is regard as one of the best, if not the best standing shooter in the game today. Carl rarely puts pen to paper, but he was kind enough to share his techniques with AccurateShooter.com’s readers.
If you are position shooter, or aspire to be one some day, read this article word for word, and then read it again. We guarantee you’ll learn some techniques (and strategies) that can improve your shooting and boost your scores. This stuff is gold folks, read and learn…
How to Shoot Standing by Carl Bernosky
Shooting consistently good standing stages is a matter of getting rounds down range, with thoughtfully-executed goals. But first, your hold will determine the success you will have.
1. Your hold has to be 10 Ring to shoot 10s. This means that there should be a reasonable amount of time (enough to get a shot off) that your sights are within your best hold. No attention should be paid to the sights when they are not in the middle — that’s wasted energy. My best hold is within 5 seconds after I first look though my sights. I’m ready to shoot the shot at that time. If the gun doesn’t stop, I don’t shoot. I start over.
2. The shot has to be executed with the gun sitting still within your hold. If the gun is moving, it’s most likely moving out, and you’ve missed the best part of your hold.
3. Recognizing that the gun is sitting still and within your hold will initiate you firing the shot. Lots of dry fire or live fire training will help you acquire awareness of the gun sitting still. It’s not subconscious to me, but it’s close.
4. Don’t disturb the gun when you shoot the shot. That being said, I don’t believe in using ball or dummy rounds with the object of being surprised when the shot goes off. I consciously shoot every shot. Sometimes there is a mistake and I over-hold. But the more I train the less of these I get. If I get a dud round my gun will dip.* I don’t believe you can learn to ignore recoil. You must be consistent in your reaction to it.
5. Know your hold and shoot within it. The best part of my hold is about 4 inches. When I get things rolling, I recognize a still gun within my hold and execute the shot. I train to do this every shot. Close 10s are acceptable. Mid-ring 10s are not. If my hold was 8 inches I would train the same way. Shoot the shot when it is still within the hold, and accept the occasional 9. But don’t accept the shots out of the hold.
6. Practice makes perfect. The number of rounds you put down range matter. I shudder to think the amount of rounds I’ve fired standing in my life, and it still takes a month of shooting standing before Perry to be in my comfort zone. That month before Perry I shoot about 2000 rounds standing, 22 shots at a time. It peaks me at just about the right time.
This summarizes what I believe it takes to shoot good standing stages. I hope it provides some insight, understanding, and a roadmap to your own success shooting standing.
— Good Shooting, Carl
* This is very noticeable to me when shooting pistol. I can shoot bullet holes at 25 yards, but if I’ve miscounted the rounds I’ve fired out of my magazine, my pistol will dip noticeably. So do the pistols of the best pistol shooters I’ve watched and shot with. One might call this a “jerk”, I call it “controlled aggressive execution”, executed consistently.
While nearly everybody now favors digital photography over “old-fashioned” 35mm film, don’t toss those old 35mm film canisters, especially the clear Fuji-type with secure snap-in lids. Small plastic film canisters have a multitude of uses for the shooter and reloader.
Here Are Things You Can Do with Plastic Film Canisters:
1. Hold thrown powder charges. If you weigh powder charges after throwing them with a manual powder dispenser, throw the charges first into a film canister and then use that to drop the powder into the measuring pan on your scale. The canister will catch every kernel of powder. If you throw charges directly into a weighing pan, powder can sometimes bounce out. Using the film canister will help keep spilled powder off your loading bench and floor.
2. Store extra sets of foam ear-plugs in the canister. You never want to be without ear protection. This editor has four film canisters filled with plugs. Two go in the range kit, one goes in the car’s glove compartment, and a second stays in a lock box I use to transport pistols. This way I never find myself at the range without ear protection.
3. Place smaller cotton patches in film canisters, marked by caliber. If you use the water-tight Fuji-style canisters, you can even pre-soak the patches with solvent. You can have one canister for wet patches, another for dry patches. That saves time when you’re at the range, and avoids spillage. One caution–some solvents may react with plastic, so test this first before you put a solvent-filled canister in your range kit.
4. Store your neck bushings, sorted by caliber in film canisters. With a permanent marking pen, you can mark the side or top of the canister with the bushing sizes, or caliber.
5. Store your favorite Bolt Grease (for rifles) or anti-seize compound (good for pistol slide rails), in the canister. You don’t need to fill it all the way up — a little dab will do ya. We only recommend this with the snap-top Fuji canisters.
6. Protect your muzzles with canisters, during transport. When shipping a rifle or barrel, slip the film canister over the muzzle, then secure it with electrical tape. This will protect the precious crown of a match barrel from dings or damage.
7. Protect front sights with linked film canisters. Forum member SPClark explains: “I’ve seen several shooters use film canisters to make up front match sight protection. Use some elastic cord between two canisters… that’s easy to remove once you get to the line.”
TELL US Your Tips!
There are countless other uses for 35mm film canisters. We invite readers to respond with their own tips on using these handy containers. If you don’t have some stashed in your workshop already, you can get empties for free at most film processing centers. The clear plastic Fuji canisters are the best — you can see what’s inside and the lids are watertight.
On the Shooting Sports USA website, there’s a great profile of Kevin Nevius, one of America’s leading competitive marksmen. Kevin is best known for his smallbore success — Kevin won smallbore National Championships in 2008, 2010, and 2014. Kevin also has also an impressive record in long-range centerfire competition. He won the NRA 2018 Long Range Championship, while in 2005 and 2006 he won the Sierra Trophy at Camp Perry in 1000-yard competition. This story, penned by gunwriter Hap Rocketto, covers Kevin’s career, which has included multiple championships and many records.
“My brother got me into long range varmint hunting and I started building my own guns very early,” Nevius told Dan Holmes in a Pronematch.com interview. “I had a hunting friend who shot indoor smallbore who started me in three position and I was hooked.”
At the 2018 NRA Long Range Championships, Kevin Nevius went head to head against the nation’s top long-range aces this past week, and emerged on top. Besting the likes of past multi-time Long Range Champions David Tubb and John Whidden, Kevin Nevius shot superbly at Camp Atterbury to win his first NRA National Long Range Championship.Kevin built his own rifles for the match, using Kelbly centerfire actions in a Grunig & Elmiger smallbore stock. Here is Kevin’s first-hand report of his 2018 LR Championship victory.
Smallbore shooting is where I learned to build a good position, and so much of that carries forward to Long Range High Power. It was a huge shock though, the first time I looked at a 44” aiming black through aperture sights at 1000 yards! Smallbore aiming blacks are twice as big, at one tenth the distance — the fact that we can hit something at 1000 yards with that sight picture still amazes me!
Here are highlights from Hap Rocketto’s Profile of Kevin Nevius:
Champion shooter Kevin Nevius grew up in a household that did not allow firearms, an unlikely beginning for one of the United States’ premier prone rifleman and gunsmiths. Once out on his own he fell in with his brother who enjoyed long-range varmint hunting. His natural bent for things mechanical (he is a professional structural engineer) soon had him tinkering with rifles, which eventually led him to building his own.
Everything fell into line for him in smallbore during the 2008 season. After shooting a series of training matches in which he was most successful, he arrived at Camp Perry at the peak of performance and won his first National Smallbore Rifle Conventional Prone Championship. Kevin came back strong in 2010, winning the inaugural individual National Smallbore Rifle Metric Prone Championship, as well as the team title at Bristol, IN. [Kevin then won the Smallbore Conventional Prone Championship in 2014 with a practically perfect score of 4799-390X (LINK).]
Along the way, Nevius has won some impressive national records. In conventional competition he co-holds the 1200-shot metallic sight aggregate record of 1200-102X. He was just one shot short of perfection in the 480 aggregate, where he holds the civilian record of 4799-412X, just one point behind, and 11 Xs ahead of, Joe Hein’s 4800-401X open record.
Kevin Nevius hopes to build a smallbore rig capable of 3/8-MOA at 100 yards.
Building the Ultimate Rimfire Prone Rifle
Kevin is not just a great trigger-puller. He also smiths his own rifles. His current goal as a gunsmith is to build a rimfire rifle that will shoot 3/8″ groups at 100 yards. That’s a big challenge — 3/8-MOA represents very good accuracy for a centerfire rifle with handloaded ammo. But if any rimfire smith can build a rifle that will shoot that well at 100, it’s probably Kevin.
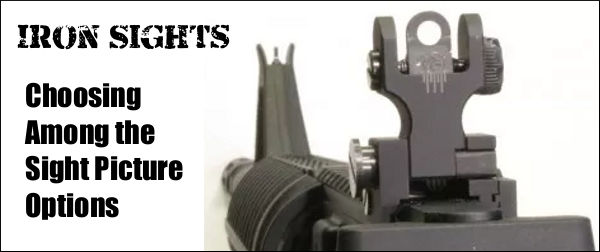
In an article for the CMP Online Magazine, SSG Tobie Tomlinson of the USAMU Service Rifle Team explains the various sight alignments employed by iron sights shooters. Tobie writes: “There are a myriad of sight picture options that shooters have used to great effect over the years. The sight picture that allows you to consistently shoot the smallest group, with a minimal shift in zeros, is the correct one. Remember, for any shooter to be successful, consistent sight picture must be complemented by front sight focus and sight alignment.” CLICK HERE to read FULL ARTICLE
Center Hold
The front sight is placed directly in the center of the target. A center hold is great in different light conditions. On a bright day the target appears small. On a dark day the target appears large. In [any] light conditions the center of the target is always in the center. A shooter who has problems with elevation shots in various light conditions may benefit from a center hold.
6 O’Clock Hold
With the 6 O’Clock hold the front sight is placed at the bottom of the aiming black. For many shooters, this hold allows precision placement of the front sight. The ability to accurately call your shots will come with time and experience. Light changes, which alter the appearance of the target, may affect shooters who utilize the 6 O’Clock hold.
Sub 6 Hold
The sub 6 is just like the 6 O’Clock hold, only there is a small line of white between the front sight and the aiming black. Many shooters have a problem determining the exact 6 O’Clock position with their front sight, but by using a sub 6 or line of white they may be able to better estimate their hold.
Frame Hold
With the frame hold, just like with the other holds, the front sight is in the center of the rear sight. The front sight can then be placed at the 6 or 12 O’Clock position on the frame when there is no visible aiming point. This hold is typically reserved for foul weather and poor light conditions. By placing the front sight at the top or bottom of the frame, a shooter may hold better when there is little target to see. It can be difficult to hold a tight group this way, but it may add more hits in bad conditions. This technique is normally applied when shooting longer ranges such 600 or 1000 yards.
In the digital archives of Shooting Sports USA, we’ve found some great features that deserve a second look. A few years back, Shooting Sports USA published Sights, Wind and Mirage, an outstanding article that explains how to judge wind speed/direction and adjust your sights accordingly. Authored by highly respected shooter Ernest (Ernie) Vande Zande, this article is a definite “must-read” for all competitive rifle shooters — even those who shoot with a scope rather than irons. Vande Zande’s discussion of mirage alone makes the article well worth reading. Highly recommended.
Invaluable Insights from a World-Class Shooter
The article covers a wide variety of topics including Wind Reading, Mirage, Effects of Sight Canting, Quadrant Shooting, and Sight Adjustment Sequencing. Vande Zande offers many jewels of insight from his decades of experience shooting and coaching in top level tournaments. U.S. Shooting Team Leader at the 1996 Olympics, Vande Zande has set more than 200 records in National and International competition. He was the Smallbore Rifle Prone Champion at Camp Perry in 1980. An International Distinguished shooter, Ernie has been on nine Dewar teams and he was a member of the USAR Shooting Team from 1982. No matter what your discipline, if you are a competitive rifle shooter, you should CLICK HERE to read Sights, Wind, and Mirage.
As part of the NRA Mentor Program, the NRA offers a helpful video about using sights. This covers all types of sighting systems — blade sights, aperture sights, V-notch sights, red dot sights, shotgun bead sights, and telescopic sights with reticles. For new shooters, this video can be helpful — it explains sight basics in very clear and comprehensible terms. And even for experienced shooters, this can provide some helpful tips on sight alignment, particularly when shooting pistols.
Additional information about using sights is contained in the NRA’s free Guide for New Shooters. This helpful 14-page digital publication provides the key firearms safety rules, explains range etiquette, and even has a section on gun cleaning. CLICK HERE to download Guide for New Shooters.
Training With Lasers — Trigger Control
Training with laser sights helps diagnose and improve trigger control errors by showcasing the importance of “surprise break” and follow-through. Working with gun-mounted lasers, which put a red or green dot right on the target, can quickly diagnose errors such as recoil anticipation, jerking the trigger, and breaking the wrist. This video shows how handgunners can use pistol-mounted lasers to correct bad habits and shoot more consistently.
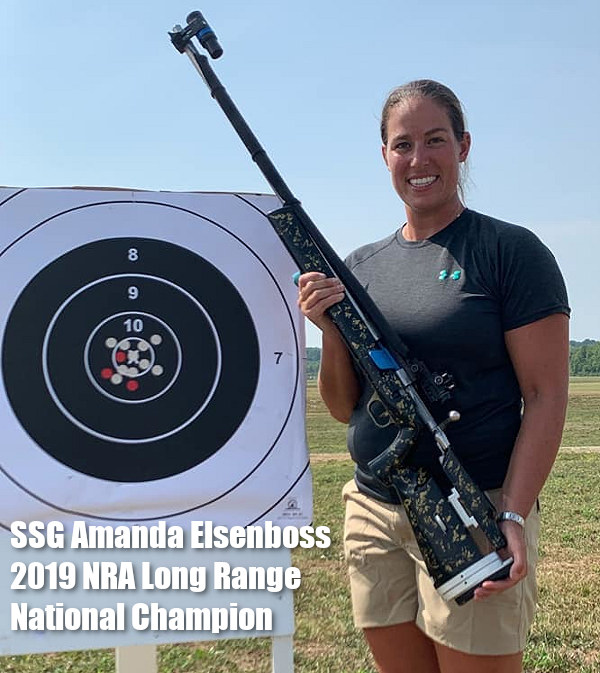
The display target is a copy, for spectators, of the larger, official target. The actual X-Ring is 10″ at 1000 yards. Amanda shot without a bipod, using only a sling to support the rifle, and aperture sights (no scope).
Congrats to Amanda Elsenboss for winning the 2019 NRA National Long Range Championships held this month at Camp Atterbury, Indiana. This completes her season of dominance, winning the Interservice, CMP, and NRA Long Range Championships. Amanda finished off her campaign with a win in the Mustin match and a shoot-off score of 100-9x. She also won the Leech Cup with a 200-15X, and 100-6X shoot-off score. Great job, Amanda!
Before his retirement from the U.S. Army, Emil Praslick III coached Amanda as a shooter with the U.S. Army Markmanship (USAMU) team. Emil was impressed with Amanda’s skill and dedication. Emil posted: “[Amanda is] by far the easiest shooter to coach I’ve ever worked with. A machine.”
Amanda expressed gratitude: “Thank you to everyone who supported me during the 2019 CMP Long Range Matches. Everyone’s support and encouragement helped me along the way, fan club included. Especially, a huge shout out to past and present AMU members for pointing me in the right direction. When the moment of confusion happened I always knew who I could count on to get me back on track. So, Thank you to everyone on and off the range who was cheering me along!”
Amanda Helps Train Young Competitors
When Amanda is not shooting matches or practicing with the USAMU, she helps train new shooters. Here SSG Amanda Elsenboss offers pointers to a Liberty University Service Rifle shooter at a CMP Small Arms Firing School (SAFS). Amanda Elsenboss hails from Woodbury, Connecticut and holds the military occupational specialty of small arms repairer. Elsenboss started shooting when she was 13, and soon became an avid rifle competitor. She now serves as a shooter/instructor on the USAMU Service Rifle Team.
Video Interview with SSG Amanda Elsenboss
This video, featuring SSG Amanda Elsenboss, was created by the USAMU to mark Women’s History Month. Amanda talks about her career in the military, and her love of competitive shooting. This is a great video, well worth watching. There are images from many shooting ranges around the nation.
SSG Amanda Elsenboss. CLICK Speaker Icon to Hear Sound!
Our friend Anette Wachter (aka 30CalGal) is profiled this month on the NRA Family website. Annette talks about how she got into the shooting sports (though a challenge from her ex-husband), and how she has advanced along the way. She is now one of the top female Palma shooters in the nation. She also now competes regularly in Precision Rifle matches — tactical style competitions. She enjoys the challenge of PRS events, and she also competes in 3-Gun matches, with pistol, rifle, and shotgun.
Anette writes about the shooting sports for many publications. She also offers tips and gear reviews through her popular website, 30CalGal.com.
NRA: What type of shooting do you do, and what makes you like it so much?
Anette: Mostly long-range rifle disciplines. I don’t shoot High Power much anymore, but of course I am on the U.S. National Rifle Team and the Palma Team, so that occupies much of my time. My new love is Precision Rifle. This is the new hot and trendy shooting sport that is taking over the industry. It is like a sniper challenge. All unknown distances and usually the matches are out in the field. I also compete in 3-Gun, which is a ton of fun.
NRA: What advice do you have for new shooters who want to get into these sports?
Anette: If you want to get in to any discipline of competition I always suggest going to a local match to watch first. With the Internet you can find out your state competition information. Look for local organizations like the USPSA. See the type of equipment shooters are using and how the sport is run. Ask a lot of questions. Shooters are a very generous culture as well, in my experience. When I started out I was loaned almost everything to try it out.
NRA: From what you have seen, are there a lot more women getting involved in the shooting sports these days?
Anette: I started shooting and competing in 2006. I remember going to NRA Nationals at Camp Perry and, out of almost a thousand competitors, I was one of maybe 20 to 30 women. At local matches I would be one of two. In the past five or six years and especially in the last three, I have seen the numbers jump like crazy. Three years ago a few women in the 3-Gun market decided to put on the first Ladies 3-Gun ProAm in Georgia. We were wondering if anyone would show up. Over 200 women competed. Any of us that had extra guns and equipment were loaning them out. For many of the women it was their first match ever. It changed lives.
In this video Anette offers smart tips for shooting with bipod:
About the 30 Cal Gal Life is short. Go Shoot! — Anette Wachter
Along with being a talented competitive shooter, Anette has her own Gun Blog, 30CalGal.com, and she writes for several gun publications including GunUp Magazine, Shooting Sports USA, Sure Shots Magazine, and Wide Open Spaces. She also designs and crafts custom jewelry items, many of which utilize cartridge cases or other shooting-themed components. You can purchase Anette’s jewelry through her AW Collections webstore.


 How to Shoot Standing
 5. Know your hold and shoot within it. The best part of my hold is about 4 inches. When I get things rolling, I recognize a still gun within my hold and execute the shot. I train to do this every shot. Close 10s are acceptable. Mid-ring 10s are not. If my hold was 8 inches I would train the same way. Shoot the shot when it is still within the hold, and accept the occasional 9. But don’t accept the shots out of the hold.


 Champion shooter Kevin Nevius grew up in a household that did not allow firearms, an unlikely beginning for one of the United States’ premier prone rifleman and gunsmiths. Once out on his own he fell in with his brother who enjoyed long-range varmint hunting. His natural bent for things mechanical (he is a professional structural engineer) soon had him tinkering with rifles, which eventually led him to building his own.

 In an article for the
  Center Hold
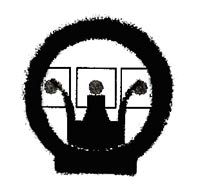 6 O’Clock Hold
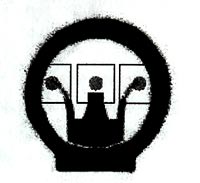 Sub 6 Hold
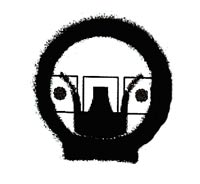 Frame Hold
 In the digital archives of Shooting Sports USA, we’ve found some great features that deserve a second look. A few years back,