If you have an older version of QuickLOAD, such as V3.1 shown above, then you should definitely upgrade. This will give you more complete and up-to-date cartridge, powder, and bullet data files.
Got QuickLOAD software? Then it’s time to upgrade your data files — new data became available in January 2018. The makers of QuickLOAD offer inexpensive CDs with updated data files (for propellants and projectiles). These data update CDs will add the latest available powder, cartridge, and bullet files to your current version of QuickLOAD/QuickTARGET.
There are two update CDs now offered with data current through January 2018. One handles the older installations, QuickLOAD/QuickTARGET 3.0, 3.1, 3.2, 3.3, 3.4, and 3.5. A second update CD works for QuickLOAD/QuickTARGET 3.6, 3.8, and early 3.9. This second disk is primarily a data update.
Price for either update disk is $15.95. In North America, order from Neconos.com, or call 800-451-3550 (9 am to 5 pm Pacific Time). In the United Kingdom, you can get the update disk from JMS Arms, Merrivale, London Road, Handcross, West Sussex, RH17 6BA, England, Phone: 01444 400126. In Europe you can order direct from QuickLOAD’s creator: Ing. Hartmut Broemel, Neubrecker Weg 15, D-64832 Babenhausen, Germany, fax/phone (+49) 0 6073 688481
QuickLOAD is a pretty amazing program. Using information for over 1200 cartridges, 250 powders, and 2500 bullet types, QuickLOAD allows you to predict velocities and pressures for your hand-loaded ammo. You can check predicted pressures with different powder choices and seating depths before loading an actual round. If you do not yet own QuickLOAD, you can now order the latest Version 3.9 of this unique software. Priced at $152.95, the latest version 3.9 contains all the updates through January, 2018 and is compatible with WINDOWS 2000, XP, VISTA, Windows 7, Winows 8 and Windows 10. QuickLOAD/QuickTARGET 3.9 can be purchased for $152.95 from Neconos.com. For a full explanation of the features and benefits of QuickLOAD software, click the link below.
EDITOR’S Comment: We believe every serious rifle hand-loader should own and use QuickLOAD. We have used this program for over a decade. It is invaluable in load development, particularly when testing a variety of bullets and when changing seating depths. This software is NOT a substitute for standard, conservative reloading practices. However QuickLOAD can very surprisingly effective in comparing cartridge performance and predicting the effects of changes in charge weight.
Product tip from EdLongrange. We welcome reader submissions.
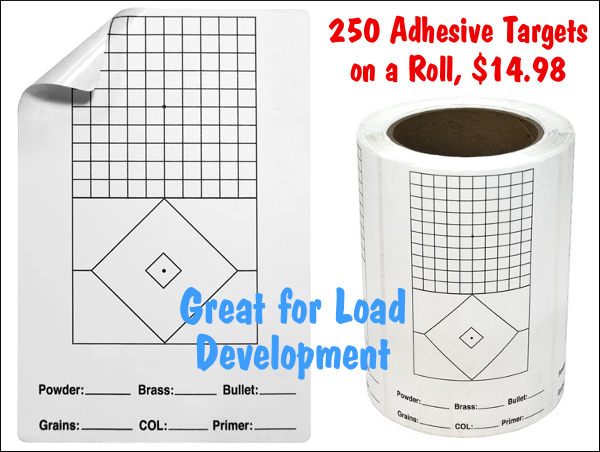
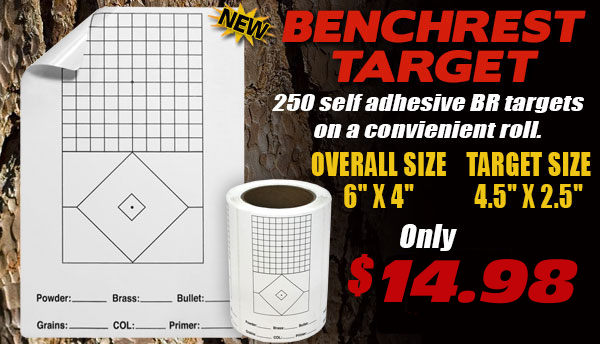
Here’s a smart new product from Midsouth Shooters Supply: 250 self-adhesive Benchrest Targets on a convenient roll. Not just for benchrest competitors, these stick-on targets work great for anyone doing load development. Each target offers a precision 1/4″ grid at the top with diamond aiming box below. This is similar to official targets used in Benechrest matches, with the addition of the upper grid lines which allow you to instantly estimate group size. These targets also include an area to list your load components. Midsouth sells the 250-target roll for $14.98.
This target was designed for benchrest shooting, developing new loads or cataloging existing ones. This easy-to-use target has a 1/4″ grid pattern at the top which helps measure groups. The vertical aiming square at the bottom helps align the cross hairs of your scope for consistent shot placement. At the very bottom of the target there is room to record your reloading information. Each Target sticker measures 6″ x 4″ with a 4.5″ x 2.5″ printed area.
This article was written in 2014 for the Sierra Bullets Blog. It describes one method of load development that is commonly used. There are other methods that can work also. Some guys first isolate seating depth and then fine-tune velocity with charge weights. Other guys may aim for a known velocity node (speed range) and then optimize accuracy by adjusting seating depth. Still others look for smallest ES and tightest vertical to minimize 1000-yard vertical dispersion. There are many ways to skin a cat. Different rifles (and even different barrels) can demand different styles of load development.
In this instance the writer achieved desired results seating his bullets .007″ back from max “jam” length. For other applications (and other barrels) you may get the best, most consistent results seating off the rifling by .020″ or more. In disciplines with quick-fire such as PRS, it may be wise to develop loads that “jump” the bullet.
F-Class Long Range Load Development Methodology
by Mark Walker, Sierra Bullets Product Development Manager
Since I just put a new barrel on my F-class rifle… I figured it might be a good time to discuss load tuning for long range shooting. Getting the most accuracy out of your rifle is one of the most important aspects of load tuning. For long range shooting in particular, using a load that produces the least amount of vertical variation is vital. There are several steps to the process that I use, so I will go through the basics of each.
When I first get a new barrel installed, I like to determine what the loaded cartridge “jam” length is. I do this by taking an empty case (no powder or primer) that has been neck sized with the proper bushing (I like to shoot for 0.002 smaller than the loaded cartridge neck diameter) and seat a bullet long in it so that the throat of the rifle will move the bullet back into the case when I close the bolt. I close the bolt several times until the bullet stops moving back into the case at which point I use a comparator with my calipers and get a length measurement on the cartridge. This is what I consider to be the “jam length” for this barrel and chamber. I came up with 3.477″ as the “jam length” for this particular barrel. [Editor: In this instance, Mark is using “Jam length” to mean max seating depth he can achieve without bullet set-back.]
Next, I will fire-form some brass using a starting load of powder and bullets seated to “jam” while breaking in the barrel. My barrel break in process is not very technical; it’s mostly just to get the brass formed and the rifle sighted in. I do clean every 5 rounds or so just because I feel like I have to.
Once I have the brass formed, I use them to load for a “ladder test” to see what powder charge the rifle likes. With a ladder test, you take your starting load and load one round each with a slightly increasing amount of powder until you reach your max load for that cartridge. You then fire each round using the same aiming point to see where the bullets start to form a group. For this barrel and cartridge, I started at 53.3 grains of H4831SC powder and increased the load by 0.3 grains until I reached 55.7 grains. I always seat my bullets to “jam” when doing a ladder test. We will determine the final seating depth in another test later. It’s usually best to shoot this test at a minimum of 200 yards because at closer ranges the bullets will impact too close together making it hard to determine which load works best. I shot this test at 300 yards.
As you can see from the target, the lightest load #1 had the lowest velocity and impacted lowest on the target. Shots #2 and #3 were a little higher and in the same hole. Shots #4 thru #6 were slightly higher yet and all had the same elevation. Shots #7 and #8 were the highest on the target however pressure signs were starting to show. For some reason shot #9 went back into the group and the chronograph didn’t get a reading so I ignored that shot.
When picking a load, I am looking for the most shots at the same vertical location on the target. As you can see that would be shots #4 through #6 so I would pick a powder charge from those shots which would be 54.2 grains to 54.8 grains. As a side note, shots #2 and #3 are only 0.851 lower so I wouldn’t be afraid of using one of those loads either. I settled on 54.5 grains as the load I wanted to use. It’s right in the middle of the group so if the velocity goes up or down slightly, the bullet should still hit in the same place on the target.
Now that we’ve settled on a powder charge, I want to find the seating depth the rifle likes. I usually start at jam length and [shorten the COAL] in 0.003 increments until I get to 0.015 deeper than jam. [Editor: By this he means he is seating the BULLET deeper in the case, NOT deeper into the lands. He ended up at .007″ shorter than his hard jam length of 3.477″.]
I load 3 rounds at each depth using the 54.5 grain powder charge and shoot a group with each depth at 150 yards. As you can see from the target, the first two groups are not good at all. Next one looks good and is the smallest group on the target. The next three are not quite as small but the vertical location on the target is almost the same which indicates a sweet spot which will help keep the vertical stringing to a minimum on target. I went with 3.470″ which is right in the middle once again and should give some flexibility with the seating depth.
So after all of that, my load is 54.5 grains of H4831SC and a cartridge length of 3.470. I plan on loading up enough ammo to shoot five groups of five shots and see exactly how this load works on target as well as what the extreme velocity spreads are over several groups.
I sincerely hope some of this information helps you to get the best accuracy out of your rifle. I do not take credit for coming up with any of this, a whole lot of good shooters use this same method or a variant of it when working up their loads.
For more information about load development, please contact the Sierra Bullets technical support team at 1-800-223-8799 or by email at sierra [at] sierrabullets.com.
Disclaimer: Load data represented here may not be safe in your rifle. Always start low and work up, watching for pressure signs.
An outfit in Washigton State, Box to Bench Precision, has developed an oversize (23.5″ x 30″) precisely-scaled target designed for load development and scope testing. This target is very innovative. On the target you’ll find various clusters of aim points for various tasks. Upper left are orange aiming spots for testing various powder charges. In the upper right quadrant are more red aim points to be used when testing bullet seating depth. Running down the center of the target is a vertical line with horizontal marks showing precise MOA and Mil heights at 100 yards — use this feature to verify your click values.
And there’s more. In the lower right quadrant (far right) are three black targets to be used for chrono work. With these you can record cold velocity, hot barrel velocity and a “Final Velocity”. Over in the lower left quadrant, in the left-most column, are three dot targets for zeroing and recording group size with load data. Finally, four more black/white targets can be used for a scope box test (aka “shooting the square”). With a box test, you move from target to target, clicking in sequence to each corner of the square in sequence, evenutally returning to your original aim point. If your scope tracks correctly, the last box test shot should end up right on top of the first shot.
Record the Entire Load Development Process on One Target
For those used to shooting at conventional bulleyes or benchrest targets, this target may seem confusing, but it can really help organize and simplify the process of load development. We like the idea of having a single, durable target that performs double-duty — serving for load development as well as scope checking. And we like the fact that the target is pretty strong — the maker says: “The target is Tear-Resistant and Water-Proof”. We’d expect a maker based in the Pacific NW to design a target that can handle wet weather.
How to Order
So how much does all this target technology cost? A single, 23.5″ x 30″ target costs $6.99. A pack of three targets costs $19.47, while a five-target pack runs $29.95 (which works out to $5.99 per target). Targets ship in a durable cardboard tube. If you like what you see and want to order these targets, visit the Box To Box Precision Online Store.
Each Wednesday, the U.S. Army Marksmanship Unit publishes a reloading “how-to” article on the USAMU Facebook page. This past week’s “Handloading Hump Day” article, the latest in a 7-part series, relates to chronograph testing and statistical samples. We highly recommend you read this article, which offers some important tips that can benefit any hand-loader. Visit the USAMU Facebook page next Wednesday for the next installment.
Chronograph Testing — Set-Up, Sample Sizes, and Velocity Factors
Initial Chronograph Setup
A chronograph is an instrument designed to measure bullet velocity. Typically, the bullet casts a shadow as it passes over two electronic sensors placed a given distance apart. The first screen is the “start” screen, and it triggers an internal, high-speed counter. As the bullet passes the second, or “stop” screen, the counter is stopped. Then, appropriate math of time vs. distance traveled reveals the bullet’s velocity. Most home chronographs use either 2- or 4-foot spacing between sensors. Longer spacing can add some accuracy to the system, but with high-quality chronographs, 4-foot spacing is certainly adequate.
Laboratory chronographs usually have six feet or more between sensors. Depending upon the make and model of ones chronograph, it should come with instructions on how far the “start” screen should be placed from one’s muzzle. Other details include adequate light (indoors or outdoors), light diffusers over the sensors as needed, and protecting the start screen from blast and debris such as shotgun wads, etc. When assembling a sky-screen system, the spacing between sensors must be extremely accurate to allow correct velocity readings.
Statistics: Group Sizes, Distances and Sample Sizes
How many groups should we fire, and how many shots per group? These questions are matters of judgment, to a degree. First, to best assess how ones ammunition will perform in competition, it should be test-fired at the actual distance for which it will be used. [That means] 600-yard or 1000-yard ammo should be tested at 600 and 1000 yards, respectively, if possible. It is possible to work up very accurate ammunition at 100 or 200 yards that does not perform well as ranges increase. Sometimes, a change in powder type can correct this and produce a load that really shines at longer range.
The number of shots fired per group should be realistic for the course of fire. That is, if one will be firing 10-shot strings in competition then final accuracy testing, at least, should involve 10-shot strings. These will reflect the rifles’ true capability. Knowing this will help the shooter better decide in competition whether a shot requires a sight adjustment, or if it merely struck within the normal accuracy radius of his rifle.
How many groups are needed for a valid test? Here, much depends on the precision with which one can gather the accuracy data. If shooting from a machine rest in good weather conditions, two or three 10-shot groups at full distance may be very adequate. If it’s windy, the rifle or ammunition are marginal, or the shooter is not confident in his ability to consistently fire every shot accurately, then a few more groups may give a better picture of the rifle’s true average.
In this video, Bryan Litz of Applied Ballistics explains how to choose a bullet for long-range shooting and explains what you should be looking for when developing a long-range load. Bryan notes that, with a new rifle build, the bullet you select may actually dictate your gun components. When starting from a “clean slate”, once you select a bullet, you will then pick a barrel, twist rate, and cartridge that are appropriate for that bullet. In choosing a long-range projectile, Bryan recommends you choose a high-BC bullet “that is known for precision”. Then you need to find an ultra-consistent, reliable load.
This video is worth watching. Bryan Litz makes some very good points.
Load Development — Why Consistency is Key (and Half-MOA May Be Good Enough)
After choosing a bullet for your long-range project, then you need to develop a load through testing. Bryan explains: “Once you’ve selected a bullet … and you have selected the components around that bullet, the most important thing to remember in hand-loading is consistency. You’re going to do some testing to see what combination of powder charge, powder type, and seating depth give you the best groups and lowest standard deviations in muzzle velocity.”
Bryan says that if you develop a load that can shoot consistent, half-minute groups in all conditions, you should be satisfied. Bryan says that many long-range shooters “spin their wheels” trying to achieve a quarter-MOA load. Often they give up and start all over with a new bullet, new powder, and even a new cartridge type. That wastes time, money, and energy.
Bryan cautions: “My advice for hand-loaders who are long-range shooters, is this: If you can get a load that is reliable and can shoot consistent, half-minute groups with low MV variation and you can shoot that load in any condition and it will work well, then STICK with THAT LOAD. Then focus on practicing, focus on the fundamentals of marksmanship. The consistency you develop over time by using the same ammunition will mean more to your success in long range shooting than refining a half-minute load down to a quarter-minute load.”
Bryan notes that, at very long range, shooting skills and wind-calling abilities count most: “Your ability to hit a 10″ target at 1000 yards doesn’t improve very much if you can make your rifle group a quarter-minute vs. a half a minute. What’s going to determine your hit percentage on a target like that is how well you can calculate an accurate firing solution and center your group on that target. A lot of people would be more effective if they focused on the fire solution and accurately centering the group on the target [rather than attempting to achieve smaller groups through continuous load development].”
Editor’s Note: We agree 100% with the points Bryan makes in this video. However, for certain disciplines, such as 600-yard benchrest, you WILL need a sub-half-MOA rifle to be competitive at major matches. Well-tuned, modern 600-yard benchrest rigs can shoot 1/4-MOA or better at 100 yards. Thankfully, with the powder, bullets, and barrels available now, 1/4-MOA precision (in good, stable conditions) is achievable with a 17-lb benchgun built by a good smith with premium components.
When a rifle isn’t shooting up to it’s potential, we need to ask: “Is it the gun or the shooter?” Having multiple shooters test the same rifle in the same conditions with the same load can be very revealing…
When developing a load for a new rifle, one can easily get consumed by all the potential variables — charge weight, seating depth, neck tension, primer options, neck lube, and so on. When you’re fully focused on loading variables, and the results on the target are disappointing, you may quickly assume you need to change your load. But we learned that sometimes the load is just fine — the problem is the trigger puller, or the set-up on the bench.
Here’s an example. A while back we tested two new Savage F-Class rifles, both chambered in 6mmBR. Initial results were promising, but not great — one gun’s owner was getting round groups with shots distributed at 10 o’clock, 2 o’clock, 5 o’clock, 8 o’clock, and none were touching. We could have concluded that the load was no good. But then another shooter sat down behind the rifle and put the next two shots, identical load, through the same hole. Shooter #2 eventually produced a 6-shot group that was a vertical line, with 2 shots in each hole but at three different points of impact. OK, now we can conclude the load needs to be tuned to get rid of the vertical. Right? Wrong. Shooter #3 sat down behind the gun and produced a group that strung horizontally but had almost no vertical.
Hmmm… what gives?
Shooting Styles Created Vertical or Horizontal Dispersion
What was the problem? Well, each of the three shooters had a different way of holding the gun and adjusting the rear bag. Shooter #1, the gun’s owner, used a wrap-around hold with hand and cheek pressure, and he was squeezing the bag. All that contact was moving the shot up, down, left and right. The wrap-around hold produced erratic results.
Shooter #2 was using no cheek pressure, and very slight thumb pressure behind the tang, but he was experimenting with different amounts of bag “squeeze”. His hold eliminated the side push, but variances in squeeze technique and down pressure caused the vertical string. When he kept things constant, the gun put successive shots through the same hole.
Shooter #3 was using heavy cheek pressure. This settled the gun down vertically, but it also side-loaded the rifle. The result was almost no vertical, but this shooting style produced too much horizontal.
A “Second Opinion” Is Always Useful
Conclusion? Before you spend all day fiddling with a load, you might want to adjust your shooting style and see if that affects the group size and shape on the target. Additionally, it is nearly always useful to have another experienced shooter try your rifle. In our test session, each time we changed “drivers”, the way the shots grouped on the target changed significantly. We went from a big round group, to vertical string, to horizontal string.
Interestingly, all three shooters were able to diagnose problems in their shooting styles, and then refine their gun-handling. As a result, in a second session, we all shot that gun better, and the average group size dropped from 0.5-0.6 inches into the threes — with NO changes to the load.
That’s right, we cut group size in half, and we didn’t alter the load one bit. Switching shooters demonstrated that the load was good and the gun was good. The skill of the trigger-puller(s) proved to be the limiting factor in terms of group size.
When a rifle isn’t shooting up to it’s potential, we need to ask: “Is it the gun or the shooter?” Having multiple shooters test the same rifle in the same conditions with the same load can be very revealing…
When developing a load for a new rifle, one can easily get consumed by all the potential variables — charge weight, seating depth, neck tension, primer options, neck lube, and so on. When you’re fully focused on loading variables, and the results on the target are disappointing, you may quickly assume you need to change your load. But we learned that sometimes the load is just fine — the problem is the trigger puller, or the set-up on the bench.
Here’s an example. A while back we tested two new Savage F-Class rifles, both chambered in 6mmBR. Initial results were promising, but not great — one gun’s owner was getting round groups with shots distributed at 10 o’clock, 2 o’clock, 5 o’clock, 8 o’clock, and none were touching. We could have concluded that the load was no good. But then another shooter sat down behind the rifle and put the next two shots, identical load, through the same hole. Shooter #2 eventually produced a 6-shot group that was a vertical line, with 2 shots in each hole but at three different points of impact. OK, now we can conclude the load needs to be tuned to get rid of the vertical. Right? Wrong. Shooter #3 sat down behind the gun and produced a group that strung horizontally but had almost no vertical.
Hmmm… what gives?
Well each of the three shooters had a different way of holding the gun and adjusting the rear bag. Shooter #1, the gun’s owner, used a wrap-around hold with hand and cheek pressure, and he was squeezing the bag. All that contact was moving the shot up, down, left and right. Shooter #2 was using no cheek pressure, and very slight thumb pressure behind the tang, but he was experimenting with different amounts of bag “squeeze”. His hold eliminated the side push, but variances in squeeze technique and down pressure caused the vertical string. When he kept things constant, the gun put successive shots through the same hole. Shooter #3 was using heavy cheek pressure. This settled the gun down vertically, but it also side-loaded the rifle. The result was almost no vertical, but this shooting style produced too much horizontal.
A “Second Opinion” Is Always Useful
Conclusion? Before you spend all day fiddling with a load, you might want to adjust your shooting style and see if that affects the group size and shape on the target. Additionally, it is nearly always useful to have another experienced shooter try your rifle. In our test session, each time we changed “drivers”, the way the shots grouped on the target changed significantly. We went from a big round group, to vertical string, to horizontal string.
Interestingly, all three shooters were able to diagnose problems in their shooting styles, and then refine their gun-handling. As a result, in a second session, we all shot that gun better, and the average group size dropped from 0.5-0.6 inches into the threes — with NO changes to the load.
That’s right, we cut group size in half, and we didn’t alter the load one bit. Switching shooters demonstrated that the load was good and the gun was good. The skill of the trigger-puller(s) proved to be the limiting factor in terms of group size.


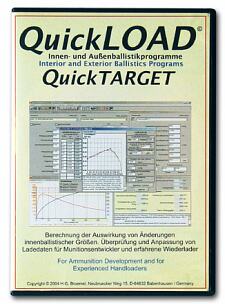 Got QuickLOAD software? Then it’s time to upgrade your data files — new data became available in January 2018. The makers of QuickLOAD offer inexpensive CDs with updated data files (for propellants and projectiles). These data update CDs will add the latest available powder, cartridge, and bullet files to your current version of QuickLOAD/QuickTARGET.