|
|
July 2nd, 2014
 Want to shoot better scores at your next match? Here’s a smart, inexpensive do-it-yourself project from the good folks at Criterion Barrels. For less than one dollar in materials, in just a few minutes you can create a handy, effective mirage shield, custom-fitted to your favorite rifle. Want to shoot better scores at your next match? Here’s a smart, inexpensive do-it-yourself project from the good folks at Criterion Barrels. For less than one dollar in materials, in just a few minutes you can create a handy, effective mirage shield, custom-fitted to your favorite rifle.
All precision shooters should be familiar with mirage, a form of optical distortion caused primarily by variations in air temperature. Savvy shooters will use mirage as a valuable tool when gauging wind speed and direction. Natural mirage is unavoidable, but there are many techniques designed to limit its influence in long-range marksmanship.

A form of mirage can be produced by the barrel itself. Heat rising from the barrel may distort sight picture through your optics, leading to erratic results. Mirage caused by barrel heat can be reduced dramatically by a simple, light-weight mirage shield.
How to Make a Mirage Shield
|
A mirage shield is an extremely cost-effective way to eliminate a commonly-encountered problem. Making your own mirage shield is easy. Using old venetian blind strips and common household materials and tools, you can construct your own mirage shield for under one dollar. |
Materials Required:
1. Vertical PVC Venetian blind panel
2. Three 1”x1” pieces adhesive-backed Velcro
3. Ruler or tape measure
4. Scissors or box cutter
5. Pencil or marker |
1. Measure the distance from the end of the receiver or rail to the crown of the barrel.
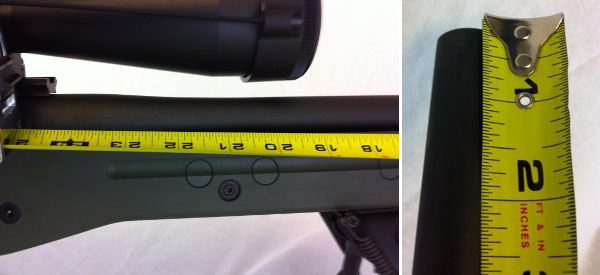
2. Using a pencil and ruler, measure the same distance and mark an even line across the blind.

3. Cut across the line using scissors or a box cutter, shortening the blind to the required length. (Remember, measure twice, cut once!)
4. Expose the adhesive backing on the loop side of the Velcro. Center and apply the Velcro strips on the barrel at regular intervals.

5. Expose the adhesive backing of the fuzzy side of the Velcro.
6. Place the blind on the upper side of the barrel. Apply downward pressure. Once the Velcro has secured itself to the barrel, separate the two sides. Proceed to mold both sides of the Velcro to fit the contour of their respective surfaces.
7. Reaffix the blind. Barrel related mirage is now a thing of the past!

How to Remove and Re-Attach the Mirage Shield
Removal of your mirage shield is accomplished by simply removing the blind. You can un-install the Velcro by pulling off the strips and then gently removing any adhesive residue left behind using an appropriate solvent. (Simple cooking oil may do the job.) Caution: With fine, high-polish blued barrels, test any solvent on a non-visible section of the barrel. Before storing the gun, re-oil the barrel to remove active solvents and residual fingerprints.
June 29th, 2014
Riflescopes are mechanical contraptions. One of the sad realities about precision shooting is that, sooner or later, you will experience a scope failure. If you’re lucky it won’t happen in the middle of a National-level competition. And hopefully the failure will be dramatic and unmistakable so you won’t spend months trying to isolate the issue. Unfortunately, scope problems can be erratic or hard to diagnose. You may find yourself with unexplained flyers or a slight degradation of accuracy and you won’t know how to diagnose the problem. And when a 1/8th-MOA-click scope starts failing, it may be hard to recognize the fault immediately, because the POI change may be slight.
When An Expensive Scope Goes Bad
Recently, this editor had a major-brand 8-25x50mm scope go bad. How did I know I had a problem? Well the first sign was a wild “drop-down” flyer at a 600-yard match. After shooting a two-target relay, I took a look at my targets. My first 5-shot group had five shots, fairly well centered, in about 2.2″. Pretty good. Everything was operating fine. Then I looked at the second target. My eye was drawn to four shots, all centered in the 10 Ring, measuring about 2.4″. But then I saw the fifth shot. It was a good 18″ low, straight down from the X. And I really mean straight down — if you drew a plumb line down from the center of the X, it would pass almost through the fifth shot.
That was disconcerting, but since I had never had any trouble with this scope before, I assumed it was a load problem (too little powder?), or simple driver error (maybe I flinched or yanked the trigger?). Accordingly, I didn’t do anything about the scope, figuring the problem was me or the load.

But, at the next range session, things went downhill fast. In three shots, I did manage to get on steel at 600, with my normal come-up for that distance. Everything seemed fine. So then I switched to paper. We had a buddy in the pits with a walkie-talkie and he radioed that he couldn’t see any bullet holes in the paper after five shots. My spotter said he thought the bullets were impacting in the dirt, just below the paper. OK, I thought, we’ll add 3 MOA up (12 clicks), and that should raise POI 18″ and I should be on paper, near center. That didn’t work — now the bullets were impacting in the berm ABOVE the target frame. The POI had changed over 48″ (8 MOA). (And no I didn’t click too far — I clicked slowly, counting each click out loud as I adjusted the elevation.) OK, to compensate now I took off 8 clicks which should be 2 MOA or 12″. No joy. The POI dropped about 24″ (4 MOA) and the POI also moved moved 18″ right, to the edge of the target.
 For the next 20 shots, we kept “chasing center” trying to get the gun zeroed at 600 yards. We never did. After burning a lot of ammo, we gave up. Before stowing the gun for the trip home, I dialed back to my 100-yard zero, which is my normal practice (it’s 47 clicks down from 600-yard zero). I immediately noticed that the “feel” of the elevation knob didn’t seem right. Even though I was pretty much in the center of my elevation (I have a +20 MOA scope mount), the clicks felt really tight — as they do when you’re at the very limit of travel. There was a lot of resistance in the clicks and they didn’t seem to move the right amount. And it seemed that I’d have four or five clicks that were “bunched up” with a lot of resistance, and then the next click would have almost no resistance and seem to jump. It’s hard to describe, but it was like winding a spring that erratically moved from tight to very loose. For the next 20 shots, we kept “chasing center” trying to get the gun zeroed at 600 yards. We never did. After burning a lot of ammo, we gave up. Before stowing the gun for the trip home, I dialed back to my 100-yard zero, which is my normal practice (it’s 47 clicks down from 600-yard zero). I immediately noticed that the “feel” of the elevation knob didn’t seem right. Even though I was pretty much in the center of my elevation (I have a +20 MOA scope mount), the clicks felt really tight — as they do when you’re at the very limit of travel. There was a lot of resistance in the clicks and they didn’t seem to move the right amount. And it seemed that I’d have four or five clicks that were “bunched up” with a lot of resistance, and then the next click would have almost no resistance and seem to jump. It’s hard to describe, but it was like winding a spring that erratically moved from tight to very loose.
At this point I announced to my shooting buddies: “I think the scope has taken a dump.” I let one buddy work the elevation knob a bit. “That feels weird,” he said: “the clicks aren’t consistent… first it doesn’t want to move, then the clicks jump too easily.”
Convinced that I had a real problem, the scope was packed up and shipped to the manufacturer. So, was I hallucinating? Was my problem really just driver error? I’ve heard plenty of stories about guys who sent scopes in for repair, only to receive their optics back with a terse note saying: “Scope passed inspection and function test 100%. No repairs needed”. So, was my scope really FUBAR? You bet it was. When the scope came back from the factory, the Repair Record stated that nearly all the internal mechanicals had been replaced or fixed: “Replaced Adjustment Elevation; Replaced Adjustment Windage; Reworked Erector System; Reworked Selector; Reworked Parallax Control.”
How to Diagnose Scope Problems
When you see your groups open up, there’s a very good chance this is due to poor wind-reading, or other “driver error”. But my experience showed me that sometimes scopes do go bad. When your accuracy degrades without any other reasonable explanation, the cause of the problem may well be your optics. Here are some of the “symptoms” of scope troubles:
1. Large shot-to-shot variance in Point of Impact with known accurate loads.
2. Uneven tracking (either vertical or horizontal).
3. Change of Point of Impact does not correspond to click inputs.
4. Inability to zero in reasonable number of shots.
5. Unexpected changes in needed click values (compared to previous come-ups).
6. Visible shift in reticle from center of view.
7. Changed “feel” or resistance when clicking; or uneven click-to-click “feel”.
8. Inability to set parallax to achieve sharpness.
9. Turrets or other controls feel wobbly or loose.
10. Internal scope components rattle when gun is moved.
Source of Problem Unknown, but I Have a Theory
Although my scope came with a slightly canted reticle from the factory, it had otherwise functioned without a hitch for many years. I was able to go back and forth between 100-yard zero and 600-yard zero with perfect repeatability for over five years. I had confidence in that scope. Why did it fail when it did? My theory is side-loading on the turrets. I used to carry the gun in a thick soft case. I recently switched to an aluminum-sided hard case that has pretty dense egg-crate foam inside. I noticed it took some effort to close the case, though it was more than big enough, width-wise, to hold the gun. My thinking is that the foam wasn’t compressing enough, resulting in a side-load on the windage turret when the case was clamped shut. This is just my best guess; it may not be the real source of the problem. Remember, as I explained in the beginning of this story, sometimes scopes — just like any mechanical system — simply stop working for no apparent reason.
June 10th, 2014
Father’s Day (Sunday, June 15) is right around the corner. If dad enjoys hunting, here’s a way to save fifty bucks on a nice gift for the old man. Now through June 15, 2014, Zeiss is offering a $50.00 rebate on the TERRA 3X series rifle-scopes or TERRA ED Binoculars. The scopes offer 1/4-MOA clicks with a choice of standard Z-Plex or RZ6 or RZ8 ballistic reticles. Pick your power: 2-7x32mm, 3-9x42mm, 4-12x42mm, 3-9x50mm, and 4-12x50mm. CLICK Here for more details.
If you’re wondering about these binoculars, trust us, they are high quality. TERRA ED Binoculars feature SCHOTT ED glass — just about the best you can get. These binocs, in 8x42mm or 10x42mm versions, offer great low-light performance and a wide-angle field of view.


May 22nd, 2014
 Forum member Jacob spotted this simple, but effective set of scope ring inserts on the Brownells Website. With these inserts, you can use a scope with 1″-diameter main tube in 30mm rings. Non-marring, matte black Delrin sleeves surround the scope tube so it can fit larger-diameter rings. Each sleeve comes in two parts for easy installation around your scope tube. This way you can use the same 30mm rings for all your scopes. Forum member Jacob spotted this simple, but effective set of scope ring inserts on the Brownells Website. With these inserts, you can use a scope with 1″-diameter main tube in 30mm rings. Non-marring, matte black Delrin sleeves surround the scope tube so it can fit larger-diameter rings. Each sleeve comes in two parts for easy installation around your scope tube. This way you can use the same 30mm rings for all your scopes.
Ring Reducers are sold as front/rear kits. Cost is just $19.99 for the 1″ to 30mm converters, item 084-000-091. There are also sets that reduce 30mm rings to 25mm, and 1″ rings to 3/4″ or 7/8″.
Note: These Brownells units simply function as plastic bushings. Unlike Burris Signature Ring inserts, they do not allow you to “pre-load” windage or elevation. If your rings are misaligned, the Brownells Ring Reducers won’t correct that problem.
April 22nd, 2014
Looking for a good, solid scope for your hunting or varmint rifle, but don’t want to spend more than $400.00? Here’s your opportunity. Natchez Shooting Supplies just slashed prices on the Weaver Classic Extreme Series of rifle scopes. This is a major price cut. Scopes that previously retailed for $500 or more are now being sold for $300-$350.00. Here’s an example, the Weaver Classic Extreme 8-32x50mm is going for $499.99 on eBay but Natchez has it for $349.95. And the Weaver 4-16x50mm Classic Extreme scope is now just $299.95, also marked way down from the original $500+ price. These scopes offer 30mm maintubes, 95% light transmission, multi-coated optics, and fast-focus eyepieces.
Quantities are limited and prices are subject to change. CLICK HERE for Natchez Sale Inventory.
 Sale Tip by EdLongrange. We welcome reader submissions.
.
April 18th, 2014
 Here’s a cool new optics mount at a very attractive price — just $87.95. Midsouth Shooter’s Supply is now featuring the Warne Skeletonized integrated scope mount for Picatinny Rails. This should work great on flat-top ARs. And for you fashionistas out there, the Warne mount is offered in four different colors: Matte Black, Dark Earth (tan), Ruby Red, and Bold Blue. Tactical shooters will probably pick black or tan sets, while image-conscious 3-Gun competitors might favor the Red or Blue versions. Here’s a cool new optics mount at a very attractive price — just $87.95. Midsouth Shooter’s Supply is now featuring the Warne Skeletonized integrated scope mount for Picatinny Rails. This should work great on flat-top ARs. And for you fashionistas out there, the Warne mount is offered in four different colors: Matte Black, Dark Earth (tan), Ruby Red, and Bold Blue. Tactical shooters will probably pick black or tan sets, while image-conscious 3-Gun competitors might favor the Red or Blue versions.
These Warne integrated ring/mount sets are offered for 1″, 30mm, and 34mm rings. The 1″ and 30mm versions come in all four (4) colors and cost $87.95. The 34mm is offered in Matte Black only for $115.00. You may want to order soon. These are popular. The most popular colors (black and dark earth) could sell out quickly at this price.


March 23rd, 2014
Need a first-rate scope for you new rifle? How would you like to get a Nightforce for a great price? Well, you’re in luck. Lilja Precision Rifles (“Lilja”) has placed its entire inventory of late-model Nightforce scopes on sale. The reason is that Lilja has decided to stop selling scopes and focus on its primary barrel-making business. Dan Lilja says that: “We have been a Nightforce dealer since Nightforce’s first year in business. But we’ve made the decison to leave the scope-selling business… and concentrate on our barrels. That part of our business is excellent and taking all of our time.”

Show below are the scopes on sale with regular price and sale price. Quantities are limited and these scopes are being sold “First Come, First Serve”. Prices are limited to stock on hand and do not include shipping. Scopes are not returnable – all sales final.

Lilja explains that some of these prices are well below MAPP (Minimum Advertised Price Policy) because they are for discontinued products. From time to time, Nightforce changes reticle combinations (or other features) and an product number (sku) becomes obsolete. Lilja also has some optics accessories for sale, such as rings and bases, PC programs, torque wrenches and other small items. Call (406) 826-3084 for availability or visit Lilja Precision Rifles.
Sale tip from EdLongrange. We welcome reader submissions.
January 30th, 2014
 Nightforce makes great scopes — just ask the man who owns one. Here’s your chance to get a Nightforce NXS, Benchrest, or Competition scope at a big discount. Bullets.com has acquired a large selection of 2013-model Nightforce scopes, and these are now being offered at sale prices. You can save hundreds of dollars on a scope (compared to original retail prices). For example the 5-22x56mm NXS is on sale for $1495.00. This same 2013 optic retails elsewhere for $1830.00 or more. The 2013 15-55x52mm Competition scope is $1840.00. Compare that to $2352.00 for a 2014-edition 15-55 Comp scope. Nightforce makes great scopes — just ask the man who owns one. Here’s your chance to get a Nightforce NXS, Benchrest, or Competition scope at a big discount. Bullets.com has acquired a large selection of 2013-model Nightforce scopes, and these are now being offered at sale prices. You can save hundreds of dollars on a scope (compared to original retail prices). For example the 5-22x56mm NXS is on sale for $1495.00. This same 2013 optic retails elsewhere for $1830.00 or more. The 2013 15-55x52mm Competition scope is $1840.00. Compare that to $2352.00 for a 2014-edition 15-55 Comp scope.
These special offers are limited to scopes in inventory. When they’re gone, they’re gone. When shopping online, go to the Bullets.com Nightforce Promo Page, and click on a particular model. In the detail page that opens you will see full specifications, including objective size, turret click value, and reticle type. Here are the specific Nightforce scopes on sale at Bullets.com:

Before placing your order with Bullets.com, be sure you are 100% certain about the model you are ordering. Some scopes with the same magnification range come with a choice of either 50mm objective or 56mm objective. Likewise, there are various reticles offered for each basic model, and Nightforce offers 1/4 MOA clicks on some scopes, with 1/8 MOA clicks on others.
December 27th, 2013
Nightforce Optics has introduced a new medium-magnification, second-focal plane scope for hunters and tactical shooters. Described as “the most affordable Nightforce riflescope [offered] to date”, the all-new 4-14x56mm SHV will sell for $995.00 (non-illuminated model) or $1195.00 with an illuminated reticle. The “SHV” stands for ShooterHunterVarminter™, reflecting this scope’s versatility — it can be used for a wide variety of applications. The SHV has plenty of travel for long-range use: 100 MOA of elevation adjustment and 70 MOA of horizontal (windage) travel. Two reticle options will initially be offered, the basic IHR (Int’l Hunting Reticle) with floating center cross-hair, and the popular MOAR reticle with 1-MOA vertical and horizontal hash marks.

The 4-14 SHV scope represents a new direction for Nightforce. The optics-maker kept the price under $1000.00 by “limiting some options, offering simpler controls, and using a less complex manufacturing process.” Nightforce said the goal with the SHV was to offer a scope priced “within the reach of a wider range of hunters and shooters who don’t need the ‘overbuilt’ characteristics of our NXS™ series, most of which were originally created to withstand actual combat conditions.”


The 4-14x56mm SHV weighs 26.8 oz. for the basic version, and 28.5 oz. for the illuminated model. Full specifications are listed below. CLICK HERE for 2014 Nightforce Catalog.

November 2nd, 2013
 Many folks struggle when they sight-in a scoped rifle for the first time. A very common mistake is clicking the turrets in the wrong direction. That’s frustrating and it wastes ammo. Another common problem occurs when people sight-in at a distance other than 100 yards. People sometimes struggle to figure out how many clicks they need to correct point of impact if they’re zeroing at 200, 250, or 300 yards. Many folks struggle when they sight-in a scoped rifle for the first time. A very common mistake is clicking the turrets in the wrong direction. That’s frustrating and it wastes ammo. Another common problem occurs when people sight-in at a distance other than 100 yards. People sometimes struggle to figure out how many clicks they need to correct point of impact if they’re zeroing at 200, 250, or 300 yards.
To make the sight-in process more fool-proof, AccuScope has released two handy Apps for smart phone users. Whether used for initial sight-in or in-the-field adjustments, these smartphone Apps can get you zeroed quickly and reliably.

Using the Apps is easy. First, boresight the gun to get on paper. After the gun is fouled-in (so it is shooting normally) shoot a carefully aimed 3-shot group. Then go to the target and measure the vertical and horizontal distance from the 3-shot group center to your aiming point. Input those numbers into the App, along with your sight-in distance (from muzzle to target). The App then calculates exactly how many elevation and/or windage clicks you must crank into your scope to move point-of-impact to point of aim. Put in the specified clicks and then take a fourth shot to confirm your zero. The fourth shot should impact right on your point of aim (within the limits of the gun’s inherent accuracy.)
Given Murphy’s Law, a shooter can still mess things up if he inputs left clicks when the App calls for right clicks, or inputs down clicks when he needs up clicks. But as long as you look at the “R/L” and “Up/Down” labels on your turrets before spinning the knobs, you shouldn’t have any problems.
AccuScope is available in two versions, Standard and Premium. The $4.99 Standard version works for 1/4 MOA-click-value scopes. The $9.99 Premium version works with all scopes and any click values. The Premium version works with 1/8 MOA clicks, 1/4 MOA clicks, Metric clicks, or Milrad segment click values. So, if you have a scope with 1/8 MOA clicks, you’ll need the Premium version.
AccuScope iPhone Apps are available through Apple’s App Store: Standard | Premium
AccuScope Android Apps are available through the AppBrain Store: Standard and Premium
Editor’s Comment: Does this App really provide a solution you can’t figure out yourself with simple arithmetic? No, but some math-challenged guys may find that the App prevents errors. Additionally, following the step-by-step process used by the App will probably help some shooters avoid confusion, and avoid wasting ammo clicking in the wrong directions.
Note however, that there is an even simpler way to zero, if you have a very solid front and rear rest that will hold the gun absolutely steady while you click. After bore-sighting, fire a couple rounds (with the same point of aim). Then place the rifle so the center of the cross-hairs is exactly on your original point of aim. Next, without disturbing the gun in any way, dial your turrets so that the center of the cross-hair moves over the center of your group. That’s it. You’re now zeroed (though you may want to repeat the process for confirmation). Again, this only works if the gun doesn’t shift one bit when you’re clicking. Having a helper steady the gun as you click the turrets will make this “no-math” method work more effectively.
Click-to-Initial POI Zeroing Method Demonstrated
Product Tip by EdLongrange. We welcome reader submissions.
|


