Do you use bushings to size your case-necks? Are you assuming that your bushings are actually round on the inside, with a hole that’s centered-up properly? Well you may be in for an unpleasant surprise, based on what our friend Jim de Kort recently discovered. Jim was concerned about the run-out on his brass. His cases went into his bushing-equipped FL die pretty straight, but came out of the die with up to .004″ run-out. “What gives?”, Jim wondered. “Could the problem be the bushings themselves?”
To answer that question, Jim decided to examine his bushings. Using an Accuracy One Wheel-drive concentricity gauge, Jim checked out some of his neck bushings. What he discovered may surprise you…
Neck Bushing Flaws Revealed
Trust no one… — Jim de Kort
Jim writes: “I measured the concentricity of my 6BR rounds today. I noticed they went into the neck-bushing equipped full-length sizing die with less than .001″ deviation but came out with .003-.004″. The culprit, it appears, was the bushing itself. Without it the cases stayed within .0005″ to .001″ deviation, so something was happening with the bushing.
One bushing had .00025″ deviation on the outside, yet almost .003″ on the inside, so it is crooked. But even when using a bushing that is within .001″ I still get .003″ runout after sizing. I repeated the same procedure for my 6×47 and got the same results. When using the bushing, concentricity suffers a lot.”
Before we bash the bushing-makers, we must acknowledge that many different things can contribute to excessive run-out and/or mis-alignment of case-necks. We don’t have all the answers here, and Jim would be the first to say that some mysteries remain. Still, these are interesting results that give all precision hand-loaders something to think about.
Jim Borden of Borden Accuracy also offers this tip: “Check the trueness of the face of the die cap. That has more to do with trueness than the bushing. Also check perpendicularity of hole in bushing to top surface. When I was making dies, the cap was made by threading and facing the threaded tenon in same setup.”
Editor’s Comment: Many people have great results with neck-bushing dies, but Jim isn’t the only fellow who has seen some very odd results. I personally employ honed, non-bushing dies for many of my chamberings. These non-bushing dies (with the necks honed for .002-.003″ neck tension) produce extremely straight ammo, with run-out consistently under .0015″.
For this Saturday-at-the-Movies session we offer a selection of videos featuring interesting tools and products for handloaders. If you spend much time in your reloading room, these tools can save you time and help you load better ammo in less time. Today’s feature products range from sophisticated, premium tools such as 21st Century powered neck-turning lathe, to basic add-ons such as Lee Breech Lock Bushings, which are very handy if you load a variety of cartridge types.
21st Century Powered Neck-Turning Lathe
Power is activated by the red button on the end of the blue, horizontal feed handle:
Do you neck-turn hundreds of cases annually? Then you deserve this outstanding tool. The 21st Century Innovation Powered Neck-Turning Lathe may well be quite simply the best system ever created for quickly and precisely uniforming (and reducing) the neckwall thickness of cartridge brass. We have the original manual 21st Century neck-turning lathe, and can attest that it works great. With this powered system you can turn necks faster and more efficiently, with less effort. This is like going from a stick shift to an automatic transmission. The cases feed very smoothly and the results are beautiful. Note: The videos show the version as first marketed by 21st Century Shooting, which now operates as 21st Century Innovation.
The Powered Neck-Turning lathe is a modular system. Swing the bar from right to left to feed the case. The power head (with case holder) glides on stainless steel rails for smooth movement. This allows very precise feed rate. Power is supplied via a button that is built into the end of the feed handle. Push the red button to make the case spin. It’s as simple as that.
Hornady OAL Tool and Hornady Bullet Comparator
Gun Tech Steve Ostrem explains how to properly use Hornady’s Overall Length Gauge to determine length-to-land precisely. The OAL Gauge uses a “Modified Case” that threads onto the tool and holds a bullet. Push on the back of the gauge until you feel the bullet just touch the rifling. (We do this gently at first, tapping the rod a couple time to ensure the bullet is aligned correctly). Once you’ve got the length, then use the tool with a comparator on your calipers to get the length-to-lands. NOTE: We recommend taking the measurement 3-4 times in a row to get a reliable number. With a little practice your should be able to get repeatable measurements within .0015″.
Henderson Power Case Trimming/Chamfering Machine Test
F-Class John tests some of the finest reloading and shooting equipment you can buy. Recently he added the impressive Henderson Gen 3 Powered Trimmer to his inventory of tools. John is now a Henderson fan. He likes the speed, precision, and repeatability of the $779.00 Henderson machine, which trims-to-length and chamfers the case mouth all in one pass. Unlike some other trimming tools, the Henderson indexes off the overall case length NOT the shoulder. John found this worked just fine for his .284 Winchester brass, which has all been full-length sized prior to trimming.
Watch the video to see the Henderson trimmer in action. The dual, parallel horizontal support shafts provide precise alignment of the case as it moves inward toward the cutter blade. The Taper-Lock cutter provides a 14-degree inside chamfer and 30-degree outside chamfer. The trimming process is very consistent case after case, and the Henderson’s design captures brass shavings effectively.
This related video shows a comparison with the popular Giraud Powder Trimer
As noted in this comparison, John liked the precision of the Henderson trimmer and the overall design of the machine, which offers good ergonomics and very precise alignment of the cases. Cycling is smooth and positive, as you can see from the videos. The Giraud is also an excellent machine for bulk trimming/chamfering but the Henderson has some advantages.
Concentricity Checking with Accuracy One Gauge
Every serious hand-loader needs a quality concentricity gauge. The Accuracy One Concentricity Gauge boasts a smart design that delivers precise, repeatable results. We like the unit’s easy adjustability and its ability to work in a variety of configurations. The Accuracy One Gauge measures internal and external neck runout of cartridge cases as well as seated bullet runout. It can also measure the runout of the ogive, bearing surface, and boat-tail of individual bullets. And it can even measure your primer pocket runout.
Tools Galore — Affordable Tools and Accessories for Reloaders
This detailed 15-minute video from the Bolt Action Reloading YouTube Channels, features a variety of lower-cost products/tool that help with key reloading tasks. The video looks at hand priming tools, case prep tools, Lyman stepped loading blocks, powder tricklers, expander mandrels, powder trickler, long-tube funnels and more! If you are getting started in hand-loading, this is a very helpful video to watch. It covers a lot of ground, illustrating options for tool types.
This Lyman case prep tool is one of many products reviewed in this 15-minute video.
Today is Friday the 13th. For those of you who are superstitious — maybe you should avoid climbing ladders, playing the stock market, or using power tools today.
When it comes to shooting, there are many things that shooters chalk up to “bad luck”. In fact, most of these instances of “bad fortune” just come from a failure to anticipate problems. When you have a major, critical problem at a shooting match, i.e. a “train wreck”, this can be the end of your weekend. In this article, Ballistics Guru Bryan Litz talks about “train wrecks” and how to avoid them, even if you are shooting on Friday the 13th. As Bryan told us: “I don’t believe in superstition — we make our own luck!”
How to Avoid “Train Wrecks” In Competition
In any shooting competition, you must try to avoid major screw-ups that can ruin your day (or your match). In this article, past F-TR National Mid-Range and Long Range Champion Bryan Litz talks about “Train Wrecks”, i.e. those big disasters (such as equipment failures) that can ruin a whole match. Bryan illustrates the types of “train wrecks” that commonly befall competitors, and he explains how to avoid these “unmitigated disasters”.
Urban Dictionary “Train Wreck” Definition: “A total @#$&! disaster … the kind that makes you want to shake your head.”
Success in long range competition depends on many things. Those who aspire to be competitive are usually detail-oriented, and focused on all the small things that might give them an edge. Unfortunately it’s common for shooters lose sight of the big picture — missing the forest for the trees, so to speak.
Consistency is one of the universal principles of successful shooting. The tournament champion is the shooter with the highest average performance over several days, often times not winning a single match. While you can win tournaments without an isolated stellar performance, you cannot win tournaments if you have a single train wreck performance. And this is why it’s important for the detail-oriented shooter to keep an eye out for potential “big picture” problems that can derail the train of success!
Train wrecks can be defined differently by shooters of various skill levels and categories. Anything from problems causing a miss, to problems causing a 3/4-MOA shift in wind zero can manifest as a train wreck, depending on the kind of shooting you’re doing.
Below is a list of common Shooting Match Train Wrecks, and suggestions for avoiding them.
1. Cross-Firing. The fastest and most common way to destroy your score (and any hopes of winning a tournament) is to cross-fire. The cure is obviously basic awareness of your target number on each shot, but you can stack the odds in your favor if you’re smart. For sling shooters, establish your Natural Point of Aim (NPA) and monitor that it doesn’t shift during your course of fire. If you’re doing this right, you’ll always come back on your target naturally, without deliberately checking each time. You should be doing this anyway, but avoiding cross-fires is another incentive for monitoring this important fundamental. In F-Class shooting, pay attention to how the rifle recoils, and where the crosshairs settle. If the crosshairs always settle to the right, either make an adjustment to your bipod, hold, or simply make sure to move back each shot. Also consider your scope. Running super high magnification can leave the number board out of the scope’s field view. That can really increase the risk of cross-firing.
2. Equipment Failure. There are a wide variety of equipment failures you may encounter at a match, from loose sight fasteners, to broken bipods, to high-round-count barrels that that suddenly “go south” (just to mention a few possibilities). Mechanical components can and do fail. The best policy is to put some thought into what the critical failure points are, monitor wear of these parts, and have spares ready. This is where an ounce of prevention can prevent a ton of train wreck. On this note, if you like running hot loads, consider whether that extra 20 fps is worth blowing up a bullet (10 points), sticking a bolt (DNF), or worse yet, causing injury to yourself or someone nearby.
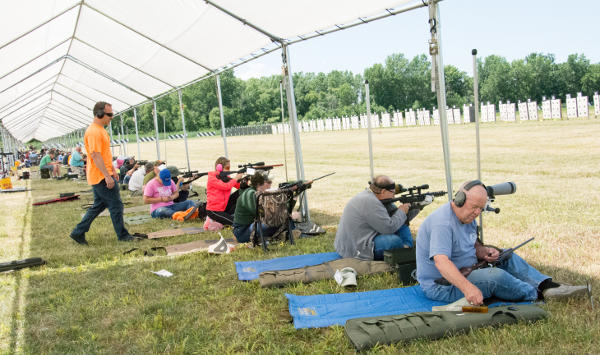
[Editor’s Note: The 2016 F-Class Nationals will employ electronic targets so conventional pit duties won’t be required. However, the following advice does apply for matches with conventional targets.]
3. Scoring/Pit Malfunction. Although not related to your shooting technique, doing things to insure you get at least fair treatment from your scorer and pit puller is a good idea. Try to meet the others on your target so they can associate a face with the shooter for whom they’re pulling. If you learn your scorer is a Democrat, it’s probably best not to tell Obama jokes before you go for record. If your pit puller is elderly, it may be unwise to shoot very rapidly and risk a shot being missed (by the pit worker), or having to call for a mark. Slowing down a second or two between shots might prevent a 5-minute delay and possibly an undeserved miss.
4. Wind Issues. Tricky winds derail many trains. A lot can be written about wind strategies, but here’s a simple tip about how to take the edge off a worse case scenario. You don’t have to start blazing away on the command of “Commence fire”. If the wind is blowing like a bastard when your time starts, just wait! You’re allotted 30 minutes to fire your string in long range slow fire. With average pit service, it might take you 10 minutes if you hustle, less in F-Class. Point being, you have about three times longer than you need. So let everyone else shoot through the storm and look for a window (or windows) of time which are not so adverse. Of course this is a risk, conditions might get worse if you wait. This is where judgment comes in. Just know you have options for managing time and keep an eye on the clock. Saving rounds in a slow fire match is a costly and embarrassing train wreck.
5. Mind Your Physical Health. While traveling for shooting matches, most shooters break their normal patterns of diet, sleep, alcohol consumption, etc. These disruptions to the norm can have detrimental effects on your body and your ability to shoot and even think clearly. If you’re used to an indoor job and eating salads in air-conditioned break rooms and you travel to a week-long rifle match which keeps you on your feet all day in 90-degree heat and high humidity, while eating greasy restaurant food, drinking beer and getting little sleep, then you might as well plan on daily train wrecks. If the match is four hours away, rather than leaving at 3:00 am and drinking five cups of coffee on the morning drive, arrive the night before and get a good night’s sleep.”
Keep focused on the important stuff. You never want to lose sight of the big picture. Keep the important, common sense things in mind as well as the minutia of meplat trimming, weighing powder to the kernel, and cleaning your barrel ’til it’s squeaky clean. Remember, all the little enhancements can’t make up for one big train wreck!
They say that a man can never have too much money or too much time. Darrell Jones would add that a man can never have too many BR-based rifles. Darrell had a fleet of BRs, in 22 BR, 6mm BR, 6.5 BR, 7 BR, and 30 BR. But he was intrigued by the potential of a rifle in the .257 caliber. Could it shoot as well as a 6mm BR? Could it challenge the more popular calibers in the highly competitive 600-yard benchrest game? Through careful research and component selection, Darrell created a 25 BR rifle that proves the viability of the 25 BR as a competition round. Pushing 115gr high-BC Berger bullets at 2837 fps, Darrell’s 25 BR “Peppermint” won first place in its very first match.
The Barely Bigger BR — Exploring the .25 Caliber Option
Rifle Report by Darrell Jones
I decided to build a 25 BR after several weeks of deliberation and ruling out a .257 Ackley Improved. Part of my dilemma was that I wanted to shoot F-Class competition at 600 yards, and I was unsure about the accuracy potential of the 25 BR. However, I currently have several BRs chambered in 22 BR, 6BR, 6.5 BR, 7 BR, and 30 BR and they all shoot exceptionally well at 600 yards. This lead me to believe a 25 BR should deliver fine accuracy, just like its other BR siblings. Why wouldn’t a 25 BR shoot accurately provided that I built it with the right components? The feasibility saga began. I began searching diligently for custom 25-caliber bullets. Unfortunately, there are not many 25-caliber custom bullet makers. I actually found only two custom bulletsmiths who produce the 25s. I did look at Fowlers and then looked at Bergers. Both Jeff Fowler and Berger made 110-grain flat-base bullets when I was looking. [Editor — this 110gr bullet is no longer listed by Berger]. The Berger 110gr FB bullets (.414 ballistic coefficient) shot very well out of my 12-twist 25-06 Ackley. However, I wanted to shoot a heavier bullet if possible. Berger makes a 25-caliber 115gr VLD boat-tail with a high ballistic coefficient. This needs a 10-twist barrel.
Panda Action, McMillan Stock, Weaver T-36
As you can see, I went with a Panda polished action and a weighted McMillan BR stock painted metallic silver with red candy cane stripes thus the name “Peppermint”. This gun actually does double duty now as a 25 BR and 6 PPC switch barrel. When I want to run the gun as a 6 PPC for short range, I simply screw on the PPC barrel, then swap in a bolt (fitting the PPC bolt face) from another Panda action I own. That’s one advantage of owning custom Kelbly actions! Don’t even think about exchanging bolts between factory guns. Kelbly rings and a Weaver T-36 fixed-power scope handle the optical duties while a Jewell trigger set at one ounce takes care of the firing mechanism.
Chambering for the .25 Caliber BR Wildcat
I wanted a chamber that would let me shoot both the 110s and the 115s. I took some time surfing the net looking for rental reamers that had suitable throat dimensions. I found that Elk Ridge Reamer Rentals had a 25 BR pilot reamer available. I called and Elk Ridge faxed me a reamer diagram that indicated it was designed to tight SAMMI specs. I asked how often was the reamer used and was told “not very often”.
I did want a minimum no-turn neck optimized for Lapua brass. The drawing indicated that the reamer would cut a .281″ neck and a throat of 1.0315″. This was very close to ideal, though I did have to turn two thousandths off the necks of Lapua 6BR brass after I necked it up. I resized using a .277″ bushing and the loaded rounds came out to be .279″. Realizing that this was in the ball park, I decided to go with the Elk Ridge Reamer and build a 25 BR that could shoot 110gr or 115gr bullets. Now the question was where to get a match-grade 25-caliber barrel. I called quite a few of the custom barrel-makers, including BlackStar Barrels in Texas (no longer operating). I have had wonderful success with the BlackStar barrel on my 6BR “Chantilly” — it delivered great accuracy and impressive velocities. Since the 25 BR was so similar, I went with another BlackStar. I ordered a 10-twist, 6-groove, 1.250″-diameter straight-contour tube.
After chambering, the barrel finished at 1.245″ diameter and 27.5″ inches with an 11° crown. I actually had the throat lengthened to accept both Berger 110gr and 115gr bullets. The bases of the FB 110-grainers sit flush with the neck-shoulder junction, when they are seated .010″ into the lands. With the longer 115gr VLDs, the bottom of the bearing surface (i.e. start of boat-tail) is just about even with the neck-shoulder junction.
Accurate Load Development
The barrel broke in easily with just 10 shots, using a “shoot one and clean” process. The load I started with was 31.5 grains of Varget with CCI 450 primers. The Berger 110s and Berger 115s had the same Point of Impact (POI) at 100 yards. However, the 115s impacted two inches higher at 600 yards with the same load. That shows the benefits of a higher BC. Pushed by the CCI 450s and 31.5 grains of Varget, the 115-grainers were running about 2837 FPS. I boosted the load up to 32.0 grains but I noticed primer cratering, so I backed off, settling on 31.5 grains for the 115gr Berger VLD.
Peppermint Wins at 600 Yards
For her debut in competition, I took “Peppermint” to our local 600 yard F-class match. Shooting the Berger 115s with 31.5 grains Varget, she won with a perfect score of 200 with 14 Xs. At my club, we use a SR3 target. The X-Ring measures 3″ in diameter and the 10-Ring measures 7″. At the match there were some very good shooters with top-flight custom rifles in accurate calibers such as 6.5-284 and 22 Dasher. I was very fortunate to come out on top, but I give the credit to Peppermint’s good bench manners and outstanding accuracy.
As you can see from the target, “Peppermint” is a very accurate rifle that has proven herself in competition. It takes a good gun to finish “on top” in her very first match. So far, I’m very happy with the project, and more than satisfied with the accuracy of the 25 BR. This is definitely a worthy cartridge for Egg Shoots, 500m varmint matches, and the 600-yard F-Class game.
BR-Based Cartridge Comparison
CALIBER
22 BR
6mm BR
25 BR
6.5 BR
7 BR
30 BR
Bullet
80gr SMK
107gr SMK
115gr Berger
107gr SMK
130gr SMK
118gr BIB
BC
.420
.527
.522
.420
.391
na
Load Grains
31.0 H4350
30.0 Varget
31.5 Varget
32.0 Varget
34.0 AA2460
34.0 H4198
Barrel Length
27″
27″
27.5″
27.5″
28″
24″
Velocity
3100 fps
2880 fps
2837 fps
2851 fps
2719 fps
2970 fps
Comparing the BR-Based Variants
Now that I have several calibers in the BR cartridge family, (22 BR, 6mm BR, 6.5 BR, 7 BR, and a 30 BR), it is my humble opinion that they each have their own place. A varmint hunter’s dream, the 22 BR can push a bullet faster and more accurately than the 22-250. With an 8-Twist barrel, the 22 BR can send an 80gr SMK to 600 yards with extreme accuracy.
The 6 BR can do it all. The 6mm caliber offers a wide variety of quality bullets suitable for any shooting situation. All the major custom barrel makers produce outstanding 6mm barrels in a full range of twists. Moreover, since the 6 BR cartridge is so popular, there is a great store of knowledge about reloading for the 6 BR. It is easy to find a load that will shoot superbly in any bullet weight.
The 25 BR has proved to be easily tuneable, proficient and not fickle. You can obtain extreme accuracy without great effort in load development. The 115gr Berger offers a good high-BC projectile for this caliber, making the 25 BR a viable alternative to the 6 BR. As I’ve shown, it is competitive with a 6 BR in head to head competition.
Compared to the 25 BR, the 6.5 BR has a small edge in ballistics. However, there are not many light bullet choices available, especially from custom makers. The 123gr Lapua Scenar is an excellent bullet with a .547 stated BC, but it may be a bit heavy for the case capacity.
The 7 BR was designed for silhouette shooting, and it excels at that task. The 7 BR can push a 130 grain bullet fast enough to knock over the steel silhouettes at 500 meters with real consistency.
The 30 BR is nothing less than outstanding. The 30 BR is now the dominant cartridge on the benchrest Score-shooting circuit. It is also highly accurate for group shooting at 200 yards and very capable of winning a 600-yard F-Class match. Barrel life of over 6,000 rounds is realistic.
I like all the “flavors” of BR derived from the 6mm BR Norma case. However, if I could only have one BR in my safe, give me my 8-Twist, 6 BR “Chantilly” and I will be a happy camper. The final point I would make is if a cartridge is stamped BR on the case, it will shoot extremely accurately if you can.
Here are two different bullet types, seated to the same CBTO length, but different COAL. Note the shiny scratches on the bullets made by the comparator tool which indicates a point on the bullet ogive near where the ogive will engage the rifling.
Effects Of Cartridge Over All Length (COAL) And Cartridge Base To Ogive (CBTO) – Part 2 by Bryan Litz forBerger Bullets. Part One of this series focused on the importance of COAL in terms of SAAMI standards, magazine lengths, seating depths, and pressure levels. Another measure of length for loaded ammunition is highly important to precision, namely Cartridge Base to Bullet Ogive Length (CBTO).
Figure 2. Chamber throat geometry showing the bullet jump to the rifling or lands.
Look at Figure 2. Suppose the bullet was seated out of the case to the point where the base of the bullet’s nose (ogive) just contacted the beginning of the riflings (the lands) when the bolt was closed. This bullet seating configuration is referred to as touching the lands, or touching the riflings and is a very important measurement to understand for precision hand-loading. Due to the complex dynamics of internal ballistics which happen in the blink of an eye, the distance a bullet moves out of the case before it engages the riflings is highly critical to precision potential. Therefore, in order to systematically optimize the precision of his handloads, it’s critically important that the precision hand-loader understands how to alter bullet seating depth in relation to the barrel rifling. Part of the required knowledge is understanding how to accurately and repeatably measure the Cartridge Base To Ogive (CBTO) dimension. This is explained in the FULL ARTICLE.
Bryan Litz offers an extended discussion on how to measure CBTO using different tools and methods, including the Hornady OAL gauge. You can read this discussion in the full article found on the Berger Bullets website. CLICK HERE to Read Full Article.
Why Not Use CBTO as a SAAMI Standard?
If CBTO is so important to rifle accuracy, you might ask, “Why is it not listed as the SAAMI spec standard in addition to COAL?” There is one primary reason why it is not listed in the standard. This is the lack of uniformity in bullet nose shapes and measuring devices used to determine CBTO.
Benefits of Having a Uniform CBTO
There is another aspect to knowing your CBTO when checking your COAL as it pertains to performance. With good bullets, tooling, and carefully-prepared cases you can easily achieve a CBTO that varies less than +/- .001″ but your COAL can vary as much as .025″ extreme spread (or more with other brands). This is not necessarily bad and it is much better than the other way around. If you have a CBTO dimension that varies but your COAL dimension is tight (within +/- .002″) then it is most likely that your bullet is bottoming out inside the seater cone on the bullet tip. This is very bad and is to be avoided. It is normal for bullets to have precisely the same nose shape and it is also normal for these same bullets to have nose lengths that can vary as much as .025″.
Summary of Cartridge Base To Ogive (CBTO) Discussion
Here are four important considerations regarding bullet seating depth as it relates to CBTO:
1. CBTO is a critical measurement to understand for handloaders because it’s directly related to precision potential, and you control it by simply setting bullet seating depth.
2. Tools and methods for measuring CBTO vary. Most of the measurement techniques have pitfalls (which may give rise to inconsistent results) that you should understand before starting out.
3. A CBTO that produces the best precision in your rifle may not produce the best precision in someone else’s rifle. Even if you have the same rifle, same bullets, same model of comparator gauges, etc. It’s possible that the gauges are not actually the same, and measurements from one don’t translate to the same dimension for another.
4. Once you find the CBTO that produces the best precision in your rifle, it’s important to allow minimal variation in that dimension when producing quality handloads. This is achieved by using quality bullets, tooling, and properly preparing case mouths and necks for consistent seating.
Larry Medler has come up with a smart little invention — a simple, inexpensive Empty Chamber Indicator for rimfire rifles. It is made from a section of plastic “weed-wacker” line and a wooden ball from a hobby shop. Larry says he was inspired by Juniors who used something similar for their 17-Caliber Air Rifles.
How to Make the Empty Chamber Indicator
Construction Method: First, drill a 7/64″ diameter hole all the way through the 1″-diameter wooden ball. Then enlarge half of that 1″-long hole using a 13/64” diameter drill. Next insert an 8″ piece of heavy duty (0.095″ diameter) weed wacker line through the ball, leaving about 2″ on the side with the bigger-diameter hole. Then, with the short end of the line, fold over the last half-inch so the line is doubled-over on itself. Then slide the line into the ball, stuffing the doubled-over section through the 13/64″ (large) hole. Finally, pull the longer end of the line until the doubled-over section is flush with the outside of the ball. This gives you a sturdy line attachment without messy adhesives. When the assembly’s complete, hold the ECI by the tail and dip the ball in yellow paint. If you’re making more than one ECI, you can drill horizontal holes in a spare block of wood and use that as a drying rack.
At a Rimfire Sporter match like this, all shooters must have an Empty Chamber Indicator.
The Empty Chamber Indicator for Smallbore Rifles
Larry explains: “At all Highpower rifle matches, silhouette matches, and other shooting events I have attended, Open Bore Indicators (OBI), or what are now called Empty Chamber Indicators (ECI) have been mandatory. The NRA’s yellow ECI for Highpower rifles is easy to use and has been well-received by the shooters. However, I had not seen a truly workable ECI for 22 rimfire rifles — until I visited Michigan’s Washtenaw Sportsman’s Club where I saw juniors using ECIs for their 17 Caliber Air Rifles. Someone at the club made the empty chamber indicators by attaching an 8″ piece of weed wacker line to a 1″-diameter wooden ball, painted bright yellow. I now make similar ECIs for the 22 rimfire silhouette matches I run.”
If you don’t match your ammo to your chamber, bad things can happen, that’s for sure. A while back, Forum member BigBlack had an experience at the gun range that reminds us of the importance of safety when shooting. He encountered evidence that someone had fired the wrong cartridge in a 7mm WSM rifle. The problem is more common than you may think. This Editor has personally seen novices try to shoot 9mm ammo in 40 S&W pistols. BigBlack’s story is along those lines, though the results were much more dramatic. It’s too bad a knowledgeable shooter was not nearby to “intervene” before this fellow chambered the wrong ammo.
7mm-08 is Not the Same as a 7mm WSM
BigBlack writes: “I know this has probably been replayed a thousand times but I feel we can never be reminded enough about safety. This weekend at the range I found a ruptured case on the ground. My immediate thoughts were that it was a hot load, but the neck area was begging for me to take a closer look, so I did. I took home the exploded case and rummaged through my old cases until I found a close match. From my investigative work it appears someone shot a 7mm-08 in a 7mm WSM. Take a look. In the above photo I’ve put together a 7mm WSM case (top), the ruptured case (middle), and a 7mm-08 case (bottom).”
The photo reveals what probably happened to the 7mm-08 case. The shoulder moved forward to match the 7mm WSM profile. The sidewalls of the case expanded outward in the much larger 7mm WSM chamber until they lacked the strength to contain the charge, and then the case sides ruptured catastrophically. A blow-out of this kind can be very dangerous, as the expanding gasses may not be completely contained within the action.
Can’t Happen to You? Think Again.
This kind of mistake — chambering the wrong cartridge — can happen to any shooter who is distracted, who places even a single wrong round in an ammo box, or who has two types of ammo on the bench. One of our Forum members was testing two different rifles recently and he picked up the wrong cartridge from the bench. As a result, he fired a .30-06 round in a .300 Win Mag chamber, and the case blew out. Here is his story:
“I took two of my hunting rifles I have not used for over 25 years to the range yesterday to get new scopes on paper, a .30-06 and .300 Win Mag. I had four boxes of old Winchester factory ammo (two of each cartridge), which had near identical appearances. I accidentally chambered a .30-06 round in the Sako .300 Win Mag rifle. It sprayed powder on my face and cracked the stock at the pistol grip. If I had not been wearing safety glasses I might be blind right now.
You should always wear protective eyewear, EVERY time you shoot.
“I feel lucky and am very thankful for being OK — other than my face looks funny right now. I am also grateful for learning a valuable lesson. I will never put two different cartridges on the bench at the same time again.”
If you are considering purchasing a progressive reloading press — you’ve struck gold. Today’s Saturday at the Movies article showcases the most comprehensive video ever created about progressive presses. Hosted by Gavin Gear of UltimateReloader.com, this remarkable 79-minute video covers a dozen presses from six leading manufacturers: Dillon, Frankford Arsenal, Hornady, Lee, Mark 7 (Lyman), and RCBS.
Set aside plenty of time, because there is a wealth of information — the “mother lode” of progressive press coverage. Along with the big comparison video, Gavin has prepared a detailed, 17-page online article which covers all of the presses in the shootout. This 17-page article also includes many product-specific videos. We link to five of these videos below.
12 Progressive Presses are compared in this comprehensive video:
Here it is! Ultimate Reloader’s long-awaited Progressive Press Shootout. This online article and accompanying video represent the most exhaustive and most in-depth look at progressive press reloading equipment. The Ultimate Reloader Progressive Shootout covers a dozen different progressives from Dillon, Frankford Arsenal, Hornady, Mark 7 (Lyman), and RCBS. Reviewer Gavin Gear demonstrates how each press works and provides data on costs, output rates, capabilities, and accessories so that potential buyers can make informed purchasing decisions.
MORE INFO — Progressive Press Shootout Online Article
To accompany the remarkable 79-minute Progressive Press Shootout Video, Gavin Gear has posted a ton of information on his UltimateReloader.com website. A lengthy online article provides detailed information on the particular presses, press mounts, and lighting, as well as general details such as cost of ownership. We provide links to particular topics below. This is a GREAT RESOURCE — it’s like getting an entire chapter of a technical book all for FREE!
Below we provide links to each product-specific online page, along with the corresponding time-link to the related segment of the 79-minute Progressive Shootout video.
NOTE: Along with the presses featured in these six videos, the Ultimate Reloader Progressive Press Comparison video covers six other presses (12 total), in a comprehensive 1 hour 19 minute video linked at the top of this article.
The U.S. Army Marksmanship Unit (USAMU) published a series of reloading articles on its Facebook Page. In this article, the second in a 3-part series, the USAMU covers the process of loading competition pistol ammunition. The authors focus on two key elements — the taper crimp and the quality/uniformity of the original brass. If you shoot pistol competitively, or just want to maximize the accuracy of your handguns, read this article. The taper crimp tips are very important.
Loading Accurate Competition Pistol Ammunition — Part 2 of 3
Today, we resume our series on factors affecting accuracy in pistol handloads. Readers who missed Part One can visit our USAMU Facebook Page. Scroll down to March 28, 2018 to find that first installment which is worth reading.
One often-overlooked aspect of handloading highly-accurate pistol ammunition is the amount of taper crimp used, and its effect on accuracy. (NOTE: this article pertains to loading for semi-autos – revolver crimp techniques involve some quite different issues.) Briefly, different amounts of taper crimp are used with various handloads to obtain best accuracy. The amount is based on bullet weight, powder burn rate and charge, plus other factors such as case neck tension. During machine-rest testing of experimental Service Pistol ammunition, many variables are examined. Among these, our Shop often varies a load’s crimp in degrees of 0.001″ when re-testing for finest accuracy.
How to Measure Taper Crimp on Pistol Cartridges
One question that often arises is, “How do I measure the taper crimp I’m putting on my cartridges?” Using the narrow part of one’s dial caliper jaws, carefully measure the case diameter at the exact edge of the case mouth on a loaded cartridge. It’s important to take several measurements to ensure consistency. Also, be sure to measure at several places around the case mouth, as case wall thickness can vary. After measuring 2-3 cartridges with a given crimp setting, one can be confident of the true dimension and that it can be repeated later, if needed.
However, for good results, one must use brass from one maker due to variances in case wall thickness. For example, the same degree of crimp that imparts a measurement of 0.471″ with Brand X brass may result in 0.469″ with Brand Y. Thus, for best accuracy, using brass from the same manufacturer is important — particularly for 50-yard Slow Fire. In a perfect world, it is better still to use brass from one lot number if possible. With the popularity of progressive presses using interchangeable tool heads, keeping separate tool heads adjusted for each load helps maximize uniformity between ammunition lots.
Brass Uniformity and Accuracy
Brass is important to pistol accuracy. While accurate ammunition can be loaded using brass of mixed parentage, that is not conducive to finest results, particularly at 50 yards. It is important for the serious competitor to pay attention to his brass – even if only for the 50-yard “Slow Fire” portions of “Bullseye” matches and practice. By segregating brass as described above, and additionally keeping track of the number of times a given batch of cases has been fired, one can ensure case neck tension and case length are at their most uniform.
Given the large volumes of ammunition consumed by active pistol competitors, using inexpensive, mixed surplus brass for practice, particularly at the “short line” (25 yards), is understandable. In NRA Outdoor Pistol (“Bullseye”), the 10-ring is relatively generous — especially for a well-trained shooter with an accurate pistol and load. However, for the “long line” (50 yards), purchasing and segregating a lot of high-quality brass to be used strictly for slow-fire is a wise idea. To keep track of your brass on the line, use a unique headstamp marking with 1 or 2 colors of marking pen ink.
Uniform Cartridge Overall Length is Important
Cartridge case Overall Length (OAL) uniformity as it comes from the factory is important to achieving utmost accuracy. More uniform case lengths (best measured after sizing) contribute to greater consistency of crimp, neck tension, ignition/burn of powder charge, headspace (rimless cartridges), etc. Cartridge case-length consistency varies noticeably by maker and, with lesser manufacturers, also from lot to lot. Some manufacturers are more consistent in their dimensions than others, and also in the hardness/ductility of their brass. Similarly, pay attention to primer brands, powder lot numbers, etc.
Consider Using a Lock-Out Die with Progressive Presses
When reloading pistol ammo with a Progressive press, we strongly recommend the use of a lock-out die, or other system that can detect double charges or low charges. If your progressive is manually advanced, the possibility of a double charge is very real — and that can have disastrous consequences.
On UltimateReloader.com website you’ll find an excellent two-part series on the function and set-up of the RCBS Lock-Out Die. This die prevents loading if a high or low powder charge is detected. The video above shows setup of the RCBS Lock-Out Die on the Dillon XL-650 progressive press.
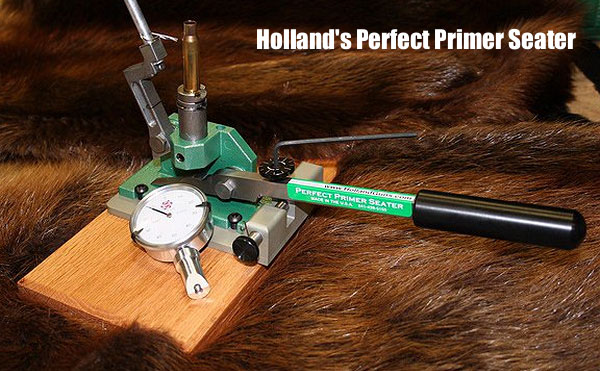
Gunsmith Darrell Holland sells a Priming Tool Adapter that upgrades the RCBS Auto Bench Priming Tool with key features — including primer seating depth control. If your hand starts to hurt after priming dozens of cases with a hand-held, squeeze-type priming tool, you may want to consider Holland’s invention, which he calls the “Perfect Primer Seater” (PPS).
Holland basically has modified the RCBS lever, adding a precise crush control and a means of measuring depth with a gauge. He claims this gives “an EXACT primer seating depth based on primer pocket depth and primer thickness”. With Holland’s PPS, primer seating depth is controlled with a rotating wheel that limits lever travel in precise gradations. You can buy the complete priming system for $340.00, or, if you already own the RCBS Auto Prime tool, you can purchase an adapter kit (with base, arm, adjuster, and gauge etc.) for $190.00. To order, visit Hollandguns.com Reloading Equipment Page. Look for the Perfect Primer Seater Adapter for $190.00 or order the Complete Unit for $340.00.
User Review by Tommy Todd
Sierra Bullets’ Chief Ballistician Tommy Todd acquired the Holland Perfect Primer Seater, and gave it a positive review. Todd writes: “This cartridge case priming system allows you to measure the primer pocket depth and adjust the seating tool to match the primer seating depth for a contact fit with a measured lot of primers to the cases you are working with. Mr. Darrell Holland has taken a standard RCBS automatic bench-mounted priming tool and modified it to a new level of precision. The modifications allow you to measure the primer pocket depth, primer height, and with the addition of an adjustable stop on the priming tool achieve precision primer seating, rather than how the primer ‘feels'[.]
If you are already utilizing the RCBS priming tool, Mr. Holland offers an adapter kit to upgrade your equipment. If you are looking for a new priming unit, I suggest giving this product a try. Increasing consistency when seating primers should result in smaller groups[.]”


 Train Wrecks (and How to Avoid Them)
 4. Wind Issues. Tricky winds derail many trains. A lot can be written about wind strategies, but here’s a simple tip about how to take the edge off a worse case scenario. You don’t have to start blazing away on the command of “Commence fire”. If the wind is blowing like a bastard when your time starts, just wait! You’re allotted 30 minutes to fire your string in long range slow fire. With average pit service, it might take you 10 minutes if you hustle, less in F-Class. Point being, you have about three times longer than you need. So let everyone else shoot through the storm and look for a window (or windows) of time which are not so adverse. Of course this is a risk, conditions might get worse if you wait. This is where judgment comes in. Just know you have options for managing time and keep an eye on the clock. Saving rounds in a slow fire match is a costly and embarrassing train wreck.


 I did want a minimum no-turn neck optimized for Lapua brass. The drawing indicated that the reamer would cut a .281″ neck and a throat of 1.0315″. This was very close to ideal, though I did have to turn two thousandths off the necks of Lapua 6BR brass after I necked it up. I resized using a .277″ bushing and the loaded rounds came out to be .279″. Realizing that this was in the ball park, I decided to go with the Elk Ridge Reamer and build a 25 BR that could shoot 110gr or 115gr bullets. Now the question was where to get a match-grade 25-caliber barrel. I called quite a few of the custom barrel-makers, including BlackStar Barrels in Texas (no longer operating). I have had wonderful success with the BlackStar barrel on my 6BR “Chantilly” — it delivered great accuracy and impressive velocities. Since the 25 BR was so similar, I went with another BlackStar. I ordered a 10-twist, 6-groove, 1.250″-diameter straight-contour tube.
 After chambering, the barrel finished at 1.245″ diameter and 27.5″ inches with an 11° crown. I actually had the throat lengthened to accept both Berger 110gr and 115gr bullets. The bases of the FB 110-grainers sit flush with the neck-shoulder junction, when they are seated .010″ into the lands. With the longer 115gr VLDs, the bottom of the bearing surface (i.e. start of boat-tail) is just about even with the neck-shoulder junction.
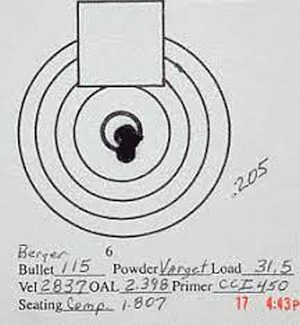 For her debut in competition, I took “Peppermint” to our local 600 yard F-class match. Shooting the Berger 115s with 31.5 grains Varget, she won with a perfect score of 200 with 14 Xs. At my club, we use a SR3 target. The X-Ring measures 3″ in diameter and the 10-Ring measures 7″. At the match there were some very good shooters with top-flight custom rifles in accurate calibers such as 6.5-284 and 22 Dasher. I was very fortunate to come out on top, but I give the credit to Peppermint’s good bench manners and outstanding accuracy.
 Now that I have several calibers in the BR cartridge family, (22 BR, 6mm BR, 6.5 BR, 7 BR, and a 30 BR), it is my humble opinion that they each have their own place. A varmint hunter’s dream, the 22 BR can push a bullet faster and more accurately than the 22-250. With an 8-Twist barrel, the 22 BR can send an 80gr SMK to 600 yards with extreme accuracy.

 Effects Of Cartridge Over All Length (COAL) And Cartridge Base To Ogive (CBTO) – Part 2


 User Review by Tommy Todd


