Here’a useful article by Sierra Bullets Media Relations Manager Carroll Pilant. This story, which originally appeared in the Sierra Bullets Blog, covers some of the more common ammo problems that afflict hand-loaders. Some of those issues are: excessive OAL, high primers, and improperly-sized cases. Here Mr. Pilant explains how to avoid these common problems that lead to “headaches at the range.
I had some gentlemen at my house last fall getting rifle zeros for an upcoming elk hunt. One was using one of the .300 short mags and every 3rd or 4th round would not chamber. Examination of the case showed a bulge right at the body/shoulder junction. These were new cases he had loaded for this trip. The seating die had been screwed down until it just touched the shoulder and then backed up just slightly. Some of the cases were apparently slightly longer from the base to the datum line and the shoulder was hitting inside the seating die and putting the bulge on the shoulder. I got to thinking about all the gun malfunctions that I see each week at matches and the biggest percentage stem from improper handloading techniques.
One: Check Your Cases with a Chamber Gage
Since I shoot a lot of 3-gun matches, I see a lot of AR problems which result in the shooter banging the butt stock on the ground or nearest solid object while pulling on the charging handle at the same time. I like my rifles too well to treat them that way (I cringe every time I see someone doing that). When I ask them if they ran the ammo through a chamber gage, I usually get the answer, “No, but I need to get one” or “I didn’t have time to do it” or other excuses. The few minutes it takes to check your ammo can mean the difference between a nightmare and a smooth running firearm.
A Chamber Gauge Quickly Reveals Long or Short Cases
Size Your Cases Properly
Another problem is caused sizing the case itself. If you will lube the inside of the neck, the expander ball will come out a lot easier. If you hear a squeak as the expander ball comes out of a case neck, that expander ball is trying to pull the case neck/shoulder up (sometimes several thousandths). That is enough that if you don’t put a bulge on the shoulder when seating the bullet … it can still jam into the chamber like a big cork. If the rifle is set up correctly, the gun will not go into battery and won’t fire but the round is jammed into the chamber where it won’t extract and they are back to banging it on the ground again (with a loaded round stuck in the chamber). A chamber gage would have caught this also.
Oversizing cases also causes problems because the firing pin doesn’t have the length to reach the primer solid enough to ignite it 100% of the time. When you have one that is oversized, you usually have a bunch, since you usually do several cases at a time on that die setting. If the die isn’t readjusted, the problem will continue on the next batch of cases also. They will either not fire at all or you will have a lot of misfires. In a bolt action, a lot of time the extractor will hold the case against the face of the breech enough that it will fire. The case gets driven forward and the thinner part of the brass expands, holding to the chamber wall and the thicker part of the case doesn’t expand as much and stretches back to the bolt face. If it doesn’t separate that time, it will the next time. When it does separate, it leaves the front portion of the case in the chamber and pulls the case head off. Then when it tries to chamber the next round, you have a nasty jam. Quite often range brass is the culprit of this because you never know how many times it has been fired/sized and in what firearm. Back to beating it on the ground again till you figure out that you have to get the forward part of the case out.
Just a quick tip — To extract the partial case, an oversized brush on a cleaning rod [inserted] and then pulled backward will often remove the case. The bristles when pushed forward and then pulled back act like barbs inside the case. If you have a bunch of oversized case that have been fired, I would dispose of them to keep from having future problems. There are a few tricks you can use to salvage them if they haven’t been fired though. Once again, a case gage would have helped.
Two: Double Check Your Primers
Another thing I see fairly often is a high primer, backwards primer, or no primer at all. The high primers are bad because you can have either a slam fire or a misfire from the firing pin seating the primer but using up its energy doing so. So, as a precaution to make sure my rifle ammo will work 100% of the time, I check it in a case gage, then put it in an ammo box with the primer up and when the box is full, I run my finger across all the primers to make sure they are all seated to the correct depth and you can visually check to make sure none are in backwards or missing.
Three: Check Your Overall Cartridge Length
Trying to load the ammo as long as possible can cause problems also. Be sure to leave yourself enough clearance between the tip of the bullet and the front of the magazine where the rounds will feed up 100%. Several times over the years, I have heard of hunters getting their rifle ready for a hunt. When they would go to the range to sight in, they loaded each round single shot without putting any ammo in the magazine. On getting to elk or deer camp, they find out the ammo is to long to fit in the magazine. At least they have a single shot, it could be worse. I have had hunters that their buddies loaded the ammo for them and then met them in hunting camp only to find out the ammo wouldn’t chamber from either the bullet seated to long or the case sized improperly, then they just have a club.
Four: Confirm All Cases Contain Powder
No powder in the case doesn’t seem to happen as much in rifle cartridges as in handgun cartridges. This is probably due to more handgun ammo being loaded on progressive presses and usually in larger quantities. There are probably more rifle cartridges that don’t have powder in them than you realize though. Since the pistol case is so much smaller internal capacity, when you try to fire it without powder, it usually dislodges the bullet just enough to stick in the barrel. On a rifle, you have more internal capacity and usually a better grip on the bullet, since it is smaller diameter and longer bearing surface. Like on a .223, often a case without powder won’t dislodge the bullet out of the case and just gets ejected from the rifle, thinking it was a bad primer or some little quirk.
For rifle cases loaded on a single stage press, I put them in a reloading block and always dump my powder in a certain order. Then I do a visual inspection and any case that the powder doesn’t look the same level as the rest, I pull it and the one I charged before and the one I charged after it. I inspect the one case to see if there is anything visual inside. Then I recharge all 3 cases. That way if a case had powder hang up and dump in the next case, you have corrected the problem.
On progressive presses, I try to use a powder that fills the case up to about the base of the bullet. That way you can usually see the powder as the shell rotates and if you might have dumped a partial or double charge, you will notice as you start to seat the bullet if not before. On a progressive, if I don’t load a cartridge in one smooth stroke (say a bullet tipped over sideways and I raised the ram slightly to reset it) Some presses actually back the charge back adding more powder if it has already dumped some so you have a full charge plus a partial charge. When I don’t complete the procedure with one stroke, I pull the case that just had powder dumped into it and check the powder charge or just dump the powder back into the measure and run the case through later.
At the request of our readers, we provide select “Deals of the Week”. Every Sunday afternoon or Monday morning we offer our Best Bargain selections. Here are some of the best deals on firearms, hardware, reloading components, optics, and shooting accessories. Be aware that sale prices are subject to change, and once clearance inventory is sold, it’s gone for good. You snooze you lose.
NOTE: All listed products are for sale to persons 18 years of age or older. No products are intended for use by minors.
1. Midsouth — Rebate $25-$75 on RCBS Products
⏺ Major RCBS rebate program through 9/20/2023
RCBS recently announced a rebate program that applies to most RCBS products, including presses, powder dispensers, case-prep machines, priming tools, reloading dies and more. You can save up to $75 with this rebate promo. After qualifying purchases, you can submit your rebate request online or by regular mail. Products must be purchased between 8/10/2023 through 9/20/2023, while the deadline for mail-in or online submission is 10/20/2023. CLICK HERE for Rebate ENTRY FORM.
Buy RCBS product(s) totaling between $100 and $249.99 and get $25 back.
Buy RCBS products(s) totaling between $250.00 and $399.99 and get $40 back.
Buy RCBS products(s) totaling $400 or more and get $75 back.
2. Graf & Sons — Major Sale on Primers IN STOCK
⏺ Good selection of primers at very competitive prices
If you need primers, check out the current Primer Sale at Grafs.com. Graf’s has a wide selection of pistol, rifle, and shotshell primers IN STOCK from CCI, Federal, Fiocchi, Remington, and Winchester. But don’t hesitate — the most popular primer types could sell out quickly.
3. Sportsman’s Warehouse — Savage Axis Rifle Sale, $429.99
⏺ Great prices on scope-equipped Savage hunting rifles
Hunters shopping for a new, affordable rifle should consider the Savage Arms Axis XP with Scope now on sale at Sportsman’s Warehouse. For only $429.99 you get the rugged and reliable Savage Arms Axis XP complete with a mounted Bushnell 4-12x40mm scope. The Savage Axis XP features a 22″ button-rifled barrel, 4-round detachable magazine, and black synthetic stock. At the same $429.99 sale price you can get the Axis Compact with 20″ barrel and synthetic stock sized for smaller shooters. There is a wide choice of chamberings: .223 Rem, .243 Win, 6.5 Creedmoor, .270 Win, .308 Win, and .30-06 Springfield.
4. Midsouth — Frankford Arsenal X-10 Press, $999.99
⏺ Save $150 on great, new 10-station progressive press
Midsouth has the impressive new Frankford Arsenal X-10 Progressive Press with Case Feeder on sale for $999.99. Right now you can save $150 and get FREE Shipping. The new X-10 is a 10-station automatic indexing reloading press with strong steel construction, multiple ball bearings, and a proprietary 10-station, gear driven, shell plate. The X-10’s features include dual de-capping stations, in-line primer pocket swaging capability, and the ability to run powder check and case trimming dies. Compared to a Dillon XL750 (or even a $2240 RL1100), the X-10 offers notable additional capabilities and performance.
5. EuroOptic — Vortex Optics Closeouts, Save 47-54%
⏺ Very good deals on popular scopes
Vortex Optics makes excellent optics and Vortex has some of the best customer service in the industry with a rock-solid lifetime guarantee. If you’re looking for a new zoom scope check out the Vortex Optics Sale at EuroOptic.com. You can grab a 3-9x40mm Diamondback, a 4-24x50mm Strike Eagle, and/or 6-24x50mm Viper at 47-54% OFF.
6. Amazon — Highwild AR500 Dueling Tree Target Kit, $179.99
⏺ Fun, six-paddle reactive target at good price
Shooting reactive targets provides instant gratification with a hit. And reactive dueling tree type targets allow a challenging “One on One” competition with a buddy. The Highwild AR500 Dueling Tree Target is a great bargain right now at $179.99. This dueling tree features six reactive paddles made of high-quality, laser-cut AR500 1/4″ thick steel plate. The forward leaning steel post can automatically reset the steel paddles by gravity. That way you don’t need springs or pull-cords.
7. MidwayUSA — Major Ammunition Sale with up to 30% Savings
⏺ Major savings on name brand rifle and pistol ammunition
MidwayUSA is running a big Ammunition Sale right now with very attractive prices. You’ll find 145 types of pistol, rifle, and shotgun ammo for a huge range of cartridges. Among rifle hunting ammo there’s a wide range of bullet choices. Sale prices are up to 30% off. From hunting to target ammo — there’s something for everyone.
8. Amazon — Scope Turret Magnifying Glass with Level, $15.95
Making rapid, yet precise scope turret adjustments can be challenging, especially during fast, timed stages. Most scope turrets have small, thin markings that can be tough to see (particularly with older eyes). To see your elevation turret markings better, try the Monstrum Scope Turret Magnifying Glass with Level. This simple but effective tool places a magnifier on the shooter’s side of the turret allowing easy viewing. In addition, this handy unit includes a built-in bubble level to help the shooter avoid canting his rifle.
9. Amazon — Cordless Air Duster/Vacuum, $49.99 (after discount)
⏺ Very useful for reloading room — with $20 OFF special
Most reloaders use compressed air to clean spilt powder or debris off their work areas because it’s simple and easy. But cans of air are expensive and they loose effectiveness as you use them. A great solution is the iDOO Cordless Air Duster 2-in-1 Vacuum Cleaner. With a powerful brushless motor, the iDOO air duster can blow away dust. Switch the configuration and this dual-purpose unit works as a hand-held vacuum cleaner. NOTE: Amazon’s stated price is $69.99. But there is currently a $20 Off instant coupon. Click the “Apply $20 Coupon” button on the Amazon page to reduce the net price to $49.99.
⏺ Very useful, long-life product that protects your firearms investment
You may own a gunsafe to keep your firearms secure, but do you have a system to protect those firearms from rust and corrosion? Pick up the Hornady Reusable Dehumidifier Bag and you can easily help prevent moisture and rust from ruining your gun collection. This moisture-absorbing bag has a built-in indicator that will change from blue to pink when the pouch is saturated and ready to reactivate.
Try a club match this summer! Every summer weekend, there are hundreds of local club “fun matches” conducted around the country. One of the good things about club shoots is that you don’t have to spend a fortune on equipment to have fun. But we’ve seen that many club shooters handicap themselves with a few common equipment oversights or lack of attention to detail while reloading. Here are SIX TIPS that can help you avoid these common mistakes, and build more accurate ammo for your club matches.
1. Align Front Rest and Rear Bag
We see many shooters whose rear bag is angled left or right relative to the bore axis. This can happen when you rush your set-up. But even if you set the gun up carefully, the rear bag can twist due to recoil or the way your arm contacts the bag. After every shot, make sure your rear bag is aligned properly (this is especially important for bag squeezers who may actually pull the bag out of alignment as they squeeze).
Forum member ArtB adds: “To align my front rest and rear bag with the target, I use an old golf club shaft. I run it from my front rest stop through a line that crosses over my speed screw and into the slot between the two ears. I stand behind that set-up and make sure I see a straight line pointing at the target. I also have a piece of tape that I’ve placed on the golf shaft that indicates how far the back end of the rear bag should be placed from the front rest stop.”
2. Avoid Contact Interference
We see three common kinds of contact or mechanical interference that can really hurt accuracy. First, if your stock has front and/or rear sling swivels make sure these do NOT contact the front or rear bags at any point of the gun’s travel. When a sling swivel digs into the front bag that can cause a shot to pop high or low. To avoid this, reposition the rifle so the swivels don’t contact the bags or simply remove the swivels before your match. Second, watch out for the rear of the stock grip area. Make sure this is not resting on the bag as you fire and that it can’t come back to contact the bag during recoil. That lip or edge at the bottom of the grip can cause problems when it contacts the rear bag. Third, watch out for the stud or arm on the front rest that limits forward stock travel. With some rests this is high enough that it can actually contact the barrel. We encountered one shooter recently who was complaining about “vertical flyers” during his match. It turns out his barrel was actually hitting the front stop! With most front rests you can either lower the stop or twist the arm to the left or right so it won’t contact the barrel.
3. Weigh Your Charges — Every One
This may sound obvious, but many folks still rely on a powder measure. Yes we know that most short-range BR shooters throw their charges without weighing, but if you’re going to pre-load for a club match there is no reason NOT to weigh your charges. You may be surprised at how inconsistent your powder measure actually is. One of our testers was recently throwing H4198 charges from a mechanical measure for his 30BR. Each charge was then weighed twice with a Denver Instrument lab scale. Our tester found that thrown charges varied by up to 0.7 grains! And that’s with a premium measure.
4. Measure Your Loaded Ammo — After Bullet Seating
Even if you’ve checked your brass and bullets prior to assembling your ammo, we recommend that you weigh your loaded rounds and measure them from base of case to bullet ogive using a comparator. If you find a round that is “way off” in weight or more than .005″ off your intended base to ogive length, set it aside and use that round for a fouler. (Note: if the weight is off by more than 6 or 7 grains you may want to disassemble the round and check your powder charge.) With premium, pre-sorted bullets, we’ve found that we can keep 95% of loaded rounds within a range of .002″, measuring from base (of case) to ogive. Now, with some lots of bullets, you just can’t keep things within .002″, but you should still measure each loaded match round to ensure you don’t have some cases that are way too short or way too long.
5. Check Your Fasteners
Before a match you need to double-check your scope rings or iron sight mounts to ensure everything is tight. Likewise, you should check the tension on the screws/bolts that hold the action in place. Even with a low-recoiling rimfire rifle, action screws or scope rings can come loose during normal shooting.
6. Make a Checklist and Pack the Night Before
Ever drive 50 miles to a match then discover you have the wrong ammo or that you forgot your bolt? Well, mistakes like that happen to the best of us. You can avoid these oversights (and reduce stress at matches) by making a checklist of all the stuff you need. Organize your firearms, range kit, ammo box, and shooting accessories the night before the match. And, like a good Boy Scout, “be prepared”. Bring a jacket and hat if it might be cold. If you have windflags, bring them (even if you’re not sure the rules allow them). Bring spare batteries, and it’s wise to bring a spare rifle and ammo for it. If you have just one gun, a simple mechanical breakdown (such as a broken firing pin) can ruin your whole weekend.
The Shooting Sports USA website includes two excellent articles about the basics of metallic cartridge reloading. These two articles provide an excellent summary of the key procedures. If you are new to reloading, we recommend you read both articles:
Part II is particularly helpful because it explains the entire reloading process step-by-step, with 14 listed steps. The author notes: “In this, the second installment on metallic cartridge reloading, we’ll follow the sequence of steps involved in reloading a rifle cartridge and refining a metallic cartridge load. These steps are based on the use of a single-stage reloading press and a separate priming tool.”
Much important advice is provided as this article runs through the 14 Steps of Reloading. For example, when explaining Step 13, Bullet Seating, the article states:
“Proper seating depth is critical. Too much bullet protrusion and the cartridge may not work through the gun’s magazine, or it may fail to chamber. Too little and the bullet intrudes excessively into the powder chamber, decreasing volume and raising pressure. Neck tension is also important; any bullet that fails to seat with some resistance may be held only loosely by the neck and may be driven back into the case when the round is chambered, especially in semi-automatic arms.”
Important Guide to Detecting Over-Pressure Signs in Brass
As an example of the invaluable advice provided in these two articles, here’s a sample from Part II that explains how to determine if your load is over-pressure. We recommend that EVERY reader read this twice. There are more things to consider than a stiff bolt lift. You need to inspect cartridges very carefully:
When neck-turning cases, it’s a good idea to extend the cut slightly below the neck-shoulder junction. This helps keep neck tension more uniform after repeated firings, by preventing a build-up of brass where the neck meets the shoulder. One of our Forum members, Craig from Ireland, a self-declared “neck-turning novice”, was having some problems turning brass for his 20 Tactical cases. He was correctly attempting to continue the cut slightly past the neck-shoulder junction, but he was concerned that brass was being removed too far down the shoulder.
Craig writes: “Everywhere I have read about neck turning, [it says] you need to cut slightly into the neck/shoulder junction to stop doughnutting. I completely understand this but I cant seem to get my neck-turning tool set-up to just touch the neck/shoulder junction. It either just doesn’t touch [the shoulder] or cuts nearly the whole shoulder and that just looks very messy. No matter how I adjust the mandrel to set how far down the neck it cuts, it either doesn’t touch it or it cuts far too much. I think it may relate to the bevel on the cutter in my neck-turning tool…”
Looking at Craig’s pictures, we’d agree that he didn’t need to cut so far down into the shoulder. There is a simple solution for this situation. Craig is using a neck-turning tool with a rather shallow cutter bevel angle. This 20-degree angle is set up as “universal geometry” that will work with any shoulder angle. Unfortunately, as you work the cutter down the neck, a shallow angled-cutter tip such as this will remove brass fairly far down. You only want to extend the cut about 1/32 of an inch past the neck-shoulder junction. This is enough to eliminate brass build-up at the base of the neck that can cause doughnuts to form.
The answer here is simply to use a cutter tip with a wider angle — 30 to 40 degrees. The cutter for the K&M neck-turning tool (above) has a shorter bevel that better matches a 30° shoulder. There is also a 40° tip available. PMA Tool and 21st Century Shooting also offer carbide cutters with a variety of bevel angles to exactly match your case shoulder angle*. WalkerTexasRanger reports: “I went to a 40-degree cutter head just to address this same issue, and I have been much happier with the results. The 40-degree heads are available from Sinclair Int’l for $15 or so.” Forum Member CBonner concurs: “I had the same problem with my 7WSM… The 40-degree cutter was the answer.” Below is Sinclair’s 40° Cutter for its NT-series neck-turning tools. Item NT3140, this 40° Cutter sells for $14.99. For the same price, Sinclair also sells the conventional 30° Cutter, item NT3100.
Al Nyhus has another clever solution: “The best way I’ve found to get around this problem is to get an extra shell holder and face it off .020-.025 and then run the cases into the sizing die. This will push the shoulder back .020-.025. Then you neck turn down to the ‘new’ neck/shoulder junction and simply stop there. Fireforming the cases by seating the bullets hard into the lands will blow the shoulder forward and the extra neck length you turned by having the shoulder set back will now be blended perfectly into the shoulder. The results are a case that perfectly fits the chamber and zero donuts.”
Product Review by F-Class John
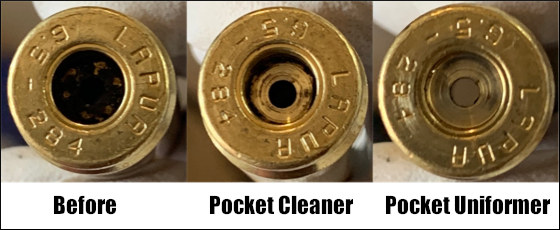
Case preparation is critical for precision reloading. One must trim cases, debur/chamfer case mouths, clean necks, spruce up primer pockets and do other important tasks. Complete case prep can involve many separate processes, each requiring its own tools. With each of those tools comes additional cost as well as the need for more storage and bench space. To make case prep easier, faster, and more convenient Lyman created the Case Prep Xpress (#ad). The Case Prep Xpress, introduced a few years back, combines up to five prep stages into one well-built, stable, versatile unit. Watch this video to see the machine in action:
The Case Prep Xpress features five (5) independently-turning spindles all with the common 8/32 thread. This allows you to attach multiple tools supplied with the unit PLUS many other screw-on prep tools. For our testing we started out using a variety of the 12 included tools and found they cover the majority of case prep tasks. Lyman supplies deburr and chamfer tools, pocket uniformers, reamers and cleaners, as well as an assortment of neck brushes.
The deburr and chamfer tools worked really well, creating beautiful bevels all while leaving a nice flat edge across the top of the neck which is critical for accuracy and brass life. We found the primer pocket cleaning tool did a good job, but for truly clean pockets we recommend using the primer pocket uniforming tool, which very efficiently removes even hard residues.
The benefit of having interchangeable heads is that you can add your own accessories. We like to use a bore brush with bronze wool wrapped around it for use inside our necks. This worked perfectly once we screwed it in. In fact, we couldn’t think of any 8/32-threaded accessory that wouldn’t work well on this machine. Another great design feature is how all the accessories are oriented straight up. This allows for perfect visual alignment of your cases onto the tools which is critical — especially when performing cutting operations such as primer pocket uniforming.
Along with the five power stations there are six female-threaded storage spots on the sides where tools can be placed to ensure they don’t get lost. We like this feature since there will be more than five accessories you want to use and having them easily available is a great feature. You can keep 11 tools right on the machine (5 on top, 6 on the sides). That way you don’t have to dig through storage bins.
The Case Prep Xpress has a removable front bin to hold brass shavings, and there are two circular trays on either side of the bin. In front is a long tray that holds the provided brush. This makes it relatively easy to clean off brass shavings and other debris from case prep processes.
SUMMARY — Versatile Case Prep Xpress Is A Good Value
For the money, Lyman’s Case Prep Xpress is tough to beat. It performs multiple tasks well while being stable and easy-to-use. Yes there are some multi-spindle prep centers that offer variable or fast/slow RPM spindles while the Lyman’s spindles are all fixed RPM. (See, e.g. the RCBS Brass Boss). However those other systems don’t include all the convenient on-board storage of the Case Prep Xpress, and are typically more expensive. The Lyman Case Prep Xpress sells for about $170-$190 “street price”. It’s currently on sale for $179.99 on Amazon (#ad). This makes the Lyman Case Prep Xpress a fine value — it offers great versatility while saving space and saving money compared to buying five or more separate, powered tools.
As an Amazon affiliate, this site can earn revenues through sales commissions.
Here’s a simple task you can do that will give your seater die a more perfect fit to your match bullets. You can lap the inside of the seater stem so that it matches the exact profile of the bullet. This spreads out the seating force over a larger area of the bullet jacket. That allows smoother, more consistent seating, without putting dents, creases, or sharp rings in your bullets.
This process is demonstrated here by our friend Erik Cortina of Team Lapua-Brux-Borden. Erik, one of the nation’s top F-Class shooters and a skilled machinist, explains: “Here I’m lapping my new seater die stem with lapping compound. I chuck up a bullet in the lathe and lap the inside of the seating stem. I put lapping compound on the bullet and also in the stem. You can do the same with a hand drill and bore paste. You can see in the piture below how much contact area the stem has on the bullet after being lapped. This bullet is a Berger 7mm 180-grain Hybrid. ”
It can be helpful but it’s not necessary to make your seating stem an exact match to a bullet, particularly if you’re loading hunting or varmint rounds. But it is helpful to do some mild internal stem polishing. This should eliminate any ring (or dent) that forms on the bullet jacket during seating.
Sharp edges on a seating stem can cause a ring to be pressed into the bullet jacket — especially with compressed loads that resist downward bullet movement.
Q2: Is there any down-side to the process?
Not really. However, if you shoot many different bullet types for a particular cartridge, you may not want to conform the stem aggressively to one particular bullet design. Lightly lap the inside of the stem to remove burrs/sharp edges but leave it at that. A light lap will prevent a ring forming when seating bullets.
There is an excellent article about primers on the Shooting Times website. We strongly recommend you read Mysteries And Misconceptions Of The All-Important Primer, written by Allan Jones. Mr. Jones is a bona fide expert — he served as the manager of technical publications for CCI Ammunition and Speer Bullets and Jones authored three editions of the Speer Reloading Manual.
This authoritative Shooting Times article explains the fine points of primer design and construction. Jones also reveals some little-known facts about primers and he corrects common misconceptions. Here are some highlights from the article:
Size Matters
Useful Trivia — even though Small Rifle and Small Pistol primer pockets share the same depth specification, Large Rifle and Large Pistol primers do not. The standard pocket for a Large Pistol primer is somewhat shallower than its Large Rifle counterpart, specifically, 0.008 to 0.009 inch less.
Magnum Primers
There are two ways to make a Magnum primer — either use more of the standard chemical mix to provide a longer-burning flame or change the mix to one with more aggressive burn characteristics. Prior to 1989, CCI used the first option in Magnum Rifle primers. After that, we switched to a mix optimized for spherical propellants that produced a 24% increase in flame temperature and a 16% boost in gas volume.
Foiled Again
Most component primers have a little disk of paper between the anvil and the priming mix. It is called “foil paper” not because it’s made of foil but because it replaces the true metal foil used to seal early percussion caps. The reason this little disk exists is strictly a manufacturing convenience. Wet primer pellets are smaller than the inside diameter of the cup when inserted and must be compacted to achieve their proper diameter and height. Without the foil paper, the wet mix would stick to the compaction pins and jam up the assembly process.
Primer Functionality and Primer Types Compared
This video looks at a variety of primer types from multiple manufacturers, foreign and domestic. The video explains the basics of how primers function, and then explains the key characteristics of standard primers, magnum primers, and mil-spec primers (designed for semi-auto rifles).
Many novice hand-loaders believe that neck bushing Inside Diameter (ID) size is the only important factor in neck tension. In fact, many different things will influence the grip on your bullet and its ability to release from the case neck. To learn more about neck tension and “case grip”, take the time to read this article carefully. We bet you’ll gain knowledge that will let you load more accurate ammo, with better ES/SD.
Editor: Guys, this is a VERY important article. You really should read it over carefully, twice. Variations in the force required to release a bullet can significantly affect accuracy and ES/SD. You really need to know how the grip on bullet can be altered by many different factors.
Neck Tension (i.e. Grip on Bullets) Is a Complex Phenomenon
While we certainly have considerable control over neck tension by using tighter or looser bushings (with smaller or bigger Inside Diameters), bushing size is only one factor at work. It’s important to understand the multiple factors that can increase or decrease the resistance to bullet release. Think in terms of overall brass-on-bullet “grip” instead of just bushing size (or the internal neck diameter in non-bushing full-length sizing dies).
Bullet grip is affected by many things, such as:
1. Neck-wall thickness.
2. Amount of bullet bearing surface (shank) in the neck.
3. Surface condition inside of neck (residual carbon can act as a lubricant; ultrasonic cleaning makes necks “grabby”).
4. Length of neck (e.g. 6mmBR neck vs. 6mm Dasher).
5. Whether or not the bullets have an anti-friction coating.
6. The springiness of the brass (which is related to degree of work-hardening; number of firings etc.)
7. The bullet jacket material.
8. The outside diameter of the bullet and whether it has a pressure ridge.
9. Time duration between bullet seating and firing (necks can stiffen with time).
10. How often the brass is annealed.
11. Amount (length) of neck sized (e.g. you can size only half the neck).
12. Interior diameter of bushing, or neck section of non-bushing die. – and there are others…
One needs to understand that bushing size isn’t the beginning and end of neck tension questions, because, even if bushing size is held constant, the amount of bullet “grip” can change dramatically as the condition of your brass changes. Bullet “grip” can also change if you alter your seating depth, and it can even change if you ultrasonically clean your cases.
6-time U.S. National Long-Range Champion John Whidden adds: “Our tests show us that the condition of the necks in regards to lubed or not, carbon inside or not, squeaky clean or not, etc., matter even more than the size of the bushing used. An ultrasonically cleaned or brand new dry case neck make for some quite high seating force.”
In our Shooters’ Forum a reader asked: “How much neck tension should I use?” This prompted a lengthy Forum discussion in which other Forum members recommended a specific number based on their experience, such as .001″, .002″, or .003″. These numbers, as commonly used, correspond to the difference between case-neck OD after sizing and the neck OD of a loaded round, with bullet in place. In other words, the numbers refer to the nominal amount of interference fit (after sizing).
While these commonly-used “tension numbers” (of .001″, .002″ etc.) can be useful as starting points, neck tension is actually a fairly complex subject. The actual amount of “grip” on the bullet is a function of many factors, of which neck-OD reduction during sizing is just one. Understanding these many factors will help you maintain consistent neck tension as your brass “evolves” over the course of multiple reloadings.
Seating Depth Changes Can Increase or Decrease Grip on Bullet
You can do this simple experiment. Seat a boat-tail bullet in your sized neck with .150″ of bearing surface (shank) in the neck. Now remove the bullet with an impact hammer. Next, take another identical bullet and seat it with .300″ of bearing surface in another sized case (same bushing size/same nominal tension). You’ll find the deeper-seated bullet is gripped much harder.
Neck-Wall Thickness is Important Too
I have also found that thinner necks, particularly the very thin necks used by many 6mm PPC benchrest shooters, require more sizing to give equivalent “grip”. Again, do your own experiment. Seat a bullet in a case turned to .008″ neckwall thickness and sized down .003″. Now compare that to a case with .014″ neckwall thickness and sized down .0015″. You may find that the bullet in the thin necks actually pulls out easier, though it supposedly has more “neck tension”, if one were to consider bushing size alone.
In practical terms, because thick necks are less elastic than very thin necks, when you turn necks you may need to run tighter bushings to maintain the same amount of actual grip on the bullets (as compared to no-turn brass). Consequently, I suspect the guys using .0015″ “tension” on no-turn brass may be a lot closer to the guys using .003″ “tension” on turned necks than either group may realize.
Toward a Better Definition of Neck Tension
As a convenient short-cut, we tend to describe neck tension by bushing size alone. When a guy says, “I run .002 neck tension”, that normally means he is using a die/bushing that sizes the necks .002″ smaller than a loaded round. Well we know something about his post-sizing neck OD, but do we really have a reliable idea about how much force is required to release his bullets? Maybe not… This use of the term “neck tension” when we are really only describing the amount of neck diameter reduction with a die/bushing is really kind of incomplete.
My point here is that it is overly simplistic to ask, “should I load with .001 tension or .003?” In reality, an .001″ reduction (after springback) on a thick neck might provide MORE “grip” on a deep-seated bullet than an .003″ reduction on a very thin-walled neck holding a bullet with minimal bearing surface in the neck. Bushing ID is something we can easily measure and verify. We use bushing size as a descriptor of neck tension because it is convenient and because the other important factors are hard to quantify. But those factors shouldn’t be ignored if you want to maintain consistent neck tension for optimal accuracy.
Consistency and accuracy — that’s really what this all about isn’t it? We want to find the best neck tension for accuracy, and then maintain that amount of grip-on-bullet over time. To do that you need to look not only at your bushing size, but also at how your brass has changed (work-hardened) with time, and whether other variables (such as the amount of carbon in the neck) have changed. Ultimately, optimal neck tension must be ascertained experimentally. You have to go out and test empirically to see what works, in YOUR rifle, with YOUR bullets and YOUR brass. And you may have to change the nominal tension setting (i.e. bushing size) as your brass work-hardens or IF YOU CHANGE SEATING DEPTHS.
Remember that bushing size alone does not tell us all we need to know about the neck’s true “holding power” on a bullet, or the energy required for bullet release. True bullet grip is a more complicated phenomenon, one that is affected by numerous factors, some of which are very hard to quantify.
The Tactical Rifle Shooters Facebook Group recently showcased tools used to measure case headspace before and after “bumping” the shoulder. After a case is fired, hand-loaders who full-length size their cases will typically bump the shoulders back anywhere from .001″ to .0035″, depending on the rifle and application. With our 6mmBR and Dasher cases we like about .0015″ bump.
You want the amount of case sizing and bump to be the same for all your brass. To ensure uniformity, it makes sense to measure your cases before and after the FL sizing process. When we have time, we check every case. Other folks will simply check the first 3-4 cases coming out of the FL sizing die to ensure the FL die setting is correct and delivering desired headspace/bump.
1. Whidden Gunworks Shoulder Bump Gauge
There are a variety of tools that can be used to measure shoulder bump. Our favorite is a special cartridge-specific bushing made by Whidden Gunworks. The Whidden Shoulder Bump Gauge enables you to adjust your sizing die to the desired measurement. The bump gauge is attached to your calipers with a set screw and determines the measurement from the base to the shoulder of the case. The photo below, from Tactical Rifle Shooters, shows the Whidden Bump Gauge for the .375 CheyTac cartridge.
2. Dave Manson Vertical Comparator with Dial Read-Out
Dave Manson states: “This tool was designed to make life easier for the advanced shooter and re-loader by allowing precise measurement of ammunition, case, and chamber headspace. With this information, the re-loader will be able to fine-tune clearances and fits between his ammunition and chamber, with resultant improvements in accuracy and case life.” The functions of the Manson Comparator are:
1. Measure headspace of factory or reloaded ammunition
2. Quantify chamber headspace by measuring headspace of a fired case
3. Ensure minimal shoulder set-back when setting up re-loading dies
4. Compare base-to-ogive length to ensure consistent bullet-to-rifling relationship.
Hornady’s Lock-N-Load Headspace Comparator system is easy-to-use and handy. You can get a kit with Red bushing-holder body and 5 bushings for $43.43 at Midsouth. Hornady explains: “The Lock-N-Load® Headspace Comparator… gauge measures variations in brass before and after firing or re-sizing. It allows for headspace comparison between fire-formed brass and re-sized brass.” IMPORTANT: Hornady states: “To determine the proper bushing diameter for your cartridge, simply add the neck diameter and the shoulder diameter and divide that number by two. Use the bushing closest to that number.” Hornady offers five: .330″, .350″, .375″, .400″, and .420″.
One tip — We have found the Hornady gauges may vary a little from unit to unit even with the same nominal size. If you have more than one gauge for the same cartridge, test each on your brass — you may then note a slight difference in your bump measurements. Mark one and use that consistently. There is also an Anvil Base Kit that mounts to the opposite blade on the caliper. This provides a more stable surface for the base of your case.
4. L.E. Wilson Case Gage Depth Micrometer
If you are looking for precise “bump” measurements without having to mess with calipers and clamp-on gauge blocks, you may want to consider the L.E. Wilson Case Gage Depth Micrometer (currently $130.00). This takes very precise, repeatable measurements, but you need to know your starting point. The manufacturer explains: “Every reloader should know exactly how much your Full Length Sizing Die is pushing back the shoulder. With the NEW Case Gage Depth Micrometer you can do just that! It has never been easier to measure you cases headspace before and after sizing. The Depth Mic allows you to slip the micrometer perfectly over the top of the Gage with your case inserted into the Gage and take a measurement. Micrometer has graduations of .001″. The Case Gage Depth Micrometer is set to a zero of .100″ on the scale at our factory. Because of differences in ‘feel’ and temperature, we include a the Gage Block for you to test Zero and to adjust if necessary.”
5. Pistol Brass Case DIY Bump Gauge
Last is a “field expedient” set-up if you do not have any of the comparator tools shown above. A sized .45 ACP case (or other suitable pistol case) can be used to measure shoulder bump. The mouth of the pistol case sits on the shoulder of your rifle cartridge brass.
Make sure the .45 ACP case is trimmed square and that it is round. We recommend you first run it through an expander, then size it, trim it and chamfer. Next, take the .45 ACP case and slip it over the neck of a fired, unsized rifle case with the primer removed. Align the two cases between the jaws of your calipers and note the length from rim to rim (See left photo below).
OK, now you have the length for a fired rifle case BEFORE sizing. Next, take a full-length sized rifle case (without primer) and do the same thing, placing the .45 ACP case over the neck of the FL-sized case (Right Photo). The difference between the two numbers is the amount of “bump” or set-back you are applying to the shoulder. Here the difference is .0015″. The amount of bump you need varies with your chamber and your load, but .0015-.002″ is a good initial setting.


 Oversizing cases also causes problems because the firing pin doesn’t have the length to reach the primer solid enough to ignite it 100% of the time. When you have one that is oversized, you usually have a bunch, since you usually do several cases at a time on that die setting. If the die isn’t readjusted, the problem will continue on the next batch of cases also. They will either not fire at all or you will have a lot of misfires. In a bolt action, a lot of time the extractor will hold the case against the face of the breech enough that it will fire. The case gets driven forward and the thinner part of the brass expands, holding to the chamber wall and the thicker part of the case doesn’t expand as much and stretches back to the bolt face. If it doesn’t separate that time, it will the next time. When it does separate, it leaves the front portion of the case in the chamber and pulls the case head off. Then when it tries to chamber the next round, you have a nasty jam. Quite often range brass is the culprit of this because you never know how many times it has been fired/sized and in what firearm. Back to beating it on the ground again till you figure out that you have to get the forward part of the case out.


 1. Align Front Rest and Rear Bag
 5. Check Your Fasteners


 When neck-turning cases, it’s a good idea to extend the cut slightly below the neck-shoulder junction. This helps keep neck tension more uniform after repeated firings, by preventing a build-up of brass where the neck meets the shoulder. One of our Forum members, Craig from Ireland, a self-declared “neck-turning novice”, was having some problems turning brass for his 20 Tactical cases. He was correctly attempting to continue the cut slightly past the neck-shoulder junction, but he was concerned that brass was being removed too far down the shoulder.


 In our
  Neck-Wall Thickness is Important Too


