Powder Valley, a leading distributor of reloading supplies, is pleased to announce the launch of a major update and enhancement to its PowderValley.com website. The enhanced website now has a completely updated look, improved search and browse features, along with a streamlined checkout experience. The updated website is also mobile-friendly so it works great with smartphones and mobile devices. And right now the Powder Valley website features special discounts, with some items up to 50% Off. For big savings, click the Weekly Deals tag on the home page.
There are convenient, one-click product category links for:
“We’re excited to provide our customers with a new website that is fast, easy to navigate, and helps them make an informed buying decision” said Bill Clinton, CEO of Powder Valley. “The new website is the first step in a series of strategic changes at Powder Valley which will improve our ability to implement significant improvement in how we serve customers, from enhanced product information to increased breadth and depth of our product offering.”
To learn more about Powder Valley and its full lineup of reloading supplies, visit PowderValley.com. On the updated website, as you scroll down the home page, you’ll see convenient major feature categories for:
1. Sales and Clearance | 2. New Arrivals | 3. Popular Products
About Powder Valley
Powder Valley began in 1984 as Dexter Automotive, the first master distributor of Accurate brand powder. In 2000, Bryan and Noel Richardson purchased the company and moved operations to Winfield, Kansas. Since then Powder Valley has become the single largest distributor of canister powder in the USA, stocking nearly every brand of Smokeless and Black Powder offered in the nation. Powder brands include Hodgdon, IMR, Vihtavuori, Alliant, Ramshot, Winchester, Hornady, Shooters World, Goex, Schuetzen, Swiss and more, along with an ever-expanding offering of bullets, brass, wads, shot, gun care items, and reloading equipment. Powder Valley also carries a wide selection of rifle, pistol, and shotgun primers.
A while back, Sinclair International’s Reloading Press Blog featured a “round-table” discussion of reloading techniques. Sinclair’s team of tech staffers were asked: “What do you feel is the one-most crucial step in precision reloading?”
Here are their responses (along with comments from our Editors):
Phil Hoham: “I feel that when working up a load do not go too high or too low in your powder charge. Stay away from ‘suggested loads’ you hear at the range, or on the internet. Always be sure to use a published reloading manual that presents not only minimums and maximums, but also pressure, velocity, and a proper range of powders used. Do not get distracted in the reloading process, and remain focused at all times during each step involved.”
AccurateShooter.com: Some loads presented on the Internet are OK as a starting point, but it is absolutely critical to understand that pressure maximums will vary considerably from one rifle to another (of the same chambering). For example, one 6mmBR rifle shooting 105gr bullets can max out with 30.0 grains of Varget powder, while another rifle, with the same chamber dimensions, but a different barrel, could tolerate (and perform better) with half a grain more powder. You need to adjust recommended loads to your particular rifle and barrel.
Pete Petros: “This could be a very broad topic, but if I were to pick one, it would be making sure to pay close attention, and weigh each and every powder charge to ensure that each load is exact and consistent. This is important not only for accuracy, but also for safety reasons.”
AccurateShooter.com: If you’re shooting beyond 200 yards, it is critical to weigh your loads with an accurate scale or automated system such as the AutoTrickler V3/V4. Loads that are uniform (within a few kernels) will exhibit lower Extreme Spread and Standard Deviation. And remember, even if you stick with the same powder, when you get a new powder lot, you may have to adjust your load quite a bit. For example, .308 Palma shooters have learned they may need to adjust Varget loads by up to a full grain from one lot of Varget to the next.
Ron Dague: “I feel that the most important step(s) in reloading for accuracy are in the initial case prep. Uniforming the primer pocket to the same depth to ensure consistency in primer seating is a crucial step. Additionally de-burring the flash holes, each in the same way to clean up and chamfer the inside is important. It ensures that the ignition from the primer is uniform and flows out in the same consistent pattern. Doing so will create uniform powder ignition and tighten up your velocity Extreme Spread.”
AccurateShooter.com: With some brands of brass, primer pocket uniforming and flash-hole deburring is useful. However, with the best Lapua, Norma, and RWS brass it may be unnecessary, or worse, counter-productive. So long as your Lapua brass flash-holes are not obstructed or smaller than spec, it may be best to leave them alone. This is particularly true with the small flash holes in 220 Russian, 6BR, and 6.5×47 cases. MOST of the flash-hole reaming tools on the market have cutting bits that vary in size because of manufacturing tolerances. We’ve found tools with an advertised diameter of .0625″ (1/16″) that actually cut an 0.068″ hole. In addition, we are wary of flash-hole deburring tools that cut an aggressive inside chamfer on the flash-holes. The reason is that it is very difficult to control the amount of chamfer precisely, even with tools that have a depth stop.
Rod Green: “I feel that bullet seating is the most important step. If you had focused on making sure all prior steps (case prep, powder charge, etc.) of the process have been carefully taken to ensure uniformity, bullet seating is the last step, and can mean all the difference in the world in terms of consistency. Making sure that the bullet is seated to the same depth each time, and time is taken to ensure that true aligned seating can make the load.”
Bob Blaine: “I agree with Rod. I strongly feel that consistent bullet seating depth is the most important step in creating the most accurate hand loads. I have seen the results in both my bench and long range rifles. Taking the time to ensure exactness in the seating process is by far, the number one most important step in my book.”
AccurateShooter.com: Agreed. When loading match ammo, after bullet seating, we check every loaded round for base of case to ogive length. If it varies by more than 3 thousandths, that round is segregated or we attempt to re-seat the bullet. We measure base of case to bullet ogive with a comparator mounted on one jaw of our calipers. You may have to pre-sort your bullets to hold the case-base to ogive measurement (of loaded rounds) within .003″.
Many shooters prefer to deprime their brass before resizing. That way they can tumble cases or keep primer debris off their main press. To deprime cases before sizing or cleaning you can use a Decapping Die. This pushes out the spent primer without changing the neck or body of a case. Such decapping dies work fine, but they do require the use of a press. Here is a handy alternative — a cool tool that allows you to deprime brass anywhere — no press needed.
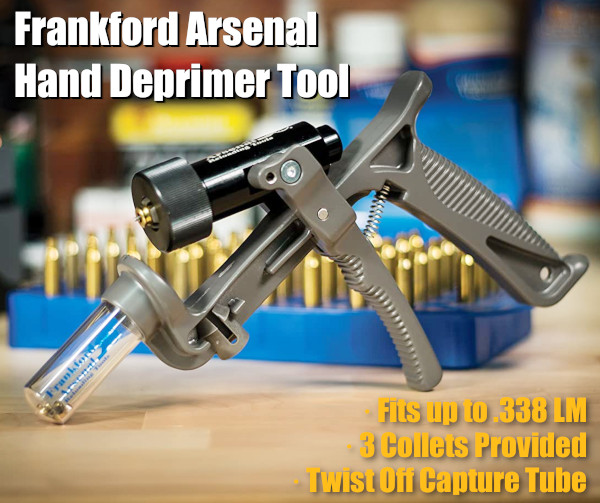
Handheld Primer Removal Tool From Frankford Arsenal
This cleverly-designed Hand Deprimer Tool allows you to deprime cartridge cases without a press. This hand-tool from Frankford Arsenal will deprime brass and capture primers conveniently. You can deprime your cases while watching TV or relaxing in your favorite chair.
This device lets you remove spent primers anywhere — no press needed and all the mess (cups/anvils/residue) stays in the capture chamber. This tool comes works with nearly all common case types up to .338 Lapua Magnum. With good leverage, this tool does the job quickly and efficiently. Forum members have praised this handy tool, but recommend wearing a thick glove if doing more than 100 cases in a session.
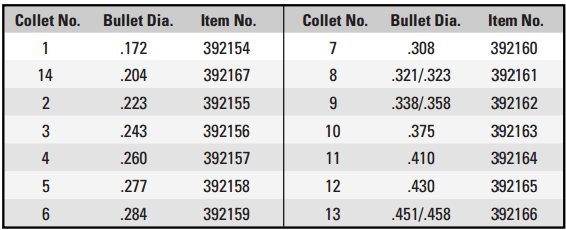
This handy depriming tool is very versatile. With a universal, cylinder-style cartridge-holder, the tool can deprime a wide variety of cartridge types from .20 caliber up to .338 caliber. Three different plastic collets are provided to handle for different diameter cases. Spent primers are captured in a removable spent primer catch tube. Simply twist off the clear catch tube to dump the spent primers. With die-cast metal construction, this tool should last through many thousands of depriming cycles. MSRP is $54.99. Right now it is $47.98 on Amazon with 82% 5-star ratings.
User Modifications — Grip Padding and High-Volume Capture
Many users recommended putting some kind of padding on the grip and front lever to reduce pressure on the fingers. This can be done with a wrap or a rubber covering. In addition, users have adapted the unit with an attached hose and large primer capture jug. If you depriming hundreds of cases at a time, this hose conversion may make sense.
Review from actual owner: “I have owned one of these for about eight years and deprimed over 10,000 cases with this tool. I have never had to replace a single part on it. You will have to adjust the return spring every so often, but that is a very easy task. If you are depriming a LOT of brass, the handle can tear up your hand a bit. Solution: Wear a Mechanics Glove. Easy Peasy! You will NOT regret this purchase.”
How to Adapt Tool for Small Flash Hole Brass
The Frankford Arsenal Deprimer Tool was designed for LARGE flash-hole brass. To deprime brass with small (1.5mm/0.59″) small flash-holes, as found on Lapua .220 Russian and 6mmBR cases, you will need to reduce the pin diameter. Frankford Arsenal currently recommends purchasing a replacement pin and “sanding it down” to the smaller diameter. NOTE: This is NOT difficult — simply spin the stock pin in some sandpaper.
He who dies with the most toys wins — right? Well Sinclair has another interesting gadget you can add to your reloading bench. The Sinclair Case Neck Sorting Tool lets you quickly sort brass by neck-wall thickness. For those who shoot “no-turn” brass, this can improve neck-tension consistency. Large variances in neck-wall thickness can cause inconsistent neck “grip” on the bullet. Generally, we’ve found that more consistent neck tension will lower ES and (usually) improve accuracy. We know some guys who shoot no-turn 6mmBR brass in competition with considerable success — but their secret is pre-sorting their brass by neck-wall thickness. Cases that are out-of-spec are set aside for sighters (or are later skim-turned).
Watch Case Neck Sorting Tool Operation in Video
How the Case Neck Sorting Tool Works
Here’s how the Sinclair tool works. Cases are rotated under an indicator tip while they are supported on a case-neck pilot and a support pin through the flash hole. The unit has a nice, wide base and low profile so it is stable in use. The tool works for .22 through .45 caliber cases and can be used on .17- and .20-caliber cases with the optional carbide alignment rod. The MIC-4 pin fits both .060 (PPC size) and .080 (standard size) flash holes. Sinclair’s Case Neck Sorting Tool can be ordered with or without a dial indicator. The basic unit without dial indicator (item item 749006612) is priced at $59.99. You can also buy the tool complete with dial indicator (item 749007129) for $89.99. IMPORTANT: This sorting tool requires caliber-specific Case Neck Pilots which must be ordered separately.
Editor’s Comment: The purpose of this Sinclair tool is rapid, high-quantity sorting of cartridge brass to ascertain significant case-neck-wall thickness variations. Consider this a rapid culling/sorting tool. If you are turning your necks, you will still need a quality ball micrometer tool to measure neck-wall thickness (to .0005) before and after neck-turning operations.
When you make a reloading mistake, you may need to “pull down” assembled ammo. The embedded UltimateReloader.com video demonstrates how to use the Hornady Cam-Lock bullet pulling system.
When Reloading Goes Bad — The Danger of Over-Charging
Our friend Gavin Gear of UltimateReloader.com was recently reloading some 9mm pistol ammo with his Hornady progressive press. As part of his reloading procedure, he visually checks the cases — and he noticed that the charges seemed high. Sure enough, his most recently-produced rounds were about two grains over spec. He diagnosed the issue: “I was using a powder measure without a baffle. What happened was, over the course of the loading session, things settled in, and the charge level increased.”
Not knowing just when his powder measure started delivering too much powder, Gavin decided, for safety’s sake, to pull down all the ammo he had just reloaded. Yes that’s time-consuming, but it’s better than the alternative — having a dangerous Kaboom while shooting. With fast-burning pistol powders, a two-grain over-charge could cause a blown case, damaged firearm, and/or serious injury.
Watch Cam-Lock Bullet Puller Used to Remove Bullets from Loaded Ammo:
Use of Bullet Puller starts 4:00 minutes into video.
Gavin says it is vitally important to perform safety checks during the reloading process: “You’ve got to do it — check every single round to make sure there IS powder, and that there’s not too MUCH powder. Double, Triple, Quadruple check your components… and your powder charges. You can’t be too careful.”
To pull down a loaded round, first place the cartridge in the shellholder on your press ram. Then raise the round up into the bullet puller device installed where a die would go. The Hornady Cam-lock bullet puller works by clamping the bullet in a collet when you flip down the red-coated lever. Then, with the case held by the rim in the shell-holder, the bullet exits the cartridge as the press ram is lowered. It takes time, but it’s pretty fool-proof once you get the hang of it. This entire process is illustrated in Gavin’s video, starting near the four-minute mark.
The Hornady Cam Lock Bullet Puller has four (4) key components: 1. Cam-Lock die body; 2. Cam-Lock lever; 3. Stem; and 4. Collet (Caliber-specific).
NOTE: In order to use this tool, you’ll need the appropriate collet for each diameter range of bullets you intend to pull. For example use collet #3 for 6mm, collect #6 for 7mm, and collet #7 for .308 Caliber.
RCBS Lock-Out Die
A good safety option for users with progressive presses is the RCBS Lock-Out Die. This has a charge detection rod that dips into each case after powder has dropped. You adjust the die to the proper charge height for your desired load. If the actual dispensed charge is too high or too low, the Lock-Out Die senses the problem and stops the press from advancing to the next case (it does this by preventing the ram/shellplate from fully elevating). We’ve used the Lock-out die with success for both pistol and rifle cartridges. It’s sensitive to about one-half grain with pistol powders.
This Lock-Out Die works with Hornady and Dillon progressives as well as with RCBS progressives. It does take up one die station on the press.
We are re-publishing this article at the request of Forum members who found the information very valuable. If you haven’t read this Safety Tip before, take a moment to learn how you can inspect your fired brass to determine if there may be a potential for case separation. A case separation can be dangerous, potentially causing serious injury.
On the highly-respected Riflemans’ Journal blog, created by our late dear friend German Salazar*, there was an excellent article about Cartridge Case-Head Separation. In this important article, Salazar (aka GS Arizona) examined the causes of this serious problem and explained the ways you can inspect your brass to minimize the risk of a case-head separation. As cases get fired multiple times and then resized during reloading, the cases can stretch. Typically, there is a point in the lower section of the case where the case-walls thin out. This is your “danger zone” and you need to watch for tell-tale signs of weakening.
The photo below shows a case sectioned so that you can see where the case wall becomes thinner near the web. You can see a little arrow into the soot inside the case pointing to the thinned area. This case hadn’t split yet, but it most likely would do so after one or two more firings.
Paper Clip Hack for Detecting Problems
The article provided a great, easy tip for detecting potential problems. You can use a bent paper clip to detect potential case wall problems. Slide the paper clip inside your case to check for thin spots. GS Arizona explains: “This simple little tool (bent paper clip) will let you check the inside of cases before you reload them. The thin spot will be immediately apparent as you run the clip up the inside of the case. If you’re seeing a shiny line on the outside and the clip is really hitting a thin spot inside, it’s time to retire the case. If you do this every time you reload, on at least 15% of your cases, you’ll develop a good feel for what the thin spot feels like and how it gets worse as the case is reloaded more times. And if you’re loading the night before a match and feel pressured for time — don’t skip this step!”
* Sadly, German Salazar passed away unexpectedly on June 21, 2022 at age 62. German was a great inspiration to this site and help guide the creation of the AccurateShooter Forum. A brilliant man, expert attorney, and top-tier marksman, German will be sorely missed in the shooting sports world.
The February 2013 edition of Shooting Sports USA magazine has an interesting feature by Glen Zediker, who sadly passed away in October 2020. In this Transporting Success, Part I article, Zediker explains the advantages of loading at the range when you are developing new loads or tuning existing loads. Glen, the author of the popular Handloading for Competition book, discusses the gear you’ll need to bring and he explains his load development procedure. In discussing reloading at the range, Glen focuses on throwing powder and seating bullets, because he normally brings enough sized-and-primed brass to the range with him, so he doesn’t need to de-prime, re-size, and then re-prime his cases.
Zediker writes: “Testing at the range provides the opportunity to be thorough and flexible. You also have the opportunity to do more testing under more similar conditions and, therefore, get results that are more telling. Once you are there, you can stay there until you get the results you want. No more waiting until next time.”
Zediker starts with three-shot groups: “I usually load and fire three samples [with] a new combination. I’ll then increase propellant charge… based on the results of those three rounds, and try three more. I know that three rounds is hardly a test, but if it looks bad on that few, it’s not going to get any better.”
Glen reminds readers to record their data: “Probably the most important piece of equipment is your notebook! No kidding. Write it down. Write it all down.”
There’s More to the Story…
Editor’s Note: In Zediker’s discussion of loading at the range, he only talks about throwing powder and seating bullets. In fact, Glen opines that: “There is little or no need for sizing.” Well, maybe. Presumably, for each subsequent load series, Zediker uses fresh brass that he has previously sized and primed. Thus he doesn’t need to de-prime or resize anything.
That’s one way to develop loads, but it may be more efficient to de-prime, re-size, and load the same cases. That way you don’t need to bring 50, 80, or even 100 primed-and-sized cases to the range. If you plan to reload your fired cases, you’ll need a system for de-priming (and re-priming) the brass, and either neck-sizing or full-length sizing (as you prefer). An arbor press can handle neck-sizing. But if you plan to do full-length sizing, you’ll need to bring a press that can handle case-sizing chores. Such a press need not be large or heavy. Many benchresters use the small but sturdy RCBS Partner Press, for sale now at Amazon for $114.99. You may even get by with the more basic Lee Precision Compact Reloading Press, shown in Zediker’s article. This little Lee press, Lee product #90045, currently retails for $44.99 at Midsouth.
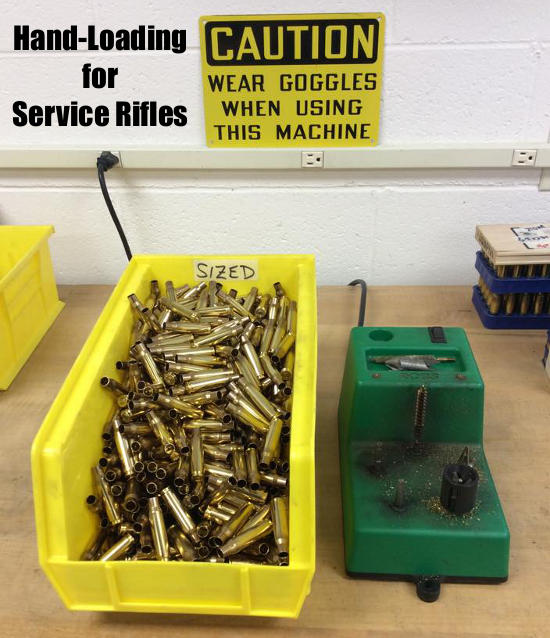
The U.S. Army Marksmanship Unit (USAMU) has published a great series of reloading “how-to” articles on its Facebook Page. This post covers key factors to consider when loading ammunition for Match Rifles and Service Rifles, with a particular focus on self-loading “gas guns”. Visit the USAMU Facebook Page regularly for other, helpful reloading and marksmanship tips.
We offer some “cardinal rules” to help new gas-gun handloaders with safety and efficiency. These address both Match Rifle and Service Rifle versions of the AR15, M1 Garand, M1A, and M110. However, they can also improve safe reloading for many other auto-loaders such as M1 Carbines, FALs, SIGs, etc. The author distilled these principles many years ago to help focus on the essential aspects of these rifles.
RULE ONE: Service Rifles Are Not Benchrest Rifles
Gas-guns require a relatively loose fit between ammunition and chamber (vs. bolt actions) for safe, smooth operation. Many techniques, such as neck sizing and keeping cartridge headspace quite tight, are popular in the extreme bolt gun accuracy realm. However, they are of little value with Service Rifles, and some could even be hazardous. Before adopting a specialized technique, seriously consider whether it is appropriate and beneficial in a gas-gun.
RULE TWO: Never Compromise Safety to Obtain Accuracy
Example: If choosing a brand of great, but ultra-sensitive match primers offers possibly better accuracy at the risk of slam-fires in your design of rifle, don’t do it! You are issued exactly two eyes and ten fingers (best-case scenario). Risking them trying to squeeze 0.25 MOA better accuracy out of an M1A, etc. simply isn’t worth it.
RULE THREE: Tailor the Precision to Your Individual Skill and Your Rifle’s Potential
This has been addressed here before, but bears repeating for newcomers. If you are struggling to break out of the Marksman Class, or using a CMP M1 “As-Issued,” then laboriously turning the necks of your 600-yard brass is a waste of time. Your scores will improve much faster by practicing or dry-firing. On the other hand, if the reigning champions anxiously check your scores each time you fire an event, a little neck-turning might not be so far-fetched.
Verifying Load Improvements — Accuracy hand-loading involves a wide variety of techniques, ranging from basic to rather precise. Carefully select those which offer a good return on investment for your time and labor. In doubt? Do a classic pilot study. Prepare ammo for at least three or four ten-shot groups with your new technique, vs. the same with your standard ammo. Then, pick a calm day and test the ammo as carefully as possible at its full distance (e.g. 200, 300, or 600 yards) to verify a significant improvement. A little testing can save much labor!
This video explains the procedure for ordering an M1 Garand from the CMP.
RULE FOUR: Be Your Own Efficiency Expert
Serious Service Rifle shooters generally think of ammunition in terms of thousands of rounds, not “boxes”, or even “hundreds”. Analyze, and WRITE DOWN each step in your reloading process. Count the number of times each case is handled. Then, see if any operations can be dropped or changed without reducing safety or accuracy. Eliminating just two operations saves 2000 steps per 1000 rounds loaded. Conversely, carefully consider any measurable benefits before adding a step to your routine.
RULE FIVE: In Searching for Greater Accuracy with Efficiency, Look for System Changes
For example, instead of marking your 300-yard rounds individually to differentiate them from your 200-yard ammo, would a simple change in primers work? If accuracy is maintained, using brass-colored primers for 200 and silver for 300 provides an indelible indicator and eliminates a step! Similarly, rather than spending hours selecting GI surplus brass for weight and neck uniformity, consider splurging on some known, high-quality imported match brass for your 600-yard loads. Results should be excellent, time is saved, and given limited shooting at 600 yards, brass life should be long.
RULE SIX: Check All Your Primers Before Packaging Your Loaded Ammo
This seems simple and even intuitive. However, many slam-fires (which were much more common when M1s and M1As were the standard) are due, at least in part, to “high” primers. Primers should be seated below flush with the case head. The USAMU has addressed this at length in a previous column, but each round should be checked for properly-seated primers before they are packaged for use.
A fire in the home is always to be feared. And a fire in your reloading room can be disastrous. Near your reloading bench you probably have flammable solvents, and maybe gunpowder. What would happen if an electrical fire started in your reloading room? Would you be alerted? Do you have a proper fire extinguisher at hand?
Here’s a true story from Forum Member Joe O. (aka “Joecob”) that provides a valuable safety lesson. After Joe started up his old tumbler, an internal connector worked loose, causing an arc which started a fire in his basement reloading area. Luckily Joe had a functioning smoke detector, and a fire extinguisher.
Very few of us would worry about fire when we plug in a tumbler or other AC-powered reloading tool. But there is always the possibility of a malfunction and a fire. Quick thinking (and a handy extinguisher) prevented serious damage to Joe’s reloading room and house — but things could have been worse (much worse), had Joe not responded quickly.
Fire in the Reloading Room — Report by Joecob
The day before ‘Sandy’ hit I was cleaning brass the way I always have. I set the vibratory tumbler on the back of my reloading bench in the basement. I loaded the media hopper with 40 fired empty brass cases (and walnut media), plugged the cord in, turned the tumbler on and went back upstairs to watch TV. I could hear the tumbler running in the background.
About half an hour later I heard the basement smoke alarm go off. I ran downstairs. Flames were licking from the melting plastic of the tumbler.
I grabbed the nearby ABC cannister extinguisher and squirted out the fire and soaked the charred bench areas with water. Good thing I had the extinguisher! And I was glad I religiously store powder and primers properly — away from the bench (and everything else).
What caused the fire? It looks like an internal AC connector finally vibrated loose enough to arc and ignite the plastic. WHEH! I had been using that thing for 25 years the same way without mishap. Guess I should have known to periodically check the guts of a thing that plugs in and vibrates for a living?
Today I went out and bought a new even bigger ‘Pro’ ABC extinguisher, plus a dual-detector smoke alarm, and an ultrasonic cleaner. That experience was scarier than the storm. I hope this true account might help someone else to avoid a bad experience.
In his account, Joe refers to an “ABC” cannister fire extinguisher. The “ABC” refers to the fire classification rating: Class A (trash, wood, and paper), Class B (liquids and gases), and Class C (energized electrical equipment) fires. There are many brands of ABC-rated extinguishers.
The rechargeable Kidde 210 unit (sku 21005779) contains four pounds of a multipurpose monoammonium phosphate dry chemical extinguishing agent. It has a discharge time of 13 to 15 seconds, a discharge range of 10 to 15 feet, and an operating pressure of 100 PSI. The seamless aluminum cylinder measures 4.5 inches in diameter and 15.7 inches tall. The Kidde 210 has a 6-year limited warranty. This is Amazon’s #1 Best Seller among Fire Extinguishers.
This is a grim tale. A man almost lost the use of his right hand, and did suffer terrible injuries to his fingers. All because he picked the wrong bottle of powder off the shelf. We have run this story before, and we will continue to run it every year, as a caution to our readers. This mistake is easy to make, but the consequences can be dire. Always, always double-check your powder labels before you start the hand-loading process. If you don’t, you may not have a hand to load with next time…
Similar Labels, Disasterous Consequences
The shooter, Denny K., was assembling some rounds for his brand new 7mm-08 Savage hunting rifle. He thought he was loading with Hodgdon Varget. Instead he had filled his powder measure with Hodgdon TiteGroup, a fast-burning pistol powder. The labels are similar, so the mistake is understandable. But the results were devastating. Here’s what 41 grains of TiteGroup can do in a 7mm-08:
Posting on the Firing Line, in a thread entitled “Lucky to Be Alive”, Denny writes:
“This is the hardest post to post. I know if I had read it a week ago my comment would have been: ‘You have no business reloading’. I had everything perfect, except pouring the wrong powder in the powder measure. I type this slowly with my left hand, embarrassed but … possibly saving someone else a tragedy or, like me, a long drive to the Emergency Room and surgery to save my finger.”
The Still-Sealed Bottle of Varget
Denny did not initially comprehend exactly why the kaboom happened. He thought maybe his new Savage rifle was at fault. Then, on his return home, he discovered something…
Denny wrote: “The seven-hour period it took to go to ER, transport to Trauma Center and surgery made me think it was a Savage rifle issue. Brand new rifle, new brass, triple-checked loading data. The next day I was humbled when I realized the Varget powder was still sealed.
I knew what powder to use. I thought [Varget] was what I used. Not until the following day did I realize the Varget was still sealed.”
At that point, Denny realized what caused the accident — “operator error”. He knew he had to warn others about using the wrong powder: “I knew I needed to share my mistake, even though it is embarrassing, just to remind people. I’ve been reloading for 30 years…”
Editor’s Comment: Denny was not a novice reloader. His experience demonstrates that this kind of mistake can be made by any hand-loader, even one with decades of experience. Be safe guys, take your time when you load your ammo. Remove powders from measures after your loading sessions (pistol powders can look very similar to rifle powders). And by all means CHECK the LABEL on the jug. As the TiteGroup label says: “A little goes a long way.”
It’s not a bad idea to separate your pistol powders from your rifle powders, or perhaps even load for pistol in a separate part of your workshop.


 A while back, Sinclair International’s Reloading Press Blog featured a “round-table” discussion of reloading techniques. Sinclair’s team of tech staffers were asked: “What do you feel is the one-most crucial step in precision reloading?”


 He who dies with the most toys wins — right? Well Sinclair has another interesting gadget you can add to your reloading bench. The Sinclair

 RCBS Lock-Out Die
 On the highly-respected Riflemans’ Journal blog, created by our late dear friend German Salazar*, there was an excellent article about Cartridge Case-Head Separation. In this important article, Salazar (aka GS Arizona) examined the causes of this serious problem and explained the ways you can inspect your brass to minimize the risk of a case-head separation. As cases get fired multiple times and then resized during reloading, the cases can stretch. Typically, there is a point in the lower section of the case where the case-walls thin out. This is your “danger zone” and you need to watch for tell-tale signs of weakening.


 There’s More to the Story…


 A fire in the home is always to be feared. And a fire in your reloading room can be disastrous. Near your reloading bench you probably have flammable solvents, and maybe gunpowder. What would happen if an electrical fire started in your reloading room? Would you be alerted? Do you have a proper fire extinguisher at hand?
 I grabbed the nearby ABC cannister extinguisher and squirted out the fire and soaked the charred bench areas with water. Good thing I had the extinguisher! And I was glad I religiously store powder and primers properly — away from the bench (and everything else).


