In recent months, Forster Co-Ax® presses have been hard to find, as demand has out-stripped supply. But the folks at Forster Products are working hard to get these excellent presses out to vendors. Be patient, check with multiple sellers, and you should be able to find one.
If you are not yet familiar with the many unique features of the Forster Co-Ax, we recommend you watch the video embedded below. This shows how the press operates and highlights the design elements which set the Co-Ax apart from every other reloading press on the market.
Video Shows Special Features of Forster Co-Ax Reloading Press
Forster Co-Ax Press Video Review
This is a very thorough review of the Forster Co-Ax done by Rex Roach. This 14-minute video shows the key Co-Ax features, explaining how the floating case-holder jaws work (3:30 time-mark), how the dies are held in place (4:40 time-mark), how spent primers are captured (6:10 time-mark), and how to set the primer seating depth (10:00 time-mark). We’ve used a Co-Ax for years and we still learned a few new things by watching this detailed video. If you are considering purchasing a Co-Ax, definitely watch this video start to finish.
The Co-Ax case-holder features spring-loaded, floating jaws. These jaws have two sets of openings, small and large. This allows the system to adapt to various rim diameters. The jaw plates can simply be reversed to switch from small jaw to large jaw. In the photo above, the Co-Ax is configured with the large jaw openings in the center.
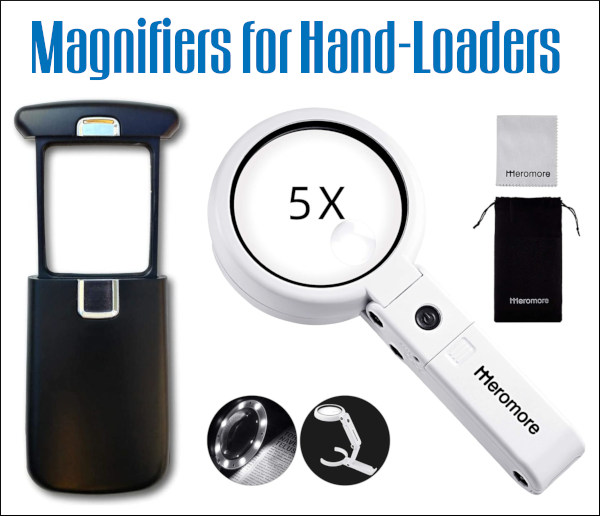
What is the most-used piece of equipment on this Editor’s reloading bench? No it’s not my Rock-Chucker press, my priming tool, or even my calipers. The one item in near-constant use is a small, folding magnifying glass. Mine folds into a square case and offers 4X viewing with an 8X bifocal insert. With this handy tool I can inspect case mouths for burrs, check primer pockets, inspect meplats, and look for flaws on bullet jackets. I also use the magnifier to see rifling marks on bullets seated into the rifling, or check my bolt for galling. The number of uses is nearly endless. I keep one magnifier at my reloading bench and another in my range kit.
Folding magnifiers are so handy yet inexpensive that you should own a couple spares (including one in the range box). I bought my magnifier in a book-store, but you can also find them on Amazon.com and FoldingMagnifier.com starting at under $2.00. To see inside cases and dies and view fine details, consider the 5X Meromore Folding Magnifier with a built-in, battery-powered LED light, plus a 11X high-magnification insert.
With a decent small magnifier, you can easily see any minute flaws in your barrel crowns. That’s important because crown damage can cause hard-to-diagnose accuracy issues. We’ve known guys who spend weeks tinkering with loads, when the real problem was a worn-out or damaged crown.
The slide-out iLumen8, shown at left in top photo, offers 3X power with built-in illumination. An “Amazon’s Choice” item, this palm-sized magnifier is $18.95 on Amazon.
As a cartridge case is reloaded multiple times, burnt powder residue and carbon builds up on the inside of the case. Unless the case interior is cleaned in some fashion, eventually you’ll see a slight reduction in case capacity. One of our Forum members from Australia wonders about the effects of reduced case capacity: “If the capacity of the case decreases as the crud builds up, then it effectively reduces the size of the cartridge (inside). Wouldn’t that change the pressure produced from that of an equivalent clean case?”
Interesting Test of Case Capacity Changes
Forum member Fred Bohl has actual test results that can help answer the above question. Fred proved that, over a 20-reload cycle, the case capacity of uncleaned cases did decline a small amount. However, surprisingly, this did not seem to affect the actual chronographed velocity of the load. Extreme Spread (ES) did increase, but Fred believes the higher ES was due to changes in case-neck tension, rather than due to the slight reduction in case capacity. Fred reports:
“Back when beginning to use ultrasonic case cleaning, part of the motivation was to get the inside clean based on the assumption that allowing burnt residue to build up inside cases would affect capacity, and, ultimately, performance. An experiment was done to test this hypothesis. The load used, 30.5 grains of RL15 behind 107gr SMKs in a 6mmBR, was selected for best group and lowest ES in prior load development. It turned out to be 92% of initial case capacity and neither “full” or compressed. (I would suspect that different powders, load weight, and total case capacity might produce very different results.)
We took 30 cases of identical initial capacity and tracked three lots of 10 each:
LOT 1: No Internal cleaning LOT 2: Cleaned with media in tumbler LOT 3: Cleaned with Ultrasound machine
Each case (in each lot) was shot and reloaded 20 times. The simplified results after 20 reloads of each lot were as follows:
Lot 1 (not cleaned) – 0.3 to 0.4 gr. loss of capacity, 5 to 8 fps greater ES.
Lot 2 (tumble cleaned) – 0.1 to 0.3 gr. loss of capacity, 4 to 6 fps greater ES.
Lot 3 (ultrasonic cleaned) – no loss of capacity, no detectable change in ES.
FINDINGS There was no detectable correlation of velocity change to the lots. An oddity was that on very hot days Lot 1 velocities were, occasionally, slightly higher. From results of another ongoing test, I believe the above differences in ES are probably due more to variance in bullet grip tension than case capacity. The ultrasound cleaned cases (LOT 3) did maintain the lowest ES, but we are not 100% sure of the reasons why. More consistent bullet seating might be the reason.”
Editor’s NOTE: Fred’s results do suggest that carbon build-up inside the uncleaned cases might cause a slight increase in pressure that shows up on hot days. Fred has posted that: “A local shooter reported doing the 20 reload, no-clean test on a .308 that gave a loss of capacity of 2.0 grains, doubled ES and significant velocity changes. However, I don’t have any details on his load weight or powder.” Obviously a lot of carbon can build up with 20 reloads. Many shooters retire their brass before then.
Ultrasonic Cleaning and Neck Lube
Some time ago, Jason Baney did a lengthy test on ultrasonic cleaning. Jason found that with his ultrasonically-cleaned cases, the inside of the necks got so “squeaky clean” that he needed to use dry lube in the necks. Jason uses the $21.50 dry lube kit from Neconos.com. This applies ultra-fine Moly powder to the neck interior using small carbon steel balls.
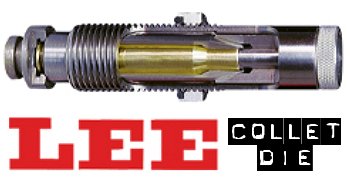
Editor’s NOTE: We generally recommend full-length sizing your cases. But there may be some situations where you may want to body-size your brass in one operation, and then neck-size the case as a final operation for reduced run-out. Or, perhaps you have a non-bushing FL sizing die and you want to modify the neck sizing. This article explains how to use a Lee Collet Die to size case-necks.
For those who prefer to neck-size their brass (rather than full-length-size), the LEE Collet Die is a popular, inexpensive option. It works by having collet tangs or “fingers” press the neck against a central mandrel. A collet squeezes the case neck against a precision mandrel for a perfect fit with minimum run-out. The benefit is that you get a very straight neck, which is sized consistently from top to bottom. Canadian shooter Jerry Teo explains: “LEE Collet Dies produce sized cases with very low runout (measured runout is under .001″ using a Sinclair concentricity gauge). You also don’t get the build-up of brass at the base of the neck, as can happen with bushing neck dies. The neck-shoulder junction stays nice and crisp.”
Here’s a good video that explains how to use a Lee Collet Die to Neck-Size .243 Win brass:
UPDATE to LEE Collet Dies — Neck Protrusion Change
The Lee Precision website notes a small design change: “If you’re a long-time user of Lee Collet Neck Sizing Die you may notice we have modified the Collet so a small portion of the neck protrudes through the end of the Collet-sizing portion. This often-requested modification was implemented in 2019. This change allows the portion of the neck that protrudes above the Collet to remain in its fire-formed condition. This provides a natural flare to the case neck allowing easy and concentric seating of bullets. This is especially important when seating cast bullets or low-drag coated bullets.”
TIP ONE — Adjusting Tension
LEE Collet dies don’t have a specific mechanical adjustment for neck tension. But you CAN easily modify the die to provide more or less tension. If you want to adjust the neck tension using a Lee Collet die, you can simply chuck the mandrel in a drill and reduce the diameter with some sand-paper (to increase neck tension) or you can order a mandrel the next caliber larger and turn it to whatever diameter you want (the larger the mandrel diameter, the less the neck tension). You can also order custom mandrels from Lee sized to any diameter you want.
Regarding neck tension, Boyd Allen makes an important point: “The only way to properly get more neck tension with collet dies is to either reduce the diameter of the mandrel, or order a smaller-diameter mandrel from Lee. I remind folks that adjusting the die position to have more toggle at the top of the ram stroke (not the factory recommended method), or leaning on the press handle with more force than recommended will NOT increase neck tension.”
No Custom Lee Collet Dies For Now
In years past, Lee also offered Custom Collet Dies, made from two fired cases. Hopefully these will be available in the future. However, earlier this year, Lee announced it had suspended sale of most custom dies including Collet Dies: “March 17, 2021: Due to unprecedented order volume, we have suspended custom services for Collet Necksizing Dies, Full-Length Sizing Die Sets, Quick Trim Dies, Case Length Gauges, Factory Crimp Dies, and Bullet Molds until we are able to meet the required volume of our standard products.”
TIP TWO — Polish and Tune for Easy Case Removal
Some users have complained that their Collet Dies grab the case-neck too firmly, making the case hard to remove. There are solutions to this problem. First inspect the collet fingers and smooth the inner surface up a bit with polishing compound or an extra-fine sanding pad. Second, you can open up the fingers a little bit. LEE recommends that if your Collet Die is sticking, take a steel punch and tap the fingers apart a little bit so that the natural “unloaded” position is wider. Lastly, you should lightly lubricate the outside of the collet fingers (see arrows) before you re-assemble the die. This will ensure they slide smoothly. Also, to prevent the collet fingers from closing too tight, never load up the die with your press without putting a case in place first. Without a case neck between the collet fingers and the mandrel, the collet can clamp itself too tight as you raise the ram.
TIP THREE — Always Have a Case Inside When Operating Collet Die
Our friend Boyd Allen tells us that you need to follow directions and NEVER operate the die without a case inside. Boyd explains: “This is because doing so will spring the quadrents of the collet inward so that they interfere with the insertion of a case, and the user will have to figure out how to undo the damage if the die is to operate properly. This advice would not be needed if everyone read the instructions before using the die…. but many times, they don’t. Another thing that I tell new users is to take the die apart so that they will have a better chance of understanding how it works.”
TIP FOUR — Size Twice and Spin Your Case 1/8th Turn
After reaching fully “down” on your press handle, withdraw the case about an inch and manually rotate it about 1/8th (NOT 1/4 or 1/2) turn while still in the shell-holder, then size again. This will place the die’s collet petals on the four “high spots” of the case neck and will result in a rounder, more evenly-sized neck with slightly more bullet tension. This takes only about one second more per case and is well worth the slight extra effort. (We thank reader Stonecreek for this smart tip).
Shooting Prairie Dogs at extreme long range takes some highly specialized equipment. Forum Member VolDoc and his friends have taken long-range varminting to a whole new level. With his Savage-based, Hart-barreled 20 BR, VolDoc managed a verified 1,032-yard Prairie Dog kill, possibly the longest recorded with a .20-Caliber rifle. But that’s just part of VolDoc’s impressive precision varminting arsenal. Here we showcase three of VolDoc’s accurate rigs: his stunning English Walnut Diamondback 6BR/Dasher, his Nesika-actioned “Orange Crush” Dasher, and the 1K Prairie Dog-slaying 20 BR Savage.
Diamondback Switch-Barrel Rifle Specifications
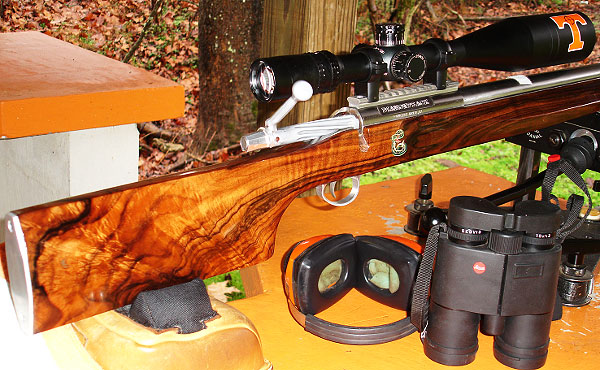
The action is a Stiller Diamondback, drop-port. The custom stock is similar to a Shehane ST-1000, but crafted from 40-year-old English Walnut. [Editor’s note: the wood on this gun is gorgeous!] There are three barrels for the gun with three different chamberings: 6BR Brux 1:8″-twist HV; 6BRX Krieger 1:8″-twist HV, and 6mm Dasher Krieger 1:8.5″ twist fluted straight contour (no taper). The scope is a Nightforce 12-42x56mm, with 2DD reticle.
Comments: This rifle is a good study in comparison of the three different chamberings. On the same rifle platform (same stock and action), each of these barrels had killed prairie dogs over 1,000 yards. So if someone asks which is best, a 6BR, or 6BRX, or 6 Dasher, VolDoc says they are all effective. The improved cartridges will deliver higher velocities, which can be an advantage. On the other hand it is simpler to load 6mmBR brass right out of the box, and it’s easy to find an accurate load for the 6mmBR (see photo).
Nesika 6mmBR/Dasher Rifle Specifications
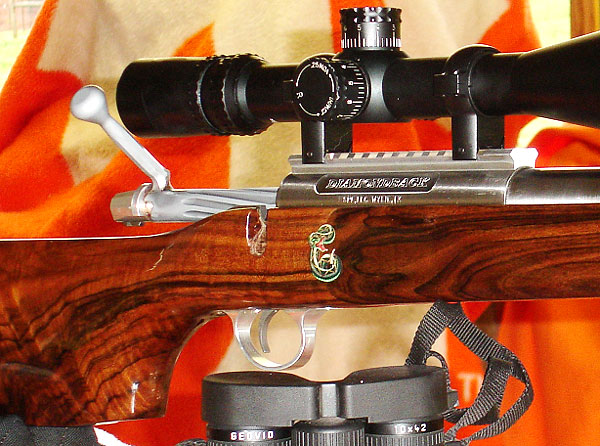
VolDoc’s “Big Orange Crush” rifle has a stainless Nesika ‘J’ action, with 2 oz. Jewell trigger, in a painted fiberglass Shehane ST-1000 stock. Originally a 6BR, the gun is now chambered as a 6mm Dasher with a .271 no-turn neck. The barrel is a 1:12″-twist Krieger fited with Vais muzzle brake. On top is a NightForce NXS 12-42x56mm scope with double-dot reticle. The double-dot gives precise aiming and lower dot can be used as an aming point, when you need a few more MOA of elevation in the field.
Comments: Big Orange Crush shoots 87gr V-Maxs into bugholes at 3,400 fps. VolDoc’s load with the 87s is very stout, more than 32 grains of Vihtavuori N-135 with Wolf SRM primers. Cases are full-length sized, with an 0.266″ bushing for the necks.
This 3400 fps load with the 87gr V-Maxs has accounted for hundreds of Prairie Dogs killed from 97 yards to 1,050 yards. The 87gr V-Max at this speed literally picks Prairie Dogs up and throws them 10 feet vertically and laterally. VolDoc reports: “The barrel now has more than 3,000 rounds down the tube and exhibits little throat fire-cracking and no loss of accuracy. I can’t explain why, it just hasn’t deteriorated yet. This rifle is my best-ever ‘go-to’ Prairie Dog rifle.”
Savage 20 BR Rifle Specifications
The action is a Savage Dual Port, with an aftermarket Sharp Shooter Supply (SSS) 4 oz. Evolution trigger. The stock is a modified Savage factory unit that has been pillar-bedded. The factory barrel was replaced with a 28″ Hart stainless, 1:9″ twist barrel fitted with a Rayhill muzzle brake. The gun is chambered in 20 BR with a 0.235″ no-turn neck. Kevin Rayhill did the smithing. To provide enough elevation to shoot at 1,000 yards plus, Ray fitted a +20 MOA Bench Source scope base. This +20 rail is very well-crafted, and made especially for the Savage Model 12.
Comments: VolDoc reports: “When I got the Savage back from Kevin Rayhill, it still had my 6 BR factory barrel on it, as I use it to compete in Factory-class regional matches. I put on the new 20 BR Hart barrel Kevin had chambered and quickly put in a full day of load development using the 55gr Bergers (0.381 G1 BC) and the 40gr V-Maxs. Both proved very easy to tune and I soon had my loads. My 55gr Berger load with runs about 3590 fps. Varget was very accurate with the 55s (see load dev. targets below).
The mild recoil of the 20 BR, along with a very good muzzle break (Rayhill’s design) enables me to spot every hit or miss myself. Kevin also re-contoured the underside of the Savage stock so it tracks straight back on recoil, also making seeing hits easier.”
The 20 Caliber 1000-Yard Prairie Dog Quest
Making the 1032-Yard Shot with a 20 BR by Dr. John S. (aka “VolDoc”)
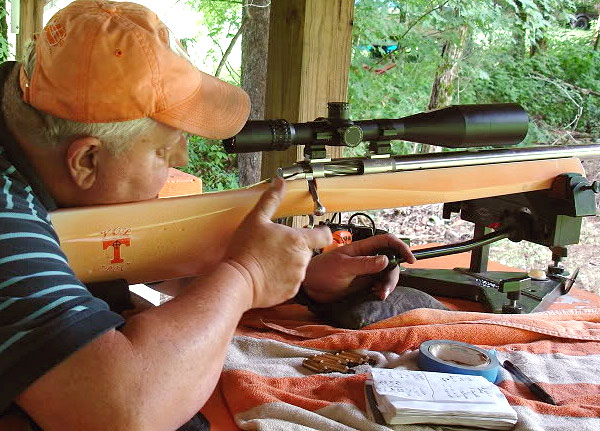
This article covers my recent successful quest for a 20-caliber varmint kill past 1,000 yards. This may be a first — I couldn’t find anyone else with a confirmed 20-Cal Prairie Dog kill at 1000+. I started a thread on the Varmint section of the AccurateShooter.com Forum about building a 20 BR capable of 1,000-yard Minute of Prairie Dog accuracy and many said 20 Cal bullets just could not do it. Some came to my defense and said those that doubted had never studied the ballistics of the 20BR with the new Berger 55gr bullets now available. Well, folks, I can tell you, hitting a Prairie Dog at 1000 yards isn’t easy — but it IS possible. Here’s how it was done….
Gale-Force Winds and High Temps
After arriving at our Prairie Dog Ranch in Colorado, I soon realized my quest was going to be especially difficult because we had continual 40+ mph winds and 100° heat every day. We had a special place where Birdog and I had made many 1,000-yard+ kills in years past, so I knew the ideal location but needed a small window of opportunity either early morning or late afternoon. Based on past experience, I knew I needed about 21 MOA from my 100-yard zero to get to 1,000 yards. On the first day of the Safari, I shot the 20 BR in the 45 mph brutal winds and heat of 97°. But after about 20 shots, I connected on a dog and lifted him about three feet high. Well, that’s a start.
Winds Subside — Here’s Our Chance …
On the second day of our shoot, I had listened to the early weather forecast, so I knew that there was to be a brief period of light winds early in the morning. We were out on the Colorado prairie at daylight and the conditions were perfect. The sunrise was at my back and we had about a 10 mph tailwind. I looked through my Leica Geovid Rangefinder Binos and the Prairie Dogs were out for breakfast. I quickly ranged the targets and found a group at about 1,050 yards. The technique is to find the dogs, range them, click-up according to your ballistic chart and shoot.
My first shot was very, very close. I added about four clicks up and a couple of clicks left for windage and let another go. That shot threw dirt all over, but the dog didn’t even flinch. This is another good point to remember about long-range Prairie Dog hunting. To be successful, the dogs can’t be too skittish, because if they have been shot at even a few times, they will go down and stay down. So, you should have an agreement with those in your party as to where each member is going to be shooting and respect this boundary. Drive-by shooting style is OK if that’s your thing, it’s just not mine.
Hitting the Mark — Dead Dog at 1032 Yards
On the fourth shot, I saw the dog go belly up and kick its final throws. My quest for the 20-Caliber 1,000-yard Prairie Dog had become a reality. We confirmed the distance with our lasers at 1,032 yards. Our technique for retrieving a dead dog at that range is worth mentioning. When I killed that dog, I left it in the crosshairs of my Nightforce scope. My shooting buddy kept looking through the scope (of my gun) and guided me to the deceased dog using Motorola walkie-talkies. When I got to the dog I was jubilant. I marked it with my tripod and orange jacket, and we took some pictures. (See view through scope photo below). The 55gr Bergers require a center mass hit as they will not expand, especially at that range. I centered this dog in the head — his BAD LUCK, my GOOD.
After making the 1,032-yard kill, I shot many many other Prairie Dogs with the Savage 20 BR using the 40gr V-Maxs. The dog flights were spectacular — red mist and helicopters, counter-clockwise or clockwise on demand. I killed at least five at over 500 yards. I will not use the 55 Bergers on Prairie Dogs again since the quest is over. I will use the 40gr V-Maxs and 39gr Sierra BlitzKings for next trip’s 20 BR fodder.
At the request of our readers, we provide select “Deals of the Week”. Every Sunday afternoon or Monday morning we offer our Best Bargain selections. Here are some of the best deals on firearms, hardware, reloading components, optics, and shooting accessories. Be aware that sale prices are subject to change, and once clearance inventory is sold, it’s gone for good. You snooze you lose.
⏺ Nicely equipped semi-auto .22LR — Good for NRL22 matches
Are you looking to get into the NRL22 discipline but don’t have a rifle to do it with? Check out the Thompson Center T/CR22 .22 LR Rimfire Rifle. This features a 17″ barrel (with front and rear sights) and the stock has a handsome Mossy Oak Camo finish. Equipped with a Picatinny Rail, this is ready to mount a scope for competition. This is a good starter rifle for NRL22 and other tactical rimfire games. Plus it can serve for fun plinking and hunting small varmints.
⏺ Save $110-$125 on quality spotters with Big 82mm objectives
Having a quality spotting scope is critical for a successful hunt or for reading wind and mirage at a match. One of the absolute best scope for the money is the Kowa 82sv and right now you can take advantage of the Kowa Scope Specials over at Creedmoor Sports. You can pick up the 82sv along with a cover plus your choice of the 25x LER eyepiece or the 20-60x eye piece and be ready for whatever adventure is next on your list.
3. Bullet Central — Berger 7mm 180gr Hybrid Bullets, $63.99
⏺ Choice of Champions — Get Berger 7mm 180s while you can
One of the most sought-after match bullets right now is the Berger 7mm/.284 180gr Hybrid Match Bullet. Many vendors are sold out. But we found them in-stock at Bullet Central and ready to ship. Considering the demand, we wouldn’t wait long to order and we’d probably order enough for your upcoming matches this year (including the F-Class Nationals).
4. Amazon — Roll-Up Shooting Mat with Bonus Sand Bag, $34.99
⏺ Great value, rolls-up into small format, free support sandbag
Traveling for matches can often mean stripping down to the bare minimum of gear and that usually mean leaving behind large padded shooting mats. A good option instead is a packable shooting mat such as this 78.5″ x 28.5″ Depring folding mat. This mat folds up into a very small footprint making it great for throwing in your checked baggage. FOUR Colors are offered, all priced at $34.99: Tan (shown), OD Green, Black, and Camo. These Depring shooting mats ship with a FREE 6″ x 3.75″ “Unfilled Gun Rest Sand Bag” which can be used for front or rear support.
5. Midsouth — LEE Breech Lock Reloader Press, $41.99
⏺ Great deal on compact press with breech lock quick die changes
Every handloader can benefit from a compact, secondary press for decapping at home and/or seating bullets at the range. Weighing under 2.5 pounds, this LEE Breech Lock Reloader Press is easy to transport. The open front design makes it easy to insert/remove cases. This LEE press offers Breech Lock functionality for rapid die changes. With the Breech Lock bushing in place, you can instantly swap dies with a twist of the wrist. Right now this LEE Reloader Press is on sale for $41.99 at Midsouth
6. Natchez — Federal XM193 5.56×45 Ammo 400rds, $399.99
⏺ Big savings on CCI 9mm ammo and XM193 ammo for ARs and .223 Rem rifles
Natchez is running a special ammo deal right now. You can save on rifle and pistol ammo AND get FREE SHIPPING. Choose one of three bulk packs: CCI Blazer 9mm 500 rounds for $549.99; or Federal XM193 5.56×45 400 rounds in can for $369.99 ($319.99/400 rds if you buy two cans); or Winchester Lake City M193 5.56×45 1000 rounds in box for $779.99. NOTE: The rifle bulk packs are officially 5.56x45mm ammo, but it should also shoot fine in most modern rifles chambered for .223 Remington. The CCI 9mm and Winchester M193 are priced very competitively, so don’t hesitate.
7. Sportsman’s Warehouse — Allen Soft Rifle Case Sale, 20% OFF
⏺ Huge selection of soft-side rifle cases on sale starting at $16
You can never have enough protection for your rifles while transporting them which means having a quality soft case. A great place to start is with the Allen soft case sale over at Sportsman’s Warehouse. You’ll find everything from simple single gun cases to deluxe double rifle cases — all at 20% off.
⏺ Durable, fitted pistol cases for 3 or 6 handguns
Do you find yourself needing to transport several pistols at a time but are tired of having a case for every gun? A handy, affordable solution are the MTM Tactical Pistol Handgun Cases. These fitted cases are offered in different sizes to accommodate 3 to 6 pistols with ease. These can also be locked up to comply with just about any state requirement. They also feature a rubber O-Ring for weather protection.
⏺ Versatile knife for camping and home, sharp stainless blade
Sometimes you just need a simple, no-nonsense knife in the field that doesn’t cost a lot in case it’s lost or broken. We found this Morakniv Craftline Pro S Fixed Blade Utility Knife which fits the bill exactly. It’s stainless steel, comes with a sheath, and is 3.6″ long making it well-suited for a multitude of cutting tasks. It also makes a good marine safety knife.
10. Amazon — MTM 50rd Deluxe Ammo Carry Box, $11.49
⏺ Hinged top, bullet tip protection, secure latches
Carrying 50 rounds of .20 Practical, .222 Rem, .204 Ruger, or .223 Rem/5.56×45 ammunition has never been easier thanks to the MTM H50-RS Deluxe 50-Round Rifle Ammo Case. These stackable MTM ammo boxes feature a strong, durable mechanical hinge. This provides years of use and allows the lid to sit flat. This MTM Deluxe case also has specially designed slots that hold the cartridges in place while protecting the bullet tips. Maximum Overall Cartridge Lenthe is 2.37″ bullet up and 3.45″ bullet down.
When you make a reloading mistake, you may need to “pull down” assembled ammo. The embedded UltimateReloader.com video demonstrates how to use the Hornady Cam-Lock bullet pulling system.
When Reloading Goes Bad — The Danger of Over-Charging
Our friend Gavin Gear of UltimateReloader.com was recently reloading some 9mm pistol ammo with his Hornady progressive press. As part of his reloading procedure, he visually checks the cases — and he noticed that the charges seemed high. Sure enough, his most recently-produced rounds were about two grains over spec. He diagnosed the issue: “I was using a powder measure without a baffle. What happened was, over the course of the loading session, things settled in, and the charge level increased.”
Not knowing just when his powder measure started delivering too much powder, Gavin decided, for safety’s sake, to pull down all the ammo he had just reloaded. Yes that’s time-consuming, but it’s better than the alternative — having a dangerous Kaboom while shooting. With fast-burning pistol powders, a two-grain over-charge could cause a blown case, damaged firearm, and/or serious injury.
Watch Cam-Lock Bullet Puller Used to Remove Bullets from Loaded Ammo:
Use of Bullet Puller starts 4:00 minutes into video.
Gavin says it is vitally important to perform safety checks during the reloading process: “You’ve got to do it — check every single round to make sure there IS powder, and that there’s not too MUCH powder. Double, Triple, Quadruple check your components… and your powder charges. You can’t be too careful.”
To pull down a loaded round, first place the cartridge in the shellholder on your press ram. Then raise the round up into the bullet puller device installed where a die would go. The Hornady Cam-lock bullet puller works by clamping the bullet in a collet when you flip down the red-coated lever. Then, with the case held by the rim in the shell-holder, the bullet exits the cartridge as the press ram is lowered. It takes time, but it’s pretty fool-proof once you get the hang of it. This entire process is illustrated in Gavin’s video, starting near the four-minute mark.
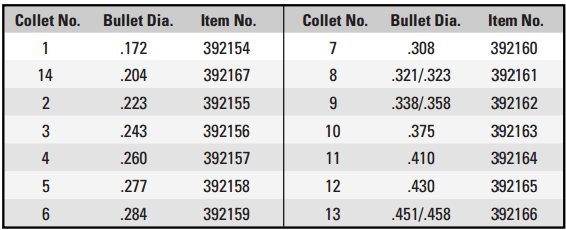
The Hornady Cam Lock Bullet Puller has four (4) key components: 1. Cam-Lock die body; 2. Cam-Lock lever; 3. Stem; and 4. Collet (Caliber-specific).
NOTE: In order to use this tool, you’ll need the appropriate collet for each diameter range of bullets you intend to pull. For example use collet #3 for 6mm, collect #6 for 7mm, and collet #7 for .308 Caliber.
RCBS Lock-Out Die
A good safety option for users with progressive presses is the RCBS Lock-Out Die. This has a charge detection rod that dips into each case after powder has dropped. You adjust the die to the proper charge height for your desired load. If the actual dispensed charge is too high or too low, the Lock-Out Die senses the problem and stops the press from advancing to the next case (it does this by preventing the ram/shellplate from fully elevating). We’ve used the Lock-out die with success for both pistol and rifle cartridges. It’s sensitive to about one-half grain with pistol powders.
This Lock-Out Die works with Hornady and Dillon progressives as well as with RCBS progressives. It does take up one die station on the press.
The U.S. Army Marksmanship Unit regularly publishes a reloading “how-to” article on the USAMU Facebook page. One excellent “Handloading Hump Day” post covered preparation of once-fired 5.56x45mm brass. This article, the first in a 3-part series, has many useful tips. If you shoot a rifle chambered in .223 Rem or 5.56x45mm, this article is worth reading.
This week, Handloading Hump-Day will answer a special request from several competitive shooters who asked about procedures for morphing once-fired GI 5.56mm brass into accurate match brass for NRA High Power Rifle use. The USAMU has used virgin Lake City (LC) 5.56 brass to win National Championships and set National Records for many years. In this 3-part series, we’ll share techniques proven to wring match-winning accuracy from combat-grade brass.
GI brass has an excellent attribute, worth noting — it is virtually indestructible. Due to its NATO-spec hardness, the primer pockets last much longer than most commercial brass when using loads at appropriate pressures.
Preparing Once-Fired GI 5.56 Brass for Reloading (Part 1 of 3)
Assuming our readers will be getting brass once-fired as received from surplus dealers, the following steps can help process the low-cost raw material into reliably accurate components.
1. Clean the Brass
First, clean the brass of any dirt/mud/debris, if applicable. Depending on the brass’s condition, washing it in a soap solution followed by a thorough rinsing may help. [This step also extends the life of the tumbling media.] Approaches range from low-tech, using gallon jugs 1/2 full of water/dish soap plus brass and shaking vigorously, to more high-tech, expensive and time-consuming methods.
2. Wet-Tumbling Options (Be Sure to Dry the Brass)
When applying the final cleaning/polish, some use tumblers with liquid cleaning media and stainless steel pins for a brilliant shine inside and out, while others take the traditional vibratory tumbler/ground media approach. Degree of case shine is purely personal preference, but the key issue is simple cleanliness to avoid scratching ones’ dies.
If a liquid cleaner is used, be SURE to dry the cases thoroughly to preclude corrosion inside. One method is to dump the wet brass into an old pillow case, then tilt it left/right so the cases re-orient themselves while shifting from corner to corner. Several repetitions, pausing at each corner until water stops draining, will remove most water. They can then be left to air-dry on a towel, or can be dried in a warm (150° F-200° F max) oven for a few minutes to speed evaporation.
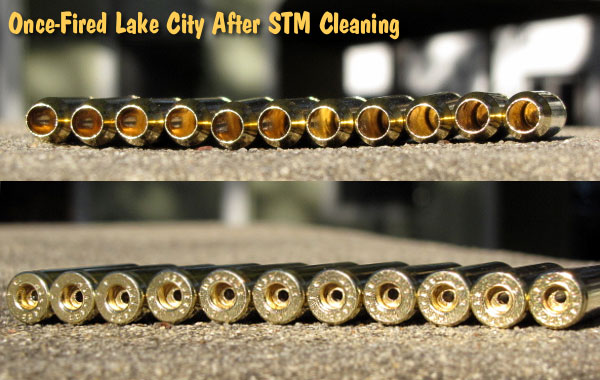
Shown below are Lake City cases after cleaning with Stainless Media (STM). Note: STM Case cleaning was done by a third party, not the USAMU, which does not endorse any particular cleaning method.
3. Inspect Every Case
Once dry, inspect each case for significant deformation (i.e., someone stepped on it), damaged mouths/necks and case head/rim damage. Some rifles’ ejectors actually dig small chunks of brass out of the case head — obviously, not ideal for precision shooting. Similarly, some extractors can bend the case rims so badly that distortion is visible when spinning them in one’s fingers. These can be used for plinking, but our match brass should have straight, undamaged rims.
Dented case mouths are common, and these can easily be rounded using a conical, tapered tool, [such as a .223 expander mandrel. A dummy 7.62 or .30-06 cartridge with a FMJ spitzer can also work.] If most of your brass is of one headstamp, this is a good time to cull out any odd cases.
4. Check the Primers Before Decapping
Your clean, dry and inspected brass is now ready for full-length sizing, decapping and re-priming. Historically, primer crimps on GI brass have caused some head-scratching (and vile language) among handloaders. Our next installment will detail efficient, easy and practical methods to remove primer crimp, plus other useful handloading tips. Until next week, Good Shooting!
NOTE: The USAMU Handloading (HL) Shop does not RE-load fired 5.56 brass. We use virgin LC brass with our chosen primer already staked in place. However, our staff has extensive personal experience reloading GI brass for competition, which will supplement the Shop’s customary steps. In handloading, as in life, there are many ways to accomplish any given task. Our suggestions are note presented as the “only way,” by any means. Time for loading/practicing is always at a premium. Readers who have more efficient, alternative methods that maintain top accuracy are invited to share them here.
Accuracy Potential of Mil-Surp 5.56×45 Brass
So, how accurate can previously-fired GI surplus brass be in a good National Match AR-15? Well, here’s a data point from many years ago that might be of interest. A High Power shooter who wrote for the late Precision Shooting magazine took a Bill Wylde-built AR match rifle to a registered Benchrest match. His first 5-round group ever fired in a BR match was officially measured at 0.231″ at 200 hundred yards. This was fired in front of witnesses, while using a moving target backer that confirmed all five rounds were fired.
He recounted that his ammo was loaded progressively with factory 52gr match bullets and a spherical powder using mixed years of LC brass with no special preparation whatsoever. Obviously, this was “exceptional”. However, he had no difficulty obtaining consistent 0.5-0.6 MOA accuracy at 200 yards using LC brass and a generic “practice” load that was not tuned to his rifle.
Saving Money by Using GI Brass
So, with good commercial brass readily available, why would one go to all the extra steps necessary to process fired GI brass? [Editor: It’s about saving money.]
Economically, it makes great sense. When the author was actively practicing and competing with the service rifle, he had ~3,000 rounds of 5.56mm brass, which allowed him to load during winter and spend most time in the summer practicing. If one were wealthy and wanted to shoot nothing but the finest imported brass, the current cost of 3,000 is ~$1920 (plus shipping.)
Dropping down to good, but less-expensive new, U.S. commercial brass brings the price to a much more realistic ~$720. However, at current rates, the same amount of surplus GI once-fired brass costs between $120 — $150, leaving lots of room in the budget for other expenses. [Editor: that’s less than 10% of the cost of the best imported brass.]
Figure 1. When the bullet is seated farther out of the case, there is more volume available for powder. This enables the cartridge to generate higher muzzle velocity with the same pressure.
Effects Of Cartridge Over All Length (COAL) And Cartridge Base To Ogive (CBTO) – Part 1 by Bryan Litz forBerger Bullets.
Many shooters are not aware of the dramatic effects that bullet seating depth can have on the pressure and velocity generated by a rifle cartridge. Cartridge Overall Length (COAL) is also a variable that can be used to fine-tune accuracy. It’s also an important consideration for rifles that need to feed rounds through a magazine. In this article, we’ll explore the various effects of COAL, and what choices a shooter can make to maximize the effectiveness of their hand loads.
Sporting Arms and Ammunition Manufacturers’ Institute (SAAMI)
Most loading manuals (including the Berger Manual), present loading data according to SAAMI (Sporting Arms and Ammunition Manufacturers’ Institute) standards. SAAMI provides max pressure, COAL and many other specifications for commercial cartridges so that rifle makers, ammo makers, and hand loaders can standardize their products so they all work together. As we’ll see later in this article, these SAAMI standards are in many cases outdated and can dramatically restrict the performance potential of a cartridge.
Bullet seating depth is an important variable in the accuracy equation. In many cases, the SAAMI-specified COAL is shorter than what a hand loader wants to load their rounds to for accuracy purposes. In the case where a hand loader seats the bullets longer than SAAMI specified COAL, there are some internal ballistic effects that take place which are important to understand.
Effects of Seating Depth / COAL on Pressure and Velocity
The primary effect of loading a cartridge long is that it leaves more internal volume inside the cartridge. This extra internal volume has a well known effect; for a given powder charge, there will be less pressure and less velocity produced because of the extra empty space. Another way to look at this is you have to use more powder to achieve the same pressure and velocity when the bullet is seated out long. In fact, the extra powder you can add to a cartridge with the bullet seated long will allow you to achieve greater velocity at the same pressure than a cartridge with a bullet seated short.
When you think about it, it makes good sense. After all, when you seat the bullet out longer and leave more internal case volume for powder, you’re effectively making the cartridge into a bigger cartridge by increasing the size of the combustion chamber. Figure 1 illustrates the extra volume that’s available for powder when the bullet is seated out long.
Before concluding that it’s a good idea to start seating your bullets longer than SAAMI spec length, there are a few things to consider.
Geometry of a Chamber Throat
The chamber in a rifle will have a certain throat length which will dictate how long a bullet can be loaded. The throat is the forward portion of the chamber that has no rifling. The portion of the bullet’s bearing surface that projects out of the case occupies the throat (see Figure 2).
The length of the throat determines how much of the bullet can stick out of the case. When a cartridge is chambered and the bullet encounters the beginning of the rifling, known as the lands, it’s met with hard resistance. This COAL marks the maximum length that a bullet can be seated. When a bullet is seated out to contact the lands, its initial forward motion during ignition is immediately resisted by an engraving force.
Seating a bullet against the lands causes pressures to be elevated noticeably higher than if the bullet were seated just a few thousandths of an inch off the lands.
A very common practice in precision reloading is to establish the COAL for a bullet that’s seated to touch the lands. This is a reference length that the hand loader works from when searching for the optimal seating depth for precision. Many times, the best seating depth is with the bullet touching or very near the lands. However, in some rifles, the best seating depth might be 0.100″ or more off the lands. This is simply a variable the hand loader uses to tune the precision of a rifle.
Here’s something you don’t see every day — a reloading press that has loaded over 1,000,000 rounds of ammo. At the NRA Convention in Dallas in 2018, Redding showcased an old Redding T-7 Turret Press delivered to Sierra Bullets decades ago. 0ne of the very first T-7s made by Redding, this “old warrior” was used by Sierra Bullets to load over 1,000,000 rounds of ammunition in Sierra’s ballistics lab.
Redding T-7 Still Within Spec
After all that loading, Redding tested the press and, remarkably, found that it still remained “within spec”. Redding notes: “This press was subjected to real world reloading wear and stress yet remains within ‘new’ spec after this historic test”. When showcased in Dallas, this Redding turret press was fitted with indicators to show “just how good American steel and craftsmanship remains after what, in a normal situation, would represent numerous lifetimes of use.”
About Redding Reloading
Redding Reloading Equipment has crafted quality, American-made products for the precision handloading market since 1946. Along with single-stage and turret presses, Redding makes great dies. And Redding’s line of tools/accessories includes concentricity gauges, scales, trimmers, powder measures, powder tricklers, cleaning tools, deburring tools, bushings, and many other quality items.


 In recent months, Forster Co-Ax® presses have been hard to find, as demand has out-stripped supply. But the folks at Forster Products are working hard to get these excellent presses out to vendors. Be patient, check with multiple sellers, and you should be able to find one.
 What is the most-used piece of equipment on this Editor’s reloading bench? No it’s not my Rock-Chucker press, my priming tool, or even my calipers. The one item in near-constant use is a small, folding magnifying glass. Mine folds into a square case and offers 4X viewing with an 8X bifocal insert. With this handy tool I can inspect case mouths for burrs, check primer pockets, inspect meplats, and look for flaws on bullet jackets. I also use the magnifier to see rifling marks on bullets seated into the rifling, or check my bolt for galling. The number of uses is nearly endless. I keep one magnifier at my reloading bench and another in my range kit.


 TIP ONE — Adjusting Tension
 TIP TWO — Polish and Tune for Easy Case Removal


 Making the 1032-Yard Shot with a 20 BR

 Hitting the Mark — Dead Dog at 1032 Yards


 Traveling for matches can often mean stripping down to the bare minimum of gear and that usually mean leaving behind large padded shooting mats. A good option instead is a


 Carrying 50 rounds of .20 Practical, .222 Rem, .204 Ruger, or .223 Rem/5.56×45 ammunition has never been easier thanks to the

 RCBS Lock-Out Die


 Effects Of Cartridge Over All Length (COAL) And Cartridge Base To Ogive (CBTO) – Part 1

 Redding T-7 Still Within Spec


