To err is human… Sooner or later you’ll probably get a case stuck in a die. This “fix-it” article, which originally appeared in the Western Powders Blog, explains how to remove a firmly stuck cartridge case using an RCBS kit. This isn’t rocket science, but you do want to follow the directions carefully, step-by-step. Visit the Western Powders Blog for other helpful Tech Tips.
Curing the Stuck Case Blues
Sticking a case in the sizer die is a rite of passage for the beginning handloader. If you haven’t done it yet, that’s great, but it probably will eventually happen. When it does, fixing the problem requires a bit of ingenuity or a nice little kit like the one we got from RCBS.
The first step is to clear the de-capping pin from the flash hole. Just unscrew the de-capping assembly to move it as far as possible from the primer pocket and flash hole (photo at right). Don’t try to pull it all the way out. It won’t come. Just unscrew it and open as much space as possible inside the case.
Place the die upside down in the padded jaws of a vise and clamp it firmly into place. Using the supplied #7 bit, drill through the primer pocket. Be careful not to go too deeply inside the cartridge once the hole has opened up. It is important to be aware that the de-capping pin and expander ball are still in there and can be damaged by the bit.
Drill and Tap the Stuck Case
Once the cartridge head has been drilled, a ¼ – 20 is tap is used to cut threads into the pocket. Brass is relatively soft compared to a hardened tap, so no lube is needed for the tapping process. RCBS says that a drill can be used for this step, but it seems like a bit of overkill in a project of this nature. A wrench (photo above right) makes short work of the project.
RCBS supplies a part they call the “Stuck Case Remover Body” for the next step. If you are a do-it-yourselfer and have the bit and tap, this piece is easily replicated by a length of electrical conduit of the proper diameter and some washers. In either case, this tool provides a standoff for the screw that will do the actual pulling.
With an Allen Wrench, Finish the Job
Run the screw through the standoff and into the tapped case head. With a wrench, tighten the screw which hopefully pulls the case free. Once the case is free, clamp the case in a vice and pull it free of the de-capping pin. There is tension here because the sizing ball is oversized to the neck dimension as part of the sizing process. It doesn’t take much force, but be aware there is still this last little hurdle to clear before you get back to loading. Don’t feel bad, everyone does this. Just use more lube next time!
Article find by EdLongrange. We welcome reader submissions.
Here are some really smart tips for hand-loaders compiled by Sierra Bullets. These suggestions were submitted by Sierra’s Facebook fans — and some are very valuable indeed. Some of these tips will help you load more accurate ammo. Other selections will help you stay SAFE — which should always be your #1 priority. For example, we concur with the advice to “Check and Double Check. Everything. Every Time”. Also definitely keep “One powder on the bench at a time” — that could be a life-saver. You may want to print these “words of wisdom” and place them on a wall in your loading room.
Reloading Safety Tips — Sound Advice
ALWAYS START LOW: “Just because a load manual says X grains of X powder with X bullet is max, your rifle could reach max pressure a grain or two before what the book says. Start low and work up.” — Walter Coats
BE SAFE: “Check and double check. Everything. Every time. Only one type of powder on the bench at a time.” — Glen Lundgren
DON’T RUSH: “Be patient, don’t be in a hurry, have fun and find your rhythm. Just tell your family you’re putting yourself in ‘time-out’. They will understand.” — Erik Dyal
POWDER RULE #1: “One powder on the bench at one time, it might save your life.” — James A. Kimery
STAY FOCUSED: “Relaxed but concentrated attention. Have fun enjoying a great hobby and pastime but stay focused.” — Jim Caldwell
POLICE LOADING AREA: “Keep your reloading bench area clean and put items away ASAP.” — Eric J. Ford
BE PATIENT: “Focus, Focus, Focus — be patient — it AIN’T a race.” — William Stanley
RECORD YOUR LOADS: “Write down on a small card what you’re loading – bullet weight, powder weight, type of powder, and primer. And put it in the powder hopper. I am unloading .45 FMJ because I forgot what type powder was in the hopper.” — Michael Conniff
HAVE a PROCEDURE for INTERRUPTIONS: “If, for any reason, you have to leave the bench while in the process of dropping powder charges, turn the next case to be charged upside down in the loading block so you know where you left off.” — Bill Tinsley
LABEL EVERYTHING: “OCD is a good habit to have with your loading bench. CLEARLY label everything!” — Andy Pynckel
HAVE a GOAL: “Never start reloading or developing a load without a specific goal in mind. Second keep meticulous records.” — Peter Eick
RESEARCH THE JOB: “Read all you can about it before you start!” — Keith Shively
KEEP TRACK: “I put all my primed brass upside down (primer up) and as I charge the casing, I (of course) flip it primer down.” — Mark Ewing
Product Review by F-Class John
Case preparation is critical for precision reloading. One must trim cases, debur/chamfer case mouths, clean necks, spruce up primer pockets and do other important tasks. Complete case prep can involve many separate processes, each requiring its own tools. With each of those tools comes additional cost as well as the need for more storage and bench space. To make case prep easier, faster, and more convenient Lyman created the Case Prep Xpress. The Case Prep Xpress, introduced a few years back, combines up to five prep stages into one well-built, stable, versatile unit. Watch this video to see the machine in action:
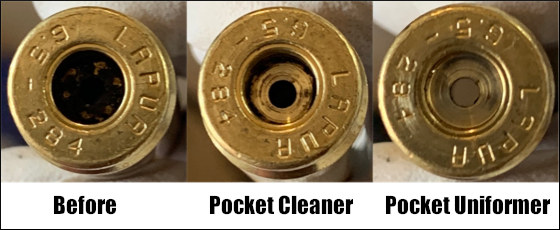
The Case Prep Xpress features five (5) independently-turning spindles all with the common 8/32 thread. This allows you to attach multiple tools supplied with the unit PLUS many other screw-on prep tools. For our testing we started out using a variety of the 12 included tools and found they cover the majority of case prep tasks. Lyman supplies deburr and chamfer tools, pocket uniformers, reamers and cleaners, as well as an assortment of neck brushes.
The deburr and chamfer tools worked really well, creating beautiful bevels all while leaving a nice flat edge across the top of the neck which is critical for accuracy and brass life. We found the primer pocket cleaning tool did a good job, but for truly clean pockets we recommend using the primer pocket uniforming tool, which very efficiently removes even hard residues.
The benefit of having interchangeable heads is that you can add your own accessories. We like to use a bore brush with bronze wool wrapped around it for use inside our necks. This worked perfectly once we screwed it in. In fact, we couldn’t think of any 8/32-threaded accessory that wouldn’t work well on this machine. Another great design feature is how all the accessories are oriented straight up. This allows for perfect visual alignment of your cases onto the tools which is critical — especially when performing cutting operations such as primer pocket uniforming.
Along with the five power stations there are six female-threaded storage spots on the sides where tools can be placed to ensure they don’t get lost. We like this feature since there will be more than five accessories you want to use and having them easily available is a great feature. You can keep 11 tools right on the machine (5 on top, 6 on the sides). That way you don’t have to dig through storage bins.
The Case Prep Xpress has a removable front bin to hold brass shavings, and there are two circular trays on either side of the bin. In front is a long tray that holds the provided brush. This makes it relatively easy to clean off brass shavings and other debris from case prep processes.
SUMMARY — Versatile Case Prep Xpress Is A Good Value
For the money, Lyman’s Case Prep Xpress is tough to beat. It performs multiple tasks well while being stable and easy-to-use. Yes there are some multi-spindle prep centers that offer variable or fast/slow RPM spindles while the Lyman’s spindles are all fixed RPM. (See, e.g. the RCBS Brass Boss). However those other systems don’t include all the convenient on-board storage of the Case Prep Xpress, and are more expensive. The Lyman Case Prep Xpress sells for $150-$160 “street price”. It costs $154.99 at Midsouth, and is in-stock now (1/13/2021). This makes the Lyman Case Prep Xpress a fine value — it offers great versatility while saving space and saving money compared to buying five or more separate, powered tools.
Our friend Gavin Gear of UltimateReloader.com has tested the nicely-crafted Buchanan Hand Press. This symmetrical, twin-lever tool can handle pretty much any sizing and/or seating task as it offers plenty of leverage — even for full-length case resizing. Crafted by Buchanan Precision Machine, this Hand Press has a central mount for the die on top with a conventional shell-holder at the bottom. There is a handy spent primer catcher, plus an optional Lock-N-Load die insert adapter (Top Plate). This press is well-built, but the $250.00 price is steep. There is also a basic version without upper plate for $200.00, but even then you could buy FOUR Lee Hand Presses for the cost of a Buchanan.
You can see how this press works in this UltimateReloader video. Gavin demonstrates all the key functions, including decapping, sizing, and bullet seating. You can see that Gavin was impressed with this hand press, which is well-suited for loading at the range:
Gavin explains that the modern Buchanan Hand Press is based on a previous design: “This press is an evolution of an old press that has been out of production for years: the Huntington Industries Decker Hand Press. While it shares some of the basic design features, the Buchanan Precision Machine Hand Reloading Press takes quality and functionality to the next level. This press accepts standard shell holders, uses standard 7/8×14 dies (or dies with Hornady Lock-N-Load bushings as I showed in the above video), and has a COL capacity of 3 3/4″. Need to load 30-06 away from the bench? No problem, this press can handle it. Unlike other hand presses, this one stands by itself on a flat/level surface, and can be clamped to a bench in order to stay in one spot.”
Sinclair International has created a series of helpful articles on rifle cartridge reloading. Today’s feature lists ten basic steps for precision hand-loading, with links to longer, detailed Sinclair Int’l technical articles providing more complete information. There’s a lot of helpful info here guys, if you click all the links to access the ten “long form” articles.
Tying It All Together: 10 Steps To Precision Handloads
Feature based on article by Roy Hill, Brownells/Sinclair Copywriter
Sinclair Int’l offers a series of detailed articles on hand-loading precision rifle ammunition. The articles are included in Sinclair’s GunTech Articles Archive, but sorting through the index to find each article takes time. To help you access all these articles quickly, here’s a handy summary of ten key topics, with links to longer articles covering each subject in detail.
Part 1: The first step in making high-quality handloads is to carefully choose the best brass for your application. You need to know how to identify the different types of brass and how to choose the best kind for the ammo you want to load. CLICK HERE for Part 1.
Part 2: Even high-quality brass can have burrs around the flash hole that can interfere with the primer flame and cause inconsistent ignition – which can lead to shot groups opening up. Flash hole deburring is a critical step in making sure primers ignite powder consistently. CLICK HERE for Part 2.
Part 3: The next step is to make sure the primer pockets are square and uniform. Like flash hole deburring, primer pocket uniforming may reduce variations in primer ignition by ensuring more consistent primer seating. CLICK HERE for Part 3.
Part 4: Making sure all your cases are precisely the same length is crucial, especially when you use cases that have been fired before. Case trimming is the way to get there. CLICK HERE for Part 4.
Part 5: After trimming, cases still have to be resized. In order for them to work through the resizing die, they have to be lubricated. The case lube method you choose is crucial to making precision handloads. CLICK HERE for Part 5.
Part 6: Now it’s time to choose the dies that will resize your cases. There are several important options to consider in selecting the right sizing dies. CLICK HERE for Part 6.
Part 7: Wait! You’re not quite ready to start sizing yet. There’s yet more to consider before you start cranking cases through the press. Learn more about setting up and adjusting your sizing dies. CLICK HERE for Part 7.
Part 8: Once the cases are completely prepped, it’s time to start putting fresh components back into them. We start off by seating primers. CLICK HERE for Part 8.
Part 9: After the primers are seated, it’s time to drop in the powder. There are several tools that will help you handle powder for precision handloads. CLICK HERE for Part 9.
Part 10: The final step in the process is carefully seating the bullet to just the right depth. And then… you’re ready to try your loads at the range. CLICK HERE for Part 10.
Before you load that nice new cartridge brass for the first time, run an expander mandrel down the case necks. This will iron out dents and provide more uniform neck tension. Chose a mandrel diameter that provides appropriate neck tension.
Lapua brass is so good that you’ll be tempted to just load and shoot, if you have a “no-turn” chamber. However, some minimal case prep will ensure more uniform neck tension. Keeping your neck tension very uniform allows more consistent bullet seating. That, in turn, usually yields better accuracy, and lower Extreme Spread and Standard Deviation (ES/SD). Lapua brass, particularly 6mmBR, 6.5×47, 6.5 Creedmoor, and .308 Win comes from the factory with tighter-than-optimal necks. Before you seat bullets, at a minimum, you should inside chamfer the case mouths, after running an expander mandrel down the necks. The expander mandrels from both Sinclair Int’l and K&M will both leave the necks with enough neck tension (more than .001″) so you can then seat bullets without another operation. We suggest putting a bit of lube on the mandrel before running it down the necks — but remove any lube that gets inside the necks before seating bullets.
Both Sinclair and K&M Tools make a die body specifically to hold expander mandrels. The Sinclair version, is shown above. This $32.99 unit fits caliber-specific expander mandrels ($9.99) which measure approximately .001″ less than bullet diameter for each caliber. This is an updated “Gen II” design that completely captures the mandrel within the die so the mandrel cannot pull out. It also has an O-ring in the die cap that allows the mandrel to self-center within the case neck. Sinclair now offers three sizes of die bodies for expander mandrels: .17 -.338 Caliber (#749-011-715WS $32.99); .357 – .50 caliber (#749-008-843WS, $32.99), and a special .50 Cal die body for large-diameter 50 BMG presses (#749-009-163WS, $39.99). All Generation II dies are machined from stainless steel and the standard diameter 7/8-14 dies include the Sinclair Stainless Steel Split Lock Ring.
Once you run the Sinclair expander mandrel down the necks of Lapua brass, after you account for brass spring-back, you’ll have about .002″ neck tension*. This will make the process of seating bullets go much more smoothly, and you will also iron out any dents in the case mouths. Once the case mouths are all expanded, and uniformly round, then do your inside neck chamfering/deburring. The same expander mandrels can be used to “neck-up” smaller diameter brass, or prepare brass for neck-turning.
Forum member Mike Crawford adds: “These expanders can also reduce runout from offset seating. Prior to bullet seating, expand the sized necks to force thickness variance outward. With the Sinclair system, the necks will springback fine, and will not be pulled out of center. This leaves plenty of tension, and bullets seated more centered. I do this, even with turned necks, to get improved seating.”
Mandrels vs. Expander Balls on Decapping Rods
If you haven’t acquired an appropriate expander mandrel for your brass, but you DO have a full-length sizing die with an expander ball, this will also function to “iron out” the necks and reduce tension. However, using a die with an expander ball will work the necks more — since you first size them down, then the ball expands them up again. Typically (but not always), run-out is worse when using an expander ball vs. an expander mandrel.
* This .002″ tension is what we have observed with Lapua 6mmBR, 6.5×47, 6.5 Creedmoor, and .308 Win brass. This might vary with much smaller or larger cases, and of course a different brand of brass might yield different results. If you get too little tension with your current mandrel, you can get a smaller-diameter mandrel from 21st Century Shooting. 21st Century even offers low-friction Titanium Nitride-coated mandrels.
Written by Sierra Bullets Ballistic Technician Duane Siercks
One of the first things new reloaders notice is that load data varies between reloading manuals. The Sierra Bullets Technicians frequently get inquiries asking us to explain why the load data appears to be inconsistent. This article explains five key factors that can influence published load data.
Example of load data variances for two 168 grain bullets:
Here are five reasons why the load data varies:
The Bullet
Basically, the similarities in the .30 caliber 168 grain Match bullets (for example) end with weight and diameter. The bullets likely have dimensional differences such as bearing surface length. Bearing surface has a large effect on pressure and velocity. There are also differences in boat tail, flat base, ogive and over-all lengths, which each help determine the cartridge over-all-length (COAL). With different COAL’s, we can expect changes in pressure and velocity also. In some calibers there are differences in bullet diameter with different bullet manufacturers.
It is also worth noting that bullet manufacturers do not all use the same copper alloy for their jackets. This produces more or less friction that results in load pressures and velocities. The solid copper bullets also vary quite a bit in comparison to a lead core and copper jacketed bullet.
The Gun
Each gun is unique, even if you are using the same make, model, and caliber. Special consideration should be used to consider that not all firearm chambers are the same either, creating more variables that need consideration. There can be drastic differences in the throat length. This controls the amount of “jump” that a bullet experiences when the cartridge is fired.
The Powder
Within normal manufacturing tolerances, you can see some variation in a given powders burn rate between different lots of the same powder. So naturally when two different Manuals are produced, it would be doubtful that the same lots would be tested.
The Cartridge Cases
New cases are almost always near minimum specs in dimension. A load fired in a new case would likely have slightly more pressure that when fired in a re-sized case. This would certainly be true if we were loading into fire-formed cases that have had minimal re-sizing done. Fired cases that are full length resized most of the time be slightly larger than the new unfired cases. This gives you differences in case capacity. The same powder charge placed within a new case and a full length resized case will produce different pressure levels and probably different velocities.
Conditions
Temperature can cause pressure increases or decreases. Hot temperatures tend to cause pressures to increase, while cold temperatures will usually do the opposite. Humidity and altitude can impact pressures and velocities likewise.
Conclusion
As you can see, an amazing number of variables effect any load combination. With the differences in the manuals, you’re just seeing firsthand examples of what took place when the data was collected with that particular set of components and firearm. Think of a reloading manual as a report. In essence, a reloading manual says, “We tried this particular component combination, and these are the results we obtained.”
Remember that you may or may not reach the same maximum load safely. There is no “one load fits all bullets.” The minimum load data offers a safe place to start. The maximum load data listed should always be regarded as a safety guideline and not necessarily a goal! Your gun should shoot accurately without breaching the maximum load data. The best advice is: always start low and work your load up!
If you have questions about variances in load data or other reloading questions, please call our ballistic technicians at 1-800-223-8799 or send us an email at sierra [at] sierrabullets.com.
Do you shoot a magnum cartridge? Here are two modern-formulation powders you may want to try: Reloder 23 and 26. We have been particularly impressed with Reloder 23. It has worked well in competition for target cartridges such as the 7mm RSAUM. Reloder 23 is like a slower version of Reloder 16 — a very temp-stable powder which has proven a worthy rival to H4350.
Ever heard of Alliant Reloder 23? Or Reloder 26? These two relatively new European-produced Reloder propellants were introduced in 2014. Most folks haven’t tried these Reloder powders because it took quite a while for the first shipments of RL 23 and RL 26 to arrive in the USA. But now these two new propellants are available in the USA, with substantial inventories in stock at some larger vendors. For example, Powder Valley has both RL 23 and RL 26 in stock now at $23.50 per pound. Many other vendors have ample RL 23, but RL 26 is a bit harder to find.
From our Forum members who shoot large magnum cartridge types with heavy bullets, we have heard good things about both RL 23 and RL 26. Reports from the field indicate that both these powders are delivering impressive velocities with low velocity ES/SD.
What are the characteristics of RL 23 and RL 26? That question was answered by Paul Furrier who works for ATK, the parent company of Alliant Powders. Posting in our Shooters’ Forum, Paul writes:
“Let me provide some factual info about these products. Some of the stuff that gets propagated is not correct. Reloder 23 is produced by our Swedish partner Bofors, and Reloder 26 is produced in Switzerland by our extremely capable partner Nitrochemie. I have seen it stated that they are both made by Bofors, so that is incorrect.
I have also noticed people are equating Reloder 23 to Reloder 22, and Reloder 26 to Reloder 25. Both of those statements are definitely incorrect. We do state that the performance of Reloder 23 is similar to Reloder 22, and it is, in general burn speed terms, but they are most certainly not the same. We have worked quite a lot of recipes for Reloder 23, and they are not the same as Reloder 22. Reloder 26 is definitely slower burning than Reloder 25, so there shouldn’t be any confusion there either.”
Furrier says that RL 23 is NOT sensitive to temperature shifts: “Reloder 23 was developed to bring a truly temp-stable powder to the Reloder 22 burn-speed range using Bofors new process technology. This is the second product developed for us with this TZ® process, the first being AR-Comp™. We see terrific efficiencies, SDs, accuracy and flat temp response from these powders. Please try them, I think you will be impressed.”
Forum member Danny Reever and this Editor have discussed how novice reloaders can struggle with the fine points of reloading, making errors in seating depth, neck-bushing choice, or sizing their cases. We agreed that a good resource covering more than “Reloading Basics” is sorely needed. Danny reminded me that Glen Zediker’s excellent Handloading for Competition book has been available since 2002. Danny says this may still be the best guide in print for those getting started in precision reloading, though the book is not without flaws.
Danny observed: “I consider this still the best book out there on the subject. I’ve bought a lot of other books only to be sorely disappointed after spending $30-$40 of my hard-earned cash. This book is not one of those! I’ve read and re-read Zediker’s treatise at least four times and refer to it often for advice while reloading. My number one suggestion for those who buy the book is to sit down with a highlighter and read it cover to cover. It’s well-written with a bit of humor and it is not boring.”
Extremely comprehensive, Zediker’s book covers nearly all of the key factors involved in accurate reloading: case sorting, brass prep, load development, neck-sizing, full-length sizing, bushing selection/use, tool selection, priming, powder measurement, and bullet seating. The book also explains how to test and evaluate your ammo, and how to monitor and interpret pressure signs.
There are many “must-read” sections in Zediker’s book, according to Danny: “The section beginning on page 161 dealing with concentricity (and how to achieve it) is excellent. Likewise the Load Limits section discussing pressures offers very valuable advice and info. You should also read Zediker’s commentaries about load testing, powders (burn characteristics etc.), and the effects of temperature.”
Zediker has conveniently provided a detailed summary of his book on the web, complete with table of contents, sample pages (PDF format), and dozens of illustrations. Shown above is just one small section that covers ejectors.
Overall, we recommend Glen Zediker’s Handloading for Competition, though the book definitely could use some updating. Danny says: “Plunk down the [money] and buy this book, you won’t be sorry.” Zediker’s book is available from Amazon.com ($34.99), Midsouth Shooters ($33.49), and Zediker Publishing ($36.95).
Sierra BulletsBallistic Technician Gary Prisendorf has written a nice essay about how reloading can become a life-time hobby, a rewarding pastime that can bring together a father and son…
Memories of My Father — Reloading As a Life-Time Hobby
by Gary Prisendorf
For as long as I can remember I have been around reloading. I have tons of childhood memories of my father reloading and shooting. I remember how he would let me help him load his ammunition, by letting me clean primer pockets or wipe the sizing lube off of his cases. I really thought I was doing something. Well, I guess I was, I was spending quality time with my father doing something that would become a great hobby and eventually land me a great job working for Sierra Bullets.
If you are a reloader, teach someone. You may just give them a hobby for the rest of their life and who knows, you could help them find an enjoyable career, doing something that they love.
— Gary Prisendorf
I remember watching my father sizing cases on his Herters press, dropping his powder charges with a Belding & Mull powder measure and weighing powder charges with his Texan scales. Heck, I can even remember when he would buy powder at a local pawn shop, and they would weigh it out and put it in a paper sack. He would save his empty powder cans, wrap them with masking tape and write what the powder was on them with a black magic marker.
When I was in Junior High, I got my first shotgun, a 20 gauge Mossberg 500 and within a couple of weeks my father came home with a 20 gauge Lee Load-All and a pound of Blue Dot. He gave me a crash course on how to use it, and got me up and running with a couple of safe loads. I put a lot of shells through that old 20 gauge.
From that day forward I was hooked. If I got a new gun, I was loading ammunition for it. I don’t buy factory ammunition unless I just want to shoot it up so I can get some once fired brass. I reload everything that I shoot, except for rimfire stuff, and if I could figure out how to do that safely, I would probably load that too.
Through the years I have learned to appreciate things — such as once-fired military .30-06 cases that can be converted to obscure cartridge types. And I know the value of a five-gallon bucket of lead wheel weights that will be melted down and cast into bullets.
I remember finding 19 once-fired Norma 7.7×58 Arisaka cases laying on the ground at a public shooting range, and it was like Christmas came early. I must have looked for that 20th case for about thirty minutes, but I never did find it.
I can’t thank my father enough for getting me started in reloading, he gave me a great hobby, many wonderful memories and taught me the skills that gave me a career doing something that I love.


 Sticking a case in the sizer die is a rite of passage for the beginning handloader. If you haven’t done it yet, that’s great, but it probably will eventually happen. When it does, fixing the problem requires a bit of ingenuity or a nice little kit like the one we got from RCBS.


 Forum member Danny Reever and this Editor have discussed how novice reloaders can struggle with the fine points of reloading, making errors in seating depth, neck-bushing choice, or sizing their cases. We agreed that a good resource covering more than “Reloading Basics” is sorely needed. Danny reminded me that Glen Zediker’s excellent


