There is an excellent article about primers on the Shooting Times website. We strongly recommend you read Mysteries And Misconceptions Of The All-Important Primer, written by Allan Jones. Mr. Jones is a bona fide expert — he served as the manager of technical publications for CCI Ammunition and Speer Bullets and Jones authored three editions of the Speer Reloading Manual.
This authoritative Shooting Times article explains the fine points of primer design and construction. Jones also reveals some little-known facts about primers and he corrects common misconceptions. Here are some highlights from the article:
Size Matters
Useful Trivia — even though Small Rifle and Small Pistol primer pockets share the same depth specification, Large Rifle and Large Pistol primers do not. The standard pocket for a Large Pistol primer is somewhat shallower than its Large Rifle counterpart, specifically, 0.008 to 0.009 inch less.
Magnum Primers
There are two ways to make a Magnum primer — either use more of the standard chemical mix to provide a longer-burning flame or change the mix to one with more aggressive burn characteristics. Prior to 1989, CCI used the first option in Magnum Rifle primers. After that, we switched to a mix optimized for spherical propellants that produced a 24% increase in flame temperature and a 16% boost in gas volume.
Foiled Again
Most component primers have a little disk of paper between the anvil and the priming mix. It is called “foil paper” not because it’s made of foil but because it replaces the true metal foil used to seal early percussion caps. The reason this little disk exists is strictly a manufacturing convenience. Wet primer pellets are smaller than the inside diameter of the cup when inserted and must be compacted to achieve their proper diameter and height. Without the foil paper, the wet mix would stick to the compaction pins and jam up the assembly process.
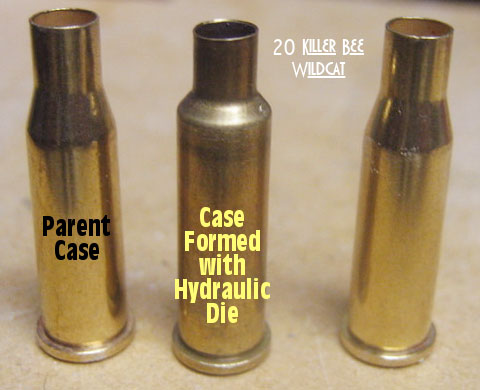
Are you a confirmed wildcatter? Do you like to experiment with custom cartridge types? Or do you just like the extra performance you can get from a specialty cartridge such as a 20 Vartarg or 22-250 AI? Well, if you love wildcat cartridges, you’ll probably enjoy this book. Now available for the first time since 2003, The Handloader’s Manual of Cartridge Conversions explains the processes and tools needed to convert standardized brass into hundreds of different rifle and pistol cartridge types. A vast variety of case designs are covered — from vintage cartridge types to modern, cutting-edge wildcats.
This classic reference guide has been revised with an easy-to-search format, complete with a full index of hundreds of cartridges. This book belongs on the shelf of any hand-loader who enjoys making and shooting wildcat cartridges. However do note that much of the text is unchanged from earlier editions. For some cartridge types, the author recommends “parent” brass brands that are no longer available. In other situations, there may be more convenient conversions now offered. Nonetheless this is an important resource. As one verified purchaser explains: “Great reference for making the cartridges that are hard to get or no longer in production. Offers an alternative to the the time, expense and effort of having to re-chamber a classic. Saves ‘Grandpa’s shooters’ from becoming safe queens.”
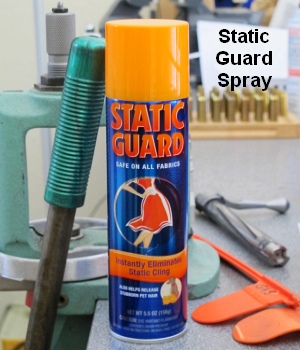
Apparently reducing static charges on and around electronic scales can reduce their propensity to drift, lessening the problem of “wandering zero”. Just how and why static charges interfere with scale performance is unclear, but many shooters have noticed that static electricity can cause electronic scales to behave strangely. So how do you reduce static charges around your digital balance? GS Arizona, creator of the Rifleman’s Journal Blog, has found a very simple solution — an anti-static aerosol spray — that, by all indications, actually works. When this “spray-can solution” was suggested to GS by a fellow shooter, GS was skeptical. However, he tried the stuff and he says that it really does help the scale maintain zero over time, with much less observed drift.
Static Guard Reduced Scale Drift
GS Arizona explains that the use of “Static Guard” spray helped mitigate the problem of a drifting zero on his Ohaus Navigator electronic scale. He writes: “My electronic scale… suffers from drifting zero (as they all seem to). I’ve read dozens of forum posts about drift and how to minimize its occurrence, so I know this problem isn’t limited to my scale or my workshop. Sometime last year, John Lowther mentioned the use of anti-static spray as a solution to the drift problem. John stated that the spray had virtually eliminated drift for him.”
GS Arizona found that the Static Guard actually worked: “The spray works great, just as John said it would. I spray all surfaces that I touch with my hands and arms as well as the pan (top and bottom), the metal tray on which the pan rests and the table under the scale. In six months or so of using the spray I’ve re-applied it about two or three times; it certainly isn’t something that you need to do each time you sit down to load. Before using the spray, it was not uncommon for me to re-zero the scale 10 times in the course of loading 72 rounds; now it might need it once during a session.”
Last fall, Shooting Times released an article entitled “Ten Most Common Reloading Mistakes”. Listed below are the Top Ten mistakes hand-loaders can make, at least according to Shooting Times. What do you think of this list — does it overlook some important items?
Top Ten Reloading Mistakes According to Shooting Times:
1. Cracked Cases — Reloaders need to inspect brass and cull cases with cracks.
2. Dented Cases — Dents or divets can be caused by excess case lube.
3. Excessive Powder Charge — Overcharges (even with the correct powder) can be very dangerous.
4. Primers Not Seated Deep Enough — “High” primers can cause functioning issues.
5. Crushed Primers — Some priming devices can deform primers when seating.
6. Excess Brass Length — Over time, cases stretch. Cases need to be trimmed and sized.
7. Bullets Seated Too Far Out — If the bullet is seated too long you may not even be able to chamber the round. Also, with hunting rounds, bullets should not engage the rifling.
8. Burrs on Case Mouths — Ragged edges on case mouths can actually shave bullet jackets.
9. Excess Crimp — This is a common problem with pistol rounds loaded on progressives. If case lengths are not uniform some cases will get too much crimp, others too little.
10. Inadequate Crimp — This can be an issue with magnum pistol cartridges in revolvers.
Do you agree with this list? We think some important things are missing, such as not adjusting full-length sizing dies properly. This can cause the shoulder to be pushed back too far (or not far enough). Another common mistake is using brass that is worn out, i.e. stretched in the case-head area from multiple cycles of hot loads. We also think the #1 error a reloader can make is using the wrong powder altogether. That can be a fatal mistake. See what happens when you load pistol powder in a rifle.
Each Wednesday, the U.S. Army Marksmanship Unit (USAMU) publishes a reloading “how-to” article on the USAMU Facebook page. In this article, the USAMU’s reloading gurus help you avoid potentially disastrous mistakes with a progressive — such as double powder changes. The USAMU experts caution that: “beginners would be better served by starting on a single-stage press”. That said, owning a progressive makes sense if you shoot more than 100 centerfire rounds a week. If you own a progressive press, or are thinking of buying one, you should read this article.
For those interested in progressives, we’ll examine different key features among the types and relate them to handloading processes. The first, and simplest, type is the manually-advanced progressive. The shellplate holds the several cartridges being processed with each stroke of the handle. On these presses, the loader must manually advance the shellplate after each handle stroke.
While this obviously slows production vs. a press that cycles the shellplate automatically, this feature does have advantages though. (The disadvantages follow shortly.) No case is advanced to the next station until the operator deliberately does so – which is especially helpful for the new handloader.
Problems that arise during loading can be diagnosed and fixed without fears of some “extra” operation happening unnoticed with cartridges at the other stations. Beginners NOTE: one way to positively prevent this risk is to remove the cases from each press station when a problem emerges, before beginning diagnosis. Usually, however, experienced loaders omit this step as a time-saving measure, being confident in their understanding of the loading machine, process and the appropriate remedy.
If all cartridge cases are left in place, the operator must monitor what’s happening at each station. For example, raising the press ram twice may result in a double-charge of powder. With rifle cartridges, this usually results in a massive powder over-flow, alerting the loader to the problem. With pistol cases or small rifle charges in large cases, such an over-flow isn’t guaranteed. [Editor — one way to be sure you don’t have an overcharge or undercharge is to use a Lock-Out Die — see below.] The manually-advanced progressive keeps all operations under the loader’s control at all times. This is intuitively easier for the beginning loader to understand and to operate with confidence.
However, this same characteristic can be problematic if the loader isn’t paying 100% attention to what they are doing during routine operation. Some new handloaders apparently aspire to load progressively while daydreaming and paying little attention to the operation. Their plan is to feed components in, like feeding potato chips to a monkey, while good ammo drops out at the other end. Unfortunately, such an approach may likely result in something other than “good” ammo dropping out at the end…
Forgetting to cycle the shellplate when appropriate will cause problems. As with all handloading, distractions MUST be kept to a minimum for safety purposes. Never watch TV, talk with friends, or have other distractions (such as a rambunctious pet or child) in the room when loading. Avoiding distractions will do much to ensure that one produces consistent, high-quality ammunition, free of defects. For example, when a case doesn’t line up correctly with the case mouth expander or powder drop tube, a difference in “feel” often alerts the loader to correct the problem without ruining a case. If one is interrupted or becomes distracted, be certain to examine ALL cases in the shellplate before resuming loading.
Better Safe Than Sorry — the RCBS Lock-Out Die
RCBS Makes a “Lock-Out Die” that senses the powder charge. This will halt the Progressive press if you have a double charge, or an undercharge. Your Editor has the Lock-Out Die on his RCBS Pro 2000. It has “saved his bacon” a half-dozen times over the years. It can be used on Dillon and Hornady progressives as well as RCBS machines.
Other advantages of the typical manually-advanced progressives are that they are usually simpler in design, with fewer moving parts to get out of adjustment. This appeals to the mechanically dis-inclined! Caliber conversion kits are usually cheaper and take less time to install. This especially benefits the enthusiast who reloads for a wide variety of calibers.
However, many popular manually-advanced progressives have fewer die stations than the higher-end, auto-advancing machines. One item that is very useful when actually dispensing powder on a progressive press is a cartridge case powder-level sensor. This warns if powder levels in each case are too high or too low; however, it does require a die station of its own.
This condition (incorrect powder charges) often results from powder (especially extruded rifle powder) “bridging” in the powder measure. That is, one charge doesn’t fully empty into its cartridge case. This leaves some extra powder hanging up in the measure to join the normal charge in the next case. With some extruded powders, this can be quite obvious without a sensor. However, the sensor can detect small variations that would not be obvious to even an experienced, attentive operator. Considering the machine’s potential to use a powder sensor in addition to one’s other customary dies is a wise idea.
Similarly, pistol shooters are best served to seat bullets and crimp cartridges in separate operations. This should be taken into account when selecting a progressive press. Whenever loading fully-progressively, choosing powders that dispense very easily, e.g., ball/spherical or very fine-grain extruded powders, can help keep charges quite uniform.
Figure 1. When the bullet is seated farther out of the case, there is more volume available for powder. This enables the cartridge to generate higher muzzle velocity with the same pressure.
Effects Of Cartridge Over All Length (COAL) And Cartridge Base To Ogive (CBTO) – Part 1 by Bryan Litz forBerger Bullets.
Many shooters are not aware of the dramatic effects that bullet seating depth can have on the pressure and velocity generated by a rifle cartridge. Cartridge Overall Length (COAL) is also a variable that can be used to fine-tune accuracy. It’s also an important consideration for rifles that need to feed rounds through a magazine. In this article, we’ll explore the various effects of COAL, and what choices a shooter can make to maximize the effectiveness of their hand loads.
Sporting Arms and Ammunition Manufacturers’ Institute (SAAMI)
Most loading manuals (including the Berger Manual), present loading data according to SAAMI (Sporting Arms and Ammunition Manufacturers’ Institute) standards. SAAMI provides max pressure, COAL and many other specifications for commercial cartridges so that rifle makers, ammo makers, and hand loaders can standardize their products so they all work together. As we’ll see later in this article, these SAAMI standards are in many cases outdated and can dramatically restrict the performance potential of a cartridge.
Bullet seating depth is an important variable in the accuracy equation. In many cases, the SAAMI-specified COAL is shorter than what a hand loader wants to load their rounds to for accuracy purposes. In the case where a hand loader seats the bullets longer than SAAMI specified COAL, there are some internal ballistic effects that take place which are important to understand.
Effects of Seating Depth / COAL on Pressure and Velocity
The primary effect of loading a cartridge long is that it leaves more internal volume inside the cartridge. This extra internal volume has a well known effect; for a given powder charge, there will be less pressure and less velocity produced because of the extra empty space. Another way to look at this is you have to use more powder to achieve the same pressure and velocity when the bullet is seated out long. In fact, the extra powder you can add to a cartridge with the bullet seated long will allow you to achieve greater velocity at the same pressure than a cartridge with a bullet seated short.
When you think about it, it makes good sense. After all, when you seat the bullet out longer and leave more internal case volume for powder, you’re effectively making the cartridge into a bigger cartridge by increasing the size of the combustion chamber. Figure 1 illustrates the extra volume that’s available for powder when the bullet is seated out long.
Before concluding that it’s a good idea to start seating your bullets longer than SAAMI spec length, there are a few things to consider.
Geometry of a Chamber Throat
The chamber in a rifle will have a certain throat length which will dictate how long a bullet can be loaded. The throat is the forward portion of the chamber that has no rifling. The portion of the bullet’s bearing surface that projects out of the case occupies the throat (see Figure 2).
The length of the throat determines how much of the bullet can stick out of the case. When a cartridge is chambered and the bullet encounters the beginning of the rifling, known as the lands, it’s met with hard resistance. This COAL marks the maximum length that a bullet can be seated. When a bullet is seated out to contact the lands, its initial forward motion during ignition is immediately resisted by an engraving force.
Seating a bullet against the lands causes pressures to be elevated noticeably higher than if the bullet were seated just a few thousandths of an inch off the lands.
A very common practice in precision reloading is to establish the COAL for a bullet that’s seated to touch the lands. This is a reference length that the hand loader works from when searching for the optimal seating depth for precision. Many times, the best seating depth is with the bullet touching or very near the lands. However, in some rifles, the best seating depth might be 0.100″ or more off the lands. This is simply a variable the hand loader uses to tune the precision of a rifle.
Ever wondered what caused a particular bulge or marking on a case? And more importantly, does the issue make the case unsafe for further use? Sierra Bullets Ballistic Technician Duane Siercks offers some insight into various issues and their causes in two Case Diagnostic articles from the Sierra Blog.
Incipient Case-Head Separation
This is a Winchester .308 Win case that has a real issue. This case has a very obvious incipient case head separation in the process of becoming a complete failure.
This is most commonly caused by over-sizing the case causing there to be excess headspace on the case. After a few firings and subsequent re-sizing, this case is just about ready to come completely apart. Proper die adjustment is certainly a requirement here. Of course this case is not safe to reuse.
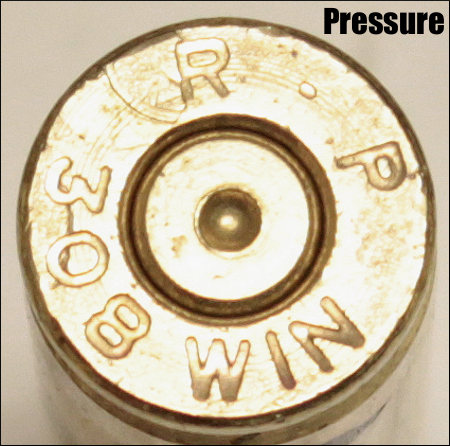
Excessive Pressure (Load Too Hot)
If you will notice in the picture of the case rim, there are two pressure signs to notice. First, look at the primer. It is basically flattened to about the max of what could be considered safe. If this was the only pressure sign noted, I would probably be fine with this load, but would constantly keep an eye on it especially if I was going to use this load in warmer temperatures. This load could easily cross into the “excess pressure” realm very quickly.
There is another sign of pressure that we cannot ignore. If you’ll notice, there is an ejector mark apparent that is located over the “R” of the R-P headstamp. This absolutely tells us that this load would not have been in the safe pressure range. If there were any of these rounds loaded, they should not be fired and should be dis-assembled. This case should not be reloaded.
Split Case-Neck
Here we have an R-P .22-250 case that has died the death. Everything looks fine with this case except the neck is split. This case must be tossed.
A split neck is a normal occurrence that you must watch for. It is caused by work-hardening of the brass. Brass cases get harder with age and use. Brand new cases that are stored for a period of time can become hard enough that they will split like this case within one to two firings. I have had new factory loads do the same thing. Then as we resize and fire these cases repeatedly, they tend to get harder and harder. Eventually they will split. The life of the case can be extended by careful annealing practices. This is an issue that would need to be addressed in an article by itself. Of course this case is no longer usable.
In the classes that I teach, I try to use examples like this to let the students see what they should be looking for. As always, if we can assist you, whether you are new to reloading or very experienced, contact us here at Sierra Bullets by phone at 1-800-223-8799 or by email at sierra@sierrabullets.com.
Dented Case Body
Here we have a Lake City 7.62×51 (.308 Win.) case with two heavy marks/dents in the case body.
This one may be a bit of a mystery. It appears as if this case may have been caught in the action of a semi-auto rifle when the firearm jammed or the case failed to clear during the cycling process. I probably would not reload this case just to prevent any feeding problems. This also appeared to be a factory loaded round and I don’t really see any pressure issues or damage to the case.
Multiple Problems — Lake City 5.56×45 unknown year.
This case has suffered multiple failures and cannot be re-used. First its has have a very rounded shoulder that is split. Upon first look it was obvious that this round had been a victim of excess pressure. The firearm (perhaps an AR?) was apparently not in full battery, or there was possibly a headspace issue also. While taking a closer look, the primer was very flat and the outside radius of the primer cup had been lost. High pressure! Then I also noticed that there was an ejector mark on the case rim. This is most certainly an incident of excessive pressure. This case is ruined and should be discarded.
It is very important to observe and inspect your cases before each reloading. After awhile it becomes second nature to notice the little things. Never get complacent as you become more familiar with the reloading process. If ever in doubt, call Sierra’s Techs at 1-800-223-8799.
Coating bullets with a friction-reducing compound such as Molybdenum Disulfide (Moly) offers potential benefits, including reduced barrel heat, and being able to shoot longer strings of fire between bore cleanings. One of the effects of reduced friction can be the lessening of internal barrel pressures. This, in turn, means that coated bullets may run slower than naked bullets (with charges held equal).
To restore velocities, shooters running coated bullets are inclined to “bump up” the load — but you need to be cautious.
Be Careful When Increasing Loads for Coated Bullets
We caution shooters that when your start out with coated bullets in a “fresh barrel” you should NOT immediately raise the charge weight. It may take a couple dozen coated rounds before the anti-friction coating is distributed through the bore, and you really start to see the reduced pressures. Some guys will automatically add a grain or so to recommended “naked” bullet charge weights when they shoot coated bullets. That’s a risky undertaking.
We recommend that you use “naked” bullet loads for the first dozen coated rounds through a new barrel. Use a chronograph and monitor velocities. It may take up to 30 rounds before you see a reduction in velocity of 30-50 fps that indicates that your anti-friction coating is fully effective.
We have a friend who was recently testing moly-coated 6mm bullets in a 6-6.5×47. Moly had not been used in the barrel before. Our friend had added a grain to his “naked” bullet load, thinking that would compensate for the predicted lower pressures. What he found instead was that his loads were WAY too hot initially. It took 30+ moly-coated rounds through the bore before he saw his velocities drop — a sign that the pressure had lowered due to the moly. For the rounds fired before that point his pressures were too high, and he ended up tossing some expensive Lapua brass into the trash because the primer pockets had expanded excessively.
LESSON: Start low, even with coated bullets. Don’t increase your charge weights (over naked bullet loads) until you have clear evidence of lower pressure and reduced velocity.
Procedure After Barrel Cleaning
If you shoot Moly, and clean the barrel aggressively after a match, you may want to shoot a dozen coated “foulers” before starting your record string. Robert Whitley, who has used Moly in some of his rifles, tells us he liked to have 10-15 coated rounds through the bore before commencing record fire. In a “squeaky-clean” bore, you won’t get the full “benefits” of moly immediately.
To learn more about the properties of dry lubricants for bullets, read our Guide to Coating Bullets. This covers the three most popular bullet coatings: Molybdenum Disulfide (Moly), Tungsten Disulfide (WS2 or ‘Danzac’), and Hexagonal Boron Nitride (HBN). The article discusses the pros and cons of the different bullet coatings and offers step-by-step, illustrated instructions on how to coat your bullets using a tumbler.
Each Wednesday, the U.S. Army Marksmanship Unit publishes a reloading “how-to” article on the USAMU Facebook page. A recent “Handloading Hump Day” post covered preparation of once-fired 5.56x45mm brass. This article, the first in a 3-part series, has many useful tips. If you shoot a rifle chambered in .223 Rem or 5.56x45mm, this article is worth reading.
This week, Handloading Hump-Day will answer a special request from several competitive shooters who asked about procedures for morphing once-fired GI 5.56mm brass into accurate match brass for NRA High Power Rifle use. The USAMU has used virgin Lake City (LC) 5.56 brass to win National Championships and set National Records for many years. In this 3-part series, we’ll share techniques proven to wring match-winning accuracy from combat-grade brass.
GI brass has an excellent attribute, worth noting — it is virtually indestructible. Due to its NATO-spec hardness, the primer pockets last much longer than most commercial brass when using loads at appropriate pressures.
Preparing Once-Fired GI 5.56 Brass for Reloading (Part 1 of 3)
Assuming our readers will be getting brass once-fired as received from surplus dealers, the following steps can help process the low-cost raw material into reliably accurate components.
1. Clean the Brass
First, clean the brass of any dirt/mud/debris, if applicable. Depending on the brass’s condition, washing it in a soap solution followed by a thorough rinsing may help. [This step also extends the life of the tumbling media.] Approaches range from low-tech, using gallon jugs 1/2 full of water/dish soap plus brass and shaking vigorously, to more high-tech, expensive and time-consuming methods.
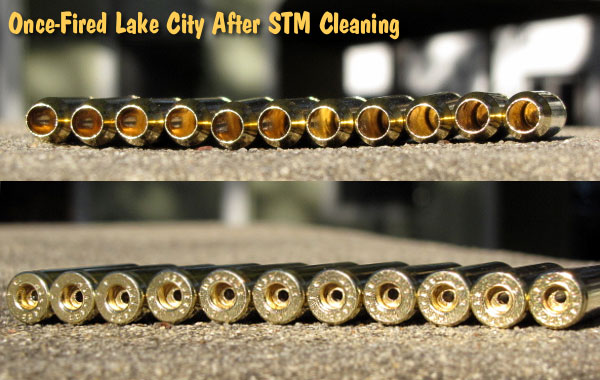
2. Wet-Tumbling Options (Be Sure to Dry the Brass)
When applying the final cleaning/polish, some use tumblers with liquid cleaning media and stainless steel pins for a brilliant shine inside and out, while others take the traditional vibratory tumbler/ground media approach. Degree of case shine is purely personal preference, but the key issue is simple cleanliness to avoid scratching ones’ dies.
If a liquid cleaner is used, be SURE to dry the cases thoroughly to preclude corrosion inside. One method is to dump the wet brass into an old pillow case, then tilt it left/right so the cases re-orient themselves while shifting from corner to corner. Several repetitions, pausing at each corner until water stops draining, will remove most water. They can then be left to air-dry on a towel, or can be dried in a warm (150° F-200° F max) oven for a few minutes to speed evaporation.
Shown below are Lake City cases after cleaning with Stainless Media (STM). Note: STM Case cleaning was done by a third party, not the USAMU, which does not endorse any particular cleaning method.
3. Inspect Every Case
Once dry, inspect each case for significant deformation (i.e., someone stepped on it), damaged mouths/necks and case head/rim damage. Some rifles’ ejectors actually dig small chunks of brass out of the case head — obviously, not ideal for precision shooting. Similarly, some extractors can bend the case rims so badly that distortion is visible when spinning them in one’s fingers. These can be used for plinking, but our match brass should have straight, undamaged rims.
Dented case mouths are common, and these can easily be rounded using a conical, tapered tool, [such as a .223 expander mandrel. A dummy 7.62 or .30-06 cartridge with a FMJ spitzer can also work.] If most of your brass is of one headstamp, this is a good time to cull out any odd cases.
4. Check the Primers Before Decapping
Your clean, dry and inspected brass is now ready for full-length sizing, decapping and re-priming. Historically, primer crimps on GI brass have caused some head-scratching (and vile language) among handloaders. Our next installment will detail efficient, easy and practical methods to remove primer crimp, plus other useful handloading tips. Until next week, Good Shooting!
NOTE: The USAMU Handloading (HL) Shop does not RE-load fired 5.56 brass. We use virgin LC brass with our chosen primer already staked in place. However, our staff has extensive personal experience reloading GI brass for competition, which will supplement the Shop’s customary steps. In handloading, as in life, there are many ways to accomplish any given task. Our suggestions are note presented as the “only way,” by any means. Time for loading/practicing is always at a premium. Readers who have more efficient, alternative methods that maintain top accuracy are invited to share them here.
Accuracy Potential of Mil-Surp 5.56×45 Brass
So, how accurate can previously-fired GI surplus brass be in a good National Match AR-15? Well, here’s a data point from many years ago that might be of interest. A High Power shooter who wrote for the late Precision Shooting magazine took a Bill Wylde-built AR match rifle to a registered Benchrest match. His first 5-round group ever fired in a BR match was officially measured at 0.231″ at 200 hundred yards. This was fired in front of witnesses, while using a moving target backer that confirmed all five rounds were fired.
He recounted that his ammo was loaded progressively with factory 52gr match bullets and a spherical powder using mixed years of LC brass with no special preparation whatsoever. Obviously, this was “exceptional”. However, he had no difficulty obtaining consistent 0.5-0.6 MOA accuracy at 200 yards using LC brass and a generic “practice” load that was not tuned to his rifle.
Saving Money by Using GI Brass
So, with good commercial brass readily available, why would one go to all the extra steps necessary to process fired GI brass? [Editor: It’s about saving money.]
Economically, it makes great sense. When the author was actively practicing and competing with the service rifle, he had ~3,000 rounds of 5.56mm brass, which allowed him to load during winter and spend most time in the summer practicing. If one were wealthy and wanted to shoot nothing but the finest imported brass, the current cost of 3,000 is ~$1920 (plus shipping.)
Dropping down to good, but less-expensive new, U.S. commercial brass brings the price to a much more realistic ~$720. However, at current rates, the same amount of surplus GI once-fired brass costs between $120 — $150, leaving lots of room in the budget for other expenses. [Editor: that’s less than 10% of the cost of the best imported brass.]
During shooting season, there are probably 400 or more club “fun matches” conducted around the country. One of the good things about these club shoots is that you don’t have to spend a fortune on equipment to have fun. But we’ve seen that many club shooters handicap themselves with a few common equipment oversights or lack of attention to detail while reloading. Here are SIX TIPS that can help you avoid these common mistakes, and build more accurate ammo for your club matches.
1. Align Front Rest and Rear Bags. We see many shooters whose rear bag is angled left or right relative to the bore axis. This can happen when you rush your set-up. But even if you set the gun up carefully, the rear bag can twist due to recoil or the way your arm contacts the bag. After every shot, make sure your rear bag is aligned properly (this is especially important for bag squeezers who may actually pull the bag out of alignment as they squeeze).
Forum member ArtB adds: “To align my front rest and rear bag with the target, I use an old golf club shaft. I run it from my front rest stop through a line that crosses over my speed screw and into the slot between the two ears. I stand behind that set-up and make sure I see a straight line pointing at the target. I also tape a spot on the golf shaft that indicates how far the back end of the rear bag should be placed from the front rest stop. If you don’t have a golf shaft, use a wood dowel.
2. Avoid Contact Interference. We see three common kinds of contact or mechanical interference that can really hurt accuracy. First, if your stock has front and/or rear sling swivels make sure these do NOT contact the front or rear bags at any point of the gun’s travel. When a sling swivel digs into the front bag that can cause a shot to pop high or low. To avoid this, reposition the rifle so the swivels don’t contact the bags or simply remove the swivels before your match. Second, watch out for the rear of the stock grip area. Make sure this is not resting on the bag as you fire and that it can’t come back to contact the bag during recoil. That lip or edge at the bottom of the grip can cause problems when it contacts the rear bag. Third, watch out for the stud or arm on the front rest that limits forward stock travel. With some rests this is high enough that it can actually contact the barrel. We encountered one shooter recently who was complaining about “vertical flyers” during his match. It turns out his barrel was actually hitting the front stop! With most front rests you can either lower the stop or twist the arm to the left or right so it won’t contact the barrel.
3. Weigh Your Charges — Every One. This may sound obvious, but many folks still rely on a powder measure. Yes we know that most short-range BR shooters throw their charges without weighing, but if you’re going to pre-load for a club match there is no reason NOT to weigh your charges. You may be surprised at how inconsistent your powder measure actually is. One of our testers was recently throwing H4198 charges from a Harrell’s measure for his 30BR. Each charge was then weighed twice with a Denver Instrument lab scale. Our tester found that thrown charges varied by up to 0.7 grains! And that’s with a premium measure.
4. Measure Your Loaded Ammo — After Bullet Seating. Even if you’ve checked your brass and bullets prior to assembling your ammo, we recommend that you weigh your loaded rounds and measure them from base of case to bullet ogive using a comparator. If you find a round that is “way off” in weight or more than .005″ off your intended base to ogive length, set it aside and use that round for a fouler. (Note: if the weight is off by more than 6 or 7 grains you may want to disassemble the round and check your powder charge.) With premium, pre-sorted bullets, we’ve found that we can keep 95% of loaded rounds within a range of .002″, measuring from base (of case) to ogive. Now, with some lots of bullets, you just can’t keep things within .002″, but you should still measure each loaded match round to ensure you don’t have some cases that are way too short or way too long.
5. Check Your Fasteners. Before a match you need to double-check your scope rings or iron sight mounts to ensure everything is tight. Likewise, you should check the tension on the screws/bolts that hold the action in place. Even on a low-recoiling rimfire rifle, action screws or scope rings can come loose during normal firing.
6. Make a Checklist and Pack the Night Before. Ever drive 50 miles to a match then discover you have the wrong ammo or that you forgot your bolt? Well, mistakes like that happen to the best of us. You can avoid these oversights (and reduce stress at matches) by making a checklist of all the stuff you need. Organize your firearms, range kit, ammo box, and shooting accessories the night before the match. And, like a good Boy Scout, “be prepared”. Bring a jacket and hat if it might be cold. If you have windflags, bring them (even if you’re not sure the rules allow them). Bring spare batteries, and it’s wise to bring a spare rifle and ammo for it. If you have just one gun, a simple mechanical breakdown (such as a broken firing pin) can ruin your whole weekend.


Size Matters


 Apparently reducing static charges on and around electronic scales can reduce their propensity to drift, lessening the problem of “wandering zero”. Just how and why static charges interfere with scale performance is unclear, but many shooters have noticed that static electricity can cause electronic scales to behave strangely. So how do you reduce static charges around your digital balance? GS Arizona, creator of the Rifleman’s Journal Blog, has found a very simple solution — an anti-static aerosol spray — that, by all indications, actually works. When this “spray-can solution” was suggested to GS by a fellow shooter, GS was skeptical. However, he tried the stuff and he says that it really does help the scale maintain zero over time, with much less observed drift.
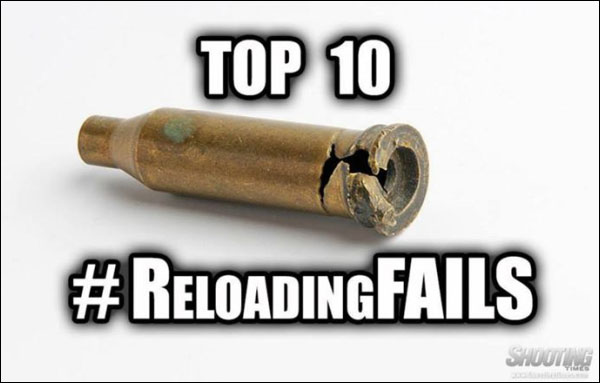


 Effects Of Cartridge Over All Length (COAL) And Cartridge Base To Ogive (CBTO) – Part 1


 1. Align Front Rest and Rear Bags. We see many shooters whose rear bag is angled left or right relative to the bore axis. This can happen when you rush your set-up. But even if you set the gun up carefully, the rear bag can twist due to recoil or the way your arm contacts the bag. After every shot, make sure your rear bag is aligned properly (this is especially important for bag squeezers who may actually pull the bag out of alignment as they squeeze).
 3. Weigh Your Charges — Every One. This may sound obvious, but many folks still rely on a powder measure. Yes we know that most short-range BR shooters throw their charges without weighing, but if you’re going to pre-load for a club match there is no reason NOT to weigh your charges. You may be surprised at how inconsistent your powder measure actually is. One of our testers was recently throwing H4198 charges from a Harrell’s measure for his 30BR. Each charge was then weighed twice with a Denver Instrument lab scale. Our tester found that thrown charges varied by up to 0.7 grains! And that’s with a premium measure.
 5. Check Your Fasteners. Before a match you need to double-check your scope rings or iron sight mounts to ensure everything is tight. Likewise, you should check the tension on the screws/bolts that hold the action in place. Even on a low-recoiling rimfire rifle, action screws or scope rings can come loose during normal firing.


