Shown are funnel with ultra-long drop tube (which helps get more kernels in the cases), RCBS Chargemaster (in wood box), and Hood Press (similar to Harrell’s Combo press).
Loading at the range remains important in the Benchrest for Group discipline. In a Special Report below, IBS President Jeff Stover explains how loading methods (and hardware) have evolved over the years. The advent of accurate, affordable electronic powder dispensers, such as the RCBS ChargeMaster and Frankford’s new Intellidropper, have changed the game and made it easier to load efficiently at the range. And quality manual powder measures are fast and can be very consistent, with a little practice. Loading at the range permits competitors to tune their load to the conditions, change seating depths, or even choose different bullets to suit the barrel’s preferences on any given day.
Although pre-loading is not uncommon, most 100/200-yard group shooters usually load at the match, often between relays. The goal is to shoot smaller groups by staying “in tune”. In a game where 5-shot groups “in the 1s and Zeros” is the goal, tuning loads for the conditions helps deliver match-winning accuracy. Nearly all competitors in this short-range discipline shoot the 6mm PPC cartridge, or a PPC variant.
Loading at the Range — Then and Now
In benchrest shooting for group, loading at the range has been de rigueur for decades. In the Score discipline, preloading is usually the custom. The main reason is that, in Score competition, only one Aggregate (warm-up match and five record targets) per day is usually shot. That would be less than 50 shots, assuming a few sighter shots. Also, the 30BR, the dominant Benchrest-for-Score cartridge, is very amenable to pre-loading.
By contrast, the Group discipline includes 21 targets (two warm-ups and twenty record targets) over a weekend, usually shot with 6PPC-chambered rifles. Many times, the 6PPC shooters may tweak their loads through the day given changing atmospheric conditions or simply trying to find the correct tune to “dot up”. This term, “Dot up”, means the shots are essentially going through the same hole, or closely so.
Loading at the range was a bit different when benchrest competition was in its infancy. The 1951 book, Modern Accuracy by Bob Wallack, is the best of the early benchrest books. Copies can be found, from time to time, on eBay or Alibris. It is a fascinating survey of benchrest as it existed more than six decades ago. There’s even coverage of a controversial target that was argued over at the time. In it, there is a photo of Wallack using the rear bumper of a car at the bench to clamp his reloading tools. Things have come a long way compared to the range loading set-ups of modern shooters. Here you can see Bob Wallack way back in 1950:
Modern loading bench set-ups shown in this Special Report belong to top shooters Howie Levy, Bob Hamister, and Kent Harshman.
At the request of our readers, we provide select “Deals of the Week”. Every Monday morning we offer our Best Bargain selections. Here are some of the best deals on firearms, hardware, reloading components, optics, and shooting accessories. Be aware that sale prices are subject to change, and once clearance inventory is sold, it’s gone for good. You snooze you lose.
1. Bud’s Gun Shop — Howa American Flag Chassis Rifle, $1180.38
Legacy Sports offers a special American Flag Chassis Rifle with a USA flag-theme red, white, and blue Cerakote finish and 3-chamber muzzle brake. Components include APC modular chassis and Luth-AR adjustable butt-stock. This special edition is sold with a Nikko 4-16x50mm scope and shipped in a hard case. Choose from the .308 Win version ($1180.38 at Bud’s GunShop) or 6.5 Creedmoor version ($1239.00 at GunPrime.com). Note: Act soon — these special editions are almost sold out!
Right now CostCo is offering the Cannon CS72 Executive Series 72-Gun Safe for just $749.99 DELIVERED! That’s a great price for a HUGE safe with 43.8 cubic feet of internal space. This 649-pound behemoth measures 59″H x 45″W x 28″D and weight 696 pounds (over 1/3 of a ton!). This is built strong with 1″ thick composite door, six 1″-diameter locking bolts, and 60-minute fire rating. NOTE: The $749.99 price includes “Standard shipping via common carrier” to the lower 48 states. This is a great value. You could easily pay $1600 or more for a safe this size from a local vendor.
3. MidwayUSA — Bullseye AmmoCam, $199.99 or $299.99
Want a wireless Target Camera but short on cash? You can now get the Bullseye AmmoCam basic system for just $199.99, a $100.00 savings. We suggest you go with the Long Range version for $299.99, which has an external antenna. The Long Range model should work to 1000 yards and beyond in flat terrain. The system generates its own WIFI Hotspot so you do not need Internet or Cellular service! Works anywhere, all you need is an iPhone, iPad, or Android Device. The external antenna on the Long Range version allows you to shield the box without disruption of the WIFI signal. COMMENT: AccurateShooter.com recommends TargetVision systems over these AmmoCams. However, for shooters on a limited budget, these Bullseye systems should suffice, and you’ll save hundreds of dollars.
4. Graf’s — Platinum Case Prep & Trim + EZ Tumbler, $179.99
If you want to step up your brass preparation game, here’s a great deal. Graf’s is offering the Frankford Arsenal Case Prep & Trim PLUS the EZ Tumbler for only $179.99. That’s an amazing deal considering you could pay $199.99 or more for the Prep & Trim unit by itself, and the EZ Tumbler is regularly $50 or more. This Grafs.com combo deal represents a savings of nearly $70.00.
5. Harbor Freight — Rolling Security Case (Carry-On Size), $69.99
How would you like to be able to carry your Spotting Scope, Laser Rangefinder, Kestrel, Binoculars, Camera, Target Cam, and other valuables in a secure, lockable, foam-filled hard-case? Or use that case to hold your front rest and other vital hardware. And wouldn’t it be great if that same rugged case worked as carry-on luggage, so you could bring it with you onboard airline flights, rather than risk it with baggage handlers. Harbor Freight now offers the Apache 5800 rolling hard-case with “pluckable” foam. Sized 22″ x 14″ x 9″ (like a carry-on), this costs just $69.99 with coupon. The equivalent rolling Pelican 1510 case costs $189.95. The Apache 5800 case lists for $89.99 but you can get it for just $69.99 with COUPON Code 89000237. Enter Code #89000237 during online checkout to save $20.00.
6. Amazon — Nikon Buckmaster II Scope Bundle, $142.95
Need a good, basic, reliable name-brand scope for your deer rifle or varmint rig? Here’s one of the best scope deals we’ve seen in 2019. You get a nice 4-12x40mm Nikon Buckmaster II by itself for just $121.90 with FREE shipping. Or get the same 4-12x40mm Nikon optic PLUS lens covers, Nikon Lens Pen, Nikon micro-fiber lens cleaning cloth, AND a Lumintrail keychain light for $142.95 with FREE Shipping. That’s still less than you might pay for a deluxe set of rings. These scopes are new production optics, fully covered by the Nikon no questions asked warranty. If you prefer less magnification, you can get the 3-9x40mm Buckmaster II for $129.95 with all the same accessories.
7. Midsouth — Aguila .22 LR Ammo, 500 Rds $17.99
Plinking is fun. Especially when your ammo is really cheap. If you need low-cost .22 LR rimfire ammo for range sessions with friends and family, check out this crazy good deal from Midsouth. You get 500 rounds of Aguila 38gr HiVel .22 LR ammo for just $17.99 (marked down from $32.99). That works out to 3.6 cents ($0.036) per round. We’ve used this stuff. It’s not match-grade, but it’s more than adequate for .22 LR handguns and rifles with fun targets, such as dueling trees and rimfire poppers.
Guys, here’s just what you need (maybe) to convince the significant other to join you for a day at the range — a combo set of “high-fashion” ear muffs and ANSI-rated safety glasses. The comfortable, zebra-print muffs provide 21 dB of noise reduction (we recommend running plugs underneath them). The stylish, tortoise-shell pattern Bella Ballistica™ shooting eyewear has passed MIL-PRF-31013 ballistic tests and meets ANSI Z87+ high-velocity requirements with a chic designer appearance. The lady in your life just might appreciate the stylish eyewear and distinctive muffs, earning you “bonus points”. And she’ll never suspect you only spent five bucks!
9. Cabela’s — Lyman 36″ x 10″ Maintenance Mat, $14.99
Here’s something we all can use — a chemical-resistant cleaning mat. This Lyman 36″ x 10″ mat provides a cushioned surface for your fine firearms. Multiple dividers hold small parts. The molded, raised edges help contain spills and excess solvents. Chemical-resistant design won’t break down with use and is easy to clean with soap and water. Made from synthetic rubber, this handy mat rolls up for easy storage. Cabela’s is offering a great price ($14.99) — this very same mat sells for $24.76 on Amazon.
10. Amazon — Two Rolls of 3″ Neon Target Stickers, $14.99
We like these bright, Neon 3″ target stickers. They are big enough to see easily at 600 yards, giving you a 1/2 MOA target center at that distance. For $14.99 at Amazon.com, you get 250 3″-diameter self-adhesive centers (125 targets per roll) that stick to almost any surface The high-contrast fluorescent red/orange color provides an excellent HI-VIZ aiming point, along with good contrast for bullet holes that fall within the 3″ circle. To help line up your reticle cross-hairs, the target centers feature black markers at 3, 6, 9, and 12 0’Clock. NOTE: These stickers may qualify for FREE Shipping with combined orders over $25.00.
At the request of our readers, we provide select “Deals of the Week”. Every Monday morning we offer our Best Bargain selections. Here are some of the best deals on firearms, hardware, reloading components, optics, and shooting accessories. Be aware that sale prices are subject to change, and once clearance inventory is sold, it’s gone for good. You snooze you lose.
1. Sportsman’s Guide — Ruger 10/22, $189.99 with CODE
If there’s one gun that’s synonymous with shooting sports, it’s the Ruger 10/22. This classic rimfire rifle is inexpensive to buy, yet very reliable. If you’ve been looking to pick one up or buy your kid his or her first rifle, here’s your chance to get a wood- or synthetic-stocked 10/22 from Sportsman’s Guide. Member Price is $199.49 while non-member price is $209.99. But it gets better — use Code GUNSNGEAR to save an additional $20.00. With that Code, SG members can snag one for just $179.49! The non-member price is $189.99 with Code. NOTE: The GUNSNGEAR $20 OFF Code works with or without a membership.
2. Grizzly Industrial — Bald Eagle Mini Arbor Press, $74.95
Have you been looking for a low-cost arbor press to get started with in-line seating? Perhaps you’d like to load your bullets long initially, and then adjust the bullet seating depth during load development (or even at matches). Arbor presses are great for bullet seating tasks at the range. If you need a compact arbor press for your loading duties — here is really good deal. Grab a Bald Eagle Mini Arbor press and you’ll be off and running for the low price of $74.95.
3. Midsouth — RCBS ChargeMaster Lite, $229.99
Do you need an electronic powder scale and dispenser? Check out this great deal at Midsouth Shooters Supply. Suggested retail for the ChargeMaster Lite is $299.99. Amazon’s best price for this unit is $269.49. But now you can get it for just $229.99 at Midsouth. So you can save at least $40 with this Midsouth sale. Put the money saved into bullets or powder. The RCBS ChargeMaster Lite is the modern second generation Scale/Dispenser, descended from the original ChargeMaster. The ChargeMaster Lite features an easy-to-use LCD touchscreen. Dispenser precision is plus/minus 0.1 grains. The unit comes with twin check weights and a convenient plastic cover for the powder pan.
4. Graf’s — Platinum Case Prep & Trim + EZ Tumbler, $179.99
If you want to step up your brass preparation game, here’s a great deal. Graf’s is offering the Frankford Arsenal Case Prep & Trim PLUS the EZ Tumbler for only $179.99. That’s an amazing deal considering you could pay $199.99 or more for the Prep & Trim unit by itself, and the EZ Tumbler is regularly $50 or more. This Grafs.com combo deal represents a savings of nearly $70.00.
5. Bruno Shooters Supply — Labradar w/ FREE SHIPPING
Labradar is considered the class leader in shooting chronographs. The ultra-accurate, state-of-the-art Labradar chronos have become so sought-after that they’re hardly ever discounted. While that may be true, Bruno’s is doing the next best thing and offering the Labradar with FREE SHIPPING as well as any accessories you buy along with it. This is a great time to grab the most advanced chrono on the market, along with genuine Labradar accessories.
6. Midsouth — 350 Rds 9mm FMJ in Container, $74.99
Nearly all gun guys (and gals) own one or more 9mm pistols. Here is some very cost-effective Aguila 9x19mm ammo that lets you train more often. Right now Midsouth is offering 350 rounds of 9mm FMJ plus a nice ammo can for the low price of $74.99, a great deal. At that price you can may want to buy 1000 rounds or more. We’ve shot this ammo. It is reliable and the brass is reloadable.
7. Black Widow — Refurbished Trim-II with Die, $79.50
Trimming your brass to length can be a chore with manual trimmers. There are high-end motorized trimming systems, but some of these cost hundreds of dollars. Fear not as Black Widow Shooters now has the refurbished trim-II w/ free die for only $79.50! That’s a savings of over 50% off the normal price. The beauty of this unit is that you simply attach it to any drill, adjust it to length and start trimming. It’s just that easy. Once you use a tool like this you may never go back to manual trimmers.
8. Midway USA — Wheeler Scope Mounting Kit, $79.99
Does the thought of mounting your own scope scare you but you’re tired of paying someone else to do it? With the help of the Wheeler Engineering Scope Mounting Kit your fears will be put at ease. This $79.99 Kit includes everything you need including a torque wrench, alignment bars, levels and more. All of this comes packaged in convenient transport case.
Have you ever been ready to run to the range and blow off a few rounds only to find that you’re out of targets? If you’re like us that’s one of the most frustrating things that can happen when heading to the club and nobody likes using printer paper and a marker to make a target. Pick up this 100 count set of sight-in targets and you won’t have to run to the store last minute or dig through the range trash cans hoping to find a barely-used target. This is a great value — only 13 cents per target! Great deal.
Each Wednesday, the U.S. Army Marksmanship Unit (USAMU) publishes a reloading “how-to” article on the USAMU Facebook page. A while back, the USAMU’s reloading gurus addressed a question frequently asked by handloaders: “How much neck tension is optimal, and how should I select a neck bushing size?” The USAMU offers a straight-forward answer, suggesting that hand-loaders start with a neck bushing that sizes the neck so that it is .003″ less than the loaded outside diameter with bullet in place. From there, you can experiment with more or less tension, but this is a good starting point for many popular cartridge types.
Determining Optimal Case-Neck Tension
This week, we examine determining the correct case neck tension for optimum accuracy. Our method is simple, but relies on the use of case sizing dies which accept interchangeable neck diameter bushings graduated in 0.001″ increments. (Those readers using fixed-diameter dies with expander balls aren’t forgotten, however. Methods of tailoring these dies for proper neck tension will be found below.)
In our experience across many calibers, sizing case necks 0.003″ under the loaded-case neck diameter usually yields excellent accuracy. In other words, the sized case neck expands 0.003″ when the bullet is seated.
Bushing Choice for Optimal Sizing
Over the years, we have periodically experimented with increasing neck tension to possibly improve accuracy. In testing with machine rests at 300/600 yards, accuracy often deteriorated as neck tension increased; thus, 0.003″ expansion (from sized neck to loaded neck) is where we usually start.
Using the .260 Remington as an example, our loaded cartridge case necks measure 0.292”. Simply subtract 0.003” from that, and use a bushing that sizes necks to 0.289” (after springback). There are exceptions — sometimes, brass may be a bit soft or hard. Some case necks might need, say, 0.001” more tension, but in general, this works well.
This .003″ standard of neck tension works very well for single-loaded, long range cartridges. Depending on your caliber and firearm, it MAY also work very well for magazine-fed cartridges. If this neck tension proves inadequate for your purpose, one can increase neck tension as needed while monitoring for possible accuracy changes.
Special Considerations for Coated Bullets: If you are using moly-coated bullets, this significantly reduces the “grip” of the case neck on the bullet, and you can expect to have to tighten your case necks accordingly — particularly for magazine-fed ammunition. In any event, we do not crimp rifle cartridges, and advise against it for accuracy handloads.
Tips for Using Expander Balls
Many savvy handloaders avoid the use of expander balls in high-accuracy reloading, if possible. These can stretch cases and/or disturb the concentricity of the case neck vs. case body. If using a die with an expander ball, tapering both ends of the ball and polishing it to a mirror finish can significantly reduce these effects. (Special carbide expander ball/decapping stem sets are available for this as well.)
The typical dies used with expander balls are intended to take any cases the user may find, and size them down well below the ideal “spec” to ensure any cases will give good neck tension. The necks are then expanded up to provide heavy to medium neck tension as the expander ball exits the neck. The brass is over-worked, leading to premature work-hardening, and seated-bullet concentricity may suffer. However, the cartridges produced are perfectly adequate for most handloaders. Those who seek finest accuracy generally prefer not to over-work their brass if possible.
Another Option — Custom-Honed FL Dies
There are companies which offer to convert one’s standard dies to accept neck bushings, and that gives excellent flexibility. Another, more “old-school” approach, is to have the neck of one’s FL die honed out to the desired diameter for sizing, based on one’s case neck thickness. The expander ball may then be reduced until it barely touches the case necks after sizing, or it may be eliminated entirely. However, once performed, this modification is permanent and leaves fewer options than the bushing route, if one later changes case neck thickness.
Those shooters who turn their case necks for optimum neck wall thickness uniformity, or for a tight-neck chamber, will want to take the reduced neck wall thickness into consideration. For example, when setting up a 7mm match rifle to use a standard hunting die without an expander ball, the slightly thinner necks resulted in a perfect 0.003″ reduction in the fired-neck diameter. The result was a low-cost die that fit with custom precision and yielded excellent, match accuracy!
This article first appeared in 2014. We are reprising it at the request of many readers who are fans of the .30-06 cartridge.
The “Old Warhorse” .30-06 Springfield cartridge is not dead. That’s the conclusion of Forum member Rick M., who has compared the 1000-yard performance of his .30-06 rifle with that of a rig chambered for the more modern, mid-sized 6.4×47 Lapua cartridge. In 12-16 mph full-value winds, the “inefficient and antiquated” .30-06 ruled. Rick reports:
“I was shooting my .30-06 this past Sunday afternoon from 1000 yards. The wind was hitting 12-16 mph with a steady 9 O’clock (full value) wind direction. My shooting buddy Jeff was shooting his 6.5×47 Lapua with 123gr Scenar bullets pushed by Varget. Jeff needed 13 MOA left windage to keep his 6.5x47L rounds inside the Palma 10 Ring. By contrast I only needed 11.5 MOA left windage with my .30-06. I was shooting my ’06 using the 185gr Berger VLD target bullet with H4350. I managed the same POI yet the .30-caliber bullet only needed 11.5 MOA windage. That’s significant. From this experience I’ve concluded that the Old Warhorse ain’t quite dead yet!”
Rick likes his “outdated” .30-06 rifle. He says it can deliver surprisingly good performance at long range:
“To many of the younger generation, the Old Warhorse .30-06 is ‘outdated’ but I can guarantee that the .30-06 Springfield is a VERY ACCURATE cartridge for 1000-yard shooting (and even out further if need be). With some of the advanced powders that we have today, the .30-06 will surprise many shooters with what it’s capable of doing in a good rifle with the right rate of twist. My rifle has a 1:10″ twist rate and I had it short-throated so that, as the throat erodes with time, I could just seat the bullets out further and keep right on shooting. My recent load is Berger 185gr Target VLDs pushed by IMR 4350. This is a very accurate load that moves this bullet along at 2825 fps.”
Intelli-Dropper Priced Under $200.00: The new Frankford Arsenal Intelli-Dropper will be available very soon from leading vendors such as Midsouth, Grafs.com, and MidwayUSA for around $199.99.
A new electronic powder scale/dispenser just hit the market to compete with units from Lyman, RCBS, and Hornady. The new Frankford Arsenal Platinum Series “Intelli-Dropper” scale/dispenser looks similar to a ChargeMaster Lite, with a LED digital touch-screen. But it is a true “new generation” device with an advanced brain that can “talk” to a Mobile App on your smartphone via BlueTooth. This way you can store powder and load information on your smartphone and then control the scale/dispenser from the App. Advantages? You could list different loads for different bullets, and you can also keep a complete history of your loading for different cartridges. For years this Editor recorded his load data via a spreadsheet on a laptop computer. Now you can have the equivalent of a loading spreadsheet right in your phone.
Frankford Arsenal Platinum Series Intelli-Dropper FEATURES
Large Back-lit LCD Display
Auto and Manual Trickle capability
Holds up to 7,000 grains (1 lb) of powder
Bluetooth Capability
Downloadable App Functionality
App Has Powder and Bullet Databases
Manual Trickle Capability — Nice!
Another cool feature is that you can use the machine to manual trickle. So you could throw powder rapidly with a manual powder measure then “trickle up” to the final tenth of a grain.
Intelli-Dropper Controls
The Frankford Arsenal Platinum Series Electronic Intelli-Dropper features an individual powder calibration button for the fastest, most accurate powder measurements. The large back-lit LCD display provides easy-to-see controls. The machine stores load data in your downloadable smart-phone or tablet App. The Intelli-Dropper features BOTH Auto and Manual trickle capability with up to 200 grains of powder per throw. Holds up to 7,000 grains (1 lb) of powder and offers +/- 0.1 grain accuracy.
Mobile App Features
The Intelli-Dropper’s downloadable App features bullet and powder databases, with the ability to add additional bullets/powders. The App stores your load data, and comes with info already stored in the App including cartridge list, powder list. Plus the bullet list is very detailed with bullet type, caliber, weight, ballistic coefficient, sectional density, and length. The App lets you input charge weight, case, primer type, barrel length and more. And the App can even upload photos of your test targets — so you can record group size accuracy results. That’s cool.
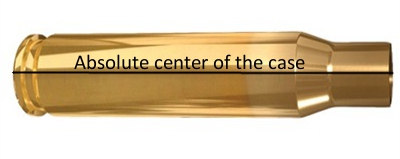
The way you drop powder in the case will affect your max powder volume and the load density. Look at the photo above. These photos show the SAME 30.6 grains of powder using four different fill methods. If you are working with a powder that is below max safe pressure at your current “full case” (with room left for the bullet), and you want to get more velocity with that powder, consider a different case-filling technique.
Most of us assume that if we weigh our powder carefully (down to the tenth of a grain or less) we can achieve a uniform powder fill from case to case in our handloads. Weighing does ensure that the weight of the propellant in each case is the same, but is the column of powder the same by volume each time? “Not necessarily” is the answer. An interesting experiment by our friend Boyd Allen demonstrates that the manner in which you place kernels in the case can make a significant difference in the height of the powder column within the brass case.
Using a Gempro 250 scale, Boyd measured exactly 30.6 grains of Vihtavuori N-133 powder. He then inserted this powder in the same cartridge case multiple times. (The case has a fired primer in place.) But here is the key — Boyd used various filling techniques. He did a slow fill, and a fast fill, and he also experimented with tapping and drop tubes. What Boyd discovered was that you can start with the exact same weight of powder (in fact the very same set of kernels), yet end up with vary different fill heights, depending on how you drop the kernels into the case. Look at the photos. Despite variations in lighting, the photos show the same 30.6 grains of powder, placed in the same cartridge, with four different methods.
Using funnels with long drop tubes packs kernels more tightly, creating a shorter powder column. That allows you to get more propellant (by weight) into the case.
Boyd Explains the Procedure Used for his Experiment.
EDITOR’s NOTE: So there is no misunderstanding, Boyd started with a weighed 30.6 grain charge. This identical charge was used for ALL four fills. After a fill the powder was dumped from the case into a pan which was then used for the next fill technique to be tried. So, the powder weight was constant. Indeed the exact same kernels (of constant weight and number) were used for each fill.
Boyd writes: “I used the same powder for all fills, 30.6 gr. on a GemPro 250 checked more than once. All fills employed the same RCBS green transparent plastic funnel. The fast drop with the funnel only overflowed when it was removed from the case neck, and 15 granules of powder fell on the white paper that the case was sitting on. The fast-funnel-only drop with tapping, was done with the funnel in place and the case and funnel in one hand, while tapping the case body with the index finger hard, many times (about 20 fast double taps). My idea here was to “max out” the potential of this tapping technique.
The slow drop with the funnel and 10″-long .22 cal. Harrell’s Precision drop tube, was done by holding the scale pan over the funnel and tapping the spout of the pan repeatedly on the inside of the funnel about 1/3 down from the top, with the scale pan tilted just enough so that the powder will just flow. Many taps were involved, again, to max out the technique.
Again, to be clear, after each case filling, the powder was poured from the case back into the scale pan carefully. You may notice the similarity between the fast drop with the drop tube, and the funnel only with tapping. Although I did not photograph it, fast tube drop and tapping (combined) improved on tapping alone, but only to about half as far down the neck as the slow with drop tube. Due to the endless possible permutations, I picked four and left it at that.
I believe that I can make the rough judgment that the scale pan funnel and drop tube technique, which involved a longer drop period, and probably less velocity at the top of the tube, left more room in the top of the case neck than the slow drop from the measure with the same drop tube. You have both pictures, so you can make the comparison.” — Boyd
Does Powder Column Height Variance Make a Difference?
Boyd’s experiment proves pretty conclusively that the method of dropping a given weight of powder can affect the height of the powder column in the case and the degree of powder compression (when a bullet is seated). He showed this to be true even when the exact same set of kernels (of constant weight) was used in repetitive loadings. This raises some interesting questions:
Here are highlights from an article Glen Zediker wrote for the Midsouth Blog. In this article Glen focuses on cartridge brass for semi-auto rifles, AR-platform guns in particular. Glen notes that semi-autos are tougher on brass than bolt-action rifles, so you need strong, durable brass, that has been full-length sized. And you need to be careful about neck tension, and primers. The article starts with Glen’s recommendations for tough, hard brass, and then includes the points outlined below.
ONE: Full Length-Size Cases with Adequate Shoulder Set-Back
This is a huge source of debate… amongst my readers, but, since now I’m strictly speaking of semi-auto needs I doubt there will be much dissent: full-length resize all cases! Most cases from most semi-autos will emerge with a pretty well-blown case shoulder [taming down an excessively functioning gas system can reduce this]. Make double-sure you’re sizing the cases down to at least 0.003 clearance. If you don’t there are safety and function problems ahead.
TWO: USE Sufficient Neck Tension
The case neck [must be] reduced an adequate amount to retain the bullet. There should be a minimum net difference of 0.003 inches (three-thousandths) between sized outside case neck diameter and loaded round outside case neck diameter. [Editor — that means at least three thou of “grip”.] Reason: don’t take a chance of inadvertent bullet movement during the recoil and feeding cycles. That movement can be back or forward! It’s easily possible for a bullet to jump ahead when the inertia from the bolt carrier assembly chambers the next round.
THREE: Use Tough Primers
Choose a tough primer! There’s a floating firing pin on an AR15 (M1A also) that is supposed to be held in check but that system doesn’t always work! If you load and extract a round and see a little dimple in the primer, that’s from the firing pin tapping off of it (again, created by inertia of bolt closing). A combination of a high primer and a sensitive primer cup assembly can create a “slam-fire”. Brands? CCI has some mil-spec primers that work well, and I’ve had great success with Remington 7-1/2. Some of the well-respected “match” primers are a little thin. The CCI and Remington also hold up well to the (sometimes) greater firing forces working on the primer (again, from the quick unlocking).
And, finally, make double-sure that each and every primer is seated to below flush with the case head! That’s true for any firearm (because it also means that the primer is fully seated) but imperative for safety in a semi-auto. This is especially an issue for those who use a progressive-type loading press.
Sinclair Internationalhas released an interesting article about Case Concentricity* and bullet “run-out”. This instructional article by Bob Kohl explains the reasons brass can exhibit poor concentricity, and why high bullet run-out can be detrimental to accuracy.
Concentricity, Bullet Alignment, and Accuracyby Bob Kohl
The purpose of loading your own ammo is to minimize all the variables that can affect accuracy and can be controlled with proper and conscientious handloading. Concentricity and bullet run-out are important when you’re loading for accuracy. Ideally, it’s important to strive to make each round the same as the one before it and the one after it. It’s a simple issue of uniformity.
The reason shooters work with tools and gauges to measure and control concentricity is simple: to make sure the bullet starts down the bore consistently in line with the bore. If the case isn’t properly concentric and the bullet isn’t properly aligned down the center of the bore, the bullet will enter the rifling inconsistently. While the bore might force the bullet to align itself with the bore (but normally it doesn’t), the bullet may be damaged or overstressed in the process – if it even it corrects itself in transit. These are issues we strive to remedy by handloading, to maintain the best standard possible for accurate ammunition.
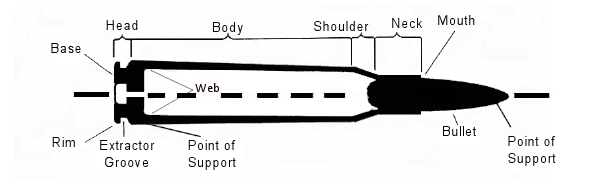
The term “concentricity” is derived from “concentric circle”. In simple terms it’s the issue of having the outside of the cartridge in a concentric circle around the center. That goes from case head and center of the flash hole, to the tip of the bullet.
Factors Affecting Concentricity
The point of using this term is to identify a series of issues that affect accurate ammunition. Ideally this would work best with a straight-walled case; but since most rifle cartridge cases are tapered, it equates to the smallest cross section that can be measured point by point to verify the concentric circle around the center. For the examples below, I’m working with .308 Winchester ammo.
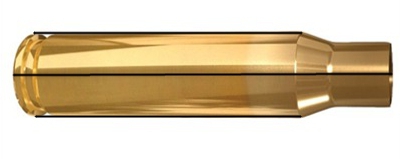
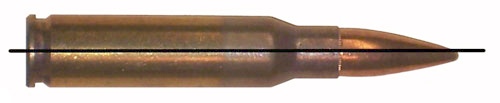
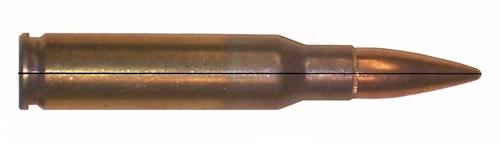
Figure 1: The cartridge.
Figure 2: Centerline axis of the case, extending from flash hole to case mouth.
The case walls have to be in perfect alignment with the center, or axis, of that case, even if it’s measured at a thousandth of an inch per segment (in a tapered case).
Figure 3: Case body in alignment with its axis, or centerline, even in a tapered case.
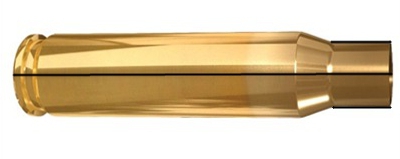
The case neck must also be in alignment with its axis. By not doing so you can have erratic bullet entry into the bore. The case neck wall itself should be as uniform as possible in alignment and in thickness (see the M80 7.62x51mm NATO cartridge in Figure 5) and brass can change its alignment and shape. It’s why we expand the case neck or while some folks ream the inside of the neck and then turn the outside for consistent thickness, which affects the tension on the bullet when seated.
Figure 4: Neck in alignment with center of the case axis.
Figure 5: Variations in case neck wall thickness, especially on some military brass, can cause an offset of the bullet in its alignment. This is an M80 ball round. Note the distinct difference of the neck walls.
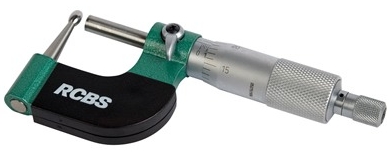
Having a ball micrometer on hand helps, especially with military brass like 7.62x51mm in a semi-auto rifle, where there are limits as to how thin you want the neck walls to be. In the case of 7.62 ball brass you want to keep the wall to .0145″.
Figure 6: A ball micrometer like this RCBS tool (#100-010-268) can measure case neck thickness.
Turning the outside of the neck wall is important with .308 military cases regardless of whether you expand or ream the neck walls. There are several outside neck turning tools from Forster, Hornady, Sinclair, and others. I’ve been using classic Forster case trimming (#100-203-301) and neck turning (#749-012-890) tools for 40 years.
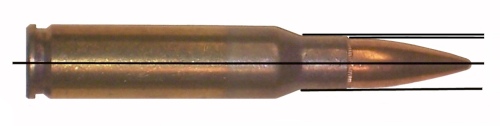
Bullet Run-Out
The cartridge, after being loaded, still needs to be in alignment with the center of the case axis. Figure 7 shows a bad example of this, a round of M80 ball. A tilted bullet is measured for what’s known as bullet “run-out”.
Figure 7: An M80 round with the bullet tilted and not aligned with the axis. This will be a flyer!
Run-out can be affected by several things: (1) improperly indexing your case while sizing, which includes not using the proper shell holder, especially while using a normal expander ball on the sizing die (it also can stretch the brass). (2) The head of a turret press can flex; and (3) improper or sloppy bullet seating. This is also relevant when it comes to using a progressive press when trying to load accuracy ammo.
Mid Tompkins came up with a simple solution for better bullet seating years ago. Seat your bullet half way into the case, back off the seater die and rotate the case 180 degrees before you finish seating the bullet. It cuts down on run-out problems, especially with military brass. You also want to gently ream the inside of the neck mouth to keep from having any brass mar the surface of the bullet jacket and make proper seating easier. A tilted bullet often means a flyer.
Figure 8: Proper alignment from the center of the case head to the tip of the bullet.
(NOTE: This links to a Web Archive version of older Sinclair Int’l article.)
*Actually some folks would say that if we are talking about things being off-center or out-of-round, we are actually talking about “eccentricity”. But the tools we use are called “Concentricity Gauges” and Concentricity is the term most commonly used when discussing this subject.
Story Tip from EdLongrange. We welcome reader submissions.
The U.S. Army Marksmanship Unit publishes reloading “how-to” articles on the USAMU Facebook page. One Wednesday “Handloading Hump Day” post covered preparation of once-fired 5.56x45mm brass. This article, the first in a 3-part series, has many useful tips. If you shoot a rifle chambered in .223 Rem or 5.56x45mm, this article is worth reading. And visit the USAMU Facebook page for other hand-loading tips.
This week, Handloading Hump-Day will answer a special request from several competitive shooters in Alaska. They asked about procedures for morphing once-fired GI 5.56mm brass into accurate match brass for NRA High Power Rifle use. The USAMU has used virgin Lake City (LC) 5.56 brass to win National Championships and set National Records for many years. In this 3-part series, we’ll share techniques proven to wring match-winning accuracy from combat-grade brass.
Preparing Once-Fired GI 5.56 Brass for Reloading (Part 1 of 3)
Assuming our readers will be getting brass once-fired as received from surplus dealers, the following steps can help process the low-cost raw material into reliably accurate components.
1. Clean the Brass
First, clean the brass of any dirt/mud/debris, if applicable. Depending on the brass’s condition, washing it in a soap solution followed by a thorough rinsing may help. [This step also extends the life of the tumbling media.] Approaches range from low-tech, using gallon jugs 1/2 full of water/dish soap plus brass and shaking vigorously, to more high-tech, expensive and time-consuming methods.
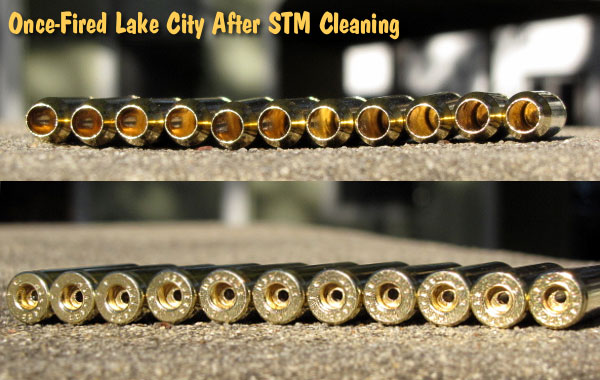
2. Wet-Tumbling Options (Be Sure to Dry the Brass)
When applying the final cleaning/polish, some use tumblers with liquid cleaning media and stainless steel pins for a brilliant shine inside and out, while others take the traditional vibratory tumbler/ground media approach. Degree of case shine is purely personal preference, but the key issue is simple cleanliness to avoid scratching ones’ dies.
Shown below are Lake City cases after cleaning with Stainless Media (STM). Note: STM Case cleaning was done by a third party, not the USAMU, which does not endorse any particular cleaning method.
If a liquid cleaner is used, be SURE to dry the cases thoroughly to preclude corrosion inside. One method is to dump the wet brass into an old pillow case, then tilt it left/right so the cases re-orient themselves while shifting from corner to corner. Several repetitions, pausing at each corner until water stops draining, will remove most water. They can then be left to air-dry on a towel, or can be dried in a warm (150° F-200° F max) oven for a few minutes to speed evaporation.
3. Inspect Every Case
Once dry, inspect each case for significant deformation (i.e., someone stepped on it), damaged mouths/necks and case head/rim damage. Some rifles’ ejectors actually dig small chunks of brass out of the case head — obviously, not ideal for precision shooting. Similarly, some extractors can bend the case rims so badly that distortion is visible when spinning them in one’s fingers. These can be used for plinking, but our match brass should have straight, undamaged rims.
Dented case mouths are common, and these can easily be rounded using a conical, tapered tool, [such as a .223 expander mandrel. A dummy 7.62 or .30-06 cartridge with a FMJ spitzer can also work.] If most of your brass is of one headstamp, this is a good time to cull out any odd cases.
4. Check the Primers Before Decapping
Your clean, dry and inspected brass is now ready for full-length sizing, decapping and re-priming. Historically, primer crimps on GI brass have caused some head-scratching (and vile language) among handloaders. Our next installment will detail efficient, easy and practical methods to remove primer crimp, plus other useful handloading tips. Until next week, Good Shooting!
NOTE: The USAMU Handloading (HL) Shop does not RE-load fired 5.56 brass. We use virgin LC brass with our chosen primer already staked in place. However, our staff has extensive personal experience reloading GI brass for competition, which will supplement the Shop’s customary steps. In handloading, as in life, there are many ways to accomplish any given task. Our suggestions are note presented as the “only way,” by any means. Time for loading/practicing is always at a premium. Readers who have more efficient, alternative methods that maintain top accuracy are invited to share them here.


 Bushing Choice for Optimal Sizing