This shocking photo of destroyed AR-15 bits and pieces was posted on Facebook by William Walter, a firearms instructor. William said this was “The worst AR-15 blow-up I have ever seen. Has anyone else seen one this bad?” It is indeed catastrophic. Seeing the above image, our friend Grant Ubl wrote: “that is most definitely THE most FUBAR’d AR15 that I have ever seen”.
Luckily the shooter sustained only minor injuries — nothing worse than a broken finger tip. But his AR-15 is certainly toast. The lower was polymer. Note the past tense. According to Walter: “It was a polymer lower and polymer magazine. Pieces of both were distributed up to 25 feet from the bench he was firing from.”
The cause of the Kaboom is somewhat mysterious. The Kaboom occurred on the 4th round fired — the first three went OK, and there is NO evidence of a squib load (i.e. no bulge in barrel). This was definitely NOT a .300 BLK round in a .223 Rem Chamber. William Walter suspects that pistol powder may be involved, but that has not been confirmed.
First thing I suspected was bore obstruction, but there wasn’t any sign of it. The case head literally atomized…you can see the brass residue on the parts. The bolt was split in two also. This was number four fired during load testing. The previous three were fine…no high pressure signs on the primer. — William Walter
One Facebook poster noted: “We had one similar here in PA about 14 years ago. The guy used Winchester 231 instead of Winchester 748 and ended up with a pile of parts very similar looking. The rifle went Kaboom on his first sighter in offhand and no one was injured surprisingly. The carrier looked like someone cut it down the middle with a torch very similarly to this picture. It also cut the bottom of the carrier and all three pieces look like a peeled banana.”
Walter stated that here: “[The shooter] had fired four rounds of the same load. He was shooting Win 748…24 grains with a 77 Sierra. I will reserve my theory until after we discuss as to not steer the conversation.
On reading that, Dennis Santiago posted: “Did you mean WW 748? That’s on the fast side powder for a .223 meant for lighter bullets. 24 grains with a long bullet like a Sierra 77 would be way too much.”
Walter noted that there was a possibility of some pistol powder getting into the catridge that detonated: “[The shooter] said he does load pistol and this was first time loading rifle. He said he used his 650 powder measure, but also a funnel and trickler.” Considering that, one poster suggested that maybe pistol powder was still left in the bottom of the powder measure.
It will be interesting to determine what exactly happened here. The remaining rounds from the same loading session will be pulled down and analyzed. A discussion of this incident appears on the Precision Shooting Journal Facebook Page.
Question to our readers: What do you think was the probable cause of this catastrophic Kaboom?
You can never be too safe when hand-loading your own ammunition. This helpful Brownells video outlines the Seven Fundamental Reloading Safety Tips. This is important information for novice hand-loaders and a good refresher for those with reloading experience!
Summary of the Seven Safety Tips:
1. Store your reloading supplies in a safe and dry location, away from children and away from any possible source of ignition. This includes keeping your powder and primers separate.
2. Get and use respected reloading manuals, especially for new cartridges. Start low and work up slowly while watching for warning signs of pressure and/or case fatigue.
3. Locate your reloading activity where you will not be distracted. If you get interrupted, stop. (Distractions will eventually lead to mistakes.)
4. Do NOT mix powders. Keep your powders clearly marked and dated. You can use masking tape to write the date on the container.
5. If you load the same cartridge type for different firearms, make sure your ammo headspaces properly in each gun.
6. Check cases frequently. Look for split necks, case head separation or other signs of fatigue and excessive pressure.
7. If reloading military brass, be aware that case capacity is usually reduced, and initial loads should be at least 10-15% lower than published data.
Here are some other tips that will help your avoid making costly mistakes (such as using the wrong powder, or undercharging a case):
Powder Type — Always double-check the label on your powder containers. After placing powder in the powder measure, put a piece of tape on the measure with the powder type written on it. Some guys write the powder type on a card and place that right in the hopper.
Scale Drift — Electronic balances can drift. If you are using a digital powder scale, calibrate the scale with a test weight every 50 rounds or so.
Case Fill — If you throw more than one charge at a time, look INSIDE every case before seating a bullet. Squib charges can be dangerous if you don’t notice them before firing the next round.
Progressive Presses — When using a progressive press, consider using an RCBS Lock-Out Die. This will detect a low charge and stop the machine. These dies will work with RCBS, Hornady, and Dillon progressives.
Do you have a friend or family member who is just getting started in handgunning? The NSSF has created five Handgun 101 videos that cover the basics of handgun shooting, starting with key principles of firearms safety. Hosted by Top Shot Season 4 Champion Chris Cheng, these videos explain the important fundamentals of pistol shooting. If you will be taking a youngster (or novice adult) to the range for the first time, it would be a good idea to have him or her watch one or both of these videos. CLICK HERE to view all Handgun 101 videos.
Handgun 101: Rules for Safe Firearm Handling
Handgun 101: Single Action vs. Double Action Explained
Think you can “get by” without protective eyewear? This story provides yet another example of why you should wear safety glasses every time you go shooting. You only have one set of eyes — they are much too precious to risk.”
Bad Primer Blasts Gas Through Side of Casehead
Our friend Grant Guess recently had a “close encounter” with a bad primer. An apparently defective primer caused part of the casehead on one of his rounds to blow out. This, in turn, allowed high pressure gas to vent through the damaged primer pocket. Take a good look, boys and girls. This is yet another very good reason to wear safety glasses. The cartridge was a 6.5-06, hand-loaded in necked-down Winchester-headstamp .270 Win brass. Grant reports:
“I had a blow-through between the primer and the primer pocket today. The action was really smoking and I got a face full of gas. This was a reasonably light charge. Thank God for safety glasses.
I should also mention that it appears there is a 3/64 hole that is halfway between the primer and the primer pocket. Like it burned a small jet hole through both of them.”
Could this happen to you? It just might. On seeing this damaged case, one of Grant’s Facebook friends, Chris D., observed: “Search the internet, you will see a lot of these pin hole ‘in the corner’ failures. Obviously Winchester has some issues with the LR primers.”
Careful Examination Reveals Apparent Primer Defect
After this incident, Grant examined the damaged case: “I pinned the flash hole and it is not over-sized or under-sized. The primer clearly has an area where it had a defect. At [50,000 CUP], it doesn’t take much of a defect to cause issues. There was a slight bit of pucker-factor on the next shot….”
Do you have a concealed carry permit, or do you plan to carry a concealed handgun in the future? Then you can benefit from Beretta’s FREE 15-page e-book, Ten Essential Tips for CCW Holders. This eBook, in handy PDF format, helps gun owners select an appropriate handgun (and holster), understand legal obligations and responsibilities, and train effectively with the firearm. This short eBook offers many useful tips to consider, in particular for gunowners who are contemplating the pros and cons of everyday carry for themselves.
As the Beretta CCW booklet says, “Carrying a concealed handgun requires a certain amount of confidence. You need to be confident in your knowledge of laws and regulations. You have to have confidence in your accuracy, and you need to trust that you can carry a gun effectively, securely and comfortably. If a gun is a burden for you to carry, you probably won’t.”
Surprising Facts About Actual Defensive Handgun Use
You may be surprised to learn when and how handguns are actually used for self-defense. Most defensive uses are at very short range and the incident only lasts a matter of seconds. You need to be prepared, and train to be proficient drawing and aiming your weapon. And remember, shooting is a last resort, when a safe retreat is not available.
55% of gunfights take place in 0-5 feet.
20% of gunfights take place in 5-10 feet.
20% of gunfights take place in 10-21 feet.
95% of gunfights take place in 0-21 feet. (Source: FBI)
The average man can cover 21 feet of ground in 1.5 seconds.
The average gunfight is over in 3-5 seconds.
3 to 4 shots are usually fired.
Most gunfights take place in low-light conditions.
On average, one shot in four strikes someone.
Here are two (2) sample pages from Beretta’s CCW eBook.
This is a grim tale. A man almost lost the use of his right hand, and did suffer terrible injuries to his fingers. All because he picked the wrong bottle of powder off the shelf.
Similar Labels, Disasterous Consequences
The shooter, Denny K., was assembling some rounds for his brand new 7mm-08 Savage hunting rifle. He thought he was loading with Hodgdon Varget. Instead he had filled his powder measure with Hodgdon TiteGroup, a fast-burning pistol powder. The labels are similar, so the mistake is understandable. But the results were devastating. Here’s what 41 grains of TiteGroup can do in a 7mm-08:
Posting on the Firing Line, in a thread entitled “Lucky to Be Alive”, Denny writes:
“This is the hardest post to post. I know if I had read it a week ago my comment would have been: ‘You have no business reloading’. I had everything perfect, except pouring the wrong powder in the powder measure. I type this slowly with my left hand, embarrassed but … possibly saving someone else a tragedy or, like me, a long drive to the Emergency Room and surgery to save my finger.”
The Still-Sealed Bottle of Varget
Denny did not initially comprehend exactly why the kaboom happened. He thought maybe his new Savage rifle was at fault. Then, on his return home, he discovered something…
Denny wrote: “The seven-hour period it took to go to ER, transport to Trauma Center and surgery made me think it was a Savage rifle issue. Brand new rifle, new brass, triple-checked loading data. The next day I was humbled when I realized the Varget powder was still sealed.
I knew what powder to use. I thought [Varget] was what I used. Not until the following day did I realize the Varget was still sealed.”
At that point, Denny realized what caused the accident — “operator error”. He knew he had to warn others about using the wrong powder: “I knew I needed to share my mistake, even though it is embarrassing, just to remind people. I’ve been reloading for 30 years…”
Editor’s Comment: Denny was not a novice reloader. His experience demonstrates that this kind of mistake can be made by any hand-loader, even one with decades of experience. Be safe guys, take your time when you load your ammo. Remove powders from measures after your loading sessions (pistol powders can look very similar to rifle powders). And by all means CHECK the LABEL on the jug. As the TiteGroup label says: “A little goes a long way.”
It’s not a bad idea to separate your pistol powders from your rifle powders, or perhaps even load for pistol in a separate part of your workshop.
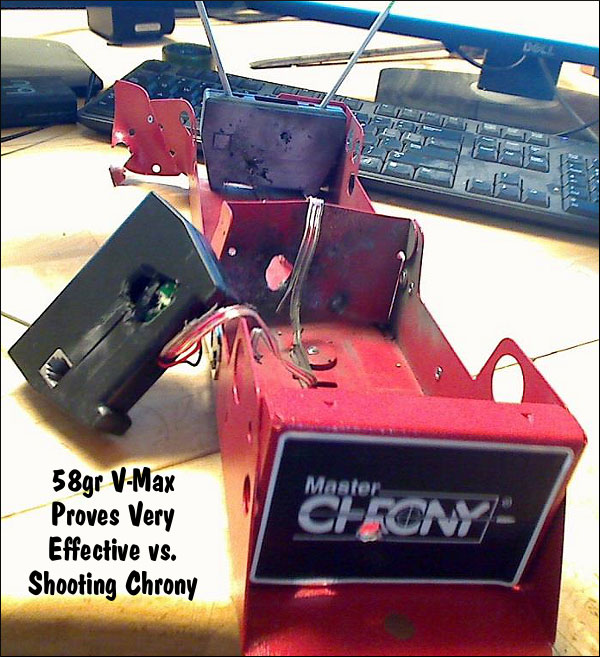
There is nothing more frustrating (or embarassing) than sending a live round into your expensive new chronograph. As the photo below demonstrates, with most types of chronographs (other than the barrel-hung Magnetospeed), you can fatally injure your expensive chrono if it is not positioned precisely.
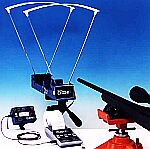
When setting up a chrono, we always unload the rifle, remove the bolt and bore-sight to ensure that the path of the bullet is not too low. When bore-sighting visually, set up the rifle securely on the sandbags and look through the bore, breech to muzzle, lining up the barrel with your aim point on the target. Then (during an appropriate cease-fire), walk behind the chronograph. Looking straight back through the “V” formed by the sky-screens, you should be able to see light at the end of the barrel if the gun is positioned correctly. You can also use an in-chamber, laser bore-sighter to confirm the visual boresighting (see photo).
Adjust the height, angle and horizontal position of the chronograph so the bullet will pass through the middle of the “V” below the plastic diffusers, no less than 5″ above the light sensors. We put tape on the front sky-screen supports to make it easier to determine the right height over the light sensors.
Use a Test Backer to Confirm Your Bullet Trajectory
You can put tape on the support rods about 6″ up from the unit. This helps you judge the correct vertical height when setting up your rifle on the bags. Another trick is to hang a sheet of paper from the rear skyscreen and then use a laser boresighter to shine a dot on the paper (with the gun planted steady front and rear). This should give you a good idea (within an inch or so) of the bullet’s actual flight path through the “V” over the light sensors. Of course, when using a laser, never look directly at the laser! Instead shine the laser away from you and see where it appears on the paper.
Alignment of Chronograph Housing
Make sure the chrono housing is parallel to the path of the bullet. Don’t worry if the unit is not parallel to the ground surface. What you want is the bullet to pass over both front and rear sensors at the same height. Don’t try to set the chrono height in reference to the lens of your scope–as it sits 1″ to 2″ above your bore axis. To avoid muzzle blast interference, set your chronograph at least 10 feet from the end of the muzzle (or the distance recommended by the manufacturer).
Rifles with Elevated Iron Sights
All too often rookie AR15 shooters forget that AR sights are positioned roughly 2.4″ above the bore axis (at the top of the front sight blade). If you set your bullet pass-through point using your AR’s front sight, the bullet will actually be traveling 2.4″ lower as it goes through the chrono. That’s why we recommend bore-sighting and setting the bullet travel point about 5-8″ above the base of the sky-screen support shafts. (Or the vertical distance the chronograph maker otherwise recommends). NOTE: You can make the same mistake on a scoped rifle if the scope is set on very tall rings, so the center of the cross-hairs is much higher than the bore axis line.
TARGET AIM POINT: When doing chrono work, we suggest you shoot at a single aiming point no more than 2″ in diameter (on your target paper). Use that aiming point when aligning your chrono with your rifle’s bore. If you use a 2″ bright orange dot, you should be able to see that through the bore at 100 yards. Using a single 2″ target reduces the chance of a screen hit as you shift points of aim. If you shoot at multiple target dots, place them in a vertical line, and bore sight on the lowest dot. Always set your chron height to set safe clearance for the LOWEST target dot, and then work upwards only.
Other Chronograph Tips from Forum Members:
When using a chronograph, I put a strip of masking tape across the far end of the skyscreens about two-thirds of the way up. This gives me a good aiming or bore-sighting reference that’s well away from the pricey bits. I learned that one the hard way. — German Salazar
A very easy and simple tool to help you set up the chronograph is a simple piece of string! Set your gun (unloaded of course) on the rest and sight your target. Tie one end of the string to the rear scope ring or mount, then pull the string along the barrel to simulate the bullet path. With the string showing the bullet’s path, you can then easily set the chronograph’s placement left/right, and up/down. This will also let you set the chrono’s tilt angle and orientation so the sensors are correctly aligned with the bullet path. — Wayne Shaw
If shooting over a chrono from the prone position off a bipod or similar, beware of the muzzle sinking as recoil causes the front of the rifle to drop. I “killed” my first chronograph shooting off a gravel covered firing point where I’d not given enough clearance to start with and an inch or two drop in the muzzle caused a bullet to clip the housing. — Laurie Holland
We first ran this eye-opening story two years ago. We’re republishing it today as a reminder that safety should always be a shooter’s #1 concern at the range. Avoid distractions and always check your barrel for obstructions before you chamber a round or pull the trigger. A moment of inattention can result in a catastrophic kaboom …
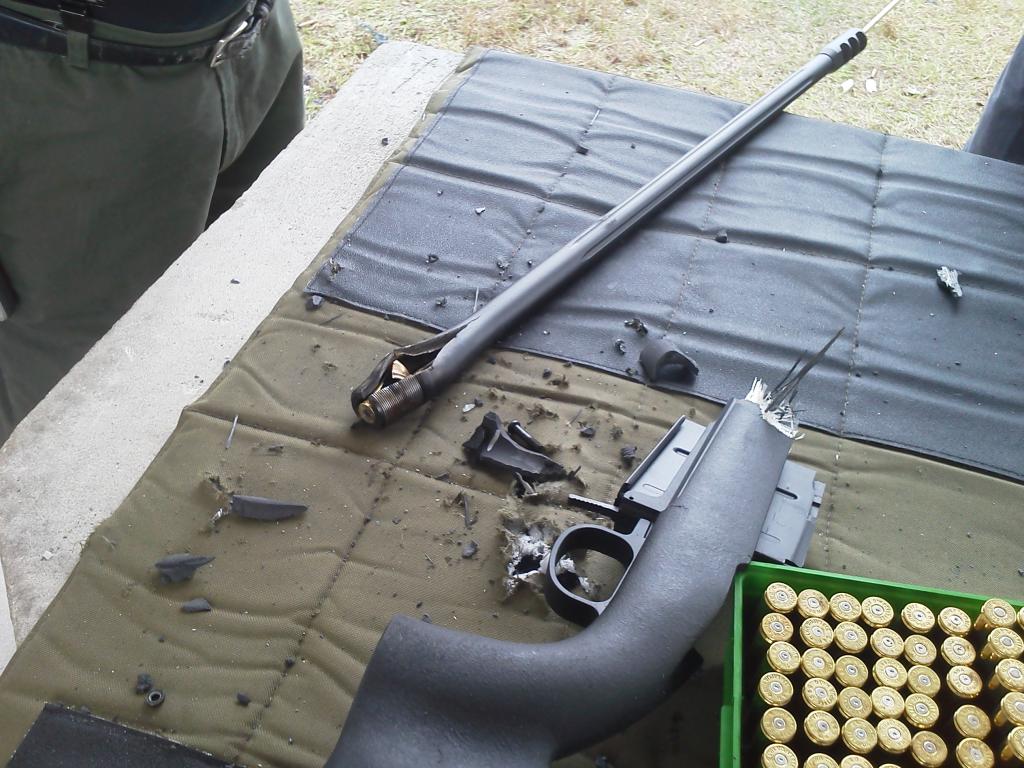
Discharging a .338 Lapua Magnum round with a cleaning rod in the barrel — that’s a recipe for disaster. What happens when a fired .338 caliber bullet and a cleaning rod try to occupy the same place at the same time? Well you get a catastrophic kaboom, with metal pieces flying all over the place, and a shooter very lucky to escape without serious injury. This incident occurred recently in Manatee, Florida, as reported by Sniper’s Hide member Queequeg. We thank SnipersHide.com for granting permission to publish these revealing images in the Daily Bulletin.
This story should serve as a chilling reminder to follow proper safety practices whenever you are at the range. Always check to make sure there is no obstruction in the bore BEFORE loading a live round.
.338 Lapua Magnum + Cleaning Rod + Inattention = Kaboom!
Kaboom at Manatee!
A while back, Sniper’s Hide member Queequeg published shocking photos of a catastrophic kaboom involving a .338 Lapua Magnum (Savage action). The action was blown off the rifle, shrapnel went through the roof, and the barrel split at the tenon before taking an excursion downrange. The action did crack in the front but the lugs remained engaged so the bolt did not slam to the rear (luckily for the shooter).
Here’s the report: “This happened [January 20, 2014] at the Manatee Gun and Archery Club. Al, Ren and myself were there with a couple other folks. Ren was at bench 12, I was at 13. The fellow at 11 was running a Savage .338 Lapua. He had a very bad day! He damn sure could have killed himself and quite likely Ren as well.”
Queeqeg added: “After the boom, I heard Ren ask ‘Are you alright’ and then turned to look in time to see the fellow reacting in total shock — literally stunned. Ren and I went over to him and could not see any major injuries. Ren was uninjured as well but had a lot of fiberglass splinters on him. The barrel nut is what I presume punched the two holes in the roof. The shooter is a regular there[.] He had been having a problem with sticky cases though he said he was certain the loads were mild. That’s why he was content to knock the sticky ones out with the rod. He simply forgot to remove the rod after knocking out the last stuck case. You can see what happened next.”
The Important Lesson Here
What did the .338 LM shooter do wrong here? You will say — “Well that’s obvious, he left a cleaning rod in the barrel and then shot a round.” Yes, that was a potentially fatal error. But that was his second mistake — one that occurred only because he made a more fundamental judgment error first.
The FIRST mistake was not acknowledging the problem with his ammo. Had he heeded the warning signs, he would still have a rifle (and an unsoiled pair of trousers). When he first observed that he was having problems with extracting cases, a warning light should have gone off in his head. Presuming his extractor was not broken (and that the chamber was cut properly) he should have been able to extract his brass if he was running safe loads. The lesson here we all need to learn is that if you observe a serious ammo-related issue, it is time to stop shooting. Don’t try to invent work-arounds just to extend your range session, when there are clear signs that something is wrong, very wrong.
Winchester Repeating Arms has issued a Safety Notice and Recall for Winchester XPR rifles. This large-scale recall covers all XPR rifles, of all calibers. The issue involves the possibility of an unintentional discharge when the safety is manipulated. According to Winchester, continuous product testing revealed that moving the safety switch on the XPR rifle “may cause movement in the trigger system that could result in unintended firing of certain XPR rifles”. Accordingly, Winchester will replace certain trigger group parts in Winchester XPR rifles at no charge to the customer. Winchester requests that all owners of XPR rifles send their rifles back to the factory for retro-fitting.
For more details on how to return your rifle for retro-fitting, or if you are unsure if your rifle is included in the recall, or if you have any other questions, call 1-800-727-4312 or e-mail Winchester at XPR@winchesterguns.com. You can also CLICK HERE to view the Recall Notice and do a Serial Number search to verify your recall status. (By the terms of the notice, it appears that ALL XPRs are subject to the recall).
WARNING: Do not load or shoot any XPR rifle until it has been returned to the Winchester Service center and Received a retrofit. Failure to follow this warning may result in a risk of harm, including serious personal injury or death to you and others.
Our friend Grant Guess recently had a “close encounter” with a bad primer. An apparently defective primer caused part of the casehead on one of his rounds to blow out. This, in turn, allowed high pressure gas to vent through the damaged primer pocket. Take a good look, boys and girls. This is yet another very good reason to wear safety glasses. The cartridge was a 6.5-06, handloaded in necked-down Winchester-headstamp .270 Win brass. Grant reports:
“I had a blow through between the primer and the primer pocket today. The action was really smoking and I got a face full of gas. This was a reasonably light charge. Thank God for safety glasses.
I should also mention that it appears there is a 3/64 hole that is halfway between the primer and the primer pocket. Like it burned a small jet hole through both of them.”
Could this happen to you? It just might. On seeing this damaged case, one of Grant’s Facebook friends, Chris D., observed: “Search the internet, you will see a lot of these pin hole ‘in the corner’ failures. Obviously Winchester has some issues with the LR primers.”
Careful Examination Reveals Apparent Primer Defect
After this incident, Grant examined the damaged case: “I pinned the flash hole and it is not over-sized or under-sized. The primer clearly has an area where it had a defect. At [50,000 CUP], it doesn’t take much of a defect to cause issues. There was a slight bit of pucker-factor on the next shot….”


 Do you have a friend or family member who is just getting started in handgunning? The NSSF has created five Handgun 101 videos that cover the basics of handgun shooting, starting with key principles of firearms safety. Hosted by Top Shot Season 4 Champion Chris Cheng, these videos explain the important fundamentals of pistol shooting. If you will be taking a youngster (or novice adult) to the range for the first time, it would be a good idea to have him or her watch one or both of these videos.


 When setting up a chrono, we always unload the rifle, remove the bolt and bore-sight to ensure that the path of the bullet is not too low. When bore-sighting visually, set up the rifle securely on the sandbags and look through the bore, breech to muzzle, lining up the barrel with your aim point on the target. Then (during an appropriate cease-fire), walk behind the chronograph. Looking straight back through the “V” formed by the sky-screens, you should be able to see light at the end of the barrel if the gun is positioned correctly. You can also use an in-chamber, laser bore-sighter to confirm the visual boresighting (see photo).