Here’s a helpful hint for hand-loaders from Sierra Bullets. While this article focuses on Sierra’s new Tipped Match-King bullets, the recommended solutions apply to other bullet types as well. The article explains how sharp edges on a seating stem can cause a ring to be pressed into the bullet jacket — especially with compressed loads that resist downward bullet movement. Here Sierra technician Rich Machholz diagnoses the problem and provides a solution.
Solutions for Ring Marks Caused by Seating Stems
by Sierra Bullets Ballistic Technician Rich Machholz
Now that the new Tipped MatchKing® (TMK) bullets are being shipped and shooters are putting them to use I have received several calls regarding marking on the bullet ogive from the seating stem.
The cause can be traced to one of several things. In the .223 and especially with the long, 77 grain TMK seated at 2.250” or even 2.260” most loads of Varget® and Reloder® 15 are compressed loads, sometimes heavily compressed. This puts a great deal of pressure on the bullet through the seating stem. The result of all this pressure is a mark of varying depth and appearance on the ogive of the bullet. [Editor: We have seen this issue with a variety of other bullet types/shapes as well, including non-tipped VLDs. The solution is profiling the internal cone of the seating stem to match your bullet shape.]
Some older seating stems might even bear against the tip of the bullet which can make a slight bulge in the jacket just below the junction of the resin tip and the copper jacket in a compressed load. If this is the case there is not a ready fix other than calling the die manufacturer and requesting a new deeper seating stem.
Polish Your Seating Stem to Remove Sharp Internal Edges
If the seating stem is of proper depth the culprit most generally is a thin sharp edge on the inside taper of the seating stem. This is an easy fix that can be accomplished by chucking a spare 77 grain bullet in your drill, coating it with valve grinding compound or even rubbing compound or in a pinch even tooth paste.* Remove the seating stem assembly from the seating die. Turn the drill on and put the seating stem recess over the spinning bullet with the polishing compound to break or smooth the sharp edge that is making the offending mark. This might take more than one application to get the proper polish depending upon what you use, but the more you polish the better the blend of angles which will [ensure the stem matches the bullet contours, not leaving a sharp ring].
If the above is a little more than you care to tackle you might try very fine emery cloth twisted to a point that can be inserted into the mouth to the seating stem and rotated to polish the inside to eliminate any sharp edges that might be present.
Load Advice for 77gr TMKs in the .223 Rem
And last but certainly not least. Actually, even though we don’t say you need additional data for the TMKs, remember you are dealing with heavily-compressed loads in some cases because of the additional bullet length. Due to the additional length of these new bullets and in the interest of gaining some room in the case you might consider trying a slightly faster extruded powder like BenchMark or the 4895s or an even more dense powder like the spherical H335®, CFE223 or TAC. The extra room will allow for trouble free bullet seating also.
Good luck and remember we are no further away than your telephone: 1-800-223-8799.
Here’s a simple task you can do that will give your seater die a more perfect fit to your match bullets. You can lap the inside of the seater stem so that it matches the exact profile of the bullet. This spreads out the seating force over a larger area of the bullet jacket. That allows smoother, more consistent seating, without putting dents, creases, or sharp rings in your bullets.
This process is demonstrated here by our friend Erik Cortina of Team Lapua-Brux-Borden. Erik, one of the nation’s top F-Class shooters and a skilled machinist, explains: “Here I’m lapping my new seater die stem with lapping compound. I chuck up a bullet in the lathe and lap the inside of the seating stem. I put lapping compound on the bullet and also in the stem. You can do the same with a hand drill and bore paste. You can see in the piture below how much contact area the stem has on the bullet after being lapped. This bullet is a Berger 7mm 180-grain Hybrid. ”
It can be helpful but it’s not necessary to make your seating stem an exact match to a bullet, particularly if you’re loading hunting or varmint rounds. But it is helpful to do some mild internal stem polishing. This should eliminate any ring (or dent) that forms on the bullet jacket during seating.
Sharp edges on a seating stem can cause a ring to be pressed into the bullet jacket — especially with compressed loads that resist downward bullet movement.
Q2: Is there any down-side to the process?
Not really. However, if you shoot many different bullet types for a particular cartridge, you may not want to conform the stem aggressively to one particular bullet design. Lightly lap the inside of the stem to remove burrs/sharp edges but leave it at that. A light lap will prevent a ring forming when seating bullets.
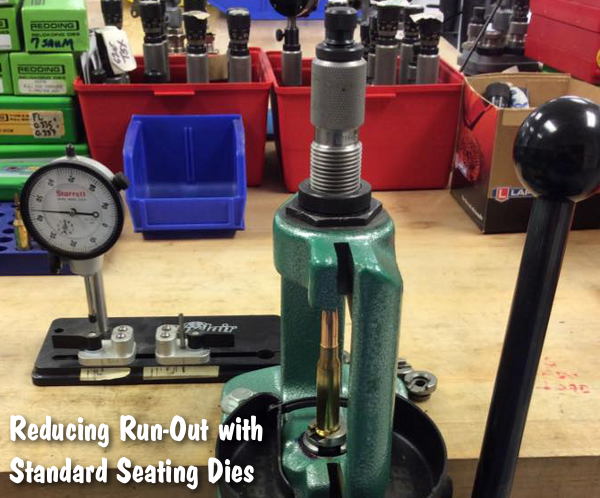
The U.S. Army Marksmanship Unit published a series of reloading “how-to” articles on the USAMU Facebook page. A while back the USAMU’s reloading gurus looked at the subject of cartridge run-out and what can be done to produce straighter ammo. Tasked with producing thousands of rounds of ammo for team members, the USAMU’s reloading staff has developed smart methods for improving concentricity, even with budget-priced dies. For other hand-loading tips, visit the USAMU Facebook page.
Minimizing Runout with Standard Seating Dies
This USAMU article explains how to set up standard bullet seating dies dies to minimize Total Indicated Run-out (TIR). The loading process is described using a single-stage press since most handloaders have one. A high-quality run-out gauge is essential for obtaining consistent, accurate results.
Having sized, primed, and charged our brass, the next step is bullet seating. Many approaches are possible; one that works well follows. When setting up a standard seating die, insert a sized, trimmed case into the shellholder and fully raise the press ram. Next, back the seating stem out and screw the die down until the internal crimping shoulder touches the case mouth.
Back the die out ¼ turn from this setting to prevent cartridge crimping. Next, lower the press ram and remove the case. Place a piece of flat steel (or window glass, which is quite flat) on the shellholder and carefully raise the ram.
Place tension on the die bottom with the flat steel on the shellholder. This helps center the die in the press threads. Check this by gently moving the die until it is well-centered. Keeping light tension on the die via the press ram, secure the die lock ring. If one were using a match style, micrometer-type seating die, the next step would be simple: run a charged case with bullet on top into the die and screw the seating stem down to obtain correct cartridge OAL.
However, with standard dies, an additional step can be helpful. When the die has a loosely-threaded seating stem, set the correct seating depth but don’t tighten the stem’s lock nut. Leave a loaded cartridge fully raised into the die to center the seating stem in the die. Then, secure the stem’s lock nut. Next, load sample cartridges and check them to verify good concentricity.
One can also experiment with variations such as letting the seating stem float slightly in the die to self-center, while keeping correct OAL. The run-out gauge will show any effects of changes upon concentricity. However, this method has produced excellent, practical results as evidenced by the experiment cited previously. These results (TIR Study 2) will reproduced below for the reader’s convenience.
First, however, let’s examine run-out figures of some factory-loaded match ammunition. This should give readers who are new to TIR gauges some perspective about the TIR ranges one might encounter.
TIR Study 1: 50 rounds Lake City M852 Match 7.62mm
(168 gr. Sierra MatchKings)
0.000” – 0.001” = 2%
0.001” – 0.002” = 30%
0.002” – 0.003” = 16%
0.003” – 0.004” = 22%
0.004” – 0.005” = 14%
0.005” – 0.006” = 14%
0.006” – 0.007” = 0%
0.007” – 0.008” = 2%
TIR Study 2: 50 rounds of .308 match ammo loaded using carefully-adjusted standard dies, vs. 50 using expensive “Match” dies from the same maker.
Standard dies, TIR:
0.000” — 0.001” = 52%;
0.001”– 0.002” = 40%;
0.002”– 0.003” = 8%.
None greater than 0.003”.
Note: both samples were loaded using the O-Ring method, i.e. with a rubber O-Ring placed under the locking ring of the Full-length sizing die to allow that die to float.
These tips are intended to help shooters obtain the best results from inexpensive, standard loading dies. Especially when using cases previously fired in a concentric chamber, as was done above, top-quality match dies and brass can easily yield ammo with virtually *no* runout, given careful handloading.
Here’s a simple task you can do that will give your seater die a more perfect fit to your match bullets. You can lap the inside of the seater stem so that it matches the exact profile of the bullet. This spreads out the seating force over a larger area of the bullet jacket. That allows smoother, more consistent seating, without putting dents, creases, or sharp rings in your bullets.
This process is demonstrated here by our friend Erik Cortina of Team Lapua-Brux-Borden. Erik, one of the nation’s top F-Class shooters and a skilled machinist, explains: “Here I’m lapping my new seater die stem with lapping compound. I chuck up a bullet in the lathe and lap the inside of the seating stem. I put lapping compound on the bullet and also in the stem. You can do the same with a hand drill and bore paste. You can see in the piture below how much contact area the stem has on the bullet after being lapped. This bullet is a Berger 7mm 180-grain Hybrid. ”
It can be helpful but it’s not necessary to make your seating stem an exact match to a bullet, particularly if you’re loading hunting or varmint rounds. But it is helpful to do some mild internal stem polishing. This should eliminate any ring (or dent) that forms on the bullet jacket during seating.
Sharp edges on a seating stem can cause a ring to be pressed into the bullet jacket — especially with compressed loads that resist downward bullet movement.
Q2: Is there any down-side to the process?
Not really. However, if you shoot many different bullet types for a particular cartridge, you may not want to conform the stem aggressively to one particular bullet design. Lightly lap the inside of the stem to remove burrs/sharp edges but leave it at that. A light lap will prevent a ring forming when seating bullets.
Forster offers an innovative item for precision hand-loaders. The Forster Accu-Ring has precise markings so you can set your sizing dies with extreme precision in your press. The annodized black ring has laser-etched contrasting precision markings in .001″ increments. This allows you to more easily set the amount of sizing and shoulder “bump” you get when you move a die up or down in your press.
In addition, if you have a conventional seating die without a micrometer adjustment, this new Forster Accu-Ring can help you achieve more precise bullet seating. SEE Ultimate Reloader Review.
The precision Forster Accu-Ring was tested by UltimateReloader.com. The testers tried the new ring with both a sizing die and and seating die. The test confirmed the ring provides greater precision, compared to conventional die lock rings.
See the Forster Accu-Ring in this Ultimate Reloader product test video:
The product description from Midsouth Shooters explains:
Accu-Ring Cross Bolt Die Lock Ring (Anodized and Laser-Marked)
The Forster Accu-Ring makes setting up your Sizing Die easier by giving you reference marks in thousandth of an inch increments (.001″). To use these reference marks, simply use a fine ink marker to put a point of reference line on your die. Turn the die clockwise to increase the amount of shoulder bump or counterclockwise to decrease the shoulder bump (i.e. increase case’s headspace length).
There are many other factors that could influence the final amount of shoulder bump during sizing. Ductility of the brass or springback, type of case lube used, pulling an expander ball through the neck and the amount of slack in the linkage of your reloading press are a few things that cause variation in shoulder bump of sized cases. The reference marks on your lock ring will help you to zero in on what you want the headspace length of your cases to be.
Remember to lock up the Accu-Ring completely after you make an adjustment before you size a case again. Otherwise you will obtain inconsistent results if the ring is not tightened.
Another use is for non-micrometer seating dies. Instead of guessing with your seating stem, you can make fine adjustments to your seating depths using the Accu-Ring.
Forster has a new product for precision hand-loaders. The new Forster Accu-Ring has precise markings so you can set your sizing dies with extreme precision in your press. The annodized ring has laser-etched precision markings in .001″ increments. This allows you to more easily set the amount of sizing and shoulder “bump” you get when you move a die up or down in your press.
In addition, if you have a conventional seating die without a micrometer adjustment, this new Forster Accu-Ring can help you achieve more precise bullet seating. SEE Ultimate Reloader Review.
The new Forster Accu-Ring was tested by UltimateReloader.com. The testers tried the new ring with both a sizing die and and seating die. The test confirmed the ring provides greater precision, compared to conventional die lock rings.
See the new Accu-Ring in this Ultimate Reloader product test video released on 10/1/2021:
The product description from Midsouth Shooters explains:
Accu-Ring Cross Bolt Die Lock Ring (Anodized and Laser-Marked)
The Forster Accu-Ring makes setting up your Sizing Die easier by giving you reference marks in thousandth of an inch increments (.001″). To use these reference marks, simply use a fine ink marker to put a point of reference line on your die. Turn the die clockwise to increase the amount of shoulder bump or counterclockwise to decrease the shoulder bump (i.e. increase case’s headspace length).
There are many other factors that could influence the final amount of shoulder bump during sizing. Ductility of the brass or springback, type of case lube used, pulling an expander ball through the neck and the amount of slack in the linkage of your reloading press are a few things that cause variation in shoulder bump of sized cases. The reference marks on your lock ring will help you to zero in on what you want the headspace length of your cases to be.
Remember to lock up the Accu-Ring completely after you make an adjustment before you size a case again. Otherwise you will obtain inconsistent results if the ring is not tightened.
Another use is for non-micrometer seating dies. Instead of guessing with your seating stem, you can make fine adjustments to your seating depths using the Accu-Ring.
Each Wednesday, the U.S. Army Marksmanship Unit publishes a reloading “how-to” article on the USAMU Facebook page. A while back the USAMU’s reloading gurus looked at the subject of cartridge run-out and what can be done to produce straighter ammo. Tasked with producing thousands of rounds of ammo for team members, the USAMU’s reloading staff has developed smart methods for improving concentricity, even with budget=price dies. For other hand-loading tips, visit the USAMU Facebook page.
Minimizing Runout with Standard Seating Dies
This USAMU article explains how to set up standard bullet seating dies dies to minimize Total Indicated Run-out (TIR). The loading process is described using a single-stage press since most handloaders have one. A high-quality run-out gauge is essential for obtaining consistent, accurate results.
Having sized, primed, and charged our brass, the next step is bullet seating. Many approaches are possible; one that works well follows. When setting up a standard seating die, insert a sized, trimmed case into the shellholder and fully raise the press ram. Next, back the seating stem out and screw the die down until the internal crimping shoulder touches the case mouth.
Back the die out ¼ turn from this setting to prevent cartridge crimping. Next, lower the press ram and remove the case. Place a piece of flat steel (or window glass, which is quite flat) on the shellholder and carefully raise the ram.
Place tension on the die bottom with the flat steel on the shellholder. This helps center the die in the press threads. Check this by gently moving the die until it is well-centered. Keeping light tension on the die via the press ram, secure the die lock ring. If one were using a match style, micrometer-type seating die, the next step would be simple: run a charged case with bullet on top into the die and screw the seating stem down to obtain correct cartridge OAL.
However, with standard dies, an additional step can be helpful. When the die has a loosely-threaded seating stem, set the correct seating depth but don’t tighten the stem’s lock nut. Leave a loaded cartridge fully raised into the die to center the seating stem in the die. Then, secure the stem’s lock nut. Next, load sample cartridges and check them to verify good concentricity.
One can also experiment with variations such as letting the seating stem float slightly in the die to self-center, while keeping correct OAL. The run-out gauge will show any effects of changes upon concentricity. However, this method has produced excellent, practical results as evidenced by the experiment cited previously. These results (TIR Study 2) will reproduced below for the reader’s convenience.
First, however, let’s examine run-out figures of some factory-loaded match ammunition. This should give readers who are new to TIR gauges some perspective about the TIR ranges one might encounter.
TIR Study 1: 50 rounds Lake City M852 Match 7.62mm
(168 gr. Sierra MatchKings)
0.000” – 0.001” = 2%
0.001” – 0.002” = 30%
0.002” – 0.003” = 16%
0.003” – 0.004” = 22%
0.004” – 0.005” = 14%
0.005” – 0.006” = 14%
0.006” – 0.007” = 0%
0.007” – 0.008” = 2%
TIR Study 2: 50 rounds of .308 match ammo loaded using carefully-adjusted standard dies, vs. 50 using expensive “Match” dies from the same maker.
Standard dies, TIR:
0.000” — 0.001” = 52%;
0.001”– 0.002” = 40%;
0.002”– 0.003” = 8%.
None greater than 0.003”.
Note: both samples were loaded using the O-Ring method, i.e. with a rubber O-Ring placed under the locking ring of the Full-length sizing die to allow that die to float.
These tips are intended to help shooters obtain the best results from inexpensive, standard loading dies. Especially when using cases previously fired in a concentric chamber, as was done above, top-quality match dies and brass can easily yield ammo with virtually *no* runout, given careful handloading.
Here’s a simple task you can do that will give your seater die a more perfect fit to your match bullets. You can lap the inside of the seater stem so that it matches the exact profile of the bullet. This spreads out the seating force over a larger area of the bullet jacket. That allows smoother, more consistent seating, without putting dents, creases, or sharp rings in your bullets.
This process is demonstrated here by our friend Erik Cortina of Team Lapua-Brux-Borden. Erik, one of the nation’s top F-Class shooters and a skilled machinist, explains: “Here I’m lapping my new seater die stem with lapping compound. I chuck up a bullet in the lathe and lap the inside of the seating stem. I put lapping compound on the bullet and also in the stem. You can do the same with a hand drill and bore paste. You can see in the piture below how much contact area the stem has on the bullet after being lapped. This bullet is a Berger 7mm 180-grain Hybrid. ”
It can be helpful but it’s not necessary to make your seating stem an exact match to a bullet, particularly if you’re loading hunting or varmint rounds. But it is helpful to do some mild internal stem polishing. This should eliminate any ring (or dent) that forms on the bullet jacket during seating.
Sharp edges on a seating stem can cause a ring to be pressed into the bullet jacket — especially with compressed loads that resist downward bullet movement.
Q2: Is there any down-side to the process?
Not really. However, if you shoot many different bullet types for a particular cartridge, you may not want to conform the stem aggressively to one particular bullet design. Lightly lap the inside of the stem to remove burrs/sharp edges but leave it at that. A light lap will prevent a ring forming when seating bullets.
Clearance Check — Remove the seating stem and drop a bullet into it. The farther down the ogive or nose-cone the step recess grips the bullet, the better. If it’s only pressing down against the bullet tip, a crooked seat is assured, along with inconsistent seating depth. — Glen Zediker
Some folks acquire a new seating die and then are surprised to find their hand-loads show crooked bullets and/or inconsistent seating depth. The problem could be a mis-match between the bullet and the die’s seating stem. In some case, particularly with long, streamlined bullets, the bullet tip can actually touch the bottom inside of the stem. This can cause a variety of problems, as Glen Zediker explains…
Invest in a Good Seating Die Reloading Tip by Glen Zediker
The bullet seating operation is the “last thing” that happens and it’s also the one thing that can corrupt the care and treatment given to the quality of the loaded round prior. A sleeve-style seater, well-machined, goes a whopping long ways toward preserving alignment, and, therefore, concentricity. Also make sure that the stem in yours comes to rest well down onto the bullet ogive, and, above all else, is not contacting the bullet tip! That will wreck a round.
If you have this problem, you should contact the die maker — some will offer a different seating stem expressly designed for longer, pointier bullets. This “long bullet stem” will normally drop right into your existing die. If you plan to run long, VLD-style bullets you should request the special seating stem right from the get-go.
Each Wednesday, the U.S. Army Marksmanship Unit publishes a reloading “how-to” article on the USAMU Facebook page. This USAMU “Handloading Hump Day” article, the second in a series on improving concentricity, has many useful tips. If you use standard (non-micrometer) seating dies when loading some cartridge types, this article is worth reading. And visit the USAMU Facebook page next Wednesday for the next installment.
Once again, it’s time for USAMU’s “Handloading Hump-Day!” Last week, we addressed achieving very good loaded-cartridge concentricity (AKA “TIR”, or Total Indicator Runout) using standard, “hunting grade” reloading dies.
We explained how to set up the Full-Length Size die to float slightly when correctly adjusted for desired case headspace. We also cited a study in which this method loaded ammunition straighter than a set of [higher grade] match dies from the same maker. [One of the keys to reducing TIR with both sets of dies was using a rubber O-ring below the locking ring to allow the die to float slightly. READ Full-Length Sizing Die TIP HERE.]
Now, we’ll set up a standard seating die to minimize TIR — the other half of the two-die equation. As before, we’ll use a single-stage press since most new handloaders will have one. A high-quality runout gauge is essential for obtaining consistent, accurate results.
Having sized, primed and charged our brass, the next step is bullet seating. Many approaches are possible; one that works well follows. When setting up a standard seating die, insert a sized, trimmed case into the shell-holder and fully raise the press ram. Next, back the seating stem out and screw the die down until the internal crimping shoulder touches the case mouth.
Back the die out one-quarter turn from this setting to prevent cartridge crimping. Next, lower the press ram and remove the case. Place a piece of flat steel on the shellholder and carefully raise the ram. Place tension on the die bottom with the flat steel on the shellholder. This helps center the die in the press threads. Check this by gently moving the die until it is well-centered. Keeping light tension on the die via the press ram, secure the die lock ring.
If one were using a micrometer-type seating die, the next step would be simple: run a charged case with bullet on top into the die and screw the seating stem down to obtain correct cartridge OAL.
However, with standard dies, an additional step can be helpful. When the die has a loosely-threaded seating stem, set the correct seating depth but don’t tighten the stem’s lock nut. Leave a loaded cartridge fully raised into the die to center the seating stem. Then, secure the stem’s lock nut. Next, load sample cartridges and check them to verify good concentricity.
One can also experiment with variations such as letting the seating stem float slightly in the die to self-center, while keeping correct OAL. The runout gauge will show any effects of changes upon concentricity. However, the first method has produced excellent, practical results as evidenced by the experiment cited previously. These results (TIR Study 2) will reproduced below for the reader’s convenience.
TIR Study 2: Standard vs. Match Seating Dies
50 rds of .308 Match Ammo loaded using carefully-adjusted standard dies, vs. 50 using expensive “Match” dies from the same maker.
Standard dies, TIR:
0.000” — 0.001” = 52%;
0.001”– 0.002” = 40%;
0.002”– 0.003” = 8%. None greater than 0.003”.
AccurateShooter Comment: This shows that, with careful adjustment, the cheaper, standard dies achieved results that were as good (or better) than the more expensive “Match” Dies.
These tips are intended to help shooters obtain the best results from inexpensive, standard loading dies. Especially when using cases previously fired in a concentric chamber, as was done above, top-quality match dies and brass can easily yield ammo with virtually *no* runout, given careful handloading.