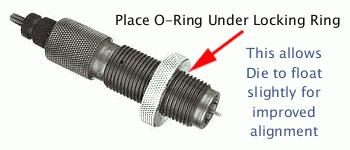
Here’s an inexpensive procedure that can help you load straighter ammo, with slightly better measured concentricity (i.e. less run-out) on the case necks and bullets. Simply use a Rubber O-Ring on the underside of the die locking ring. This allows the die to self-align itself (slightly) to the case that is being sized. Without the O-Ring, if the flat surface on the top of your press is not perfectly square with the thread axis, your die can end up slightly off-angle. This happens when the bottom of the locking ring butts up tight against the top of the press. The O-Ring allows the die to float slightly, and that may, in turn, reduce the amount of run-out induced during case sizing.
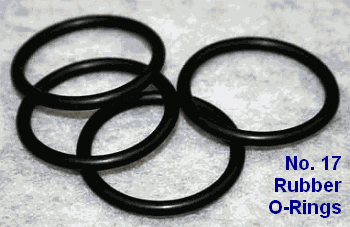
Top prone shooter GSArizona, who sadly passed in 2022, tried this trick and said it works: “Go to your local hardware store and get a #17 O-Ring (that’s the designation at Ace Hardware, don’t know if its universal). Slip the O-Ring on the die and re-adjust the lock ring so that the O-Ring is slightly compressed when the die is at the correct height. Size and measure a few more cases. You will probably see a slight improvement in neck concentricity as the die can now float a bit as the case enters and leaves it. This isn’t going to be a dramatic improvement, but it’s a positive one.”
We want to stress that adding O-Rings to sizing dies may help some reloaders, but we don’t offer this as a panacea. Try it — if using the O-Ring reduces measured runout that’s great. If it doesn’t, you’ve only spent a few pennies to experiment.
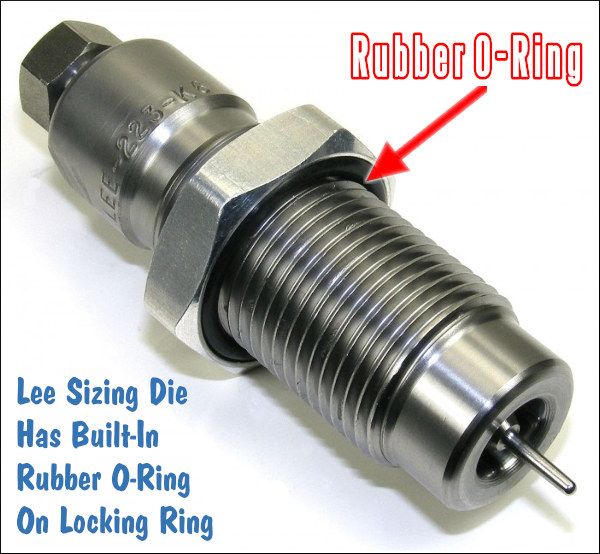
Lee Precision makes die lock rings with built-in O-Rings. Lee’s distinctive lock ring design allows the same kind of self-alignment, which is good. However, Lee lock rings don’t clamp in place on the die threads, so they can move when you insert or remove the dies — and that can throw off your die setting slightly. By using an O-Ring under a conventional die lock ring (that can be locked in place), you get the advantages of the Lee design, without the risk of the lock ring moving.
Here’s a cool tool for your hand-loaders, particularly if you load large quantities of bulk ammo for a variety of firearms. Lyman’s handy Ammo Checkers check the diameters of reloaded rounds and factory ammo, so you can quickly confirm that your ammo fits a standard chamber. Just drop your loaded rounds in the Ammo Checker, and if the round fits into the gauge, it will fit in the gun’s chamber.
Lyman Ammo Checkers are multi-caliber — each orange block checks six or eight different cartridge types, with each caliber/cartridge name engraved on the gauge. Ammo Checkers are machined to SAAMI minimum chamber dimensions from solid blocks of 6061 T6 aluminum. Ammo Checkers are available in three versions covering most common handgun and rifle calibers:
Handgun Ammo Checker (#7833000) $32.99 on Amazon
Fits: 380 Auto, 9mm Luger, 38 Super, 40 S&W, 45 ACP, 38/357, 44 Spl/Mag, and 45 Colt
Why Use a Case Gauge?
We find that case gauges like the Lyman Ammo Checker are particularly useful for handgun reloaders using progressive presses. The chambers of many popular semi-auto pistols are partly unsupported. This allows the case to swell in the bottom quarter. The case may not be sized adequately by your sizing die, which can lead to misfeeds or malfunctions.
Additionally, if you have loaded a large quantity of ammo for a semi-auto rifle such as an AR15, it’s not a bad idea to check your cartridges before you load them into your magazines. All you need is one mis-sized round to cause a stoppage. That will ruin your day if you are competing in a Service Rifle match or 3-Gun event.
Here’s an inexpensive procedure that can help you load straighter ammo, with slightly better measured concentricity (i.e. less run-out) on the case necks and bullets. Simply use a Rubber O-Ring on the underside of the die locking ring. This allows the die to self-align itself (slightly) to the case that is being sized. Without the O-Ring, if the flat surface on the top of your press is not perfectly square with the thread axis, your die can end up slightly off-angle. This happens when the bottom of the locking ring butts up tight against the top of the press. The O-Ring allows the die to float slightly, and that may, in turn, reduce the amount of run-out induced during case sizing.
Top prone shooter GSArizona, who sadly passed in 2022, tried this trick and said it works: “Go to your local hardware store and get a #17 O-Ring (that’s the designation at Ace Hardware, don’t know if its universal). Slip the O-Ring on the die and re-adjust the lock ring so that the O-Ring is slightly compressed when the die is at the correct height. Size and measure a few more cases. You will probably see a slight improvement in neck concentricity as the die can now float a bit as the case enters and leaves it. This isn’t going to be a dramatic improvement, but it’s a positive one.”
We want to stress that adding O-Rings to sizing dies may help some reloaders, but we don’t offer this as a panacea. Try it — if using the O-Ring reduces measured runout that’s great. If it doesn’t, you’ve only spent a few pennies to experiment.
Lee Precision makes die lock rings with built-in O-Rings. Lee’s distinctive lock ring design allows the same kind of self-alignment, which is good. However, Lee lock rings don’t clamp in place on the die threads, so they can move when you insert or remove the dies — and that can throw off your die setting slightly. By using an O-Ring under a conventional die lock ring (that can be locked in place), you get the advantages of the Lee design, without the risk of the lock ring moving.
Many novice hand-loaders believe that neck bushing Inside Diameter (ID) size is the only important factor in neck tension. In fact, many different things will influence the grip on your bullet and its ability to release from the case neck. To learn more about neck tension and “case grip”, take the time to read this article carefully. We bet you’ll gain knowledge that will let you load more accurate ammo, with better ES/SD.
Editor: Guys, this is a VERY important article. You really should read it over carefully, twice. Variations in the force required to release a bullet can significantly affect accuracy and ES/SD. You really need to know how the grip on bullet can be altered by many different factors.
Neck Tension (i.e. Grip on Bullets) Is a Complex Phenomenon
While we certainly have considerable control over neck tension by using tighter or looser bushings (with smaller or bigger Inside Diameters), bushing size is only one factor at work. It’s important to understand the multiple factors that can increase or decrease the resistance to bullet release. Think in terms of overall brass-on-bullet “grip” instead of just bushing size (or the internal neck diameter in non-bushing full-length sizing dies).
Bullet grip is affected by many things, such as:
1. Neck-wall thickness.
2. Amount of bullet bearing surface (shank) in the neck.
3. Surface condition inside of neck (residual carbon can act as a lubricant; ultrasonic cleaning makes necks “grabby”).
4. Length of neck (e.g. 6mmBR neck vs. 6mm Dasher).
5. Whether or not the bullets have an anti-friction coating.
6. The springiness of the brass (which is related to degree of work-hardening; number of firings etc.)
7. The bullet jacket material.
8. The outside diameter of the bullet and whether it has a pressure ridge.
9. Time duration between bullet seating and firing (necks can stiffen with time).
10. How often the brass is annealed.
11. Amount (length) of neck sized (e.g. you can size only half the neck).
12. Interior diameter of bushing, or neck section of non-bushing die. – and there are others…
One needs to understand that bushing size isn’t the beginning and end of neck tension questions, because, even if bushing size is held constant, the amount of bullet “grip” can change dramatically as the condition of your brass changes. Bullet “grip” can also change if you alter your seating depth, and it can even change if you ultrasonically clean your cases.
6-time U.S. National Long-Range Champion John Whidden adds: “Our tests show us that the condition of the necks in regards to lubed or not, carbon inside or not, squeaky clean or not, etc., matter even more than the size of the bushing used. An ultrasonically cleaned or brand new dry case neck make for some quite high seating force.”
In our Shooters’ Forum a reader asked: “How much neck tension should I use?” This prompted a lengthy Forum discussion in which other Forum members recommended a specific number based on their experience, such as .001″, .002″, or .003″. These numbers, as commonly used, correspond to the difference between case-neck OD after sizing and the neck OD of a loaded round, with bullet in place. In other words, the numbers refer to the nominal amount of interference fit (after sizing).
While these commonly-used “tension numbers” (of .001″, .002″ etc.) can be useful as starting points, neck tension is actually a fairly complex subject. The actual amount of “grip” on the bullet is a function of many factors, of which neck-OD reduction during sizing is just one. Understanding these many factors will help you maintain consistent neck tension as your brass “evolves” over the course of multiple reloadings.
Seating Depth Changes Can Increase or Decrease Grip on Bullet
You can do this simple experiment. Seat a boat-tail bullet in your sized neck with .150″ of bearing surface (shank) in the neck. Now remove the bullet with an impact hammer. Next, take another identical bullet and seat it with .300″ of bearing surface in another sized case (same bushing size/same nominal tension). You’ll find the deeper-seated bullet is gripped much harder.
Neck-Wall Thickness is Important Too
I have also found that thinner necks, particularly the very thin necks used by many 6mm PPC benchrest shooters, require more sizing to give equivalent “grip”. Again, do your own experiment. Seat a bullet in a case turned to .008″ neckwall thickness and sized down .003″. Now compare that to a case with .014″ neckwall thickness and sized down .0015″. You may find that the bullet in the thin necks actually pulls out easier, though it supposedly has more “neck tension”, if one were to consider bushing size alone.
In practical terms, because thick necks are less elastic than very thin necks, when you turn necks you may need to run tighter bushings to maintain the same amount of actual grip on the bullets (as compared to no-turn brass). Consequently, I suspect the guys using .0015″ “tension” on no-turn brass may be a lot closer to the guys using .003″ “tension” on turned necks than either group may realize.
Toward a Better Definition of Neck Tension
As a convenient short-cut, we tend to describe neck tension by bushing size alone. When a guy says, “I run .002 neck tension”, that normally means he is using a die/bushing that sizes the necks .002″ smaller than a loaded round. Well we know something about his post-sizing neck OD, but do we really have a reliable idea about how much force is required to release his bullets? Maybe not… This use of the term “neck tension” when we are really only describing the amount of neck diameter reduction with a die/bushing is really kind of incomplete.
My point here is that it is overly simplistic to ask, “should I load with .001 tension or .003?” In reality, an .001″ reduction (after springback) on a thick neck might provide MORE “grip” on a deep-seated bullet than an .003″ reduction on a very thin-walled neck holding a bullet with minimal bearing surface in the neck. Bushing ID is something we can easily measure and verify. We use bushing size as a descriptor of neck tension because it is convenient and because the other important factors are hard to quantify. But those factors shouldn’t be ignored if you want to maintain consistent neck tension for optimal accuracy.
Consistency and accuracy — that’s really what this all about isn’t it? We want to find the best neck tension for accuracy, and then maintain that amount of grip-on-bullet over time. To do that you need to look not only at your bushing size, but also at how your brass has changed (work-hardened) with time, and whether other variables (such as the amount of carbon in the neck) have changed. Ultimately, optimal neck tension must be ascertained experimentally. You have to go out and test empirically to see what works, in YOUR rifle, with YOUR bullets and YOUR brass. And you may have to change the nominal tension setting (i.e. bushing size) as your brass work-hardens or IF YOU CHANGE SEATING DEPTHS.
Remember that bushing size alone does not tell us all we need to know about the neck’s true “holding power” on a bullet, or the energy required for bullet release. True bullet grip is a more complicated phenomenon, one that is affected by numerous factors, some of which are very hard to quantify.
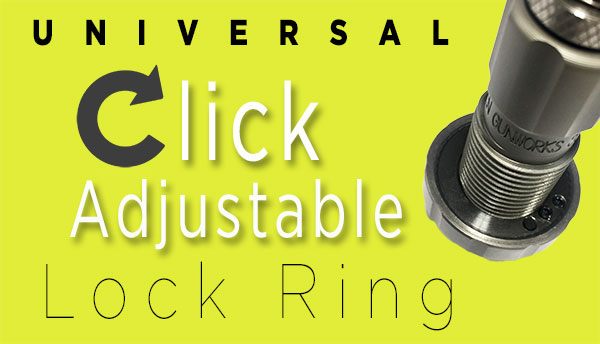
With the Whidden Click-Adjustable Sizer Dies, you can change shoulder bump by .001″ (one-thousandth) with a simple click. Fast. Easy. Precise.
As handloaders have become more aware of shoulder bump and proper adjustment of the sizer die in recent years, there has become a need for an easier way to adjust the sizer die properly. For most folks, with their conventional dies, it takes lengthy trial trial and error to get the shoulder setback correct. Anyone who has done this can attest that it can be a slow and annoying job.
Whidden Gunworks has solved the problem with the innovative Click Adjustable Sizer Die. Patent No: 10,393,488. This die and lock ring work together to give the user a clicking feel to the adjustment just like a high end rifle scope. Each click moves the shoulder bump exactly .001″ so you can easily find the exact shoulder bump that you desire.
The Click Adjustable option is available on Whidden Custom Sizer dies as well (7/8”-14 format dies only)! Included with the Click Adjustable Sizer Die is a Shoulder Bump Gauge. This gauge attaches to standard calipers and allows measurement from the case shoulder to the base. Using the Shoulder Bump Gauge with the Click Adjustable Sizer Die will make the proper sizer die setup easier than ever before.
Click-adjustable die sets are available with both bushing and non-bushing configurations. Along with these complete die sets, Whidden Gunworks offers a separate click-adjustable ring to use with existing dies. Priced at $58.99, the Whidden Click-Adjust Lock Ring represents a modest investment for a major gain in die ease-of-use and precision adjustability.
The Whidden Universal Click Adjustable Lock Ring you can instantly turn your sizer die into a Click Adjustable Die. This ring works with any 7/8 OD sizer of any brand with adjustable shoulder bump. Simple in design, the inner and outer ring can rotate independently of each other. Each click is metered in true 1 thousandths adjustment and has 0.100″ total available travel. These work great with nearly all sizing 7/8 OD sizing dies, and one verified purchaser noted: “Not only are they useful on reloading dies, but it’s the cat’s meow on the Giraud Power Trimmer Case Holders.”
Dillon Users Take Note: The Whidden Click Adjustable Sizing Die will not work with the Dillon 550 or 650 progressive reloading press systems. The Universal Click Adjustable Lock Ring is not compatible with the Dillon floating toolhead.
Here’s an inexpensive procedure that can help you load straighter ammo, with slightly better measured concentricity (i.e. less run-out) on the case necks and bullets. Simply use a Rubber O-Ring on the underside of the die locking ring. This allows the die to self-align itself (slightly) to the case that is being sized. Without the O-Ring, if the flat surface on the top of your press is not perfectly square with the thread axis, your die can end up slightly off-angle. This happens when the bottom of the locking ring butts up tight against the top of the press. The O-Ring allows the die to float slightly, and that may, in turn, reduce the amount of run-out induced during case sizing.
Top prone shooter GSArizona, who sadly passed last year, tried this trick and said it works: “Go to your local hardware store and get a #17 O-Ring (that’s the designation at Ace Hardware, don’t know if its universal). Slip the O-Ring on the die and re-adjust the lock ring so that the O-Ring is slightly compressed when the die is at the correct height. Size and measure a few more cases. You will probably see a slight improvement in neck concentricity as the die can now float a bit as the case enters and leaves it. This isn’t going to be a dramatic improvement, but it’s a positive one.”
We want to stress that adding O-Rings to sizing dies may help some reloaders, but we don’t offer this as a panacea. Try it — if using the O-Ring reduces measured runout that’s great. If it doesn’t, you’ve only spent a few pennies to experiment.
Lee Precision makes die lock rings with built-in O-Rings. Lee’s distinctive lock ring design allows the same kind of self-alignment, which is good. However, Lee lock rings don’t clamp in place on the die threads, so they can move when you insert or remove the dies — and that can throw off your die setting slightly. By using an O-Ring under a conventional die lock ring (that can be locked in place), you get the advantages of the Lee design, without the risk of the lock ring moving.
With the Whidden Click-Adjustable Sizer Dies, you can change shoulder bump by .001″ (one-thousandth) with a simple click. Fast. Easy. Precise.
As handloaders have become more aware of shoulder bump and proper adjustment of the sizer die in recent years, there has become a need for an easier way to adjust the sizer die properly. For most folks, with their conventional dies, it takes lengthy trial trial and error to get the shoulder setback correct. Anyone who has done this can attest that it can be a slow and annoying job.
Whidden Gunworks has solved the problem with the innovative Click Adjustable Sizer Die. Patent No: 10,393,488. This die and lock ring work together to give the user a clicking feel to the adjustment just like a high end rifle scope. Each click moves the shoulder bump exactly .001″ so you can easily find the exact shoulder bump that you desire.
The Click Adjustable option is available on Whidden Custom Sizer dies as well (7/8”-14 format dies only)! Included with the Click Adjustable Sizer Die is a Shoulder Bump Gauge. This gauge attaches to standard calipers and allows measurement from the case shoulder to the base. Using the Shoulder Bump Gauge with the Click Adjustable Sizer Die will make the proper sizer die setup easier than ever before.
Click-adjustable die sets are available with both bushing and non-bushing configurations. Along with these complete die sets, Whidden Gunworks offers a separate click-adjustable ring to use with existing dies. Priced at $58.99, the Whidden Click-Adjust Lock Ring represents a modest investment for a major gain in die ease-of-use and precision adjustability.
The Whidden Universal Click Adjustable Lock Ring you can instantly turn your sizer die into a Click Adjustable Die. This ring works with any 7/8 OD sizer of any brand with adjustable shoulder bump. Simple in design, the inner and outer ring can rotate independently of each other. Each click is metered in true 1 thousandths adjustment and has 0.100″ total available travel. These work great with nearly all sizing 7/8 OD sizing dies, and one verified purchaser noted: “Not only are they useful on reloading dies, but it’s the cat’s meow on the Giraud Power Trimmer Case Holders.”
Dillon Users Take Note: The Whidden Click Adjustable Sizing Die will not work with the Dillon 550 or 650 progressive reloading press systems. The Universal Click Adjustable Lock Ring is not compatible with the Dillon floating toolhead.
Here’s a handy new item, particularly if you load large quantities of bulk ammo for a variety of firearms. Lyman’s new Ammo Checkers check the diameters of reloaded rounds and factory ammo, so you can quickly confirm that your ammo fits a standard chamber. Just drop your loaded rounds in the Ammo Checker, and if the round fits into the gauge, it will fit in the gun’s chamber.
Lyman Ammo Checkers are multi-caliber — each orange block checks six or eight different cartridge types, with each caliber/cartridge name engraved on the gauge. Ammo Checkers are machined to SAAMI minimum chamber dimensions from solid blocks of 6061 T6 aluminum. Ammo Checkers are available in three versions covering most common handgun and rifle calibers:
Handgun Ammo Checker (#7833000) $35.99 at Brownells
Fits: 380 Auto, 9mm Luger, 38 Super, 40 S&W, 45 ACP, 38/357, 44 Spl/Mag, and 45 Colt
Why Use a Case Gauge?
We find that case gauges like the Lyman Ammo Checker are particularly useful for handgun reloaders using progressive presses. The chambers of many popular semi-auto pistols are partly unsupported. This allows the case to swell in the bottom quarter. The case may not be sized adequately by your sizing die, which can lead to misfeeds or malfunctions.
Additionally, if you have loaded a large quantity of ammo for a semi-auto rifle such as an AR15, it’s not a bad idea to check your cartridges before you load them into your magazines. All you need is one mis-sized round to cause a stoppage. That will ruin your day if you are competing in a Service Rifle match or 3-Gun event.
Many novice hand-loaders believe that neck bushing Inside Diameter (ID) size is the only important factor in neck tension. In fact, many different things will influence the grip on your bullet and its ability to release from the case neck. To learn more about neck tension and “case grip”, take the time to read this article carefully. We bet you’ll gain knowledge that will let you load more accurate ammo, with better ES/SD.
Editor: Guys, this is a VERY important article. You really should read it over carefully, twice. Variations in the force required to release a bullet can significantly affect accuracy and ES/SD. You really need to know how the grip on bullet can be altered by many different factors.
Neck Tension (i.e. Grip on Bullets) Is a Complex Phenomenon
While we certainly have considerable control over neck tension by using tighter or looser bushings (with smaller or bigger Inside Diameters), bushing size is only one factor at work. It’s important to understand the multiple factors that can increase or decrease the resistance to bullet release. Think in terms of overall brass-on-bullet “grip” instead of just bushing size (or the internal neck diameter in non-bushing full-length sizing dies).
Bullet grip is affected by many things, such as:
1. Neck-wall thickness.
2. Amount of bullet bearing surface (shank) in the neck.
3. Surface condition inside of neck (residual carbon can act as a lubricant; ultrasonic cleaning makes necks “grabby”).
4. Length of neck (e.g. 6mmBR neck vs. 6mm Dasher).
5. Whether or not the bullets have an anti-friction coating.
6. The springiness of the brass (which is related to degree of work-hardening; number of firings etc.)
7. The bullet jacket material.
8. The outside diameter of the bullet and whether it has a pressure ridge.
9. Time duration between bullet seating and firing (necks can stiffen with time).
10. How often the brass is annealed.
11. Amount (length) of neck sized (e.g. you can size only half the neck).
12. Interior diameter of bushing, or neck section of non-bushing die. – and there are others…
One needs to understand that bushing size isn’t the beginning and end of neck tension questions, because, even if bushing size is held constant, the amount of bullet “grip” can change dramatically as the condition of your brass changes. Bullet “grip” can also change if you alter your seating depth, and it can even change if you ultrasonically clean your cases.
6-time U.S. National Long-Range Champion John Whidden adds: “Our tests show us that the condition of the necks in regards to lubed or not, carbon inside or not, squeaky clean or not, etc., matter even more than the size of the bushing used. An ultrasonically cleaned or brand new dry case neck make for some quite high seating force.”
In our Shooters’ Forum a reader asked: “How much neck tension should I use?” This prompted a lengthy Forum discussion in which other Forum members recommended a specific number based on their experience, such as .001″, .002″, or .003″. These numbers, as commonly used, correspond to the difference between case-neck OD after sizing and the neck OD of a loaded round, with bullet in place. In other words, the numbers refer to the nominal amount of interference fit (after sizing).
While these commonly-used “tension numbers” (of .001″, .002″ etc.) can be useful as starting points, neck tension is actually a fairly complex subject. The actual amount of “grip” on the bullet is a function of many factors, of which neck-OD reduction during sizing is just one. Understanding these many factors will help you maintain consistent neck tension as your brass “evolves” over the course of multiple reloadings.
Seating Depth Changes Can Increase or Decrease Grip on Bullet
You can do this simple experiment. Seat a boat-tail bullet in your sized neck with .150″ of bearing surface (shank) in the neck. Now remove the bullet with an impact hammer. Next, take another identical bullet and seat it with .300″ of bearing surface in another sized case (same bushing size/same nominal tension). You’ll find the deeper-seated bullet is gripped much harder.
Neck-Wall Thickness is Important Too
I have also found that thinner necks, particularly the very thin necks used by many 6mm PPC benchrest shooters, require more sizing to give equivalent “grip”. Again, do your own experiment. Seat a bullet in a case turned to .008″ neckwall thickness and sized down .003″. Now compare that to a case with .014″ neckwall thickness and sized down .0015″. You may find that the bullet in the thin necks actually pulls out easier, though it supposedly has more “neck tension”, if one were to consider bushing size alone.
In practical terms, because thick necks are less elastic than very thin necks, when you turn necks you may need to run tighter bushings to maintain the same amount of actual grip on the bullets (as compared to no-turn brass). Consequently, I suspect the guys using .0015″ “tension” on no-turn brass may be a lot closer to the guys using .003″ “tension” on turned necks than either group may realize.
Toward a Better Definition of Neck Tension
As a convenient short-cut, we tend to describe neck tension by bushing size alone. When a guy says, “I run .002 neck tension”, that normally means he is using a die/bushing that sizes the necks .002″ smaller than a loaded round. Well we know something about his post-sizing neck OD, but do we really have a reliable idea about how much force is required to release his bullets? Maybe not… This use of the term “neck tension” when we are really only describing the amount of neck diameter reduction with a die/bushing is really kind of incomplete.
My point here is that it is overly simplistic to ask, “should I load with .001 tension or .003?” In reality, an .001″ reduction (after springback) on a thick neck might provide MORE “grip” on a deep-seated bullet than an .003″ reduction on a very thin-walled neck holding a bullet with minimal bearing surface in the neck. Bushing ID is something we can easily measure and verify. We use bushing size as a descriptor of neck tension because it is convenient and because the other important factors are hard to quantify. But those factors shouldn’t be ignored if you want to maintain consistent neck tension for optimal accuracy.
Consistency and accuracy — that’s really what this all about isn’t it? We want to find the best neck tension for accuracy, and then maintain that amount of grip-on-bullet over time. To do that you need to look not only at your bushing size, but also at how your brass has changed (work-hardened) with time, and whether other variables (such as the amount of carbon in the neck) have changed. Ultimately, optimal neck tension must be ascertained experimentally. You have to go out and test empirically to see what works, in YOUR rifle, with YOUR bullets and YOUR brass. And you may have to change the nominal tension setting (i.e. bushing size) as your brass work-hardens or IF YOU CHANGE SEATING DEPTHS.
Remember that bushing size alone does not tell us all we need to know about the neck’s true “holding power” on a bullet, or the energy required for bullet release. True bullet grip is a more complicated phenomenon, one that is affected by numerous factors, some of which are very hard to quantify.
Here’s an inexpensive procedure that can help you load straighter ammo, with slightly better measured concentricity (i.e. less run-out) on the case necks and bullets. Simply use a Rubber O-Ring on the underside of the die locking ring. This allows the die to self-align itself (slightly) to the case that is being sized. Without the O-Ring, if the flat surface on the top of your press is not perfectly square with the thread axis, your die can end up slightly off-angle. This happens when the bottom of the locking ring butts up tight against the top of the press. The O-Ring allows the die to float slightly, and that may, in turn, reduce the amount of run-out induced during case sizing.
Top prone shooter GSArizona has tried this trick and he says it works: “Go to your local hardware store and get a #17 O-Ring (that’s the designation at Ace Hardware, don’t know if its universal). Slip the O-Ring on the die and re-adjust the lock ring so that the O-Ring is slightly compressed when the die is at the correct height. Size and measure a few more cases. You will probably see a slight improvement in neck concentricity as the die can now float a bit as the case enters and leaves it. This isn’t going to be a dramatic improvement, but it’s a positive one.”
We want to stress that adding O-Rings to sizing dies may help some reloaders, but we don’t offer this as a panacea. Try it — if using the O-Ring reduces measured runout that’s great. If it doesn’t, you’ve only spent a few pennies to experiment.
Lee Precision makes die lock rings with built-in O-Rings. Lee’s distinctive lock ring design allows the same kind of self-alignment, which is good. However, Lee lock rings don’t clamp in place on the die threads, so they can move when you insert or remove the dies — and that can throw off your die setting slightly. By using an O-Ring under a conventional die lock ring (that can be locked in place), you get the advantages of the Lee design, without the risk of the lock ring moving.


 In our
  Neck-Wall Thickness is Important Too