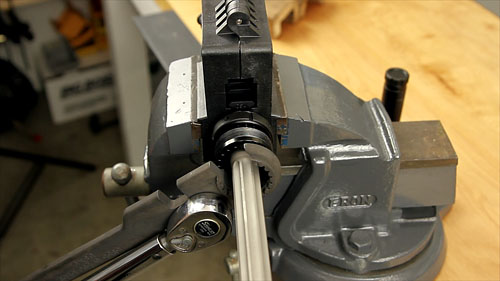
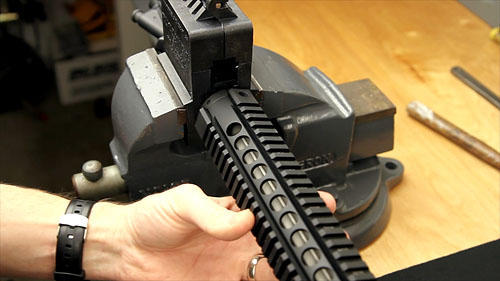
Here are the main tools you’ll need to assemble an AR-platform rifle
Planning to put together an AR-platform rifle? Or are you looking to upgrade your AR with a new barrel, stock, or trigger group? Then you should check out the AR-15 Rifle Build DVD from our friends at UltimateReloader.com. This DVD covers all the details of a custom build, using high-resolution video sequences, and helpful supporting graphics.
In this DVD, Ultimate Reloader’s Gavin Gear guides you through the entire process including selecting components, acquiring and using the necessary tools, assembly steps and details for each component, and even mounting a scope. Building an AR-15 can be overwhelming, but with the right guidance and help it’s not difficult and can be very rewarding. With this DVD you’ll be able to build your AR-15 with confidence.
Upper: Barrel / Gas Block / Gas Tube
Upper: Handguard Installation
UltimateReloader.com’s AR-15 Build DVD is available just $9.90 (plus $3.80 shipping/handling). This DVD can pay for itself many times over by showing you how to do your own gunsmithing (and get quality AR components at attractive prices).
Gavin in Action — Seven-minute AR-15 Build
To preview the AR Build DVD, check out this YouTube video from UltimateReloader.com. This 12-minute video shows the basics of assembling a standard AR15 with Del-ton components. Gavin shows how to install the AR trigger group and other parts in an AR-15 lower. You’ll also see the basics of barrel and handguard installation. This video covers the highlights, but we strongly recommend you buy the full DVD before starting your first AR-15 build.
Our friend Gavin Gear of UltimateReloader.com recently tested the nicely-crafted Buchanan Hand Press. This symmetrical, twin-lever tool can handle pretty much any sizing and/or seating task as it offers plenty of leverage — even for full-length case resizing. Crafted by Buchanan Precision Machine, this Hand Press has a central mount for the die on top with a conventional shell-holder at the bottom. There is a handy spent primer catcher, plus an optional Lock-N-Load die insert adapter. This press is well-built, but the $245.00 price is steep. You can buy FIVE Lee Hand Presses for the cost of this Buchanan.
You can see how this press works in this recent UltimateReloader video. Gavin demonstrates all the key functions, including decapping, sizing, and bullet seating. You can see that Gavin was impressed with this hand press, which is well-suited for loading at the range:
Gavin explains that the modern Buchanan Hand Press is based on a previous design: “This press is an evolution of an old press that has been out of production for years: the Huntington Industries Decker Hand Press. While it shares some of the basic design features, the Buchanan Precision Machine Hand Reloading Press takes quality and functionality to the next level. This press accepts standard shell holders, uses standard 7/8×14 dies (or dies with Hornady Lock-N-Load bushings as I showed in the above video), and has a COL capacity of 3 3/4″. Need to load 30-06 away from the bench? No problem, this press can handle it. Unlike other hand presses, this one stands by itself on a flat/level surface, and can be clamped to a bench in order to stay in one spot.”
Thinking of trying out the Precision Rifle Series, starting off with a gas gun? Well Gavin Gear of UltimateReloader.com did just that, competing in his first-ever PRS match up in Washington State. With its timed stages (some just 90 seconds long), Gavin learned that PRS is about speed as well as accuracy. As a PRS newbie, Gavin found the competition fun but challenging. Gavin’s account of his experiences, set forth in two articles with accompanying videos, will help other novice PRS competitors prepare for PRS-type matches and assemble the right equipment.
What PRS is All About
PRS is all about pushing your rifle skills to edge. You may have to hit targets at four different distances in 90 seconds- and dial in your dope between each shot. These kinds of challenges are super-difficult, but with enough experience and practice, it’s amazing what you can do. I saw guys that were so smooth, steady, fast, and accurate, it was mind blowing! It doesn’t come easy, and the guys at the top of the heap are super-dedicated. — Gavin Gear
This video has cool Aerial Drone footage, and in-depth explanation of stages:
Gavin’s First PRS Match: The Experience
By: Ultimate Reloader
Gavin told us that he’s wanted to try out the PRS game: “For a long time I’ve talked with friends about trying out a PRS-style match. Life has been busy, but when the right opportunity came, I decided to give it a try. My friend and shooting partner Jim Findlay offered to help me prepare, and told me it would be ‘fun to shoot gas guns together’. I decided I would shoot an AR-15, and thought that would be an ideal opportunity to try something new — the 22 Nosler. I wasn’t sure exactly what I was getting myself into, but that’s typically the way things happen when you’re really trying something new. It was a great experience, and it taught me a lot about shooting. I also made some great connections and friends during the match. If you are at all interested in PRS (Precision Rifle Series, or just Precision Rifle in general) I would suggest you enter and compete in a match. You most likely won’t regret it.”
Gavin enjoyed his first match: “Overall, the match was more fun and more laid back than I thought it would be. The guys in our squad were all really helpful, and even loaned me gear to try out when they noticed my gear wasn’t right for a particular shooting activity. One such case was when Ken Gustafson (of KYL Gear) offered to loan me one of the bags he had made. Below you can see me shooting off the infamous unstable tippy tank trap with a KYL Gear bag, and I’ll have to say [the bag] was amazing. It helped me lock down my rifle and get on target. What a great feeling!”
Gavin did experience issues with his “stout” 22 Nosler loads: “I did run into some trouble — I had loaded my 22 Nosler rounds to max charge weight with Varget powder and experienced some failure-to-feed issues during the match. Initially I thought my bolt needed more lubrication, but [it was] between 96 – 100°F during the hottest part of the Match day.” With the ultra-high ambient temperatures, Gavin experienced over-pressure. Word to the wise — “Test everything you plan to use on match day, and take into account things like weather conditions as well”.
Gear Choices and Selection
Gavin tells us: “In order to be successful in a PRS match, you need a rifle that is accurate enough, extremely reliable, has great ergonomics, handles well, and fits your budget.”
22 Nosler AR-15 rifle used by Gavin in the PRS match
18″ 1:8-twist 22 Nosler Upper
Two Stage Match Trigger – .154″ Hi-Speed DMR (GEISSELE AUTOMATICS)
Hogue AR-15 rubber grip
Magpul PRS stock
Harris S-BRM 6-9″ bipod
Vortex Viper HS-T 6-24x50mm scope
Action Type — Bolt vs. Semi: While most PRS competitors use bolt-action rifles, there are classes of competition that specifically call for semi-automatic actions to be used. Even so, in Open Class where you can pick which action type you’d like to use, there’s a split between the two for various reasons. I used an AR-15 in my first match, and for comparison, I think I’ll use a bolt-action rifle in my next match!
Support — Bipods and Bags: I think the first thing I said when trying to shoot from a barricade was: ‘You have to be kidding’. For someone used to prone shots from a bipod (when shooting long-range) this new challenge seemed impossible. My reticle was literally all over the place trying to shoot a target at 400 yards. But over time things improved drastically! Part of this improvement came from practice and technique, and part came from using the right support systems, such as the Game Changer Bag from Armaggedon Gear:
Photo Courtesy Accurate Ordnance.
All the Gear Items You Need — Bags, Bipods, Optics and More
UltimateReloader.com’s PRS Gear Summary covers Rifle Choice (gas gun vs. bolt-action), chambering options, optics, support systems (bipods and bags), dope cards, accessories and much more. Both novice and experienced PRS competitors will find this article well worth reading.
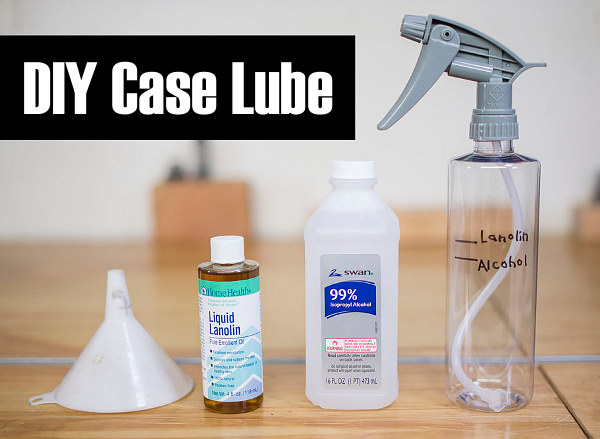
In the YouTube video embedded below, our friend Gavin Gear of UltimateReloader.com shows how to make your own case lube using simple, inexpensive ingredients. As recommended by the 6.5 Guys, this Liquid Lanolin + Isopropyl Alcohol mix works well and is very cost-effective. You can make a pint of this home-brew Lanolin case lube for a fraction of the price of commercial aerosol spray lubes.
Gavin describes the exact mixing process on his Ultimate Reloader website. Gavin says this lube mix is a good complement to the Hornady One-Shot (pistol) and Dillon DCL (rifle) lubes he has used for pistol and rifle reloading sessions. CLICK HERE to read more.
Do your hands/wrists get tired when prepping scores of cartridge cases? There’s an alternative to the big, costly case prep centers that occupy lots of space on your reloading bench. Little Crow Gunworks has developed a $29.95 hand tool that makes chamfering by hand much easier. You’ve got to watch this Precision Prep Tool in action — click on the VIDEO below to see Gavin Gear of UltimateReloader.com demonstrate how it works.
See How Tool Head Spins With Arm Movement — Very Clever!
With this tool, a natural motion of the forearm translates into rotary motion of the tool head (watch the video!). The tool-head holds four (4) tools: inside and outside neck chamfer tools, plus large and small primer pocket reamers. A hex adapter lets you use the primer pocket reamers with a power drill to remove the crimps on military brass.
Gavin Gear was impressed with this innovative device: “I’ll admit, I didn’t know how this tool worked until I tried it out, and it’s pretty amazing how something so simple can make such a big impact on a chore like brass prep. I’ve tried a lot of brass prep tools, and this is one smooth setup. I think the Precision Prep Tool is a good option for case prep chores, especially if you want to trim on the go, or sitting in your recliner watching TV.”
This is the first manually-operated case prep tool that puts four tools at your fingertips. Other single-head inline tools require the user to twist their wrist or rotate the tool in their hand. The PPT consists of a knurled solid aluminum handle with a bearing-mounted aluminum tool head. The tool head has four 8-32 tapped holes which accept case prep tools manufactured by most reloading companies. To use the tool, simply rotate your forearm in a clockwise motion to chamfer, deburr, or clean the primer pocket. Priced at $29.95, the tool comes in five (5) colors: Red, Blue, Green, Silver, and Black.
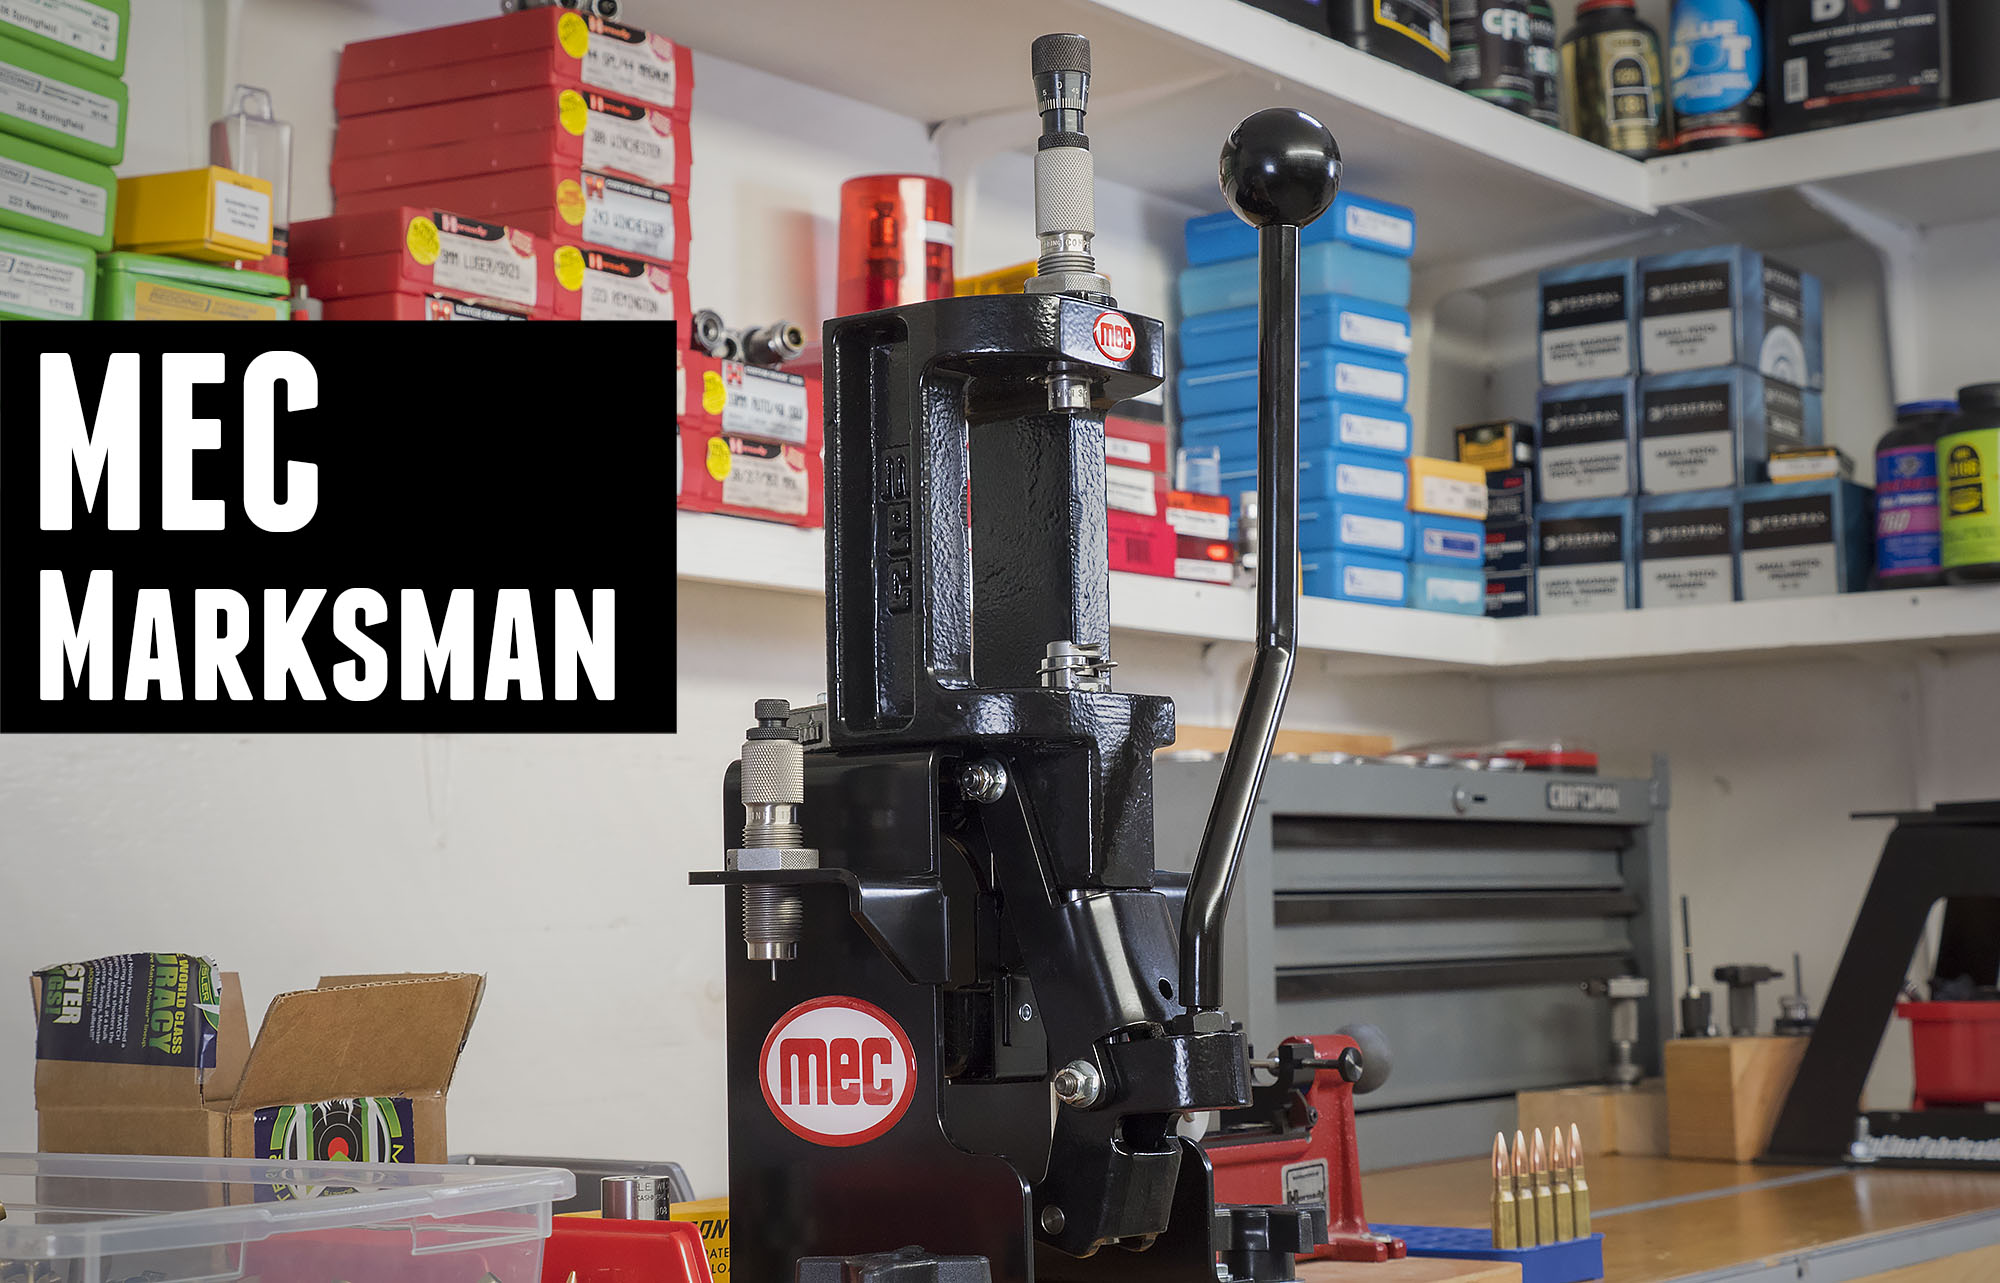
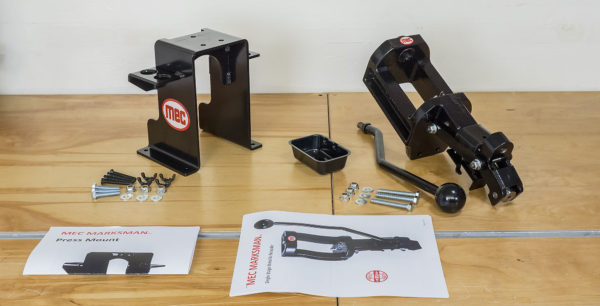
We were impressed when we first saw the new MEC Marksman press. Created by the makers of the popular MEC shotshell reloading systems, the new Marksman combines a sturdy cast-iron frame with a modern open-front design. With a $225.00 MSRP it is more expensive than an RCBS Rock Chucker, but it offers some distinct advantages — such as the open front plus a floating shell-holder system.
Our friend Gavin Gear got his hands on a MEC Marksman press and put it through its paces. He came away impressed with the product, saying it delivers excellent performance, and has many impressive features. Gavin tells us: “Cast iron tools and machines are a lifetime investment. The made-in-USA MEC Marksman features ductile cast-iron construction, an open-front frame design for easy cartridge access, a new floating shell-holder design with a unique retention system, and ambidextrous handle setup.”
Gavin liked the Marksman’s system for holding spent primers. A tray sits behind the ram to catch spent primers exiting from a hole near the bottom of the ram. This is more foolproof than the plastic primer cups on some other single-stage presses. Expect less spent primer “spillage”.
The Marksman is sold as a stand-alone unit. However MEC also offers a very nice steel mount/riser for the Marksman. Gavin tested the Marksman with this riser, and he says it was sturdy and well-built. Gavin liked the riser. He said that elevating the Markman press up above the benchtop made it easier to handle cases and to operate the handle. You also get extra left- and right-side die-holders.
Do you have some old, tired brass that needs a thorough cleaning — inside and out? Consider using an ultrasonic cleaning machine. When used with the proper solution, a good ultrasonic cleaning machine can quickly remove remove dust, carbon, oil, and powder residue from your cartridge brass. The ultrasonic process will clean the inside of the cases, and even the primer pockets. Tumbling works well too, but for really dirty brass, ultrasonic cleaning may be a wise choice.
Our friend Gavin Gear recently put an RCBS Ultrasonic cleaning machine through its paces using RCBS Ultrasonic Case Cleaning Solution (RCBS #87058). To provide a real challenge, Gavin used some very dull and greasy milsurp brass: “I bought a huge lot of military once-fired 7.52x51mm brass (fired in a machine gun) that I’ve been slowly prepping for my DPMS LR-308B AR-10 style rifle. Some of this brass was fully prepped (sized/de-primed, trimmed, case mouths chamfered, primer pockets reamed) but it was gunked up with lube and looking dingy.”
UltimateReloader.com Case Cleaning Video (7.5 minutes):
Gavin describes the cleaning exercise step-by-step on UltimateReloader.com. Read Gavin’s Cartridge Cleaning Article to learn how he mixed the solution, activated the heater, and cycled the machine for 30 minutes. As you can see in the video above, the results were impressive. If you have never cleaned brass with ultrasound before, you should definitely watch Gavin’s 7.5-minute video — it provides many useful tips and shows the cleaning operation in progress from start to finish.
Ultra Dry Necks After Ultrasonic Cleaning — Some Suggestions
The Ultrasonic cleaning process gets cartridge brass so “squeaky clean” that increased force may be required to seat your bullets, or they may “grab” as they go in the necks. To reduce bullet-seating effort, you may benefit from adding a little dry case lube inside the case-neck before loading (use a nylon brush). Another trick is adding a teaspoon of Ballistol lube to the cleaning solution. That provides a trace lubricant inside the necks, but does not interfere with powder ignition in any way.
The RCBS ultrasonic cleaning machine features a large 3-liter capacity, 60 watt transducer, and 100 watt ceramic heater. The RCBS ultrasonic machine can be found under $140.00, and this unit qualifies for RCBS Rebates ($10 off $50 purchase or $50 off $300.00 purchase). RCBS also sells 32 oz. bottles of cleaning concentrate that will make up to 10 gallons of Ultrasonic Solution.
Gavin Gear of UltimateReloader.com recently reviewed Lee Precision’s new lever-operated, bench-mounted priming tool. The Lee Auto Bench Prime features a hopper-style primer feeder set at an angle. Gavin likes the tool, reporting that primers feed well and seat fully with very little effort. And switching from large to small primer size (or vice-versa) is quick and easy. Overall, Gavin says the Lee Auto Bench Prime has earned a place in his reloading room: “This is now my tool of choice for off-press priming. The Lee Auto Bench Prime is easier to use than a hand priming tool, and more efficient.”
Watch UltimateReloader.com’s Lee Auto Bench Prime Gear Review
Gavin tells us that the system worked well: “All in all, I’m really liking the LEE Auto Bench Prime. In the video, I prime both small primer .223 Rem brass and large primer .308 Win cases. I was impressed with how easy it was to seat the primers, and how quickly the process goes.”
How the Lee Auto Bench Prime Performs
Gavin had three important “take-aways” from his initial loading sessions with the Lee Auto Bench Prime:
1. I was surprised by the low effort needed to prime cases — it’s pretty amazing.
2. You can quickly and easily install shellholders and change primer sizes.
3. The folding primer tray works very well. It’s a great setup from my testing so far.
Are there any negatives with the tool? Gavin noted that, in the course of loading 100+ rounds, once or twice he had to tap the triangular tray to get the primer to feed: “That’s not a big deal, and may smooth out with time”.
Tool Costs Under $30.00
Available at Grafs.com for just $28.59, the Lee Auto Bench Prime tool is very affordable. It costs much less than competitive bench-mounted priming tools from Forster and RCBS.
NOTE: this tool requires dedicated Auto Prime shell holders (sold separately), but that’s a relatively small added expense. A set of Lee shell-holders (shown at right) costs less than $20.00 (street price).
Planning to put together an AR-platform rifle? Or are you looking to upgrade your AR with a new barrel, stock, or trigger group? Then you should check out the AR-15 Rifle Build DVD from our friends at UltimateReloader.com. This DVD covers all the details of a custom build, using high-resolution video sequences, and helpful supporting graphics.
In this DVD, Gavin Gear guides you through the entire process including selecting components, acquiring and using the necessary tools, assembly steps and details for each component, and even mounting a scope. Building an AR-15 can be overwhelming, but with the right guidance and help it’s not difficult and is a lot of fun. With this DVD you’ll be able to build your AR-15 with confidence.
Right now, as a New Year’s promotion, the AR-15 Build DVD is on sale for just $9.90 (plus $3.80 shipping/handling). This DVD can pay for itself many times over by showing you how to do your own gunsmithing (and get quality AR components at attractive prices).
Our friend Gavin Gear of UltimateReloader.com got his hands on Hornady’s all-new, pyramid-style Lock-N-Load Iron reloading press. This single-stage press features a unique, open-front design that makes it easier to place and remove cases during reloading processes. The compact footprint of this Iron Press also allows for a variety of placement options.
This video shows the new open-front Hornady Iron Press:
Gavin installed the Iron Press on his bench which features horizontal metal channels (for placement flexibility). Gavin reports: “The arrival of this press is great in its timing. I’m just about to move from progressive loading of 6.5 Creedmoor (for the Ruger Precision Rifle) to single-stage precision reloading. This will be the perfect press for that task! Based on the feedback and questions I’ve gotten recently, I’ll compare the consistency between progressive presses and single-stage presses.”
To raise the Iron Press higher, Gavin used an Ultramount from Inline Fabrication: “I was hoping to make slight modifications to the Ultramount in order to adapt it for use with my Ultimate Reloader bench system, and that worked out just fine! Here’s a picture of the Ultramount bolted down: I can easily slide it side to side to make room for other items on my bench.” NOTE: After taking the pictures shown here, Gavin rotated the Ultramount 180 degrees. This moved the whole press forward (towards the operator), providing more bench clearance for the Iron Press linkage and handle.