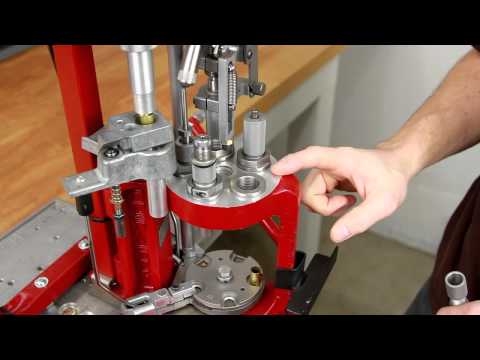
When you make a reloading mistake, you may need to “pull down” assembled ammo. The embedded UltimateReloader.com video demonstrates how to use the Hornady Cam-Lock bullet pulling system.
When Reloading Goes Bad — The Danger of Over-Charging
Our friend Gavin Gear of UltimateReloader.com was recently reloading some 9mm pistol ammo with his Hornady progressive press. As part of his reloading procedure, he visually checks the cases — and he noticed that the charges seemed high. Sure enough, his most recently-produced rounds were about two grains over spec. He diagnosed the issue: “I was using a powder measure without a baffle. What happened was, over the course of the loading session, things settled in, and the charge level increased.”
Not knowing just when his powder measure started delivering too much powder, Gavin decided, for safety’s sake, to pull down all the ammo he had just reloaded. Yes that’s time-consuming, but it’s better than the alternative — having a dangerous Kaboom while shooting. With fast-burning pistol powders, a two-grain over-charge could cause a blown case, damaged firearm, and/or serious injury.
Watch Cam-Lock Bullet Puller Used to Remove Bullets from Loaded Ammo:
Use of Bullet Puller starts 4:00 minutes into video.
Gavin says it is vitally important to perform safety checks during the reloading process: “You’ve got to do it — check every single round to make sure there IS powder, and that there’s not too MUCH powder. Double, Triple, Quadruple check your components… and your powder charges. You can’t be too careful.”
To pull down a loaded round, first place the cartridge in the shellholder on your press ram. Then raise the round up into the bullet puller device installed where a die would go. The Hornady Cam-lock bullet puller works by clamping the bullet in a collet when you flip down the red-coated lever. Then, with the case held by the rim in the shell-holder, the bullet exits the cartridge as the press ram is lowered. It takes time, but it’s pretty fool-proof once you get the hang of it. This entire process is illustrated in Gavin’s video, starting near the four-minute mark.
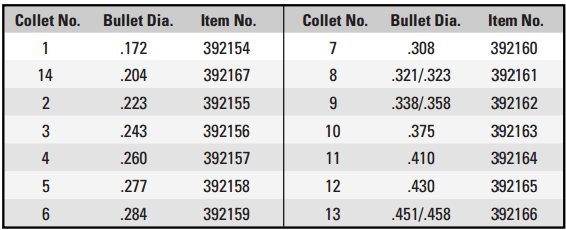
The Hornady Cam Lock Bullet Puller has four (4) key components: 1. Cam-Lock die body; 2. Cam-Lock lever; 3. Stem; and 4. Collet (Caliber-specific).
NOTE: In order to use this tool, you’ll need the appropriate collet for each diameter range of bullets you intend to pull. For example use collet #3 for 6mm, collect #6 for 7mm, and collet #7 for .308 Caliber.
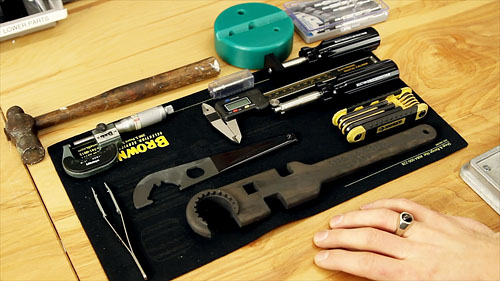
Here are the main tools you’ll need to assemble an AR-platform rifle
Planning to put together an AR-platform rifle? Or are you looking to upgrade your AR with a new barrel, stock, or trigger group? Then you should check out the AR-15 Rifle Build DVD from our friends at UltimateReloader.com. This DVD covers all the details of a custom build, using high-resolution video sequences, and helpful supporting graphics.
In this DVD, Gavin Gear guides you through the entire process including selecting components, acquiring and using the necessary tools, assembly steps and details for each component, and even mounting a scope. Building an AR-15 can be overwhelming, but with the right guidance and help it’s not difficult and can be very rewarding. With this DVD you’ll be able to build your AR-15 with confidence.
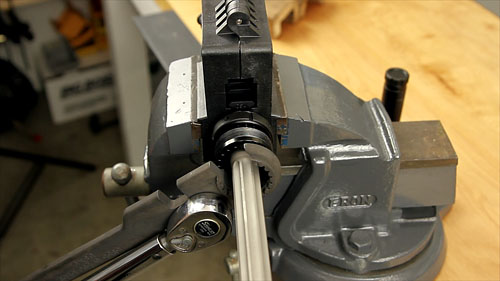
Upper: Barrel / Gas Block / Gas Tube
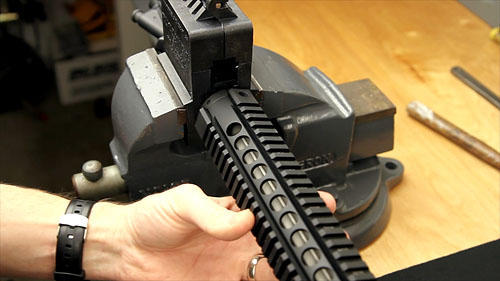
Upper: Handguard Installation
UltimateReloader.com’s AR-15 Build DVD is available just $9.90 (plus $3.80 shipping/handling). This DVD can pay for itself many times over by showing you how to do your own gunsmithing (and get quality AR components at attractive prices).
See Parts Installed in See-Through AR-15 Lower
This isn’t part of UltimateReloader.com DVD, but this YouTube video shows how to install the AR trigger group and other parts in an AR-15 lower. A transparent, see-through Tennessee Arms Company lower receiver was chosen to make it easier to see how the parts are installed.
MagnetoSpeed’s technology has completely changed the market for firearms chronographs. With a MagnetoSpeed barrel-mounted chrono you can quickly and easily record muzzle velocity (MV) without having to set up tripods or walk down-range. The compact MagnetoSpeed chronos are easy to set up and transport. With the full-featured V3 model, everything you need comes in a small fitted case. In the top photo are the components used with the MagnetoSpeed V3 Kit:
1. V3 Bayonet sensor
2. Display and control unit
3. Bayonet spacers (plastic and rubber)
4. Cords and mounting hardware (left), suppressor heat shield (right)
5. Alignment rod (square cross-section)
6. Rail adapter (sold separately)
Our friend Gavin Gear of UltimateReloader.com recently reviewed the MagnetoSpeed V3 and came away impressed. Gavin explains the a good chrono is essential: “If you want to load and shoot precision ammunition, you need the tools that will produce and validate the precision of your loads. A good chronograph is one of those tools! In this post I’m going to introduce you to the MagnetoSpeed V3 chonograph, the high-end electromagnetic chronograph which fills out the top slot in MagnetoSpeed’s equipment portfolio.”
In this 11-minute video Gavin reviews MagnetoSpeed’s top-of-the-line V3 Chronograph. He shows what ships with the unit, how to set it up for both rifles and pistols, and then he puts it through its paces showing how it captures velocity data. Gavin says he will follow-up with future videos showing how to link the MagnetoSpeed V3 to your mobile phone and how to log velocity data for future reference. To learn more about this high-tech chrono, visit UltimateReloader.com.
by Gavin Gear, UltimateReloader.com
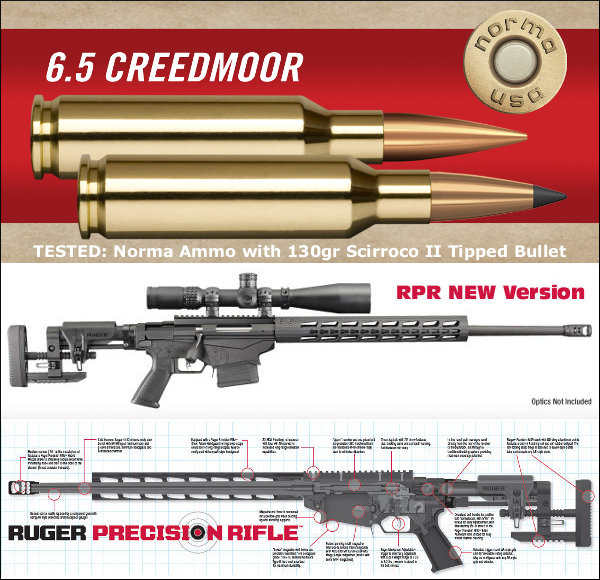
Norma is known for its high-quality brass and ammunition. I’ve used Norma brass for precision reloading in calibers like .30-06 with great results. Recently, I saw that Norma had announced a new addition to their Professional Hunter lineup of ammunition: in 6.5 Creedmoor! I thought I should try some out with the Ruger Precision Rifle, and that’s what I’ll cover in this post.
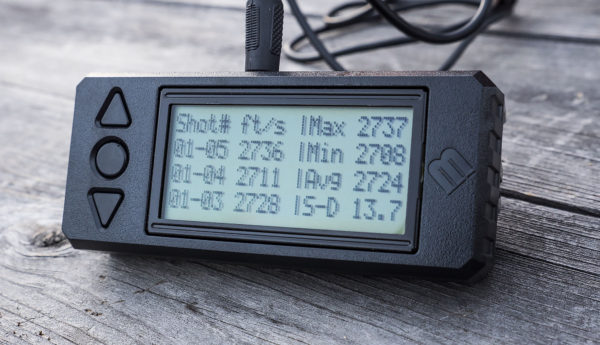
As you saw in the video, this ammunition behaves more like match ammunition than it does hunting ammunition — I really wish it was deer season! Here are the chronograph results:
This article comes from the Midsouth Shooters Blog. You’ll find other helpful gear reviews, reloading tips, and technical articles at www.MSSBlog.com.
With an SD of 13.7 FPS, this ammunition is very consistent in terms of velocity. It’s not surprising that the first four shots went into a .5″ group. This new ammunition is built around the Swift Scirocco II 6.5mm Bullet, and here’s more info about this precision-oriented hunting projectile:
Technical Information
Caliber: 264, 6.5mm
Bullet Diameter: 0.264
Bullet Weight: 130 Grains
Bullet Length: 1.350″
Bullet Style: Polymer Tip Spitzer Boat Tail
Bullet Coating: Non-Coated
Ballistics Information:
Sectional Density: .266
Ballistic Coefficient:.571
This is certainly a great choice of ammunition if you are hunting medium game with a rifle chambered in 6.5 Creedmoor. Can’t wait to sit down again with this ammunition to see if I can get that 3/8″ 5-shot group I know this ammo is capable of! If you want to try this Norma 6.5 Creedmoor Professional Hunter ammo yourself, you can purchase this excellent ammunition at Midsouth Shooters Supply.
How much can you save reloading your own ammo? Well that depends on the cost of components and how much you have invested in your reloading gear. UltimateReloader.com has created a handy online Reloading Costs Calculator that lets you quickly compare the cost of reloaded ammo vs. factory ammo. Just enter the costs of powder, primers, bullets, and brass, and the Calculator will tell you the cost per round, per 20-rd box, per 50-rd box, and cost per thousand. Note — when setting the price of the brass you need to divide the initial cost by the number of predicted reloads. For example if you have 500 pieces of brass that cost $40/100 to buy ($200 total), but you get 8 reloads per case, then you put $25.00 in the Calculator ($200 total brass cost divided by 8).
True Reloading Cost Should Include Amortized Tool Expenses
Ah… but there is a catch. To understand the true cost of reloading, you also need to consider the costs of your tools and accessories, amortized over the tools’ loading lifespan. Let’s say you have $1000.00 invested in presses, dies, tumblers, measuring tools and other accessories, with a residual value of $500.00 (upon resale). If you load 5,000 rounds with those tools over their lifespan, you need to add $0.10 per round for tooling costs (your investment minus residual value, divided by the number of rounds loaded). The UltimateReloader.com Calculator does not include amortized tooling costs, but that’s something you can easily figure out on your own.
Excellent Resource for Reloading Videos
After you’ve tried out the Reloading Costs Calculator, check out the other content on UltimateReloader.com. This site features some of the best gun-related “how-to” videos on the internet. With sharp video and clear audio, the production quality is very high. If you use a progressive press (Dillon, Hornady, RCBS), you should definitely watch UltimateReloader.com’s videos — you’ll probably learn a new trick or two. In the sample video below, you can see how Hornady’s new Bullet Feeder works with its Lock-N-Load Progressive press.
Service Rifle shooters and varminters burn through a lot of ammunition. If you’re shooting more than 250 rounds of ammo a month, you may want to consider getting a progressive press — at least for your practice and varmint ammo. New technologies have made today’s progressives more efficient than ever. RCBS has developed a rifle-bullet feeding system that works with the RCBS Pro 2000 Progressive. The bullet-feeder can also be fitted to some Dillon units with modifications. There are four main components to the RCBS rifle-bullet feeder system: 1) base and two-piece adjustable column; 2) collator (bowl and motor); 3) drop tube and shutoff assembly; and 4) bullet feed die assembly.
Our friend Gavin Gear has tested the RCBS bulet feeder on an RCBS Pro 2000 for his UltimateReloader.com website. You can see his hands-on video review above. I’m pleased Gavin did this review because I have a Pro 2000 myself, and I can confirm that it is a very good machine. It is sturdy, the rotary-style powder measure is very precise, and the strip primer system works great. (I can change from small primer feeding to large primer feeding in a couple of minutes — honest.) I’ve also found the strip primer system virtually foolproof — so long as you insert the strips in the right direction! I haven’t used the Bullet Feeder yet, but you can see the Pro 2000 in action with the feeder in Gavin’s video above.
On UltimateReloader.com, Gavin puts the RCBS Bullet Feeder through its paces. Gavin writes: “As you can see from this picture (at left), the RCBS Rifle Bullet Feeder adds quite a bit of overall height to the progressive reloader.This is the case with all bullet feeders that use a collator (some add more than others). One of the reasons that these units are tall is to allow for a sufficient ‘buffer’ of dropped bullets so that the collator can keep up with fluctuations in loading speed and to allow enough ‘stack weight’ on the column of bullets so that they drop/feed correctly.” As fitted to the Pro 2000, Gavin says the bullet feeder system achieves “very efficient loading with excellent COL consistency and bullet concentricity.”


 Our friend Gavin Gear has tested the RCBS bulet feeder on an RCBS Pro 2000 for his


