Each Wednesday, the U.S. Army Marksmanship Unit publishes a reloading “how-to” article on the USAMU Facebook page. A while back, the USAMU’s reloading gurus looked at the subject of case lubrication. Tasked with producing thousands of rounds of ammo for team members, the USAMU’s reloading staff has developed very efficient procedures for lubricating large quantities of cases. This article reveals the USAMU’s clever “big-batch” lube methods. For other helpful hand-loading tips, visit the USAMU Facebook page on upcoming Wednesdays.
Rapid, High-Volume Case Lubrication
Today’s topic covers methods for quickly applying spray lube to cartridge cases prior to sizing. A typical order for this shop may be 25,000 rounds, so [speeding up] the lubrication process can be a real time-saver. While your ammunition lots probably aren’t this large, the efficient methods discussed here may help save a considerable amount of time over your handloading career. Our case lubrication rates range from 1500-1600 cases per hour, to 2400-2500 cases per hour, depending on caliber.
This shop uses virgin brass, whereas most home handloaders use fired brass, which necessitates some small changes at times. These will be discussed as they arise. Begin with fired brass that has been tumbled clean.
Ensure as much tumbling media as possible is removed from the brass, as when it gets into a size die, it can dent cases significantly. This is a good time to round out dents in the case mouths using a tapered tool to prevent damage from the decapping stem.
First, dump the clean cases into a large box or reloading bin. Shake the bin back and forth so that many cases are oriented with the mouths up. Next, pick up as many cases as is convenient with the mouths “up”, from natural clusters of correctly-oriented cases. With 7.62mm-size cases, this is usually 3-4, and with 5.56mm cases, this can be up to 8-10. Place the cases into the rack slots, mouth-up. Doing this in groups rather than singly saves considerable time. Once these clusters have been depleted, it will be time to re-shake the bin to orient more cases “up.”.
This photo shows a case lubrication rack made by a USAMU staffer.
Naturally, adjust the spacing to best fit the calibers you reload. We have found this size … convenient for handling through the various phases of case lubrication/transfer to progressive case feeders for processing. Note that the 1/2-inch angle does not cover much of the critical case area at the base, just forward of the extractor groove, where most re-sizing force will be exerted. As the USAMU uses virgin brass, less lubrication is required for our brass than would be needed for Full Length (FL) sizing of previously-fired brass.
NOTE: The amount applied using our rack is easily enough for our purpose. If using fired brass, be sure to adequately lube this base area to avoid having cases stick in the full-length sizing die.
Using a spray lube, coat the cases adequately, but not excessively, from all sides. Be sure to get some lube into the case mouths/necks, in order to reduce expander ball drag and case stretching/headspace changes. The spray lube this shop uses does not harm primers or powder, and does not require tumbling to remove after lubing.*
Take a close look at the photo above. The USAMU shop uses a common kitchen turntable, which allows the rack to be rotated easily. We place this in a custom-made box which prevents over-spray on to floors and walls.
Angled Box Method for Smaller Cases to be Neck-Sized
A refinement of the above method which especially speeds processing of 5.56x45mm cases is as follows. A small cardboard box which holds about 100 cases is fitted with an angled “floor” secured by tape. With the smaller 5.56mm cases, usually about 8-10 cases per handful can be picked up, already correctly-oriented, and placed into the box together. This prevents having to place them into the rack slots, saving time.
HOWEVER, note that this does not allow nearly as much lube access to the case bodies as does the rack. For our purposes — neck-sizing and setting neck tension on new brass, this works well. If using this procedure with fired brass, take steps to ensure adequate lube to prevent stuck cases.
As always, we hope this will help our fellow handloaders. Good luck, and good shooting!
*A two-part test performed here involved spraying primed cases heavily, while getting more lube into the case mouth/body than even a careless handloader would likely apply. The second part of the test involved literally spraying considerable quantities of the lube directly into the cases, drenching the primers. After a several-day wait to allow the lube to penetrate the primers, they were then fired in a test barrel. All fired normally; no unusual reports were noted. This bolstered confidence that normal amounts of the lube would not adversely affect our ammunition, and we have been pleased with the results over several years.
As a member of the USAMU, SFC Daniel Horner established himself as one of the top 3-Gun shooters on the planet. In fact, given his major championship titles, a strong argument can be made that Horner is the most successful Multi-Gun competitor in history — the best of the best. Now a civilian professional, Dan Horner competes as Team SIG Sauer’s 3-Gun ace.
Horner captured yet another prestigious Championship earlier this month, winning the 2020 USPSA National Championship. Horner finished first in the Tactical Division at the 2020 USPSA Multi-Gun Nationals at the Universal Shooting Academy in Frostproof, Florida, June 11-14, 2020. This is Daniel’s 12th victory at the prestigious Multi-Gun Nationals.
At the USPSA Nationals Horner competed through 12 stages with pistol, rifles, and shotgun. For pistol competition, Horner used a SIG Sauer P320 X5 LEGION pistol with iron sights. For the long-range competition, Horner used his SIG Sauer M400 rifle with a SIG Sauer TANGO6T riflescope, and a SIG KILO 3000BDX Rangefinder.
Click Photo for full-screen diagram
Horner said the 2020 Multi-Gun Nationals were very tough — a special challenge:
“The competition at this year’s Multi-Gun Nationals was the best I’ve seen. Everyone that competed had obviously spent extra time training and practicing while they were at home over the past few months. With this being the first major nationals match since quarantine, the training showed and the competition was elevated. The accuracy and reliability of my SIG equipment, combined with my training routine, gave me the edge I needed to pull-off the victory[.]”
How Hot is Horner — Just Watch and Be Amazed
Here are two videos showcasing Horner’s Skills with Rifle and pistol. In the first video, Horner demonstrates how to move and shoot with an AR platform rifle. In the second video, Horner demonstrates his speed, mobility, and accuracy during the final stage of a 3-Gun Nation event.
Rifle Skills for Multi-Gun Competition — Grip, Stance, and Body Position
Daniel Horner Shreds 3-Gun Nation Stage with Blazing Speed
As a soldier with the USAMU, Horner was a true phenom with rifle, pistol, and shotgun, winning multiple 3-Gun titles against tough competition. When he was on his game, no one on the planet was better in the 3-Gun arena. His record of major multi-gun championships may never be rivaled. He has won over 125 major events/titles at the world, national, regional, and state level.
Daniel Horner Major Titles
10-Time USPSA Multi-Gun National Champion
4-Time 3-Gun Nation Pro Series Champion
2014 NRA World Shooting Championship Winner
2-Time Int’l Sniper Competition Team Winner
2-Time IDPA National Champion
IPSC Shotgun National Champion
Do you enjoy 3-Gun competition or other types of “Action Shooting”? Then you should visit the USAMU Facebook Page today Friday, June 19th at 2:00 pm Eastern.
There will be a LIVE Q & A session today. Members of the U.S. Army Marksmanship Unit (USAMU) will answer questions about Action Shooting, about the USAMU in general, and about the U.S. Army. This is a great opportunity to communicate directly with some of the top 3-gun shooters in the nation. If you have specific questions, then post a comment on the USAMU’s Facebook page before the session.
Want to learn more about Action Shooting? This Virtual Tour Video first tours the USAMU training center. Then team members show the rifles, pistols, and shotguns they use in Multi-Gun competition.
SFC Daniel Horner — Greatest 3-Gunner Ever?
Though now a civilian competing for SIG Sauer, SFC Daniel Horner was a USAMU superstar. One of the best 3-Gun competitors in history, Horner was blazing fast (and wicked accurate) with all three guns.
As a soldier with the USAMU, Horner was a true phenom with rifle, pistol, and shotgun, winning multiple 3-Gun titles against tough competition. When he was on his game, no one on the planet was better in the 3-Gun arena. His record of major multi-gun championships may never be rivaled. He has won over 125 major events/titles at the world, national, regional, and state level.
Daniel Horner Major Titles
10-Time USPSA Multi-Gun National Champion
4-Time 3-Gun Nation Pro Series Champion
2014 NRA World Shooting Championship Winner
2-Time Int’l Sniper Competition Team Winner
2-Time IDPA National Champion
IPSC Shotgun National Champion
Rifle Grip, Stance, and Body Position for Action Shooting Competition
In this action-packed video, SFC Horner gives tips on how to properly handle a semi-automatic rifle, including grip, stance and body position.
Turn on your TVs and break out the popcorn — it’s a big week on Shooting USA. A full hour of SHOT Show coverage runs tonight (5/6/20) at 9:00 pm ET. This episode provides a “first look” at the new guns, optics, and gear introduced for 2020. Shooting USA’s team looks at over 65 new products.
2020 SHOT Show Highlights: Colt Python, Hornady A-Tip bullets, Manners PRS Stock, Volquartsen Summit .17 WSM, Ruger-57 Pistol, Pinnacle Precision Rifle, HK SP5, Impact Sport Muffs, Laugo Arms Alien Pistol, Vortex 1-10X Scope, Glock 44 Pistol, Hornady Rapid Safe and more.
This SHOT Show 2020 episode airs on the Outdoor Channel Wednesday, May 6 at 9:00 pm ET and Thursday, May 7 at 3:00 pm ET. If you miss those broadcasts, you can watch this and ALL episodes of Shooting USA on Vimeo.com by subscription. The SHOT Show 2020 edition is just $0.99.
Great Shooting USA Episodes
For our Bulletin followers, here are two of our favorite full-length Shooting USA episodes, and well as two excellent instructional segments, one with past NRA High Power Champion SGT Sherri Jo Gallagher.
Texas Varmint Silhouette Match — 200 Meters to 750 Yards
We love shooting reactive targets. This Texas varmint silhouette match features multiple target shapes, 10 at each distance: Tiny Prairie Dogs at 200m, 3″x3″ Armadillos at 300m; 3″x5″ Coyotes at 385m; 5″x4″ Hogs at 500m; Chickens (on swingers) at 600 yards; and Pigs (on Swingers) at 750 yards. Competitors are allowed 10 rounds and 10 minutes to hit each set of targets.
EDITOR: We strongly recommend you take the time to watch this Shooting USA feature — it shows some top-flight benchrest rifles, and also covers the origins of benchrest varmint silhouette in Pennsylvania. There are even some AccurateShooter Forum members on screen. John Scoutten also does a nice job explaining the challenges of shooting this discipline with a PRS rig. We think any benchrest or tactical shooter will really enjoy this video.
Travis Frazier of Field & Cave Outfitters says shooters love the reactive targets: “The most exciting thing is seeing your hits — these [targets] really go airborne”. Yep, that’s the best thing about Varmint Silhouette matches — hits deliver instant gratification. Travis designs and produces these steel targets.
Vintage Sniper Match and GAP Grind PRS Match
Historic Rifles are on the firing line! It’s the Vintage Sniper Match in Talladega for collectors competing with classic rifles and historically accurate optics from the two World Wars. A team from the U.S. Army Marksmanship Unit also takes the challenge with a reproduction 03A4.
Plus, John Scoutten welcomes a new shooter to Precision Rifle (PRS) Competition. The two team up to take on 25 grueling stages at the Bushnell GAP Grind in Tennessee. With a special Pro/Am format, the GAP Grind is one of the most popular tactical matches in the country
Reading the Wind — SGT Sherri Jo Gallager (USAMU)
This segment, created when Sherri Jo was shooting with the USAMU team, explains how to evaluate wind conditions and adjust your hold for long range.
Minute of Angle (MOA) Defined with Jim Scoutten
Minute of Angle (MOA) — what does it actually mean? And what do you get when a rifle manufacturer guarantees one-half MOA accuracy? Jim Scoutten answers these questions and explains MOA basics. One MOA is an angular measurement equivalent to 1.047″ at 100 yards.
Nikon offers eyepieces with reticles for its flagship Monarch Fieldscopes. Eyepiece reticles help spotters call shot corrections with precise click values (MOA or Mils).
Using a spotting scope seems simple. Just point it at the target and focus, right? Well, actually, it’s not that simple. Sometimes you want to watch mirage or trace, and that involves different focus and viewing priorities. Along with resolving bullet holes (or seeing other features on the target itself), you can use your spotting scope to monitor mirage. When watching mirage, you actually want to focus the spotting scope not on the target, but, typically, about two-thirds of the distance downrange. When spotting for another shooter, you can also use the spotting scope to watch the bullet trace, i.e. the vapor trail of the bullet. This will help you determine where the bullet is actually landing, even if it does not impact on the target backer.
In this video, SFC L.D. Lewis explains how to use a spotting scope to monitor mirage, and to watch trace. SFC Lewis is a former Army Marksmanship Unit member, U.S. Army Sniper School instructor, and current U.S. Army Reserve Service Rifle Shooting Team member. In discussing how precision shooters can employ spotting scopes, Lewis compares the use of a spotting scope for competition shooters vs. military snipers. NOTE: You may wish to turn up the audio volume, during the actual interview segment of this video.
On Wednesdays, The U.S. Army Marksmanship Unit regularly publishes reloading “how-to” articles on the USAMU Facebook page. One “Handloading Hump Day” article, part 5 of a 6-part series, relates to reloading on Progressive Presses. This article concerns proper procedures for Auto-Indexing Progressives, which advance the shell-plate with every pull of the handle. Auto Progressives are very efficient, but they also require special attention and focus, because so many things are happening at once. You need to train yourself to watch every station. If you run a progressive press now, or are considering getting a progressive, we recommend you read this article. Visit the USAMU Facebook page for other helpful handloading guidance.
Progressive Loading Presses — Self-Advancing Shellplate Type
Recently, we addressed manually-operated progressive presses for the beginning handloader. This type press requires one to manually advance the shellplate after each handle stroke. An advantage for beginners is that nothing happens at any station until the loader wants it to. This helps users avoid problems from clearing malfunctions without noticing that the shellplate has advanced itself. (Read Previous USAMU Article on Manual Progressives.)
The next, more luxurious type progressive press advances the shellplate automatically whenever the handle is cycled. [Editor: This is also called an “Auto-Indexing” Progressive Press.] Typically, each stroke automatically sizes and primes a case, operates the powder measure (if used) and seats a bullet. Some also have case feeders that automatically put a new case in the shellplate with every cycle. Others require the loader to insert a case each cycle. With both types, the loader usually puts a bullet on each sized/primed/charged case.
[CAVEAT: While our Handloading Shop has several progressive presses, ALL of our powder charges are thrown/weighed by hand. We do not use powder measures on our presses. Our progressives are used for brass preparation, priming, seating, etc., but not for fully-progressive loading.]
The manually-advanced press can be a boon to beginners, but as one gains experience it can be a mixed blessing, depending on one’s style. If one pays close attention to every operation and loads without distractions, the manual press is very reliable and allows full scrutiny of each round as it is loaded. However, if one easily drifts into day-dreaming, or isn’t focused on paying careful attention at all times, the manual progressive can be a bit of a liability. The opportunity for forgetting a powder charge, leading to a squib load, is ever-present. [Editor: A lock-out die can help reduce the risk of a squib load, or a double-charge. See below.]
The automatically-advancing progressives help prevent this by ensuring a powder charge will be dropped each time the handle is operated. Experienced handloaders often appreciate this feature due to the savings of time and effort. Individual preferences between the two press styles are influenced by several factors. These include one’s comfort with more- vs. less-complicated mechanisms, how often one changes calibers (case feeders often must be converted, in addition to dies and shellplates), how many rounds one loads annually, relative ease of changing primer mechanisms from small to large, etc. Automatic progressives and their caliber conversion kits tend to be significantly more expensive than manual progressives and caliber conversions from the same maker.
One USAMU handloader, who likes simple, bullet-proof machines and maximum efficiency when converting presses, owns two manually-advanced progressives. One is set up for large primers, and the other for small primers. He can change calibers in the twinkling of an eye. As he loads for many different calibers, this fits his style. Another handloader here is just the opposite. He loads for a few calibers, but in larger quantities. He much prefers his self-advancing press with case-feeder for its speed. He makes large lots of ammo in a given caliber before switching, to improve overall efficiency. His caliber conversion kits are more expensive than those for the manually-advanced progressive, but he uses fewer of them.
Whichever type one chooses, it is VERY important to buy quality gear from a manufacturer with a long, well-established track record for quality, durability and good customer support. Avoid jumping on the “latest, greatest” model until it has a proven track record. For example, this writer knows a loader who got a brand-new, expensive, self-advancing model press some years back, shortly after its introduction. As is too often the case these days, the manufacturer released it before all the “bugs” were worked out.
Better Safe Than Sorry — the RCBS Lock-Out Die
RCBS Makes a “Lock-Out Die” that senses the powder charge. This will halt the Progressive press if you have a double charge, or an undercharge. Your Editor has the Lock-Out Die on his RCBS Pro 2000. It has “saved his bacon” a half-dozen times over the years. It can be used on Dillon and Hornady progressives as well as RCBS machines.
It would not fully seat primers to the correct depth. No amount of adjustment, extra force, or fiddling would do better than to seat primers barely flush with the case head. Any inattention could result in a slightly “high” primer, protruding above the case head. It created a risk for slam-fires, particularly in semi-autos without spring-retracted firing pins, such as the M1 or M1A. In desperation, he had a machinist buddy study the problem and machine a new part to correct it. No dice. Its engineering didn’t permit full primer seating, even with extended parts. He now wishes he’d heeded his shooting buddies’ advice to stick with the “tried and true,” reliable performer they all used.
Whichever press one selects, see if the maker has a kit or list of commonly-replaced parts. Having needed springs, pins, etc. on hand in the rare event that one breaks or “goes missing” can save the day when one is busy loading for a match! Another tip for improving one’s overall loading efficiency (rounds loaded with minimal set-up/tear-down time) is to plan one’s handloading by primer size. For example, if your machine is set to use small primers, load all the calibers that you intend to that take small primers, before converting the press to load large-primer calibers.
In our next chapter, we’ll discuss peculiarities of progressive loading for rifle cartridges, with remedies for problems such as excessive cartridge-case headspace variation when sizing, tips for ensuring best powder charge consistency, and so on. Until then, be safe, and good shooting!
The U.S. Army Marksmanship Unit (USAMU), in cooperation with Shooting USA TV, has created a series of instructional Pro Tip pages covering a wide range of shooting disciplines. All totaled, there are more than 50 USAMU Pro Tips. Most relate to rifle marksmanship but there are also numerous tips for shotgunners and pistol shooters. Each Pro Tip entry includes multiple photos and 6-15 paragraphs, in an easy-to-follow format. Many Pro Tips also include an instructional video produced by Shooting USA. Here are three Pro Tip videos, and links to seven more Pro Tip web pages.
USAMU TOP TEN PRO TIPS
1. Reading the Wind with SGT Sherri Gallagher.
Apart from gravity, wind has the most pull on the bullet as it travels down range. Being able to accurately read the wind and mirage will greatly enhance your performance on the rifle range. National Champion, SGT Gallagher gives you some of her tips.
2. Angle Shooting with SFC (Ret.) Emil Praslick.
SFC Praslick shows you how to determine the angle to your target, and then how to include that to change your data necessary to hit your target on the first shot.
3. Rifle Grip, Stance and Body Position for 3-Gun with SFC Daniel Horner.
Professional 3-gun marksman SFC Daniel Horner, U.S. Army Marksmanship Unit (USAMU), give tips on how to properly handle a semi-automatic rifle, including grip, stance and body position.
Each Wednesday, the U.S. Army Marksmanship Unit (USAMU) publishes a reloading “how-to” article on the USAMU Facebook page. In this article, the USAMU’s reloading gurus help you avoid potentially disastrous mistakes with a progressive — such as double powder changes. The USAMU experts caution that: “beginners would be better served by starting on a single-stage press”. That said, owning a progressive makes sense if you shoot more than 100 centerfire rounds a week. If you own a progressive press, or are thinking of buying one, you should read this article.
For those interested in progressives, we’ll examine different key features among the types and relate them to handloading processes. The first, and simplest, type is the manually-advanced progressive. The shellplate holds the several cartridges being processed with each stroke of the handle. On these presses, the loader must manually advance the shellplate after each handle stroke.
While this obviously slows production vs. a press that cycles the shellplate automatically, this feature does have advantages though. (The disadvantages follow shortly.) No case is advanced to the next station until the operator deliberately does so – which is especially helpful for the new handloader.
Problems that arise during loading can be diagnosed and fixed without fears of some “extra” operation happening unnoticed with cartridges at the other stations. Beginners NOTE: one way to positively prevent this risk is to remove the cases from each press station when a problem emerges, before beginning diagnosis. Usually, however, experienced loaders omit this step as a time-saving measure, being confident in their understanding of the loading machine, process and the appropriate remedy.
If all cartridge cases are left in place, the operator must monitor what’s happening at each station. For example, raising the press ram twice may result in a double-charge of powder. With rifle cartridges, this usually results in a massive powder over-flow, alerting the loader to the problem. With pistol cases or small rifle charges in large cases, such an over-flow isn’t guaranteed. [Editor — one way to be sure you don’t have an overcharge or undercharge is to use a Lock-Out Die — see below.] The manually-advanced progressive keeps all operations under the loader’s control at all times. This is intuitively easier for the beginning loader to understand and to operate with confidence.
However, this same characteristic can be problematic if the loader isn’t paying 100% attention to what they are doing during routine operation. Some new handloaders apparently aspire to load progressively while daydreaming and paying little attention to the operation. Their plan is to feed components in, like feeding potato chips to a monkey, while good ammo drops out at the other end. Unfortunately, such an approach may likely result in something other than “good” ammo dropping out at the end…
Forgetting to cycle the shellplate when appropriate will cause problems. As with all handloading, distractions MUST be kept to a minimum for safety purposes. Never watch TV, talk with friends, or have other distractions (such as a rambunctious pet or child) in the room when loading. Avoiding distractions will do much to ensure that one produces consistent, high-quality ammunition, free of defects. For example, when a case doesn’t line up correctly with the case mouth expander or powder drop tube, a difference in “feel” often alerts the loader to correct the problem without ruining a case. If one is interrupted or becomes distracted, be certain to examine ALL cases in the shellplate before resuming loading.
Better Safe Than Sorry — the RCBS Lock-Out Die
RCBS Makes a “Lock-Out Die” that senses the powder charge. This will halt the Progressive press if you have a double charge, or an undercharge. Your Editor has the Lock-Out Die on his RCBS Pro 2000. It has “saved his bacon” a half-dozen times over the years. It can be used on Dillon and Hornady progressives as well as RCBS machines.
Other advantages of the typical manually-advanced progressives are that they are usually simpler in design, with fewer moving parts to get out of adjustment. This appeals to the mechanically dis-inclined! Caliber conversion kits are usually cheaper and take less time to install. This especially benefits the enthusiast who reloads for a wide variety of calibers.
However, many popular manually-advanced progressives have fewer die stations than the higher-end, auto-advancing machines. One item that is very useful when actually dispensing powder on a progressive press is a cartridge case powder-level sensor. This warns if powder levels in each case are too high or too low; however, it does require a die station of its own.
This condition (incorrect powder charges) often results from powder (especially extruded rifle powder) “bridging” in the powder measure. That is, one charge doesn’t fully empty into its cartridge case. This leaves some extra powder hanging up in the measure to join the normal charge in the next case. With some extruded powders, this can be quite obvious without a sensor. However, the sensor can detect small variations that would not be obvious to even an experienced, attentive operator. Considering the machine’s potential to use a powder sensor in addition to one’s other customary dies is a wise idea.
Similarly, pistol shooters are best served to seat bullets and crimp cartridges in separate operations. This should be taken into account when selecting a progressive press. Whenever loading fully-progressively, choosing powders that dispense very easily, e.g., ball/spherical or very fine-grain extruded powders, can help keep charges quite uniform.
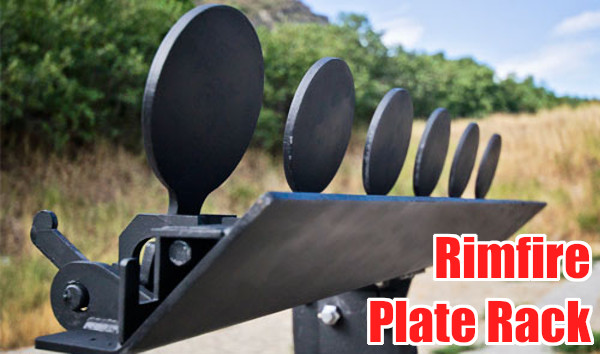
The Action Target Sport Plate Rack is specifically designed for .22 LR Rimfire shooting. This rack features six 4″-diameter plates that reset with a provided cable.
Shooting plates is fun. You get immediate feedback — “instant gratification” when you make a hit. When shooting steel inside 100 yards, we like to use .22 LR rimfire guns. The ammo is inexpensive, noise levels are lower (though you still need ear protection), and at close ranges there are fewer issue with ricochets and bullet splash-back. Additionally, for busy folks who don’t have time to reload, you can pick up a .22 LR rifle or pistol, grab a couple $5 boxes of ammo, and get to the range in a few minutes. The convenience means it is easier to shoot every week if you like.
Above, SFC Joel Turner from the USAMU’s Action Shooting Team offers a few pointers on how to shoot plates quickly and accurately. He’s using a centerfire pistol, but the same principles apply for rimfire handguns. Click speaker icon to activate audio.
New .22 LR CP33 Pistol is Great for Plates
If you like shooting plates, one of the better new handguns for the job is Kel-Tec’s CP33. We tested this interesting handgun at the 2019 SHOT Show Media Day at the Range, and were impressed. The pistol is big, but balances well. The sights are easy to see, and the full-length rail lets you easily mount a variety of optics. The trigger is surprisingly good — better than 90% of rimfire handguns out there. For the plates game, this “quad-stack” gun can handle long stages without mag changes. The standard clear-sided CP33 magazine holds 33 rounds of .22 LR ammo.
If you are interested in an affordable, but very accurate, high-capacity semi-auto rimfire pistoldefinitely consider Kel-Tec’s new CP33. 22 Plinkster agrees — this is a nice pistol. In his video review below 22 Plinkster reports: “This handgun has been 100% reliable IF I load the magazine the right way… and it’s pretty dog-gone accurate.”
Shooting Sports USA (SSUSA) tested Keltec’s CP33 with a variety of ammo. The CP33 consistently shot about one-half-inch for five shots “from a 25-yard sandbag bench rest using the iron sights.” SSUSA noted that the gun disassembles quickly and easily by removing one central pin. SSUSA’s tester, Chris Christian, was impressed with the gun, saying it balanced well and the sights aligned naturally.
SSUSA notes: “The rapid growth of rimfire competition in Steel Challenge has prompted some gun makers to enter the fray. Kel-Tec is one, and their new CP33 .22 LR pistol has a lot of potential.”
GunsAmerica also reviewed the Keltec CP33, which it called “The Most Innovative Gun of 2019″. Reviewer Riley Baxter liked the ergonomics and sights. He tested a variety of ammo, getting the best results with Norma Match-22. Baxter concluded: “I thoroughly enjoyed every moment that I spent shooting the KelTec CP33[.] The magazines took a little bit of trial and error… but once I had this down, the CP33 ran reliably and loading 33 rounds took no time at all. This is a gun that I would recommend to anyone who may be interested in buying a .22 pistol[.]”
Each Wednesday, the U.S. Army Marksmanship Unit publishes a reloading “how-to” article on the USAMU Facebook page. A recent “Handloading Hump Day” post covered preparation of once-fired 5.56x45mm brass. This article, the first in a 3-part series, has many useful tips. If you shoot a rifle chambered in .223 Rem or 5.56x45mm, this article is worth reading.
This week, Handloading Hump-Day will answer a special request from several competitive shooters who asked about procedures for morphing once-fired GI 5.56mm brass into accurate match brass for NRA High Power Rifle use. The USAMU has used virgin Lake City (LC) 5.56 brass to win National Championships and set National Records for many years. In this 3-part series, we’ll share techniques proven to wring match-winning accuracy from combat-grade brass.
GI brass has an excellent attribute, worth noting — it is virtually indestructible. Due to its NATO-spec hardness, the primer pockets last much longer than most commercial brass when using loads at appropriate pressures.
Preparing Once-Fired GI 5.56 Brass for Reloading (Part 1 of 3)
Assuming our readers will be getting brass once-fired as received from surplus dealers, the following steps can help process the low-cost raw material into reliably accurate components.
1. Clean the Brass
First, clean the brass of any dirt/mud/debris, if applicable. Depending on the brass’s condition, washing it in a soap solution followed by a thorough rinsing may help. [This step also extends the life of the tumbling media.] Approaches range from low-tech, using gallon jugs 1/2 full of water/dish soap plus brass and shaking vigorously, to more high-tech, expensive and time-consuming methods.
2. Wet-Tumbling Options (Be Sure to Dry the Brass)
When applying the final cleaning/polish, some use tumblers with liquid cleaning media and stainless steel pins for a brilliant shine inside and out, while others take the traditional vibratory tumbler/ground media approach. Degree of case shine is purely personal preference, but the key issue is simple cleanliness to avoid scratching ones’ dies.
If a liquid cleaner is used, be SURE to dry the cases thoroughly to preclude corrosion inside. One method is to dump the wet brass into an old pillow case, then tilt it left/right so the cases re-orient themselves while shifting from corner to corner. Several repetitions, pausing at each corner until water stops draining, will remove most water. They can then be left to air-dry on a towel, or can be dried in a warm (150° F-200° F max) oven for a few minutes to speed evaporation.
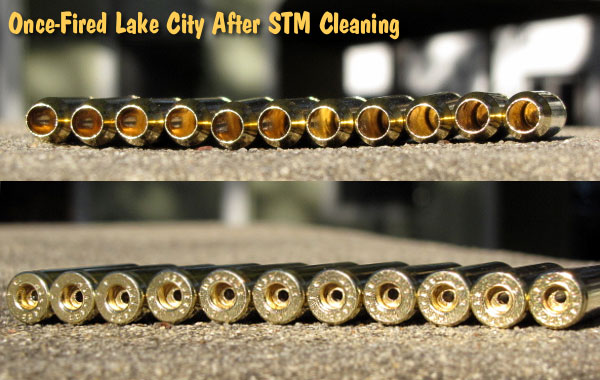
Shown below are Lake City cases after cleaning with Stainless Media (STM). Note: STM Case cleaning was done by a third party, not the USAMU, which does not endorse any particular cleaning method.
3. Inspect Every Case
Once dry, inspect each case for significant deformation (i.e., someone stepped on it), damaged mouths/necks and case head/rim damage. Some rifles’ ejectors actually dig small chunks of brass out of the case head — obviously, not ideal for precision shooting. Similarly, some extractors can bend the case rims so badly that distortion is visible when spinning them in one’s fingers. These can be used for plinking, but our match brass should have straight, undamaged rims.
Dented case mouths are common, and these can easily be rounded using a conical, tapered tool, [such as a .223 expander mandrel. A dummy 7.62 or .30-06 cartridge with a FMJ spitzer can also work.] If most of your brass is of one headstamp, this is a good time to cull out any odd cases.
4. Check the Primers Before Decapping
Your clean, dry and inspected brass is now ready for full-length sizing, decapping and re-priming. Historically, primer crimps on GI brass have caused some head-scratching (and vile language) among handloaders. Our next installment will detail efficient, easy and practical methods to remove primer crimp, plus other useful handloading tips. Until next week, Good Shooting!
NOTE: The USAMU Handloading (HL) Shop does not RE-load fired 5.56 brass. We use virgin LC brass with our chosen primer already staked in place. However, our staff has extensive personal experience reloading GI brass for competition, which will supplement the Shop’s customary steps. In handloading, as in life, there are many ways to accomplish any given task. Our suggestions are note presented as the “only way,” by any means. Time for loading/practicing is always at a premium. Readers who have more efficient, alternative methods that maintain top accuracy are invited to share them here.
Accuracy Potential of Mil-Surp 5.56×45 Brass
So, how accurate can previously-fired GI surplus brass be in a good National Match AR-15? Well, here’s a data point from many years ago that might be of interest. A High Power shooter who wrote for the late Precision Shooting magazine took a Bill Wylde-built AR match rifle to a registered Benchrest match. His first 5-round group ever fired in a BR match was officially measured at 0.231″ at 200 hundred yards. This was fired in front of witnesses, while using a moving target backer that confirmed all five rounds were fired.
He recounted that his ammo was loaded progressively with factory 52gr match bullets and a spherical powder using mixed years of LC brass with no special preparation whatsoever. Obviously, this was “exceptional”. However, he had no difficulty obtaining consistent 0.5-0.6 MOA accuracy at 200 yards using LC brass and a generic “practice” load that was not tuned to his rifle.
Saving Money by Using GI Brass
So, with good commercial brass readily available, why would one go to all the extra steps necessary to process fired GI brass? [Editor: It’s about saving money.]
Economically, it makes great sense. When the author was actively practicing and competing with the service rifle, he had ~3,000 rounds of 5.56mm brass, which allowed him to load during winter and spend most time in the summer practicing. If one were wealthy and wanted to shoot nothing but the finest imported brass, the current cost of 3,000 is ~$1920 (plus shipping.)
Dropping down to good, but less-expensive new, U.S. commercial brass brings the price to a much more realistic ~$720. However, at current rates, the same amount of surplus GI once-fired brass costs between $120 — $150, leaving lots of room in the budget for other expenses. [Editor: that’s less than 10% of the cost of the best imported brass.]


 Using a spotting scope seems simple. Just point it at the target and focus, right? Well, actually, it’s not that simple. Sometimes you want to watch mirage or trace, and that involves different focus and viewing priorities. Along with resolving bullet holes (or seeing other features on the target itself), you can use your spotting scope to monitor mirage. When watching mirage, you actually want to focus the spotting scope not on the target, but, typically, about two-thirds of the distance downrange. When spotting for another shooter, you can also use the spotting scope to watch the bullet trace, i.e. the vapor trail of the bullet. This will help you determine where the bullet is actually landing, even if it does not impact on the target backer.