Photo 1: Three Near-Equal-Weight 7mm Bullets with Different Shapes
TECH TIP: Bullets of the same weight (and caliber) can generate very different pressure levels due to variances in Bearing Surface Length (BSL).
Bullet 1 (L-R), the RN/FB, has a very slight taper and only reaches its full diameter (0.284″) very near the cannelure. This taper is often seen on similar bullets — it helps reduce pressures with good accuracy. The calculated BSL of Bullet 1 was ~0.324″. The BSL of Bullet 2, in the center, was ~0.430”, and Bullet 3’s was ~ 0.463″. Obviously, bullets can be visually deceiving as to BSL!
This article from the USAMU covers an important safety issue — why you should never assume that a “book” load for a particular bullet will be safe with an equal-weight bullet of different shape/design. The shape and bearing surface of the bullet will affect the pressure generated inside the barrel. This is part of the USAMU’s Handloading Hump Day series, published on the USAMU Facebook page.
Beginning Handloading, Part 13:
Extrapolating Beyond Your Data, or … “I Don’t Know, What I Don’t Know!”
We continue our Handloading Safety theme, focusing on not inadvertently exceeding the boundaries of known, safe data. Bullet manufacturers’ loading manuals often display three, four, or more similar-weight bullets grouped together with one set of load recipes. The manufacturer has tested these bullets and developed safe data for that group. However, seeing data in this format can tempt loaders — especially new ones — to think that ALL bullets of a given weight and caliber can interchangeably use the same load data. Actually, not so much.
The researchers ensure their data is safe with the bullet yielding the highest pressure. Thus, all others in that group should produce equal or less pressure, and they are safe using this data.
However, bullet designs include many variables such as different bearing surface lengths, hardness, and even slight variations in diameter. These can occasionally range up to 0.001″ by design. Thus, choosing untested bullets of the same weight and caliber, and using them with data not developed for them can yield excess pressures.
This is only one of the countless reasons not to begin at or very near the highest pressure loads during load development. Always begin at the starting load and look for pressure signs as one increases powder charges.
Bullet bearing surface length (BSL) is often overlooked when considering maximum safe powder charges and pressures. In photo 1 (at top), note the differences in the bullets’ appearance. All three are 7mm, and their maximum weight difference is just five grains. Yet, the traditional round nose, flat base design on the left appears to have much more BSL than the sleeker match bullets. All things being equal, based on appearance, the RN/FB bullet seems likely to reach maximum pressure with significantly less powder than the other two designs.
Bearing Surface Measurement Considerations
Some might be tempted to use a bullet ogive comparator (or two) to measure bullets’ true BSL for comparison’s sake. Unfortunately, comparators don’t typically measure maximum bullet diameter and this approach can be deceiving.
Photo 2: The Perils of Measuring Bearing Surface Length with Comparators
In Photo 2, two 7mm comparators have been installed on a dial caliper in an attempt to measure BSL. Using this approach, the BSLs differed sharply from the original [measurements]. The comparator-measured Bullet 1 BSL was 0.694” vs. 0.324” (original), Bullet 2 was 0.601” (comparator) vs. 0.430” (original), and Bullet 3 (shown in Photo 2) was 0.602” (comparator) vs. 0.463” (original). [Editor’s comment — Note the very large difference for Bullet 1, masking the fact that the true full diameter on this bullet starts very far back.]
It’s hunting season already in many areas of the country. Improve your chances of a successful hunt by working on your position shooting skills before heading into the backcountry. Here are tips from Team USA Olympian and ISSF World Cup Winner SFC Michael McPhail.
One of the world’s best smallbore shooters, McPhail is also an avid hunter, who enjoys harvesting game with centerfire rifles. In this excellent short video from the USAMU, McPhail shows how competition shooting positions can be adapted for hunters. McPhail shows how well-established positions can provide a more stable platform for hunters in the field. That can help ensure a successful hunt. McPhail demonstrates three positions: kneeling, supported prone, and sitting in a tree-stand.
Watch SFC McPhail Demonstrate Positions for Hunters (Good Video):
McPhail first demonstrates the kneeling position. Michael notes: “I like kneeling. It’s a little bit of an under-utilized position, but it’s almost as stable as prone. It allows you get up off the ground a little bit higher to [compensate for] vegetation. For kneeling start by taking your non-dominant foot and put that towards the target, while at the same time dropping down to a knee on the dominant leg. At the same time … wrap the sling around wrist and fore-arm, lean slightly into the target and take the shot.”
McPhail shows a nice “field expedient” use of your backpack. He shows how the basic prone position can be adapted, using the pack as a front rifle support. McPhail recommends pulling your dominant (strongside) leg forward, bent at the knee. According to Michael, this takes pressure off the abdomen, helps minimizes heart beat effects, and helps with breathing.
Last but not least, McPhail shows some clever treestand tricks. McPhail recommends a position with your weakside leg pulled up and firmly braced on the front rail of the treestand. You can then rest your support arm on your leg. (That would be the left arm for a right-handed shooter). This provides a rock-solid position when shooting from a stand. The second half of the video shows how this works.
Each Wednesday, the U.S. Army Marksmanship Unit publishes a reloading “how-to” article on the USAMU Facebook page. A while back, the USAMU’s reloading gurus looked at the subject of case lubrication. Tasked with producing thousands of rounds of ammo for team members, the USAMU’s reloading staff has developed very efficient procedures for lubricating large quantities of cases. This article reveals the USAMU’s clever “big-batch” lube methods. For other helpful hand-loading tips, visit the USAMU Facebook page on upcoming Wednesdays.
Rapid, High-Volume Case Lubrication
Today’s topic covers methods for quickly applying spray lube to cartridge cases prior to sizing. A typical order for this shop may be 25,000 rounds, so [speeding up] the lubrication process can be a real time-saver. While your ammunition lots probably aren’t this large, the efficient methods discussed here may help save a considerable amount of time over your handloading career. Our case lubrication rates range from 1500-1600 cases per hour, to 2400-2500 cases per hour, depending on caliber.
This shop uses virgin brass, whereas most home handloaders use fired brass, which necessitates some small changes at times. These will be discussed as they arise. Begin with fired brass that has been tumbled clean.
Ensure as much tumbling media as possible is removed from the brass, as when it gets into a size die, it can dent cases significantly. This is a good time to round out dents in the case mouths using a tapered tool to prevent damage from the decapping stem.
First, dump the clean cases into a large box or reloading bin. Shake the bin back and forth so that many cases are oriented with the mouths up. Next, pick up as many cases as is convenient with the mouths “up”, from natural clusters of correctly-oriented cases. With 7.62mm-size cases, this is usually 3-4, and with 5.56mm cases, this can be up to 8-10. Place the cases into the rack slots, mouth-up. Doing this in groups rather than singly saves considerable time. Once these clusters have been depleted, it will be time to re-shake the bin to orient more cases “up.”.
This photo shows a case lubrication rack made by a USAMU staffer.
Naturally, adjust the spacing to best fit the calibers you reload. We have found this size … convenient for handling through the various phases of case lubrication/transfer to progressive case feeders for processing. Note that the 1/2-inch angle does not cover much of the critical case area at the base, just forward of the extractor groove, where most re-sizing force will be exerted. As the USAMU uses virgin brass, less lubrication is required for our brass than would be needed for Full Length (FL) sizing of previously-fired brass.
NOTE: The amount applied using our rack is easily enough for our purpose. If using fired brass, be sure to adequately lube this base area to avoid having cases stick in the full-length sizing die.
Using a spray lube, coat the cases adequately, but not excessively, from all sides. Be sure to get some lube into the case mouths/necks, in order to reduce expander ball drag and case stretching/headspace changes. The spray lube this shop uses does not harm primers or powder, and does not require tumbling to remove after lubing.*
Take a close look at the photo above. The USAMU shop uses a common kitchen turntable, which allows the rack to be rotated easily. We place this in a custom-made box which prevents over-spray on to floors and walls.
Angled Box Method for Smaller Cases to be Neck-Sized
A refinement of the above method which especially speeds processing of 5.56x45mm cases is as follows. A small cardboard box which holds about 100 cases is fitted with an angled “floor” secured by tape. With the smaller 5.56mm cases, usually about 8-10 cases per handful can be picked up, already correctly-oriented, and placed into the box together. This prevents having to place them into the rack slots, saving time.
HOWEVER, note that this does not allow nearly as much lube access to the case bodies as does the rack. For our purposes — neck-sizing and setting neck tension on new brass, this works well. If using this procedure with fired brass, take steps to ensure adequate lube to prevent stuck cases.
As always, we hope this will help our fellow handloaders. Good luck, and good shooting!
*A two-part test performed here involved spraying primed cases heavily, while getting more lube into the case mouth/body than even a careless handloader would likely apply. The second part of the test involved literally spraying considerable quantities of the lube directly into the cases, drenching the primers. After a several-day wait to allow the lube to penetrate the primers, they were then fired in a test barrel. All fired normally; no unusual reports were noted. This bolstered confidence that normal amounts of the lube would not adversely affect our ammunition, and we have been pleased with the results over several years.
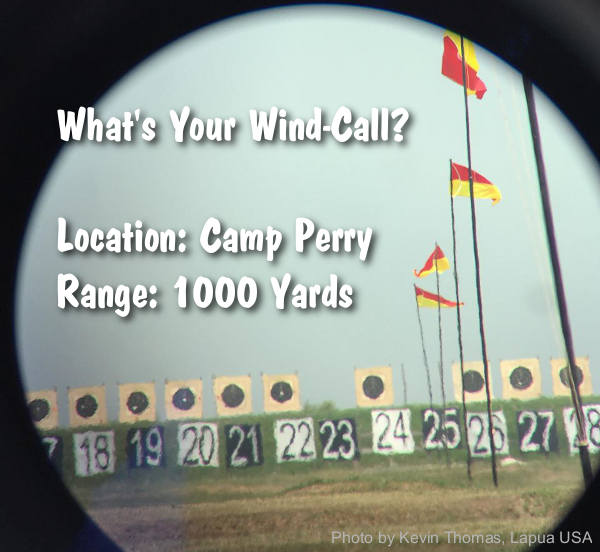
In today’s feature, Emil Praslick III of Team Applied Ballistics explains how to determine wind direction down range. Praslick, now retired from the U.S. Army, was an 18-time National and 2-time World Champion coach with the USAMU. Emil is consider by many to be one of America’s greatest wind readers — a master when is comes to identifying wind value and direction, and predicting wind cycles.
Video ONE: Determining the Direction of the Wind
Key Point in Video — Find the Boil
Emil explains how to determine wind direction using optic. The method is to use spotting scope, riflescope, or binoculars to look for the “Boil” — the condition in mirage when the light waves rising straight up. The wind will generate that straight-up, vertical boil in your optics when it is blowing directly at you, or directly from your rear. To identify this, traverse your scope or optics until you see the boil running straight up. When you see that vertical boil, the direction your optic is pointing is aligned with the wind flow (either blowing towards you or from directly behind you).
Video TWO: The No Wind Zero Setting
In this second video, Emil defines the “No-Wind Zero”, and explains why competitive shooters must understand the no-wind zero and have their sights or optics set for a no-wind zero starting point before heading to a match. In order to hit your target, after determining wind speed and direction, says Emil, “you have to have your scope setting dialed to ‘no wind zero’ first.”
Coach of Champions — Emil Praslick III
SFC Emil Praslick III, (U.S. Army, retired) works with Berger Bullets and Applied Ballistics. Emil served as the Head Coach of the U.S. National Long Range Rifle Team and Head Coach of the USAMU for several years. Teams coached by Emil have won 33 Inter-Service Rifle Championships. On top of that, teams he coached set 18 National records and 2 World Records. Overall, in the role of coach, Praslick can be credited with the most team wins of any coach in U.S. Military history.
Next week, on August 2, 2017, the nation’s top Service Rifle Teams will compete in National Trophy Infantry Team (NTIT) Match at Camp Perry, Ohio. In this match, known informally as the “Rattle Battle”, six-member teams shoot at 200, 300, 500 and 600 yards with time limits — 384 rounds total. To win this match, the six shooters must work like a finely-tuned machine. This is a popular match with spectators as there is plenty of action in a short time span. SEE Camp Perry 2018 NM Schedule.
This video shows the winning 2011 NTIT team at Camp Perry. Six USAMU shooters started with a combined load of 384 rounds to be fired at 8 targets from 600 and 500 yards prone, then 300 yards seated, and finally 200 yards standing.
Last year, the USAMU-Barnhart Team won the title with a score of 1439, with the USMC Team seconed as 1406. The record for this match is 1466, set by the USAMU-Remily Team in 1996. 2017 Team Barnhart members included: SFC Shane Barnhart (coach), SFC Evan Hess (captain), SFC Brandon Green, SFC William Pace, SSG Cody Shields, SGT Joseph Peterson, SPC Lane Ichord, and PVT Forrest Greenwood. (U.S. Army photos by Michelle Lunato/released).
The National Trophy Infantry Team Match (NTIT) was first fired in 1922 and is part of the the CMP’s annual National Rifle Matches at Camp Perry. The NTIT is called the “Rattle Battle” because it emphasizes extremely fast, accurate fire.
Our friend Grant U., who runs the Precision Shooting Journal on Facebook, says the NTIT is a special match, a real “crowd-pleaser: “The National Trophy Infantry Team Match (Rattle Battle)… was always one of my favorite team events. It takes a hell of a lot more planning, practice, and precision than one might expect. You get one shot at it and the entire team had better be running on all cylinders because there are no alibis. Each team of six shooters is allocated 384 rounds and when the teams fire at 600 and 500 yards, it sounds like a war.”
SFC Brandon Green, one of the nation’s finest marksmen, won the 2018 NRA High Power Rifle Championship at Camp Atterbury, Indiana.
PHOTOS courtesy U.S. Army Marksmanship Unit. See more on USAMU Facebook Page.
This article, from the USAMU Facebook Page, concerns reloading safety. In the relentless quest for more speed and flatter ballistics, some hand-loaders load way too hot, running charges that exceed safe pressure levels. Hint: If you need a mallet to open your bolt, chances are your load is too hot. Stay within safe margins — your equipment will last longer, and you won’t risk an injury caused by over-pressure. In this article, the USAMU explains that you need to account for bullet shape, diameter, and bearing surface when working up a load. Don’t assume that a load which is safe for one bullet will be safe for another even if both bullets are exactly the same weight.
Today, we continue our handloading safety theme, focusing on not inadvertently exceeding the boundaries of known, safe data.
Bullet manufacturers’ loading manuals often display three, four, or more similar-weight bullets grouped together with one set of load recipes. The manufacturer has tested these bullets and developed safe data for that group. However, seeing data in this format can tempt loaders — especially new ones — to think that ALL bullets of a given weight and caliber can interchangeably use the same load data. Actually, not so much.
The researchers ensure their data is safe with the bullet yielding the highest pressure. Thus, all others in that group should produce equal or less pressure, and they are safe using this data.
However, bullet designs include many variables such as different bearing surface lengths, hardness, and even slight variations in diameter. In fact, diameters can occasionally range up to 0.001″ by design. Thus, choosing untested bullets of the same weight and caliber, and using them with data not developed for them can yield excess pressures.
This is only one of the countless reasons not to begin at or very near the highest pressure loads during load development. Always begin at the starting load and look for pressure signs as one increases powder charges.
Bullet Bearing Surface and Pressure
Bullet bearing surface length (BSL) is often overlooked when considering maximum safe powder charges and pressures. In Photo 1, note the differences in the bullets’ appearance. All three are 7 mm, and their maximum weight difference is just five grains. Yet, the traditional round nose, flat base design on the left appears to have much more BSL than the sleeker match bullets. All things being equal, based on appearance, the RN/FB bullet seems likely to reach maximum pressure with significantly less powder than the other two designs.
Photo 1: Three Near-Equal-Weight 7mm Bullets with Different Shapes
Due to time constraints, the writer used an approximate, direct measurement approach to assess the bullets’ different BSLs. While fairly repeatable, the results were far from ballistics engineer-grade. Still, they are adequate for this example.
Bullet 1 (L-R), the RN/FB, has a very slight taper and only reaches its full diameter (0.284 inch) very near the cannelure. This taper is often seen on similar bullets; it helps reduce pressures with good accuracy. The calculated BSL of Bullet 1 was ~0.324″. The BSL of Bullet 2, in the center, was ~0.430″, and Bullet 3’s was ~ 0.463″. Obviously, bullets can be visually deceiving as to BSL!
Some might be tempted to use a bullet ogive comparator (or two) to measure bullets’ true BSL for comparison’s sake. Unfortunately, comparators don’t typically measure maximum bullet diameter and this approach can be deluding.
Photo 2: The Perils of Measuring Bearing Surface Length with Comparators
In Photo 2, two 7mm comparators have been installed on a dial caliper in an attempt to measure BSL. Using this approach, the BSLs differed sharply from the original [measurements]. The comparator-measured Bullet 1 BSL was 0.694” vs. 0.324” (original), Bullet 2 was 0.601” (comparator) vs. 0.430” (original), and Bullet 3 (shown in Photo 2) was 0.602” (comparator) vs. 0.463” (original). [Editor’s comment — Note the very large difference for Bullet 1, masking the fact that the true full diameter on this bullet starts very far back. You can use comparators on calipers, but be aware that this method may give you deceptive reading — we’ve seen variances just by reversing the comparators on the calipers, because the comparators, typically, are not perfectly round, nor are they machined to precision tolerances.]
Thanks to the U.S. Army Marksmanship Unit for allowing the reprint of this article.
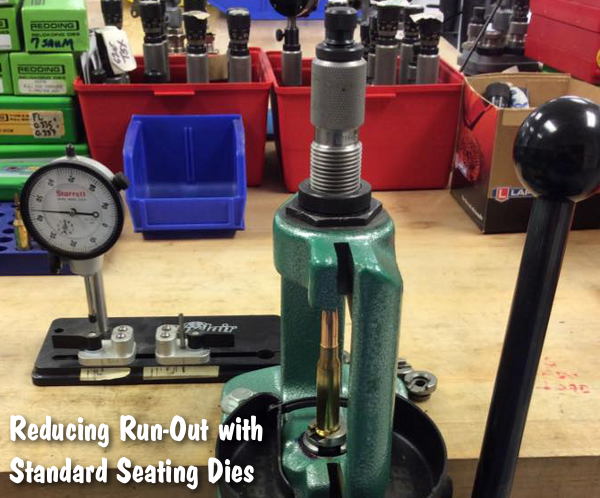
Each Wednesday, the U.S. Army Marksmanship Unit publishes a reloading “how-to” article on the USAMU Facebook page. This USAMU “Handloading Hump Day” article, the second in a series on improving concentricity, has many useful tips. If you use standard (non-micrometer) seating dies when loading some cartridge types, this article is worth reading. And visit the USAMU Facebook page next Wednesday for the next installment.
Once again, it’s time for USAMU’s “Handloading Hump-Day!” Last week, we addressed achieving very good loaded-cartridge concentricity (AKA “TIR”, or Total Indicator Runout) using standard, “hunting grade” reloading dies.
We explained how to set up the Full-Length Size die to float slightly when correctly adjusted for desired case headspace. We also cited a study in which this method loaded ammunition straighter than a set of [higher grade] match dies from the same maker. [One of the keys to reducing TIR with both sets of dies was using a rubber O-ring below the locking ring to allow the die to float slightly. READ Full-Length Sizing Die TIP HERE.]
Now, we’ll set up a standard seating die to minimize TIR — the other half of the two-die equation. As before, we’ll use a single-stage press since most new handloaders will have one. A high-quality runout gauge is essential for obtaining consistent, accurate results.
Having sized, primed and charged our brass, the next step is bullet seating. Many approaches are possible; one that works well follows. When setting up a standard seating die, insert a sized, trimmed case into the shell-holder and fully raise the press ram. Next, back the seating stem out and screw the die down until the internal crimping shoulder touches the case mouth.
Back the die out one-quarter turn from this setting to prevent cartridge crimping. Next, lower the press ram and remove the case. Place a piece of flat steel on the shellholder and carefully raise the ram. Place tension on the die bottom with the flat steel on the shellholder. This helps center the die in the press threads. Check this by gently moving the die until it is well-centered. Keeping light tension on the die via the press ram, secure the die lock ring.
If one were using a micrometer-type seating die, the next step would be simple: run a charged case with bullet on top into the die and screw the seating stem down to obtain correct cartridge OAL.
However, with standard dies, an additional step can be helpful. When the die has a loosely-threaded seating stem, set the correct seating depth but don’t tighten the stem’s lock nut. Leave a loaded cartridge fully raised into the die to center the seating stem. Then, secure the stem’s lock nut. Next, load sample cartridges and check them to verify good concentricity.
One can also experiment with variations such as letting the seating stem float slightly in the die to self-center, while keeping correct OAL. The runout gauge will show any effects of changes upon concentricity. However, the first method has produced excellent, practical results as evidenced by the experiment cited previously. These results (TIR Study 2) will reproduced below for the reader’s convenience.
TIR Study 2: Standard vs. Match Seating Dies
50 rds of .308 Match Ammo loaded using carefully-adjusted standard dies, vs. 50 using expensive “Match” dies from the same maker.
Standard dies, TIR:
0.000” — 0.001” = 52%;
0.001”– 0.002” = 40%;
0.002”– 0.003” = 8%. None greater than 0.003”.
AccurateShooter Comment: This shows that, with careful adjustment, the cheaper, standard dies achieved results that were as good (or better) than the more expensive “Match” Dies.
These tips are intended to help shooters obtain the best results from inexpensive, standard loading dies. Especially when using cases previously fired in a concentric chamber, as was done above, top-quality match dies and brass can easily yield ammo with virtually *no* runout, given careful handloading.
For the shooting sports to survive, and thrive, we need to bring new shooters into the game. It’s vital that young people get involved in compeitive shooting at an early age. It’s equally important that novice shooters get instruction and encouragement from skilled mentors.
Thankfully the Civilian Marksmanship Program is providing that kind of knowledgeable skills training through programs conducted throughout the country. Recently, at Camp Butner (North Carolina), the CMP offered a Small Arms Firing School (SAFS) taught by U.S. Army Marksmanship Unit (USAMU) experts. The USAMU trainers had a chance to teach members of the Liberty University Shooting Team. Here is the CMP’s report on the successful SAFS:
Liberty University Rifle Team Attends CMP’s Small Arms Firing School Story based on report by Ashley Brugnone, CMP Writer
On a beautiful, sunny morning in North Carolina, over 40 bright-eyed students of all ages set foot on the grounds of Camp Butner Training Facility to take part in a century-old tradition that has trained thousands of new marksmen around the country — the Small Arms Firing School (SAFS). The class was held during the CMP’s Eastern Travel Games at the end of April.
Attending the SAFS were student-athletes of Liberty University, a private institution in Virginia. This year the school launched a new program with four shooting teams: rifle, pistol, shotgun, and three-gun. Among the Liberty University Flames and Lady Flames rifle team member are some accomplished shooters, but others are relatively inexperienced.
Susie Krupp of the Liberty Lady Flames team was the High Non-Distinguished competitor of the event, earning her introductory EIC points.
The SAFS course is a combination of classroom education and hands-on competition and safety instruction on the firing line. At the conclusion, students fire a true M16 rifle match, with the chance to receive Excellence-in-Competition (EIC) points towards earning a Distinguished Rifleman Badge – a prestigious achievement. All equipment is provided by the CMP — even the rifles.
This year members of the U.S. Army Marksmanship Unit (USAMU) trained students. Here SSG Amanda Elsenboss offers pointers to a Liberty University Service Rifle shooter. The USAMU video below features SSG Elsenboss, who has served in the U.S. Army for 8.5 years.
Executive director and head coach of the Liberty University shooting sports program, Dave Hartman, was impressed by the SAFS event and grateful for the education his team received. The university is already looking forward to next year’s Eastern Games: “What’s beautiful about this event is that our competitors can come to this event without any prior knowledge, they don’t need to have a rifle. They go through the classroom portion, and they learn a vast amount of information. And having the USAMU here was fantastic.”
Great News — There will be serious smallbore rifle competition at Camp Perry this year (though the NRA National Smallbore Championships will still be held at Camp Wa-Ke-De in Indiana). The CMP will host a new series of smallbore events in July at Camp Perry, the Mecca of competitive shooting in the USA. This way smallbore competitors can enjoy the experience of shooting on the famed Camp Perry ranges. Smallbore competitions have been slotted into the Camp Perry National Match schedule July 16-22, 2018. These smallbore events include: 3×40 two-day event; 3P Team Match; Two-Day Prone event; Elimination Prone event; Prone Team Match; USAMU Training Clinic.
The smallbore matches will be fired on Rodriguez Range at Camp Perry under a covered firing line. Shooters Technology will provide a scoring App that allows instant scoring for quick results. Finals will be conducted on the CMP’s Electronic Targets installed on the Camp Perry Petrarca Range.
Learn more about the CMP’s smallbore rifle events at the 2018 National Matches on the CMP website. In addition to an event schedule, the 2018 CMP Smallbore Rifle Competition Rules is also available online. To register for the Camp Perry smallbore events, or to review the 2018 Rulebook, visit http://thecmp.org/competitions/cmp-national-matches/smallbore-matches/.
NATIONAL MATCHES at CAMP PERRY
The National Trophy Pistol and Rifle Matches have been a continued tradition of marksmanship excellence every summer since 1903. Moved to Camp Perry, Ohio, in 1907, the event now draws well over 6,000 annual visitors. For any serious marksman, competing at the National Matches at Camp Perry if a definite “bucket list” item, an experience that creates life-long memories. Participants range from novices to the world’s top smallbore and high power shooters.
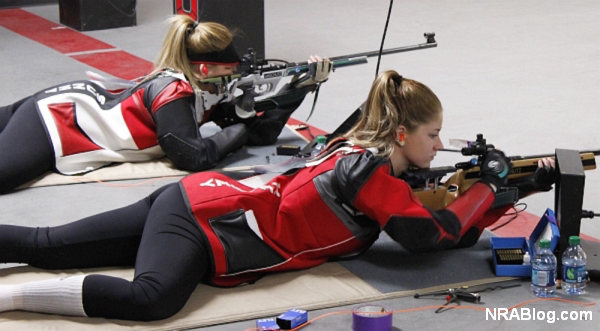
Here’s a video from 2011 when the NRA Smallbore Championships were held at Camp Perry. It is great to see smallbore events return to Camp Perry in 2018.
Note how men and women compete on the same firing line. Photos courtesy NRA Blog.
Starting today, St. Patrick’s Day, many of the nation’s top young shooters will be at Fort Benning, Georgia at the 2018 NRA Intercollegiate Rifle and Pistol Shooting Club Championships. Hosted by the U.S. Army Marksmanship Unit (USAMU), the event runs March 17-25, 2018, with pistol matches first, followed by rifle competition. More than 100 marksmen (and women) from collegiate shooting programs across the USA will compete for individual and team honors.
Story based on Report in NRA Blog
The NRA Intercollegiate Pistol Championships (March 17-20), will determine the National Collegiate Individual and Team Champions in Free Pistol, Standard Pistol, Open Air Pistol, Women’s Air Pistol and Women’s Sport Pistol disciplines. Competitors have qualified based on scores fired in the annual NRA Intercollegiate Pistol Sectionals.
Once the Pistol Championships wrap up, the NRA Intercollegiate Rifle Club Championships run March 23-25. This year brings back the reigning champions of the University of Akron to defend their title. Throughout the rifle championship, all participants and coaches will also have an opportunity to participate in Smallbore Rifle and Air Rifle competitions and training summits.
Visit the NRA Blog and Shooting Sports USA for coverage of the NRA Intercollegiate Pistol and Rifle Club Championships. To learn more about the NRA’s Collegiate programs, visit Collegiate.NRA.org.