The U.S. Army Marksmanship Unit (USAMU) has produced an excellent series of videos, which collectively cover the Basic Rifleman’s Course. If you are getting started in high power shooting, or want to improve your position shooting skills, this series is well worth watching. And these videos are not just for service rifle shooters — even bench shooters can benefit from these videos, particularly Part 5, which explains how to estimate wind speed and direction. The lead instructor for these videos is SFC Brandon Green, the 2015 National High Power Champion, and Service Rifle Champion at the 2017 CMP Trophy Matches. When SFC Green talks, you should listen. This man is one of the greatest marksmen in the nation’s history.
Part 5 — Wind and Weather Estimation (Very Useful for All Shooters)
Note: This video includes a hit location “target analysis” in the first 6 minutes.
Part 4 — Minute of Angle Explained
Part 3 — Ballistics and Zeroing
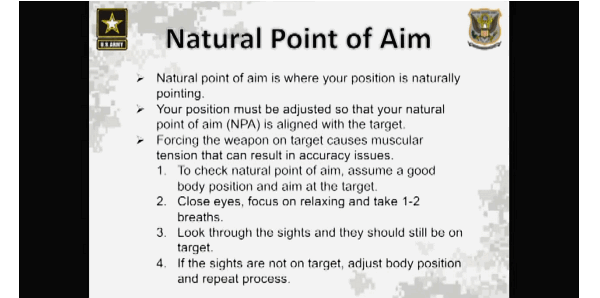
Part 2 — Positions, Sight Alignment, and Natural Point of Aim (Very Useful)
Part 1 — Aiming and Sight Picture
SFC Brandon Green (left above) set four new National Records at Camp Perry this year.
Story tip from Precision Shooting Journal on Facebook.
The U.S. Army Marksmanship Unit (USAMU) has published a great series of reloading “how-to” articles on its Facebook Page. This post covers key factors to consider when loading ammunition for Match Rifles and Service Rifles, with a particular focus on self-loading “gas guns”. Visit the USAMU Facebook Page each Wednesday for other, helpful “Handloading Hump-Day” tips.
We offer some “cardinal rules” to help new gas-gun handloaders with safety and efficiency. These address both Match Rifle and Service Rifle versions of the AR15, M1 Garand, M1A, and M110. However, they can also improve safe reloading for many other auto-loaders such as M1 Carbines, FALs, SIGs, etc. The author distilled these principles many years ago to help focus on the essential aspects of these rifles.
RULE ONE: Service Rifles Are Not Benchrest Rifles
Gas-guns require a relatively loose fit between ammunition and chamber (vs. bolt actions) for safe, smooth operation. Many techniques, such as neck sizing and keeping cartridge headspace quite tight, are popular in the extreme bolt gun accuracy realm. However, they are of little value with Service Rifles, and some could even be hazardous. Before adopting a specialized technique, seriously consider whether it is appropriate and beneficial in a gas-gun.
RULE TWO: Never Compromise Safety to Obtain Accuracy
Example: If choosing a brand of great, but ultra-sensitive match primers offers possibly better accuracy at the risk of slam-fires in your design of rifle, don’t do it! You are issued exactly two eyes and ten fingers (best-case scenario). Risking them trying to squeeze 0.25 MOA better accuracy out of an M1A, etc. simply isn’t worth it.
RULE THREE: Tailor the Precision to Your Individual Skill and Your Rifle’s Potential
This has been addressed here before, but bears repeating for newcomers. If you are struggling to break out of the Marksman Class, or using a CMP M1 “As-Issued,” then laboriously turning the necks of your 600-yard brass is a waste of time. Your scores will improve much faster by practicing or dry-firing. On the other hand, if the reigning champions anxiously check your scores each time you fire an event, a little neck-turning might not be so far-fetched.
Verifying Load Improvements — Accuracy hand-loading involves a wide variety of techniques, ranging from basic to rather precise. Carefully select those which offer a good return on investment for your time and labor. In doubt? Do a classic pilot study. Prepare ammo for at least three or four ten-shot groups with your new technique, vs. the same with your standard ammo. Then, pick a calm day and test the ammo as carefully as possible at its full distance (e.g. 200, 300, or 600 yards) to verify a significant improvement. A little testing can save much labor!
RULE FOUR: Be Your Own Efficiency Expert
Serious Service Rifle shooters generally think of ammunition in terms of thousands of rounds, not “boxes”, or even “hundreds”. Analyze, and WRITE DOWN each step in your reloading process. Count the number of times each case is handled. Then, see if any operations can be dropped or changed without reducing safety or accuracy. Eliminating just two operations saves 2000 steps per 1000 rounds loaded. Conversely, carefully consider any measurable benefits before adding a step to your routine.
RULE FIVE: In Searching for Greater Accuracy with Efficiency, Look for System Changes
For example, instead of marking your 300-yard rounds individually to differentiate them from your 200-yard ammo, would a simple change in primers work? If accuracy is maintained, using brass-colored primers for 200 and silver for 300 provides an indelible indicator and eliminates a step! Similarly, rather than spending hours selecting GI surplus brass for weight and neck uniformity, consider splurging on some known, high-quality imported match brass for your 600-yard loads. Results should be excellent, time is saved, and given limited shooting at 600 yards, brass life should be long.
RULE SIX: Check All Your Primers Before Packaging Your Loaded Ammo
This seems simple and even intuitive. However, many slam-fires (which were much more common when M1s and M1As were the standard) are due, at least in part, to “high” primers. Primers should be seated below flush with the case head. The USAMU has addressed this at length in a previous column, but each round should be checked for properly-seated primers before they are packaged for use.
Do you enjoy shooting pistols for sport, or perhaps you carry a handgun for self-defense? If you’re like most of us, you might benefit from a “refresher course” on the fundamentals of handgun shooting. The NRA has created a useful Infographic that covers important basics of handgun marksmanship — key things such as Sight Alignment and Trigger Control. Here are the first two (2) lessons. Click the link below to see all SIX (6) training topics: Sight Alignment, Sight Focus, Trigger Control, Breath Control, Hold Control, and Follow-Through.
Video Shows Sight Alignment, Grip, Stance, Trigger Control and More
In this USAMU video, SGT Shane Coley talks about the basics of sight alignment and trigger control. But then SGT Coley talks about other important control factors such as grip, arm position, and body stance. For rapid-fire shooting, you need to have a good arm and body positioning to control recoil and get back on target quickly. This video is a valuable complement to the NRA Infographic because it demonstrates all the important pistol fundamentals during live fire, at the range.
The 2017 Fort Benning Multi-Gun Challenge will be held November 16-19, 2017. This year there will be at least 12 stages, plus more than 40 guns on the prize table!
Rifle, pistol, shotgun. More guns = more fun. If you are curious about multi-gun matches, check out this video from Shooting USA. This episode covers the 3-Gun Match at Fort Benning, Georgia. This one-of-a-kind match is the only multi-gun competition where civilians can run-and-gun on an active U.S. Army installation. What’s more, at this match competitors get to ride in a Stryker armored vehicle and shoot Army weapons such as the M249 SAW and M203 Grenade launcher. The lure of playing with military hardware, along with the quality of the stages, makes this a hugely popular 3-Gun event which quickly sells out every year.
Interested in 3-Gun Shooting? Here’s an in-depth report on the Fort Benning Multi-Gun Challenge:
Getting Started in 3-Gun Competition
Thinking of getting started in 3-Gun competition? In this NSSF video, Top Shot Finalist Chris Cerino reviews the hardware you’ll need for multi-gun matches. Chris talks about carbine configurations — including barrel, handguard, and optics options. In reviewing shotguns, Chris discusses shotshell caddies and the high-capacity extended tubular magazines now available. Cerino also demonstrates pistol techniques and explains the key features of a belt/holster rig for 3-Gun competition.
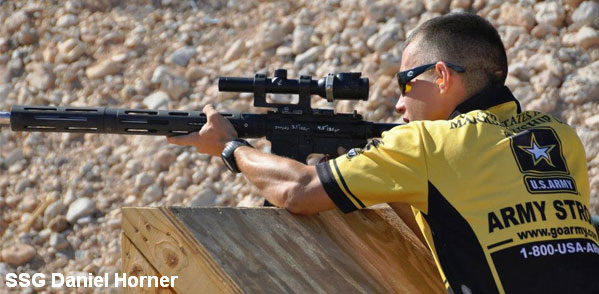
SSG Dan Horner of the USAMU, a past winner of the 3-Gun Nation Championship, is one of the country’s best multi-gun competitors. Here Horner offers some tips on 3-Gun hardware, and safety procedures:
Adapting to New Equipment
There’s a lot of hardware in 3-Gun Competition. To succeed you need mastery of ALL the tools: “New competitors should know how to operate all their equipment. They should spend time getting familiar with their equipment. I spend exponentially more time ensuring the gear is right than I do shooting.”
Safety in 3-Gun Competition
Everyone practicing with shotguns, rifles and pistols must keep safety as top priority. “Obviously, safety is the No. 1 priority, but after that, the focus should be on developing specific skills,” noted Horner. A good three-gunner must not only be fast, but he or she must also be accurate and be able to adapt to a wide variety of shooting positions. And strategy is involved too. Successful 3-gunners develop a ‘plan of attack’ for each stage.
Hunting season is coming up, so it’s time to get your rifle squared away. You’ll want to zero that rifle before the hunt, and you need to know how your shots will impact with a cold barrel.
Commonly, hunters won’t have the ability to fire one or two fouling shots before heading out on a hunt. Therefore it’s important that a hunter understands how his rifle shoots with a “cold bore shot”. Both the point of impact (and possibly velocity), may be different with a cold bore than with a barrel that has been warmed and fouled with a series of shots. In this video from the U.S. Army Marksmanship Unit (USAMU), you’ll learn how to determine your cold bore point of impact (POI) for a rifle that just been cleaned, as well as the cold bore POI with a barrel that has already been “fouled in”.
SGT Joe Hein of the USAMU shows how to plot cold bore POI with both a clean bore and a fouled bore. Note that the “cold bore” shot from a fouled barrel was closer to the follow-up shots than the cold bore shot from a clean barrel. This is typical of many factory barrels. SGT Hein provides a simple way to understand your rifle’s cold bore performance. Hein’s advice can keep you from missing that long range shot at that big buck on opening day. A little time spent on the range before that critical first shot will help ensure you have meat in the freezer this season.
In an impressive performance, the U.S. Army Marksmanship Unit’s Service Rifle Team won the National Trophy Infantry Team (NTIT) Match on July 20th at Camp Perry, Ohio. In this match, also known as the “Rattle Battle”, six-member teams shoot at 200, 300, 500 and 600 yards with time limits — 384 rounds total. To win this match, the six shooters must work like a finely-tuned machine. This is a popular match with spectators as there is plenty of action in a short time span.
This year, the USAMU-Barnhart Team won the title with a score of 1439. The record for this match is 1466, set by the USAMU-Remily Team in 1996. 2017 Team Barnhart members included: SFC Shane Barnhart (coach), SFC Evan Hess (captain), SFC Brandon Green, SFC William Pace, SSG Cody Shields, SGT Joseph Peterson, SPC Lane Ichord, and PVT Forrest Greenwood. The second place USMC team scored a 1406. (U.S. Army photos by Michelle Lunato/released).
The National Trophy Infantry Team Match (NTIT) was first fired in 1922 and is part of the the CMP’s annual National Rifle Matches at Camp Perry. The NTIT is sometimes called the “Rattle Battle” because it emphasizes extremely fast, accurate fire.
Our friend Grant U., who runs the Precision Shooting Journal on Facebook, says the NTIT is a special match, a real “crowd-pleaser: “The National Trophy Infantry Team Match (Rattle Battle)… was always one of my favorite team events. It takes a hell of a lot more planning, practice, and precision than one might expect. You get one shot at it and the entire team had better be running on all cylinders because there are no alibis. Each team of six shooters is allocated 384 rounds and when the teams fire at 600 and 500 yards, it sounds like a war.”
PHOTOS courtesy U.S. Army Marksmanship Unit. See more on USAMU Facebook Page.
The NRA National Smallbore Championships (Conventional and Metric) took place July 8-17 at the Wa-Ke’-De Range in Bristol, Indiana. The NRA’s Shooting Sports USA website has extensive coverage of the event written by correspondent Hap Rocketto.
In team competition, the USAMU shooters dominated: “The [conventional] paper team match was an AMU runaway — they carded a 4766-338X to have a 30-point pad on the second place Coast to Coast Team’s 4736-267X effort. The Illinois State Association finished third with a 4679-210X.”
USAMU shooters on the firing line at the Wa-Ke’-De outdoor range in Bristol, IN. Photo courtesy USAMU.
There were some great individual performances. In early prone competition, three shooters didn’t drop a point: “The U.S. Army Marksmanship Unit’s (AMU) Patrick Sunderman… opened the tournament with a 400-38X. Mike McPhail, perhaps one of the best prone shooters in world, followed up with a score of 400-37X and … civilian Daniel Martz closed out the top three with his 400-36X.” Later, in kneeling position, McPhail shot his second perfect score of the day, 400-30X, to win the kneeling match.
Iron Man Competition
There was a special “Iron Man” title for the best performance over the entire 8-day cycle. Rocketto writes: “The final prone match, 40 shots on the metric target with any sights, was the deciding factor in the Iron Man competition when McPhail beat George Norton by four points. Over eight days, McPhail shot a 9504-711X, Norton 9501-655X, and last year’s Iron Man Sunderman scored 9478-640X.” Overall the Army swept the top three places.
The Iron Man podium: SFC Mike McPhail (Center), SSG George Norton, & SPC Patrick Sunderman.
The last shot of the any sight metric position championship marked the end of the 2017 NRA National Smallbore Championships. The target frames have been stacked away until next year — when smallbore rifle shooters will again converge upon the Wa-Ke’-De Range in Bristol, Indiana.
Men and women now compete on equal terms at the National Smallbore Championship, gunning for the same honors in “gender-neutral” classifications. Photo courtesy Shooting Sports USA.
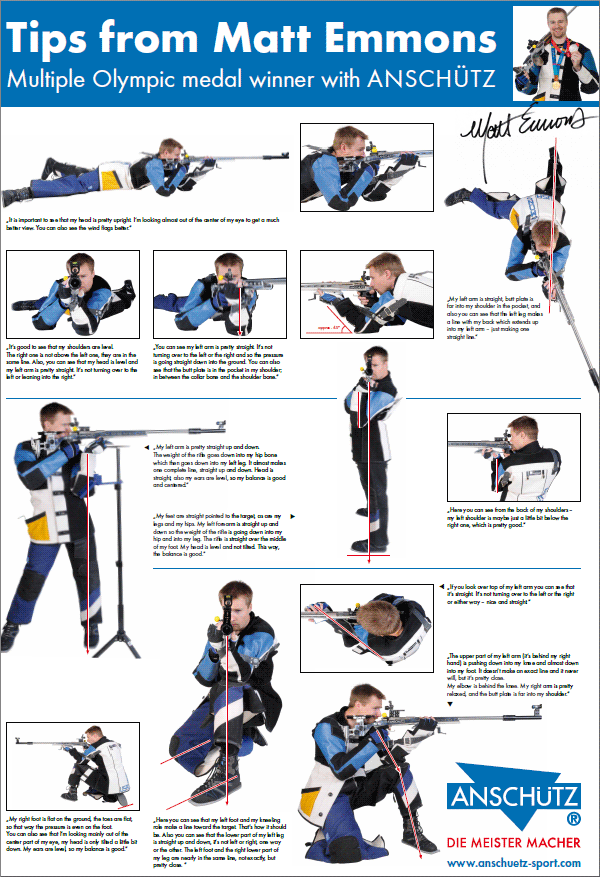
The Key to 3P — Beginner’s Guide to Smallbore Position Shooting
Would you like to try smallbore position shooting? Here are some tips from one of the best 3P shooters on the planet, Olympian Matt Emmons. Matt Emmons competed in the Three-Position Event at the Rio Olympics his fourth Olympic appearance. Matt has competed on the U.S. National Team since 1997, medaling in three Olympic games: Gold in 2004 in Men’s 50m Prone; Silver in 2008 in Men’s 50m Prone; and Bronze in 2012 in Men’s 50m 3X40. Although his specialty is Men’s 3-Position rifle, Emmons’ World Championship and Olympic Gold are in Men’s 50m Prone. He usually shoots an Anschütz or Bleiker .22LR rifle, with Eley Tenex ammo.
Here are shooting tips from Matt, courtesy Anschütz. Click image below to launch a large, full-screen PDF file.
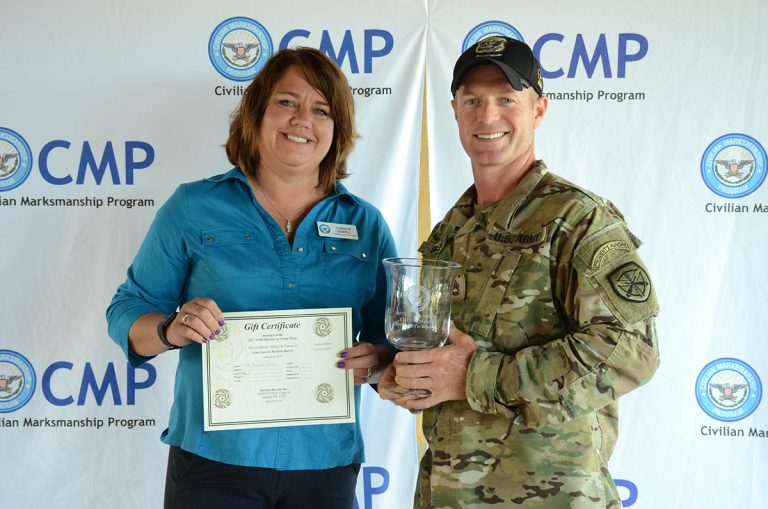
Story based on Report by Ashley Brugnone, CMP Writer
SFC Brandon Green, 32, of the U.S. Army Marksmanship Unit, fired a score of 2368-97X to earn the championship title in the 2400 Aggregate Rifle event held during the inaugural Civilian Marksmanship Program (CMP) Cup Matches. The 2400 Aggregate award goes to the top shooter in the three combined 800 Aggregates. The 2015 National High Power Champion, SFC Green is a gifted competitor who has excelled in multiple rifle disciplines. In addition to Service Rifle and High Power events, Green has competed in PRS and tactical matches.
Even before joining the USAMU Green was an ace marksman. As a junior, he earned Distinguished Air Rifle Badge #1. “I’ve been very fortunate to get support from friends, family and the ROTC programs in high school, and of course from the CMP and NRA as well, which kind of catered to someone like myself, coming in as a junior and shooting all the way up through the High Power sports,” said Green. “I’ve also been lucky enough to gain so many opportunities from being a part of the Army and the USAMU. It’s been a long learning journey, but it’s been a good one.”
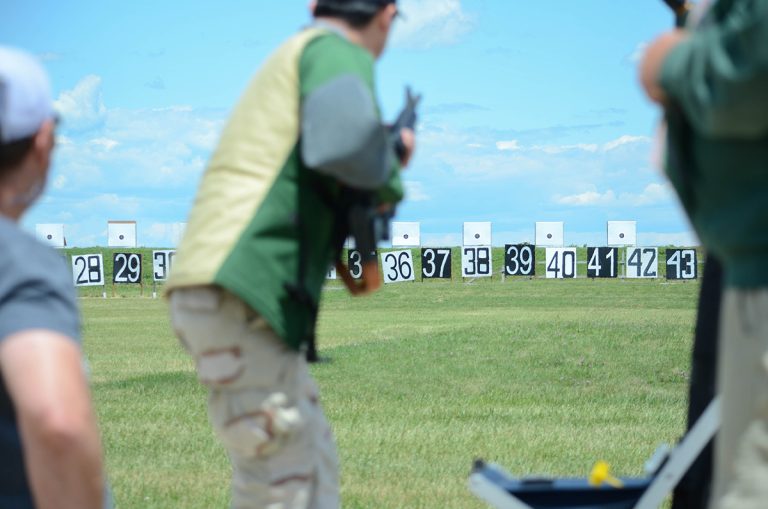
The CMP Cup Matches, which kicked off the 2017 National Matches at Camp Perry, were introduced as an extra series of elite match and service rifle competitions. The schedule included a 4-Man Team Match, three consecutive days of 800 Aggregate matches, and an EIC Service Rifle Match.
4-Man Team Match kicked off a week of events fired entirely on the CMP’s electronic High Power targets.
The CMP Cup Series week marked a new era at Camp Perry, with the first successful competitions fired on the base’s ranges using CMP’s mobile electronic targets. Over 36,000 rounds were sent downrange, with less than 50 questioned by competitors throughout the week. For many, the Cup Matches provided an initial look at the CMP’s target system.
Also making marks in the 2400 Aggregate match during CMP Cup Week was SSG Amanda Elsenboss, 28, of the Army Marksmanship Unit, who earned the High Woman Award, as well as Serena Juchnowski, 18, of Richfield, OH, who snagged the High Junior credit. Paul Terrence, 65, of Cleveland, OH, was named the High Senior of the event.
What does a two-time High Power National Champion choose for PRS comps? A set of twins. Twin rifles that is. SFC Brandon Green of the USAMU is one of America’s best marksmen. He’s excelled in Service Rifle and High Power disciplines, and now he’s getting very serious about the Precision Rifle Series (PRS). Brandon recently took delivery of “Twins” — two impressive rifles optimized for PRS competition. Green told us: “The Twins are ready for business! The silver one is a 6XC and the black one is a 6.5×47 Lapua”. Both rifles feature Impact Precision actions (with AICS-type mags), 24″ Proof stainless barrels, and Fat Bastard muzzle brakes. Rifle work was done by Stuteville Precision (Wade Stuteville) and Exodus Rifles (Joe Walls).
In the 6XC, Brandon runs Berger 105gr VLDs in Norma 6XC brass. For the 6.5×47 Lapua he shoots 140gr Berger Hybrids or 143gr Hornady ELD-Xs in Lapua brass. Both rifles have stainless steel Proof barrels, but the 6.5x47L has a matte black Cerakote finish.
Brandon loves his new Twins. He said he likes the “feel” of the guns with the Foundation stocks: “These rifles weigh around 17 pounds with optics. They feel very solid under recoil — without the ‘tuning fork’ vibration you can get with a metal-chassis gun. They feel like a good wood-stocked gun, but the material is stronger and more rigid than wood. I’ve heard that guys are having success with these Foundation stocks with the actions installed without pillars or conventional bedding.” Currently Brandon is running both guns without action-screw pillars. He did have one skim-bedded, but he doesn’t think that was really needed. “Both rifles hammer now”, Brandon tells us.
Green Runs Vortex Razor HD Gen II 4.5-27x56mm FFP scopes on both rifles:
High-Tech Micarta Stock Material
At first glance, those stocks may look like wood, but they are actually a special “Micarta” material that is strong, durable, and stable. Micarta, often used for knife handles, is a “a brand name for composites of fiberglass, carbon fiber, or other fabric in a thermosetting plastic.” The stock-maker, Foundation Stocks, says Micarta offers some distinct advantages over laminated wood or conventional fiberglass: “The solid block of material gives us a dense, homogenous material that is absent of any voids or air pockets commonly found in composite stocks. The high compression strength of the material allows us to build an action/DBM specific stock that requires no bedding or pillars. The material is very durable and stable in extreme environments. We use advanced CAD software to design and model our stocks, working in conjunction with action manufacturers and rifle builders to provide exact fitment.”
Here is a close-up of a Foundation Stock showing the distinctive Micarta texture:
Tactical Competition vs. NRA High Power Competition
Brandon says PRS competition is tough: “PRS can be pretty humbling, but it’s been a lot of fun and a great challenge. For a shooter (like me) with a Service Rifle/High Power background, the variations in stages combined with the time limits can be very challenging. And the unusual shooting positions put a new spin on things. PRS is definitely a different ball game, but I really enjoy it. After the National Championships this summer I hope to shoot three or four PRS matches in September and October.”
SFC Brandon Green honored as the 2015 High Power National Champion.
Life before the Twins… Here is Brandon, with his previous PRS rig, at the MasterPiece Arms Precision Rifle Shootout, a PRS event at the CORE Shooting Solutions Range in Florida:
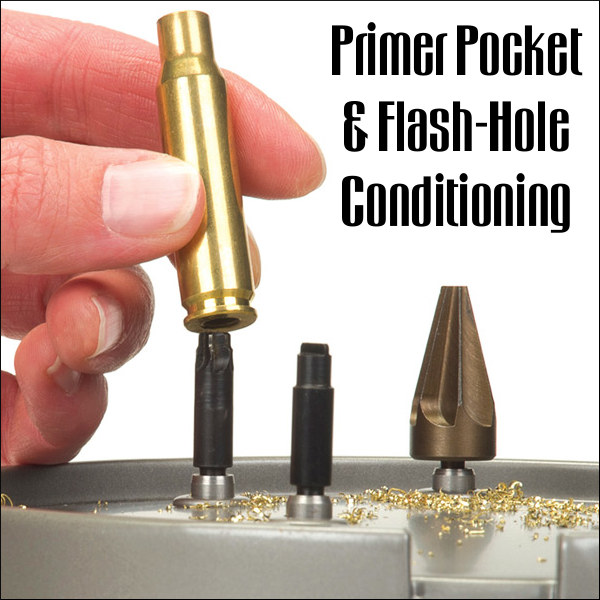
Each Wednesday, the U.S. Army Marksmanship Unit publishes a reloading “how-to” article on the USAMU Facebook page. This week’s “Handloading Hump Day” article covers two basic case prep chores — uniforming primer pockets and deburring flash-holes. Visit the USAMU Facebook page for other tips.
Primer Pocket & Flash-Hole Conditioning
This week, we’ll address a question that frequently arises: “Do you uniform primer pockets and deburr flash-holes?” As we tailor our handloading methods to the specific needs of each instance, the answer, not surprisingly, is “Sometimes!” However, don’t flip that dial just yet, as what determines our approach may be helpful in deciding how to address one’s own techniques. Moreover, we have a buried “Easter Egg” morsel that may bring a chuckle, as well as useful safety information!
Generally, the USAMU Handloading Shop does not uniform primer pockets (PP) or deburr flash holes (FH) of our rifle brass. We’re certainly not against it… Rather, this reflects the very high volume of ammunition we load, the fact that very few cases are ever re-loaded for a second firing, and the types of brass we use. However, as a need is perceived, we DO deburr flash holes. Of interest, we have fired many very small, 1000-yard test groups and aggregates using weight-selected, domestic brass that had not had PPs uniformed or FHs deburred.
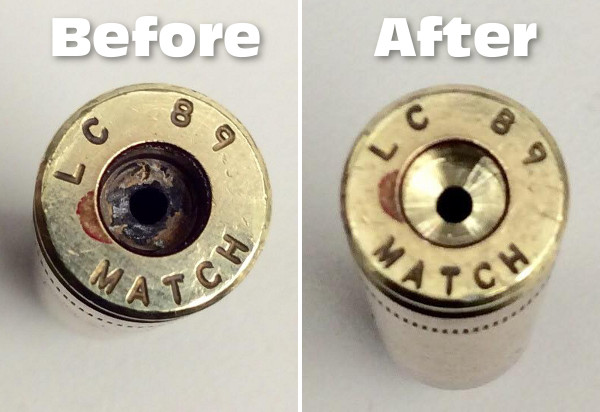
Before and After — On the left is a fired, deprimed 7.62×51 case with primer residue intact. On the right the primer pocket has been uniformed to SAAMI specs. Note the shiny finish at the bottom of the pocket — evidence of the the removal of metal when uniforming the primer pocket.
As to the type cases we use, many thousands of our long-range 5.56mm cases come to us from the arsenal with the primer of our choice pre-installed and staked-in, per usual practice. Obviously, we cannot uniform either FHs or PPs on this live, primed brass. However, after careful sorting, inspection and preparation, we do obtain match-winning results with it.
Shooters who reload their brass several times may decide to uniform PPs and deburr FHs, especially on their “300-yard and beyond” brass. Here, they will use the cases many times, while the uniforming is performed only once. Also, most handloaders only process moderate amounts of brass, compared to our multi-thousand round lots.
Having high quality Long Range (LR) brass helps. Many of the better brass manufacturers install their flash holes so that no burrs are created. Still, it does pay to inspect even THESE manufacturer’s products, as occasional slips are inevitable. Very rarely, some of the best makers will have a significant burr in, say, 1 per 1000 or 2000 cases, and it’s worth catching those.
Exceptions can always be found. Recently, we began processing a large lot of match brass from a premier manufacturer. We were startled to find that every case had a significant burr in the FH — something we’d never before seen from this maker. We then broke out the FH deburring tools and went to work.
Some observers have noted that it can be difficult to truly verify the contribution to accuracy of these procedures — particularly when firing from the shoulder, in conditions. Members of this staff, as individual rifle competitors, do often perform these operations on their privately-owned LR rifle brass. One could ascribe this to the old Highpower Rifle maxim that “if you think it helps, then it helps.”
However, a World Champion and Olympic Gold/Silver medalist here commented on his own handloading (for International competition, which demands VERY fine accuracy). He noted that he did seem to see a decline in accuracy whenever he did not uniform FHs, deburr FHs and clean primer pockets before each reloading. (One might be tempted to counter that only a truly World Class shooter could reliably detect the difference.) However, with the wisdom of decades experience, our Champion also remarked that “It could have been that I just wasn’t shooting as well that day.”
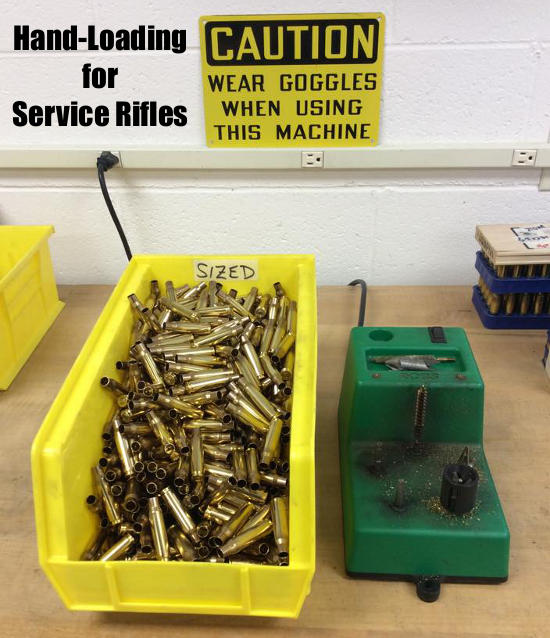
For those who do opt for these procedures, note that various tool models may have adjustable depth-stops; pay attention to the instructions. Some FH-deburring tools (which enter the case mouth, not the primer pocket) are dependent upon uniform case length for best results.
Above is a flash-hole deburring tool on an RCBS powered case-prep unit. These case prep machines can save a lot of pain and misery, helping one perform various functions quickly and efficiently.


 Matt Emmons competed in the Three-Position Event at the Rio Olympics his fourth Olympic appearance. Matt has competed on the U.S. National Team since 1997, medaling in three Olympic games: Gold in 2004 in Men’s 50m Prone; Silver in 2008 in Men’s 50m Prone; and Bronze in 2012 in Men’s 50m 3X40. Although his specialty is Men’s 3-Position rifle, Emmons’ World Championship and Olympic Gold are in Men’s 50m Prone. He usually shoots an Anschütz or Bleiker .22LR rifle, with Eley Tenex ammo.