Estimating Actual Cost per Round by Caliber
This article comes from the USAMU, which provide shooting and reloading tips on its Facebook Page. This week’s USAMU TECH TIP outlines a ballpark-estimate method of calculating the actual cost per round of different calibers. Some applications, and some shooters, by virtue of their high level of competition, require the very best ballistic performance available — “Darn the cost, full speed ahead!
If you are in serious contention to win a major competition, then losing even a single point to inferior ballistic performance could cost you a national title or record. However, this “horsepower” does come at a cost! Some calibers are barrel-burners, and some offer much longer barrel life. Look at this comparison chart:
Estimated Cost Per Round by Cartridge Type
Below are some estimated total expense per round (practice and competition) based on component costs, type used, expected barrel life and a standard, chambered barrel cost of $520.00 across calibers.
5.56x45mm: $0.46/round (barrel life 6,000 rounds)*
6mmBR: $0.81/round (barrel life 2800 rounds)
6XC: $0.97/round (barrel life 2200 rounds)
.308 Win: $0.80/round (barrel life 4500 rounds)
6.5-284: $1.24/round (barrel life 1100 rounds)
*Note the high round count estimate for 5.56x45mm. This is a bit deceptive, as it assumes a period of “lesser accuracy” use. The USAMU says: “Much of the difference you see here between 5.56 and .308 is due to using the 5.56 barrel for 100-200 yard training with less-expensive, 55gr Varmint bullets after its long-range utility is spent”.
Moreover, while some applications require specialized, high-cost components, others do not. And, if the shooter is still relatively new to the sport and hasn’t refined his skill to within the top few percentile of marksmen, a more economical caliber choice can help stretch a limited budget. Translation: More skill per dollar!
In this post, the prices for all items mentioned here were taken from a major component supplier’s current advertisements, and all brass was of top quality, except in the case of 5.56mm. There, 200 top-quality, imported cases were reserved for 600-yard shooting, and the other brass used was once-fired Lake City surplus.
Cartridge cases were assumed to be loaded 10 times each. [Your mileage may vary…] Bullet prices assumed the use of less-expensive, but good-quality match bullets for the bulk of shooting as appropriate.
The cost of top-tier, highly-expensive match bullets was also calculated for a realistic percentage of the shots fired, based on ones’ application. Barrel life by caliber was taken from likely estimates based on experience and good barrel maintenance.
Brass Costs Based on 10 Loads Per Case
Often, handloaders may calculate ammunition cost per round by adding the individual costs of primers, powder charges and projectiles. Many don’t consider the cost of brass, as it is reloaded several times. Here, we’ll consider the cost of enough top-quality brass to wear out a barrel in our given caliber, at 10 loads per case, except as noted above.
Don’t Forget Amortized Barrel Costs
Few shooters factor in the full, true cost of barrel life. Depending on caliber, that can dramatically increase the cost per round. For example, consider a long-range rifle in 6.5/284 caliber. This cartridge performs amazingly well, but at a cost. Ballpark estimated barrel life [in a top-quality barrel] is 1100 rounds. Some wear out faster, some last longer, but this gives a rough idea of what to expect.
Accurate barrels are a joy to use, but they are an expendable resource!
A top-quality barrel plus installation was estimated at about $520.00. At 1100 rounds, barrel life adds $0.47 per round to our total cost. Thus, what had started out as an [components-only estimate, with brass cost] of $0.76/round now totals $1.24 per shot!
Cost Considerations When Choosing a Catridge Type
Some shooters might ask themselves if they could meet their present needs with a more economical caliber. If so, that equates to more practice and matches per available dollar, and more potential skill increase on the available budget.
Each shooter knows his skill level, practice needs, and shooting discipline’s requirements. Some might shoot NRA Service Rifle or Match Rifle using a 5.56mm with a long barrel life. Others might be Match Rifle shooters faced with choosing between, say, a 6mm BR vs. 6XC. A realistic assessment of ones needs, performance-wise, may help guide the shooter toward a caliber that’s most optimized to their needs at the moment.
Admittedly, the factors affecting cost for any individuals circumstances can vary significantly. However, hopefully this will provide one useful method of evaluating one’s training and competition choices, based on their skill, goals and needs.
Shooting Sports USA just released an excellent, in-depth article about the first-ever PRS Gas Gun Match. If you enjoy tactical-style shooting, or have an interest in modern semi-auto rifles, we strongly recommend you read this match report by SSUSA Editor John Parker. Offered in a magazine-style format, this SSUSA feature includes explanations of the rules and tactics for these matches, along with interviews with top competitors, including match winner SSG Tyler Payne of the USAMU.
Payne dominated the match, finishing 200 points ahead of the next competitor. Payne competed in Open Class shooting a JP Enterprises LRP-07 chambered in 6mm Creedmoor, running Berger 105gr 6mm Hybrids at 2975 fps. He used a Vortex Razor HD 4.5-27x56mm scope. With its 6X zoom ratio, this optic allowed SSG Payne to switch from a wide field of view to high magnification as the stage demanded. With targets out to 800 yards, having 27X on tap was useful.
There are three divisions in PRS Gas Gun Matches: Tactical Light (.223 Rem/5.56), Tactical Heavy (.308 Win), and Open. At this match, about 65% of shooters competed in Tac Light. Match Director Ryan Castle said: “The remaining 35% was split pretty evenly between Open and Tactical Heavy.”
Open Class Caliber Choices
“For Ammo in Open Class, 6mm and 6.5mm Creedmoor were popular — overall winner SSG Tyler Payne won using a rifle chambered in 6mm Creedmoor”. — John Parker, SSUSA
Gas guns to 800 yards, yep there are targets down there somewhere… Jeff Cramblit Facebook photo
Gas Gun Match Loads — Short Range vs. Long Range
“The .223/5.56 [Tactical Light] guns had some lag time waiting on shot impacts. I believe the long-term solution may be to find a light and fast load for closer stages for near-instant reaction time and use a heavy load for the long shots to see splash and get the target to move a little more.” — Sean Murphy, Nightforce
Interview with Match Winner Tyler Payne
SSG Tyler Payne told SSUSA: “This match has a lot of similarities to 3-Gun, which I’ve been shooting for 11 years now. With targets out to 800 yards, limited rounds and 30-second penalties, the match gave you the opportunity to go as fast as you wanted but really forced you to be accurate. Training for PRS has given me enough discipline to make my shots count and 3-Gun has taught me how to be efficient. Those two things helped me excel at this match. Having to slow down with a gas gun and make my shot count was very foreign to me. Usually at matches with a gas gun, you get as many shots as you want to take, so having to slow down was difficult.”
“If I had any pointers for someone wanting to try this type of match it would be to get out and confirm your data as far as you can. Don’t trust your ballistic Apps. Other than that, ask questions, watch the experienced shooters and have fun”.
For the new PRS “Gasser” Competition, the PRS developed rules on gun types, scoring, match timing, penalties, safety and other key topics. CLICK HERE for Full PRS Gas Gun Series Rules.
Open Division: The Open Division rifles will not exceed a caliber of .30 or a velocity of 3,200 fps. With this and other divisions, Match Officials may request at any point during a match that a competitor fire their rifle through chronograph..
Tactical Light Division: Tactical Light Division rifles are restricted to 5.56 NATO/.223 Remington calibers only. Bullet weight cannot exceed 77 grains and muzzle velocity cannot exceed 3,000 fps.
Tactical Heavy Division: This class is restricted to .308 Win (7.62×51) gas guns. Most will be AR-10 platform rifles. Bullet weight cannot exceed 178 grains and muzzle velocity cannot exceed 2,800 fps.
Scoring and Penalties
The Gas Gun Series utilizes a time plus penalty-based scoring system for all match scoring. This means the score is the shooter’s total combined time on all stages plus any penalties accrued.
Penalties are as follows:
30 seconds for any rifle targets not engaged or neutralized.
15 seconds for any pistol targets not engaged or neutralized.
15 seconds for hitting a “No Shoot” target.
No more than 50% of the stages at a match can utilize an unlimited round count. At least 25% of the targets in Gas Gun Series match must be 2 MOA or smaller. Max distance is 800 yards.
Each Wednesday, the U.S. Army Marksmanship Unit publishes a reloading “how-to” article on the USAMU Facebook page. This past week’s “Handloading Hump Day” article, the latest in a 7-part series, relates to chronograph testing and statistical samples. We highly recommend you read this article, which offers some important tips that can benefit any hand-loader. Visit the USAMU Facebook page next Wednesday for the next installment.
Chronograph Testing — Set-Up, Sample Sizes, and Velocity Factors
Initial Chronograph Setup
A chronograph is an instrument designed to measure bullet velocity. Typically, the bullet casts a shadow as it passes over two electronic sensors placed a given distance apart. The first screen is the “start” screen, and it triggers an internal, high-speed counter. As the bullet passes the second, or “stop” screen, the counter is stopped. Then, appropriate math of time vs. distance traveled reveals the bullet’s velocity. Most home chronographs use either 2- or 4-foot spacing between sensors. Longer spacing can add some accuracy to the system, but with high-quality chronographs, 4-foot spacing is certainly adequate.
Laboratory chronographs usually have six feet or more between sensors. Depending upon the make and model of ones chronograph, it should come with instructions on how far the “start” screen should be placed from one’s muzzle. Other details include adequate light (indoors or outdoors), light diffusers over the sensors as needed, and protecting the start screen from blast and debris such as shotgun wads, etc. When assembling a sky-screen system, the spacing between sensors must be extremely accurate to allow correct velocity readings.
Statistics: Group Sizes, Distances and Sample Sizes
How many groups should we fire, and how many shots per group? These questions are matters of judgment, to a degree. First, to best assess how ones ammunition will perform in competition, it should be test-fired at the actual distance for which it will be used. [That means] 600-yard or 1000-yard ammo should be tested at 600 and 1000 yards, respectively, if possible. It is possible to work up very accurate ammunition at 100 or 200 yards that does not perform well as ranges increase. Sometimes, a change in powder type can correct this and produce a load that really shines at longer range.
The number of shots fired per group should be realistic for the course of fire. That is, if one will be firing 10-shot strings in competition then final accuracy testing, at least, should involve 10-shot strings. These will reflect the rifles’ true capability. Knowing this will help the shooter better decide in competition whether a shot requires a sight adjustment, or if it merely struck within the normal accuracy radius of his rifle.
How many groups are needed for a valid test? Here, much depends on the precision with which one can gather the accuracy data. If shooting from a machine rest in good weather conditions, two or three 10-shot groups at full distance may be very adequate. If it’s windy, the rifle or ammunition are marginal, or the shooter is not confident in his ability to consistently fire every shot accurately, then a few more groups may give a better picture of the rifle’s true average.
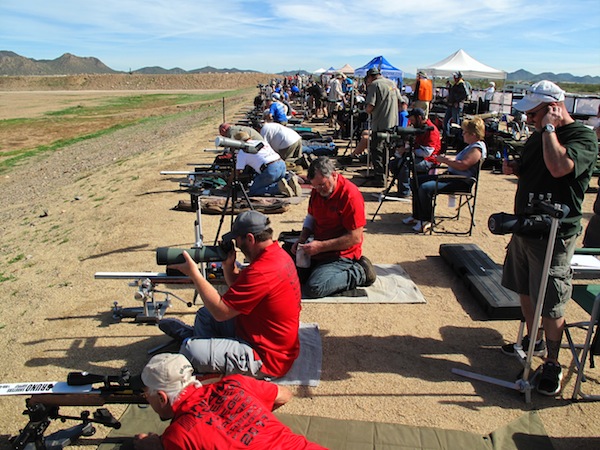
Thursday was TEAM DAY at the Berger Southwest Nationals (SWN). In the Sling, F-TR, and F-Open classes, dozens of 4-person teams shot under coaches at 800, 900, and 1000 yards. The key difference between the team game and individual competition is that (for the most part) shooters function as trigger pullers only. Wind and elevation calls are typically made by the coaches, who sometimes even dial clicks for the shooters. In the above photo Bryan Litz is just about to click his shooter’s elevation turret.
This year the Scottish Thistle Team won the Sling division, lead by a strong 449-27X performance by Angus McLeod. The Hayes Rays of Sunshine Team finished second, six points back. In the highly competitive F-TR class, North by Southwest took the team title, with Da Bulls in second.
In the F-Open class, the Cluster Ducks (clever name) took the win, edging out second place The Longshots by a single point. Third in F-Open was Tex-Mex #1. Kudos to AccurateShooter’s own Jay Christopherson, our site systems manager, who lead 4th Place Team Lapua/Brux with a strong 448-25X. Jay keeps our servers running smoothly — and he’s a great shooter in his own right.
Here’s Team Krieger (foreground) getting ready on the 1000-yard line.
Anette Wachter (in chair) shot a 450-36X in the Team Match — not dropping a single point. Outstanding!
TEAM EVENT TOP THREE in SLING, F-OPEN, and F-TR
SLING
1st Place — Scotland Thistle 1786-100X
Angus McLeod, 449-29X
Sandy Walker, 447-27X
Ian Shaw, 445-24X
Michael Barlow, 445-21X
2nd Place — Hayes Rays of Sunshine 1780-97X
3rd Place — Sabine 1775-88X
NOTABLES: Annette Wachter, 450-36X (4th Place Team High)
F-OPEN
1st Place — The Cluster Ducks 1789-100X
James Laney, 450-27X
Kevin Shepherd, 448-24X
Norman Harrold, 448-21X
Joe Meyer, 443-28X
2nd Place — The Longshots 1788-103X
3rd Place — Tex-Mex #1 1781-93X
NOTABLES: Jay Christopherson, 448-25X (4th Place Team High)
F-TR
1st Place — North by Southwest 1773-74X
Daniel Lentz, 445-22X
Ian Klemm, 445-17X
Daniel Pohlabel, 443-18X
Ken Klemm, 440-17X
2nd Place — Da Bulls 1770-81X
3rd Place — Michigan F-TR Team 1764-85X
NOTABLES: Mike Plunkett 447-16X (4th Place Team High)
NEW F-OPEN TEAM Record: The Cluster Ducks set a new National Team Record for 800/900/1000 yards with their 1789-100X Score. In fact, the second-place Longshots also broke the previous 1786-104X record, set by Team Grizzly in 2014. Because the Cluster Ducks edged The Longshots by one point the Ducks will go down in the record books. But both teams can rightfully say they broke the then-current 1786-point F-Open record. Well done shooters!
Team Thunder-Struck from the Land Down Under brought along an inflatable mascot.
GUNS and GEAR HIGHLIGHTS
Interesting Competition Hardware at Ben Avery
Eliseo F-Class Chassis with Two-Piece Barrel Block
Christine Harris was shooting a new prototype Eliseo F-Class stock with a two-part barrel block. This is similar to the Eliseo F1 stock but the bolt-together barrel block allows easier exchange of barreled actions.
Stunning F-Open Rig from Cerus Rifleworks Cerus Rifleworks showed us a jaw-dropping new F-Open rifle. This is an amazing combination of beauty and advanced performance. The CNC-milled stock is stiff and straight, with tolerances that put most wood stocks to shame.
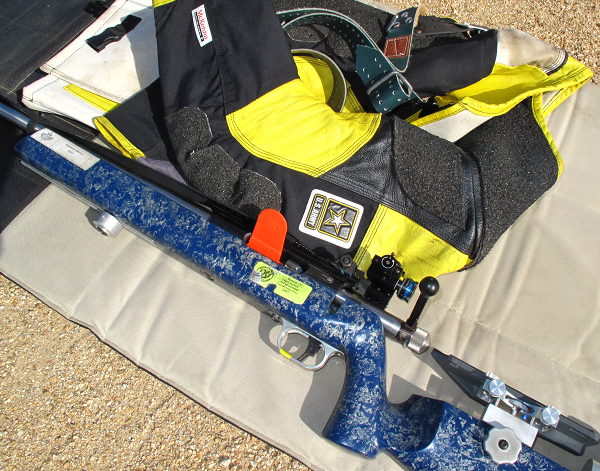
A Lady Soldier’s Coat and Rifle
This Monard shooting coat belongs to SSG Amanda Elsenboss, a shooter with the USAMU Team. The rifle features a Barnard action in what appears to be a classic Robertston Composites H&H-style prone stock. Nice hardware for a talented lady soldier.
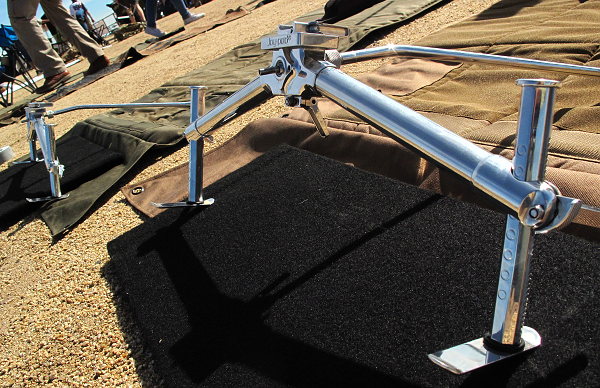
Pair of ‘Pods
We saw many SEB Joy-Pods on the front end of F-TR rifles. These light-weight bipods offer quick and easy aiming via a joystick-controlled coaxial head. The large flat feet allow the rifle to move back smoothly on recoil, and then slide right back on target.
Gear-Hauler for Many Seasons
This cart has seen countless matches over the years. Those stickers are markers in time, recording decades of shooting matches in many venues. How many stickers can you identify?
Distinguished Rifleman’s Spotting Scope
The stories this old spotting scope could tell — how many targets has it seen over the years? The most important sticker, “Distinguished Rifleman”, bears witness to its owner’s skill and commitment to the sport.
Nightforce Optics Competition Scopes
Nightforce, a major sponsor of the Berger SW Nationals, had a variety of scopes mounted on viewing rigs. You could quickly compare one scope vs. another. We’d like to see more optics makers demo their scopes at major matches.
If you shoot a pistol, you should watch this video. It covers the key fundamentals of handgun shooting: stance, arm position, grip, sight alignment, and trigger control. This excellent video features USAMU shooter SGT Shane Coley.
Arm/Elbow Position: You should not lock your elbows says SGT Coley: “Because my elbows are slightly bent, it allows the recoil to transfer into my shoulders, down my core, into my legs and to the ground, allowing me to maintain a flat-shooting gun … on multiple targets.”
Grip (Hand Position): SGT Coley explains how to divide the support between both hands: “In terms of grip pressure, I’m applying about 60% to my support hand, and 40% to my strong hand. This is because I need to maintain dexterity with my strong hand to operate the trigger at high rates of speed.”
Trigger Control: The placement of your finger on the trigger blade itself is very important notes Coley: “Putting too much (or not enough) of your finger on the trigger can cause you to pull or push your shots. When you squeeze the trigger, make sure to squeeze it all the way to the rear, in one smooth motion. A quick dry-fire drill to help you with this is to take an empty piece of brass and place it on the front of your slide. Aim at the target, and with the proper trigger control, you should be able to break the shot without the piece of brass falling.”
Pistol Pointers
On the web, you’ll find hundreds of pistol shooting videos — some good, some not helpful at all. In some of those “not helpful” videos the featured shooter has bad habits, or more often than not, he exhibits poor accuracy on target. You won’t find those kinds of shortcomings in this USAMU-sponsored video. SGT Coley doesn’t make foolish mistakes, nor does he exhibit bad habits when shooting. And his accuracy is outstanding. When you look for a pistol trainer — stick to someone like SGT Coley, who has solid fundamentals, the complete skill set, and superior accuracy. A trainer can’t teach a skill that he doesn’t understand himself.
Top to bottom – Remington firing pin assembly with ISS, Tubb SpeedLock alloy-composite system without ISS (current versions have dual, opposite-wound springs), and Remington short action firing pin assembly without ISS.
Each Wednesday, the U.S. Army Marksmanship Unit publishes a reloading “how-to” article on the USAMU Facebook page. Last week’s “Handloading Hump Day” article covered mechanical issues and related ignition irregularities that can cause vertical fliers even with good ammunition in an otherwise excellent rifle. We highly recommend you read this article, which offers some important tech tips.
Vertical Dispersion: Mechanical/Ignition Issues?
Poor or inconsistent ignition has long been known to be one of the “usual suspects” when one encounters vertical fliers that just shouldn’t be there. By having a sense of some of the basic principles involved, and a few basic areas to check, the shooter may avoid colsiderable frustration, not to mention time, expensive loading components and barrel wear.
Is your well-built rifle of high-quality components plagued with vertical fliers across more than 1-3 handload combinations? Consider the bedding, crown and scope/sight mounts. Are they correct? If so, then you might check for ignition issues before boldly undertaking an extensive, expensive, and quite possibly fruitless quest for the “magic handload”.
SEEING IS BELIEVING: While the author had been aware for many years that poor ignition should be considered and ruled out when dealing with vertical fliers in an otherwise-excellent rifle, actually seeing the problem and its almost instantaneous cure really drove the lesson home.
He was working with a “dot” rifle – a .22 LR match rifle that really stacked bullets into little piles at 50 yards and beyond. With one lot of ELEY Tenex, it produced consistent “bughole” groups at 50, but with another, selected lot of Tenex, similar groups were regularly ruined by single, vertical fliers that did not appear in other rifles. Rather than spending days burning up expensive, select ammunition looking for “magic lots”, he contacted a well-respected rimfire gunsmith and explained the situation.
Without so much as batting an eye, the highly-experienced ‘smith tore into the rifle’s action, and quickly found the cause(s) of the problem. He discovered a demonstrably weak firing pin spring, plus a chip out of the face of the firing pin where it contacted the cartridge rim.
After replacing and tuning the offending parts, the rifle immediately began shooting tiny, bughole groups with the previously “unacceptable” lot of Tenex. Centerfire rifles can also benefit from ensuring positive, consistent ignition. A wise riflesmith is literally worth his weight in gold!
So, what are some issues we as shooters can inspect in our rifles to help determine if ignition woes could be part of our problem? At the club level, ask yourself if that “experienced” Remington, Winchester 70, or even Springfield-based match bolt gun you’re using is still running its’ original 40-80 year-old factory striker spring? If so, a new replacement is cheap insurance against current or future problems. (And BTW, it might be best to stick to the normal, factory-spec spring weight. A super-powerful spring can cause vertical, just as a weak one one can.) Along with that, a routine check for proper firing-pin protrusion is a quick preventive measure that can rule out potential issues.
Other areas to consider are the centering and consistency of the firing pin’s operation in the bolt. Admittedly, with the increasing use of precision-machined custom actions, this is becoming less an issue every day. Below is the firing pin assembly from a custom BAT action:
However, particularly with factory actions, a very quick and easy check is to remove the bolt, let the firing pin go forward, and look at the firing pin tip through the firing pin hole. Is the tip off-center in the hole, and possibly striking it as it moves forward? Is the hole out-of-round or burred from being struck repeatedly? If so, a trip to the riflesmith is likely in order.
Similarly, machining issues in the bolt/firing pin system can lead to rough and erratic firing pin movement, in which the firing pin drags against an internal surface of the bolt. In high-quality rifles these issues are relatively rare, but not unheard-of, and it takes mere minutes to rule them out. It may be worthwhile to remove the cocking piece/firing pin/spring assembly and look for any unusual gouges, dings, peening, burrs or signs of abnormal wear.
This task is especially easy with Winchester 70s, Springfields, and the similar Mauser 98s, involving little more than the push of a button and unscrewing the cocking piece assembly. This is just one of the many reasons these tried-and-true actions have earned such a loyal following in the field, among hunters who must maintain their rifles away from a shop.
Particularly with older rifles, watch for and remove excess grease (or even Cosmoline!) from both the firing pin assembly and inside the bolt. This can help improve firing pin speed and consistency. Other bolt-action designs may need a take-down tool or other measures.
As part of this inspection, AFTER ENSURING THE RIFLE IS UNLOADED, slowly cock the rifle, dry-fire, and repeat several times. Listen carefully near the action for inconsistency in the sounds it generates. Does the striker falling make the same sound each time? Do you hear or feel grinding upon operation? If so, where?
Be sure to check the operation of the cocking piece (bolt shroud), firing pin within the bolt shroud, the cocking piece cam and the rear of the bolt body where the cocking piece cam operates. As with our examination for abnormal wear marks discussed above, look for marks indicating roughness or a possible need for light polishing. Then, clean and lightly grease the bearing surfaces while you’re at it.
Remington 700 bolt shroud and cocking cam
These are relatively easy checks that shooters can undertake to perform a preliminary inspection on their own. Other mechanical issues can also cause ignition issues, chiefly centered around the action of the trigger, sear and sear spring. If these are suspected, a trip to an experienced, qualified riflesmith for diagnosis is recommended. We hope you find this information helpful! Join us again next week, and in the meantime, enjoy the shooting sports safely!
Team USA Olympian and ISSF World Cup Winner SFC Michael McPhail is one of the world’s best smallbore rifle shooters. He is also an avid hunter, who enjoys harvesting game with centerfire rifles. In this excellent short video from the USAMU, McPhail shows how competition shooting positions can be adapted for hunters. McPhail shows how well-established positions can provide a more stable platform for hunters in the field. That can help ensure a successful hunt. McPhail demonstrates three positions: kneeling, supported prone, and sitting in a tree-stand.
Watch SFC McPhail Demonstrate Positions for Hunters (Good Video):
McPhail first demonstrates the kneeling position. Michael notes: “I like kneeling. It’s a little bit of an under-utilized position, but it’s almost as stable as prone. It allows you get up off the ground a little bit higher to [compensate for] vegetation. For kneeling start by taking your non-dominant foot and put that towards the target, while at the same time dropping down to a knee on the dominant leg. At the same time … wrap the sling around wrist and fore-arm, lean slightly into the target and take the shot.”
McPhail shows a nice “field expedient” use of your backpack. He shows how the basic prone position can be adapted, using the pack as a front rifle support. McPhail recommends pulling your dominant (strongside) leg forward, bent at the knee. According to Michael, this takes pressure off the abdomen, helps minimizes heart beat effects, and helps with breathing.
Last but not least, McPhail shows some clever treestand tricks. McPhail recommends a position with your weakside leg pulled up and firmly braced on the front rail of the treestand. You can then rest your support arm on your leg. (That would be the left arm for a right-handed shooter). This provides a rock-solid position when shooting from a stand. The second half of the video shows how this works.
The ability to read the wind is what separates good shooters from great shooters. If you want to learn wind-doping from one of the best, watch this video with 2010 National High Power Champion (and U.S. Army 2010 Soldier of the Year) Sherri Gallagher. Part of the USAMU’s Pro Tips Video Series, this video covers the basics of wind reading including: Determining wind direction and speed, Bracketing Wind, Reading Mirage, and Adjusting to cross-winds using both sight/scope adjustments and hold-off methods. Correctly determining wind angle is vital, Sheri explains, because a wind at a 90-degree angle has much more of an effect on bullet lateral movement than a headwind or tailwind. Wind speed, of course, is just as important as wind angle. To calculate wind speed, Sherri recommends “Wind Bracketing”: [This] is where you take the estimate of the highest possible condition and the lowest possible condition and [then] take the average of the two.”
It is also important to understand mirage. Sheri explains that “Mirage is the reflection of light through layers of air, based off the temperature of the ground. These layers … are blown by the wind, and can be monitored through a spotting scope to detect direction and speed. You can see what appears to be waves running across the range — this is mirage.” To best evaluate mirage, you need to set your spotting scope correctly. First get the target in sharp focus, then (on most scopes), Sheri advises that you turn your adjustment knob “a quarter-turn counter-clockwise. That will make the mirage your primary focus.”
Praslick is back! He won’t be coaching the USAMU any more but he will be helping top shooters and teams reach their goals. SFC Emil Praslick III, (U.S. Army, retired) has been hired by Berger Bullets as the company’s new Sponsorship Director. In this role, Emil will work directly with Berger’s sponsored shooters and teams. Emil will also manage Berger’s match sponsorship programs and handle Berger’s gun writer connections.
Coach of Champions — Emil Praslick
Emil’s past experiences include serving as the Head Coach of the U.S. National Long Range Rifle Team and Head Coach of the USAMU for several years. Teams coached by Emil have won 33 Inter-Service Rifle Championships. On top of that, teams he coached set 18 National records and 2 World Records. Overall, in the role of coach, Praslick can be credited with the most team wins of any coach in U.S. Military history.
Emil’s unique skill set will be a great asset for Berger-sponsored shooters. For numerous years, Emil worked tirelessly to ensure his teams and shooters performed at world-class levels, maximizing their abilities. Now, he will be doing the same for Berger’s sponsored shooters:
“My passion is coaching and working with shooters, so this is an incredible opportunity for me to help develop Team Berger by providing them with the support they need to perform at the highest level,” says Emil.
“I am thrilled that Emil has joined Berger. His experience and exceptional ability, both on and off the range, are certain to be impactful,” says Berger Bullets President, Eric Stecker.
Each Wednesday, the U.S. Army Marksmanship Unit publishes a reloading “how-to” article on the USAMU Facebook page. Recently the USAMU’s reloading gurus looked at the subject of case lubrication. Tasked with producing thousands of rounds of ammo for team members, the USAMU’s reloading staff has developed very efficient procedures for lubricating large quantities of cases. This article reveals the USAMU’s clever “big-batch” lube methods. For other hand-loading tips, visit the USAMU Facebook page next Wednesday for the next installment.
Rapid, High-Volume Case Lubrication
Today’s topic covers methods for quickly applying spray lube to cartridge cases prior to sizing. A typical order for this shop may be 25,000 rounds, so [speeding up] the lubrication process can be a real time-saver. While your ammunition lots probably aren’t this large, the efficient methods discussed here may help save a considerable amount of time over your handloading career. Our case lubrication rates range from 1500-1600 cases per hour, to 2400-2500 cases per hour, depending on caliber.
This shop uses virgin brass, whereas most home handloaders use fired brass, which necessitates some small changes at times. These will be discussed as they arise. Begin with fired brass that has been tumbled clean.
Ensure as much tumbling media as possible is removed from the brass, as when it gets into a size die, it can dent cases significantly. This is a good time to round out dents in the case mouths using a tapered tool to prevent damage from the decapping stem.
First, dump the clean cases into a large box or reloading bin. Shake the bin back and forth so that many cases are oriented with the mouths up. Next, pick up as many cases as is convenient with the mouths “up”, from natural clusters of correctly-oriented cases. With 7.62mm-size cases, this is usually 3-4, and with 5.56mm cases, this can be up to 8-10. Place the cases into the rack slots, mouth-up. Doing this in groups rather than singly saves considerable time. Once these clusters have been depleted, it will be time to re-shake the bin to orient more cases “up.”.
This photo shows a case lubrication rack made by a USAMU staffer.
Naturally, adjust the spacing to best fit the calibers you reload. We have found this size … convenient for handling through the various phases of case lubrication/transfer to progressive case feeders for processing. Note that the 1/2-inch angle does not cover much of the critical case area at the base, just forward of the extractor groove, where most re-sizing force will be exerted. As the USAMU uses virgin brass, less lubrication is required for our brass than would be needed for Full Length (FL) sizing of previously-fired brass.
NOTE: The amount applied using our rack is easily enough for our purpose. If using fired brass, be sure to adequately lube this base area to avoid having cases stick in the full-length sizing die.
Using a spray lube, coat the cases adequately, but not excessively, from all sides. Be sure to get some lube into the case mouths/necks, in order to reduce expander ball drag and case stretching/headspace changes. The spray lube this shop uses does not harm primers or powder, and does not require tumbling to remove after lubing.*
Take a close look at the photo above. The USAMU shop uses a common kitchen turntable, which allows the rack to be rotated easily. We place this in a custom-made box which prevents over-spray on to floors and walls.
Angled Box Method for Smaller Cases to be Neck-Sized
A refinement of the above method which especially speeds processing of 5.56x45mm cases is as follows. A small cardboard box which holds about 100 cases is fitted with an angled “floor” secured by tape. With the smaller 5.56mm cases, usually about 8-10 cases per handful can be picked up, already correctly-oriented, and placed into the box together. This prevents having to place them into the rack slots, saving time.
HOWEVER, note that this does not allow nearly as much lube access to the case bodies as does the rack. For our purposes — neck-sizing and setting neck tension on new brass, this works well. If using this procedure with fired brass, take steps to ensure adequate lube to prevent stuck cases.
As always, we hope this will help our fellow handloaders. Good luck, and good shooting!
*A two-part test performed here involved spraying primed cases heavily, while getting more lube into the case mouth/body than even a careless handloader would likely apply. The second part of the test involved literally spraying considerable quantities of the lube directly into the cases, drenching the primers. After a several-day wait to allow the lube to penetrate the primers, they were then fired in a test barrel. All fired normally; no unusual reports were noted. This bolstered confidence that normal amounts of the lube would not adversely affect our ammunition, and we have been pleased with the results over several years.


 Is your well-built rifle of high-quality components plagued with vertical fliers across more than 1-3 handload combinations? Consider the bedding, crown and scope/sight mounts. Are they correct? If so, then you might check for ignition issues before boldly undertaking an extensive, expensive, and quite possibly fruitless quest for the “magic handload”.


 The ability to read the wind is what separates good shooters from great shooters. If you want to learn wind-doping from one of the best, watch this video with 2010 National High Power Champion (and U.S. Army 2010 Soldier of the Year) Sherri Gallagher. Part of the USAMU’s Pro Tips Video Series, this video covers the basics of wind reading including: Determining wind direction and speed, Bracketing Wind, Reading Mirage, and Adjusting to cross-winds using both sight/scope adjustments and hold-off methods. Correctly determining wind angle is vital, Sheri explains, because a wind at a 90-degree angle has much more of an effect on bullet lateral movement than a headwind or tailwind. Wind speed, of course, is just as important as wind angle. To calculate wind speed, Sherri recommends “Wind Bracketing”: [This] is where you take the estimate of the highest possible condition and the lowest possible condition and [then] take the average of the two.”


