|
|
June 4th, 2016

Can a human, with a sling, shoot as well as a mechanical rest? The answer is “yes” (at least once in a great while) IF that sling shooter can deliver a record-breaking performance. Here’s an interesting tale of man vs. machine from our archives…
The USAMU posed an interesting challenge — could one of their shooters match the performance of a mechanical rest? Who would win in this battle between man and machine? You might just be surprised. At 600 yards, with an AR-platform rifle, the results can be remarkably close, based on targets provided by the USAMU. When clamped in a test rig, a USAMU M16A2 produced a 200-18X group with handloads. The USAMU says this was “one of our better 20-shot groups at 600 yards, testing ammo from a machine rest”. Can a human do better?

Remarkably, a human soldier came very close to matching the group shot from the machine rest. The photo below shows a 20-shot group shot by a USAMU marksman with sling and iron sights, using USAMU-loaded ammunition. The score, 200-16X, was nearly the same. As you can see, the USAMU rifleman didn’t give up much to the machine rest, even at 600 yards!
In fairness, this was no ordinary human performance. The 200-16X score was a new National Record set in December, 1994. This was fired by PFC Coleman in an Interservice Match at Okeechobee, Florida. Brilliant Performance.

June 1st, 2016
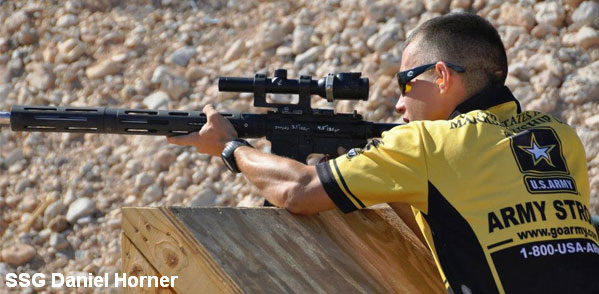
There’s no denying that 3-Gun competition is growing in popularity nationwide. Using a pistol, rifle and shotgun to shoot multiple targets at varying distances is exciting and challenging. Here are some pointers for performing better on the 3-Gun range by the USAMU’s SSG Daniel Horner, a two-time winner of Crimson Trace’s Midnight 3-Gun Invitational (M3GI) match.
 Competing in Night-Time Stages Competing in Night-Time Stages
“I use the same gear all year long, so when it comes time for this match (the M3GI), I just adapt the guns, so they will work for the night time,” stated Daniel Horner. “I attach the Crimson Trace lasers and lights to the guns in whatever is the easiest way possible. Last year I just screwed a rail to my shotgun with wood screws. So, people can compete with pretty much whatever they have available and make it work.” Horner also recommends using a pair of head-mounted lamps. One can illuminate your firearms’ iron sights while the other headlamp is aimed at the targets.
May 1st, 2016

The USAMU recently published a “how-to” article about bullet sorting. While many of us may sort bullets by base-to-ogive length (and/or weight), the USAMU story explores the “how and why” of sorting bullets by Overall Length (OAL). Read the article highlights below, and make your own decision as to whether OAL sorting is worth the time and effort. Bryan Litz of Applied Ballistics says that sorting by OAL is not a bad idea, but base-to-ogive bullet sorting probably represents a better investment of your time.

Bullet Sorting by Overall Length
We’d like to share a specialized handloading technique which we’ve long found beneficial to our long-range (600 yards and beyond) accuracy. Sorting of bullets for extreme long range (LR) accuracy is not difficult to do, but some background in theory is needed.
Here at USAMU’s Handloading Shop, we only sort individual bullets for the most demanding Long-Range applications and important competitions. Only the most accurate rifles and shooters can fully exploit the benefits of this technique. The basic sorting process involves measuring the Overall Length (OAL) of the bullets, and grouping them in 0.001″ increments. It’s not unusual to find lots of match bullets that vary as much as 0.015″-0.020″ in length throughout the lot, although lots with much less variation are seen as well. Even in bullet lots with 0.015″ OAL variation, the bullet base-to-ogive length will show much less variation. Hence, our basic sort is by bullet OAL. One obvious benefit of sorting is easily seen in the attached photo. The few bullets that are VERY different from the average are culled out, reducing probable fliers.
How does one know what OAL increments to use when sorting? The answer is simple. As each lot of bullets is unique in its OAL distribution, it’s best to sample your bullet lot and see how they are distributed. In the attached photo, you will see a set of loading trays with a strip of masking tape running along the bottom. Each vertical row of holes is numbered in 0.001″ increments corresponding to the bullets’ OAL. A digital caliper makes this task much easier. As each bullet is measured, it is placed in the line of holes for its’ OAL, and gradually, a roughly bell-shaped curve begins to form.
Note that near the center, bullets are much more plentiful than near the edges. At the extreme edges, there are a few that differ markedly from the average, and these make great chronograph or sighting-in fodder. We recommend using a sample of 200 bullets from your lot, and 300 is even better. Some bullet lots are very consistent, with a tall, narrow band of highly-uniform bullets clustered together over just a few thousandths spread. Other lots will show a long, relatively flat curve (less uniform), and you may also see curves with 2 or more “spikes” separated by several 0.001″ OAL increments.

Bullet Sorting (OAL vs. Base-to-Ogive vs. Weight) — Litz Talks
I’m often asked what is a the best measure to sort bullets by, and the answer (to this and many other questions in ballistics) is: it depends.
Choosing to sort by overall length (OAL), base to ogive (BTO), bearing surface, weight, etc. can get overwhelming. Shooters typically look for something they can measure, which shows a variation and sort by that. It’s common for dimensional variations to correlate. For example, bullets which are longer in OAL are typically also shorter in BTO, and have longer noses. All these are symptoms of a bullet that was pushed a little further into the pointing die, or possibly had more than average lube while being swaged. So in essence, if you sort by BTO, you’re measuring one symptom which can indicate a pattern in the bullets shape.
So, the question still stands — what should you measure? You’ll always see more variation in OAL than BTO, so it’s easier to sort by OAL. But sometimes the bullet tips can be jagged and have small burrs which can be misleading. Measuring BTO will result in a lower spread, but is a more direct measure of bullet uniformity.
Then there’s the question of; how much variation is too much, or, how many bins should you sort into? Shooters who see 0.025” variation in BTO may choose to sort into 5 bins of 0.005”. But if you have only 0.005” variation in the box, you’ll still sort into 5 bins of 0.001”. What’s correct? You have to shoot to know. Live fire testing will answer more questions, and answer them more decisively than any amount of discussion on the subject. The test I recommend is to identify bullets on the extreme short end of the spectrum, and some on the extreme long end. Load at least 10 rounds of each, and take turns shooting 5-shot groups with them. If there is a difference, it will be evident. The results of the testing will answer your question of: should I sort based on X, Y, or Z?”
You can read more discussion on this and other similar subjects in the new Ballistics & Bullets board in the Accurateshooter.com forum. Heres a link to the thread which is discussing bullet sorting: Bullet Sorting Thread
April 19th, 2016

Each Wednesday, the U.S. Army Marksmanship Unit publishes a reloading “how-to” article on the USAMU Facebook page. On older “Handloading Hump Day” post covers removal of military primer pocket crimps. If you ever use surplus military brass, you really should this article. It contains vital information “learned the hard way”. The writer has tried many different options for removing/swaging out crimps. He weighs the pros and cons of various methods and provides some advice that will save you time and headaches. Visit the USAMU Facebook page next Wednesday for more informative articles for handloaders.

 A common question, and important issue with US GI surplus 5.56 brass is “what to do with the primer crimp?” Our Handloading Shop does not prime/re-prime GI 5.56 brass, as we receive it in virgin state (primed) and don’t reload it. However, our staff has extensive private experience handloading GI brass in our own competitive shooting careers, and have several tips to offer. A common question, and important issue with US GI surplus 5.56 brass is “what to do with the primer crimp?” Our Handloading Shop does not prime/re-prime GI 5.56 brass, as we receive it in virgin state (primed) and don’t reload it. However, our staff has extensive private experience handloading GI brass in our own competitive shooting careers, and have several tips to offer.
Once the brass is full-length sized and decapped, the staked-in ring of displaced metal from the primer crimp remains, and hinders re-priming. Some swaging tools exist to swage out this ring, allowing free access to the primer pocket. Some are stand-alone products, and some are reloading-press mounted. Early in this writer’s High Power career, he used the common press-mounted kit several times, with less than stellar results.
Setting Up Swaging Tools
Surplus brass tends to come from mixed lots, and primer crimp varies from very mild to strong. Also, primer pocket dimensions vary. So, setting up this “one size fits most” tool involves trying to find a happy medium for a selection of different types of brass in your particular lot. Some are over-swaged, some under-swaged, and some are “Just Right.” Overall, it was a time-consuming and sub-optimal process, in this writer’s experience.
Cutting Out the Crimp Ring with a Chamfer Tool
[After trying swaging tools] this writer evolved to using the ubiquitous Wilson/RCBS/Other brands chamfer and deburring tool to cut out only the displaced crimp ring at the top of the primer pocket. One caution: DON’T OVER-DO IT! Just a little practice will let the handloader develop a “feel” for the right degree of chamfer that permits easy re-priming without removing so much metal that primer edges start to flow under pressure. For this writer, it was three half-turns of the tool in the primer pocket, with medium pressure.
Here, as with all bulk reloading operations, mechanization is our friend. A popular reloading supply house has developed an inexpensive adaptor that houses the chamfer/deburr tool (retained by an allen screw) and allows mounting in a hand drill or drill press. This speeds the operation significantly, as does use of one of the popular Case Preparation Stations that feature multiple powered operations. (Say good-bye to carpal tunnel syndrome and arthritis!)

One advantage of chamfering the primer pockets lightly to remove remnants of primer crimp, vs. swaging, is that primer pockets are not loosened in this process. US GI (usually LC) NATO 5.56 brass has a great reputation for longevity due to the superior hardness of the case head vs. some softer brands of commercial brass. This means the brass will stand up well to multiple full-pressure loads without loosening primer pockets, and the chamfering method helps support this benefit.
Powered Case Prep Centers — What to Look For
A word of advice (often learned the hard way) — think carefully before jumping on the “latest/greatest” case prep center. One with a proven, long-time track record of durability and excellent customer support has a lot going for it, vs. the flashy “new kid on the block.” Analyze the functions each case prep center can support simultaneously — i.e., can it chamfer, deburr and clean primer pockets all at the same time, without having to re-configure?
Do the tool-heads that come with it look truly functional and durable? If not, can they be easily replaced with proven or more-needed versions, such as a VLD chamfer tool, or a solid/textured primer pocket cleaner rather than a less-durable wire-brush type?
 Tips for Priming with Progressive Presses Tips for Priming with Progressive Presses
When re-priming, a couple of factors are worth noting. When re-priming using either single-stage presses, hand tools, or bench-mounted tools (such as the RCBS bench-mounted priming tool), precise alignment of the primer pocket entrance with the primer is easily achieved, and priming goes very smoothly. When using certain progressive presses, due to the tolerances involved in shell-heads, etc., one may occasionally encounter a primer that isn’t quite perfectly aligned with the primer pocket.
If resistance is felt when attempting to re-prime, DO NOT attempt to force the primer in — doing so can be dangerous! Rather, just exert SLIGHT upward pressure to keep the primer in contact with the case-head, and with the support hand, move the case back/forth a trifle. The primer will drop into alignment with the primer pocket, and then prime as usual. After priming, check each seated primer by feel. Ensure it is below flush with the case head (cleaning primer pockets helps here), and that there are no snags, burrs or deformed primers.
More Info on Primer Pocket Swaging
For more information about removing military crimps in primer pockets, we recommend you read Get the Crimp Out on the Squibloads Gun Thoughts Blog. This is a detailed, well-illustrated article that shows how to use various primer pocket reamers/cutters. It also has a very extensive discussion of swaging using CH4D, RCBS, and Dillon tools. The Squibloads author had much better luck with swaging tools than did the USAMU’s writer — so if you are considering swaging, definitely read the Squibloads article.
The illustration of primer pocket types is from the Squibloads Blog Article, Get the Crimp Out.
April 17th, 2016
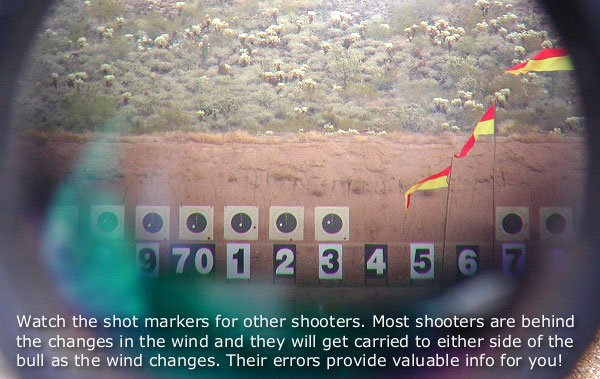
 To succeed in long-range shooting matches, given the high level of competition these days, you’ll need solid wind-reading abilities. We’ve found an article by SFC Emil Praslick III, retired USAMU Service Rifle coach and U.S. Palma Team Coach, that can help you make better wind calls in competition. To succeed in long-range shooting matches, given the high level of competition these days, you’ll need solid wind-reading abilities. We’ve found an article by SFC Emil Praslick III, retired USAMU Service Rifle coach and U.S. Palma Team Coach, that can help you make better wind calls in competition.
Emil Praslick, now retired from the U.S. Army, is considered one of the best wind gurus in the United States, if not the world. During his service with the USAMU he authored an excellent two-part article on wind reading that is available on the CMP (Civilian Marksmanship Program) website. Both articles contain helpful illustrations, and are “must-read” resources for any long-range shooter–not just Service Rifle and Highpower competitors.
Click to Read Articles:
 Part One covers basic principles, tactics, and strategies, with a focus on the 200-yard stages. Emil writes: “There are as many dimensions to ‘wind reading’ as there are stages to High Power competition. Your tactical mindset, or philosophy, must be different for the 200 and 300 yard rapid-fire stages than it would be for the 600 yard slow-fire. In the slow-fire stages you have the ability to adjust windage from shot to shot, utilizing the location of the previous shot as an indicator. Additionally, a change to the existing conditions can be identified and adjusted for prior to shooting the next shot.” Part One covers basic principles, tactics, and strategies, with a focus on the 200-yard stages. Emil writes: “There are as many dimensions to ‘wind reading’ as there are stages to High Power competition. Your tactical mindset, or philosophy, must be different for the 200 and 300 yard rapid-fire stages than it would be for the 600 yard slow-fire. In the slow-fire stages you have the ability to adjust windage from shot to shot, utilizing the location of the previous shot as an indicator. Additionally, a change to the existing conditions can be identified and adjusted for prior to shooting the next shot.”
In Part Two, Praslick provides more detailed explanations of the key principles of wind zeros, wind reading, and the “Clock System” for determining wind values: “The Value of the wind is as important as its speed when deciding the proper windage to place on the rifle. A 10 MPH wind from ’12 o-clock’ has No Value, hence it will not effect the flight of the bullet. A 10 MPH wind from ‘3 o’clock’, however, would be classified as Full Value. Failure to correct for a Full Value wind will surely result in a less than desirable result.”

Praslick also explains how to identify and evaluate mirage:
Determine the accuracy of the mirage. Mirage is the reflection of light through layers of air that have different temperatures than the ground. These layers are blown by the wind and can be monitored to detect wind direction and speed.
Focus your scope midway between yourself and the target, this will make mirage appear more prominent. I must emphasize the importance of experience when using mirage as a wind-reading tool. The best way to become proficient in the use of mirage is to correlate its appearance to a known condition. Using this as a baseline, changes in mirage can be equated to changes in the value of the wind. Above all, you must practice this skill!
Click HERE for more excellent instructional articles by Emil Praslick and other USAMU Coaches and shooters.
March 22nd, 2016

Top to bottom – Remington firing pin assembly with ISS, Tubb SpeedLock alloy-composite system without ISS (current versions have dual, opposite-wound springs), and Remington short action firing pin assembly without ISS.
Each Wednesday, the U.S. Army Marksmanship Unit publishes a reloading “how-to” article on the USAMU Facebook page. Last week’s “Handloading Hump Day” article covered mechanical issues and related ignition irregularities that can cause vertical fliers even with good ammunition in an otherwise excellent rifle. We highly recommend you read this article, which offers some important tech tips.
Vertical Dispersion: Mechanical/Ignition Issues?
Poor or inconsistent ignition has long been known to be one of the “usual suspects” when one encounters vertical fliers that just shouldn’t be there. By having a sense of some of the basic principles involved, and a few basic areas to check, the shooter may avoid colsiderable frustration, not to mention time, expensive loading components and barrel wear.
 Is your well-built rifle of high-quality components plagued with vertical fliers across more than 1-3 handload combinations? Consider the bedding, crown and scope/sight mounts. Are they correct? If so, then you might check for ignition issues before boldly undertaking an extensive, expensive, and quite possibly fruitless quest for the “magic handload”. Is your well-built rifle of high-quality components plagued with vertical fliers across more than 1-3 handload combinations? Consider the bedding, crown and scope/sight mounts. Are they correct? If so, then you might check for ignition issues before boldly undertaking an extensive, expensive, and quite possibly fruitless quest for the “magic handload”.
SEEING IS BELIEVING: While the author had been aware for many years that poor ignition should be considered and ruled out when dealing with vertical fliers in an otherwise-excellent rifle, actually seeing the problem and its almost instantaneous cure really drove the lesson home.
He was working with a “dot” rifle – a .22 LR match rifle that really stacked bullets into little piles at 50 yards and beyond. With one lot of ELEY Tenex, it produced consistent “bughole” groups at 50, but with another, selected lot of Tenex, similar groups were regularly ruined by single, vertical fliers that did not appear in other rifles. Rather than spending days burning up expensive, select ammunition looking for “magic lots”, he contacted a well-respected rimfire gunsmith and explained the situation.
Without so much as batting an eye, the highly-experienced ‘smith tore into the rifle’s action, and quickly found the cause(s) of the problem. He discovered a demonstrably weak firing pin spring, plus a chip out of the face of the firing pin where it contacted the cartridge rim.
After replacing and tuning the offending parts, the rifle immediately began shooting tiny, bughole groups with the previously “unacceptable” lot of Tenex. Centerfire rifles can also benefit from ensuring positive, consistent ignition. A wise riflesmith is literally worth his weight in gold!
So, what are some issues we as shooters can inspect in our rifles to help determine if ignition woes could be part of our problem? At the club level, ask yourself if that “experienced” Remington, Winchester 70, or even Springfield-based match bolt gun you’re using is still running its’ original 40-80 year-old factory striker spring? If so, a new replacement is cheap insurance against current or future problems. (And BTW, it might be best to stick to the normal, factory-spec spring weight. A super-powerful spring can cause vertical, just as a weak one one can.) Along with that, a routine check for proper firing-pin protrusion is a quick preventive measure that can rule out potential issues.
Other areas to consider are the centering and consistency of the firing pin’s operation in the bolt. Admittedly, with the increasing use of precision-machined custom actions, this is becoming less an issue every day. Below is the firing pin assembly from a custom BAT action:

However, particularly with factory actions, a very quick and easy check is to remove the bolt, let the firing pin go forward, and look at the firing pin tip through the firing pin hole. Is the tip off-center in the hole, and possibly striking it as it moves forward? Is the hole out-of-round or burred from being struck repeatedly? If so, a trip to the riflesmith is likely in order.
Similarly, machining issues in the bolt/firing pin system can lead to rough and erratic firing pin movement, in which the firing pin drags against an internal surface of the bolt. In high-quality rifles these issues are relatively rare, but not unheard-of, and it takes mere minutes to rule them out. It may be worthwhile to remove the cocking piece/firing pin/spring assembly and look for any unusual gouges, dings, peening, burrs or signs of abnormal wear.
This task is especially easy with Winchester 70s, Springfields, and the similar Mauser 98s, involving little more than the push of a button and unscrewing the cocking piece assembly. This is just one of the many reasons these tried-and-true actions have earned such a loyal following in the field, among hunters who must maintain their rifles away from a shop.

Particularly with older rifles, watch for and remove excess grease (or even Cosmoline!) from both the firing pin assembly and inside the bolt. This can help improve firing pin speed and consistency. Other bolt-action designs may need a take-down tool or other measures.
As part of this inspection, AFTER ENSURING THE RIFLE IS UNLOADED, slowly cock the rifle, dry-fire, and repeat several times. Listen carefully near the action for inconsistency in the sounds it generates. Does the striker falling make the same sound each time? Do you hear or feel grinding upon operation? If so, where?
Be sure to check the operation of the cocking piece (bolt shroud), firing pin within the bolt shroud, the cocking piece cam and the rear of the bolt body where the cocking piece cam operates. As with our examination for abnormal wear marks discussed above, look for marks indicating roughness or a possible need for light polishing. Then, clean and lightly grease the bearing surfaces while you’re at it.
Remington 700 bolt shroud and cocking cam

These are relatively easy checks that shooters can undertake to perform a preliminary inspection on their own. Other mechanical issues can also cause ignition issues, chiefly centered around the action of the trigger, sear and sear spring. If these are suspected, a trip to an experienced, qualified riflesmith for diagnosis is recommended. We hope you find this information helpful! Join us again next week, and in the meantime, enjoy the shooting sports safely!
January 20th, 2016
Each Wednesday, the U.S. Army Marksmanship Unit publishes a reloading “how-to” article on the USAMU Facebook page. Yesterday’s post covered primer seating depth. This article offers many useful tips — including a clever way to measure primer seating depth with ordinary jaw-type calipers. Visit the USAMU Facebook page next Wednesday for the next installment.
Primer Seating Depth — Why Uniformity is Important
The first concern is for safety: for that reason, primers should be seated below flush with the case head. One primary cause of “slam fires” (which includes catastrophic failures from firing out of battery) is “high,” or protruding primers. These stand above the case head, are readily felt with simple finger-tip inspection, and may fire when slammed by the bolt face and/or a floating firing pin in feeding.
Here at the USAMU, we ensure our rifle primers generally run -0.003″ to -0.005″ below the case head. Maximum primer depth is -0.006″ and minimum is -0.002″. Upon inspection, any cases with high primers will be corrected before loading. Aside from improving ballistic uniformity, ensuring the primers have proper compression upon seating also helps reduce possible misfires. These can be caused by the firing pin’s expending part of its energy either seating the primer or having to deform the primer cup enough to reach the anvil.
SMART TIP: How to Measure Primer Seating Depth with a Set of Calipers
A zeroed, precision set of standard calipers will also measure primer seating depth. (You don’t really need a custom tool.) Merely close the jaws and place the calipers’ narrow end squarely across the center of the case head/primer pocket. Keeping the narrow end in full contact with the case head, gently open the jaws, and the center bar will extend until it reaches the primer face. Voilà! Primer depth is read on the dial. Taking a few measurements to ensure accuracy and repeatability is recommended until one is familiar with this technique.

Brass and Primer Defects Can Cause Seating-Depth Variances
Factors affecting variance of primer seating depth include brass maker and lot number — all primer pockets are not created equal! Another factor is the primer manufacturer and individual primer lot. We’ve encountered occasional primer lots by top-quality makers that included some primers with slight defects affecting seating. While finely accurate, these primers were out-of-round or had small slivers of cup material protruding which affected primer feeding or seating depth.
Has one’s brass been fired previously? If so, how many times and the pressures involved also affect future primer seating. Obviously, this is another factor in favor of segregating one’s high-accuracy brass by maker, lot number, and number of times fired, if possible.
Measuring Primer Seating Depth with Purpose-Built Gauge
The next question, “How do we measure primer depth?” happily can be answered using tools already owned by most handloaders. [See tip above on how to measure depth with calipers.] At the USAMU, we have the luxury of purpose-built gauges made by the talented machinists of the Custom Firearms Shop. One places the primed case into the gauge, and the dial indicator reads the depth quickly and easily. The indicator is calibrated using a squarely-machined plug that simulates a case head with a perfectly flush-seated primer, easily giving meaningful “minus” or “plus” readings. The gauge is usable with a variety of case head sizes.

Primer Seating with Progressive Presses
Methods of primer seating include hand-seating using either hand held or bench-mounted tools, vs. progressive-press seating. Progressive presses may either seat by “feel,” subjective to each operator, or by using a mechanical “stop” that positively locates primers nearly identically every time. Testing here has shown that we get more uniform seating with the latter type progressive press, than we do with a high-quality bench-mounted tool lacking a positive stop.
Primer stop depth adjustments on our main progressive presses involve turning a punch screw in and out. While the screw is not calibrated, fine “tick” marks added to the top of the press help users gauge/repeat settings by “eye” efficiently with practice. Then, once a sample of primed cases is run to confirm the range and accuracy of depths, the identifying lot number and maker is noted on the press for reference. When it’s necessary to switch brass/primer lots, changes are easy to make and settings are easily repeated when it’s time to switch back.
December 31st, 2015

SFC Michael McPhail, shown above, is currently ranked #1 in the world in the smallbore 50m prone rifle discipline. He’s one of the favorites to win Gold in 2016.
 As the 2015 international shooting season comes to a close, the USAMU shooting teams are preparing for the 2016 Olympic trials and a chance to compete in the Olympic Games in Rio de Janeiro next summer. One USAMU marksman who has already secured a berth for the 2016 Olympics is SFC Michael McPhail of Darlington, Wisconsin. As the 2015 international shooting season comes to a close, the USAMU shooting teams are preparing for the 2016 Olympic trials and a chance to compete in the Olympic Games in Rio de Janeiro next summer. One USAMU marksman who has already secured a berth for the 2016 Olympics is SFC Michael McPhail of Darlington, Wisconsin.
SFC Michael McPhail, ranked number one in the world in men’s 50-meter rifle prone, already won his spot on the U.S. Olympic team by virtue of his performances in 2015 ISSF World Cup events. McPhail, of Darlington, Wisconsin, won the ISSF World Cup Finals in Munich this September. McPhail also won back-to-back gold medals at the ISSF World Cup events at Fort Benning, GA and Munich, Germany, held in May and early June of 2015.
Michael McPhail Secures Olympic Team Nomination with World Cup Finals Triumph

McPhail said for anyone who wants to participate in the Olympics, the Army provides superior coaching, training, equipment and ammunition. “For a kid who shoots and their goal is to make the Olympics, the Army Marksmanship Unit is the place to go,” McPhail said.
SFC Jason Parker, International Rifle and Pistol Teams coach noted that: “Sergeant First Class McPhail has had a fantastic year. He has a great potential for medaling in the Olympic Games.”
With one seat already taken by McPhail for men’s 50-meter rifle prone, two other USAMU Soldiers are Parker’s top picks for the second and final seat. They are SFC Eric Uptagrafft and SSG George Norton. “Sergeant First Class Uptagrafft is another top contender for making the United States Olympic Team,” Parker said. “In the past, he has won multiple world class medals, he has been to two Olympics already, and he is one of our top shooters. He will be trying to get that last spot in the prone, and I wouldn’t count him out of anything.”
For more information on the U.S. Army Marksmanship Unit, visit www.USAMU.com.
October 23rd, 2015
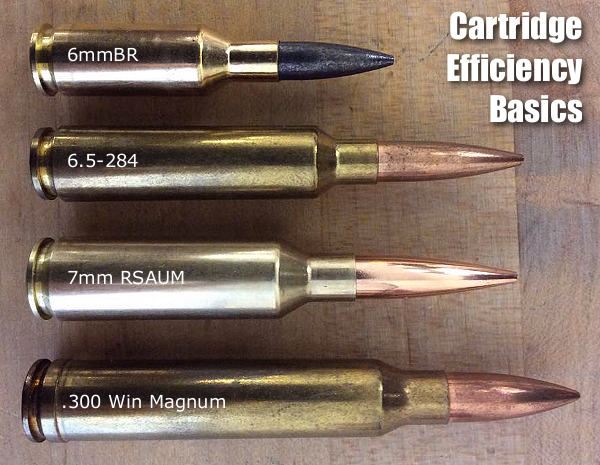
Efficient cartridges make excellent use of their available powder and case/bore capacity. They yield good ballistic performance with relatively little recoil and throat erosion.
Cartridge Efficiency: A Primer (pun intended!) by USAMU Staff
Each week, the U.S. Army Marksmanship Unit (USAMU) publishes a reloading article on its Facebook Page. In this week’s article, the USAMU discusses cartridge case efficiency and its benefits. While this is oriented primarily toward NRA High Power Rifle and Long Range (1000-yard) competition, these factors also apply to medium/big game hunters. Assuming one’s rifle and ammunition are accurate, key considerations include ballistic performance (i.e., resistance to wind effects, plus trajectory), recoil, and throat erosion/barrel life.
Efficient cartridges make excellent use of their available powder and case/bore capacity. They yield good ballistic performance with relatively little recoil and throat erosion. A classic example in the author’s experience involved a featherweight 7x57mm hunting/silhouette rifle. When loaded to modern-rifle pressures, just 43-44 grains of powder pushed a 139gr bullet at 2900 fps from its 22” barrel. Recoil in this light rifle was mild; it was very easy to shoot well, and its performance was superb.
An acquaintance chose a “do everything” 7mm Remington Magnum for use on medium game at short ranges. A larger, heavier rifle, it used ~65 grains of powder to achieve ~3200 fps with similar bullets — from its 26″ barrel. Recoil was higher, and he was sensitive to it, which hampered his shooting ability.
Similarly efficient calibers include the 6mm BR [Norma], and others. Today’s highly-efficient calibers, such as 6mm BR and a host of newer developments might use 28-30 grains of powder to launch a 105-107gr match bullet at speeds approaching the .243 Winchester. The .243 Win needs 40-45 grain charges at the same velocity.
Champion-level Long Range shooters need every ballistic edge feasible. They compete at a level where 1″ more or less drift in a wind change could make the difference between winning and losing. Shooters recognized this early on — the then-new .300 H&H Magnum quickly supplanted the .30-06 at the Wimbledon winner’s circle in the early days.
The .300 Winchester Magnum became popular, but its 190-220gr bullets had their work cut out for them once the 6.5-284 and its streamlined 140-142gr bullets arrived on the scene. The 6.5-284 gives superb accuracy and wind performance with about half the recoil of the big .30 magnums – albeit it is a known barrel-burner.
Currently, the 7mm Remington Short Action Ultra-Magnum (aka 7mm RSAUM), is giving stellar accuracy with cutting-edge, ~180 grain bullets, powder charges in the mid-50 grain range and velocities about 2800+ fps in long barrels. Beyond pure efficiency, the RSAUM’s modern, “short and fat” design helps ensure fine accuracy relative to older, longer cartridge designs of similar performance.
Recent design advances are yielding bullets with here-to-fore unheard-of ballistic efficiency; depending on the cartridge, they can make or break ones decision. Ballistic coefficients (“BC” — a numerical expression of a bullet’s ballistic efficiency) are soaring to new heights, and there are many exciting new avenues to explore.
The ideal choice [involves a careful] balancing act between bullet BCs, case capacity, velocity, barrel life, and recoil. But, as with new-car decisions, choosing can be half the fun!
Factors to Consider When Evaluating Cartridges
For competitive shooters… pristine accuracy and ballistic performance in the wind are critical. Flat trajectory benefits the hunter who may shoot at long, unknown distances (nowadays, range-finders help). However, this is of much less importance to competitors firing at known distances.
Recoil is an issue, particularly when one fires long strings during competition, and/or multiple strings in a day. Its effects are cumulative; cartridges with medium/heavy recoil can lead to shooter fatigue, disturbance of the shooting position and lower scores.
For hunters, who may only fire a few shots a year, recoil that does not induce flinching during sight-in, practice and hunting is a deciding factor. Depending on their game and ranges, etc., they may accept more recoil than the high-volume High Power or Long Range competitor.
Likewise, throat erosion/barrel life is important to competitive shooters, who fire thousands of rounds in practice and matches, vs. the medium/big game hunter. A cartridge that performs well ballistically with great accuracy, has long barrel life and low recoil is the competitive shooter’s ideal. For the hunter, other factors may weigh more heavily.
Cartridge Efficiency and Energy — Another Perspective
Lapua staffer Kevin Thomas explains that efficiency can be evaluated in terms of energy:
“Cartridge efficiency is pretty straight forward — energy in vs. energy out. Most modern single-based propellants run around 178-215 ft/lbs of energy per grain. These figures give the energy potential that you’re loading into the rifle. The resulting kinetic energy transferred to the bullet will give you the efficiency of the round. Most cases operate at around 20-25% efficiency. This is just another way to evaluate the potential of a given cartridge. There’s a big difference between this and simply looking at max velocities produced by various cartridges.”
September 30th, 2015
 2015 WSC Champion Bruce Piatt with $25,000 check. At right is Diana Muller, WSC women’s champion. 2015 WSC Champion Bruce Piatt with $25,000 check. At right is Diana Muller, WSC women’s champion.
Bruce Piatt out-gunned 218 competitors to win the 2015 NRA World Shooting Championship (WSC), a 12-stage event that required mastery of all types of firearms. How did Piatt manage the win? Versatility. Unlike many top competitors who shoot one or two disciplines, over the past 30 years Piatt has shot anything (and everything) he could fit into his schedule. Piatt told reporters: “If it goes bang, you can count me in — whether it’s Sportsman’s Team Challenge, SOF Tactical, Precision Long Range, and Bianchi Cup — I’ll shoot anything.”
Piatt’s WSC performance earned him a $25,000 check from the NRA. Piatt has been noted for his ability to “break down” stages, creating a “plan of attack” that caters to his strengths. That ability gave Piatt a “winning edge” in the complex WSC match. Piatt out-shot many of the best action shooters in the world, including 2014 WSC champion SFC Daniel Horner of the USAMU, who finished second this year. Here are the Top 20 final standings. Note that Nightforce Optics Marketing Manager Sean Murphy finished eighth overall, pretty impressive for a fellow with a full-time job in the business world.

Bruce Piatt has won multiple world and national shooting titles. He is a 5-time Bianchi Cup National Champion and 5-time winner of the SOF World Tactical 3-Gun Championship. A former law enforcement officer, Piatt has won the USPSA Law Enforcement Division National Championship 20 times. Piatt is the founder of Bruce Piatt Training Concepts LLC, which offers Police, Military, and Civilian shooting instruction and pistol-smithing classes. For more information, visit www.BrucePiatt.com.
|


