The USAMU has published a “how-to” article about bullet sorting. While many of us may sort bullets by base-to-ogive length (and/or weight), the USAMU story explores the “how and why” of sorting bullets by Overall Length (OAL). Read the article highlights below, and make your own decision as to whether OAL sorting is worth the time and effort. Bryan Litz of Applied Ballistics says that sorting by OAL is not a bad idea, but base-to-ogive bullet sorting probably represents a better investment of your time.
Bullet Sorting by Overall Length
We’d like to share a specialized handloading technique which we’ve long found beneficial to our long-range (600 yards and beyond) accuracy. Sorting of bullets for extreme long range (LR) accuracy is not difficult to do, but some background in theory is needed.
Here at USAMU’s Handloading Shop, we only sort individual bullets for the most demanding Long-Range applications and important competitions. Only the most accurate rifles and shooters can fully exploit the benefits of this technique. The basic sorting process involves measuring the Overall Length (OAL) of the bullets, and grouping them in 0.001″ increments. It’s not unusual to find lots of match bullets that vary as much as 0.015″-0.020″ in length throughout the lot, although lots with much less variation are seen as well. Even in bullet lots with 0.015″ OAL variation, the bullet base-to-ogive length will show much less variation. Hence, our basic sort is by bullet OAL. One obvious benefit of sorting is easily seen in the attached photo. The few bullets that are VERY different from the average are culled out, reducing probable fliers.
How does one know what OAL increments to use when sorting? The answer is simple. As each lot of bullets is unique in its OAL distribution, it’s best to sample your bullet lot and see how they are distributed. In the attached photo, you will see a set of loading trays with a strip of masking tape running along the bottom. Each vertical row of holes is numbered in 0.001″ increments corresponding to the bullets’ OAL. A digital caliper makes this task much easier. As each bullet is measured, it is placed in the line of holes for its’ OAL, and gradually, a roughly bell-shaped curve begins to form.
Note that near the center, bullets are much more plentiful than near the edges. At the extreme edges, there are a few that differ markedly from the average, and these make great chronograph or sighting-in fodder. We recommend using a sample of 200 bullets from your lot, and 300 is even better. Some bullet lots are very consistent, with a tall, narrow band of highly-uniform bullets clustered together over just a few thousandths spread. Other lots will show a long, relatively flat curve (less uniform), and you may also see curves with 2 or more “spikes” separated by several 0.001″ OAL increments.
Bullet Sorting — OAL vs. Base-to-Ogive vs. Weight
Expert advice from Bryan Litz, Applied Ballistics
I’m often asked what is a the best measure to sort bullets by, and the answer (to this and many other questions in ballistics) is: it depends.
Choosing to sort by overall length (OAL), base to ogive (BTO), bearing surface, weight, etc. can get overwhelming. Shooters typically look for something they can measure, which shows a variation and sort by that. It’s common for dimensional variations to correlate. For example, bullets which are longer in OAL are typically also shorter in BTO, and have longer noses. All these are symptoms of a bullet that was pushed a little further into the pointing die, or possibly had more than average lube while being swaged. So in essence, if you sort by BTO, you’re measuring one symptom which can indicate a pattern in the bullets shape.
So, the question still stands — what should you measure? You’ll always see more variation in OAL than BTO, so it’s easier to sort by OAL. But sometimes the bullet tips can be jagged and have small burrs which can be misleading. Measuring BTO will result in a lower spread, but is a more direct measure of bullet uniformity.
Then there’s the question of; how much variation is too much, or, how many bins should you sort into? Shooters who see 0.025” variation in BTO may choose to sort into 5 bins of 0.005”. But if you have only 0.005” variation in the box, you’ll still sort into 5 bins of 0.001”. What’s correct? You have to shoot to know. Live fire testing will answer more questions, and answer them more decisively than any amount of discussion on the subject. The test I recommend is to identify bullets on the extreme short end of the spectrum, and some on the extreme long end. Load at least 10 rounds of each, and take turns shooting 5-shot groups with them. If there is a difference, it will be evident. The results of the testing will answer your question of: should I sort based on X, Y, or Z?”
You can read more discussions on this and other similar subjects in our Accurateshooter.com Shooters’ Forum. Here’s a link to a thread discussing bullet sorting: Bullet Sorting Thread
In years past, the U.S. Army Marksmanship Unit published weekly reloading “how-to” article on the USAMU Facebook page. Here is a very informative USAMU article the subject of case lubrication. Tasked with producing thousands of rounds of ammo for team members, the USAMU’s reloading staff has developed very efficient procedures for lubricating large quantities of cases. This article reveals the USAMU’s clever “big-batch” lube methods. For other helpful hand-loading tips, visit the USAMU Facebook page on upcoming Wednesdays.
Rapid, High-Volume Case Lubrication
Today’s topic covers methods for quickly applying spray lube to cartridge cases prior to sizing. A typical order for this shop may be 25,000 rounds, so [speeding up] the lubrication process can be a real time-saver. While your ammunition lots probably aren’t this large, the efficient methods discussed here may help save a considerable amount of time over your handloading career. Our case lubrication rates range from 1500-1600 cases per hour, to 2400-2500 cases per hour, depending on caliber.
This shop uses virgin brass, whereas most home handloaders use fired brass, which necessitates some small changes at times. These will be discussed as they arise. Begin with fired brass that has been tumbled clean.
Ensure as much tumbling media as possible is removed from the brass, as when it gets into a size die, it can dent cases significantly. This is a good time to round out dents in the case mouths using a tapered tool to prevent damage from the decapping stem.
First, dump the clean cases into a large box or reloading bin. Shake the bin back and forth so that many cases are oriented with the mouths up. Next, pick up as many cases as is convenient with the mouths “up”, from natural clusters of correctly-oriented cases. With 7.62mm-size cases, this is usually 3-4, and with 5.56mm cases, this can be up to 8-10. Place the cases into the rack slots, mouth-up. Doing this in groups rather than singly saves considerable time. Once these clusters have been depleted, it will be time to re-shake the bin to orient more cases “up.”.
This photo shows a case lubrication rack made by a USAMU staffer.
Naturally, adjust the spacing to best fit the calibers you reload. We have found this size … convenient for handling through the various phases of case lubrication/transfer to progressive case feeders for processing. Note that the 1/2-inch angle does not cover much of the critical case area at the base, just forward of the extractor groove, where most re-sizing force will be exerted. As the USAMU uses virgin brass, less lubrication is required for our brass than would be needed for Full Length (FL) sizing of previously-fired brass.
NOTE: The amount applied using our rack is easily enough for our purpose. If using fired brass, be sure to adequately lube this base area to avoid having cases stick in the full-length sizing die.
Using a spray lube, coat the cases adequately, but not excessively, from all sides. Be sure to get some lube into the case mouths/necks, in order to reduce expander ball drag and case stretching/headspace changes. The spray lube this shop uses does not harm primers or powder, and does not require tumbling to remove after lubing.*
Take a close look at the photo above. The USAMU shop uses a common kitchen turntable, which allows the rack to be rotated easily. We place this in a custom-made box which prevents over-spray on to floors and walls.
Angled Box Method for Smaller Cases to be Neck-Sized
A refinement of the above method which especially speeds processing of 5.56x45mm cases is as follows. A small cardboard box which holds about 100 cases is fitted with an angled “floor” secured by tape. With the smaller 5.56mm cases, usually about 8-10 cases per handful can be picked up, already correctly-oriented, and placed into the box together. This prevents having to place them into the rack slots, saving time.
HOWEVER, note that this does not allow nearly as much lube access to the case bodies as does the rack. For our purposes — neck-sizing and setting neck tension on new brass, this works well. If using this procedure with fired brass, take steps to ensure adequate lube to prevent stuck cases.
As always, we hope this will help our fellow handloaders. Good luck, and good shooting!
*A two-part test performed here involved spraying primed cases heavily, while getting more lube into the case mouth/body than even a careless handloader would likely apply. The second part of the test involved literally spraying considerable quantities of the lube directly into the cases, drenching the primers. After a several-day wait to allow the lube to penetrate the primers, they were then fired in a test barrel. All fired normally; no unusual reports were noted. This bolstered confidence that normal amounts of the lube would not adversely affect our ammunition, and we have been pleased with the results over several years.
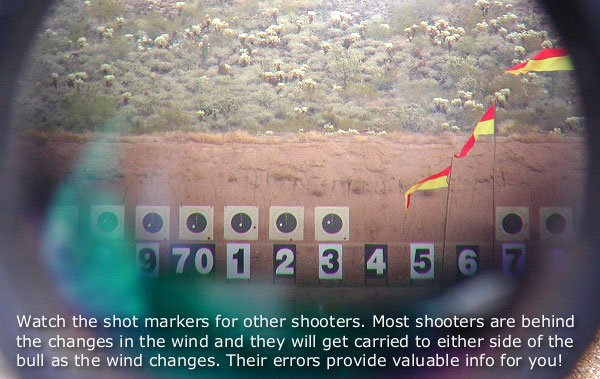
To succeed in long-range shooting matches, given the high level of competition these days, you’ll need solid wind-reading abilities. We’ve found an article by Emil Praslick III, retired USAMU Service Rifle coach and U.S. Palma Team Coach, that can help you make better wind calls in competition.
Emil Praslick, now retired from the U.S. Army, is considered one of the best wind gurus in the United States, if not the world. During his service with the USAMU he authored an excellent two-part article on wind reading that is available on the CMP (Civilian Marksmanship Program) website. Both articles contain helpful illustrations, and are “must-read” resources for any long-range shooter–not just Service Rifle and Highpower competitors.
Part One covers basic principles, tactics, and strategies, with a focus on the 200-yard stages. Emil writes: “There are as many dimensions to ‘wind reading’ as there are stages to High Power competition. Your tactical mindset, or philosophy, must be different for the 200 and 300 yard rapid-fire stages than it would be for the 600 yard slow-fire. In the slow-fire stages you have the ability to adjust windage from shot to shot, utilizing the location of the previous shot as an indicator. Additionally, a change to the existing conditions can be identified and adjusted for prior to shooting the next shot.”
In Part Two, Praslick provides more detailed explanations of the key principles of wind zeros, wind reading, and the Clock System for determining wind values: “The Value of the wind is as important as its speed when deciding the proper windage to place on the rifle. A 10 MPH wind from ’12 o-clock’ has No Value, hence it will not effect the flight of the bullet. A 10 MPH wind from ‘3 o’clock’, however, would be classified as Full Value. Failure to correct for a Full Value wind will surely result in a less than desirable result.”
Praslick also explains how to identify and evaluate MIRAGE:
Determine the accuracy of the mirage. Mirage is the reflection of light through layers of air that have different temperatures than the ground. These layers are blown by the wind and can be monitored to detect wind direction and speed.
Focus your scope midway between yourself and the target, this will make mirage appear more prominent. I must emphasize the importance of experience when using mirage as a wind-reading tool. The best way to become proficient in the use of mirage is to correlate its appearance to a known condition. Using this as a baseline, changes in mirage can be equated to changes in the value of the wind. Above all, you must practice this skill!
Click HERE for more excellent instructional articles by Emil Praslick and other USAMU Coaches and shooters.
For hunters in a tree stand, SFC McPhail recommends a position with your weakside leg pulled up and firmly braced on the front rail of the treestand. You can then rest your support arm on your leg. This provides a rock-solid position when shooting from a stand.
Team USA Olympian and ISSF World Cup Winner SFC Michael McPhail is one of the world’s best smallbore rifle shooters. He is also an avid hunter, who enjoys harvesting game with centerfire rifles. In a USAMU video, McPhail shows how competition shooting positions can be adapted for hunters. McPhail shows how well-established positions can provide a more stable platform for hunters in the field. That can help ensure a successful hunt. McPhail demonstrates three positions: kneeling, supported prone, and sitting in a tree-stand.
Watch SFC McPhail Demonstrate Positions for Hunters (Good Video):
McPhail first demonstrates the kneeling position. Michael notes: “I like kneeling. It’s a little bit of an under-utilized position, but it’s almost as stable as prone. It allows you get up off the ground a little bit higher to [compensate for] vegetation. For kneeling start by taking your non-dominant foot and put that towards the target, while at the same time dropping down to a knee on the dominant leg. At the same time … wrap the sling around wrist and fore-arm, lean slightly into the target and take the shot.”
McPhail shows a nice “field expedient” use of your backpack. He shows how the basic prone position can be adapted, using the pack as a front rifle support. McPhail recommends pulling your dominant (strongside) leg forward, bent at the knee. According to Michael, this takes pressure off the abdomen, helps minimizes heart beat effects, and helps with breathing.
In the archives of The First Shot (the CMP’s Online Magazine), SGT Walter E. Craig of the USAMU discusses physical conditioning for competitive shooters, particularly High Power competitors. Fitness training is an important subject that, curiously, is rarely featured in the shooting sports media. We seem to focus on hardware, or esoteric details of cartridge reloading. Yet physical fitness also matters, particularly for High Power shooters. In his article, Craig advocates: 1) weight training to strengthen the Skeletal Muscle System; 2) exercises to build endurance and stamina; and 3) cardiovascular conditioning programs to allow the shooter to remain relaxed with a controlled heart beat.
SGT Craig explains: “An individual would not enter a long distance race without first spending many hours conditioning his/her body. One should apply the same conditioning philosophy to [shooting]. Physical conditioning to improve shooting skills will result in better shooting performance[.] The objective of an individual physical training program is to condition the muscles, heart, and lungs thereby increasing the shooter’s capability of controlling the body and rifle for sustained periods.”
In addition to weight training and cardio workouts (which can be done in a gym), SGT Craig advocates “some kind of holding drill… to develop the muscles necessary for holding a rifle for extended periods.”
For those with range access, Craig recommends a blind standing exercise: “This exercise consists of dry-firing one round, then live-firing one round, at a 200-yard standard SR target. For those who have access only to a 100-yard range, reduced targets will work as well. Begin the exercise with a timer set for 50 minutes. Dry-fire one round, then fire one live round and without looking at the actual impact, plot a call in a data book. Continue the dry fire/live fire sequence for 20 rounds, plotting after each round. After firing is complete, compare the data book to the target. If your zero and position are solid, the plots should resemble the target. As the training days add up and your zero is refined, the groups will shrink and move to the center.”
Fitness training and holding drills help position shooters reach their full potential. Here is 6-Time U.S. National Long Range Champion John Whidden.
Training for Older Shooters
Tom Alves has written an excellent article A Suggested Training Approach for Older Shooters. This article discusses appropriate low-impact training methods for older shooters. Tom explains: “Many of the articles you will read in books about position shooting and the one mentioned above are directed more toward the younger generation of shooters in their 20s. If you look down the line at a typical high power match these days you are likely to see quite a few folks who are in their middle 30s and up. Many people in that age range have had broken bones and wear and tear on their joints so a training program needs to take that into account. For instance, while jogging for an extended period for heart and lung conditioning may be the recommended approach for younger folks, it may be totally inappropriate for older people.”
SSG Greg Markowski of the USAMU at Camp Perry, Ohio.*
The U.S. Army Marksmanship Unit (USAMU) fields pistol teams as well as rifle and shotgun competition squads. Consequently the USAMU’s Reloading Shop loads tens of thousands of pistol rounds every year. In this article, the USAMU’s handgun experts talk about reloading for handguns — with smart tips on how to achieve superior accuracy with 100% reliability. This article, which offers important insights on COAL, primers, crimps and more.
This video shows .45 ACP centerfire pistol competitors at Camp Perry
Precision Pistol Reloading — Recommended Methods
Optimize the Taper Crimp
One often-overlooked aspect of handloading highly-accurate pistol ammunition is the amount of crimp and its effect on accuracy. Different amounts of taper crimp are used with various handloads to obtain best accuracy. The amount is based on bullet weight, powder burn rate and charge, plus other factors. It is not unusual for our Shop to vary a load’s crimp in degrees of 0.001″ and re-test for finest accuracy.
Use Consistent Brass
Brass is also important to pistol accuracy. While accurate ammunition can be loaded using brass of mixed parentage, that is not conducive to finest results, particularly at 50 yards. It is important for the serious competitor/handloader to use brass of the same headstamp and ideally one lot number, to maximize uniformity. Given the volumes of ammunition consumed by active pistol competitors, using inexpensive, mixed surplus brass for practice, particularly at the “short line” (25 yards), is understandable. However [at 50 yards], purchasing and segregating a lot of high-quality brass to be used strictly for slow-fire is a wise idea.
Importance of Uniform COAL
Uniformity of the Case Overall Length (COAL) as it comes from the factory is also important to achieving utmost accuracy. More uniform case lengths (best measured after sizing) contribute to greater consistency of crimp, neck tension, ignition/burn of powder charge, and so on. Cartridge case-length consistency varies from lot to lot, as well as by maker. Some manufacturers are more consistent in this dimension than others. [Editor’s note: It is easy to trim pistol brass to uniform length. Doing this will make your taper crimps much more consistent.]
Primers and Powders — Comparison Test for Accuracy
Pay attention to primer brands, powder types and charges. Evaluating accuracy with a Ransom or other machine rest at 50 yards can quickly reveal the effect of changes made to handload recipes.
Bullet Selection — FMJ vs. JHP
Bullets are another vital issue. First, there is the question of FMJ vs. JHP. A friend of this writer spent decades making and accuracy-testing rifle and pistol bullets during QC for a major bullet manufacturer. In his experience, making highly-accurate FMJ bullets is much more difficult than making highly-accurate JHPs, in large part due to the way the jackets are formed. Small die changes could affect accuracy of FMJ lots dramatically. The CMP now allows “safe, jacketed ammunition” in Excellence-in-Competition (EIC) Service Pistol matches, although wadcutter ammunition is prohibited. Thus, the option to use very accurate JHP designs simplifies the life of CMP Service Pistol shooters in pursuit of the prestigious Distinguished Pistol Shot badge.
This animation showing 1911 Pistol operation has over 31 million YouTube views:
Hopefully, these tips will be helpful to any pistol shooters interested in accurate handloads, not just “Bullseye” shooters. Small tweaks to one’s normal routine can pay big dividends in improved accuracy and make practice and competition more rewarding. Stay safe, and good shooting!
TOP IMAGE: SSG Greg Markowski, a shooter/instructor with the USAMU, fires his pistol during the 2018 Civilian Marksmanship Program’s National Pistol Matches at Camp Perry, Ohio. At that event, Markowski claimed the General Mellon Trophy, General Patton Trophy and the General Custer Trophy. U.S. Army photo by Maj. Michelle Lunato/released by Defense Visual Information Distribution Service.
Can a human, with a sling, shoot as well as a mechanical rest? The answer is “yes” (at least once in a great while) IF that sling shooter can deliver a record-breaking performance. Here’s an interesting tale of man vs. machine from our archives…
The USAMU posed an interesting challenge — could one of their shooters match the performance of a mechanical rest? Who would win in this battle between man and machine? You might just be surprised. At 600 yards, with an AR-platform rifle, the results can be remarkably close, based on targets provided by the USAMU. When clamped in a test rig, a USAMU M16A2 produced a 200-18X group with handloads. The USAMU says this was “one of our better 20-shot groups at 600 yards, testing ammo from a machine rest”. Can a human do better?
Remarkably, a human soldier came very close to matching the group shot from the machine rest. The photo below shows a 20-shot group shot by a USAMU marksman with sling and iron sights, using USAMU-loaded ammunition. The score, 200-16X, was nearly the same. As you can see, the USAMU rifleman didn’t give up much to the machine rest, even at 600 yards!
In fairness, this was no ordinary human performance. The 200-16X score represented a new National Record set in December, 1994. This was fired by PFC Coleman in an Interservice Match at Okeechobee, Florida. Brilliant Performance.
SSG Amanda Elsenboss, now with the Pennsylvania National Guard, was the 2021 NRA National High Power Champion and 2019 NRA Long Range National Championship in 2019.
In the archives of On The Mark magazine, DCM Emeritus Gary Anderson, an Olympic Gold medal-winning shooter in his younger years, offers sage advice for competitive shooters.
In his article Ten Lessons I Wished I Had Learned as a Young Shooter, Anderson provides ten important guidelines for everyone involved in competitive shooting. Here are the Ten Lessons, but you should read the full article. Anderson provides detailed explanations of each topic with examples from his shooting career.
LESSON 1 – NATURAL ABILITY WILL NOT MAKE YOU A SHOOTING CHAMPION.
(You also need hard work, training effort and perseverance.)
LESSON 2 – ANGER IS THE ENEMY OF GOOD SHOOTING.
(The key to recovering from a bad shot is to stay cool, no matter what happens.)
LESSON 3 – BAD SHOTS CAN TEACH YOU MORE THAN GOOD SHOTS.
(Today, error analysis is one of the most powerful tools for improving scores.)
LESSON 4 – NEVER GO WITHOUT A SHOT PLAN.
(A shot plan is a detailed breakdown of each of the steps involved in firing a shot.)
LESSON 5 – PRACTICE IN BAD CONDITIONS AS WELL AS GOOD CONDITIONS.
(Most competitions are fired in windy conditions or where there are plenty of distractions.)
LESSON 6 – CHAMPIONS ARE POSITIVE, OPTIMISTIC PEOPLE.
(Negative shooters expect bad results; positive shooters expect to train hard to change bad results.)
LESSON 7 – IT’S NOT ABOUT WHETHER YOU WIN OR LOSE.
(It’s about how hard you try to win.)
LESSON 8 – YOUR DOG WON’T BITE YOU AFTER SHOOTING A BAD SCORE.
(Hopefully your coach, parents and friends won’t bite you either.)
LESSON 9 – YOUR PRESS CLIPPINGS CAN HURT YOU OR HELP YOU.
(Winning can go to our heads. We start thinking we are so good we don’t have to work hard any more.)
LESSON 10 — YOU NEVER SHOT YOUR BEST SCORE.
(Great champions are always looking for ways to improve.)
USAMU shooters on the firing line at the Wa-Ke’-De outdoor range in Bristol, IN. Photo courtesy USAMU.
About Gary Anderson Gary Anderson served as the Director of the Civilian Marksmanship Program (CMP) from 1999-2009, and is now DCM Emeritus. As a Nebraska farmboy, Gary grew up hunting and shooting. Dreams of winning an Olympic Gold Medal in shooting led Gary to the U.S. Army. In 1959, he joined the elite U.S. Army Marksmanship Unit. Just two years later, he won his first national championship.
At the 1962 World Shooting Championships in Egypt, Anderson stunned the shooting world by winning four individual titles and setting three new world records. At the 1964 Tokyo Olympics, Gary won the 300m free-rifle Gold Medal, setting a new world record in the process. At the 1966 World Shooting Championships in Germany, Anderson won three additional world titles. At the 1968 Olympics, Gary won a second gold medal in the 300m free-rifle event.
After his “retirement” from international competition, Gary competed in the National High Power Championships, winning the President’s National Trophy in 1973, 1975 and 1976. Over his competitive career, Anderson won two Olympic Gold Medals, seven World Championships, and sixteen National Championships. He is unquestionably one of the greatest American marksmen ever.
Emil Praslick III is widely recognized as one of the greatest wind wizards on the planet — a master at identifying wind value and direction, and predicting wind cycles. As coach of the USAMU and top civilian teams, Emil has helped win many high-level championships. In the three videos we feature today, Emil, who works with Capstone Precision Group (Berger, Lapua, SK, Vihtavuori) and Team Applied Ballistics, explains how to determine wind direction and velocity using a variety of indicators. Praslick, now retired from the U.S. Army, was an 18-time National and 2-time World Champion coach with the USAMU.
Video ONE: Wind Theory Basics — Understanding “Wind Values”
In this video from UltimateReloader.com, Emil explains the basics of modern wind theory. To properly understand the effect of the wind you need to know both the velocity of the wind and its angle. The combination of those variables translates to the wind value. Emil also explains that the wind value may not be constant — it can cycle both in speed and velocity. Emil also explains some of the environmental conditions such as mirage that can reveal wind conditions.
Video TWO: Determining the Direction of the Wind
Key Point in Video — Find the Boil
Emil explains how to determine wind direction using optic. The method is to use spotting scope, riflescope, or binoculars to look for the “Boil” — the condition in mirage when the light waves rising straight up. The wind will generate that straight-up, vertical boil in your optics when it is blowing directly at you, or directly from your rear. To identify this, traverse your scope or optics until you see the boil running straight up. When you see that vertical boil, the direction your optic is pointing is aligned with the wind flow (either blowing towards you or from directly behind you).
Video THREE: The No Wind Zero Setting
In this second video, Emil defines the “No-Wind Zero”, and explains why competitive shooters must understand the no-wind zero and have their sights or optics set for a no-wind zero starting point before heading to a match. In order to hit your target, after determining wind speed and direction, says Emil, “you have to have your scope setting dialed to ‘no wind zero’ first.”
Coach of Champions — Emil Praslick III
SFC Emil Praslick III, (U.S. Army, retired) works with Berger Bullets and Applied Ballistics. Emil served as the Head Coach of the U.S. National Long Range Rifle Team and Head Coach of the USAMU for several years. Teams coached by Emil have won 33 Inter-Service Rifle Championships. On top of that, teams he coached set 18 National records and 2 World Records. Overall, in the role of coach, Praslick can be credited with the most team wins of any coach in U.S. Military history.
This USAMU article explores three different “Philosophies” of precision reloading. Some handloaders seek to produce ammo that yields the very tightest groups (without factoring in the wind). Other shooters load their ammo to deliver the highest safe velocity. That’s because a projectile launched at higher velocity will drift less in the wind. The theory is that even if fast ammo doesn’t produce the tightest groups in zero wind conditions, it will yield higher scores in a the real world (where the wind blows). Lastly, some handloaders favor ammo that is ultra-consistent across a wide temperature range. This last philosophy dictates selection of a powder that is temp-insensitive, even if it may not produce the very best raw accuracy (or speed).
What’s Your Handloading Philosophy?
Objectives of Reloading — Accuracy, Velocity, Temp Stability What do you, the reader, primarily value in your handloads?
Viewpoint ONE: Accuracy Trumps Everything
Some shooters prize consistent, excellent medium/long range accuracy enough that they’re willing to give up some extra velocity (and reduced wind deflection) to obtain that. Their underlying philosophy could be stated: “Superior accuracy is present for every shot, but the wind isn’t”. One’s ability to hold well, aim well and read the wind are all factors in making this type decision. The photo below shows stellar raw accuracy. This is an 0.67″, 10-shot group at 300-yards fired from a text fixture. The group measures just 0.67″. (This shows the USAMU’s 600-yard load with 75gr bullets).
Viewpoint TWO: Load to Highest Safe Velocity for Less Wind Drift
Some shooters value obtaining the highest safe velocity, even if one’s pure, consistent mechanical accuracy at medium/long range isn’t quite as brilliant. The theory here seems to be that a really good hold extracts as much mechanical accuracy from the rifle/ammo as possible, and faster bullets equal occasional “bonus” points snatched from the jaws of wind.
[For example] one of the USAMU’s many Service Rifle National Champions revealed his philosophy. It can be stated thus: a super-accurate, but [relatively] “slow” load “required him to have a Ph.D. in wind reading for every shot, while a faster, but less accurate load netted him more points.”
Note — this was not mere speculation; his score book data backed up his claims, due to less wind effects. Remember, however, this fellow has a consistent, National Championship-level hold, and other Champions on the same team would have opted differently.
Viewpoint THREE: Temperature Stability Is Key
Still another approach is to place heavy emphasis on fine accuracy with absolute stability in changing temperatures. When this writer was actively earning his Distinguished Rifleman badge, that was his goal. The reason? Sighting shots are not allowed in EIC (“Leg”) matches. The first shot out of the barrel was for score. It had to be 100% consistent, with very reliable, predictable elevation and wind deflection regardless of the ambient temperature — even if it wasn’t the lowest wind deflection possible.
Naturally, selecting a powder that is insensitive to temperature changes is a key element here. Elevation zeros and wind effects HAD to be consistent every time. Hunters and military snipers might be among those who fall into this camp, as well as those in pursuit of their Distinguished Rifleman badges.
Contrast that with a traditional High Power shooter who gets two sighter shots before each event (offhand, sitting rapid, prone rapid, prone slow fire.) If there is a zero change on any given day, he/she can correct during sighters. This writer well remembers talking with another very high-level Service Rifle competitor who was happy to have high temperatures boost the velocities of his ammunition above their usual level… As far as this SR competitor was concerned, 60-80 fps more velocity -– even if only due to high ambient temperatures -– meant less wind deflection, and he was mighty happy to have it.
Particularly in the summer, with hot daily conditions, you need to be concerned about temperature stability. Loads worked up in winter may not work in the summer time.
This article has been confined to NRA High Power Rifle competition, which has relatively generous 10-ring dimensions in relation to the accuracy of well-built competition rifles. Hopefully, it will provide food for thought. For some, this might be an opportunity to ensure that one’s load development approach helps them attain their desired results.


 Part One covers basic principles, tactics, and strategies, with a focus on the 200-yard stages. Emil writes: “There are as many dimensions to ‘wind reading’ as there are stages to High Power competition. Your tactical mindset, or philosophy, must be different for the 200 and 300 yard rapid-fire stages than it would be for the 600 yard slow-fire. In the slow-fire stages you have the ability to adjust windage from shot to shot, utilizing the location of the previous shot as an indicator. Additionally, a change to the existing conditions can be identified and adjusted for prior to shooting the next shot.”

 Team USA Olympian and


 In the archives of


 Use Consistent Brass


 In the archives of
 Gary Anderson served as the Director of the Civilian Marksmanship Program (CMP) from 1999-2009, and is now DCM Emeritus. As a Nebraska farmboy, Gary grew up hunting and shooting. Dreams of winning an Olympic Gold Medal in shooting led Gary to the U.S. Army. In 1959, he joined the elite U.S. Army Marksmanship Unit. Just two years later, he won his first national championship.


