|
|
June 18th, 2026

Barrel-maker Dan Lilja’s website, RifleBarrels.com has an excellent FAQ page that contains a wealth of useful information. On the Lilja FAQ Page you’ll find answers to many commonly-asked questions. For example, Dan’s FAQ addresses the question of barrel life. Dan looks at factors that affect barrel longevity, and provides some predictions for barrel life, based on caliber, chambering, and intended use.
NOTE: This article was very well-received when it was first published. We are reprising it for the benefit of readers who missed it the first time.
Dan cautions that “Predicting barrel life is a complicated, highly variable subject — there is not a simple answer. Signs of accurate barrel life on the wane are increased copper fouling, lengthened throat depth, and decreased accuracy.” Dan also notes that barrels can wear prematurely from heat: “Any fast varmint-type cartridge can burn out a barrel in just a few hundred rounds if those rounds are shot one after another without letting the barrel cool between groups.”
Q. What Barrel Life, in number of rounds fired, can I expect from my new barrel?
A: That is a good question, asked often by our customers. But again there is not a simple answer. In my opinion there are two distinct types of barrel life. Accurate barrel life is probably the type most of us are referencing when we ask the question. But there is also absolute barrel life too. That is the point where a barrel will no longer stabilize a bullet and accuracy is wild. The benchrest shooter and to a lesser extent other target shooters are looking at accurate barrel life only when asking this question. To a benchrest shooter firing in matches where group size is the only measure of precision, accuracy is everything. But to a score shooter firing at a target, or bull, that is larger than the potential group size of the rifle, it is less important. And to the varmint hunter shooting prairie dog-size animals, the difference between a .25 MOA rifle or one that has dropped in accuracy to .5 MOA may not be noticeable in the field.
The big enemy to barrel life is heat. A barrel looses most of its accuracy due to erosion of the throat area of the barrel. Although wear on the crown from cleaning can cause problems too. The throat erosion is accelerated by heat. Any fast varmint-type cartridge can burn out a barrel in just a few hundred rounds if those rounds are shot one after another without letting the barrel cool between groups. A cartridge burning less powder will last longer or increasing the bore size for a given powder volume helps too. For example a .243 Winchester and a .308 Winchester both are based on the same case but the .308 will last longer because it has a larger bore.
And stainless steel barrels will last longer than chrome-moly barrels. This is due to the ability of stainless steel to resist heat erosion better than the chrome-moly steel.
Barrel Life Guidelines by Caliber and Cartridge Type
As a very rough rule of thumb I would say that with cartridges of .222 Remington size you could expect an accurate barrel life of 3000-4000 rounds. And varmint-type accuracy should be quite a bit longer than this.
For medium-size cartridges, such as the .308 Winchester, 7×57 and even the 25-06, 2000-3000 rounds of accurate life is reasonable.
Hot .224 caliber-type cartridges will not do as well, and 1000-2500 rounds is to be expected.
Bigger magnum hunting-type rounds will shoot from 1500-3000 accurate rounds. But the bigger 30-378 Weatherby types won’t do as well, being closer to the 1500-round figure.
These numbers are based on the use of stainless steel barrels. For chrome-moly barrels I would reduce these by roughly 20%.
The .17 and .50 calibers are rules unto themselves and I’m pressed to predict a figure.
The best life can be expected from the 22 long rifle (.22 LR) barrels with 5000-10,000 accurate rounds to be expected. We have in our shop one our drop-in Anschutz barrels that has 200,000 rounds through it and the shooter, a competitive small-bore shooter reported that it had just quit shooting.
Remember that predicting barrel life is a complicated, highly variable subject. You are the best judge of this with your particular barrel. Signs of accurate barrel life on the wane are increased copper fouling, lengthened throat depth, and decreased accuracy.

Benchrest Barrel Life — You May Be Surprised
I thought it might be interesting to point out a few exceptional Aggregates that I’ve fired with 6PPC benchrest rifles with barrels that had thousands of rounds through them. I know benchrest shooters that would never fire barrels with over 1500 shots fired in them in registered benchrest matches.
I fired my smallest 100-yard 5-shot Aggregate ever in 1992 at a registered benchrest match in Lewiston, Idaho. It was a .1558″ aggregate fired in the Heavy Varmint class. And that barrel had about 2100 rounds through it at the time.

Another good aggregate was fired at the 1997 NBRSA Nationals in Phoenix, Arizona during the 200-yard Light Varmint event. I placed second at this yardage with a 6PPC barrel that had over 2700 rounds through it at the time. I retired this barrel after that match because it had started to copper-foul quite a bit. But accuracy was still good.

February 24th, 2026

Above is a sectioned barrel showing an 80gr Sierra that was fired in a .223 bolt action with a cleaning rod in the bore. Both the bullet and the rod are still in the bore.
A Negligent Shooter Gets Lucky
“Here we have a story so filled with negligent acts that I can only marvel that the shooter survived the experience. The photo and narrative were provided by the gunsmith who took in the repair job, my comments are in italics. It’s worth reading, we can’t get enough safety warnings in our hobby.” — GS Arizona, Rifleman’s Journal
Description of Incident (with Commentary)
The shooter had a stuck case in his .223 chamber. The stuck case was actually a loaded round that didn’t fire. It wouldn’t extract because it was a .222 case that got mixed in with his .223 brass. [He had loaded the wrong brass.] I saw the loaded round with an 80gr bullet in it and a light primer strike. Negligent Act #1: Wrong brass was mixed in with the brass being reloaded.
The shooter removed the stuck case with a 3-piece aluminum rod. Negligent Act #2: Hammering out a loaded round with a cleaning rod. People have been killed doing this as the round can fire and drive the cleaning rod right into you. I remember one such incident about 5 years ago, the shooter was pounding out a stuck round, the cleaning rod went right through him, he didn’t survive.
The shooter didn’t notice only two segments of the cleaning rod came out when he removed it. Negligent Act #3: If you put anything at all down the barrel of a rifle you’d better make darn sure you got it all out before doing anything else!
He then chambered another round and fired it. Negligent act #4: If you’ve had a barrel obstruction of any kind, and if you’ve put something in the barrel, look through the barrel before proceeding! Within the past two years I know of an incident in which a benchrest shooter was killed in exactly this manner. The pressure built up and the rifle bolt came out of the receiver and into his chest.
The shooter is ‘OK’, but did not escape unscathed. He said there was a huge explosion and after regaining his senses found he was bleeding heavily from his forehead. The blood was thick enough that it ran in his eyes and he couldn’t see. In his words “I thought I was going to die”.
He has what looks like a pretty deep cut about an inch long on the side of his head, right in line with his right eye starting where the eye socket turns out to the side of the skull. And no telling what he’s got in the way of brass particles embedded in his forehead.
He was shooting on private property, and was alone when this happened. Negligent Act #5: Don’t shoot alone! Accidents happen, this is just one more example. If we could predict accidents, we wouldn’t have them. Always shoot with at least one other person.
He managed to get the bleeding stopped, or at least under control, packed his car and drove himself home without seeking immediate medical attention. Negligent Act #6: This one could have cost him his life after being lucky enough to survive the incident. There’s no way to know what’s happened just after an incident like this. He should have been at a hospital getting checked for shrapnel in the head.
The rod and slug could not be driven out. Since the barrel had a high round count there was no point in trying to salvage it. Note that the aluminum rod is expanded to a tight fit in the bore for the first couple inches. The base of the bullet is a little over 2″ from the mouth of the chamber.
What we’ve seen here is negligence and an absolute indifference to the established rules of safe reloading and gun handling, from start to finish, capped off with the shooter’s foolish avoidance of medical treatment. This shooter is lucky to be alive, but he’s surely used up all his luck. Don’t assume you’ll be so fortunate.
This article originally appeared in the Rifleman’s Journal website, which is no longer available. The Rifleman’s Journal site was created by German Salazar, who, sadly, passed in 2022. He was a great shooter who helped this website in many ways. RIP German.
September 19th, 2025
 The last half-inch or so of your barrel is absolutely critical. Any damage (or abnormal wear) near the crown will cause a significant drop-off in accuracy. Here are ways you can check the end of your barrel, using a common Q-Tip. The last half-inch or so of your barrel is absolutely critical. Any damage (or abnormal wear) near the crown will cause a significant drop-off in accuracy. Here are ways you can check the end of your barrel, using a common Q-Tip.
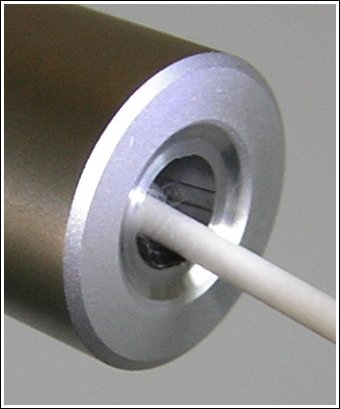
Use Q-Tip for Barrel Inspection
To find out if you have a burr or damage to your crown, you can use an ordinary Q-tip cotton swab. Check the edges of the crown by pulling the Q-tip gently out past the edge of the crown. If you have a burr, it will “grab” the cotton and leave strands behind.
Larry Willis has another way to use a Q-Tip: “Here’s a neat trick that will surprise you with how well it works.” Just insert a Q-Tip into your barrel (like the picture below), and it will reflect enough light so that you can get a real good look at the last half inch of rifling and the crown of your barrel. In most cases you’ll find that this works much better than a flashlight. Larry tells us: “I’ve used this method about a jillion times. Q-Tips are handy to keep in your cleaning supplies anyway. This is a good way to judge approximately how well you are cleaning your barrel when you’re at the range. It’s also the best way to examine your barrel when you’re in the field.”
Larry Willis is the inventor of Innovative Technologies’ Belted Magnum Collet Resizing Die. Larry explains how this die works, and offers other reloading tips on LarryWillis.com.
September 15th, 2025

Erik Dahlberg illustration courtesy FireArmsID.com.
 Sometimes you’ll get a barrel that doesn’t stabilize bullets the way you’d anticipate, based on the stated (or presumed) twist rate. A barrel might have 1:10″ stamped on the side but it is, in truth, a 1:10.5″ twist or even a 1:9.5″. Cut-rifled barrels, such as Kriegers and Bartleins, normally hold very true to the specified twist rate. With buttoned barrels, due to the nature of the rifling process, there’s a greater chance of a small variation in twist rate. And yes, factory barrels can be slightly out of spec as well. Sometimes you’ll get a barrel that doesn’t stabilize bullets the way you’d anticipate, based on the stated (or presumed) twist rate. A barrel might have 1:10″ stamped on the side but it is, in truth, a 1:10.5″ twist or even a 1:9.5″. Cut-rifled barrels, such as Kriegers and Bartleins, normally hold very true to the specified twist rate. With buttoned barrels, due to the nature of the rifling process, there’s a greater chance of a small variation in twist rate. And yes, factory barrels can be slightly out of spec as well.
After buying a new barrel, you should determine the true twist rate BEFORE you start load development. You don’t want to invest in a large supply of expensive bullets only to find that that won’t stabilize because your “8 twist” barrel is really a 1:8.5″. Sinclair International provides a simple procedure for determining the actual twist rate of your barrel.
Sinclair’s Simple Twist Rate Measurement Method
If are unsure of the twist rate of the barrel, you can measure it yourself in a couple of minutes. You need a good cleaning rod with a rotating handle and a jag with a fairly tight fitting patch. Utilize a rod guide if you are accessing the barrel through the breech or a muzzle guide if you are going to come in from the muzzle end. Make sure the rod rotates freely in the handle under load. Start the patch into the barrel for a few inches and then stop. Put a piece of tape at the back of the rod by the handle (like a flag) or mark the rod in some way. Measure how much of the rod is still protruding from the rod guide. You can either measure from the rod guide or muzzle guide back to the flag or to a spot on the handle. Next, continue to push the rod in until the mark or tape flag has made one complete revolution. Re-measure the amount of rod that is left sticking out of the barrel. Use the same reference marks as you did on the first measurement. Next, subtract this measurement from the first measurement. This number is the twist rate. For example, if the rod has 24 inches remaining at the start and 16 inches remain after making one revolution, you have 8 inches of travel, thus a 1:8″-twist barrel.
Determining Barrel Twist Rate Empirically
Twist rate is defined as the distance in inches of barrel that the rifling takes to make one complete revolution. An example would be a 1:10″ twist rate. A 1:10″ barrel has rifling that makes one complete revolution in 10 inches of barrel length. Rifle manufacturers usually publish twist rates for their standard rifle offerings and custom barrels are always ordered by caliber, contour, and twist rate. If you are having a custom barrel chambered you can ask the gunsmith to mark the barrel with the twist rate.
June 28th, 2025
Barrel-maker Dan Lilja’s website, RifleBarrels.com has an excellent FAQ page that contains a wealth of useful information. On the Lilja FAQ Page you’ll find answers to many commonly-asked questions. For example, Dan’s FAQ addresses the question of barrel life. Dan looks at factors that affect barrel longevity, and provides some predictions for barrel life, based on caliber, chambering, and intended use.
NOTE: This article was very well-received when it was first published. We are reprising it for the benefit of readers who missed it the first time.
Dan cautions that “Predicting barrel life is a complicated, highly variable subject — there is not a simple answer. Signs of accurate barrel life on the wane are increased copper fouling, lengthened throat depth, and decreased accuracy.” Dan also notes that barrels can wear prematurely from heat: “Any fast varmint-type cartridge can burn out a barrel in just a few hundred rounds if those rounds are shot one after another without letting the barrel cool between groups.”
Q. What Barrel Life, in number of rounds fired, can I expect from my new barrel?
A: That is a good question, asked often by our customers. But again there is not a simple answer. In my opinion there are two distinct types of barrel life. Accurate barrel life is probably the type most of us are referencing when we ask the question. But there is also absolute barrel life too. That is the point where a barrel will no longer stabilize a bullet and accuracy is wild. The benchrest shooter and to a lesser extent other target shooters are looking at accurate barrel life only when asking this question. To a benchrest shooter firing in matches where group size is the only measure of precision, accuracy is everything. But to a score shooter firing at a target, or bull, that is larger than the potential group size of the rifle, it is less important. And to the varmint hunter shooting prairie dog-size animals, the difference between a .25 MOA rifle or one that has dropped in accuracy to .5 MOA may not be noticeable in the field.
The big enemy to barrel life is heat. A barrel looses most of its accuracy due to erosion of the throat area of the barrel. Although wear on the crown from cleaning can cause problems too. The throat erosion is accelerated by heat. Any fast varmint-type cartridge can burn out a barrel in just a few hundred rounds if those rounds are shot one after another without letting the barrel cool between groups. A cartridge burning less powder will last longer or increasing the bore size for a given powder volume helps too. For example a .243 Winchester and a .308 Winchester both are based on the same case but the .308 will last longer because it has a larger bore.
And stainless steel barrels will last longer than chrome-moly barrels. This is due to the ability of stainless steel to resist heat erosion better than the chrome-moly steel.
Barrel Life Guidelines by Caliber and Cartridge Type
As a very rough rule of thumb I would say that with cartridges of .222 Remington size you could expect an accurate barrel life of 3000-4000 rounds. And varmint-type accuracy should be quite a bit longer than this.
For medium-size cartridges, such as the .308 Winchester, 7×57 and even the 25-06, 2000-3000 rounds of accurate life is reasonable.
Hot .224 caliber-type cartridges will not do as well, and 1000-2500 rounds is to be expected.
Bigger magnum hunting-type rounds will shoot from 1500-3000 accurate rounds. But the bigger 30-378 Weatherby types won’t do as well, being closer to the 1500-round figure.
These numbers are based on the use of stainless steel barrels. For chrome-moly barrels I would reduce these by roughly 20%.
The .17 and .50 calibers are rules unto themselves and I’m pressed to predict a figure.
The best life can be expected from the 22 long rifle (.22 LR) barrels with 5000-10,000 accurate rounds to be expected. We have in our shop one our drop-in Anschutz barrels that has 200,000 rounds through it and the shooter, a competitive small-bore shooter reported that it had just quit shooting.
Remember that predicting barrel life is a complicated, highly variable subject. You are the best judge of this with your particular barrel. Signs of accurate barrel life on the wane are increased copper fouling, lengthened throat depth, and decreased accuracy.
Benchrest Barrel Life — You May Be Surprised
I thought it might be interesting to point out a few exceptional Aggregates that I’ve fired with 6PPC benchrest rifles with barrels that had thousands of rounds through them. I know benchrest shooters that would never fire barrels with over 1500 shots fired in them in registered benchrest matches.
I fired my smallest 100-yard 5-shot Aggregate ever in 1992 at a registered benchrest match in Lewiston, Idaho. It was a .1558″ aggregate fired in the Heavy Varmint class. And that barrel had about 2100 rounds through it at the time.
Another good aggregate was fired at the 1997 NBRSA Nationals in Phoenix, Arizona during the 200-yard Light Varmint event. I placed second at this yardage with a 6PPC barrel that had over 2700 rounds through it at the time. I retired this barrel after that match because it had started to copper-foul quite a bit. But accuracy was still good.
March 14th, 2025

 Can you guess what your next barrel will weigh? In many competition disciplines, “making weight” is a serious concern when putting together a new match rifle. A Light Varmint short-range Benchrest rifle cannot exceed 10.5 pounds including scope. An F-TR rifle is limited to 18 pounds, 2 oz. (8.25 kg) with bipod. Can you guess what your next barrel will weigh? In many competition disciplines, “making weight” is a serious concern when putting together a new match rifle. A Light Varmint short-range Benchrest rifle cannot exceed 10.5 pounds including scope. An F-TR rifle is limited to 18 pounds, 2 oz. (8.25 kg) with bipod.
One of the heaviest items on most rifles is the barrel. If your barrel comes in much heavier than expected, it can boost the overall weight of the gun significantly. Then you may have to resort to cutting the barrel, or worse yet, re-barreling, to make weight for your class. In some cases, you can remove material from the stock to save weight, but if that’s not practical, the barrel will need to go on a diet. (As a last resort, you can try fitting a lighter scope.)
Is there a reliable way to predict, in advance, how much a finished barrel will weigh? The answer is “yes”. PAC-NOR Barreling of Brookings, Oregon has created a handy, web-based Barrel Weight Calculator. Just log on to Pac-Nor’s website and the calculator is free to use. Pac-Nor’s Barrel Weight Calculator is pretty sophisticated, with separate data fields for Shank Diameter, Barrel Length, Bore Diameter — even length and number of flutes. Punch in your numbers, and the Barrel Weight Calculator then automatically generates the weight for 16 different “standard” contours.

Calculator Handles Custom Contours
What about custom contours? Well the Pac-Nor Barrel Weight Calculator can handle those as well. The program allows input of eight different dimensional measurements taken along the barrel’s finished length, from breech to muzzle. You can use this “custom contour” feature when calculating the weight of another manufacturer’s barrel that doesn’t match any of Pac-Nor’s “standard” contours.
Caution: Same-Name Contours from Different Makers May Not be Exactly the Same
One key thing to remember when using the Barrel Weight Calculator is that not all “standard” contours are exactly the same, as sold by different barrel-makers. A Medium Palma contour from Pac-Nor may be slightly different dimensionally from a Krieger Medium Palma barrel. When using the Pac-Nor Barrel Weight Calculator to find the weight of a barrel from a different manufacturer, we recommend you get the exact dimensions from your barrel-maker. If these are different that Pac-Nor’s default dimensions, use the “custom contour” calculator fields to enter the true dimensions for your brand of barrel.
Smart Advice — Give Yourself Some Leeway
While Pac-Nor’s Barrel Weight Calculator is very precise (because barrel steel is quite uniform by volume), you will see some small variances in finished weight based on the final chambering process. The length of the threaded section (tenon) will vary from one action type to another. In addition, the size and shape of the chamber can make a difference in barrel weight, even with two barrels of the same nominal caliber. Even the type of crown can make a slight difference in overall weight. This means that the barrel your smith puts on your gun may end up slightly heavier or lighter than the Pac-Nor calculation. That’s not a fault of the program — it’s simply because the program isn’t set up to account for chamber volume or tenon length.
What does this mean? In practical terms — you should give yourself some “wiggle room” in your planned rifle build. Unless you’re able to shave weight from your stock, do NOT spec your gun at one or two ounces under max based on the Pac-Nor calculator output. That said, the Pac-Nor Barrel Weight Calculator is still a very helpful, important tool. When laying out the specs for a rifle in any weight-restricted class, you should always “run the numbers” through a weight calculator such as the one provided by Pac-Nor. This can avoid costly and frustrating problems down the road.
February 23rd, 2025
Above is a sectioned barrel showing an 80gr Sierra that was fired in a .223 bolt action with a cleaning rod in the bore. Both the bullet and the rod are still in the bore.
A Negligent Shooter Gets Lucky
“Here we have a story so filled with negligent acts that I can only marvel that the shooter survived the experience. The photo and narrative were provided by the gunsmith who took in the repair job, my comments are in italics. It’s worth reading, we can’t get enough safety warnings in our hobby.” — GS Arizona, Rifleman’s Journal
Description of Incident (with Commentary)
The shooter had a stuck case in his .223 chamber. The stuck case was actually a loaded round that didn’t fire. It wouldn’t extract because it was a .222 case that got mixed in with his .223 brass. [He had loaded the wrong brass.] I saw the loaded round with an 80gr bullet in it and a light primer strike. Negligent Act #1: Wrong brass was mixed in with the brass being reloaded.
The shooter removed the stuck case with a 3-piece aluminum rod. Negligent Act #2: Hammering out a loaded round with a cleaning rod. People have been killed doing this as the round can fire and drive the cleaning rod right into you. I remember one such incident about 5 years ago, the shooter was pounding out a stuck round, the cleaning rod went right through him, he didn’t survive.
The shooter didn’t notice only two segments of the cleaning rod came out when he removed it. Negligent Act #3: If you put anything at all down the barrel of a rifle you’d better make darn sure you got it all out before doing anything else!
He then chambered another round and fired it. Negligent act #4: If you’ve had a barrel obstruction of any kind, and if you’ve put something in the barrel, look through the barrel before proceeding! Within the past two years I know of an incident in which a benchrest shooter was killed in exactly this manner. The pressure built up and the rifle bolt came out of the receiver and into his chest.
The shooter is ‘OK’, but did not escape unscathed. He said there was a huge explosion and after regaining his senses found he was bleeding heavily from his forehead. The blood was thick enough that it ran in his eyes and he couldn’t see. In his words “I thought I was going to die”.
He has what looks like a pretty deep cut about an inch long on the side of his head, right in line with his right eye starting where the eye socket turns out to the side of the skull. And no telling what he’s got in the way of brass particles embedded in his forehead.
He was shooting on private property, and was alone when this happened. Negligent Act #5: Don’t shoot alone! Accidents happen, this is just one more example. If we could predict accidents, we wouldn’t have them. Always shoot with at least one other person.
He managed to get the bleeding stopped, or at least under control, packed his car and drove himself home without seeking immediate medical attention. Negligent Act #6: This one could have cost him his life after being lucky enough to survive the incident. There’s no way to know what’s happened just after an incident like this. He should have been at a hospital getting checked for shrapnel in the head.
The rod and slug could not be driven out. Since the barrel had a high round count there was no point in trying to salvage it. Note that the aluminum rod is expanded to a tight fit in the bore for the first couple inches. The base of the bullet is a little over 2″ from the mouth of the chamber.
What we’ve seen here is negligence and an absolute indifference to the established rules of safe reloading and gun handling, from start to finish, capped off with the shooter’s foolish avoidance of medical treatment. This shooter is lucky to be alive, but he’s surely used up all his luck. Don’t assume you’ll be so fortunate.
This article originally appeared in the Rifleman’s Journal website, which is no longer available. The Rifleman’s Journal site was created by German Salazar, who, sadly, has passed. He was a great shooter who helped this website in many ways. RIP German.
January 15th, 2025

This thought-provoking article is one of the 15 most popular Daily Bulletin features over the last 12 months. We are republishing this story today for readers who may have missed it the first time around…
Here’s a little known fact that may startle most readers, even experienced gunsmiths: your barrel wears out in a matter of seconds. The useful life of a typical match barrel, in terms of actual bullet-in-barrel time, is only a few seconds. How can that be, you ask? Well you need to look at the actual time that bullets spend traveling through the bore during the barrel’s useful life. (Hint: it’s not very long).
Bullet-Time-in-Barrel Calculations
If a bullet flies at 3000 fps, it will pass through a 24″ (two-foot) barrel in 1/1500th of a second. If you have a useful barrel life of 3000 rounds, that would translate to just two seconds of actual bullet-in-barrel operating time.
Ah, but it’s not that simple. Your bullet starts at zero velocity and then accelerates as it passes through the bore, so the projectile’s average velocity is not the same as the 3000 fps muzzle velocity. So how long does a centerfire bullet (with 3000 fps MV) typically stay in the bore? The answer is about .002 seconds. This number was calculated by Varmint Al, who is a really smart engineer dude who worked at the Lawrence Livermore Laboratory, a government think tank that develops neutron bombs, fusion reactors and other simple stuff.
On his Barrel Tuner page, Varmint Al figured out that the amount of time a bullet spends in a barrel during firing is under .002 seconds. Al writes: “The approximate time that it takes a 3300 fps muzzle velocity bullet to exit the barrel, assuming a constant acceleration, is 0.0011 seconds. Actual exit times would be longer since the bullet is not under constant acceleration.”
We’ll use the .002 number for our calculations here, knowing that the exact number depends on barrel length and muzzle velocity. But .002 is a good average that errs, if anything, on the side of more barrel operating life rather than less.
So, if a bullet spends .002 seconds in the barrel during each shot, and you get 3000 rounds of accurate barrel life, how much actual firing time does the barrel deliver before it loses accuracy? That’s simple math: 3000 x .002 seconds = 6 seconds.
 Gone in Six Seconds. Want to Cry Now? Gone in Six Seconds. Want to Cry Now?
Six seconds. That’s how long your barrel actually functions (in terms of bullet-in-barrel shot time) before it “goes south”. Yes, we know some barrels last longer than 3000 rounds. On the other hand, plenty of .243 Win and 6.5-284 barrels lose accuracy in 1500 rounds or less. If your barrel loses accuracy at the 1500-round mark, then it only worked for three seconds! Of course, if you are shooting a “long-lived” .308 Win that goes 5000 rounds before losing accuracy, then you get a whopping TEN seconds of barrel life. Anyway you look at it, a rifle barrel has very little longevity, when you consider actual firing time.
People already lament the high cost of replacing barrels. Now that you know how short-lived barrels really are, you can complain even louder. Of course our analysis does give you even more of an excuse to buy a nice new Bartlein, Krieger, Shilen etc. barrel for that fine rifle of yours.
January 7th, 2025
The last half-inch or so of your barrel is absolutely critical. Any damage (or abnormal wear) near the crown will cause a significant drop-off in accuracy. Here are ways you can check the end of your barrel, using a common Q-Tip.
Use Q-Tip for Barrel Inspection
To find out if you have a burr or damage to your crown, you can use an ordinary Q-tip cotton swab. Check the edges of the crown by pulling the Q-tip gently out past the edge of the crown. If you have a burr, it will “grab” the cotton and leave strands behind.
Larry Willis has another way to use a Q-Tip: “Here’s a neat trick that will surprise you with how well it works.” Just insert a Q-Tip into your barrel (like the picture below), and it will reflect enough light so that you can get a real good look at the last half inch of rifling and the crown of your barrel. In most cases you’ll find that this works much better than a flashlight. Larry tells us: “I’ve used this method about a jillion times. Q-Tips are handy to keep in your cleaning supplies anyway. This is a good way to judge approximately how well you are cleaning your barrel when you’re at the range. It’s also the best way to examine your barrel when you’re in the field.”
Larry Willis is the inventor of Innovative Technologies’ Belted Magnum Collet Resizing Die. Larry explains how this die works, and offers other reloading tips on LarryWillis.com.
October 5th, 2024
Erik Dahlberg illustration courtesy FireArmsID.com.
Sometimes you’ll get a barrel that doesn’t stabilize bullets the way you’d anticipate, based on the stated (or presumed) twist rate. A barrel might have 1:10″ stamped on the side but it is, in truth, a 1:10.5″ twist or even a 1:9.5″. Cut-rifled barrels, such as Kriegers and Bartleins, normally hold very true to the specified twist rate. With buttoned barrels, due to the nature of the rifling process, there’s a greater chance of a small variation in twist rate. And yes, factory barrels can be slightly out of spec as well.
After buying a new barrel, you should determine the true twist rate BEFORE you start load development. You don’t want to invest in a large supply of expensive bullets only to find that that won’t stabilize because your “8 twist” barrel is really a 1:8.5″. Sinclair International provides a simple procedure for determining the actual twist rate of your barrel.
Sinclair’s Simple Twist Rate Measurement Method
If are unsure of the twist rate of the barrel, you can measure it yourself in a couple of minutes. You need a good cleaning rod with a rotating handle and a jag with a fairly tight fitting patch. Utilize a rod guide if you are accessing the barrel through the breech or a muzzle guide if you are going to come in from the muzzle end. Make sure the rod rotates freely in the handle under load. Start the patch into the barrel for a few inches and then stop. Put a piece of tape at the back of the rod by the handle (like a flag) or mark the rod in some way. Measure how much of the rod is still protruding from the rod guide. You can either measure from the rod guide or muzzle guide back to the flag or to a spot on the handle.
Next, continue to push the rod in until the mark or tape flag has made one complete revolution. Then re-measure the amount of rod that is left sticking out of the barrel. Use the same reference marks as you did on the first measurement. Next, subtract this measurement from the first measurement. This number is the twist rate. For example, if the rod has 24 inches remaining at the start and 16 inches remain after making one revolution, you have 8 inches of travel, thus a 1:8″-twist barrel.
Determining Barrel Twist Rate Empirically
Twist rate is defined as the distance in inches of barrel that the rifling takes to make one complete revolution. An example would be a 1:10″ twist rate. A 1:10″ barrel has rifling that makes one complete revolution in 10 inches of barrel length. Rifle manufacturers usually publish twist rates for their standard rifle offerings and custom barrels are always ordered by caliber, contour, and twist rate. If you are having a custom barrel chambered you can ask the gunsmith to mark the barrel with the twist rate.
|


