When shooting groups at long range on paper it can be difficult to distinguish which bullet holes belong to a particular sequence of shots. If, for example, you shot three 5-shot groups at 600+ yards on a paper target, you would have 15 bullet holes on the target (assuming no misses). But at that distance it would be difficult to see the holes on target (even with a spotting scope). Accordingly, when you inspected the target up close, it would be hard to tell which shots belonged to which group. You might have a vague idea, but couldn’t be sure, without a target camera recording the shot sequence.
Here is a method to separate multiple shots into specific groups so you can better evaluate your load and shooting skills. The trick is pretty simple — mark your bullets with a color from a Sharpie or other felt marking pen. If you are shooting three 5-shot groups, mark five with red, five with green, and five with blue (or purple). Then, when you inspect the target, you can identify the group placements by the colors that appear on the paper.
Round Robin: Using colors you can shoot “Round-Robin” to evaluate seating depths, neck tension, or other variables without having the shot order (and barrel heating) affect group sizes unequally. For example you might have three different neck tensions, each marked with a different color on the bullets. Then shoot Red, Blue, Green in that sequence for five total shots per color.
Smart Tip to Show Colors More Vividly
If the bullet inks are not showing up on your target paper clearly, here is a simple trick that can make the colors “bleed” to be more visible. In your range kit, bring some alcohol solution along with some Q-tips. Then dab the shots on the paper target lightly with wet Q-Tips. Here is the front of a target before and after application of alcohol:
Forum Member NewbieShooter explains: “Dabbing a bit of alcohol on the bullet holes with Q-Tips makes the color pop a bit… especially on the back side.” See below:
In short order you will see the colors spread into the paper, clearly marking the shot holes by distinguishing colors. If you were shooting a dark bullseye, view the the BACK side of the target to see the colors on a light background.
Credits: Bullet Tips photo by Forum Member Dave Way; Target photos by Forum Member NewbieShooter; Story tip from Boyd Allen.
Share the post "Color Bullet Tips to Help Define Long-Range Groups on Paper"
Over the past 12 months, this article was one of the TOP TEN most-read Daily Bulletin features. We’re reprising it today for those who may have missed it the first time. The above diagram comes from a TiborasurasRex YouTube Video comparing G1 and G7 BC models. CLICK HERE to watch the video.
The better, up-to-date ballistics programs let you select either G1 or G7 Ballistic Coefficient (BC) values when calculating a trajectory. The ballistic coefficient (BC) of a body is a measure of its ability to overcome air resistance in flight. You’ve probably seen that G7 values are numerically lower than G1 values for the same bullet (typically). But that doesn’t mean you should select a G1 value simply because it is higher.
Some readers are not quite sure about the difference between G1 and G7 models. One forum member wrote us: “I went on the JBM Ballistics website to use the web-based Trajectory Calculator and when I got to the part that gives you a choice to choose between G1 and G7 BC, I was stumped. What determines how, or which one to use?”
The simple answer is the G1 value normally works better for shorter flat-based bullets, while the G7 value should work better for longer, boat-tailed bullets.
G1 vs. G7 Ballistic Coefficients — Which Is Right for You?
G1 and G7 refer both refer to aerodynamic drag models based on particular “standard projectile” shapes. The G1 shape looks like a flat-based bullet. The G7 shape is quite different, and better approximates the geometry of a modern long-range bullet. So, when choosing your drag model, G1 is preferable for flat-based bullets, while G7 is ordinarily a “better fit” for longer, boat-tailed bullets.
Drag Models — G7 is better than G1 for Long-Range Bullets
Many ballistics programs still offer only the default G1 drag model. Bryan Litz, author of Applied Ballistics for Long Range Shooting, believes the G7 standard is preferable for long-range, low-drag bullets: “Part of the reason there is so much ‘slop’ in advertised BCs is because they’re referenced to the G1 standard which is very speed sensitive. The G7 standard is more appropriate for long range bullets. Here’s the results of my testing on two low-drag, long-range boat-tail bullets, so you can see how the G1 and G7 Ballistic coefficients compare:
G1 BCs, averaged between 1500 fps and 3000 fps:
Berger 180 VLD: 0.659 lb/in²
JLK 180: 0.645 lb/in²
The reason the BC for the JLK is less is mostly because the meplat was significantly larger on the particular lot that I tested (0.075″ vs 0.059″; see attached drawings).
For bullets like these, it’s much better to use the G7 standard. The following BCs are referenced to the G7 standard, and are constant for all speeds.
Many modern ballistics programs, including the free online JBM Ballistics Program, are able to use BCs referenced to G7 standards. When available, these BCs are more appropriate for long range bullets, according to Bryan.
[Editor’s NOTE: BCs are normally reported simply as an 0.XXX number. The lb/in² tag applies to all BCs, but is commonly left off for simplicity.]
Share the post "G1 vs. G7 Ballistic Coefficient Models — What You Need to Know"
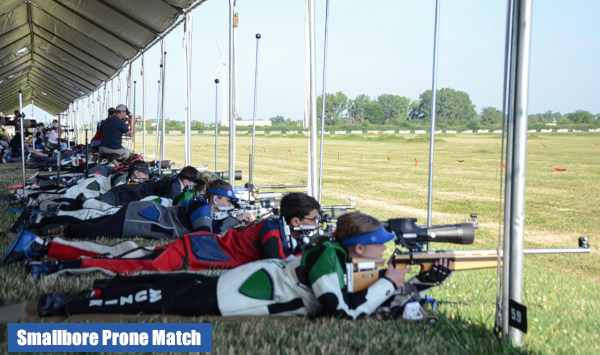
Registration for the Civilian Marksmanship Program (CMP) 2023 National Trophy Pistol and Rifle Matches at Camp Perry is now open! Held annually at Camp Perry in Ohio, the National Matches include the CMP National Trophy Pistol and Rifle Matches, the Pistol and Rifle Small Arms Firing Schools, the National Games Rifle Matches, the National Smallbore Matches and the National Mid-Range and Long Range Matches. These matches are conducted by a partnership of the CMP and Ohio National Guard.
Since their inception over a century ago, the National Matches have become a major shooting sports festival with over 4,500 annual participants. Held at the Camp Perry Nat’l Guard Training Base, the National Matches now include both indoor and outdoor events. Adult and junior athletes are welcome.
Story based on report by Ashley Dugan, CMP Staff Writer
The National Matches is comprised of the CMP National Trophy Pistol and Rifle Matches, National Games Matches, National Smallbore Matches, National Air Gun Championships and the National Mid-Range and Long Range Matches. The month-long series also includes a variety of educational clinics for marksmen and women at all experience levels. All events are open to the public and spectators are welcome.
Rimfire Sporter Rifle Match
The first event of the 2023 National Matches will be the Rimfire Sporter Rifle Match. One of the most popular annual Camp Perry events, the Rimfire Sporter Rifle match features .22 LR competition in open sights (O-Class), telescopic (T-Class) and tactical/unlimited (TU) classes, fired at 25 and 50 yards. A CMP Rimfire Clinic will be held prior to the match.
High Power, Service Rifle, and Vintage Rifle Competition
The National Trophy Rifle series includes prestigious matches like the President’s Rifle, Hearst Doubles, Rattle Battle, National Trophy Individual, and National Trophy Team events. For juniors, a special paired Junior Team Match is also on the schedule. The CMP’s High Power (HP) Rifle Championship series will include a 4-man team event and three 80-shot matches and will be fired on electronic targets.
The CMP offers many vintage and modern military rifle events during the National Games Matches portion, including the John C. Garand, Springfield, and Vintage Sniper matches.
Mid-Range and Long Range Rifle Matches (Multiple Rifle Classes)
A Mid-Range 600-yard event will be held, along with Long Range matches open to Match Rifle, Service Rifle, Palma Rifle, F-Open, F-TR or AR Tactical categories. The Long Range matches will be fired on Camp Perry’s 1000-yard Viale Range.
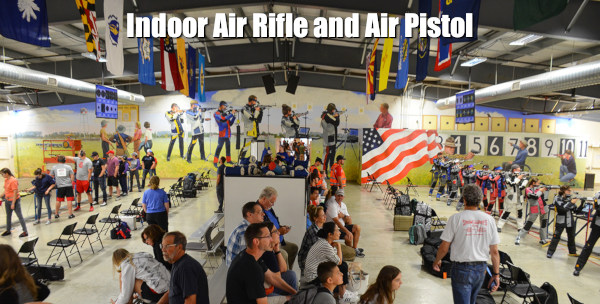
Smallbore Rifle and Air Rifle Matches
For 2023, the National Smallbore and National Air Gun schedules have been combined to allow competition in both disciplines. Anticipated events for both smallbore and air rifle include a 3-member elimination team event as well as an Aggregate for those firing in air rifle and three-position smallbore matches. NOTE: For the first time, all National Smallbore events will be fired on electronic targets!
For air rifle or air pistol competitors – check out the National Air Gun Matches, held on the electronic target range within the Gary Anderson CMP Competition Center. This series features training, followed by two days of 60-shot competitions.
Pistol Matches — Traditional and Modern Formats
This year’s National Pistol events will again include a mix of traditional matches along with a series of 900 Aggregate matches for .22, .45 and Center Fire Pistol. The 2023 Pistol matches will also see enhancements to the ranges, with target lines set at 25 and 50 yards to eliminate moving between strings.
Small Arms Firing Schools and Junior Camp
Small Arms Firing Schools (SAFS) will be held for HP rifle, smallbore, and pistol. All firearms and ammo are provided for the live-fire portion of the clinic. And a 5-day CMP National Matches Junior Camp will be open for young air rifle and smallbore competitors. Other clinics include the CMP/USMC Junior Rifle Clinic and the CMP Advanced Highpower Clinic.
Housing on Base and at Nearby Hotels
Housing for the National Matches is available on the Camp Perry grounds. On-base accommodations include four-person huts, cottages, barracks, RV spaces, and camp sites. There are also numerous hotels in the nearby Port Clinton, Fremont, and Sandusky areas. CLICK HERE for hotel lodging information.
If you have questions or need assistance, please contact the CMP at (419) 635-2141 or email competitions@thecmp.org.
Share the post "Register for 2023 CMP National Matches at Camp Perry"
Over the past 12 months, this article was one of the TOP 20 most-read Daily Bulletin features. We’re reprising it today for those who may have missed it the first time. The above diagram comes from a TiborasurasRex YouTube Video comparing G1 and G7 BC models. CLICK HERE to watch the video.
The better, up-to-date ballistics programs let you select either G1 or G7 Ballistic Coefficient (BC) values when calculating a trajectory. The ballistic coefficient (BC) of a body is a measure of its ability to overcome air resistance in flight. You’ve probably seen that G7 values are numerically lower than G1 values for the same bullet (typically). But that doesn’t mean you should select a G1 value simply because it is higher.
Some readers are not quite sure about the difference between G1 and G7 models. One forum member wrote us: “I went on the JBM Ballistics website to use the web-based Trajectory Calculator and when I got to the part that gives you a choice to choose between G1 and G7 BC, I was stumped. What determines how, or which one to use?”
The simple answer is the G1 value normally works better for shorter flat-based bullets, while the G7 value should work better for longer, boat-tailed bullets.
G1 vs. G7 Ballistic Coefficients — Which Is Right for You?
G1 and G7 refer both refer to aerodynamic drag models based on particular “standard projectile” shapes. The G1 shape looks like a flat-based bullet. The G7 shape is quite different, and better approximates the geometry of a modern long-range bullet. So, when choosing your drag model, G1 is preferable for flat-based bullets, while G7 is ordinarily a “better fit” for longer, boat-tailed bullets.
Drag Models — G7 is better than G1 for Long-Range Bullets
Many ballistics programs still offer only the default G1 drag model. Bryan Litz, author of Applied Ballistics for Long Range Shooting, believes the G7 standard is preferrable for long-range, low-drag bullets: “Part of the reason there is so much ‘slop’ in advertised BCs is because they’re referenced to the G1 standard which is very speed sensitive. The G7 standard is more appropriate for long range bullets. Here’s the results of my testing on two low-drag, long-range boat-tail bullets, so you can see how the G1 and G7 Ballistic coefficients compare:
G1 BCs, averaged between 1500 fps and 3000 fps:
Berger 180 VLD: 0.659 lb/in²
JLK 180: 0.645 lb/in²
The reason the BC for the JLK is less is mostly because the meplat was significantly larger on the particular lot that I tested (0.075″ vs 0.059″; see attached drawings).
For bullets like these, it’s much better to use the G7 standard. The following BCs are referenced to the G7 standard, and are constant for all speeds.
Many modern ballistics programs, including the free online JBM Ballistics Program, are able to use BCs referenced to G7 standards. When available, these BCs are more appropriate for long range bullets, according to Bryan.
[Editor’s NOTE: BCs are normally reported simply as an 0.XXX number. The lb/in² tag applies to all BCs, but is commonly left off for simplicity.]
This article is copyright 2023 AccurateShooter.com. No 3rd Party republication of this article is allowed without advance approval and payment of licensing fees.
Share the post "G1 vs. G7 Ballistic Coefficients — What You Need to Know"
When shooting groups at long range on paper it can be difficult to distinguish which bullet holes belong to a particular sequence of shots. If, for example, you shot three 5-shot groups at 600+ yards on a paper target, you would have 15 bullet holes on the target (assuming no misses). But at that distance it would be difficult to see the holes on target (even with a spotting scope). Accordingly, when you inspected the target up close, it would be hard to tell which shots belonged to which group. You might have a vague idea, but couldn’t be sure, without a target camera recording the shot sequence.
Here is a method to separate multiple shots into specific groups so you can better evaluate your load and shooting skills. The trick is pretty simple — mark your bullets with a color from a Sharpie or other felt marking pen. If you are shooting three 5-shot groups, mark five with red, five with green, and five with blue (or purple). Then, when you inspect the target, you can identify the group placements by the colors that appear on the paper.
Round Robin: Using colors you can shoot “Round-Robin” to evaluate seating depths, neck tension, or other variables without having the shot order (and barrel heating) affect group sizes unequally. For example you might have three different neck tensions, each marked with a different color on the bullets. Then shoot Red, Blue, Green in that sequence for five total shots per color.
Smart Tip to Show Colors More Vividly
If the bullet inks are not showing up on your target paper clearly, here is a simple trick that can make the colors “bleed” to be more visible. In your range kit, bring some alcohol solution along with some Q-tips. Then dab the shots on the paper target lightly with wet Q-Tips. Here is the front of a target before and after application of alcohol:
Forum Member NewbieShooter explains: “Dabbing a bit of alcohol on the bullet holes with Q-Tips makes the color pop a bit… especially on the back side.” See below:
In short order you will see the colors spread into the paper, clearly marking the shot holes by distinguishing colors. If you were shooting a dark bullseye, view the the BACK side of the target to see the colors on a light background.
Credits: Bullet Tips photo by Forum Member Dave Way; Target photos by Forum Member NewbieShooter; Story tip from Boyd Allen.
Share the post "Color-Coat Bullet Tips to Better Define Long-Range Groups"
Applied Ballistics has just launched a great, new online resource for shooters: The Science of Accuracy Academy. This subscription-based website is launching with nearly 30 podcast episodes, with many more planned, as well as video content, Zoom classes, and much more.
The main goal of this new online resource is to adapt and modernize the delivery of content coming from Applied Ballistics LLC. In past years, books, DVDs, and seminars were the primary avenues for delivering information. Modern technology has evolved, and the delivery of information can be done in more efficient ways such as streaming videos, podcast discussions of book and seminar content. In addition to being a more modern delivery platform, The Science of Accuracy Academy allows for more frequent updates than traditional books and DVDs.
Bryan Litz, owner of Applied Ballistics LLC tells us: “I’m very excited about this avenue to share what we’re learning in the Applied Ballistics lab. I think many shooters will benefit from the podcasts, which contain very insightful discussions and can be enjoyed in your car, or as you work. We look forward to publishing more of our research thru the Science of Accuracy Academy”.
About the Science of Accuracy Academy Content and Programs
Below, Bryan Litz comments about the Academy’s new podcast offerings and other interactive content. Bryan notes: “We’ve benefited a great deal from practicing the scientific method, and we want to share what we’ve learned.”
Book Content via Podcasts — Many of the podcast episodes are specific reviews of Applied Ballistics book chapters. I’ll sit with Mitch or Francis (both experienced, champion shooters) and discuss the chapter, what it was like to do the tests. We will also discuss behind the scenes problems, as well as what we’ve learned since publishing the books. This lets subscribers get knowledge from the books. And, as a podcast, you can listen while driving, working out, or whatever.
The World of Doppler Radar — In recent years we have spent considerable time visiting shooting matches with the AB Mobile Lab and running Doppler radar. Between that and some of the government contracting work, we’ve built up a lot of experiences and it’s been a long time since a book was published. This Academy is a great outlet for us to update the shooting world on what we’ve been doing and learning.
Ballistics Science and Precision Loading — We’ve been doing hardcore ballistic science for the past few years and have a lot to share. We’ve come to see some aspects of handloading and shooting in a fundamentally different way. For example, understanding the statistical nature of precision has caused us to re-shape how we make decisions in the handloading process. As a result, we now better understand cause-effect relationships and can make deliberate, reliable progress as a result.
Bryan Litz Announces the New Science of Accuracy Academy
The Lighter Side — Bryan told AccurateShooter.com: “Some of the podcast episodes are much less serious! We have fun arguing about which shooting disciplines are harder. For example, Mitch Fitzpatrick and I talk with Francis Colon and Chad Heckler about PRS vs. ELR shooting. We discuss what we like and dislike about the different sports, what we would like to see changed, and what competition shooting has meant for us as individuals. This open-ended format explores long range shooting from the technical to the personal and everything in-between.”
Share the post "Science of Accuracy Academy — New from Applied Ballistics"
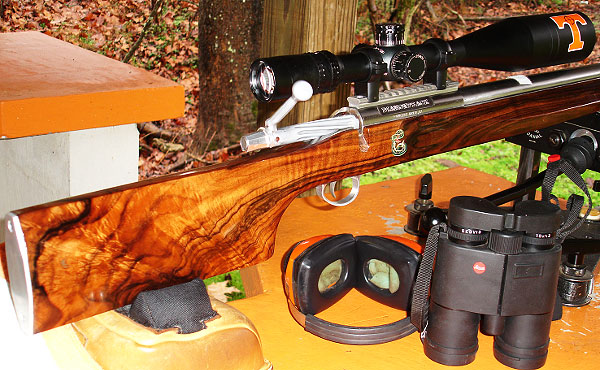
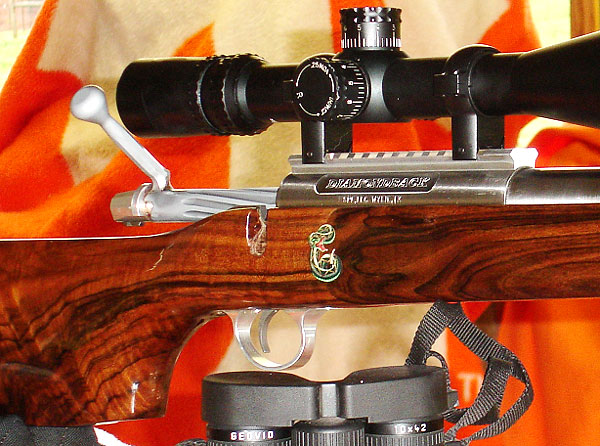
Shooting Prairie Dogs at extreme long range takes some highly specialized equipment. Forum Member VolDoc and his friends have taken long-range varminting to a whole new level. With his Savage-based, Hart-barreled 20 BR, VolDoc managed a verified 1,032-yard Prairie Dog kill, possibly the longest recorded with a .20-Caliber rifle. But that’s just part of VolDoc’s impressive precision varminting arsenal. Here we showcase three of VolDoc’s accurate rigs: his stunning English Walnut Diamondback 6BR/Dasher, his Nesika-actioned “Orange Crush” Dasher, and the 1K Prairie Dog-slaying 20 BR Savage.
Diamondback Switch-Barrel Rifle Specifications
The action is a Stiller Diamondback, drop-port. The custom stock is similar to a Shehane ST-1000, but crafted from 40-year-old English Walnut. [Editor’s note: the wood on this gun is gorgeous!] There are three barrels for the gun with three different chamberings: 6BR Brux 1:8″-twist HV; 6BRX Krieger 1:8″-twist HV, and 6mm Dasher Krieger 1:8.5″ twist fluted straight contour (no taper). The scope is a Nightforce 12-42x56mm, with 2DD reticle.
Comments: This rifle is a good study in comparison of the three different chamberings. On the same rifle platform (same stock and action), each of these barrels had killed prairie dogs over 1,000 yards. So if someone asks which is best, a 6BR, or 6BRX, or 6 Dasher, VolDoc says they are all effective. The improved cartridges will deliver higher velocities, which can be an advantage. On the other hand it is simpler to load 6mmBR brass right out of the box, and it’s easy to find an accurate load for the 6mmBR (see photo).
Nesika 6mmBR/Dasher Rifle Specifications
VolDoc’s “Big Orange Crush” rifle has a stainless Nesika ‘J’ action, with 2 oz. Jewell trigger, in a painted fiberglass Shehane ST-1000 stock. Originally a 6BR, the gun is now chambered as a 6mm Dasher with a .271 no-turn neck. The barrel is a 1:12″-twist Krieger fited with Vais muzzle brake. On top is a NightForce NXS 12-42x56mm scope with double-dot reticle. The double-dot gives precise aiming and lower dot can be used as an aming point, when you need a few more MOA of elevation in the field.
Comments: Big Orange Crush shoots 87gr V-Maxs into bugholes at 3,400 fps. VolDoc’s load with the 87s is very stout, more than 32 grains of Vihtavuori N-135 with Wolf SRM primers. Cases are full-length sized, with an 0.266″ bushing for the necks.
This 3400 fps load with the 87gr V-Maxs has accounted for hundreds of Prairie Dogs killed from 97 yards to 1,050 yards. The 87gr V-Max at this speed literally picks Prairie Dogs up and throws them 10 feet vertically and laterally. VolDoc reports: “The barrel now has more than 3,000 rounds down the tube and exhibits little throat fire-cracking and no loss of accuracy. I can’t explain why, it just hasn’t deteriorated yet. This rifle is my best-ever ‘go-to’ Prairie Dog rifle.”
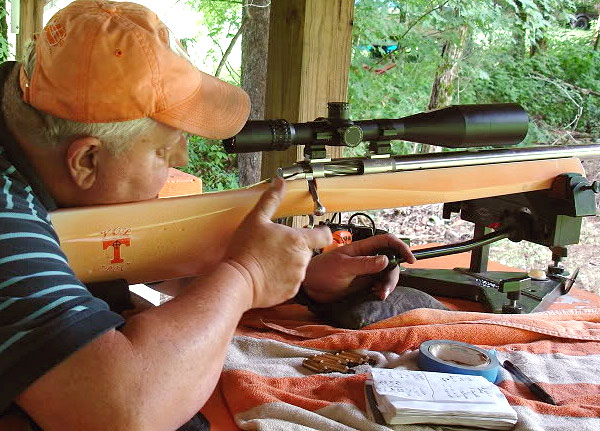
Savage 20 BR Rifle Specifications
The action is a Savage Dual Port, with an aftermarket Sharp Shooter Supply (SSS) 4 oz. Evolution trigger. The stock is a modified Savage factory unit that has been pillar-bedded. The factory barrel was replaced with a 28″ Hart stainless, 1:9″ twist barrel fitted with a Rayhill muzzle brake. The gun is chambered in 20 BR with a 0.235″ no-turn neck. Kevin Rayhill did the smithing. To provide enough elevation to shoot at 1,000 yards plus, Ray fitted a +20 MOA Bench Source scope base. This +20 rail is very well-crafted, and made especially for the Savage Model 12.
Comments: VolDoc reports: “When I got the Savage back from Kevin Rayhill, it still had my 6 BR factory barrel on it, as I use it to compete in Factory-class regional matches. I put on the new 20 BR Hart barrel Kevin had chambered and quickly put in a full day of load development using the 55gr Bergers (0.381 G1 BC) and the 40gr V-Maxs. Both proved very easy to tune and I soon had my loads. My 55gr Berger load with runs about 3590 fps. Varget was very accurate with the 55s (see load dev. targets below).
The mild recoil of the 20 BR, along with a very good muzzle break (Rayhill’s design) enables me to spot every hit or miss myself. Kevin also re-contoured the underside of the Savage stock so it tracks straight back on recoil, also making seeing hits easier.”
The 20 Caliber 1000-Yard Prairie Dog Quest
Making the 1032-Yard Shot with a 20 BR by Dr. John S. (aka “VolDoc”)
This article covers my recent successful quest for a 20-caliber varmint kill past 1,000 yards. This may be a first — I couldn’t find anyone else with a confirmed 20-Cal Prairie Dog kill at 1000+. I started a thread on the Varmint section of the AccurateShooter.com Forum about building a 20 BR capable of 1,000-yard Minute of Prairie Dog accuracy and many said 20 Cal bullets just could not do it. Some came to my defense and said those that doubted had never studied the ballistics of the 20BR with the new Berger 55gr bullets now available. Well, folks, I can tell you, hitting a Prairie Dog at 1000 yards isn’t easy — but it IS possible. Here’s how it was done….
Gale-Force Winds and High Temps
After arriving at our Prairie Dog Ranch in Colorado, I soon realized my quest was going to be especially difficult because we had continual 40+ mph winds and 100° heat every day. We had a special place where Birdog and I had made many 1,000-yard+ kills in years past, so I knew the ideal location but needed a small window of opportunity either early morning or late afternoon. Based on past experience, I knew I needed about 21 MOA from my 100-yard zero to get to 1,000 yards. On the first day of the Safari, I shot the 20 BR in the 45 mph brutal winds and heat of 97°. But after about 20 shots, I connected on a dog and lifted him about three feet high. Well, that’s a start.
Winds Subside — Here’s Our Chance …
On the second day of our shoot, I had listened to the early weather forecast, so I knew that there was to be a brief period of light winds early in the morning. We were out on the Colorado prairie at daylight and the conditions were perfect. The sunrise was at my back and we had about a 10 mph tailwind. I looked through my Leica Geovid Rangefinder Binos and the Prairie Dogs were out for breakfast. I quickly ranged the targets and found a group at about 1,050 yards. The technique is to find the dogs, range them, click-up according to your ballistic chart and shoot.
My first shot was very, very close. I added about four clicks up and a couple of clicks left for windage and let another go. That shot threw dirt all over, but the dog didn’t even flinch. This is another good point to remember about long-range Prairie Dog hunting. To be successful, the dogs can’t be too skittish, because if they have been shot at even a few times, they will go down and stay down. So, you should have an agreement with those in your party as to where each member is going to be shooting and respect this boundary. Drive-by shooting style is OK if that’s your thing, it’s just not mine.
Hitting the Mark — Dead Dog at 1032 Yards
On the fourth shot, I saw the dog go belly up and kick its final throws. My quest for the 20-Caliber 1,000-yard Prairie Dog had become a reality. We confirmed the distance with our lasers at 1,032 yards. Our technique for retrieving a dead dog at that range is worth mentioning. When I killed that dog, I left it in the crosshairs of my Nightforce scope. My shooting buddy kept looking through the scope (of my gun) and guided me to the deceased dog using Motorola walkie-talkies. When I got to the dog I was jubilant. I marked it with my tripod and orange jacket, and we took some pictures. (See view through scope photo below). The 55gr Bergers require a center mass hit as they will not expand, especially at that range. I centered this dog in the head — his BAD LUCK, my GOOD.
After making the 1,032-yard kill, I shot many many other Prairie Dogs with the Savage 20 BR using the 40gr V-Maxs. The dog flights were spectacular — red mist and helicopters, counter-clockwise or clockwise on demand. I killed at least five at over 500 yards. I will not use the 55 Bergers on Prairie Dogs again since the quest is over. I will use the 40gr V-Maxs and 39gr Sierra BlitzKings for next trip’s 20 BR fodder.
NRA Competitive Shooting has released the Official Calendar for the 2021 NRA National Championships at Camp Atterbury. The 2021 NRA Nationals at Camp Atterbury start with registration for the Smallbore Championships on Tuesday, July 6. The Smallbore Nationals continue through Sunday, July 18. The Precision Pistol National Championships begin on Tuesday, July 20, with the F-Class Mid-Range Nationals starting July 22 (registration/practice), with F-Class Long-Range commencing on July 27. Moving on to High Power Rifle, the Fullbore event runs August 1-7, while the Mid-Range Nationals begin on Tuesday, August 9, followed by the Long-Range Nationals starting on August 14, 2021. Finally, the NRA Extreme Long-Range (ELR) Championship begins on Friday, August 20 and concludes Saturday, August 21. The last week of the month, August 22-27 is slated for OTC competition.
Smallbore Rifle Championship: 6-18 July, 2021
Precision Pistol Championship: 20-25 July, 2021
F-Class Mid-Range Championship: 21-25 July, 2021
F-Class Long Range Championship: 27-30 July, 2021
Fullbore Championship: 1-7 August, 2021
High Power Mid-Range Championship: 9-13 August, 2021
High Power Long Range Championship: 14-19 August, 2021
ELR 1-Mile Championship: 20-21 August, 2021
OTC Competition: 22-28 August, 2021
NOTE: Listed dates include registration/sign-up and/or practice day, and award ceremony.
See full 2021 Camp Atterbury NRA National Championships calendar below. CLICK to view larger, full-screen printable image that is easier to read. ENLARGE (+ with mouse) after loading to read small print.
CLICK CALENDAR to VIEW Full-screen PDF then click Enlarge (+)
To learn more about the 2021 NRA Nationals, visit compete.nra.org. And for the latest updates, subscribe to the free Shooting Sports USA Insider newsletter.
Share the post "2021 NRA National Championships Schedule for Camp Atterbury"
Many guys getting started in long range shooting are confused about what kind of scope they should buy — specifically whether it should have MIL-based clicks or MOA-based clicks. Before you can make that decision, you need to understand the terminology. This article, with a video by Bryan Litz, explains MILS and MOA so you can choose the right type of scope for your intended application.
You probably know that MOA stands for “Minute of Angle” (or more precisely “minute of arc”), but could you define the terms “Milrad” or “MIL”? In his latest video, Bryan Litz of Applied Ballitics explains MOA and MILs (short for “milliradians”). Bryan defines those terms and explains how they are used. One MOA is an angular measurement (1/60th of one degree) that subtends 1.047″ at 100 yards. One MIL (i.e. one milliradian) subtends 1/10th meter at 100 meters; that means that 0.1 Mil is one centimeter (1 cm) at 100 meters. Is one angular measurement system better than another? Not necessarily… Bryan explains that Mildot scopes may be handy for ranging, but scopes with MOA-based clicks work just fine for precision work at known distances. Also because one MOA is almost exactly one inch at 100 yards, the MOA system is convenient for expressing a rifle’s accuracy. By common parlance, a “half-MOA” rifle can shoot groups that are 1/2-inch (or smaller) at 100 yards.
What is a “Minute” of Angle?
When talking about angular degrees, a “minute” is simply 1/60th. So a “Minute of Angle” is simply 1/60th of one degree of a central angle, measured either up and down (for elevation) or side to side (for windage). At 100 yards, 1 MOA equals 1.047″ on the target. This is often rounded to one inch for simplicity. Say, for example, you click up 1 MOA (four clicks on a 1/4-MOA scope). That is roughly 1 inch at 100 yards, or roughly 4 inches at 400 yards, since the target area measured by an MOA subtension increases with the distance.
MIL vs. MOA for Target Ranging
MIL or MOA — which angular measuring system is better for target ranging (and hold-offs)? In a recent article on his PrecisionRifleBlog.com website, Cal Zant tackles that question. Analyzing the pros and cons of each, Zant concludes that both systems work well, provided you have compatible click values on your scope. Zant does note that a 1/4 MOA division is “slightly more precise” than 1/10th mil, but that’s really not a big deal: “Technically, 1/4 MOA clicks provide a little finer adjustments than 1/10 MIL. This difference is very slight… it only equates to 0.1″ difference in adjustments at 100 yards or 1″ at 1,000 yards[.]” Zant adds that, in practical terms, both 1/4-MOA clicks and 1/10th-MIL clicks work well in the field: “Most shooters agree that 1/4 MOA or 1/10 MIL are both right around that sweet spot.”
This popular video, viewed over 3.3 million times on YouTube, provides a clear explanation of Minute of Angle (MOA) and how that angular measurement is used. Among novice shooters, there is much confusion over this term. In this NSSF Video, Ryan Cleckner, a former Sniper Instructor for the 1st Ranger Battalion, defines the term, “Minute of Angle” (MOA) and explains how you can adjust for windage and elevation using 1/4 or 1/8 MOA clicks on your scope. This allows you to sight-in precisely and compensate for bullet drop at various distances.
For starters, Ryan explains that, when talking about angular degrees, a “minute” is simply 1/60th. So a “Minute of Angle” is simply 1/60th of one degree of a central angle, measured either up and down (for elevation) or side to side (for windage). At 100 yards, 1 MOA equals 1.047″ on the target. This is often rounded to one inch for simplicity. Say, for example, you click up 1 MOA. That is roughly 1 inch at 100 yards, or roughly 4 inches at 400 yards, since the target area measured by 1 MOA increases in linear fashion with the distance.
Story sourced by Edlongrange.
Share the post "Minute of Angle (MOA) Explained by Informative Video"
Looking to shoot an AR-platform rifle out past 500 yards? Then you should read two articles by AR guru Glen Zediker. Author of The New Competitive AR-15 and The Competitive AR15 Builders Guide, Zediker is an expert when it comes to AR-platform rifles. Glen believes ARs have excellent long-range capability, provided they are built to high standards, with good barrels.
Glen says: “a properly configured AR-15 is easily capable of good performance at 500+ yards. Good performance means it can hit a 1-foot-square target all the time. Competitive shooters can cut that standard in nearly half (the X-Ring on an MR1 600-yard NRA High Power Rifle target is 6 inches, and high X-counts are commonplace among more skilled shooters).”
Published in the Cheaper than Dirt Shooter’s Log, Zediker’s articles first cover the history of the AR-15, and then explain how AR-platform accuracy can be optimized. Part One reviews the AR’s development as an accurate firearm, tracing its evolution from a Vietnam-era combat weapon to what is now a favored target rifle of High Power competitors. READ PART ONE.
Part Two discusses the specifics that make an AR accurate at 500 yards and beyond. Zediker talks about barrel configuration (profile and twist rate), bullet selection, floating handguards, and proper mounting of optics or iron sights. READ PART TWO.
Barrel Twist Rate
To stabilize anything longer than a 68- or 69-grain bullet, the barrel twist rate must be — at minimum– 1-in-8. Twist rates reflect how far the bullet travels along the lands or rifling to make one complete revolution. So, 1-in-8 (or 1-8, 1:8) means “one turn in eight inches.” I think it’s better to go a little faster in twist. There is nothing wrong with a 1:7 twist. The 90-grain bullets require a 1:6.5, and that is getting on the quick side. If you want to shoot Sierra 77s or equivalent, and certainly anything longer, 1:8 is necessary. By the way, it is bullet length, not weight, which constitutes the necessary twist rate to launch a stable bullet.
Optics Mounting
Correct optical sight positioning can be a challenge. With a flattop upper, I need a good inch additional forward extension at the muzzle side of the upper for the sight mount bases to avoid holding my head “back” to get the optimal view through the scope. A longer rail piece is necessary for my builds as a result.
Buttstock Length and Adjustment
An adjustable buttstock is valuable, and even more valuable if it’s well-designed. Mostly, a standard stock is too short, and the cheek area sits too low. Adding length helps a lot by itself. There are assemblies that replace the standard buttplate to allow for length and, usually, height and rotation adjustments for the buttpad. An elevation-adjustable cheekpiece is a big help to attain a solid position.
Share the post "Zediker Examines Long Range Shooting with AR-Platform Rifles"
Over the past 12 months, this article was one of the TOP TEN most-read Daily Bulletin features. We’re reprising it today for those who may have missed it the first time. The above diagram comes from a TiborasurasRex YouTube Video comparing G1 and G7 BC models. CLICK HERE to watch the video.
The better, up-to-date ballistics programs let you select either G1 or G7 Ballistic Coefficient (BC) values when calculating a trajectory. The ballistic coefficient (BC) of a body is a measure of its ability to overcome air resistance in flight. You’ve probably seen that G7 values are numerically lower than G1 values for the same bullet (typically). But that doesn’t mean you should select a G1 value simply because it is higher.
Some readers are not quite sure about the difference between G1 and G7 models. One forum member wrote us: “I went on the JBM Ballistics website to use the web-based Trajectory Calculator and when I got to the part that gives you a choice to choose between G1 and G7 BC, I was stumped. What determines how, or which one to use?”
The simple answer is the G1 value normally works better for shorter flat-based bullets, while the G7 value should work better for longer, boat-tailed bullets.
G1 vs. G7 Ballistic Coefficients — Which Is Right for You?
G1 and G7 refer both refer to aerodynamic drag models based on particular “standard projectile” shapes. The G1 shape looks like a flat-based bullet. The G7 shape is quite different, and better approximates the geometry of a modern long-range bullet. So, when choosing your drag model, G1 is preferrable for flat-based bullets, while G7 is ordinarily a “better fit” for longer, boat-tailed bullets.
Drag Models — G7 is better than G1 for Long-Range Bullets
Many ballistics programs still offer only the default G1 drag model. Bryan Litz, author of Applied Ballistics for Long Range Shooting, believes the G7 standard is preferrable for long-range, low-drag bullets: “Part of the reason there is so much ‘slop’ in advertised BCs is because they’re referenced to the G1 standard which is very speed sensitive. The G7 standard is more appropriate for long range bullets. Here’s the results of my testing on two low-drag, long-range boat-tail bullets, so you can see how the G1 and G7 Ballistic coefficients compare:
G1 BCs, averaged between 1500 fps and 3000 fps:
Berger 180 VLD: 0.659 lb/in²
JLK 180: 0.645 lb/in²
The reason the BC for the JLK is less is mostly because the meplat was significantly larger on the particular lot that I tested (0.075″ vs 0.059″; see attached drawings).
For bullets like these, it’s much better to use the G7 standard. The following BCs are referenced to the G7 standard, and are constant for all speeds.
Many modern ballistics programs, including the free online JBM Ballistics Program, are able to use BCs referenced to G7 standards. When available, these BCs are more appropriate for long range bullets, according to Bryan.
[Editor’s NOTE: BCs are normally reported simply as an 0.XXX number. The lb/in² tag applies to all BCs, but is commonly left off for simplicity.]
Share the post "G1 vs. G7 Ballistic Coefficient Models — What You Need to Know"


 The better, up-to-date ballistics programs let you select either G1 or G7 Ballistic Coefficient (BC) values when calculating a trajectory. The ballistic coefficient (BC) of a body is a measure of its ability to overcome air resistance in flight. You’ve probably seen that G7 values are numerically lower than G1 values for the same bullet (typically). But that doesn’t mean you should select a G1 value simply because it is higher.
 Drag Models — G7 is better than G1 for Long-Range Bullets


 Drag Models — G7 is better than G1 for Long-Range Bullets
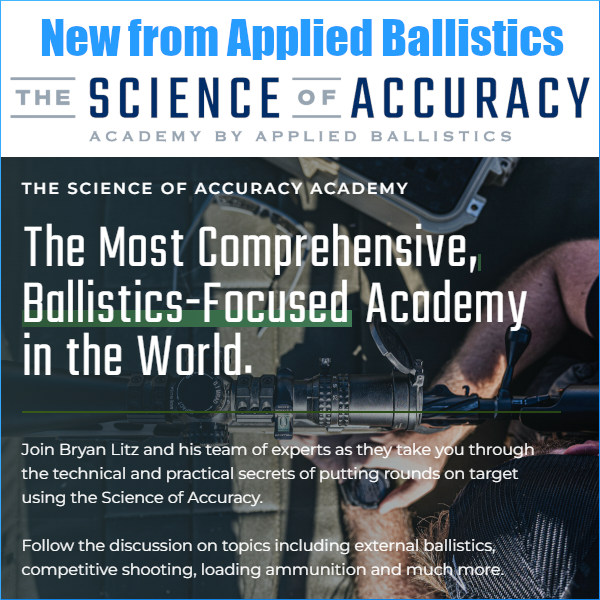


 Making the 1032-Yard Shot with a 20 BR

 Hitting the Mark — Dead Dog at 1032 Yards


 The better, up-to-date ballistics programs let you select either G1 or G7 Ballistic Coefficient (BC) values when calculating a trajectory. The ballistic coefficient (BC) of a body is a measure of its ability to overcome air resistance in flight. You’ve probably seen that G7 values are numerically lower than G1 values for the same bullet (typically). But that doesn’t mean you should select a G1 value simply because it is higher.


