Based on its external appearance, a modern riflescope may seem simple. It’s just a tube with two or three knobs on the outside right? Well, looks can be deceiving. Modern variable focal-length optics are complex systems with lots of internal parts. Modern scopes, even ‘budget’ optics, use multiple lens elements to allow variable magnification levels and parallax adjustment.
A few seasons back, we had a chance to look inside a riflescope thanks to a product display from ATK, now called Vista Outdoor, parent of Alliant Powder, CCI, Federal, RCBS, Speer, Weaver Optics. The Weaver engineers sliced open a Weaver Super Slam scope so you can see the internal lens elements plus the elevation and windage controls. We thought readers would like to see the “inner workings” of a typical modern rifle scope, so we snapped some pictures. The sectioned Super Slam scope was mounted inside a Plexiglas case, making it a bit hard to get super-sharp images, but you can still see the multiple lenses and the complex windage and elevation controls.
Check out the details of the focusing and magnification rings near the ocular (eyeball) end of the scope. There is very fine machining and threading to make everything work properly. The ocular lens is the piece of glass that faces the shooter while he aims.
Share the post "Cut-Away View Reveals Complex Interior of Modern Riflescope"
A varmint shooter’s target is not conveniently placed at a fixed, known distance as it is for a benchrester. The varminter must repeatedly make corrections for bullet drop as he moves from closer targets to more distant targets and back again. Click HERE to read an interesting Varmint Forum discussion regarding the best method to adjust for elevation. Some shooters advocate using the scope’s elevation adjustments. Other varminters prefer to hold-over, perhaps with the assistance of vertical markers on their reticles. Still others combine both methods–holding off to a given yardage, then cranking elevation after that.
Majority View — Click Your Scope
“I zero at 100 yards — I mean really zero as in check the ballistics at 200 and 300 and adjust zero accordingly — and then set the scope zero. For each of my groundhog guns I have a click chart taped into the inside of the lid of the ammo box. Then use the knobs. That’s why they’re there. With a good scope they’re a whole lot more accurate than hold-over, with or without hash marks. This all assumes you have a good range finder and use it properly. If not, and you’re holding over you’re really just spraying and praying. Try twisting them knobs and you’ll most likely find that a 500- or 600- or 700-yard groundhog is a whole lot easier than some people think.” — Gunamonth
“I have my elevation knob calibrated in 100-yard increments out to 550. Range-find the critter, move elevation knob up…dead critter. The problem with hold-over is that it is so imprecise. It’s not repeatable because you are holding over for elevation and for wind also. Every time you change targets 50 yards, it seems as if you are starting over. As soon as I got completely away from the hold over method (I used to zero for 200), my hit ratios went way up.” — K. Candler
“When I first started p-dog shooting, I attempted to use the hold-over method with a 200-yard zero with my 6mm Rem. Any dog much past 325-350 yards was fairly safe. I started using a comeups table for all three of my p-dog rifles (.223 Rems and 6mm Rem). 450-yard hits with the .223s are fairly routine and a 650-yard dog better beware of the 6mm nowadays. An added benefit (one I didn’t think of beforehand) with the comeups table (elevation only), is that when the wind is blowing, it takes half of the variables out of the equation. I can concentrate on wind, and not have to worry about elevation. It makes things much more simple.” — Mike (Linefinder).
“I dial for elevation and hold for wind. Also use a mil-dot reticle to make the windage holds easier. For windage corrections, I watch for the bullet strike measure the distance it was “off” with the mil-dot reticle, then hold that much more the other way. Very fast once you get used to it.” — PepeLP
Minority View — Hold-Over is Better
“I try to not touch my knobs once I’m zeroed at 200 meters. Most of my varmint scopes have duplex reticles and I use the bottom post to put me on at 300 meters versus turning knobs. The reason I try to leave my knobs alone is that I have gone one complete revolution up or down [too far] many times and have missed the varmint. This has happened more than once and that is why I try not to change my knobs if at all possible.” — Chino69
“I have been using the hold over method and it works for me most of the time but the 450 yards and over shots get kinda hard. I moved to a 300 yard zero this year and it’s working well. I do want to get into the click-up method though; it seems to be more fool-proof.” — 500YardHog
Compromise View — Use Both Methods
“I use both [methods] as well — hold over out to 250, and click up past that.” — Jack (Wolf)
“I use the target knobs and crank-in elevation. I also use a rangefinder and know how far away they are before I crank in the clicks. I have a scope with drop dots from Premier Recticle and like it. No cranking [knobs] out to 600.” –Vmthtr
Share the post "Varminters Debate — Prefer Cranking Elevation or Holding Over?"
Many guys getting started in long range shooting are confused about what kind of scope they should buy — specifically whether it should have MIL-based clicks or MOA-based clicks. Before you can make that decision, you need to understand the terminology. This article, with a video by Bryan Litz, explains MILS and MOA so you can choose the right type of scope for your intended application.
You probably know that MOA stands for “Minute of Angle” (or more precisely “minute of arc”), but could you define the terms “Milrad” or “MIL”? In a helpful video, Bryan Litz of Applied Ballitics explains MOA and MILs (short for “milliradians”). Bryan defines those terms and explains how they are used. One MOA is an angular measurement (1/60th of one degree) that subtends 1.047″ at 100 yards. One MIL (i.e. one milliradian) subtends 1/10th meter at 100 meters; that means that 0.1 Mil is one centimeter (1 cm) at 100 meters. Is one angular measurement system better than another? Not necessarily… Bryan explains that Mildot scopes may be handy for ranging, but scopes with MOA-based clicks work just fine for precision work at known distances. Also because one MOA is almost exactly one inch at 100 yards, the MOA system is convenient for expressing a rifle’s accuracy. By common parlance, a “half-MOA” rifle can shoot groups that are 1/2-inch (or smaller) at 100 yards.
What is a “Minute” of Angle?
When talking about angular degrees, a “minute” is simply 1/60th. So a “Minute of Angle” is simply 1/60th of one degree of a central angle, measured either up and down (for elevation) or side to side (for windage). At 100 yards, 1 MOA equals 1.047″ on the target. This is often rounded to one inch for simplicity. Say, for example, you click up 1 MOA (four clicks on a 1/4-MOA scope). That is roughly 1 inch at 100 yards, or roughly 4 inches at 400 yards, since the target area measured by an MOA subtension increases with the distance.
MIL vs. MOA for Target Ranging
MIL or MOA — which angular measuring system is better for target ranging (and hold-offs)? In a recent article on his PrecisionRifleBlog.com website, Cal Zant tackles that question. Analyzing the pros and cons of each, Zant concludes that both systems work well, provided you have compatible click values on your scope. Zant does note that a 1/4 MOA division is “slightly more precise” than 1/10th mil, but that’s really not a big deal: “Technically, 1/4 MOA clicks provide a little finer adjustments than 1/10 MIL. This difference is very slight… it only equates to 0.1″ difference in adjustments at 100 yards or 1″ at 1,000 yards[.]” Zant adds that, in practical terms, both 1/4-MOA clicks and 1/10th-MIL clicks work well in the field: “Most shooters agree that 1/4 MOA or 1/10 MIL are both right around that sweet spot.”
In a helpful NSSF video, Ryan Cleckner explains why you normally should avoid canting your rifle — rotating it clockwise or counter-clockwise. Cleckner explains that canting the rifle in one direction or another will change the point of impact: “When you rotate the rifle, not only does the [POI move] in the direction that you’re rotated, [but] it also loses some of its elevation as it rolls down.” This, Cleckner explains, can make you miss on one side or the other:
Cant to the Left — You’re going to miss low and left.
Cant to the Right — You’re going to miss low and right.
In this video, starting at the one-minute mark, Cleckner shows the effect of rifle canting when engaging a 600-yard target. A few degrees of cant (either to the left or to the right), moves the shot POI completely off the steel silhouette target. The POI change occurs mainly because you are lowering (and laterally shifting) the scope sight-line relative to the bore axis, effectively changing your zero.
David Tubb has explained: “Every 1 degree you are off on a cant, is about six inches of difference laterally at 1000 yards”.
Position Shooting with Sling — Rifle Cant Considerations
Cleckner’s discussion assumes that the scope or sights are set to hit center with the rifle level and plumb. That works for most situations when shooting prone off bipod, front mechanical rest, or front sandbag. However, many sling shooters, including David Tubb and John Whidden, do tilt or cant their rifles slightly inward because this allows a more comfortable hold with sling, or allows better eye-to-sight alignment. Holding the rifle at an angle can work — but the angle of cant must be consistent for every shot. Canting the rifle is not a sin by itself. However, after you confirm your zero on your target, the degree of cant must be the same for EVERY shot. You must maintain that exact same degree of rotation on each shot or you will experience the shot POI movement Cleckner illustrates. Consistency is the key.
John Whidden, 5-time Nat’l Long Range Champion, holds a Palma rifle. John now shoots a match rifle with an Anschutz stock which he holds more upright, but still with some counter-clockwise cant. John also installed his iron sights at an angle so that the adjustments are correct (and plumb) even with his canted hold: “While it may not be obvious in the picture, the sights on my rifle are set up so that they’re straight vertical and horizontal while I hold the rifle canted. Making sure your adjustments (scope or sights) are vertical and horizontal is a critical piece of the pie.”
Inexpensive Dual-Diameter Scope-Mounted Bubble Level
The best way to avoid inconsistent rifle canting is to use a bubble level fitted to rail or scope. One very affordable and versatile product is the Jialitte Scope Bubble Level. This features a 30mm milled inside diameter, plus an inner insert ring so it will also fit 1″-diameter main tubes. The Jialitte unit is nicely radiused, and has a low profile in the middle. User reviews have been very positive. You could easily pay $35.00 or more for a 30mm scope level. This costs just $8.79 on Amazon (Cyber Monday special).
Share the post "The Anti-Cant Device for Scopes — Why You Need One"
We first ran this article in 2012, and it was very well received. Since then, many Forum members have requested an explanation of MILS and mildots, so we decided to run this feature again…
1 Milliradian (Milrad or ‘Mil’) = 1/1000th of a radian | 1 Milliradian = 0.0573 degrees.
In this NSSF Video, Ryan Cleckner, a former Sniper Instructor for the 1st Ranger Battalion, defines the term “MilliRadian” (Milrad) and explains how you can use a mildot-type scope to range the distance to your target. It’s pretty simple, once you understand the angular subtension for the reticle stadia dots/lines. Cleckner also explains how you can use the milrad-based reticle markings in your scope for elevation hold-overs and windage hold-offs.
Even if you normally shoot at known distances, the hold-off capability of milrad-reticle scopes can help you shoot more accurately in rapidly-changing wind conditions. And, when you must engage multiple targets quickly, you can use the reticle’s mil markings to move quickly from one target distance to another without having to spin your elevation turrets up and down.
WEB RESOURCES: If you want to learn more about using Milliradians and Mildot scopes, we suggest the excellent Mil-dot Explained article from targettamers.com Guide. This covers the basics you need to know, with clear illustrations.
Also informative is The Truth about Mil Dots by Michael Haugen. Mr. Haugen begins with basic definitions: 360 degrees = 2 x Pi (symbol π) Radians. That means 1 Radian is about 57.3 degrees. 1 Milliradian (Milrad or ‘Mil’) = 1/1000th of a radian. Thus 1 Milliradian = .0573 degrees.
Share the post "Do You REALLY Know MilliRadians? Intro to Mils and Mildots"
Burris Signature Rings with polymer inserts are an excellent product. The inserts allow you to clamp your scope securely without ring marks. Moreover, using the matched offset inserts you can “pre-load” your scope to add additional elevation. This helps keep the scope centered in its elevation range while shooting at long range. Additionally, with a -20 insert set in the front and a +20 insert set in the rear, you may be able to zero at very long ranges without using an angled scope base — and that can save money. (To move your point of impact upwards, you lower the front of the scope relative to the bore axis, while raising the rear of the scope.)
Insert Elevation Values and Ring Spacing
People are sometimes confused when they employ the Burris inserts. The inset numbers (-10, +10, -20, +20 etc.) refer to hundredths of inch shim values, rather than to MOA. And you need the correct, matched top/bottom pair of inserts to give you the marked thousandth value. Importantly, the actual amount of elevation you get with Burris inserts will depend BOTH on the insert value AND the spacing between ring centers.
Forum member Gunamonth has explained this in our Shooters’ Forum:
Working with Burris Signature Rings
Burris inserts are [marked] in thousandths of an inch, not MOA. To know how many MOA you gain you also need to know the ring spacing. For example, with a -20 thou insert set in the front and a +20 thou insert set in the rear, if the ring spacing is 6″, the elevation change will be approximately +24 MOA upwards.
Here’s how we calculate that. If you have a 2 X 0.020″ “lift” over a distance of 6 inches (i.e. 0.040″ total offset at 0.5 feet) that’s equivalent to 0.080″ “lift” over 12 inches (one foot). There are 300 feet in 100 yards so we multiply 0.080″ X 300 and get 24″ for the total elevation increase at 100 yard. (Note: One inch at 100 yards isn’t exactly a MOA but it’s fairly close.)
Here’s a formula, with all units in inches:
Total Ring Offset
——————– X 3600 = Change @ 100 yards
Ring Spacing
(.020 + .020)
—————– X 3600 = 24 inches at 100 yards
Ring Spacing: 6 inches
NOTE: Using the above formula, the only time the marked insert offset will equal the actual MOA shift is when the center to center ring spacing is 3.60″. Of course, you are not required to use 3.60″ spacing, but if you have a different spacing your elevation “lift” will be more or less than the values on the inserts.
Share the post "Calculate True Elevation Changes with Burris Signature Rings"
What is Parallax?
Parallax is the apparent movement of the scope’s reticle (cross-hairs) in relation to the target as the shooter moves his eye across the exit pupil of the riflescope. This is caused by the target and the reticle being located in different focal planes.
Why is it Important?
The greater the distance to the target and magnification of the optic, the greater the parallax error becomes. Especially at longer distances, significant sighting error can result if parallax is not removed.
How to Remove Parallax
This Nightforce Tech Tip video quickly shows how to remove parallax on your riflescope.
While keeping the rifle still and looking through the riflescope, a slight nod of the head up and down will quickly determine if parallax is present. To remove parallax, start with the adjustment mechanism on infinity and rotate until the reticle remains stationary in relation to the target regardless of head movement. If parallax has been eliminated, the reticle will remain stationary in relation to the target regardless of eye placement behind the optic.
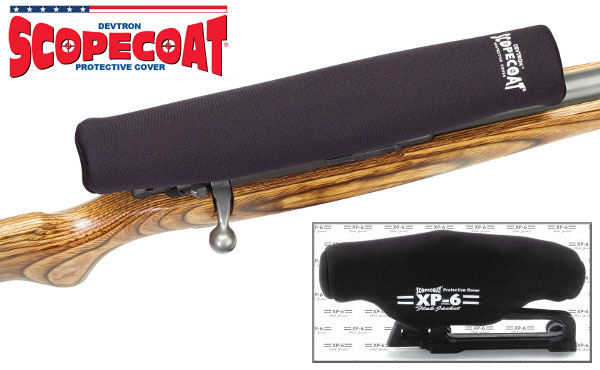
With the price of premium scopes approaching $3400.00 (and beyond), it’s more important than ever to provide extra protection for your expensive optics. ScopeCoat produces covers that shield scopes with a layer of neoprene rubber (wetsuit material) sandwiched between nylon. In addition to its basic covers, sold in a variety of sizes and colors, ScopeCoat has a line of heavy-duty 6mm-thick XP-6 covers that provide added security. CLICK HERE to review the full line of ScopeCoats on Amazon.
Triple-Thickness XP-6 Model for Added Protection
The XP-6 Flak Jacket™ is specifically designed for extra protection and durability. The 6mm-thick layer of neoprene is three times thicker than the standard ScopeCoat. XP-6 Flak Jackets are designed for tall turrets, with sizes that accommodate either two or three adjustment knobs (for both side-focus and front-focus parallax models). To shield an expensive NightForce, March, or Schmidt & Bender scope, this a good choice. XP-6 covers come in black color only, and are available for both rifle-scopes and spotting scopes.
The heavily padded XP-6 Flak Jacket is also offered in a Zippered version, shown at right. This is designed for removable optics that need protection when in storage. The full-length, zippered closure goes on quick-and-easy and provides more complete protection against dust, shock, and moisture. The line of XP-6 Scope Covers run $23 – $34 on Amazon.
Special Covers for Binos and Red-Dots
ScopeCoat offers many specialized products, including oversize covers for spotting scopes, protective “Bino-Bibs” for binoculars, rangefinder covers, even sleeves for small pistol scopes and red-dot optics. There are also custom-designed covers for the popular Eotech and Trijicon tactical optics.
Share the post "Protect Your Expensive Optics with ScopeCoat “Flak Jackets”"
At the request of our readers, we provide select “Deals of the Week”. Every Sunday afternoon or Monday morning we offer our Best Bargain selections. Here are some of the best deals on firearms, hardware, reloading components, optics, and shooting accessories. Be aware that sale prices are subject to change, and once clearance inventory is sold, it’s gone for good. You snooze you lose.
NOTE: All listed products are for sale to persons 18 years of age or older. No products are intended for use by minors.
⏺ Nice, compact 9mm complete with integrated laser — great carry gun
Here is a great value in a 9mm carry/defense pistol. The Smith & Wesson SD9VE 9mm features a comfortable grip, high visibility sights, and a built-in laser. The Crimson Trace LG-457 Laserguard is a powerful red laser designed specifically for Smith & Wesson SD/SD VE pistols. Featuring Crimson Trace’s Instinctive Activation system, the laser system can be set to activate instantly when the pistol is gripped, via a button on the grip front. This two-tone pistol has a black polymer frame and stainless slide. Priced at just $369.99 on sale, this S&W handgun is $200 less than a similar-sized Glock 19 without a laser.
2. KYGUNCO — Mossberg Night Train Rifle Combo, $731.99
⏺ Very good long range hunting deal, complete with 6-24x50mm scope
Here’s good hunting rifle package — rifle AND 6-24X scope — at a very attractive price. For $731.99, you can get a Mossberg Patriot Night Train Rifle and Scope combo package in 6.5 Creedmoor, .308 Win, or .300 Win Magnum. A high quality 6-24x50mm scope and rings are included with all three models, and the .308 Win and .300 WinMag models include a fitted muzzle brake. This is a nice, complete package with good chamberings for deer and elk.
3. Midway USA — Frankford Arsenal Sale, Save up to 35%
⏺ Big discounts on numerous popular products — save up to 35%
Frankford Arsenal offers a full line of reloading equipment from dies to tumblers. You can find all their gear on sale during the Frankford Arsenal Sale at MidwayUSA. With up to 35% off a wide variety of popular products, this is a great time to pick up reloading tools and accessories. Along with the three products shown above, here are some of the best bargains:
4. EuroOptic — Leupold BX-2 Alpine Binoculars Sale
⏺ Quality binoculars with great warranty, now $50 Off (up to 21% savings)
A good pair of binoculars needs to be durable, feel comfortable in your hands, and provide a bright, sharp image. Leupold’s BX-2 Alpine HD Binoculars have these qualities, plus a great Leupold guarantee, and excellent performance for the price. Right now EuroOptic has four types of Leupold BX-2 Alpine binoculars on sale for $50 off the regular price: 8×42, 10×42, 10×52, and 12×52. For general daytime spotting use we’d chose the 10×42 model, now just $199.99 on sale.
5. Graf & Sons — LEE Classic Turret Press, $129.99
⏺ Amazingly low price for a 4-station turret, with many great features
Right now the LEE Classic Turret Press is just $129.99 at Graf’s — an awesome deal. This 4-station Turret Press has earned excellent user reviews: “This cast iron frame model with all-steel linkage is built like a tank”; “Great press — solid as a rock. I originally bought it for reloading pistol ammo but like it so well I use it for almost everything”; “the turret auto-indexes perfectly and locks solid with no effort. I really like how easy it is to still use it as a single-stage when working up a load but not have to change dies, just simply rotate the turret by hand.” With four stations you can keep dies for multiple cartridge types. The long stroke allows rifle cases over 3″ long to be loaded. Spent primers run directly through the ram to an attached clear PVC tube that reliably catches every primer.
⏺ Big savings on popular electronic muffs favored by many shooters
All shooters should wear quality ear protection whenever they visit the range. Electronic muffs allow you to hear conversations/range instructions while still providing vital protection from loud gunshot noises. Walker’s is a respected maker of electronic muffs. And right now Walker’s Razor Slim electronic earmuffs are on sale at significant savings. These Razor Slim Ear Muffs feature slimmer ear cups. The thinner design provides less interference (and more comfort) while shooting rifles and shotguns. Razor Slim Muffs have a 23 dB Noise Reduction Rating with a fast, 0.02 second response time. These electronic muffs feature two omni-directional microphones with a single (combined) volume control.
7. Amazon — Birchwood Casey Dueling Tree, $269.99
⏺ Dueling trees are great fun for pistol and rimfire shooters
Interactive targets are fun — and a dueling tree is great for both solo training and pair shooting. Training with these targets can improve target acquisition times and follow-up shot speeds. This Birchwood Casey Dueling Tree offers fun competitions with a fellow shooter. When you hit a plate it swings to the opposite side. The winner is the shooter who gets all his plates to the other side first. Designed for handgun use, this Dueling Tree is fun and easy to set-up.
⏺ Lightweight adjustable rest for sighting-in hunting rifles and ARs
This very affordable, Birchwood Casey Bravo Shooting Rest works for sighting-in hunting rifles and ARs. At 15 lbs., it is easy to transport to the range. It has 3.5 inches of vertical adjustment with the center crank, allowing it to work with a variety of rifles, including mag-fed semi-autos. One cool feature is that this steel-framed Shooting Rest is designed so it can work from the Bench AND while shooting prone on the ground. This rest has a bubble level and adjustable rear height control. It’s on sale now for just $92.94 on Amazon, a significant savings over the regular price.
9. EuroOptic — Gamin Fenix 6 Watch, $259.99
⏺ Compact yet powerful — great item for hunters and hikers
The Fenix 6 Smartwatch by Garmin offers GPS functionality in an ultra-compact device. This Smartwatch comes preloaded with multiple Apps for finding location and mapping multi-point tracks. The Fenix 6 features ABC sensors including an altimeter, barometer, and 3-axis digital compass. This Garmin Smartwatch also offers multi-GNSS capabilities, which provides combined access to GPS, GLONASS, and Galileo navigation systems for greater navigational accuracy than GPS alone. And you can boost battery life to weeks using Expedition Mode, an ultra-efficient, low-power GPS modality.
Share the post "Bargain Finder 394: AccurateShooter’s Deals of the Week"
Over the past 12 months we have seen noteworthy innovations in riflescopes. Some very impressive scopes were showcased at SHOT Show 2023, including the impressive ZEISS LRP S3 FFP optics, and a stunning $5790.00 10-60X Schmidt & Bender. Advanced technology is also being integrated into modern riflescopes, as witnessed by a new Burris optic with a digital display linked to a Ballistic App via Bluetooth.
Gun blogger Jonathan Ocab, a very skilled shooter with both rifles and cameras, visited the booths of numerous optics makers at SHOT Show 2023. In this Sunday Showcase, Jonathan reviews some of the most notable riflescopes seen at SHOT Show. This article features seven optics brands: ZEISS, Sightron, Schmidt & Bender, Leupold, Tangent Theta, Burris, and Bushnell.
ZEISS LRP S3 Scopes — Class-Leading Elevation and Good Value
I stopped by the ZEISS booth to check out the ZEISS LRP S3 scopes that were released in the latter half of 2022. The ZEISS LRP S3 is available in two core models: 4-25x50mm and 6-36x56mm. Both scopes have 34mm main tubes and the minimum parallax distances are 16.4 yards and 10.9 yards for the 4-25X and 6-36X scopes, respectively.
The ZEISS LRP S3 scopes earned attention because the 4-25x50mm version has 46.5 MRAD/160 MOA of elevation travel while the 6-36x56mm has 32 MIL/110 MOA elevation travel. The 32 MIL elevation range of the 6-36X is exceptionally good while the 46.5 MIL elevation travel of the 4-25x50mm is best in class. Nothing else out there really rivals this. The Zeiss LRP S3 turrets and knobs are smooth, with the elevation and windage turrets having tactile clicks with no springy play from click to click.
Optically, they looked very good and in discussions with people who have LRP S3 scopes, they all indicated the LRP S3 was their favorite scope before stepping into the realm of Kahles, Zero Compromise Optic, and the other very pricey optics.
The ZEISS LRP S3 has an MSRP of $2199.99 and $2499.99 USD for the 5-25x50mm and 6-36x56mm versions, respectively. Given the features and capabilities of the LRP S3 series, I am surprised more people are not using them for NRL22/NRL22X and PRS Rimfire competitions. [Editor: The word is getting out and, and yes, more ZEISS LRP S3s are being used now at NRL22 and PRS rimfire matches.]
Sightron SVIII 5-40×56mm ED FFP
While not new, I needed to check out the Sightron SVIII 5-40x56mm ED FFP which has been out for nearly a year. Sightron’s current flagship scope, the SVIII 4-40x56mm, has a 40mm tube main tube which facilitates the 40 MIL elevation and 20 MIL windage adjustments. The SVIII offers the choice between a traditional crosshair reticle with hashes (LRM reticle) or a tree-style reticle (MH-6).
The extra-low dispersion glass in combination with their MC-777 Fully multi-coated optics provides top tier image quality in a package that carries an MSRP of $2899.
Schmidt & Bender 10-60×56mm Scope
Schmidt & Bender showed off its new 10-60x56mm scope. This 10-60x56mm uses a 34mm main tube and I am going to guess that this impacted the elevation travel as the specifications indicate it has only 25 MRAD available. Note that I say ‘only’ because 30 MRAD of elevation travel is becoming a common benchmark in the industry for long range precision rifle scopes.
The S&B 10-60x56mm is oriented towards competitive rifle shooters including F-Class, benchrest, and (extreme) long range shooters. This is reflected in the M1FL reticle that is used for the 10-60x56mm.
Note that the M1FL lacks a tree-style reticle and keeps the field of view clear with a basic crosshair reticle with MIL graduations. It is also important to note that the 10-60x56mm will be available in a Second Focal Plane (SFP) MOA scope with adjustment values of 1/4 or 1/8 MOA.
Schmidt & Bender is supporting either standard 0.1 MIL adjustment turrets or 0.05 MIL using their Multi Turn II turrets. The scope displayed had Mil turrets and was First Focal Plane (FFP). But S&B has posted: “MOA shooters take note: Soon, the 10-60x56mm will be offered with a Second Focal Plane MOA-based reticle and corresponding turret configurations with click values of ¼ or ⅛ MOA. So stay tuned.”
The 10-60x56mm also has the illumination and parallax adjustment on the same turret. While this is not new to scopes in general as many manufacturers do this, many previous S&B scopes have a separate reticle illumination knob which would affect what scope mounts could be used.
Given the reticle choice and the ability to go very fine on the turret adjustments, I feel that this scope will be sought after by F-Class and Benchrest shooters. Not to mention the 60X maximum magnification will turn the rifle scope into a spotting scope as needed (e.g., seeing hit locations when shooting on paper as opposed to electronic targets). The S&B 10-60x56mm is not a scope meant for the NRL/PRS type shooter.
Scopelist.com shows a starting price of $5790.00 for the the Schmidt & Bender 10-60x56mm. There is also a version priced at $5940.00, making this one of the most expensive optics on the market.
Leupold’s New Mark 5HD 2-10×30mm
I went to the Leupold booth to discover a new Mark 5HD iteration in the form of the 2-10x30mm optic. It is quite apparent, based on the magnification range, that new Mark 5HD 2-10x30mm is meant to compete in the Low Power Variable Optic (LVPO) arena. However, unlike other LVPOs, the Mark 5HD 2-10×30 has adjustable parallax from 40 yards to infinity — thank you Leupold!
The new Mark 5HD has the typical features found on prior Mark 5HD scopes including a 35mm main tube, locked elevation turret, capped windage turret, and the mini-throw lever on the magnification ring.
The Leupold Mark 5HD 2-10x30mm will be available in MOA with the PR1 reticle and in MIL with the TMR reticle (either illuminated or non-illuminated), and all are First Focal Plane. The MSRP is $1999.99 for the non-illuminated reticle versions and $2499.99 for the illuminated version.
Tangent Theta TT735P 7-35x56mm
Those who prefer top-tier scopes will be enamored with the new Tangent Theta TT735P scope. Tangent Theta, a Canadian company, produces very exacting scopes that are renowned for their high degree of quality including optics, functional performance, and construction and durability.
The new TT735P from Tangent Theta is a 7-35x56mm zoom scope with a 56mm objective. Unlike the other Tangent Theta models already in production which have a 34mm tube, the TT735P uses a 36mm tube. The TT735P has the same tool-less zeroing turrets which are highly regarded in existing Tangent Theta scopes.
10M Minimum Parallax Distance
The one huge feature in the TT735P is that it has a minimum parallax of 10 meters, which makes it viable for high-end rimfire platforms (e.g. NRL22/PRS). I really do not know how to convey the quality of the TT735P scope to anyone who has not handled a Tangent Theta before. The turrets are superb in tactile feel and the tool-less turret re-zeroing capability is a very exceptional (and useful) feature. This scope also offers a lockable diopter.
The new TT735P scope is one very pricey optic. The Tangent Theta 7-35×56mm is listed on the Armament.com website as ranging from USD $6,369.00 to USD $6,872.00 depending on reticle.
Gen 3 XR reticle is one of the reticle offerings for the TT735P (Source: ATI/TT)
Burris Optics 4-20x50mm Veracity PH with PEK
There is one quite notable new scope that I wanted to bring up that I saw during SHOT Show 2023 and that is the Burris Optics Veracity PH 4-20x50mm.
The Veracity PH is a 4-20x50mm riflescope with a 30mm main tube. It has a MOA reticle with 66 MOA and 37 MOA travel available on 1/4 MOA elevation and windage turrets, respectively. This sounds like a very hunter-oriented scope given the relatively short amount of elevation travel and the fact that it is in MOA. So, given the basic specifications, the Veracity PH is nothing spectacular to behold. That is until you learn more about the Programmable Elevation Knob (PEK) that is featured on the Veracity PH scope.
The PEK elevation knob does not have tactile clicks like a normal turret would and freely spins (albeit with tension). The reticle moves up and down mechanically with the erector as it normally should. However, the elevation turret is tied to the PEK system to control a digital display inside the scope’s sight picture. Note: Cant/bubble level is not visible in this photo.
The display shows a distance, the windage hold, and the rifle cant (level). The distance and windage hold values are based on the ballistic profile that will be synced with the scope via the Burris Connect phone App over Bluetooth. Note that you can elect to display the distance (that the elevation knob is set to given the ballistic profile) in yards or meters, or display the MOA dialed on the elevation turret.
The cant/bubble level in the digital display is probably the highlight feature for me as this gets a level reference in the same plane of vision as the sight picture. No changing focus to the scope rail, scope mount, or the physical scope where a bubble level may be attached. The shooter can stay on target with the sight picture and see the level of the scope (and rifle).
Furthermore, the Burris Optics representative indicated that you can set the zero of the level using the Burris Connect App. The Burris Optics Veracity PH 4-20x50mm has an MSRP of $1200.00.
Bushnell Optics Match Pro ED 5-30×56mm
Affordable Bushnell 5-30x56mm Match Pro
I made sure to visit Bushnell to see the new Bushnell Match Pro ED 5-30x56mm scope. This scope came out in December 2022 and is getting positive buzz because of its good glass quality and feature set at a $699.99 price point.
The Match Pro ED is a 5-30X magnification scope with a 56mm objective and 34mm main tube. It has locking turrets with a zero-stop for the elevation turret, and 30 MRAD and 14.5 MRAD travel for the elevation and windage, respectively.
The elevation knob has 10 MRAD per revolution for clear, easy to read graduations. The minimum parallax is 15 yards making this suitable for rimfire matches like NRL22. It comes with the Deploy MIL 2reticle, a tree-style illuminated reticle.
SHOT Show exhibition lighting is bad, but the glass looks solid. The fact that this scope is sold out at Bushnell could indicate that consumers are already clamoring for this scope.
About the Reviewer — Jonathan Ocab
Jonathan Ocab publishes various shooting sports articles on his Ocabj.net Blog and shooting sports videos on his YouTube channel.
A former High Power Service Rifle competitor (Distinguished Rifleman), Jonathan is now primarily a recreational shooter in pistol, rifle, and rimfire, with a heavy emphasis on the latter as he is currently the NRL22 Match Director at his local range. See SoCalNRL22.org.
Share the post "Sunday Showcase: Noteworthy Optics from SHOT Show 2023"
Forum member Jacob spotted this simple, but effective set of scope ring inserts on the Brownells Website. With these inserts, you can use a scope with 1″-diameter main tube in 30mm rings. Non-marring, matte black Delrin sleeves surround the scope tube so it can fit larger-diameter rings. Each sleeve comes in two parts for easy installation around your scope tube. This way you can use the same 30mm rings for all your scopes.
Ring Reducers are sold as front/rear kits. Cost is $16.99 for the Delrin 30mm to 1″ converters, item 084-000-091WB. There are also sets that reduce 30mm rings to 26mm, and 1″ rings to 3/4″ or 7/8″.
Note: These Brownells units simply function as plastic bushings. Unlike Burris Signature Ring inserts, they do not allow you to “pre-load” windage or elevation. If your rings are misaligned, the Brownells Ring Reducers won’t correct that problem.
Share the post "Put 1″-Diameter Optics in 30mm Rings with Brownells Adapters"
For many years, the Swarovski Optik website featured a blog with interesting technical articles. (Unfortunately some of these articles have been taken offline.) In the “On Target” series of blog stories, Swarovski provided a handy explanation of how optics systems work, with exploded diagrams of rifle scopes, spotting scopes, and binoculars. We’ve reproduced the key diagrams here. CLICK HERE for Swarovski On Target Archive.
Scope Terminology Focusing Lens
The focusing lens is an adjustable lens inside the optical system for focusing the image at different distances…. In the case of rifle scopes, apart from focusing, the focusing lens also facilitates parallax compensation.
Objective Lens
The objective lens is the optical system’s front lens group facing the object and operates like a converging lens. Its purpose is to display an image which, at the image plane, appears upside down, laterally transposed and reduced, and which is subsequently displayed correctly again by the reversal system.
Diopter Adjustment
For rifle scopes, the reticle can be focused using the diopter adjustment on the eyepiece, thereby correcting any visual impairment. [Editor’s Note: Movable eyepiece diopter adjustment is not offered on all rifle scopes. It is a useful feature on Swarovski and other premium scopes. This allows shooters who need eyeglasses to get a sharply focus image even without wearing corrective lenses. Of course shooters should always wear ANSI-certified eye protection. With the diopter, folks who need correction can use inexpensive, non-Rx safety eyewear instead of expensive prescription safety glasses.]
Reversal System
The purpose of the reversal system is to reverse the image by means of prisms in binoculars and telescopes, and lenses in rifle scopes….The lens reversal system is needed in rifle scopes to control the variable magnification and move the exit pupil[.]
Resource tip by EdLongRange. We welcome reader submissions.
Share the post "Eye on Optics — How Riflescopes and Spotting Scopes Work"


 A varmint shooter’s target is not conveniently placed at a fixed, known distance as it is for a benchrester. The varminter must repeatedly make corrections for bullet drop as he moves from closer targets to more distant targets and back again.
 Minority View — Hold-Over is Better


 In this NSSF Video, Ryan Cleckner, a former Sniper Instructor for the 1st Ranger Battalion, defines the term “MilliRadian” (Milrad) and explains how you can use a mildot-type scope to range the distance to your target. It’s pretty simple, once you understand the angular subtension for the reticle stadia dots/lines. Cleckner also explains how you can use the milrad-based reticle markings in your scope for elevation hold-overs and windage hold-offs.
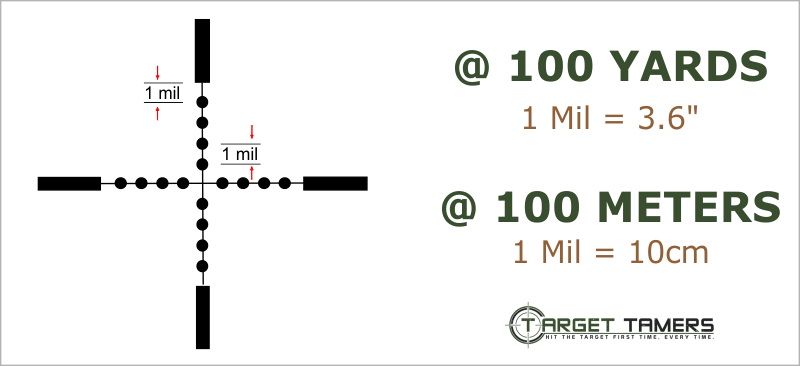


 With the price of premium scopes approaching $3400.00 (and beyond), it’s more important than ever to provide extra protection for your expensive optics.
  The heavily padded XP-6 Flak Jacket is also offered in a Zippered version, shown at right. This is designed for removable optics that need protection when in storage. The full-length, zippered closure goes on quick-and-easy and provides more complete protection against dust, shock, and moisture. The line of XP-6 Scope Covers run


 The new


 Affordable Bushnell 5-30x56mm Match Pro


