G.A. Precision (G.A.P.) has announced a new three-lug action, the Tempest. This unit features a large bolt knob with extended, curved bolt handle (similar to the bolt handle on the Accuracy International AX). Up front the Tempest boasts an integral recoil lug with extended front tenon section — for better support of heavy barrels. The Tempest’s distinctive feature is its three-lug bolt. Compared to a two-lug bolt, a three-lugger allows a short, 60° bolt lift (fewer degrees of lift to release). Like the G.A.P. Templar action, the new Tempest sports a Rem 700 footprint, though stock inletting would have to be altered slightly for the integral lug/tenon design.
Sorry guys, G.A.P. has not yet announced a retail price or delivery date (we did ask, but the folks at G.A.P. don’t even have a wholesale price from the 3rd-party manufacturer yet). Whatever it costs, the Tempest action will be popular. It has already inspired nearly 300 likes on the G.A.P. Facebook page.
Are you feeling lucky on this last day of 2014? Well Cheaper Than Dirt is giving away a very unique (and very patriotic) rifle. The Just Right Carbine is a simple, blowback-action semi-auto rifle that can be configured to shoot three different pistol cartridges: 9mm, .40 SW, and .45 ACP. The Just Right Carbine bridges the power gap between long guns chambered for rimfire cartridges and those using full-power rifle rounds. With caliber conversion kits, this modular carbine can shoot the three most popular semi-auto pistol cartridges: 9mm, .40 SW, and .45 ACP. The give-away rifle is configured to shoot one caliber, the 9mm Luger (9mm parabellum).
This special-release Stars and Strips Edition carbine is finished in an American Flag camouflage. American Rifleman magazine says this rifle is versatile and easy to operate:
“At first glance, the JR Carbine is just another AR variant. Though it shares numerous parts and an outward appearance with the ubiquitous AR platform, the JR is actually of a totally different design. Unlike the AR’s gas-operated action, the JR Carbine uses a simple blowback system similar to that of the Ruger 10/22. The bolt is held forward by spring pressure and is cycled by the energy of the fired round; there are no gas tubes or pistons involved. While it doesn’t use the AR’s operating system, the JR Carbine does share with the AR its modularity and some parts commonality, so many of the myriad of AR accessories can be used on the JR. The carbine uses a standard commercial diameter AR buffer tube so any buttstock compatible with a commercial AR can be fitted to the JR. Mil-spec and commercial AR parts are also interchangeable with the carbine’s AR-style trigger, grip, and safety[.]”
How to Enter Contest: For a chance to win this rifle, visit the Cheaper Than Dirt Contest Registration Page and complete the online entry form. Limit one entry per person and e-mail address during the Sweepstakes Period.
Report by Anette Wachter,30CalGal.com
The ball is rolling to challenge the I-594 bill that passed in Washington state last November. This is perhaps the strictest gun control law out there. Why? Because it is like the Health Care Law. There are too many pages of undefined crap that they said they would figure out after it goes in to law.
Our local Second Amendment Foundation with Alan Gottlieb has filed a lawsuit in the U.S. District Court in Tacoma, WA. The language in the new law is unclear to even law enforcement and the Washington State Department of Licensing (DOL). Have you gone to DOL’s website about this recently? There is no advice and the site just pushes you to your local law enforcement or the ATF. Local law enforcement officials do not want to enforce this law and do not know how to do so. And the ATF, a federal organization, is unclear [as to the impact of the law] as well.
The law will not be overturned so don’t get your hopes up. But they have to define it. It is so confusing. We need to get the ridiculous parts about transfers undone. So many people and agencies are affected by this unclear language.
I just had dinner last night with Brian Judy of the NRA and Adina Hicks of the Protect Our Gun Rights Washington group. There will be an organized rally in Olympia on January 15th starting at 9:00 am. That’s on a weekday when the Legislature is again in session. Visits to Legislators start at 11:00. I will be there and I will go to the office of my district’s Representative. We need your support! If you are in Washington please join us out there.
Please call your legislator ahead of time and make an appointment to see them after the rally that day. The Washington Firearms Leadership and Activism Group (WAFLAG), Protect Our Gun Rights Washington, and the Gun Rights Coalition will host the event. Both the Citizens Committee for the Right to Keep & Bear Arms and the Second Amendment Foundation are sponsoring the event also. Please read more details and the entire article by Dave Workman of TheGunMag.com HERE.
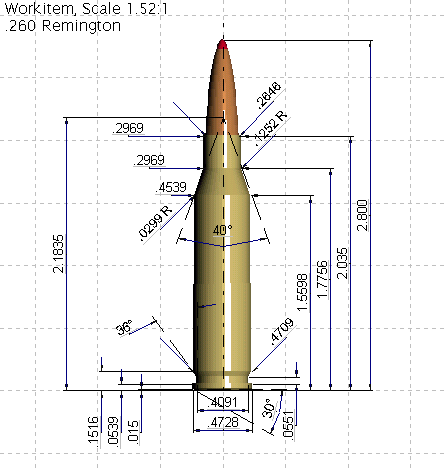
The AR-10 was designed to handle the 7.62×51/.308 Winchester and other .308 “family” cartridges such as the .243 Win and .260 Remington. Our friend Dennis Santiago recently put together an AR-10 to shoot the accurate .260 Rem cartridge. Here is his initial report:
AR-10 Platform Chambered for .260 Remingtonby Dennis Santiago
I was very curious to see how the .260 works in the AR-10 compared to a .308. I’ve always thought about chambering a bolt gun in .260 but before doing so I thought it’d be good to try it using a less expensive entry point. With an AR platform’s easy interchanging of barrels, it seem like the best way to test out the .260 Rem chambering. So far, it’s most impressive.
DPMS LR-308 in .260 Remington getting function cycle tuned and zeroed
I took the AR-10-type .260 Rem a step closer to being ready for matches yesterday. The first order of business was to confirm which buffer spring to use with both the 123 grain and 140 grain bullet loads. My .260 Rem loads, on average, are using 4-5 grains less powder than the .308 loads. In a semi-automatic action that means less gas/energy to work the mechanics. The solution in an AR-10 platform is to either cut coils in the .308 spring or use a weaker AR-15 buffer spring; yup they are not the same. In this case, a CS flat spring for the AR-15 did the trick.
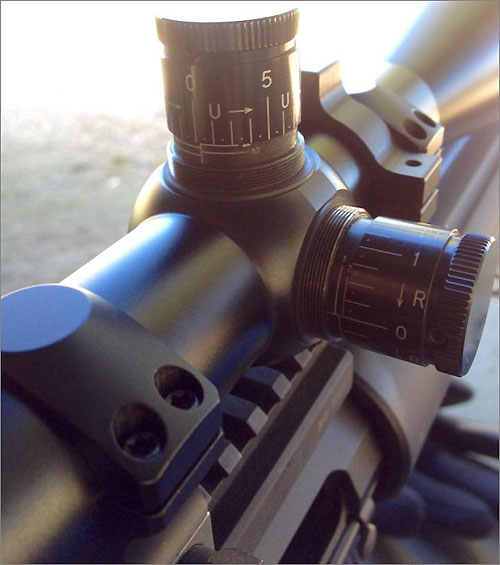
I also put a very nice NightForce Benchrest 12-42x56mm scope that came via friend Mark Gravitt on it and got zeros. This scope’s 1/8th MOA clicks are nice. The AR-10 had previously mounted a NightForce F1, a more “field tactical” 3-15X system. This 12-42X scope now sets this gun up as more of a target cannon. Field of view is limited when your minimum magnification is twelve. Maybe I’ll put an auxiliary red dot on it just to find the target.
Pet Loads: H4350 and Lapua 123gr Scenars Comment by Daily Bulletin Editor
Over a two-year period, this Editor put a lot of rounds through a .260 Remington. I did a ton of load testing with that Savage-actioned rifle (before it was rebarreled as a 6mmBR Norma). I tried two dozen load recipes with five different powders and bullets ranging from 100 grains to 142 grains. Hodgdon H4350 was my “go-to” powder. As many 260 Rem shooters have discovered, H4350 is a winner in the .260 Rem. This propellant delivered the lowest ES in my rifle and nothing beat H4350 for consistent accuracy with bullets in the 120-140 grain range. My most accurate load was with Lapua 123gr Scenars, pushed by H4350 and CCI 250 primers. The 123gr Scenars worked well jumped as well as seated into the lands. Best accuracy, in my 24″-barreled .260 Rem, was right about 2950 fps. Other powders work well, but H4350 is a very good choice for the .260 Remington (as well as the smaller 6.5×47 Lapua cartridge).
We can predict, with some certainty, how long a light bulb will last (in use), or a shingle roof, or even a nuclear reactor. But how about barrels? Is there a way to reliably estimate barrel life based on known characteristics? This article explains one effort to quantify barrel life…
How long will a barrel last before the accuracy “goes south”? There are so many variables involved (powder type, bore diameter, bullet coatings etc.) that it’s hard to predict. You might say “Well, my buddy has a .243 and he got 1500 rounds before the throat was shot out” — those kind of comparisons can be useful, but they’re not very scientific, and they won’t help much if you’ve got a gun in a new chambering (such as the 6.5×47) for which long-term test results are lacking.
Is there a more reliable way to predict barrel life — one that will work for a broad range of calibers? Well, Forum member MikeCr has developed an Excel spreadsheet that accounts for a number of variables, and gives a pretty good estimate of useful barrel life, whether you’re shooting a .223 Rem or a 338 Lapua Magnum. Mike’s program predicts barrel life using five variables: 1) Bullet Diameter; 2) Powder Charge weight; 3) Powder Heat Potential (KJ/kg); 4) Pressure (in psi); and 5) Bullet Coating (yes/no). Mike provides a table with Heat Potential ratings for most popular powder types. The user needs to know the pressure of his load. This can be estimated with QuickLOAD.
You can download the lastest version of Mike’s spreadsheet below. You’ll need Excel or an Excel viewer to open the file.
Shown below is Mike’s Spreadsheet, with variables for a 6BR shooting 105gr “naked” bullets with 30.3 grains of Hodgdon Varget powder. The formula predicts 2401 rounds of barrel life. That corresponds pretty well to what we’d expect for a 6BR — about 2500 rounds.
Mike observes: “There has been a lot of discussion lately related to cartridge design and resulting barrel life. This is a really important factor to consider amongst a myriad of choices. Barrel life is controversial, and subjective. There are no clear-cut standards for comparison. But a few years ago, I put together a spreadsheet based on Bart Bobbit’s rule of thumb. It worked pretty good, only occasionally failing some tests when validated against posted barrel lives.
According to Ken Howell, I had to account for pressure. And Henry Child’s powder temperature testing provided another piece needed. So, I’ve tweaked it here and there to pass more tests. From 223 Rem to 300 UltraMagnum. Another element added, but turned off, is shot interval. I would need way more tests to lock in on this. But everyone knows, the faster you shoot, the worse the barrel life.
Anyway, another factor hard to define is ‘accurate’ barrel life. This cannot be quantified without standards. Barrels are replaced when expectations are no longer met. I feel that a [barrel] passes peak potential in a finite period due to throat erosion. But that don’t mean it’s toast, if it still shoots well enough. It’s just as likely that many of us never see that peak potential anyway. It’s a slippery thing. Point-blank BR competitors will toss a barrel when it leaves the 1s. I could get another 4000 rounds from it, and be content with its performance, I’m sure.”
NOTE: Mike says: “This spreadsheet may show a lower barrel life than you prefer. But it pretty well spotlights cartridges to stay away from if you plan much time at the range or in dog town.”
Editor’s Comment: Mike’s spreadsheet is a helpful tool, but it is NOT a definitive “take-it-to-the-bank” indicator of barrel life. Mike cautions that predicting barrel life involves so many different factors (including how hot the barrel is run), that the task is a bit like predicting tread life on car tires. Still, the spreadsheet is very helpful. It can certainly warn us that some chamberings (such as the 6-284) are likely to be barrel burners. That can help you make a smart decision when choosing a chambering for your next rifle.
Midsouth Shooters Supply is having a huge End-of-Year Sale. Hundreds of clearance items are marked down 40% (or more) through the end of 2014. For the next couple of days there are amazing deals to be had on ammo, optics, scope rings, gun cases, reloading dies, muzzle-loader rifles, cleaning supplies and much more. Below are some of the top deals we found this morning. (NOTE: This is just a tiny fraction of the hundreds of 40% OFF clearance items.) Remember, these deeply-discounted deals expire soon — you snooze, you lose.
In this NSSF Video, Ryan Cleckner, a former Sniper Instructor for the 1st Ranger Battalion, defines the term, “Minute of Angle” (MOA) and explains how you can adjust for windage and elevation using 1/4 or 1/8 MOA clicks on your scope. This allows you to sight-in precisely and compensate for bullet drop at various distances.
For starters, Ryan explains that, when talking about angular degrees, a “minute” is simply 1/60th. So a “Minute of Angle” is simply 1/60th of one degree of a central angle, measured either up and down (for elevation) or side to side (for windage). At 100 yards, 1 MOA equals 1.047″ on the target. This is often rounded to one inch for simplicity. Say, for example, you click up 1 MOA. That is roughly 1 inch at 100 yards, or roughly 4 inches at 400 yards, since the target area measured by 1 MOA increases in linear fashion with the distance.
In our Shooters’ Forum a reader asked: “How much neck tension should I use?” This prompted a Forum discussion in which other Forum members recommended a specific number based on their experience, such as .001″, .002″, or .003″. These numbers, as commonly used, correspond to the difference between case-neck OD after sizing and the neck OD of a loaded round, with bullet in place. In other words, the numbers refer to the nominal amount of interference fit (after sizing).
While these commonly-used “tension numbers” (of .001″, .002″ etc.) can be useful as starting points, neck tension is actually a fairly complex subject. The actual amount of “grip” on the bullet is a function of many factors, of which neck-OD reduction during sizing is just one. Understanding these many factors will help you maintain consistent neck tension as your brass “evolves” over the course of multiple reloadings.
Neck Tension (i.e. Grip on Bullets) Is a Complex Phenomenon
While we certainly have considerable control over neck tension by using tighter or looser bushings (with smaller or bigger Inside Diameters), bushing size is only one factor at work. It’s important to understand the multiple factors that can increase or decrease the resistance to bullet release. Think in terms of overall brass-on-bullet “grip” instead of just bushing size.
One needs to understand that bushing size isn’t the beginning and end of neck tension questions, because, even if bushing size is held constant, the amount of bullet “grip” can change dramatically as the condition of your brass changes. Bullet “grip” can also change if you alter your seating depth significantly, and it can even change if you ultrasonically clean your cases.
Bullet grip is affected by many things, such as:
1. Neck-wall thickness.
2. Amount of bearing surface (shank) in the neck.
3. Surface condition inside of neck (residual carbon can act as a lubricant; ultrasonic cleaning makes necks “grabby”).
4. Length of neck (e.g. 6BR neck vs. 6BRX).
5. Whether or not the bullets have an anti-friction coating.
6. The springiness of the brass (which is related to degree of work-hardening; number of firings etc.)
7. The bullet jacket material.
8. The outside diameter of the bullet and whether it has a pressure ridge.
9. The time duration between bullet seating and actual firing (necks can stiffen with time).
10. How often the brass is annealed
— and there are others…
Seating Depth Changes Can Increase or Decrease Grip on Bullet
You can do this simple experiment. Seat a boat-tail bullet in your sized neck with .150″ of bearing surface (shank) in the neck. Now remove the bullet with an impact hammer. Next, take another identical bullet and seat it with .300″ of bearing surface in another sized case (same bushing size/same nominal tension). You’ll find the deeper-seated bullet is gripped much harder.
Neck-Wall Thickness is Important Too
I have also found that thinner necks, particularly the very thin necks used by many PPC shooters, require more sizing to give equivalent “grip”. Again, do your own experiment. Seat a bullet in a case turned to .008″ neckwall thickness and sized down .003″. Now compare that to a case with .014″ neckwall thickness and sized down .0015″. You may find that the bullet in the thin necks actually pulls out easier, though it supposedly has more “neck tension”, if one were to consider bushing size alone.
In practical terms, because thick necks are less elastic than very thin necks, when you turn necks you may need to run tighter bushings to maintain the same amount of actual grip on the bullets (as compared to no-turn brass). Consequently, I suspect the guys using .0015″ “tension” on no-turn brass may be a lot closer to the guys using .003″ “tension” on turned necks than either group may realize.
Toward a Better Definition of Neck Tension
As a convenient short-cut, we tend to describe neck tension by bushing size alone. When a guy says, “I run .002 neck tension”, that normally means he is using a die/bushing that sizes the necks .002″ smaller than a loaded round. Well we know something about his post-sizing neck OD, but do we really have a reliable idea about how much force is required to release his bullets? Maybe not… This use of the term “neck tension” when we are really only describing the amount of neck diameter reduction with a die/bushing is really kind of incomplete.
My point here is that it is overly simplistic to ask, “should I load with .001 tension or .003?” In reality, an .001″ reduction (after springback) on a thick neck might provide MORE “grip” on a deep-seated bullet than an .003″ reduction on a very thin-walled neck holding a bullet with minimal bearing surface in the neck. Bushing ID is something we can easily measure and verify. We use bushing size as a descriptor of neck tension because it is convenient and because the other important factors are hard to quantify. But those factors shouldn’t be ignored if you want to maintain consistent neck tension for optimal accuracy.
Consistency and accuracy — that’s really what this all about isn’t it? We want to find the best neck tension for accuracy, and then maintain that amount of grip-on-bullet over time. To do that you need to look not only at your bushing size, but also at how your brass has changed (work-hardened) with time, and whether other variables (such as the amount of carbon in the neck) have changed. Ultimately, optimal neck tension must be ascertained experimentally. You have to go out and test empirically to see what works, in YOUR rifle, with YOUR bullets and YOUR brass. And you may have to change the nominal tension setting (i.e. bushing size) as your brass work-hardens or IF YOU CHANGE SEATING DEPTHS.
Remember that bushing size alone does not tell us all we need to know about the neck’s true “holding power” on a bullet, or the energy required for bullet release. True bullet grip is a more complicated phenomenon, one that is affected by numerous factors, some of which are very hard to quantify.
Peltor folding ‘Shotgunner’ ear muffs are on sale right now at Amazon.com. Available in red (#97013), dark green (#97012), or black (#97011), the muffs cost about $15.00 (red version), and you can get free shipping with an order over $35.00. That’s a good deal for a good product. This Editor owns two sets of these muffs. They are very lightweight and comfortable. Because they fit well, with gel foam cushions, they actually seem to work better than some big bulky muffs (with higher NRRs) that don’t seal so well. If used with plugs underneath, these are highly effective and very handy.
Peltor’s Shotgunner muffs feature tapered ear domes, cutaway on the lower half for stock clearance. We have not found any other muffs on the market that allow a better cheek weld, with less interference with the comb on a riflestock. These muffs also fold up into a very compact package. You can keep one set in your range kit and a spare set in your vehicle for back-up or if a friend needs hearing protection.
This video shows the process of single-point, cut-rifled barrel-making by one of the world’s best barrel manufacturers. See Krieger barrels being made, start to finish. Krieger cut-rifled barrels have set numerous world records and are favored by many top shooters. The video show the huge, complex machines used — bore-drilling equipment and hydraulic riflers. You can also see how barrels are contoured, polished, and inspected.
For anyone interested in accurate rifles, this is absolutely a “must-watch” video. Watch blanks being cryogenically treated, then drilled and lathe-turned. Next comes the big stuff — the massive rifling machines that single-point-cut the rifling in a precise, time-consuming process. Following that you can see barrels being contoured, polished, and inspected (with air gauge and bore-scope). There is even a sequence showing chambers being cut.
Here is a time-line of the important barrel-making processes shown in the video. You may want to use the “Pause” button, or repeat some segments to get a better look at particular operations. The numbers on the left represent playback minutes and seconds.


 I just had dinner last night with Brian Judy of the NRA and Adina Hicks of the Protect Our Gun Rights Washington group. There will be an organized rally in Olympia on January 15th starting at 9:00 am. That’s on a weekday when the Legislature is again in session. Visits to Legislators start at 11:00. I will be there and I will go to the office of my district’s Representative. We need your support! If you are in Washington please join us out there.
 How long will a barrel last before the accuracy “goes south”? There are so many variables involved (powder type, bore diameter, bullet coatings etc.) that it’s hard to predict. You might say “Well, my buddy has a .243 and he got 1500 rounds before the throat was shot out” — those kind of comparisons can be useful, but they’re not very scientific, and they won’t help much if you’ve got a gun in a new chambering (such as the 6.5×47) for which long-term test results are lacking.


 In our
  Neck-Wall Thickness is Important Too


