Here is beautiful F-Open rig crafted by Forum member CigarCop of KW Precision LLC. It features a laminated wood stock with stunning figured walnut on the outside.
One of the most popular items in our Shooters’ Forum is the ongoing “Pride and Joy” thread. Since 2009, Forum members have posted photos and descriptions of their most prized rifles. Here are some of the most recent “Pride and Joy” rifles showcased in our Forum. Do you have a gun you’d like to see featured there? Just Register for the Forum and you can add your favorite gun to the list.
New 600/1000 Benchrest Light Gun for Richard Schatz in 6 BRA
This blue benchrest rig was crafted by Alex Wheeler for ace benchrest competitor Richard Schatz, a past 600-yard IBS Shooter of the Year. Richard’s new 600/1000-yard Light Gun features a Krieger barrel chambered in 6 BRA (40° Ackley version of 6mmBR Norma). That Krieger is mated to a 1.550″ BAT B action, ignition-timed for smooth bolt close and increased accuracy. The trigger is the sophisticated Bix’n Andy. Schatz’s BAT is glued and screwed into a Wheeler LRB stock, with aluminum rails and adjustable metal “tracking rudder” on the toe of the stock. The rudder can be adjusted side to side to ensure optimal tracking, while the rudder’s vertical angle can be adjusted slightly with shims.
Hand-Crafted Thumbhole-Stocked Rifle Chambered in 6 PPC
Forum Member Grimstod offered this handsome 6 PPC custom with a beautiful, hand-made thumbhole stock: “This was fully accurized with Premier Accuracy recoil lug installed. Really makes these shoot a lot better. It features a Kelbly Panda action with Hart barrel and glass bedding. Trigger fall was perfect to start and we have to give Ian Kelbly big thumbs up for making every action perfectly timed.” On top is a March competition scope. See more photos at www.premieraccuracy.com.
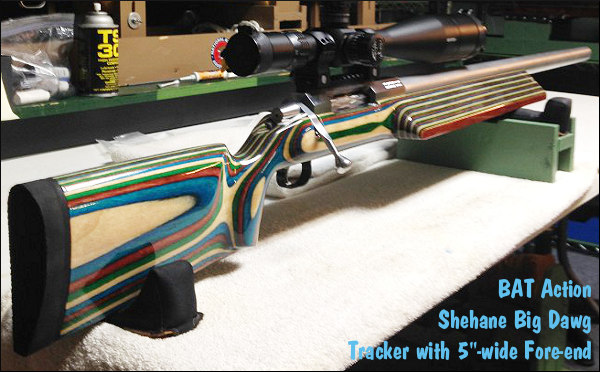
A Wicked Accurate Big Dawg in 28 Nosler
This 28 Nosler Benchrest rifle looks good and shoots even better — check out that 20-shot target shot at 200 yards! You can’t argue with that…
Belonging to Forum member LA50Shooter, this rig is chambered in 28 Nosler, with metal work by Gre-Tan Rifles. The action is a BAT Model “L” 1.650 Octagon with a 30 MOA scope rail, running a Jewell BR Trigger. The stock, from D&B Supply, is a Shehane Big Dawg Tracker with 5″ fore-end. Color scheme is “Field & Stream” Rutland laminate. This big rig boasts FOUR 34″ Benchmark barrels (1.5″ for seven inches tapering to 1.225″ at muzzle).
A Pair of Score Benchrest Beauties
Forum member JimPag showcased two new Benchrest-for-Score rifles. The rig on the left, smithed by Dwight Scott, features a Farley Black Widow RBLPRE (with Bix’n Andy trigger). It features Pistachio and Carbon Terry Leonard stock glued and screwed by Sid Goodling. The barrel is a Krieger 23.5″ chambered in 30BR with a Mike Ezell tuner. It’s topped with a Goodling-built 1-piece Davidson base and a Nightforce 42X Comp scope. The rifle on the right, smithed by Sid Goodling, features a Marsh Saguaro RBLPRE Action with Bix’n Andy trigger, and March 36-55X scope. This rifle boasts a rare Screwbean Mesquite and carbon stock by Terry Leonard. The 23″ Lilja bbl is chambered in 30 Thrasher with a Goodling tuner. (30 Thrasher is longer 30 BR case developed by Joe Entrekin). Jim also has two other barrels for this action in 30 BR and 6 BRAI. On top is a Sid Goodling-built one-piece Davidson base with a March 36-55X scope.
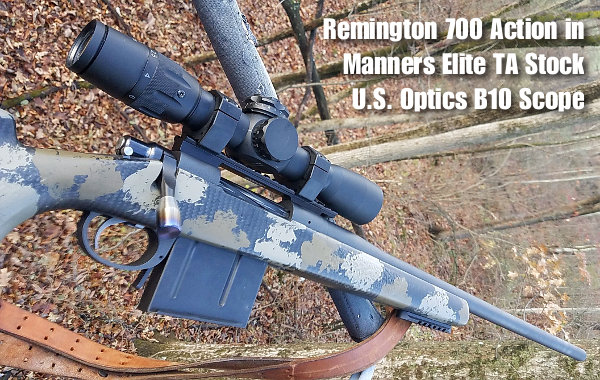
Rem 700 in Manners Stock — .284 Winchester for Hunting
Here’s a Rem 700 enhanced with a Manners Elite TA stock and other upgrades. Forum Member NickB1075 says: “Here is a rifle I finished for hunting this year. It’s a bit heavy for New York woods carry but it just shoots great. Maybe I will have to get one of those fancy Proof Research barrels to lighten it up a bit.” Nick is running a Benchmark 1:8.5″-twist barrel chambered in .284 Win with 0.315 neck for shooting 150gr Barnes bullets. Nick added a Jewell trigger and on top is a U.S. Optics B10 Scope.
When Only the Biggest and Boldest Will Do — .50 BMG
No “Pride and Joy” feature would be complete without a Big Boomer. This impressive .50 BMG, “61 inches of big bore goodness”, weighs a whopping 49 pounds (95 lbs. complete with case and accessories). This rifle’s proud owner, forum member 6MT, says everything on this black beast is jumbo-sized: “Yes, I can stick my finger clear through the ports in the muzzle brake!” The rifle boasts a U.S. Ordnance 31″ heavy-contour barrel fitted to Barnard GP action. The stock is a “Big Mac” from McMillan. No optics yet — 6MT says he is “looking at an ATACR 7-35x56mm with a Spuhr mount… As soon as my wallet recovers!”
In this video, gunsmith Alex Wheeler explains how to ensure that your full-length sizing dies fit your brass properly. With many cartridge types, it’s not unusual for factory dies to be slightly large in the bottom section. When the diameter of a FL-sizing die is too large near the base, this can leave the bottom section of fired cases “unsized”, with the result that you can have extraction issues and stiff bolt lift, or what Alex calls “clickers”. At the same time, it’s not unusual for dies to over-size fired cases at the shoulder (i.e. reduce the shoulder diameter by .004″ or more).
We strongly recommend that all hand-loaders watch this video, particularly if you load cases 6+ times with relatively high-pressure loads.
Alex explains that a key dimension is the diameter of a fired case 0.200″ above the case head. If your die does not size your fired cases at this point, you should get a FL die that does. This could be a custom die ground to fit your chamber, or it could be a “small-base” die specifically designed to “hit” the bottom section of the case. Alex also notes that some FL dies have an inside chamfer at the mouth of the die, right at the very bottom. (See video at 3:55). This can leave the section of the case right above the extractor groove unsized, which can also lead to “clickers” and stiff bolt lift.
Paint Your Brass to Find Problem Areas
If you are having stiff bolt lift or extraction issues, Alex explains that you can “paint” your brass with magic marker (or dye-chem), and then place the case in your chamber. On the “hot spots” where the case contacts the chamber wall, the marking will rub off, allowing the brass metal to shine through in the problem area(s). This will illustrate where you need better sizing from your die.
“You can ink up the case with some magic marker or dye-chem. If you are getting clickers, go ahead and mark up the case and chamber it and see where it’s wearing. This will help you diagnose [whether the problem] is coming from the base, is it coming maybe from a score in the chamber… it can even happen at the shoulder although that’s pretty rare. Usually the dies size enough at that point.”
Did you find this video helpful? View more informative Tech Tip Videos on WheelerAccuracy.com.
Video Tip from Boyd Allen. We welcome reader submissions.
This story is about safety — how you must be extra careful when shooting on public lands. Don’t assume that other people will hear your firearms or respect the posted boundaries of a shooting range. To drive this point home, we feature a video that should send chills up and down your spine. This scarey movie about two-legged creatures that appear out of nowhere… while you’re shooting. Watch this video carefully. Something happens at 0.38″ that will make your heart race. Warning: Adult language — Not suitable for playback at work.
Why You Must Always, Always Be Careful When Shooting on Public Lands…
LESSON Learned: Always be aware of your backstop and beyond. If there is any possibility of someone venturing into the “danger zone”, mark off the target area, and designate a person to watch the area around the target. That designated spotter should instantly call a halt to shooting if any person or vehicle appears. It is also a good idea to place warning signs, but don’t count on these to be headed.
This video was filmed on BLM land out in the Nevada desert. In such public areas, one must be very careful about shooting. There may be hikers, bikers, explorers, and horse-riders nearby. An offroad motorcyclist might be moving at 65 miles an hour. At that speed he’ll cover 32 yards in just one second! With that possibility, you really have to be ultra-careful. To be forewarned of potential risks, you need to watch way out to the left and right, not just focus on the backstop and the bullet’s flight path.
The shooting area shown above is located on BLM land. All BLM rules and regulations apply. Remember it is everyone’s desert so always think “safety first”. The video-maker, JFComfort (aka “Joe”), explains: “We do the majority of our shooting on BLM land surrounding the Las Vegas Valley. We have found shooting in small groups in the desert works well for us. We have spent a lot of time out there in the past. I advise you not to shoot alone and be very mindful of off-road enthusiasts. Guys on quads, dirt bikes, and Rhinos seem to pop out of nowhere. Also keep a close eye out for other shooters, not everyone is safe, respectful and courteous.”
Safety Risks Can Occur Anywhere
This kind of safety risk can appear at any shooting venue. Robert Whitley, reports a similar incident on the East Coast: “Had a situation like that happen years ago. I was shooting at 400 yards on a 500 meter range that was completely fenced. Unbeknownst to me some guys on ATVs broke through the fence so they could get across the range to a path on the other side. Heard some engine noise and held up firing and about a second later a guy on an ATV went by right in front of my target — very unnerving. The guy on the ATV was … completely oblivious to the peril he placed himself into by breaking through the fence.”
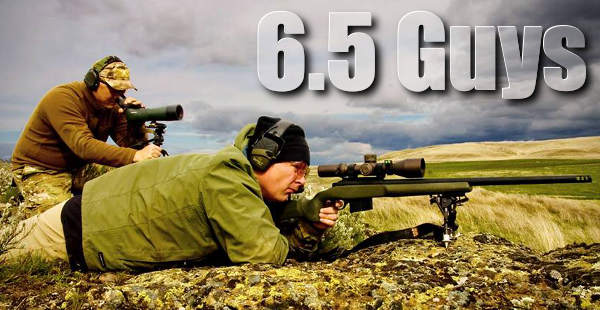
Our friends Ed and Steve, aka the 6.5 Guys seemed to be everywhere at SHOT Show. With tripods and cameras slung over their shoulders, Ed and Steve worked marathon hours, recording no less than 43 SHOT Show videos. They found all sorts of new and interesting products. They visited notable optics makers including March, Nightforce, Nikon, and Vortex. They interviewed major players in the PRS/Tactical Game including George Gardner of G.A. Precision, Tom Manners of Manners Composite Stocks, and Frank Galli, founder of Sniper’s Hide. And the 6.5 Guys also covered mainstream, large-volume rifle makers. That will be our focus here today, as we present the 6.5 Guys’ coverage of three key, long-arms builders or importers — Bergara, Legacy International, and Savage Arms.
Savage Arms — New Options for Precision Shooters
We own a couple Savage rifles, so we know Savage centerfire rifles can deliver surprisingly good accuracy for the price. It is not unusual for Savage rifles in some chamberings to shoot 0.7 MOA right out of the box. And the barrel nut system allows you to easily swap in an aftermarket custom barrel to get even more accuracy. Here the 6.5 Guys look at Savage’s new-for-2018 offerings, including the Stealth Evolution and the long-action Model 110 BA with GRS stock. A new chambering has been added — the 6.5 PRC.
Bergara — Becoming a Player in the American Market
We have been impressed with Bergara’s development as a brand in the last few years. Bergara, a Spanish company, is serious about becoming a player in the American market. The company has listened to American shooters, building hunting and tactical rifles with key features valued by American customers. Bergara rifles offer a nice combination of comfortable ergonomics with some advanced engineering, such as the B14’s internal metal chassis. In this video, the 6.5 Guys look at the latest rifle offerings from Bergara.
Legacy Sports International — Howa and Lithgow Arms
Legacy Sports Int’l is the importer/distributor for a number of rifle manufacturers, including Howa, Lithgow Arms, and Citadel. In this video, Ed looks at the Howa KRG Bravo chambered in 6mm Creedmoor. This features the smooth-running Howa 1500 action with 2-Stage HACT Trigger, set in a Kinetic Research Group modular chassis. Priced at $1279.00 MSRP with sub-MOA guarantee, it is definitely a serious contender in the PRS Factory Class. Anyone looking at a Ruger Precision Rifle should also consider this Howa.
Sometimes simpler is better when it comes to targets for fun shooting and load testing. While we normally use test targets from our Downloadable Target Page, it’s sometimes easier to just use brightly-colored “Hi-Viz” adhesive target dots.
Hi-Viz Stick-On Dots in Assorted Colors and Diameters
You can order 1″ target dots in bulk from Labeloutfitters.com. Many colors are available including fluorescent (hi-viz) Red, Green, Orange, and Yellow. These are bright and easy to see even in fading afternoon light. A pack of twenty (20) sheets (1260 dots total) costs just $5.97 (that works out to $4.74 per thousand). For the 1″-diameter stick-on dots you get 63 dots per sheet. Larger, 1.5″-diameter fluorescent dots are also available in 20-sheet packs for $5.97, with 24 large dots per sheet (480 dots total). If you want even bigger, 2″-diameter dots, sheets with 20 Hi-Viz dots per sheet are on sale for $5.97 per 20-pack(400 dots total).
Our friend Danny Reever really likes the bright dots from Label-Outfitters: “Ordered some of the 1″ dots from LabelOutfitters.com and recieved them in two days Priority Mail! Bought the flourescent red,green, and yellow and they are really nice — especially for the price.”
If you prefer smaller, 3/4″-diameter circles, Amazon.com sells Avery packs with 1008 adhesive dots for $2.69 to $6.75 per pack. Colors include Orange ($2.69, item 5465), Neon Red/Orange (item 5467), Neon Yellow (item 5470), Neon Green (item 5468), and Bright Blue (item 5461). We recommend the Neon Red/Orange for most uses, or the Neon Yellow dots for use on a black background. There is even a dispenser-box option with 1000 3/4″ dots on a roll in a box for $9.99. Amazon.com also offers 1″, 1.25″, and 2″-diameter target pasters in 500-dot and 1000-dot rolls. The best deal is a dispenser of 1000 1″ dots for $11.99.
Half-Inch Fluorescent Dots for 100-200 Yards
For close-range work, you may prefer 1/2″-diameter dots. Forum member Steve found a source for very small 1/2″ dots: Uline.com. The 1/2″ dots are available in a wide variety of colors including fluorescent Red, Pink, Yellow, and Green. Price is $12.00 for a roll of 1000 dots (item S-2063). Steve notes: “A 1/2″ circle at 300 yards is not quite entirely covered by Nightforce crosshairs at 42-power (I’d say 70% coverage). I.e., it seems easier to line up repeatedly than with the bigger (3/4″) circles, which I used to use. Note that, for me, neon green and neon orange work best on brown cardboard targets. Neon orange works well on white paper.”
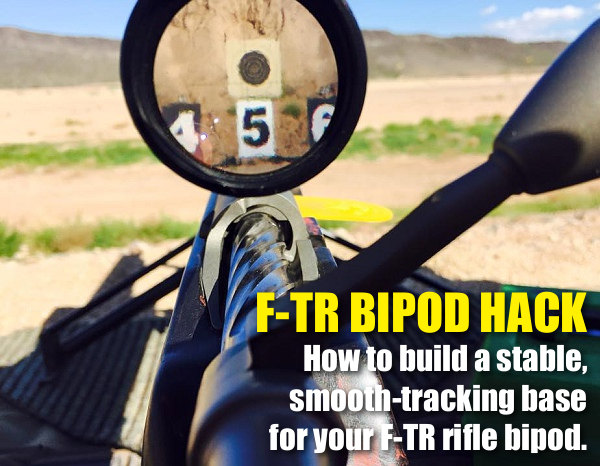
The Berger Southwest Nationals (SWN) is coming up next week at Ben Avery in Phoenix. Many of the nation’s top F-Class shooters will be there. Here are some tips that can help F-TR shooters competing at the SWN. These suggestions will also benefit any F-TR shooter who is looking for a more stable set-up under his bipod, and easier adjustment of the vertical when using a Phoenix-style (non-joystick) bipod.
How to Set up a Stable Front Pad for Your F-TR Bipod
To get peak performance from your F-TR rig, you need good support under the bipod. You want the base to be firm, but you also want a smooth, low-friction surface so the bipod feet can slide properly. Some guys just shoot off a carpet or a slab of wood with some rubber on top. There is a better way.
Forum member PBike shows how a three-element front set-up offers the best of both worlds — a firm platform with low-friction top. PBike’s set-up has three elements. Layer 1 is a thick rubber mat. Layer 2 is a steel plate with thin neoprene glued top and bottom. Layer 3, on which the bipod feet rest, is a thin neoprene door-mat with a low-friction surface, like the top of a MousePad. The video below shows how the three layers are arranged.
Pbike explains that, under F-TR rules, “You can use any series of pads or plates, so long as they are flat and do not include [tracking channels/slots] for the bipod feet”. The plate can be 12″ fore and aft, and the overall width may not extend more than 2″ beyond the bipod feet on either side.
F-TR Bipod Support Components (Bottom to Top)
LAYER ONE (bottom): Thick Rubber Pad, such as a heavy doormat
LAYER TWO (middle) Steel Plate, approximately 12″ x 24″, with attached neoprene
LAYER THREE (top): Neoprene Upper pad (slick upper surface like a MousePad)
NOTE, if the surface is not level, you can use wood shims to level the surface both left to right and front to back. The shims slide under the lowest pad. With a small saw, these can be trimmed so they don’t extend past the pad’s dimensions, maintaining compliance with F-Class rules.
The Phoenix bipod is an excellent product, but some folks like to run their rifles lower for better tracking and less hop. This can be accomplished with the PBike Aetkinz Engineering Lowering Kit. That Kit lowers the entire assembly 1.7 inches. For more information contact Pbike257 [at] gmail.com.
Phoenix Bipod “Rear Drive” and Steering Kit
F-TR rifle stock fore-ends are getting longer, allowing competitors to mount their bipods further forward. This longer “wheelbase” can deliver more stability, less hop, and better tracking. There’s a problem, however — if the bipod is attached way out front, it can be difficult to reach the bipod’s elevation controls. Some shooters grab the back end of the ski foot to adjust the rifle’s lateral position, but that doesn’t help with vertical.
PBike has developed a new accessory that lets you adjust the Bipod’s Mariner wheel easily and precisely. Basically this is a rotating, anodized aluminum tube that extends rearward. It has a 90° gear drive that replaces the Mariner wheel, allowing vertical adjustment by rotating the tube clockwise or counter-clockwise. See how it works in this video, starting at 1:40:
Pbike explains: “This is a really comfortable way to shoot. With this handle I can adjust for elevation and I can also steer the rifle fore and aft, left/right — anywhere I need to. I can make minute adjustments up and down, as needed, with the knurled handle.”
Video Suggestion by Boyd Allen. We welcome reader submissions
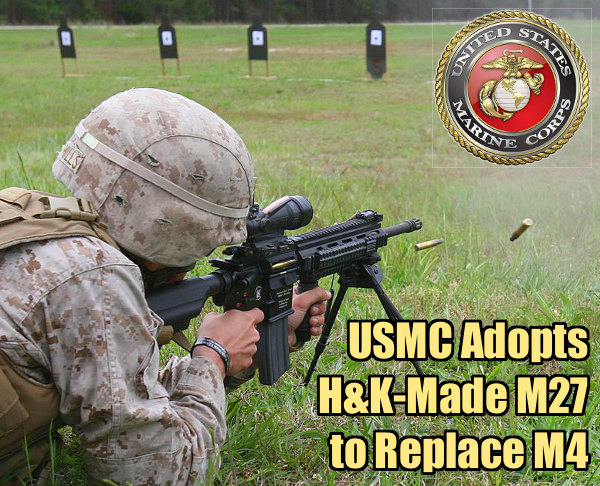
The U.S. Marine Corps will be adopting a new rifle to replace the M4 select-fire carbine. Designated the M27 IAR (Infantry Automatic Rifle), the new rifle is based on Heckler & Koch’s HK416, which looks like an AR, but runs with an internal gas piston system. The HK416 has been used by the German Army and some USA Special Operations units. This change-over has been in the works for some time, but the “protest period” has concluded, so now it is official.
The adoption of the M27 was announced at SHOT Show 2018. GunsAmerica reports: “H&K has officially received the contract for the USMC to replace the M4 carbines. The H&K model selected is the M27 Infantry Automatic Rifle, a derivative of the famous H&K 416″. The U.S. Marine Corps initially planned to purchase 6,500 M27s to replace a portion of the M249 light machine guns employed by automatic riflemen within Infantry and Light Armored Reconnaissance Battalions. In December 2017, the Marine Corps revealed a decision to equip every Marine in an infantry squad with the M27, so this is a major change. (Source: Wikipedia.com.)
According to Wikipedia: “The M27 is a lightweight, magazine-fed 5.56mm, select-fire weapon based on the Heckler & Koch HK416. It features a gas-operated, short-stroke piston action with a rotating bolt and a free-floating barrel. The handguard has four MIL-STD-1913 Picatinny rails for use with accessories and optics. The simpler gas-piston rifle system reduces the amount of time it takes to resolve malfunctions on the IAR compared with the M249 light machine gun.”
CLICK HEREfor full-screen M27 Photo by Heckler & Koch.
As deployed, early versions of the IAR have done well in combat: “The IAR was initially fielded in December 2010. 1st Battalion 3rd Marines were deployed to Afghanistan in April 2011 with 84 IARs. Former SAW gunners initially did not like the M27, but appreciated it as time went on. It weighed 9 lb. loaded, compared to 22 lb. for an M249 — a significant difference when on 5-hour long missions. It also blended in with standard M16-style service rifles, making it difficult for enemy forces to identify the machine gunner. Marines issued with the M27 [report] it is friendlier to troops [than the M249] due to its cleaner, lightweight system having fewer moving parts and jams. IAR gunners consider the rifle-grade accuracy to be a huge improvement over the SAW, despite the loss of sustained firing.” (Source: Wikipedia.com.)
Heckler & Koch Expands American Production Center in Georgia
Heckler & Koch operates a production center in the state of Georgia, not far from Fort Benning. A $28.5 million expansion, started in 2017, is adding a new 50,000-square-foot factory in the Corporate Ridge Business Park. “HK’s new U.S. factory will make use of advanced manufacturing technologies and will be staffed by German and American engineers and technicians,” said Francisco Hidalgo, CEO of HK USA. GunsAmerica notes: “H&K USA will be designing and building guns directly for the U.S. market in the USA now. Now, we can look forward to weapons built specific to the U.S. market. [We] can’t wait to see the first one stamped ‘Made in Georgia’.” It is unknown when H&K will start delivering American-made M27s to the USMC.
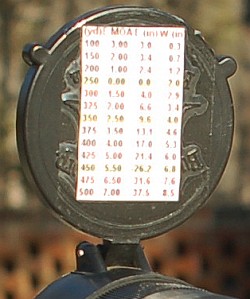
Tactical competitor Zak Smith stores his elevation and wind drift data on a handy laminated data card. To make one, first generate a come-up table, using one of the free online ballistics programs such as JBM Ballistics. You can also put the info in an Excel spreadsheet or MS Word table and print it out.
Above is a sample of a data card. For each distance, the card includes drop in inches, drop in MOA, drop in Mils. It also shows drift for a 10-mph cross wind, expressed in inches, MOA, and mils. Zak explained that “to save space… I printed data every 50 yards. For an actual data-card, I recommend printing data every 20 or 25 yards.” But Zak also advised that you’ll want to customize the card format to keep things simple: “The sample card has multiple sets of data to be more universal. But if you make your own data card, you can reduce the chance of a mistake by keeping it simple.”
Once you have the card you can fold it in half and then have it laminated at a local office store or Kinko’s. Keep this in your pocket, tape it to your stock, or tie the laminated card to your rifle. If you regularly shoot at both low and high elevations, you may want to create multiple cards (since your ballistics change with altitude). To learn more about ballistic tables and data cards, check out the excellent “Practical Long-Range Rifle Shooting–Part 1″ article on Zak’s website.
Scope-Cover Mounted Ballistics Table
Another option is to place your ballistics card on the back of the front flip-up scope cover. This set-up is used by Forum member Greg C. (aka “Rem40X”). With your ‘come-up’ table on the flip-up cover you can check your windage and elevation drops easily without having to move out of shooting position.
Greg tells us: “Placing my trajectory table on the front scope cover has worked well for me for a couple of years and thought I’d share. It’s in plain view and not under my armpit. And the table is far enough away that my aging eyes can read it easily. To apply, just use clear tape on the front objective cover.”
What if we said you could buy a brand new, quality 9mm handgun, AND 1000 rounds of American-made, brass-cased CCI 9x19mm ammo for under $430? Or get the pistol plus 350 rounds for under $320? Not possible? Yes it is. Here’s the deal:
Chambering: 9×19 mm (9mm Luger)
Action: DAO, 5.5 lb pull weight
Capacity: 7+1
Barrel length: 3.565″
Frame: Black polymer with 4140 steel inserts
Magazine: 7 round stainless (included)
Slide: 416 stainless steel with matte finish
Overall length: 5.90″
Overall width: 0.90″
Overall height: 4.50″
Overall weight: 15.8 oz.
Or Get the Even More Compact Ruger LC9s for $259.99
If you want a more compact 9mm semi-auto pistol, Sportsman’s Guide also has the Ruger LC9S for $259.99 ($246.99 member price).
Both these guns are light, slim, and reliable. The Kahr has a longer, smoother trigger pull. The Ruger is thinner and shorter, and can be purchased with a thumb safety. Bottom line — there are both excellent carry guns. Both pistols are reviewed in this video:
If you prefer a German-made gun, get the Walther Creed for $269.99. We like the grip on the Walther. It has a very short trigger reset. Like the Kahr CW9 and Ruger LC9s, the Creed represents an exceptional value.
With any of these options (Kahr, Ruger, Walther) you can get your gun and 1000 rounds of ammo for less than $450.00. 1000 rounds should last all year, even if you practice every other week.
The Swarovski Optik website features a blog with interesting technical articles. In the “On Target” series of blog stories, Swarovski has provided a handy explanation of how optics systems work, with exploded diagrams of rifle scopes, spotting scopes, and binoculars. CLICK HERE for Swarovski Optics Blog.
Scope Terminology Focusing Lens
The focusing lens is an adjustable lens inside the optical system for focusing the image at different distances…. In the case of rifle scopes, apart from focusing, the focusing lens also facilitates parallax compensation.
Diopter Adjustment
For rifle scopes, the reticle can be focused using the diopter adjustment on the eyepiece, thereby correcting any visual impairment. [Editor’s Note: Movable eyepiece diopter adjustment is not offered on all rifle scopes. It is a useful feature on Swarovski and other premium scopes. This allows shooters who need eyeglasses to get a sharply focus image even without wearing corrective lenses. Of course shooters should always wear ANSI-certified eye protection. With the diopter, folks who need correction can use inexpensive, non-Rx safety eyewear instead of expensive prescription safety glasses.]
Reversal System
The purpose of the reversal system is to reverse the image by means of prisms in binoculars and telescopes, and lenses in rifle scopes….The lens reversal system is needed in rifle scopes to control the variable magnification and move the exit pupil[.]
Parallax Explained
What is Parallax? What problems can Parallax create when you are shooting? Many novice shooters can’t answer those questions easily. Likewise, many folks don’t understand how to use their front or side-focus parallax controls most effectively. Yes the parallax control basically sharpen focus at different target distances — but there’s more involved. This video offers helpful insights.
Resource tip by EdLongRange. We welcome reader submissions.


 Scope-Cover Mounted Ballistics Table


