Eurooptic vortex burris nightforce sale


teslong borescope digital camera barrel monitor


As an Amazon Associate, this site earns a commission from Amazon sales.


July 21st, 2024

Sunday GunDay: Unique Packable Henry AR-7 3.5-Lb Rimfire Rifle

henry u.s. survival rifle AR-7 AR7 .22 LR rimfire take-down

The Henry AR-7 Survival rifle is a unique rifle. Weighing just 3.5 pounds, this little semi-auto rimfire can perform pest-control duties for a farmer or rancher, or serve as a utility rifle carried in a truck or ATV. The cleverly-designed AR-7 is affordably priced, just $299.99 at Sportsman’s Warehouse.

henry u.s. survival rifle AR-7 AR7 .22 LR rimfire take-down

We think most gun-owners would enjoy adding an AR-7 to their collection. The Henry AR-7 breaks down for easy carry in a backpack or a vehicle. The barrel, receiver, and magazines all fit INSIDE the buttstock. That’s handy. And this little 3.5-pound rifle offers surprisingly good accuracy.

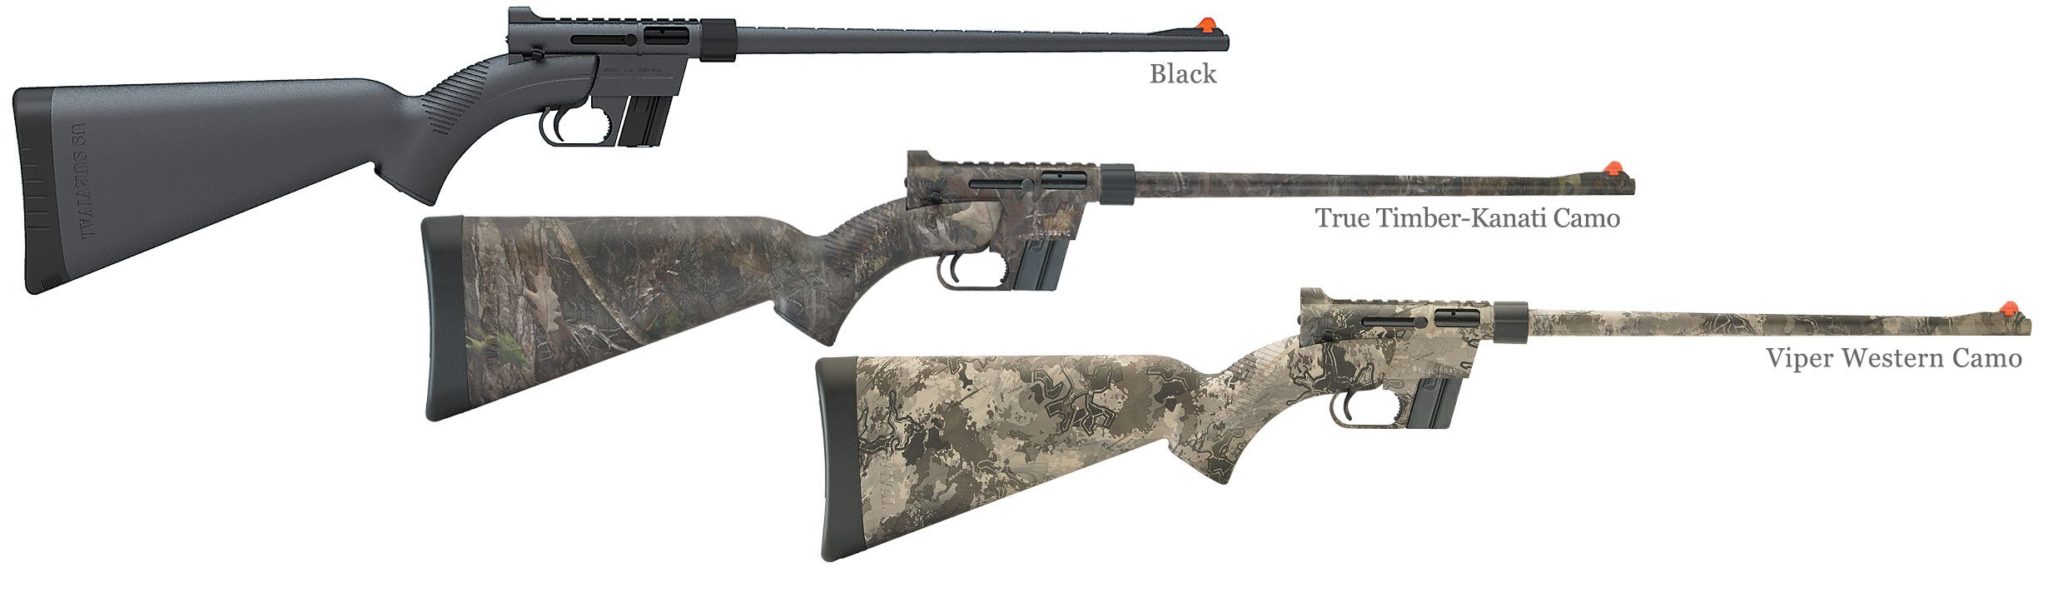
If you don’t like basic black, Henry offers two camo versions from the factory: True-Timber Kanati Camo, and Viper Western Camo. Click the photo below for full-screen (2048 pixel wide) image:

henry u.s. survival rifle AR-7 AR7 .22 LR rimfire take-down

Or, if you have artistic skills (and confidence with spray cans), you can paint your AR-7 yourself, as this owner did. The talented gun-painter reports: “[This is a] great little gun that is accurate and I love how it packs away. I paint all my black guns. Already took a grouse at 16 yards.”

henry u.s. survival rifle AR-7 AR7 .22 LR rimfire take-down

History of the Henry AR-7 Rifle
Starting in 1959 the AR-7 was provided to U.S. Air Force fliers as a survival rifle to use if they were stranded in a remote area. Today the AR-7 is a favorite of bush pilots, backpackers, and backcountry adventurers who, like their Air Force counterparts, need a rifle that’s easy to carry yet can take down small game. Like the original Henry U.S. Survival Rifle, this innovative, semi-automatic rimfire rig is lightweight (3.5 lbs.) and highly portable. At just 16.5″ long, with all components stowed, it easily fits into a backpack, or the cargo area of an ATV, truck, boat. or plane. The AR-7 is chambered in .22 LR so you can carry plenty of ammo without adding much weight to your gear. When disassembled, all the pieces fit inside the impact-resistant, water-resistant stock.

henry u.s. survival rifle AR-7 AR7 .22 LR rimfire take-down

Assembly is as easy as attaching the receiver to the stock, inserting the barrel, and screwing on the barrel nut. In a few seconds, without any tools, the Henry U.S. Survival AR-7 is ready for action. It now comes standard with a steel barrel covered in tough ABS plastic with a protective coating for corrosion resistance. The Henry U.S. Survival AR-7 is available in three finishes; Black, True Timber Kanati Camo Pattern, and True Timber Viper Western Camo Pattern. All models are equipped with an adjustable rear sight and a blade front sight. As you can see below, the built-in storage can be used to hold magazines and ammunition as well as the rifle components.

henry u.s. survival rifle AR-7 AR7 .22 LR rimfire take-down

Another AR-7 owner posted this review:

Simple Goodness: Henry AR-7 — Fun Modern Version of a Classic
Henry got this modern take of the AR-7 right. Gentle finger-tighten is all it takes to assemble. The funky orange plastic sight on the end of the barrel is kind of loud, but was also easy to target with. Brand spanking new, I was getting grapefruit-sized patterns out of each 8-round mag at 50 feet. For a compact take-down, was surprised that length-of-pull was satisfactory for a six-foot guy. It didn’t feel cramped.

For realistic backpack, bail-out, or bug-out situations this would be a smart choice. It was fussy with a single Rem Golden in the first mag… but after that no problems, and no issues at all with Federal and CCI. The safety is right-handed but large and easy to get used to. The charge handle retracts so [you must] pull it up before pulling back, but that motion seemed to become reflexive pretty quickly. The mag eject is in front of the trigger and pushes forward. All in all, [the AR-7 offers a] really nice, compact form factor. [It is] light, perfect for backpack plinking and … low-rent varmint sniping.

Inset photos from Sportsman’s Guide Customer Gallery.
Permalink - Articles, - Videos, Gear Review, Tactical No Comments »
July 21st, 2024

Wind Wisdom — How Terrain and Topography Affect Wind

Steven Blair F-Class Wind Tips

At the request of our Shooters’s Forum members, we’re repeating an excellent article by Steven Blair on wind reading. Steven, a top F-Class shooter, talks about mirage, topography effects, tail winds, and other subtle factors that can cause frustration for shooters. Steve explains that wind effects can be complex — there’s more going on than just velocity and angle. You need to notice things like berm locations and effects of temp changes over the course of the day.

Wind Reading Tips for Competitive Shooters
by Steven Blair, Past California State Long Range F-Open Champion

Assess the Terrain and How the Wind Will Interact with It
Before you begin a match, take a few minutes to look around the range at the terrain, any obstructions, range topography (berms and backstop), and trees, buildings or structures that could affect wind flow over the range. Imagine what might happen if the wind was from the left or right, headwind or tailwind. Depending upon the direction, significant effects may be seen on range. A head or tail wind may ripple across the berms, causing elevation changes, both high and low. A tall side berm, like the east side berm at Ben Avery, may cause turbulence when the wind comes from that direction. Blocking features might shield most of the wind but a break along the range can funnel strong gusts through the gap with no other indications. Take a few notes about the effects of different wind directions and refer to them if the prevailing direction changes. (Tip courtesy Tony Robertson.)

Steven Blair F-Class Wind Tips

Use a Spotting Scope, Even When Shooting a Scoped Rifle
A good spotting scope can “see” mirage much more clearly than even an expensive rifle scope. Take your spotting scope to the line and position it as sling shooters do, close enough to use without much movement. Focus the scope approximately 1/3 of the way down range or where the most significant wind effects are likely to occur. Take a quick look while waiting for pit service, glance at the flags and compare to your scope sight picture. I often see ambiguous indications at the target through the rifle scope, but see a clear indication of wind direction and speed through the spotting scope at the shorter distance. When shooting the Arizona Palma Championship at Ben Avery last weekend, I was scoring while the wind was coming from the east. Shooters up and down the line were out to the left, losing points. Mirage at the target looked moderate and the flags weren’t indicating strong wind. As I focused the spotting scope back, the mirage suddenly looked like it was flowing twice as fast around 500 yards than it was closer or farther. It wasn’t until I realized that the access road cut through the berm there that I understood what was happening. (Tip courtesy Gary Eliseo.)

Steven Blair F-Class Wind Tips

Don’t Over-React to Something That May Be an Anomaly
On ranges with sizable berms, a headwind or tailwind can cause significant elevation problems. It is generally not possible to see or predict when this will occur. When the conditions exist that cause elevation changes and other competitors are experiencing the same problem, the best strategy is to ignore it. Certainly, avoid shooting when the head or tail wind is gusting, the same as you would in a crosswind. But, if you react to random, range-induced elevation changes, the only likely result is to make it worse. Whether the problem is caused by range or ammunition, maintain your waterline hold until you have evidence that something has fundamentally changed.

Steven Blair F-Class Wind Tips

My .284 Shehane will usually require a click or two down during a string as the barrel warms. That is normal and manageable. But, if your shots are just bouncing up and down in the 10 ring, leave it alone. The same is also true of an occasional gust pushing a shot into the 9 ring. If the conditions have not changed and one shot just went out, it may be the result of a random occurrence that was not predictable. (Tip courtesy “School of Hard Knocks”.)

Adjust Spotting Scope Focus and Magnification as Needed to View Mirage vs. Target Details
In F-Class we only need to see mirage, spotters, and scoring disks. That does not take a lot of magnification. My scope is a Nikon 25-75x82mm ED. It is a superb scope for the money and makes it trivial to see minor variations in mirage. It is good to have the high magnification available, and it can always be reduced if necessary. I use different power settings for different situations.

Steven Blair F-Class Wind TipsSetting Magnification Levels
During a match, in very good viewing conditions, I set my spotting scope at 75X, full power. The mirage is more subtle in the morning and greater magnification is needed.

During a match with heavy mirage I set my spotting scope at about 40X. I have no problem seeing mirage, even at this magnification.

When practicing at 300 yards or closer I set my spotting scope at max power (75X) so I can see the little 6mm holes from my 6BR rifle. I usually need to focus back and forth between shots to see both bullet holes and mirage.

Steven Blair, 2012 California State Long Range F-Open Champion, has been shooting since childhood and competing for over 30 years. Before retiring, Steve spent 16 years in Engineering and IT with General Atomics. He has held Engineering and Marketing positions with several firearms companies and worked on projects from pistols to 155mm howitzers.

Permalink - Articles, Competition, Shooting Skills No Comments »
July 21st, 2024

How To Deal With Pesky Flyers During Load Development

Sierra Bullets Reloading Flier Flyer load development groups

by Sierra Bullets Ballistic Technician Gary Prisendorf
Occasionally someone will ask, “Why did I get a flyer that didn’t go in with the rest of my group?” If I had an answer that would stop flyers from happening, I would be rich.

There are many reasons why this can happen. Everything from gripping a forearm differently to variations in the brass casing, the list goes on and on. Most of the time the flyer is usually shooter induced and sometimes what you may think is a flyer, is just part of your group. There are a lot of shooters, that go out and test a load and they may shoot a 3/8” group at 100 yards and think that load is good. But I have seen far too many times that you can shoot another group, same load, same rifle and the next time you may get a 1 ¼” group.

Sierra bullets load development flyer group measurement target

The total opposite can also occur. You may shoot a 1 ¼” group and turn around and follow it with a 1/2″ group without changing anything. If you only shot the one group, you might decide that load wasn’t any good and move on to something else without really knowing what that load was capable of.

To really determine how a particular load is performing we need to shoot multiple groups and take an average of the group sizes to really see what that rifle/load combination is really capable of.

I suggest shooting a minimum of three 5-shot groups and averaging the group sizes before deciding if the load is acceptable or not. Obviously the more rounds you shoot for a group and the more groups that you shoot, you will get a much better representation of what that particular combination can do.

Now I’m not saying to go out and shoot 30 groups with 50 rounds in each group to determine how well your load is shooting. That would be a bit pointless, in some cases it would be time to re-barrel your rifle before your load development was finished.

In most cases, I feel that three to five, 5-shot groups will give you a pretty good representation of how a load will perform in that specific firearm.

Sierra Bullets reloading advice tips information

Permalink Reloading, Shooting Skills No Comments »