With good factory rifle ammo costing $1.30 per round or more — a Laser BoreSighter could pay for itself in just a couple range sessions.
Laser BoreSighters — fitted to your chamber — help you get on target more quickly, particularly with factory firearms. Just activate the unit, slip it into the chamber and look for the red dot on the target. The laser dot is about 2″ in diameter at 100 yards, and is visible even in full sunlight. Right now you can get HQ Issue Sight-Rite BoreSighters starting at $19.99 at Sportsman’s Guide (member price is $17.99). These units have a durable brass metal body and the battery will run an hour.
Rifle and Shotgun Cartridge Types:
Sight-Rite Boresighters are offered for popular rifle and shotgun cartridge types including: .17 HMR, .22 LR, .223 Rem, .204 Ruger, .22-250, 6.5 Creedmoor, 7mm WSM, .30-30, 20 Gauge shotshell, 12 Gauge Shotshell. Sportsman’s Guide also offers Sightmark Pistol Laser BoreSighters for $26.99: .38 SPL/.357 Mag, 9mm, .40 SW, .44 Magnum, .45 ACP.
Amazon offers MidTen Laser Boresighters complete with 6 batteries (two sets). This runs $17.99 for the .223 Rem cartridge while a larger boresighter for .25-06/.270 Win/.30-06 Boresighter is $19.89.
In-chamber BoreSighters are much safer than the kind that you insert in the end of the barrel (or attach to muzzle). If you forget your laser bore-sight placed in the end of the barrel, and then fire a round, you can blow up your barrel and/or suffer serious injury — it HAS happened.
This video shows how to use in-chamber Sightmark laser boresighters. The HQ Issue Sight-Rite XSI boresighters work the same way:
The Henry AR-7 Survival rifle is a unique rifle. Weighing just 3.5 pounds, this little semi-auto rimfire can perform pest-control duties for a farmer or rancher, or serve as a utility rifle carried in a truck or ATV. The cleverly-designed AR-7 is affordably priced, just $299.99 at Sportsman’s Warehouse.
We think most gun-owners would enjoy adding an AR-7 to their collection. The Henry AR-7 breaks down for easy carry in a backpack or a vehicle. The barrel, receiver, and magazines all fit INSIDE the buttstock. That’s handy. And this little 3.5-pound rifle offers surprisingly good accuracy.
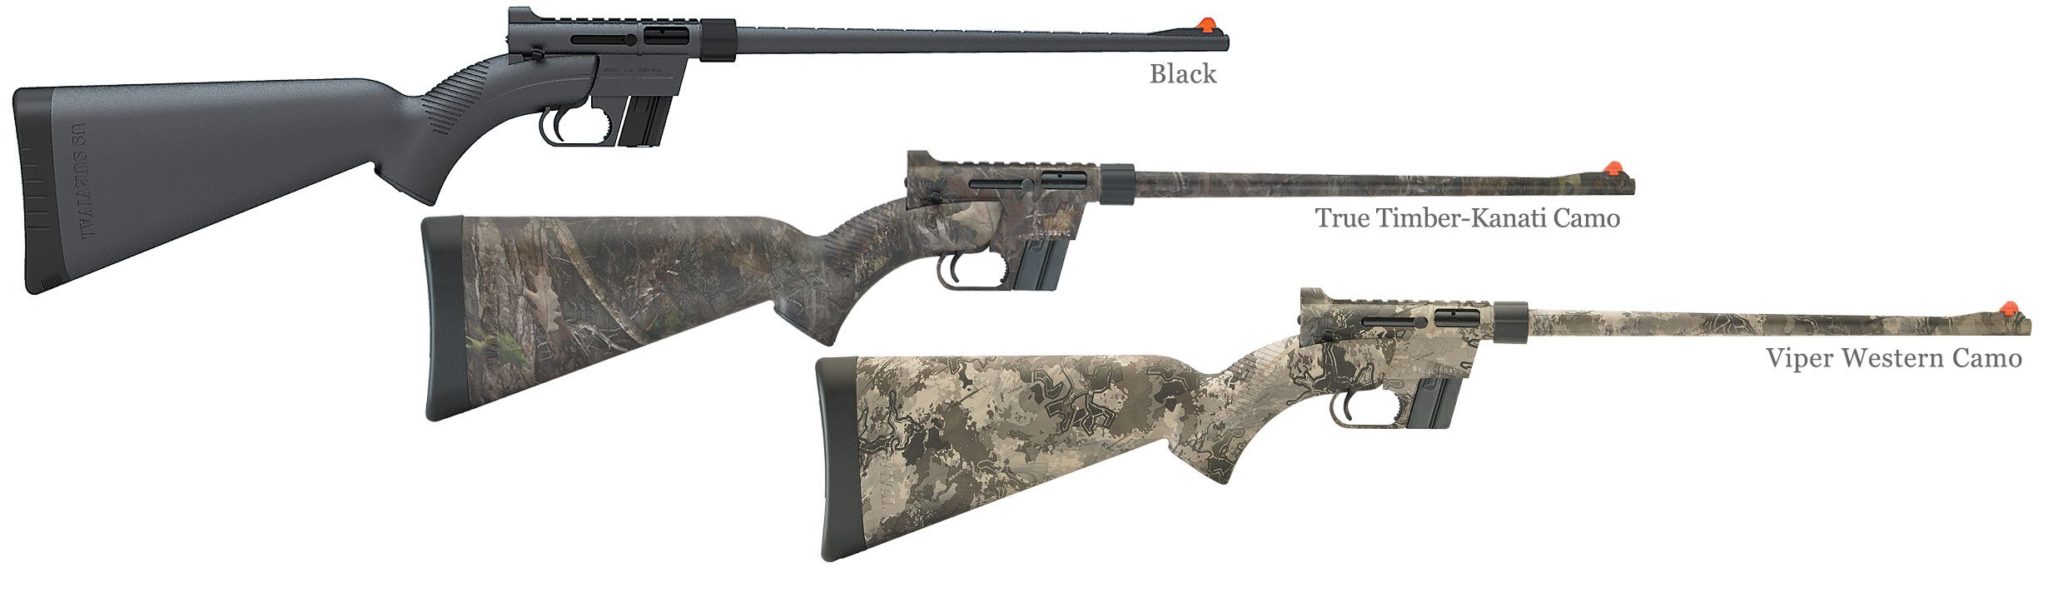
If you don’t like basic black, Henry offers two camo versions from the factory: True-Timber Kanati Camo, and Viper Western Camo. Click the photo below for full-screen (2048 pixel wide) image:
Or, if you have artistic skills (and confidence with spray cans), you can paint your AR-7 yourself, as this owner did. The talented gun-painter reports: “[This is a] great little gun that is accurate and I love how it packs away. I paint all my black guns. Already took a grouse at 16 yards.”
History of the Henry AR-7 Rifle
Starting in 1959 the AR-7 was provided to U.S. Air Force fliers as a survival rifle to use if they were stranded in a remote area. Today the AR-7 is a favorite of bush pilots, backpackers, and backcountry adventurers who, like their Air Force counterparts, need a rifle that’s easy to carry yet can take down small game. Like the original Henry U.S. Survival Rifle, this innovative, semi-automatic rimfire rig is lightweight (3.5 lbs.) and highly portable. At just 16.5″ long, with all components stowed, it easily fits into a backpack, or the cargo area of an ATV, truck, boat. or plane. The AR-7 is chambered in .22 LR so you can carry plenty of ammo without adding much weight to your gear. When disassembled, all the pieces fit inside the impact-resistant, water-resistant stock.
Assembly is as easy as attaching the receiver to the stock, inserting the barrel, and screwing on the barrel nut. In a few seconds, without any tools, the Henry U.S. Survival AR-7 is ready for action. It now comes standard with a steel barrel covered in tough ABS plastic with a protective coating for corrosion resistance. The Henry U.S. Survival AR-7 is available in three finishes; Black, True Timber Kanati Camo Pattern, and True Timber Viper Western Camo Pattern. All models are equipped with an adjustable rear sight and a blade front sight. As you can see below, the built-in storage can be used to hold magazines and ammunition as well as the rifle components.
Another AR-7 owner posted this review:
Simple Goodness: Henry AR-7 — Fun Modern Version of a Classic
Henry got this modern take of the AR-7 right. Gentle finger-tighten is all it takes to assemble. The funky orange plastic sight on the end of the barrel is kind of loud, but was also easy to target with. Brand spanking new, I was getting grapefruit-sized patterns out of each 8-round mag at 50 feet. For a compact take-down, was surprised that length-of-pull was satisfactory for a six-foot guy. It didn’t feel cramped.
For realistic backpack, bail-out, or bug-out situations this would be a smart choice. It was fussy with a single Rem Golden in the first mag… but after that no problems, and no issues at all with Federal and CCI. The safety is right-handed but large and easy to get used to. The charge handle retracts so [you must] pull it up before pulling back, but that motion seemed to become reflexive pretty quickly. The mag eject is in front of the trigger and pushes forward. All in all, [the AR-7 offers a] really nice, compact form factor. [It is] light, perfect for backpack plinking and … low-rent varmint sniping.
At the request of our Shooters’s Forum members, we’re repeating an excellent article by Steven Blair on wind reading. Steven, a top F-Class shooter, talks about mirage, topography effects, tail winds, and other subtle factors that can cause frustration for shooters. Steve explains that wind effects can be complex — there’s more going on than just velocity and angle. You need to notice things like berm locations and effects of temp changes over the course of the day.
Wind Reading Tips for Competitive Shooters by Steven Blair, Past California State Long Range F-Open Champion
Assess the Terrain and How the Wind Will Interact with It
Before you begin a match, take a few minutes to look around the range at the terrain, any obstructions, range topography (berms and backstop), and trees, buildings or structures that could affect wind flow over the range. Imagine what might happen if the wind was from the left or right, headwind or tailwind. Depending upon the direction, significant effects may be seen on range. A head or tail wind may ripple across the berms, causing elevation changes, both high and low. A tall side berm, like the east side berm at Ben Avery, may cause turbulence when the wind comes from that direction. Blocking features might shield most of the wind but a break along the range can funnel strong gusts through the gap with no other indications. Take a few notes about the effects of different wind directions and refer to them if the prevailing direction changes. (Tip courtesy Tony Robertson.)
Use a Spotting Scope, Even When Shooting a Scoped Rifle
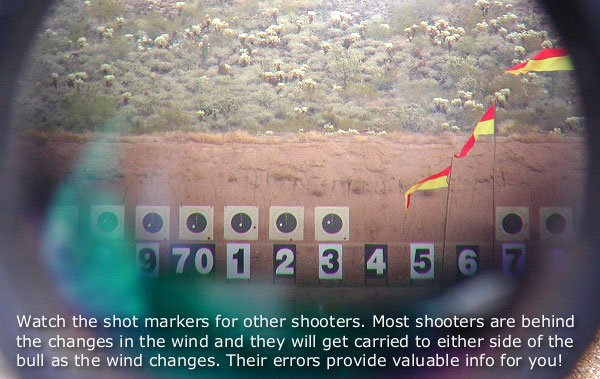
A good spotting scope can “see” mirage much more clearly than even an expensive rifle scope. Take your spotting scope to the line and position it as sling shooters do, close enough to use without much movement. Focus the scope approximately 1/3 of the way down range or where the most significant wind effects are likely to occur. Take a quick look while waiting for pit service, glance at the flags and compare to your scope sight picture. I often see ambiguous indications at the target through the rifle scope, but see a clear indication of wind direction and speed through the spotting scope at the shorter distance. When shooting the Arizona Palma Championship at Ben Avery last weekend, I was scoring while the wind was coming from the east. Shooters up and down the line were out to the left, losing points. Mirage at the target looked moderate and the flags weren’t indicating strong wind. As I focused the spotting scope back, the mirage suddenly looked like it was flowing twice as fast around 500 yards than it was closer or farther. It wasn’t until I realized that the access road cut through the berm there that I understood what was happening. (Tip courtesy Gary Eliseo.)
Don’t Over-React to Something That May Be an Anomaly
On ranges with sizable berms, a headwind or tailwind can cause significant elevation problems. It is generally not possible to see or predict when this will occur. When the conditions exist that cause elevation changes and other competitors are experiencing the same problem, the best strategy is to ignore it. Certainly, avoid shooting when the head or tail wind is gusting, the same as you would in a crosswind. But, if you react to random, range-induced elevation changes, the only likely result is to make it worse. Whether the problem is caused by range or ammunition, maintain your waterline hold until you have evidence that something has fundamentally changed.
My .284 Shehane will usually require a click or two down during a string as the barrel warms. That is normal and manageable. But, if your shots are just bouncing up and down in the 10 ring, leave it alone. The same is also true of an occasional gust pushing a shot into the 9 ring. If the conditions have not changed and one shot just went out, it may be the result of a random occurrence that was not predictable. (Tip courtesy “School of Hard Knocks”.)
Adjust Spotting Scope Focus and Magnification as Needed to View Mirage vs. Target Details
In F-Class we only need to see mirage, spotters, and scoring disks. That does not take a lot of magnification. My scope is a Nikon 25-75x82mm ED. It is a superb scope for the money and makes it trivial to see minor variations in mirage. It is good to have the high magnification available, and it can always be reduced if necessary. I use different power settings for different situations.
Setting Magnification Levels
During a match, in very good viewing conditions, I set my spotting scope at 75X, full power. The mirage is more subtle in the morning and greater magnification is needed.
During a match with heavy mirage I set my spotting scope at about 40X. I have no problem seeing mirage, even at this magnification.
When practicing at 300 yards or closer I set my spotting scope at max power (75X) so I can see the little 6mm holes from my 6BR rifle. I usually need to focus back and forth between shots to see both bullet holes and mirage.
Steven Blair, 2012 California State Long Range F-Open Champion, has been shooting since childhood and competing for over 30 years. Before retiring, Steve spent 16 years in Engineering and IT with General Atomics. He has held Engineering and Marketing positions with several firearms companies and worked on projects from pistols to 155mm howitzers.
Today’s Saturday Showcase covers gun safes. Every firearms owner should have a secure, quality gun safe with ample capacity. There are numerous choices in gun safes — but we have one key bit of advice — buy BIGGER than you think you need, because your gun collection will likely grow over time. Also you should consider the fire rating of your safe. There are other key factors to consider, such as wall thickness, lock type, shelf and storage layout, and humidity control. We recommend that all Bulletin readers read our detailed, Gun Safe Buyers Guide. This in-depth 9400-word article covers ALL these topics:
Anti-Corrosion
Budget Safes
Bolt Layout
Door Seals
Fire Proofing
Handgun Storage
Hinges
Humidity Control
Installation Tips
Interior Layout
Interior Lighting
Locks–Dial vs. Digital
Modular Safes
Rotary Racks
Size and Weight
Temperature Control
Wall Thickness
Water Proofing
Technical Features of Gun Safes — What You Need to Know
This is a very sensible, informative video that examines the technical features of gun safes. You’ll learn about the steel “gauge” or thickness, the different types of hinges, lock controls, and fire-proofing options. We think anyone contemplating purchase of a large home safe should watch this video, prepared by a respected safe retailer in Las Vegas.
Assembly of SnapSafe Titan XXL Double Door Modular Safe
In this video Gavin Gear of UltimateReloader.com shows the unpacking and assembly of a large, twin-door SnapSafe modular safe. This video shows how individual panels are assembled one by one, and how the twin doors are attached. Gavin also shows the process of installing the interior insulation panels which provide basic fire protection. Remarkably, this entire XXL modular safe can be put together with simple tools in less than an hour. SEE Full Article HERE.
Features of a Quality Safe under $1000
Even if you already have a safe, this video is well worth watching. The host shows a variety of accessories and upgrades that all gun safe owners should consider. The host explains why you should have a dehumidifier or Golden Rod. He also shows how to install handy interior lights that activate automatically when the door is opened.
The Gun Vault — The Next Step Beyond a Jumbo Gun Safe
If you have a very large gun collection and are building a new custom home, you may want to consider a Gun Vault. This is essentially a large, secure room, with a very heavy door and thick walls. In this interesting video, Atlas builds a large walk-in gun vault using the Gallow Tech Shelving System and a Fort Knox Gun Vault door.
After the Fire — What Actually Happens in a Burned Safe
In this video, the hosts open a “fireproof” gun safe that went through an actual house fire. See what happens when a gun safe that is supposed to be fireproof actually is exposed to a major fire. The results are surprising to say the least. This video shows that you need to do your homework before buying a “fireproof” safe. Understand how the fire rating systems work, and learn how the interior materials and construction make a big different in real world fire protection.
Mechanical Locks vs. Electronic Locks — What You Need to Know
One important decision when buying a gun safe is the choice of locking mechanism. Should you go with a mechanical lock or an electronic lock? There are pros and cons to both dial locks and e-locks, and as long as you get a quality lock, neither is a bad choice. To help you make your decision, This video explains the differences between the two, and reasons why you might choose one over the other.
How to Assemble a Modular Safe with Simple Tools
For gun owners who move frequently, or who may live in an upstairs apartment or condo, a modular safe makes sense. Steelhead Outdoors, based in Minnesota, offers three different safes: Nomad 26, 32, and Nomad 38. The video below shows how to assemble a Steelhead Outdoors Nomad series safe. If you have basic skills, these safes can be assembled easily in 60-90 minutes. Steelhead recommends having two people to do the job. The entire safe ships in four (4) boxes. Wrenches are included with the safe.
This time-lapse video shows the entire process of assembling the safe, start to finish.
Guide to Quick Access Handgun Safes
A quick access safe can keep your pistol secure, but also readily accessible. But not all of these devices are created equal. This video explains the features you need in a small pistol safe. The video also examines the pros and cons of seven different handgun safes. We recommend that you do NOT keep your handgun safe in plain view, such as on a bedside table. There are other locations where you still have quick access, without tempting home intruders.
Wireless Hygrometer Reports Temperature and Humidity Inside Safes
The Hornady Security® Wireless Hygrometer monitors temperature and humidity in real-time, all without opening the gun safe. The wireless hygrometer employs a remote sensor inside your safe, which measures temperature and humidity data. This data is then sent to an external base display. Wireless technology eliminates the need to open the safe and check the storage environment, preventing temperature and humidity spikes from the outside air.
The display features a large touchscreen that shows current high/low data from both the base and remote units in Fahrenheit or Celsius. The hygrometer pairs with Hornady Security’s in-safe dehumidifiers to combat oxidation-causing moisture.
Gun Safe Installation Recommendations
Every safe, when possible, should be anchored in place with heavy-duty fasteners. Ideally, use multiple bolts in the bottom of the safe, anchored to concrete or solid foundation. Choose the appropriate lag bolts or anchors for the material below your safe. If you can’t mount to the floor, bolt the safe to wall studs. You can locate the position of the studs with an inexpensive electronic “Stud Sensor” available at home supply stores.
Check the thickness of your safe floor. If the steel on the bottom of your safe is fairly thin, place a steel backing strip between the bolt heads and the safe bottom. (Large washers will work, but a backing strip is better.) Without such reinforcement, the bolt heads may pull right through thin-gauge steel if the safe is rocked, or levered from the bottom with a pry-bar.
Locate your safe in the corner of a room or in a recess that blocks access to one or more sides of the safe. On many gun safes, the steel on the top, sides, and rear is thinner than on the door. Blocking access to the sides makes it much more difficult to use power tools on the sides, where the safe is most vulnerable. It’s also wise to place the safe in a relatively tight space with limited room to maneuver. Anything that makes the safe harder to move helps deter would-be thieves.
Many people place their safe in a garage or basement. That’s not necessarily a bad idea, but people also tend to store their tools in the same locations. Don’t store your power tools next to the safe. One safe-maker told us how a customer’s safe was defeated using the owners’ own cutting torch which was stored right next to the safe!
Inspect the area around the safe. Avoid locations where there are a lot of wood beams, paint cans, or other combustible material nearby. In the event of a serious house-fire, these items will fuel the flames, increasing the likelihood that items inside your safe will be heat-damaged. Chris Luchini, co-author of Rec.Gun’s Guide to Gun Safes, offers some practical advice: “Get an alarm system. If the burglars hear an alarm go off, they are less likely to stick round to finish the job. Alarms on both the house and the safe area are a good idea.”
In our Shooters’ Forum, there’s an interesting thread about a very light hunting rifle. Featuring a Defiance ultra-light all-steel action, this 6.5×57 Lapua lightweight tips the scales at just 4.93 pounds including scope and rings! For reference, a half-gallon of milk weighs 4.3 pounds, so this rifle is LIGHT! Here’s a report from the proud owner who built the rifle for a future Kodiak Island Alaska mountain goat hunt.
Ultralight Rifle Report by Forum Member Dave
I decided I wanted the challenge of a Mountain Goat hunt after I turn 60. It was the perfect excuse to put together an ultralight, something I had wanted to do for years. I wanted to see how light a bolt action rifle could actually be. My goal was to stay under 5 pounds, without going to a Titanium action, including rings and scope. I knew this would be difficult but I did manage to achieve the goal.
I started with a Defiance anTi model Rem Model 7 short action. This is an extremely smooth action that weighs just 19.2 ounces in this size. I had Carson Lilja of Lilja Barrels program a barrel taper to my dimensions for a 6.5mm 1:8″-twist stainless, 3-groove 22″ barrel. As fitted in the rifle, the barrel is free-floated except for the first inch or so forward of the action.
Other rifle components are: Bix n Andy Dakota trigger, aluminum trigger guard, blind magazine with an aluminum follower, titanium action screws, and a Leupold 3-9X lightweight optic in Talley rings. I also had an aluminum adapter installed in the for-end to accept a magnetic mount Javelin carbon fiber bipod.
The rifle was chambered up in 6.5×47 Lapua by my friends at Sportsman’s Outfitters in Knox, Pennsylvania. Then I sent the barreled action to Wayne at Oregunsmithing (Pendleton, OR) to have a Kevlar stock built. The stock weighs a whopping 14 ounces! When it came back I had everything Cerakoted (see bottom photo before coating). This stock was a full custom, built around my barreled action. Wayne’s work was reasonably priced with a 3-month turn around.
Excellent Accuracy — 5/8″ Three-Shot Groups at 100 Yards
Now it was time to shoot the rifle and I was not disappointed. It shoots both Barnes TTSX 100s or Swift Scirocco II 130s into 5/8″ at 100 yards. Off a bipod at 400 yards, three go into 3″ or so. This thing is crazy light even though it wears a 22″ barrel.
Without scope and rings, before Cerakoting the action and barrel, this 6.5×47 rifle tipped the scales at a mere 4.20 pounds (67.2 ounces). Check it out:
Good news for shooters — electronic targets will be used at the CMP National Matches at Camp Perry this year. The Civilian Marksmanship Program (CMP) has announced that, for the first time, ALL the National Mid-Range and Long Range events will be fired on outdoor electronic targets! The Mid-Range and Long Range matches, scheduled for August 5-10, 2024, are part of the annual National Matches at Camp Perry, situated near Port Clinton, Ohio.
The electronic target system provides monitors at each firing point that instantly display accurate shot scores — this helps competitors quickly assess their shot placement and wind corrections. The use of the targets also eliminates the need for pit duty. That significantly lessens the duration of each match, so shooters can spend less time in the hot summer sun.
In this video, CMP Highpower Manager, Brian Williams demonstrates the accuracy of the KTS electronic targets and explains how the system works.
The Long Range series features 10 individual and team events on Camp Perry’s 1,000-yard Viale Range as well as a Mid-Range Match, fired at 600 yards. Only 50 targets will be assembled, meaning the Mid-Range Match will likely sell out — so competitors should sign up as soon as possible. CMP’s National Long Range matches include Match Rifle, Service Rifle, Palma, F-Open, F T/R or AR Tactical categories. The events are open to adult and junior competitors, regardless of experience level. CLICK HERE to learn more the National Mid-Range and Long Range Matches.
After successfully field testing the electronic target line for Long Range matches at two spring events, the CMP made the decision to utilize the technology at this year’s Nationals. Sara Rozanski, CMP’s Highpower Rifle Coordinator, reports: “Using the targets for Long Range at our Eastern Games in North Carolina in May and again at Camp Perry for a test match in June really encouraged us to make them available for competitors at the National Matches. We received a lot of positive feedback, and we hope bringing the technology to Camp Perry will … enhance the experience of the National Matches for those who attend our Long Range events.”
The CMP 2024 National Matches (for all divisions — pistol, rimfire, centerfire) run July 11 through August 10, 2024. Find registration links and other info on the CMP website at Thecmp.org/cmp-national-matches.
The 2024 summer season is well underway. Do you have a good first-aid kit in your vehicle to deal with possible injuries to family members of all ages? For just $23.93 you can get an excellent kit from Be Smart/TRI, the #1 maker of First Aid Kits in the USA.
TRI’s Be Smart Get Prepared First Aid Kit has 201 items inside a sturdy case with shoulder strap and carry handle. There is also a handy, detachable mini pouch with key essentials for first aid on-the-go. You can easily bring the mini-pouch along on a bike ride or hike.
This multi-purpose First Aid Kit includes:
• 50 – Bandages 3/4 x 3
• 30 – Bandages 3/8 x 1 1/2
• 6 – Bandages Closure
• 3 – Knuckle Bandages
• 1 – Tapes – .5 x 2.5yd Waterproof
• 10 – Cotton Tips – 2.75″”/10 Pack
• 4 – Finger Splints
• 1 – First Aid Guide
• 4 – Gauze Pad – 2 x 2 / 4 ply
• 4 – Gauze Pad – 4 x 4 / 4 ply
• 1 – Gauze Pad – 5 x 9
• 2 – Nitrile Gloves
• 1 – Instant Cold Pack – 5 x 6
To help ensure that outdoor adventures remain safe and trouble-free, the CTD Shooters’ Log has a helpful Essential Summer Survival Guide. This is worth reading before you venture away from civilization.
Here are some highlights of the article with links for MORE INFO:
First Aid Kits for Campers
You should never venture outside without a first aid kit close at hand. While exploring the outdoors, all types of accidents can occur—from cuts, scrapes, and burns to broken limbs and severe allergic reactions.
Basic Survival Skills
Basic survival skills are a necessity if you plan to spend any amount of time outdoors. These five tips, plus a how-to on what to pack in a lightweight, basic survival kit will help if you are ever stuck, lost, stranded or injured in the field.
How to Treat Burns
Fireworks, barbeques and campfires — in the summer we are frequently around fire, which increases our chance of getting burned. A first-degree burn is most likely home treatable, while a third degree burn requires immediate medical attention. Learn how to spot the differences between minor and severe burns.
ARs and Narrow-Forearm Sporters Benefit from Front Bag-Rider Blocks
Whidden Gunworks offers a smart product that will enhance the bench-rested accuracy of any rifle with an accessory rail on the forearm. The Whidden Track Plate fits securely in the forearm accessory rail on prone, cross-the-course, tactical, and Palma rifles. These guns typically have a narrow and/or rounded fore-end so they rock and wobble when used with a front pedestal rest. The TrackPlate cures that. Once installed it provides a rock-solid, 2.9″-wide platform that mates perfectly with a benchrest-type front sandbag. This gives sling-shooters maximum stability when testing loads or zeroing their sights or scope. Plus you can now shoot F-Class competitively with a prone gun. (The 2.9″ width is 100% legal for F-Open).
The Track Plate is light-weight, has catamaran-style runners to aid tracking and prevent rocking, and can be easily stowed in a range bag. The Track Plate fits BOTH Anschutz and American style forends and is made in the USA of machined aluminum. The Track Plate is available from Whidden Gunworks for $58.50.
Plate designer (and 5-Time Nat’l LR Rifle Champion) John Whidden says: “The Plate is great for any rifle with a rail whether it ís smallbore, centerfire, or an air gun. Now you can try F-Class with your favorite prone rifle: the Plate has a perfect low-drag finish for riding a rest or sandbags and is competition legal.”
Bag-Riders for AR-Platform Rifles from EGW
AR owners should check out the 3″-wide Delrin bag-rider from Evolution Gun Works (EGW). There are two versions, one for front Picatinny Rails, and another that mounts via sling swivel studs. These EGW Bag-Riders were developed expressly to fit the fore-ends of ARs. The front bag-riders are contoured to match the handguard profile so they fits securely with no wobble.
The $49.99 EGW Picatinny Rail front Bag-Rider simply slides on your under-forearm rail and there is a a tension bolt. Attachment is quick and easy. Or, if your AR has no rail get the original $39.99 EGW front Bag-Rider that attaches to a front sling swivel stud anchor. That allows it to mount as easily as a Harris bipod — no rail needed! Just unscrew the swivel stud, put the front bag-rider in place and attach one hex-head machine screw.
Also with the two front Bag-Riders, EGW offers a Rear Bag-Rider for ARs that attaches via the sling swivel anchor. Overall, it is a slick system. Front and rear bag-riders can be attached in a couple of minutes. The Delrin blocks slide easily in the bags and make the gun ultra-stable. The gun tracks straight back.
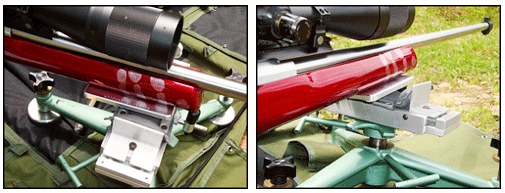
Here is a clever DIY tool we learned about from Frank Shuster, a Forum member, who, sadly, passed away in 2015. Frank was a very knowledgeable shooter who was always willing to help others. Here is one of Frank’s smart inventions. He devised a way to measure the length of a rifle’s chamber using a fired cartridge case. Frank’s system works by cutting a “collar” from part of the case neck. This then slips over a bullet seated in a case loaded without powder or primer. As you chamber the dummy round, the collar will move back to indicate the full length of the chamber. (Make sure the bullet is seated well off the lands so the dummy round can chamber fully.)
The pictured gauge can be home made (for free) with components you already have on hand. Frank explained: “I used a Dremel cut-off wheel to cut the front half of the case neck off. A jewelers needle file to de-burr both rough-cut edges. The cut-off surface does not need to be perfectly square, because you are using the original straight mouth to make contact at the front of the chamber. Seat any old bullet to the approximate normal seating length. Next apply a tiny drop of oil on the ogive of the bullet, and slide the ‘collar’ over the bullet. Then chamber the dummy round and close the bolt. Extract the round slowly and carefully and take the measurement with calipers (see top photo).”
Frank’s DIY chamber length gauge works well. In a related Shooters’ Forum thread, Frank posted: “I’ve compared length dimensions doing it this way and with the chamber length shown on my chambering reamer drawings, and the Sinclair gauge, and they are all within .001″ or so.”
Commercial Chamber Length Gauges May Not Work with Custom Chambers
Frank did use Sinclair chamber-length gauges for some applications. These bullet-shaped gauges slip into a cartridge, but “it’s inconvenient to order that little gauge only… without spending $6 shipping for a $7 item.” Moreover, the Sinclair gauges may not fit a custom chamber with a tighter neck dimension because the diameter of the ring at the end is too large.
As an alternative to commercial gauges, the collar-type, homemade gauge will function properly in a custom chamber. The homemade gauge will work with smaller-than-standard chamber neck dimensions, as long as you use a piece of appropriately-turned fired brass that fits your chamber.
The premier Multi-Gun event in the USA kicks off this week in Minnesota. The 2024 USPSA Multi-Gun National Championship runs July 19 – July 21, 2024 at the Forest Lake Sportsmen’s Club in Forest Lake, Minnesota. This event attracts top Multi-Gun competitors from across the nation vying to be crowned the USPSA National Champion. While most competitors are men, there are also talented lady shooters.
The USPSA has a great online Guide to the Multi-Gun Championship. This zoomable, 50-page “Match Book” has diagrams of all 12 stages, plus interviews with leading shooters. In addition, you’ll find a map of the Forest Lake facility on page 13 of the online Match Book.


 Setting Magnification Levels

 Every safe, when possible, should be anchored in place with heavy-duty fasteners. Ideally, use multiple bolts in the bottom of the safe, anchored to concrete or solid foundation. Choose the appropriate lag bolts or anchors for the material below your safe. If you can’t mount to the floor, bolt the safe to wall studs. You can locate the position of the studs with an inexpensive electronic “Stud Sensor” available at home supply stores.
 Locate your safe in the corner of a room or in a recess that blocks access to one or more sides of the safe. On many gun safes, the steel on the top, sides, and rear is thinner than on the door. Blocking access to the sides makes it much more difficult to use power tools on the sides, where the safe is most vulnerable. It’s also wise to place the safe in a relatively tight space with limited room to maneuver. Anything that makes the safe harder to move helps deter would-be thieves.


 Commercial Chamber Length Gauges May Not Work with Custom Chambers


