If two barrels are better than one, then why not three? That’s the thinking behind the exotic Bockdriling BD14 from Blaser, unveiled at the 2014 IWA Show in Germany. This three-barrel Bockdrilling firearm works as a shotgun, large-caliber rifle, and small-caliber rifle all in one. Even with all those barrels, the BD14 is relatively light, at 3.3 kg (7.26 lbs) without optics. That makes this a nice, carry-around gun for stalking. As you’d expect from Blaser, the twin triggers are crisp and precise, with a pull weight of just 1.43 lbs (650 grams). The front trigger is for the large-caliber rifle barrel, while the rear trigger works both the shotgun and small-caliber barrels, via a tang-mounted selector. These firearms are rare in the USA — and quite expensive. The only Blaser BD 14 we could find on GunBroker had a $9099.95 asking price. That works out to over three grand per barrel.
Here’s what Blaser USA has to say about its unique three-barreled BD 14:
“The ‘Bockdrilling’ is, put simply, an over/under (O/U) rifle-shotgun combination with a smaller caliber rifle-barrel… on the side. The barrel arrangement [allows] for an extremely slender receiver, making the BD14 exceptionally huntable.
The [patent-pending] Vertical Block Lockup… combines an extremely compact and solid block lockup in a closed system within the monoblock with the comfortable handling of a classic break-action rifle.
The double lock permits, if needed, a rapid second shot, the front trigger always releasing the large rifle-caliber. The … barrel selector actives the shotgun barrel when in position ‘top’ and activates the smaller rifle caliber in position ‘bottom’.”
Why Does Anyone Need Three Barrels?
The Blaser website explains: “As hunters, we learn to expect the unexpected, whether in a blind or stalking, so it’s understandable that we dream of a firearm that will allow us to take advantage of any situation. With the Bockdrilling BD14, Blaser has developed the perfect blind and stalking firearm – compromises are finally a thing of the past.”
Design Features of the Bockdrilling BD 14 Tri-Barrel Gun
The BD14 has a double-lock system so that a second shot can be taken without having to recock the firearm. Blaser says: “Thanks to the free-floating barrels, point of impact remains constant even with a quick succession of shots, no matter which barrel was fired first. The extremely strong vertical block lock on the BD14 helps contribute to the high degree of precision.”
Story idea from EdLongrange. We welcome reader submissions.
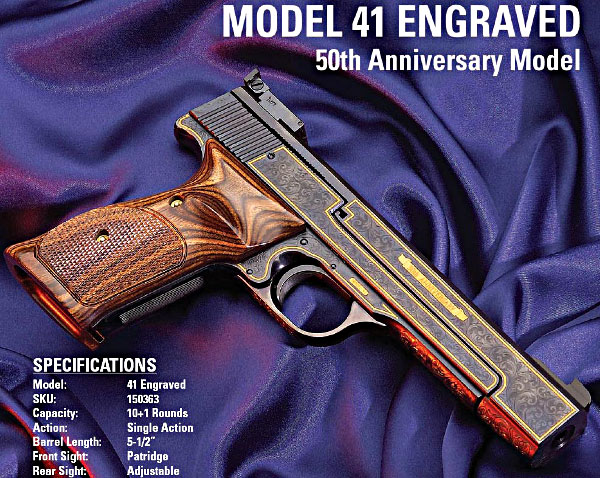
The Smith & Wesson Model 41 is a classic American rimfire target pistol. Beautifully crafted, the Model 41 boasts a superb trigger, comfortable grip, and excellent accuracy. New or used, a Model 41 is a fine addition to any firearms collection. We’ve shot a few Model 41s, and they will spoil you if you go back to a lesser rimfire pistol. First released commercially in 1957, a special 50th Anniversary Model (shown above top) came out in 2007 (hitting the market in 2008). Perhaps it should have been named the 60th Anniversary edition, as the first prototypes of the Model 41 were crafted way back in 1947. READ American Rifleman article about Model 41.
The Model 41 is one of those classic American designs that has stood the test of time. Many feel the Model 41 represents the apex of American .22 LR pistol design, much like the Colt Python is the “crown jewel” of double-action revolvers. One YouTube poster noted: “After [65] years the Model 41 is still near the top of the game in precision .22s. Very few if any of the current day pistols can match the workmanship, fit, and balance that makes having a Model 41 so enjoyable to own. S&W blew the center out of the 10 Ring with this one when they introduced it and continue to do so today.”
The Stunning 50th Anniversary Edition Model 41
Probably the most sought-after Model 41 is the handsome, machine-engraved 50th Anniversary Model, released in 2007. This was offered in a hardwood, glass-covered case. This would be a prized addition to any gun collection:
The 50th Anniversary Model was machine-engraved with Class A+ coverage, 24 carat gold striping, and special serial number range FYA0001 – FYA0500.
Of course, if you want a superb trigger in a .22 LR semi-auto pistol, look no further than the S&W Model 41. For $2000.00 to $3700.00 you can find the fully engraved, 50th Anniversary Model 41 in presentation case on various auction sights. First released in 2007, the engraved model 41 combines superior accuracy with stunning appearance.
Smith & Wesson Model 41 — An American Classic Rimfire Pistol
The Smith & Wesson Model 41 is an American classic — one of the great, iconic .22 LR target pistols. Accurate, well-balanced and built-to-last, model 41s have been in production for over 50 years. The Model 41 remains one of the most accurate pistols ever produced by Smith & Wesson.
Model 41 photo by Mightymoo01, creative commons released CC BY-SA 3.0.
Beautifully crafted, the Model 41 boasts a superb trigger, comfortable grip, and excellent accuracy. Whether an older classic or a newer model, the S&W Model 41 is something every gun owner would prize for target shooting. And “like new” high-grade models are now appreciating in value!
Smith & Wesson historian Roy Jinks recounts the development of the Model 41: “It was a difficult task to develop a competitive pistol that would meet the various needs of the top shooters. The final design was decided upon in 1956 and the new .22 target pistol was announced in Smith & Wesson’s 1957 Annual Report, stating: ‘Its design includes many advanced features, such as stocks equally suitable for right or left-hand shooters- a clean, crisp, trigger pull that is adjustable to individual preferences. The distribution of weight, together with the angle of the stocks, permits extremely steady off-hand holding. The precise micrometer sights are rigidly mounted on a one piece forged barrel to avoid any possible misalignment even after long usage.’ The handgun featured a 7 3/8-inch barrel equipped with a muzzle brake to help control recoil. The underside of the barrel was grooved to allow the addition of adjustable Olympic Style Barrel Weights. The trigger pull could be adjusted to allow for a 2-pound pull to meet the NRA Gallery Course requirement or increased to 3 pounds to meet the needs of the ISU International rules.
Smith & Wesson Model 41 with two extra slide/barrel assemblies, plus custom holster and mag holders. This sold on Cowan’s Auctions for $2640.00 in 2019.
Sales began in December of 1957 and the Model 41 was first cataloged in 1958. The factory was soon heavily back-ordered and [the Model 41] became the most popular auto-loading pistol offered by the company. In May of 1959 Smith & Wesson introduced a 5-inch lightweight barrel for the handgun to meet the demand of hunters[.] The line of Model 41s was further expanded in September of 1960 with the introduction of the Model 41-1 which fired .22 shorts for the International Rapid Fire Shooters. [I]n August of 1963 the company introduced the 5.5 inch heavy barrel. The last of the major barrel changes occurred in 1965 when the company produced the 5.5-inch heavy barrel with an extendable front sight to provide the shooter a longer sight radius. During the last 50 years the Model 41 has … established many records around the world. Today it is one of the classic target handguns[.]” READ MORE Model 41 History.
Field Test of Current Generation S&W Model 41
So how do modern production Model 41s shoot? Very well indeed, based on the results from popular gun Vlogger 22Plinkster. He took a new Model 41 to his test range and tested it for handling and accuracy. Watch the 22plinkster video below:
22plinkster runs of the most popular gun-centric YouTube channels. His videos have been watched by hundreds of thousands of firearms fans. Some of 22plinkster’s videos involve trick shots, but he’s actually a very competent marksman who has shot a vast collection of .22 LR/22 WMR pistols and rifles, making him a qualified rimfire expert.
Hickok45’s 30-Year-Old Model 41
Hickok45, a popular YouTube host, has been a fan of the S&W Model 41 since it was first released. In fact, back in 2020, Hickok45 celebrated his 30th year of ownership of this classic American rimfire. In this “Celebrating 30 Years” video, Hickok 45 demonstrates the qualities that have made the Model 41 so popular. He notes that it balances well, has an excellent trigger, and delivers superb accuracy. He observed: “What a great .22 LR pistol!”
Performance Center “Optics-Ready” Model 41
Do you prefer shooting pistols with a modern optic? Well check out the fully “Optics-Ready” S&W Performance Center Model 41. This modernized Model 41 PC has an integral Picatinny Rail mount for optics, plus adjustable target sights with a special skeletonized and removable front blade sight.
The Performance Center Model 41 sports an integral Picatinny-style equipment rail for easy installation of optics. Other standard features include an external thumb safety on the left side of the frame, custom wood target grips, and a blued finish. This full-size, 10-shot .22 LR pistol features a carbon steel frame and slide along with a 5.5-inch barrel. Measuring 10.5 inches in overall length, the Model 41 PC has an unloaded weight of 41 ounces. MSRP is $1763.00.
The S&W Model 41 History from Wikipedia
From Wikipedia: The Smith & Wesson Model 41 is a semi-automatic pistol developed by Smith & Wesson after World War II as a competitive target pistol. It was designed with a 105-degree grip angle, the same as the Colt M1911 pistol, to maintain a consistent grip angle.
Prototype and Production Models
In July 1947, two prototypes, numbered X-41 and X-42, were produced, tested, and improved for the next 10 years. In 1957, the Model 41 was made available to the public for sale when Smith & Wesson produced 679 units. At the end of 1958, they had built 9,875 Model 41 pistols. A lighter 5-inch (130 mm) barrel was offered in 1958 for field use. The Model 41-1 was introduced in 1960 and was chambered in .22 Short for International Rapid Fire competition. Only 1000 were made using light aluminum slides necessary for function with the lower powered .22 Short.
In August 1963, the 5-inch heavy barrel version came into the market. Stoeger’s Shooter’s Bible of 1964 shows a 7 3⁄8″ (190 mm) barrel grooved for Olympic center weights. The cocking indicator and 7 3⁄8″ barrel were dropped in 1978. The 7-inch (180 mm) barrel was introduced in 1978 with no provision for a muzzle brake. A 6-inch (150 mm) barrel was offered for a few months in 1991. In 1992, the Model 41 was dropped from production. In 1994, Smith & Wesson returned it to production as the Model 41 “New Model”.
The Model 41 Military Variant — S&W Model 46
In 1957, Smith & Wesson offered a “no frills” version of the Model 41, designated the Model 46. In 1959, it was selected by the U.S. Air Force for basic marksmanship training. About 4000 units were made in total: 2500 with a 7-inch barrel, 1000 with 5-inch barrels, and 500 with 5.5″ barrels. The pistol lacked the checkering, polished blue finish, and other refinements of the Model 41. It proved to be a commercial failure with consumers who preferred the more costly Model 41, and production ceased in 1966.
I have seen it time and time again, shooters on the line wrestling with their rifle trying to get the bolt closed while the wind is switching. They were too focused trying to get their bolt to close and getting their rifle settled back on the bags that they missed the wind switch. Bang… Eight! The straw that broke the camel’s back for me was at the 2017 Canadian Nationals. I was paired up with a young girl and she would try really hard to close the bolt on her rifle. The majority of the time she would get it to close, but often times she could not even get the round to chamber. She was focused on her rifle the entire time rather than on the conditions. When we completed our strings, she had five rounds that did not chamber our of 15! That is way too many!. I told her she needed to think about Full-length sizing with 0.002″ shoulder bump, or Controlled Full-length Sizing like I call it. I told her not to worry about losing accuracy. I told her that I full-length size all my rounds and asked if she noticed how smooth my bolt was and noticed my score. She said yes, they were both great!
Controlled Full-length Sizing Does NOT Harm Accuracy
I have found that Controlled Full-length Sizing does NOT hurt accuracy or shorten brass life. I find that I can focus much more on the conditions when I don’t have to think about chambering a round nor extracting it. It has become second nature. After firing, I keep my head welded to the stock, I open the bolt by placing my thumb on top of stock and rotating hand upwards. I reach in and retrieve spent case, place it back in ammo box, and pick up another loaded round and put in chamber. I verify conditions and when ready, I push the bolt in and close it with my index and middle finger.
With Controlled Full-length Sizing you “bump” the shoulder around .002″ for bolt guns.* Image courtesy Sinclair International which carries a variety of Full-length dies.
Whidden Full-Length Sizing Dies by AccurateShooter.com Editor
For proper full-length sizing, you want a quality die that’s a very good match to your chamber. For our project rifles we usually turn to Whidden Gunworks which offers both bushing and non-bushing FL dies. And if you want the hot new option, check out Whidden’s patent-pending, click-adjustable FL-sizing die. This gives instant, precise control over shoulder bump. It works great.
*With gas guns, such as the AR10, you may want to increase shoulder bump to .003″ or more. With some benchrest cartridges, .0015″ bump may prove optimal. But .002″ is a good starting point.
Palmetto State Armory (PSA) is running a major Halloween Sale for the next few days. We found some very impressive deals. For example, save $700 on a CZ hunting rifle, save $450 on a PSA AR15, save $500 on rangefinder binoculars, and save 45% on 5.56 NATO ammo. And there are big savings on other products such as gun cases, magazines, rifle scopes, triggers and more.
TIP: If you see a great deal on a product you need, we recommend you grab it quickly. The best deals can sell out quickly, particularly on popular types of ammo.
PSA Halloween SALE Best Deals
PSA Halloween Sale Bundle Deals
If you need optics for your hunting rifle, here is a great package deal. Get a good SIG Sauer laser rangefinder plus a rifle scope for under $350.00. You could pay that much just for a decent rangefinder.
If you compete in service rifle, NRL22, or 3-Gun competitions, we recommend getting a .22 LR AR-style rifle for cross-training and fun matches. With this Rimfire Combo Special you get a good S&W rimfire rifle plus 3 magazines and a nice rifle case.
Pumpkin Blast event graphic from P2K Sports Range in El Cajon, CA.
Halloween (originally “All Hallows Eve”) is celebrated every year on October 31st — this upcoming Monday. That means it’s pumpkin time. Just how much fun can you have with pumpkins? Watch these six videos and find out. In the first video, the RatedRR team sends a few orange gourds to pumpkin heaven using Det Cord, C4, and binary explosives. The sequence starting at the 2:00 minute mark in the first video is truly amazing. WARNING: DO NOT TRY THIS AT HOME!
Oh, and as a bonus for you guys who like ladies who can shoot, we included a fun video with the enthusiastic YouTuber and gun enthusiast Babee Blue. She posted: “Had a leftover Halloween pumpkin and wanted to blow it up using a Ruger .270 Win rifle. Add some Tannerite and it made for quite the fun explosion. Doesn’t everybody blow up their leftover Halloween pumpkins?”
NOTE: For all the videos, if you don’t hear sound, then click the speaker icon.
Watch Pumpkin Blasting with Explosives
In this lead video, the RatedRR team blasts a collection of pumpkins using Det Cord, C4, and binary explosives. The sequence starting at the 2:00 minute mark is jaw-dropping — truly top-tier Hollywood-style colored explosions. WARNING: DO NOT TRY THIS AT HOME!
Pumpkin Face Carved in 5.5 seconds with Handgun
In two days, on October 31st, we celebrate Halloween (which was originally called All Hallows’ Eve). That means the neighborhood kids will be ringing doorbells as soon as it gets dark. No doubt some of you procrastinators will wait ’til the last minute to set out your Halloween decorations and Jack-O-Lanterns. Don’t worry, in the video below, our friend, 3-Gun ace Taran Butler, shows how to carve a pumpkin in just about 5.5 seconds, give or take a tenth. Taran performed this feat of speed-carving with his trusty Infinity handgun, chambered in 9mm Major.
Kirsten Carves Pumpkin Face with .22 LR Volquartsen
In this video, the lovely and talented Kirsten Joy Weiss shows off her impressive trick-shot skills. To help celebrate the gouls/goblins holiday, Kirsten “carved” a pumpkin using her semi-auto Volquartsen .22 LR rifle. Kirsten had to send a lot of rimfire rounds into her orange friend.
It turns out that Mr. Pumpkin’s posterior side was better than his front. On inspection, Kirsten saw that the most impressive Jack ‘O Lantern face appeared on the reverse side of her pumpkin. It turns out the little .22-caliber bullets worked better on exit than entry. Those “exit wounds” made a very successful Halloween face.
Babee Blue Blows Up Pumpkins with .270 Win and Tannerite
In this video, the popular Babee Blue uses a rifle to drill pumpkins that were filled with some Tannerite. The result is an impressive blast when Babee puts a .270 Win round into a pumpkin downrange. This is a fun video to watch, and Babee Blue is an enthusiastic pumpkin blaster.
Which Cartridge Best Destroys a Pumpkin
This video is more about pumpkin blasting than pumpkin carving. Hosted on the Garand Thumb YouTube Channel, this engaging video has been watched over 1.3 MILLION times. The shooters try a variety of cartridge types to determine which firearm destroys pumpkins the best? The host explains: “In this very spooky special we will be putting lead to gourd in the most kinetic way possible. Which gun will do the best? Only science can tell us.”
Carving Pumpkin with Smith & Wesson .44 Magnum Revolver
Hickok45 Carves Pumpkins with Handguns
To celebrate Halloween, here’s an example of master wheelgun marksmanship. Popular YouTube host Hickok45 skillfully creates a smiling face on a pumpkin using a S&W Model 29 .44 Magnum revolver. Hickok45 is using the classic blued, double-action revolver popularized by Clint Eastwood as Dirty Harry. To form the eyes he uses multiple shots then uses a string of shots to form the mouth, reloading his Model 29 along the way. Carving pumpkins with bullets has become a tradition for Hickok45 — every year he puts a face on a pumpkin using a different firearm, typically a pistol, but he’s used other handguns and a couple rifles as well. SEE PUMPKIN Shooting Playlist. Happy Halloween!
In the next video, a pumpkin carved as a Death Star serves as the target for a .50 caliber rifle (looks like a Barrett M82 .50 BMG). As you may guess, the pumpkin Death Star suffers the same fate as the Hollywood version in Star Wars. NOTE: At the 0:42 mark in the video, a graphic displays “30,000 FPS”. That’s the high-speed camera’s frame-per-second rate, NOT the projectile velocity in feet-per-second.
Warning: These demonstrations were carried out on closed ranges by experienced professionals certified to use explosives. Possession of C4 and Det Cord may be a violation of various Federal, State, and local laws. Detonating cord and C4 are classified as high explosives and are regulated by the BATFE. Don’t even think about trying to repeat these stunts on your own.
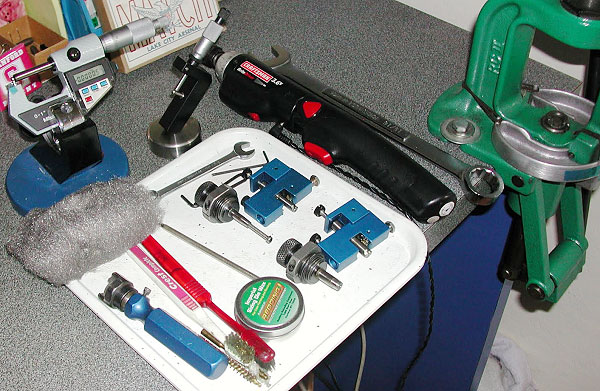
On our main AccurateShooter.com site, you’ll find a good article by GS Arizona on the Basics of Neck Turning. If you’re new to the neck-turning game, or are just looking for good tips on improving your neck-turning procedures, you should read that article. Below we offer some highlights and photos from the article, but you’ll need to read the whole story to view all the illustrations and follow all the procedures step by step.
Why Should You Consider Neck Turning?
Let’s assume that your rifle doesn’t have a tight neck chamber that requires neck turning; if you have a tight neck chamber, of course, the answer to the question is “because you have to”. For the rest of us, and that includes the vast majority of Highpower shooters, neck turning isn’t a requirement, but it can be a useful way to bring your ammunition a small but meaningful step closer to that pot of gold at the end of the rainbow: perfection. I’m not talking about a theoretical improvement, but a real one, an improvement that lies in equalizing and optimizing the neck tension of your loaded rounds. Inconsistent neck tension is a real contributor to increased muzzle velocity variance which itself is a significant factor in increased elevation dispersion at long range. So there’s our basic reason for neck turning: to equalize and optimize neck tension in order to reduce elevation dispersion.
The Tools of the Trade
Here you see everything I use and a bit more. The press, a cordless screwdriver (always plugged in, turning is tough on the old battery), a couple of K&M neck turners (one set up for 6mm, the other for .30 caliber) an expander for each size, some Imperial lube, an old toothbrush or two to keep the cutter clean, a handle with a caseholder (for those emergencies when the screwdriver dies and there’s just one more case to go!), steel wool and a tubing micrometer finish the list of tools. Hey, I left the dial calipers out of the picture! They’re always handy, keep them around, but they are useless for measuring neck thickness, so don’t try. I usually use an Optivisor magnifier while I turn necks, very handy for a clear view of what’s happening on the neck.
Expanding the Neck
Put some lube on the inside of the case neck and run it into the expander. Really, this isn’t hard. I prefer to expand each case immediately before turning it as opposed to expanding all the cases and then turning them. Brass is somewhat springy and will tend to go back toward its original size; therefore, by expanding and turning immediately, you are more likely to have all cases fit the mandrel with the same degree of tightness and to get a more consistent depth of cut.
Cutter Adjustment for Cut Depth and Length
All the tools I’ve seen have pretty good adjustment instructions. The only thing they don’t tell you is that you should have five to ten spare cases to get it right initially. Anything of the right diameter will do while you learn, for instance, just use that cheap surplus .308 brass to do initial setup and save the precious .30-06 for when you know what you’re doing. Be patient and make your adjustments slowly; you’ll need to set the cutter for thickness as well as length of cut (just into the shoulder). The depth of cut (brass thickness) takes a bit of fiddling, the length of the cut is generally easy to set.
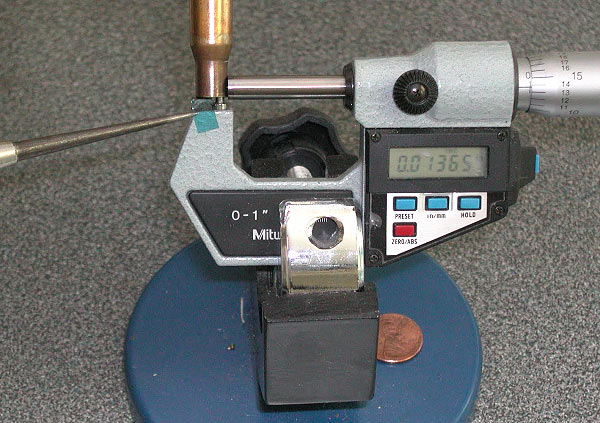
The Finished Product — A Perfectly Uniform Neck
If you read the whole article, and follow the procedures using quality tools, you should get very good results — with a little practice. To demonstrate, here’s an example of my finished, neck-turned brass. You’ll see there is a perfect, 0.0125″ thick neck. It’s very uniform around the circumference, usually I only see 1 or 2 ten-thousandths variance. Now, with the necks uniformed like this, we can select the bushing size that will give us our preferred neck tension and experiment with various levels of tension, secure in the knowledge that all of the cases will actually have the desired neck tension.
About the author — “GS Arizona” was the writing handle for German Salazar, a top-tier rifleman and gun writer. Sadly, German passed from a medical condition in 2022. German was instrumental in helping this website and our Forum get started, and we remember him as a very dear, valued friend.
German was a great individual, and a great asset to the sport. An attorney by trade, with an engineering background, German was one of the very best gun writers, who had high master shooting skills to match his writing abilities.
Smith & Wesson has received the Guns & Ammo 2024 Handgun of the Year Award for the Bodyguard 2.0 pistol. This .380 ACP ultra-compact, single-stack pistol has a $449.00 MSRP and can be purchased for $399.00 with both 10-rd and 12-rd magazines.
The Bodyguard 2.0 has received positive reviews because it has excellent ergonomics, is very easy to carry, and has a good trigger. Guns & Ammo notes: “After a thorough evaluation of accuracy, dependability, and durability, the Smith & Wesson Bodyguard 2.0 was a [single] vote short of a unanimous decision. Available with and without a thumb safety, its dimensions, ergonomics, low felt recoil, texture, and functional slide design make the Bodyguard 2.0 the most shootable new pistol for the broadest range of shooters.”
Looking at the reviews, most testers praised the new Bodyguard 2.0 for its modest recoil, good trigger, and good ergonomics. Described as a “micro-compact”, the Bodyguard 2.0 is indeed very small. As you can see in the image below, the Bodyguard 2.0 is about the size of a man’s hand with fingers extended. This photo is from a very comprehensive Ammoland.com test review by Mike Hardesty. If you are thinking of getting this pistol, definitely read that 9/10/24 Hardesty Review.
S&W explains: “The Bodyguard 2.0 leverages superior ergonomics, and an enhanced trigger to elevate performance. We’ve been able to accomplish this while still keeping the handgun small enough for deep concealment. We have meticulously engineered every component to enhance ergonomics while preserving performance in a lightweight profile, making it ideal for everyday carry.” — Kyle Tengwall, VP of Marketing.
Hickok45 Test of New S&W Bodyguard 2.0 .380 ACP
S&W Product Description:
SUPERIOR ERGONOMICS
The Bodyguard 2.0 perfectly bridges the ability to comfortably carry but maintain a high level of performance when it comes to shooting. Our ergonomic grip feels great in the hand, the stippling allows the shooter to maintain control and mitigate recoil, and the grip angle lends for a natural point of aim when coming up on target.
AGGRESSIVE SLIDE DESIGN
More serrations give the user multiple points of traction letting them grab and rack effectively in high-stress scenarios.
IMPROVED TRIGGER
Migrating to a striker-fired system and having the flat-face design makes the trigger on the Bodyguard 2.0 light and crisp. Consistent feedback allows for repeatable shots and the flat design aids in finger placement leading to more accurate shooting.
Ace shooter Julie Golob reviews the Bodyguard 2.0 pistol on her JulieGolob.com website. She tests the gun and provides size comparisons with other “micro-compact” pistols. Julie notes that: “The Bodyguard 2.0 has an overall height of 4 inches, a width just under 1 inch, and weighs in at 9.8 oz. unloaded.”
Burris Signature Rings with polymer inserts are an excellent product. The inserts allow you to clamp your scope securely without ring marks. Moreover, using the matched offset inserts you can “pre-load” your scope to add additional elevation. This helps keep the scope centered in its elevation range while shooting at long range. Additionally, with a -20 insert set in the front and a +20 insert set in the rear, you may be able to zero at very long ranges without using an angled scope base — and that can save money. (To move your point of impact upwards, you lower the front of the scope relative to the bore axis, while raising the rear of the scope.)
Insert Elevation Values and Ring Spacing
People are sometimes confused when they employ the Burris inserts. The inset numbers (-10, +10, -20, +20 etc.) refer to hundredths of inch shim values, rather than to MOA. And you need the correct, matched top/bottom pair of inserts to give you the marked thousandth value. Importantly, the actual amount of elevation you get with Burris inserts will depend BOTH on the insert value AND the spacing between ring centers.
Forum member Gunamonth has explained this in our Shooters’ Forum:
Working with Burris Signature Rings
Burris inserts are [marked] in thousandths of an inch, not MOA. To know how many MOA you gain you also need to know the ring spacing. For example, with a -20 thou insert set in the front and a +20 thou insert set in the rear, if the ring spacing is 6″, the elevation change will be approximately +24 MOA upwards.
Here’s how we calculate that. If you have a 2 X 0.020″ “lift” over a distance of 6 inches (i.e. 0.040″ total offset at 0.5 feet) that’s equivalent to 0.080″ “lift” over 12 inches (one foot). There are 300 feet in 100 yards so we multiply 0.080″ X 300 and get 24″ for the total elevation increase at 100 yard. (Note: One inch at 100 yards isn’t exactly a MOA but it’s fairly close.)
Here’s a formula, with all units in inches:
Total Ring Offset
——————– X 3600 = Change @ 100 yards
Ring Spacing
(.020 + .020)
—————– X 3600 = 24 inches at 100 yards
Ring Spacing: 6 inches
NOTE: Using the above formula, the only time the marked insert offset will equal the actual MOA shift is when the center to center ring spacing is 3.60″. Of course, you are not required to use 3.60″ spacing, but if you have a different spacing your elevation “lift” will be more or less than the values on the inserts.
We’ve found a dozen great discount/rebate programs. These specials can save you big bucks on rifles, pistols, shotguns, ammo, or bullets. Some of these rebates are worth $100 or more. For example you can Save $200 on a Beretta A400 Shotgun, save $150 on a Franchi Rifle, or Save $125 on an FN509 Pistol. Note: most of these promos are good through the end of December 2024, but some expire at the end of October 2024 — so check the dates.
NRA has announced that the 2025 National High Power Rifle, Smallbore Rifle, and Pistol Championships — the NRA National Matches — are leaving Camp Atterbury, Indiana, and will be held at different clubs around the country in 2025. (Upper photo by John Parker, SSUSA.org.)
After significant internal discussion and involvement with key NRA Competitive Shooting Board Member stakeholders and committee members from each discipline, the National Rifle Association (NRA) has determined that beginning in 2025, the NRA National Matches for High Power Rifle, Smallbore Rifle, and Precision Pistol will take place at different clubs throughout the United States.
These matches will be managed by selected match directors and staff who possess the necessary expertise to deliver an exceptional NRA National Championship experience under current NRA Rules. The NRA will continue to base its competitive shooting operations at Camp Atterbury and will conduct several annual championships and competitions at Camp Atterbury, such as the NRA World Shooting Championship and the America’s Rifle Challenge Championships.
“At the request of the committee leaders and appropriate NRA board members, the National Matches going to the clubs will ensure NRA rules continue to govern NRA Championships,” said NRA’s Director of Competitive Shooting Cole McCulloch. “The clubs are also in a position to hire experienced staff and match directors, which is what our competitors require.”
The venue changes for NRA National Matches should be a positive development for competitive shooters in the view of some leaders. Patti Clark, NRA director and chairperson of NRA’s Smallbore Rifle Committee commented: “This opportunity gives the chance to bring the Matches closer to the Smallbore community. It also allows us to keep our autonomy while providing matches to our Smallbore shooters. As soon as we have dates and locations, we will update the competitors as soon as possible. I look forward to the 2025 awards ceremony, where we will be surrounded by NRA’s historic Smallbore legacy.”


 Of course, if you want a superb trigger in a .22 LR semi-auto pistol, look no further than the S&W Model 41. For $2000.00 to $3700.00 you can find the fully engraved,


 The Performance Center Model 41 sports an integral Picatinny-style equipment rail for easy installation of optics. Other standard features include an external thumb safety on the left side of the frame, custom wood target grips, and a blued finish. This full-size, 10-shot .22 LR pistol features a carbon steel frame and slide along with a 5.5-inch barrel. Measuring 10.5 inches in overall length, the Model 41 PC has an unloaded weight of 41 ounces. MSRP is $1763.00.


 In two days, on October 31st, we celebrate Halloween (which was originally called All Hallows’ Eve). That means the neighborhood kids will be ringing doorbells as soon as it gets dark. No doubt some of you procrastinators will wait ’til the last minute to set out your Halloween decorations and Jack-O-Lanterns. Don’t worry, in the video below, our friend, 3-Gun ace
 Hickok45 Carves Pumpkins with Handguns