Many shooters these days clean their cartridge brass ultrasonically, or wet-tumble their cases with stainless media (above). Both methods get brass clean and shiny, inside and out. However, when those wet-cleaning processes are completed, you’re left with a pile of soaking wet brass. How do you dry your brass quickly and efficiently, without unsightly water spots? Read on for some great answers…
In our Shooters’ Forum, Member Terry asked: “How do you dry your brass after Ultrasonic cleaning?” In a Reloading Forum Thread, many smart suggestions were posted. A dozen fellow members outlined a variety of effective case-drying procedures, which work equally well for both wet-tumbled brass and ultrasonically-cleaned cases. Here are the Top 10 brass-drying suggestions from our Forum members.
TOP TEN Ways to Dry Cartridge Brass After Wet Cleaning
1. Food Dehydrator — Shake the brass in towel to get the bulk of water off. Next leave in the food dehydrator for 45 minutes or until there are no signs of moisture inside the cases. — Lawrence97
2. Lyman 5-Level Case Dryer — Rinse off cleaning solution(s), then load brass by type into racks in Lyman Cyclone Case Dryer. This is easier to load/unload than food dehydrators and holds more cases.
3. Hot Water + Compressed Air — Rinse all your cases as a batch using scalding hot water from the kitchen sink. Hot water evaporates off of brass very very quickly. Then hit them with compressed air. Takes 10 minutes. Simple. — SG4247
4. Oven Dry in Pre-Heated Oven — After pre-heating to 200° or so, turn off oven and put brass inside on a tray. Most important! Tell your wife what you are doing so she doesn’t crank it up to 425 to heat pizza! — MClark
NOTE: Many other members suggested oven drying at 150-200°. We recommend turning OFF the oven so you don’t cook your brass if you forget to remove the cases.
5. Towel Dry then Warm with Heat Gun — Roll brass in a towel until no more water shakes out. Lay out on cardboard box top and blow off with Harbor Freight heat gun. $9.99 on coupon. Two minutes of heated air and about half hour of wait and they are good to go. This is with primers removed. — Shaggy357
6. Compressed Air, then Sun Dry Outside – I rinse the brass, then blow them out with compressed air. Then, dependent on the time of year, lay them on a towel in the sun. — HogPatrol
7. Dishwasher on Dry Cycle – In the winter, I drop my wet brass cases neck-down on the rack pegs in the dishwasher, then turn on the dry cycle. In the summer…well, I’m in Texas. They go to the porch for a bit. — Toolbreaker
8. Alcohol Rinse then Air or Oven Dry — Rinse in 90% Isopropyl alcohol and either let air dry or stick in 175° oven for half an hour. Alternatively, use a dehydrator. — Zipollini
9. Slow Air-Dry in Loading Blocks — I have a reloading block with holes drilled in it. I simply load the block up and let it air-dry in the cupboard for a couple of days. — JCS
10. Wipe with Towel Then Anneal Normally — This thread is stirring my OCD side. Seems complicated for just drying — my brass dries just fine when I anneal it. This entire process can’t take an hour per batch. When finished, the brass is cleaned, annealed, and ready to size. — CHLuke
Deprime, then tumble brass with stainless media, water, Lemishine, and dish detergent.
Shake them easily in a strainer to knock out most media then grab 4-5 pieces, shake them over the bucket for the last of the media then inside a towel.
Finally blow out the primer pockets and wipe with a towel, load in the Annealeez.
This article was originally written by noted rimfire gunsmith Bill Myers. Sadly, Bill passed away in May 2010, but his legacy lives on. He pioneered many advancements in rimfire gunsmithing and Myers-built guns still win matches in benchrest competition.
Crafting competitive rimfire benchrest rifles is considered an art as much as a science. The smith must understand subtle, yet critical aspects of vibration control, barrel tuning, and rifle balance. In the United States, only a handful of gunsmiths consistently turn out rimfire BR rifles that consistently run at the front of the pack at major matches. Bill Myers was one of those master craftsmen. In this article Bill discussed the process of building a winning rimfire BR rig. He reveals some interesting secrets, including his procedures for testing bedding performance and his barrel indexing system. Bill’s methods obviously work, as the Suhl-actioned rifle featured here won a truckload of trophies in its very first match.
Building a Match-Winning Rimfire Benchrest Rig
by Bill Myers
In my opinion, a winning rimfire benchrest rifle is probably twice as difficult to build as a competitive centerfire rifle. The relatively slow .22 LR bullets stay in the barrel much longer than centerfire bullets. This means that vibration control is critical. Likewise bedding is critical. Bore finish and lapping are very important. The amount of bore taper or “choke” can have a huge effect on accuracy. Ignition is also very important and above all, rimfire BR rifles need a very stable stock that tracks perfectly. A rimfire that shoots great is a marriage of all components and the shooter’s need to be aware of everything possible.
Click Photo to Zoom
The rifle featured in this article was built from scratch with attention to all the details that go into accuracy. The goal was to build a gun that could win from the get-go. This would be a “Spec Gun”, meaning a rifle that was personally tested and tuned by me for optimum performance before it went out to the customer.
The Suhl trigger is as good as it gets so no change was needed. It easily adjusts down to about 2 ounces.
Baer Stock in Bubinga Wood
There are many choices when you start to build a complete rifle. It has to shoot well and it has to catch ones eye, or it’s just another rifle on the line. I prefer wood stocks on rimfires for two reasons: they are very stable if the right wood is used and they have a certain traditional appeal to many shooters. I chose Bubinga wood for this particular gun because it is very stable and heavy, it has a very dense grain and a very pronounced figure with a natural red color. The Bubinga is a very forgiving wood to work with.
Gerry and Bruce Baer in Pennsylvania do all my stock blanks. I do all my own inletting and bedding. The blank weighed 4.5 pounds when it came off of Bruce Baer’s duplicator. This Bubinga wood is so hard that it did not need pillars, but I put them in anyway. I bed all my stocks with Loctite Steel Bed liquid and add filler to desired thickness. The final bedding is done with an aircraft tooling epoxy that does not deteriorate over time. The stock has an ebony butt plate and 6 coats of automotive clear, polished to a high finish.
Suhl 150-1 Action Accurized and BN-Nickel Plated
I used a new, unfired Suhl 150-1 action. As explained in the sidebar below, the Suhl 150 actions were originally crafted in East Germany for position rifles. They have a very fast lock-time and come with an outstanding trigger. However, they need some work when adapted to a modern BR gun. The action needed to be accurized and threaded. I have a special tool that I use to accurize actions. It uses two sets of spiders for dialing-in the bolt raceway. After the bolt raceway is running true, one can thread and true up all bearing surfaces so that everything is in perfect alignment with the action raceway bore.
BN-Nitride Plating on Action
I decided to plate the action and all bolt parts with Boron Nitride nickel plating. I bough the BN Electroless Nickel Kit from Caswell Plating and did the job myself. I started by bead-blasting the action so that it would end up with a “satin” finish. The plating material is then applied in a tank. The Boron Nitride goes directly into the plating solution, but you need to use a pump to keep the solution agitated so the BN distributes evenly.
Once the action is completely ready (the metal must be perfectly prepped, with no contaminants), the process goes easily and can be completed in about half an hour. The end result is a very slick, low-friction finish, that is .0002″ (two ten-thousandths) thick and hard as glass. The Boron Nitride makes everything very smooth. After the plating job, the action was noticeably slicker than before.
The cone breech (photo below) permits the barrel to be INDEXED (rotated around bore axis) to any position on the clockface. You then test various rotation settings to find the best accuracy. The system does work. Some barrels shoot best in a particular rotational setting. E.g. with index mark at 3 O’clock vs. 12 O’clock.
Fitting and Chambering the Barrel
As for a barrel, I had two good choices: one Shilen 1:16″-twist, 4-groove ratchet and one Benchmark 1:16″-twist, 3-groove. Both barrels were very accurate and at the end, I decided to leave the Shilen on the rifle because I wanted to put the Benchmark on another Suhl I’ve set aside for myself. I chambered the barrel for Eley flat nose EPS. We’ve found the gun also shoots the new Lapua X-ACT ammo very well.
The barrel finished at 25″ long and features a tuner by the Harrell brothers of Salem, Virginia. I use a flat 90° crown–it’s the most accurate and its gives a good seal against the tuner. I also use a 45°, 12-flute cutter that leaves no burr when cutting the crown. This chamfer protects the crown when cleaning the barrel. There is no sharp edge for the brush or jag to hit on the return stroke. The barrel was headspaced at .043″ and I use a tapered reamer ground by Dave Kiff of Pacific Tool & Gauge in Oregon. The chamber leade area is lightly polished to remove reamer burrs. The breech end of the barrel is machined with a 1/2″ ball end mill to produce what I call a “Myers cone breech.” Technically, it has a sloping radius as you can see, rather than a straight-sided cone. Finishing the breech in this fashion facilitates indexing the barrel, as the barrel can be rotated to any position (on the clockface), without requiring new extractor cuts.
Barrel Indexing — Finding the “Sweet Spot”
When indexing a barrel, one rotates it to different clockface positions relative to the action. Imagine marking a barrel at TDC or 12 o’clock, and then rotating it so the mark is at 3 O’clock, 6 )’clock, 9 O’clock and so on. At each position one shoots groups to determine at which index setting best accuracy is achieved.*
I know that barrel indexing is controversial. I don’t want to get into a lengthy debate other than to say that I believe that careful and thorough testing can reveal a “preferred” index position for a good barrel. With the barrel set in that particular position relative to the action I believe the barrel can yield optimal performance.
I perform the indexing tests indoors at 50 yards. I use a rail-gun with floating action. The barrel is held in place with a clamping fixture similar to an Anschutz 2000-series action. Basically, two vertically-stacked metal blocks clamp around the barrel. I can index the barrel this way simply by unclamping the barrel blocks, rotating the barrel and then re-clamping the system. I have a special system so the action can stay in the same position, even as the barrel is rotated.
It takes time and effort to get solid indexing results. Normally I shoot at least 400 rounds of ammo in 3-4 indexing sessions. Shooting a handful of groups is not enough. You may think you’ve identified the best index position, but you need to shoot many more rounds to verify that. Also, in a very good barrel, the effects of indexing may be subtle, so it will take many groups to confirm the optimal position. In my experience, really good “hummer” barrels do not benefit as much from indexing as an “average” barrel.
Accuracy Testing with Both Barrels
I tested the rifle indoors at 50 yards at the Piney Hill Benchrest Club range. There was no finish on the stock, but it shot well in my one-piece rest with the Benchmark 16-twist, 3-groove barrel and no added weight on the tuner. I shot 30 rounds of Eley Match EPS Black Box (1064 fps) and had 25 Xs and five 10s on the IR 50/50 style target. Not too shabby for a new barrel with no special break-in.
When the Shilen barrel arrived, I installed it on the rifle. By this time the stock had been clear-coated and finished, and the action had been polished and plated. I shot the Shilen barrel outside since it was too hot in the building. The first target was a 250-19X with a new lot of Eley Match EPS Black Box (1054 fps). The gun shot well. My friend Tony Blosser asked to shoot the gun, and he drilled a 250-20X in a steady wind using the same Eley ammo. See target at right.
Advanced Procedures — Vibration Control and Tuner Position
Barrel Tuning Using 2-Way Electronic Indicators
Before competing with this rifle, I put it in a firing fixture I use to tune the barrel. I employ a pair of very expensive Swiss 2-way electronic min/max hold indicators. These measure both up movement and down movement of the barrel as the gun is fired. I can measure the actual vertical travel of the barrel at any position from the front of the receiver to the tuner. I can also tell how long the barrel vibrates, time-wise. Using this fixture I found that the Shilen barrel was very consistent in readings and seemed to work well with no additional weight on the tuner. No barrel ever stops vibrating completely — but this was close, showing less than .002″ of total movement.
Bedding and Vibration Control
I have found that measuring the actual movement of the barrel during firing tells me a lot about the quality of the bedding. I have learned that if I see very big movements (e.g. .010″ up and .005″ down), then there may be a problem with the bedding. I saw this kind of big swing on a rifle with bedding that had not cured properly.
Another pattern I watch for is uneven vertical movement. For example, if the barrel vibrates .008″ up but only .002″ down, that tells me the bedding has issues. As noted above, I look for minimal vibration travel (after the tuner is fitted and optimized), and I also want that travel to be relatively equal both up and down. Good rimfire gunsmiths agree that proper bedding has an important influence on vibration control and tuning. By measuring actual barrel movement during firing, we can, to an extent, quantify how well the bedding is working. At a minimum, we can see if there’s a serious bedding problem.
Trial by Fire — Shooting the Gun in Competition
After semi-gluing in the action, the rifle was shooting great. So, I decided to take it to the Maryland State Unlimited Championship to see if it was truly competitive — whether it could “run with the big dogs”. As it turns out, the Bubinga Suhl was more than just competitive. The rifle won three of the six cards and won the meters championship. In the photo below you can see all the trophies the gun won in its very first match. One of the other competitors in Maryland, dazzled (and perhaps a bit daunted) by the Bubinga Suhl’s stellar performance, told me: “Sell that gun Bill. Whatever you do, just get that darn rifle out of here.” Confident that this was a rifle capable of winning major matches, I packed up the rifle and shipped it to Dan Killough in Texas. Killough has shot some impressive scores with the gun.
Suhl Target Rifles — East Germany’s Legacy
Suhl 150 rifles were manufactured in former East Germany (GDR) by the Haenel firearms factory in the town of Suhl. This region has a long history in arms production. In 1751, Sauer & Sohn founded the first German arms factory in Suhl. Following WWII, Suhl 150s were produced for Communist Bloc marksmen, including East German Olympic shooters. Prior to German unification, the East German national shooting arena was located at Suhl and hosted many top-level competitions including the 1986 ISSF World Championships.
Superb Rifles with Amazing Triggers
As a product of East Germany, the “mission” of the Suhl 150 was to rival the accuracy of the Anschütz, Walther and other premium match rifles built in the West. East German shooting teams wanted to finish on top of the podium, so they needed a rifle with superb inherent accuracy. The Suhl 150s have an outstanding trigger that can be adjusted down to about two ounces. The Suhl 150 action, like the Anschütz 54, boasts an extremely fast lock-time — an important factor in a position rifle. And Suhl barrels were legendary for accuracy.
Suhl 150 Benchrest Conversions
Many of the first used Suhl 150s that made it to America were converted to Benchrest rifles because the action/trigger/barrel combination was unbeatable for the price. Some of the barrels on these “surplus” Suhls were phenomenal — as good as any custom barrels available today. It was not unknown for a Suhl 150 barreled action, transplanted into a benchrest-style stock, to win BR matches with the original barrel. Today, however, most of the Suhl benchrest conversions end up with modern, American-made barrels. While some older Suhl barrels can “shoot with the best of ‘em”, new barrel designs optimized for use with tuners have an edge, at least in benchrest circles. That’s why builders such as Bill Myers swapped out the Suhl barrel with something like a Benchmark reverse-taper two-groove.
Today Suhl 150 rifles are very hard to find in North America. In 2006, a used Suhl 150, even without sights, might fetch $1200.00 or more. Then, in 2007 through early 2008, hundreds of Suhl match rifles were imported. This drove prices down, and those “in the know” snapped up complete Suhl 150s at prices ranging from $450 to $850 (see 2007 advert at right), depending on condition.
Many of these rifles were left “as built” and used successfully in prone competition. Others were converted into benchrest and silhouette rifles, “parted out” for the actions and triggers. If you were able to grab one of those imports at a good price–consider yourself lucky.
* Bill Myers actually created his own clamping rimfire action to facilitate barrel indexing. CLICK HERE to view Myers Rimfire Action. To index the barrel, Myers simply loosened three clamping-bolts and rotated the barrel in the action. Because there is no thread to pull the barrel in or out, the headspace stays the same no matter how much the barrel is rotated. With a threaded action, you might have to use shims to test different rotational positions, or otherwise re-set the shoulder with each change.
To support the growing community of new shooters and hunters, Nosler has released a useful, informative video that can help prepare beginners for their first experience at a shooting range. This video was filmed at the Redmond Rod & Gun Club in Central Oregon.
Editor: Regular readers — if you have a friend or family member who is new to shooting, have them watch this video. It does a good job outlining important range etiquette along with safe practices.
Training at a gun range is critical to building foundational firearms skills. Unfortunately, this process can be intimidating for new shooters who are unsure of what a trip to the range fully entails. In this video Randy Newberg (Nosler Pro-Staffer) illustrates key points to help shooters feel safe and confident at any range.
The 7-minute First Trip to the Shooting Range video covers key considerations that apply to all ranges: necessary equipment, firearm safety, range commands, and range etiquette. Differences between indoor and outdoor ranges, as well as range restrictions to consider before your visit are also covered. Newberg also notes: “Before you leave your house, double-check to make sure your firearm is empty”. (Editor: Yes we’ve seen people open their gun cases only to discover their rifle, pistol, or shotgun WAS loaded!)
Important Firearms Safety Rules at the Range
Treat every firearm as if it were loaded.
Always keep your gun pointed in a safe direction.
Never point your firearm at anything you do not intend to shoot.
Always keep your finger off the trigger until your sights are on the target and you are ready to fire.
Always be sure of your target and what is beyond it. (Do NOT shoot unless you know exactly what your shot is going to strike.)
Always comply with ALL Range Commands (and make sure you can hear commands).
Experienced Shooters Should Help Newcomers Learn Safe Procedures
Nosler’s video includes a call-to-action for experienced hunters and shooters to help mentor those new to the sport. As a seasoned shooter you can accompany a new shooter to the range, showing him or her the right procedures. This includes placing rifles on the bench, setting up targets during cease-fires, and properly unloading and clearing weapons. As a mentor, you can also share educational resources that benefit newcomers, and share your effective/safe reloading methods.
Here is a clever DIY tool we learned about from Frank Shuster, a Forum member, who, sadly, passed away in 2015. Frank was a very knowledgeable shooter who was always willing to help others. Here is one of Frank’s smart inventions. He devised a way to measure the length of a rifle’s chamber using a fired cartridge case. Frank’s system works by cutting a “collar” from part of the case neck. This then slips over a bullet seated in a case loaded without powder or primer. As you chamber the dummy round, the collar will move back to indicate the full length of the chamber. (Make sure the bullet is seated well off the lands so the dummy round can chamber fully.)
The pictured gauge can be home made (for free) with components you already have on hand. Frank explained: “I used a Dremel cut-off wheel to cut the front half of the case neck off. A jewelers needle file to de-burr both rough-cut edges. The cut-off surface does not need to be perfectly square, because you are using the original straight mouth to make contact at the front of the chamber. Seat any old bullet to the approximate normal seating length. Next apply a tiny drop of oil on the ogive of the bullet, and slide the ‘collar’ over the bullet. Then chamber the dummy round and close the bolt. Extract the round slowly and carefully and take the measurement with calipers (see top photo).”
Frank’s DIY chamber length gauge works well. In a related Shooters’ Forum thread, Frank posted: “I’ve compared length dimensions doing it this way and with the chamber length shown on my chambering reamer drawings, and the Sinclair gauge, and they are all within .001″ or so.”
Commercial Chamber Length Gauges May Not Work with Custom Chambers
Frank did use Sinclair chamber-length gauges for some applications. These bullet-shaped gauges slip into a cartridge, but “it’s inconvenient to order that little gauge only… without spending $6 shipping for a $7 item.” Moreover, the Sinclair gauges may not fit a custom chamber with a tighter neck dimension because the diameter of the ring at the end is too large.
As an alternative to commercial gauges, the collar-type, homemade gauge will function properly in a custom chamber. The homemade gauge will work with smaller-than-standard chamber neck dimensions, as long as you use a piece of appropriately-turned fired brass that fits your chamber.
Springtime is turkey hunting season throughout the USA. The official spring wild turkey hunting season is set regionally by each state. In a few states, turkey season has already commenced, while most other states open their turkey seasons in early April, with the spring seasons running for 3-5 weeks. CLICK HERE to read Outdoor Life Magazine’s Turkey Hunting Resource page. This includes articles on How to Hunt Turkeys, Best Turkey Calls, Turkey Hunting Camo Gear, and Recommended Turkey Loads.
Sportsman’s Warehouse has an online page about Spring Turkey Hunting. This has features on recommended shotguns, clothing & footwear, decoys & calls, blinds & chairs, and even turkey cooking. CLICK HERE for the Sportsman’s Warehouse Turkey Hunting Page.
And Sportsman’s Warehouse has an excellent, detailed “how to” article, the Beginner’s Guide to Turkey Hunting. That feature includes the Outdoor Dan video featured above.
Saturday Showcase Spring Turkey Hunting Videos
With over 2 million views, this Canada-in-the-Rough video shows effective turkey scouting, calling, and shooting. This action-packed turkey hunting compilation features 30 turkey kill shots with shotguns.
Get Zone — At the Ranch Turkey Hunting Videos
GetZoneHunting.com has a vast video library for hunters, with hundreds of helpful videos on all types of hunting. In time for spring turkey season, GetZoneHunting offers a big collection of turkey hunting videos: At the Ranch – Turkey. On that page you’ll find 13 turkey hunting “how-to” videos. Here are links to five GetZone Turkey Hunting videos with valuable information from skilled, experienced hunters. Click each of the photos below to watch those five videos on theGetZone site.
At the Ranch – Turkey offers solid advice for turkey hunters. These five videos will help you better understand turkey behavior and have success on your hunt. Click any photo to watch the particular video on the GetZone website. (Work Warning — When each GetZone video opens, it may immediately launch an annoying commercial with loud AUDIO!). There are eight more turkey hunting videos on GetZone’s Turkey Hunting HQ Page.
At the Ranch: Shot Placement for Turkeys — CLICK to Watch Video
At the Ranch: Turkey Hunting Essentials — CLICK PHOTO to Watch Video on GetZone.com
At the Ranch: The Differences Between a Jake and a Tom — CLICK PHOTO to Watch Video on GetZone.com
At the Ranch: Early vs. Late Spring Turkey Hunt — CLICK PHOTO to Watch Video on GetZone.com
At the Ranch: How to Plan a Turkey Hunt — CLICK PHOTO to Watch Video on GetZone.com
Free Printable Turkey Target from AccurateShooter.com
As a special bonus for our readers, here is a free, printable Turkey Target, so you can practice for your turkey hunting adventure, This special Turkey Bullseye Target was created by our friend and Forum member Pascal (aka “DesertFrog”). CLICK HERE for FREE Turkey Target.
In April 2020, the National Rifle Association (NRA) launched NRAWomen.com, a website dedicated to the fastest-growing group of firearm owners — America’s women. This website serves the increasing number of female gun owners, huntresses, and competitive shooters. Female involvement in firearms is growing significantly. Consider these numbers: Statistica estimates that 19% of women in the USA owned firearms in 2020, while 23% of women surveyed in a 2011 Gallup Poll stated they owned a gun.
Jessie Harrison is one of the greatest female pistol shooters on the planet.
Here are three excellent Articles from the NRAWomen.com website, all worth reading. For each example, Click the Photo or direct link to read the full article on NRAWomen.com.
1. Flying with Firearms — What You Need to Know
We recommend that any gun owner, female OR male, should definitely read this article. It is one of the better discussions on the web of airline travel with firearms, covering international travel as well as domestic flights. The article notes that you should obtain U.S. Customs Form 4457 before flying overseas with a firearm.
“Flying with a gun is actually a lot easier than you’d probably expect. You need a couple of specific gear items, and you need to know the proper procedure, but it’s a relatively simple process. I’ve flown with long guns and handguns dozens of times around the country and around the world. The process is generally the same, but with some additional steps and maybe additional hassle depending on the airport [and personnel.]” READ FULL ARTICLE on NRAWomen.com.
2. Modular Safes — Smart Option for Easier Moving
The second article features a great video showing how to assemble a modular safe in under 30 minutes. This article also explains the benefits of modular gunsafes — primarily easier transport and installation.
“Modular safes have been around for a few years now and are becoming more popular. Here’s why: The safe comes delivered to you in panels, so you can bring them into your home one at a time and put it together anywhere you like. This makes it easy to carry up and down stairs, onto elevators or anywhere! Security — Is it as secure as one that comes pre-assembled? The answer is, absolutely.” READ FULL ARTICLE on NRAWomen.com.
3. Rimfire .22 LR Handguns for Self-Defense
This article looks at a wide variety of .22 LR pistols and revolvers. The author discusses the pros and cons of a rimfire defense gun, concluding that while the stopping power is limited, having some protection is better than going unarmed.
“Over the last few months we’ve seen the launch of new handguns chambered for .22 LR that sport the same looks and features as center-fire handguns designed for daily concealed carry. The models I’ve had a chance to work with so far include the compact Taurus TX22 semi-automatic pistol, the pocket-size Ruger Lite Rack LCP II, Kel-Tec’s P17 semi-automatic and the Taurus 942 8-shot snubnose revolver.” READ FULL ARTICLE on NRAWomen.com.
Here’s a new option for hunters and tactical competitors who want to range targets and call windage/elevation corrections using their spotting scopes. Vortex is now offering Reticle Eyepieces for its Viper HD spotting scopes. Available in both MRAD and MOA versions, these fixed-power 33.5X eyepieces feature ranging reticles with handy hash marks. This allows target ranging, plus competitors can “make accurate shot calls… with subtension lines for holdover and windage corrections.”
Vortex states: “The all-new eyepiece makes measuring target range and calling shot corrections easy, with a diopter ring that allows shooters to get the reticle dialed to their eyes, and level with the horizon line, no matter how their scope is setup.”
Powering the new eyepiece is a fixed, 33.5X magnification ocular lens. This provided plenty of power most hunting and competition scenarios. The eyepiece glass is protected with ArmorTek and XR lens coatings. These easily-installed ranging eyepieces, both MRAD and MOA, are designed for a wide field of view so user won’t miss a single vapor trail or bullet splash.
Ranging MRAD — Hashmarked ranging reticle using MRAD-based subtension lines for ranging, holdover, and windage corrections. Secondary ranging references facilitate rapid range estimating.
Ranging MOA — Hashmarked ranging reticle using MOA-based subtension lines for ranging, holdover, and windage corrections. Secondary ranging references facilitate rapid range estimating.
These eyepieces have fixed, 33.5-power magnification. “Street Price” is about $200.00.
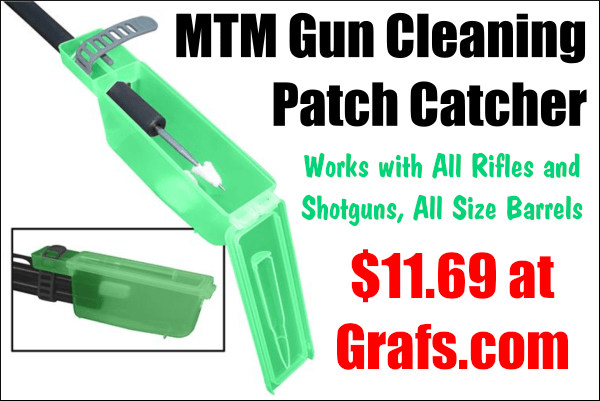
Performs as Promised — Prevents Mess at Home or at Range
When cleaning rifles, wet and dirty patches can make a real mess. And solvent spray from the muzzle is another issue. Here’s a solution — the MTM Gun Cleaning Patch Catcher. Simply slip it over your barrel to contain all the patches pushed out the muzzle and retain solvent spray/drips. No more mess and stains on your bench/table. When cleaning tasks are done, simply remove the Patch Catcher and dump the contents into the trash. The MTM Gun Cleaning Patch Catcher is just $11.69 at Grafs.com, $12.99 at Brownells, and $13.49 at MidwayUSA.
This handy see-through green container fits on the end of your rifle or shotgun barrel. It works with all patch types and bore sizes and fits virtually all barrel diameters, large and small. Slip the MTM Gun Cleaning Patch Catcher over your barrel to contain all the patches pushed out the muzzle. When cleaning tasks are done, simply remove the Patch Catcher and dump the contents into the trash. Watch the video to see how the MTM Patch Catcher works.
We’ve tried this product and it definitely helps keep work surfaces and floors clean. No more messes on the bench or spray from solvents. Purchasers do like this product — it has 78% five-star reviews on Amazon.
One owner explains: “This box straps over the muzzle end of a barrel and keeps the mess completely contained. Excess cleaning solvents collect in the bottom. Patches fall off the jag and are captured as well when the cleaning rod is withdrawn. It also completely contains the splatter burst when a bore brush exits the muzzle of whatever firearm is being cleaned.” (D.J. Bradley)
Here are actual user reviews from verified customers:
“It’s been a long time since I bought something that is just WOW brilliant but this patch catcher is just that. It is so simple, so neat, so clean and so effective. It fits perfectly on all my rifle barrels and catches patches, brush spray and most importantly most of the smells of solvents. I can now clean my rifles in the house without inviting the wrath of my darling wife.” — Emmitt P. (Amazon)
“The MTM Patch Catcher works great! It is easy to adjust to different size barrels, and … all the gunk stays in the trap! Now, no more cleaning up the work bench/floor area after gun cleaning. This trap is a must have! I never knew I needed one of these until I got the MTM one from Graf’s. My buddy had a different brand, and it was hard to use. On his, the trap that holds the dirty patches and ‘juice’ would not stay in place, and some times most of the gunk ended up on the floor.” — Michael T (Grafs.com)
“This little device is more than a patch catcher. It also contains that dirty, smelly spray when a bore bristle exits the barrel. With the [MTM Patch Catcher] top open, it will also catch spray cleaners and lubes when used on small parts.” — TwoBoxer (Amazon)
Gun Variant Q & A — Yes it works with ARs and Muzzle Brakes
Q: Has anyone used this with an AR15?
Answer: It works quite well — goes on and off easily. Slide it on the barrel until you can tighten the strap behind the flash suppressor. — Cactus
Q: Does this fit securely if you have a standard muzzle brake?
Answer: Yes, I regularly use this product on all of my rifles including my Savage 111 Long Range Hunter with a factory brake. It really keeps the smell down with the top closed. Also stops the splatter of a stiff brush exiting the muzzle. Great Product! — Iklwa
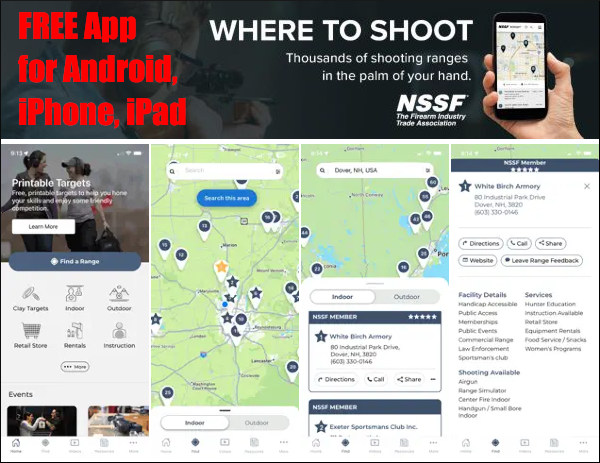
NSSF, the Firearm Industry Trade Association, has released a NEW and Improved Where To Shoot mobile App. This FREE mobile device App allows target shooters, hunters, and outdoor enthusiasts to locate shooting ranges throughout the USA. “Finding a safe, welcoming place to shoot should be simple,” said Joe Bartozzi, NSSF President/CEO. “The redesigned Where To Shoot App provides … accurate, up-to-date range information, training tools and more.”
Available for iPhone, iPad, and Android devices, the updated App provides fast, convenient access to the country’s most comprehensive directory of shooting ranges.
The Where To Shoot mobile App is available for FREE Download through the App Store and Google Play. Users can also search for ranges online at WhereToShoot.org.
A Faster Way to Discover Places to Shoot
The refreshed Where To Shoot app introduces a streamlined design and enhanced search tools that allow users to quickly find shooting facilities wherever they are — whether at home or traveling.
Key Features Include:
Nationwide Shooting Range Directory — Access one of the most comprehensive databases of shooting ranges in the United States. Events and Training Opportunities — Discover shooting events, instructional programs and other opportunities to improve skills. Mobile-Optimized Experience — Modern interface allows quick browsing and seamless range discovery. Location-Based Search — Instantly find ranges near your location or search by ZIP code, city, or state. Detailed Range Listings — View contact info, directions, and facility details before planning your visit. Indoor and Outdoor Range Filters — Identify facilities with your preferred shooting environment.
“The Where To Shoot platform has long been one of the most valuable tools for connecting target shooters with ranges,” said John McNamara, NSSF Vice President, Member Services. “This redesigned app strengthens that connection by making it even easier for people to discover local facilities and for ranges to showcase the experiences and services they offer.”
NSSF Requests Range Owners to List Their Facilities
NSSF encourages shooting range owners and operators to add or update their listings free of charge at WhereToShoot.org. By keeping listings current, ranges can help shooters easily discover safe, well-managed shooting venues. Enthusiasts can also help expand the directory by encouraging ranges that are not yet listed to create a free listing.
When shooting pistols do your shots normally land smack dab in the middle of the target? If not, you may have some technique problems that are causing your shots to move off center. Top Shot Champion Chris Cheng has produced a good video for the National Shooting Sports Foundation (NSSF) that helps handgunners diagnose accuracy issues. By shooting 3-shot groups and looking at the pattern and location of the shots, you can see what you’re doing wrong (or right). Here are some examples. Note, this process works best for shooters whose shots fall typically in one target zone. If your shots are all over the target, your form is inconsistent and problems will be harder to diagnose.
1. Low Left — Jerking Trigger: Here we see three (3) shots at the 7 O’clock position. This shows that the shooter is jerking the trigger, meaning that the shooter is pulling the trigger too quickly and therefore forcing the barrel to drop when breaking the shot. This is a very common problem, particularly with novices who are reacting to the noise/recoil of the pistol.
2. 9 O’Clock — Too Little Trigger Finger: If we see three (3) shots at the 9 O’clock position, what this can be indicative of too little trigger finger on the trigger. And therefore with every shot, the shots are getting pushed to the left. Try moving your trigger finger on to the pad of your index finger. Also try dry firing drills.
3. High Left — Anticipating Recoil: In this next example, we see three shots around the 11 O’clock position. What could be happening here is that the shooter is anticipating the recoil, and is actually lifting the gun up when he shoots. We recommend slowing down, working on your breathing, and, again, do dry-firing drills.
4. 3 O’Clock — Too Much Trigger Finger: Finally, if you see three (3) shots at the 3 O’clock position, this can indicate that there is too much trigger finger on the trigger. Therefore when the shot breaks the shooter is pulling each shot to the right. Note: Each of these descriptions is for a RIGHT-handed shooter. If you are a left-handed shooter you’ll want to reverse those descriptions.


 5. Towel Dry then Warm with Heat Gun — Roll brass in a towel until no more water shakes out. Lay out on cardboard box top and blow off with Harbor Freight heat gun. $9.99 on coupon. Two minutes of heated air and about half hour of wait and they are good to go. This is with primers removed. — Shaggy357


 Accurized and BN-Nickel Plated
 BN-Nitride Plating on Action
 Fitting and Chambering the Barrel
 Accuracy Testing with Both Barrels


 Today Suhl 150 rifles are very hard to find in North America. In 2006, a used Suhl 150, even without sights, might fetch $1200.00 or more. Then, in 2007 through early 2008, hundreds of Suhl match rifles were imported. This drove prices down, and those “in the know” snapped up complete Suhl 150s at prices ranging from $450 to $850 (see 2007 advert at right), depending on condition.


 Commercial Chamber Length Gauges May Not Work with Custom Chambers