Yes, as we start 2026, there’s snow on the ground in many parts of the nation. There have been some big snow-storms in the northeast, with very cold weather in many parts of the country.
Rifle Transformed from Ordinary Varmint Rig to a Stunning F-TR Machine
As an antidote to these weather-related worries, for this Sunday GunDay we’re offering a bit of beauty amidst snow — a handsome rifle showcased in a white winter wonderland. This handsome rifle started life as a rather ordinary .204 Ruger Rem VSSF varmint rig. With a new barrel, a new stock, and a stunning flame-pattern hydro-dip coating, this is now an ultra-accurate .223 Rem F-TR competition rifle.
Flames in the Snow…
Forum Member Brandon Schlund (aka “Bois Blanc Boy”), photographed this handsome flame-themed F-TR rifle against the snowy background of Michigan’s Bois Blanc Island. Brandon posted this to our long-running Pride and Joy Rifle Forum thread. He notes: “This is my first F-TR build, which started out as a stock Remington .204 Ruger. I had the action blue-printed, firing pin was bushed by Speedy, and I had a new bolt handle and knob installed by John Pierce.” This rifle is now fitted with a 3-groove Pac-Nor 1:6.5″-twist barrel chambered in .223 Remington to shoot the 90gr Bergers. Other components are: Kelbly KTS stock, Phoenix bipod, and Sightron 8-32x56mm SIII scope. Brandon says: “It took a long time to get this gun where it is now but I’m truly happy with it!” Here’s the “before” photo:
The Transformation — F-TR Comp Rig Made from Rem .204 Ruger Varminter Report by Brandon Schlund
This rifle started out as a “plain Jane”, factory Remington VSSF II. I shot it on varmint hunts in factory configuration. Then I decided to transform the rifle into a .223 Rem F-TR gun. As the .204 has the same bolt face as a .223 made sense to go in that direction since I would be able to use the gun for varmint hunting as well as F-TR.
While I had shot some F-Class matches with my dad (Joe Schlund aka Bench on AccurateShooter) it wasnt much. When we did a PD hunt in Wyoming I primarily shot my .204 but I decided I wanted a cartridge that could reach out a little further and also do double duty — competition and varminting.
The first step in transforming this rifle was selecting a barrel. We ordered a Pac-Nor, 1:6.5″-twist, 3 groove, 30.5″ heavy Palma contour. This was then chambered with a PTG .223 ISSF reamer with 0.169″ freebore to run the .224 caliber heavies. I went with Pac-Nor because both my father and my brother Mark (aka Labrador2 on AccurateShooter) owned Kelbly-built F-TR rifles with the same barrels. Mark and my father couldn’t be happier with the results. Pac-Nor has great customer service along with a short wait time.
I sent the barrel and the factory Remington 700 action down to Kelbly’s where they did the chambering and cut the threads. While Kelbly’s had my action I had them blueprint it. A Kelbly KTS stock with the three-way buttplate and adjustable cheek piece came next. After getting behind Dad’s rifle and Mark’s gun there was no reason to look any further. With all its adjustments, the KTS stock fits very comfortably.
Loading for the .223 Rem with H4895 and 90gr Bergers
As a .223 Rem, this rifle has proven very accurate — it’s a bullet-hole cutter at 100 yards (low twos easy). Our best load is with Hodgdon H4895, 90gr Berger VLDs, CCI BR4 primers. This load is running at about 2835 FPS but YMMV (remember this is a LONG 30.5″ barrel). The Bergers are loaded .008″ into the lands with base-to-ogive of 2.035″.
Our loading technique may be tedious — with lots of sorting and measuring. But brother Mark, father Joe, and I all enjoy the steps. Our three .223 Rem match guns all love the same load which makes loading much easier. Believe it or not we use a Hornady Lock-N-Load progressive ammo plant, which is great when loading for three guns. Our consistency is fantastic with run-out a mere .001-.0015.
We also turn necks and weigh our primers. Does neck-turning and primer weighing really make a difference? Who knows but we try to eliminate more variables since we have to the time to do it, and we actually enjoy the procedures.
Pierce Engineering Installed Action and Modified Bolt
Being from Michigan, Pierce Engineering has done a lot of work for my family’s guns. For this project the Pierce team bedded the action and glued in a single-shot follower. The stock bolt handle/knob was too short for comfort in the KTS stock. Pierce added a longer handle and tactical knob to the bolt. I then installed a .223 Rem Lapua case base into the knob.
The complete .223 Rem rifle ready to shoot F-TR, as fitted with 8-32X56mm Sightron and Phoenix Bipod, weighs 17 pounds, 15 ounces.
Flame Graphics by Camo Creek Hydrographics
After the action was bedded by Pierce, the stock was sent to Camo Creek Hydrographics in Fenton, Michigan. I selected a flame-style design which Camo Creek applied through hydro-dipping. The stock went back to Pierce’s shop, which applied three coats of clear over the entire stock. The clear-coating really enhanced the flame graphics.
Firing Pin Bushed by Speedy
I sent the bolt to Thomas “Speedy” Gonzalez to have the firing pin hole bushed as otherwise the load could crater the primers pretty bad. Knowing I’d be shooting heavy-weight .22-Cal bullets with a stout load this was a good idea. Speedy also cut his trademark grooves into the bolt shroud which looks amazing. His work is top notch! There is zero cratering now, even with the hottest of loads.
Competition Components — 8-32x56mm Sightron and Phoenix Bipod
For an F-TR rig you need a quality high-magnification optic and a premium, wide-base bipod. I installed a 8-32x56mm SIII Sightron. This was another easy choice because of the attractive price and because my family has four other Sightrons that work great.
I installed a fore-end Picatinny rail to attach a Phoenix Bipod. I extended the Mariners wheel handles by adding short sections from an aluminum arrow shaft. This lets me adjust elevation without stretching forward. I also installed a Calvin Elite Timney Trigger set at 6 ounces.
$2500.00 Invested in Rifle Transformation and Upgrade
How much did this all cost? Brandon tells us “I have roughly $2500 into the rebuild of the gun from a .204 Ruger to the .223 Rem.”
Bois Blanc Island in Michigan
Here on Bois Blanc Island we don’t have many amenities, but we do have the ability to shoot 550 yards at our local gravel pit on state land. It’s snow-bound right now as you can see. But later in the year this will be our close-to-home training center.
Winter at Bois Blanc Island, Michigan — Here’s the gravel pit where we can load test during warmer weather. When I took this photo, it was a “balmy” 10-degree day.
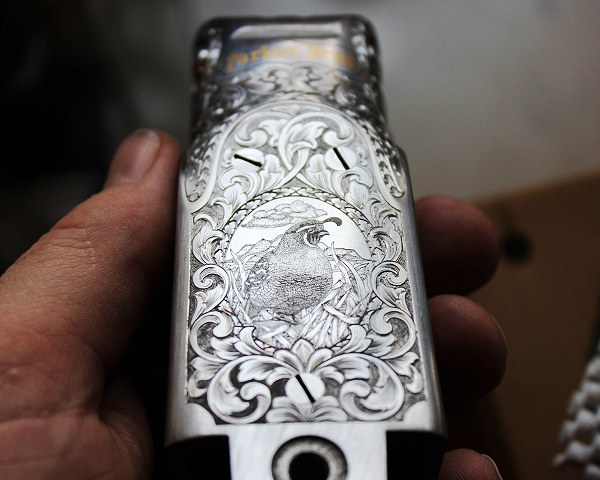
Impressive engraving by Jesse Kaufmann. Note how the scope rings have been engraved to perfectly match the engraving pattern on the Remington 547 action.
Who says fine craftsmanship is dead? There’s a modern day engraving wizard up in South Dakota, Jesse Kaufmann, who produces some of the most handsome engraving we’ve seen. Jesse, who operates Black Hills Gunstocks and Engraving LLC, is a true master at metal engraving and he also does superb stock checkering. Here are some examples of Jesse’s engraving work:
This 14-minute video showcases dozens of Jesse Kaufmann’s Engraving examples:
About Jesse Kaufmann, Master Engraver
Jesse Kaufmann was a professional stockmaker for Dakota Arms for over a decade. In 2009, he was inducted in the American Custom Gunmakers Guild as a checkering specialist. In January 2017, Jesse was awarded his Master Engraver certification by the Firearms Engravers Guild of America. With his broad skill set, Jesse is able to offer his clients a unique and complete package of stock work, finish, checkering, and engraving for a custom package that is all completed under one roof by his own hands.
Jesse Kaufmann’s work has been featured in American Rifleman, American Hunter, FEGA’s The Engraver, Sports Afield, Waidmannsheil Journal of German Gun Collectors Assn., Gun Digest 71st Edition, Modern Custom Guns Volume 2, Dangerous Game Rifles 2d. Edition. For more info, visit BlackHillsgunstocksandengraving.com, email blackhillsgunstocks [at] gmail.com, or call Jesse at (605) 499-9090 after 5:00 pm. SEE Gallery of Work.
Setting optimal bullet seating depth is very important for maximum accuracy. While some cartridges and barrels may deliver good accuracy with a wide range of bullet seating depths, other barrels may be more fussy, and may strongly prefer a specific seating depth, such as .006″ in the lands or .020″ off. To get this kind of precision, you need to know the exact position of the lands in your barrel. In addition, because barrel throats tend to move as the round count goes up, you should check the position of the lands regularly on a competition rifle.
Today’s Saturday Videos demonstrate a number of methods for finding Length to Lands in your rifle barrel. We start with the most common method — using the Hornady O.A.L. Gauge with a threaded modified case. With some practice, and a refined touch, this is actually very accurate. After this, we offer videos that have alternative methods, each with its pros and cons. You should find a method that works for you, that can achieve results within a couple thousandths for multiple measurements.
Finding Cartridge Length to Lands with O.A.L. Gauge
Probably the most common method to find length to lands is using a Hornady O.A.L. Gauge Tool with a comparator on a set of calipers. We regularly use this method with a custom modified case for our 6mmBR rifle. Using the technique described below, we can get results within .0015″ or so three out of four times. We do recommend taking multiple measurements. As explained below, be consistent and do NOT push the gray plastic rod too fast or with too much force.
During this measurement process, the modified case, with a bullet in its neck, is inserted in the chamber. Go slow, take your time. Here are FIVE TIPS that will help you get repeatable and reliable length-to-lands measurements with the Hornady O.A.L. Gauge:
1. Start with a clean chamber and clean barrel throat.
2. Make sure the modified case is fully screwed down and seated on the O.A.L. Gauge. It can sometimes unscrew a bit during repeated measurements.
3. Insert the modified case slowly and gently, but ensure the shoulder of the modified case is fully seated on the end of the chamber.
4. Push the gray plastic rod GENTLY. It is common for the bullet to be tilted a bit. You want to allow the bullet to self-center in the throat BEFORE you apply much pressure. Then tap a couple times and push until you feel resistance. Do NOT push too hard — that will jam the bullet in the lands.
5. Repeat the measurement at least 3 more times. If you follow our instructions, you should, typically, get a repeatable measurement, within 0.0015″ or so, 3 out of 4 times.
NOTE: We’ve seen some folks struggle to get repeatable measurements with this tool. In most cases, they were going too fast and pushing too hard on the gray rod, creating a hard jam.
Brownells — Using Hornady O.A.L. Gauge with Modified Case
This Brownells video shows how to use the modified (threaded) case for the cartridge your rifle shoots. Attach it to the O.A.L. Gauge, then insert a bullet into the case neck and slide the tool into the chamber. It takes a little practice to get consistent results. After getting the measurement in the barrel, you ascertain the length to lands using a Hornady Bullet Comparator attached to your calipers.
Making Your Own Modified Case — Threading the Case End
This helpful video from our friend Gavin Gear of UltimateReloader.com shows how to create a custom modified case to use with a Hornady O.A.L. Gauge. You need to drill out the primer pocket area, then tap and thread the bottom of the case.
Ultimate Reloader Shows 3 Ways to Find the Lands
This video shows three different ways to measure distance to lands. First Gavin Gear shows how to use a Hornady O.A.L. Gauge with Modified Case. The second methods shows how to use a bit of Loctite INSIDE the neck to secure a bullet. Be sure there is NO Loctite on the outside of the neck — you don’t want that in your chamber! You place the case with bullet into the chamber, then close bolt to seat the bullet. After waiting 5-10 minutes for the Loctite to set, you remove the cartridge gently. The third method (time-mark 16:50) is a Jam method using a bolt with the firing pin assembly and ejector removed (so there is no extra pressure on the case). Gavin notes: “The bullet ogive can be colored with a permanent marker if you want to indicate lands contact.”
About this third Jam method, ace F-Class shooter Erik Cortina posted: “My method is actually the last one that Travis showed. The one where you let the lands push bullet in. But it is neck tension dependent. I also put die wax in bullet ogive to prevent it from sticking in the lands. The method of seating bullet deeper and deeper until bolt closes is the Alex Wheeler method. As you said, there are a tons of ways to measure this.”
Finding Length to Lands the Speedy Way
Here is another method to find length to lands that can work with an unmounted barrel. This method is explained by Thomas “Speedy” Gonzales, a top gunsmith and ace benchrest shooter. Speedy drops a case with bullet seated into the chamber and then adjusts the seating depth with an inline seating die until there is no sticking or resistance felt. He can then adjust the true length to lands easily with his micrometer seating die. If you don’t have a modified case and do not want to partially disassemble your bolt to take measurement, you might want to use Speedy’s method.
Finding Length to Lands Using Bolt Movement — Primal Rights
This video shows how to remove the firing pin assembly in your bolt. This way the bolt can be used to advance a case with bullet smoothly into the chamber. Then the bullet seated in the case neck will move back to “first touch” contact position. Then extract the case slowly and measure.
The video host states: “Overall length gauges and modified cases tend to be close, but never as precise as we would like them to be. Here we describe how to measure the length to your lands in your rifle as precisely as possible, using a caliper and bullet comparator.” NOTE: The host says a store-bought Modified Case may not deliver that exact same length from case base to lands as your own fired case. That is true, but as long as the commercial Modified Case gives you repeatable results, you have a functional reference point which you can then use to test seating depths relative to that measurement.
Finding Length to Lands Using Bullet in Case With Split-Cut Neck
Here is a common method that requires no special tools. Simply take a fired (no primer), neck-sized case and split the necks down vertically with a Dremel. Done right, this will hold the bullet in place when you chamber the unloaded round. As the bullet touches the rifling it will move back. As the cartridge chambers, the bullet slides back into the case to give you length to lands. This is not super-accurate but it is probably good enough for finding the length to lands for a hunting rifle. The video maker explains: “No need to purchase gauges for this if you are willing to sacrifice one case. With a little time and patience you can get good results with this method.” Further Explanation.
How to Adjust Tension — Length and Number of Neck Cuts
Forum member Andris Silins, who uses this method, explains: “I made the neck cuts using a Dremel with a cut-off wheel. You can adjust tension two ways. First, you can make the cuts longer or shorter. Longer cuts = less tension. If you used only three cuts instead of four you would get more tension. The trick is to be gentle when you open and close the bolt. If you ram the bolt closed you may wedge the bullet into the lands. When you open the bolt it helps to keep a finger or two near by to guide the case out straight because the ejector wants to push it sideways.” READ MORE.
Finding the Lands with HK Rifleworks
This is another video that demonstrates how to disassemble the bolt so that the firing pin assembly and spring does not apply pressure on the empty case which would affect the bullet as it touches the lands. The video maker shows how to use a Brownells bolt disassembly tool to quickly take the bolt apart (3:20 time-mark). Once you have a repeatable measurement, you know exactly where is “first touch”. Then you can adjust your seating depth to be into the lands, or jumping the bullets. Many benchrest shooters like to load “into the lands”. PRS/NRL shooters and hunters will generally prefer to jump their bullets .0020″ or more.
For some applications, we prefer a non-bushing FL die over a bushing die. Shown here are three Forster full-length sizing dies, with necks honed to three different dimensions: 0.265″, 0.266″, and 0.267″.
The Honed Full-Length Sizing Die Option
There are many good options in full-length (FL) sizing dies. Most precision hand-loaders prefer FL dies with neck bushings. These let you adjust the “grip” on your bullet by using larger or smaller bushings. FL bushing dies are available from Whidden Gunworks, Forster, Redding and other makers.
Conventional, non-bushing full-length sizing dies can create ultra-accurate ammo with very low run-out. But many conventional non-bushing FL dies have an undersized neck diameter so you end up with excess neck tension, and you work the brass excessively.
There is another effective option, one that promises extremely low run-out. The honed FL die is a full-length sizing die that has the necked honed to provide a precise fit to the case-neck. When done right, honed FL dies produce extremely straight ammo — as there are no issues with bushing alignment (or bushings that are not perfectly concentric). This Editor owns honed dies from Forster, Redding, and Whidden Gunworks. They all perform extremely well, delivering match ammunition with extremely low run-out measured with a 21st Century Concentricity Gauge.
In one of the most popular articles we’ve ever published, Bugholes from Bipod, California shooter “Froggy” explained why he prefers honed dies for his tactical ammo.
Q: Do you FL size every time? Do you use custom dies?
Absolutely, I full length resize all of my brass every time I reload. And guess what? I’ve never had a feeding problem.
I do use a modified sizing die, without bushings. My FL resizing die has been custom-honed in the neck area to give .0015″ press fit on the bullet. I also put a slightly larger radius at the neck shoulder junction. I feel that this helps to seal the chamber. With this die, I get consistent neck tension every time–without bushings. Bushings are useful when you’re fishing around for a good load. But once you find the right amount of sizing for ideal neck tension, you can do this better with a customized FL die.
6.5 Guys Review Forster Honed Full-length Dies
The 6.5 Guys have reviewed honed FL sizing dies from Forster, explaining the pros and cons of this type of reloading die. They explained that, if you load a wide variety of bullets from different manufacturers, you many want to stick with a Bushing FL die. However, if you have settled on a particular bullet and found the “ideal” neck tension, then a honed die may make sense.
In this Gear Update, the 6.5 Guys discuss a service offered by Forster Products to custom hone the neck diameter of its full-length sizing dies to the customer’s specifications (to the thousandth). Whidden Gunworks has also crafted custom-honed FL dies for many customers, including this Editor.
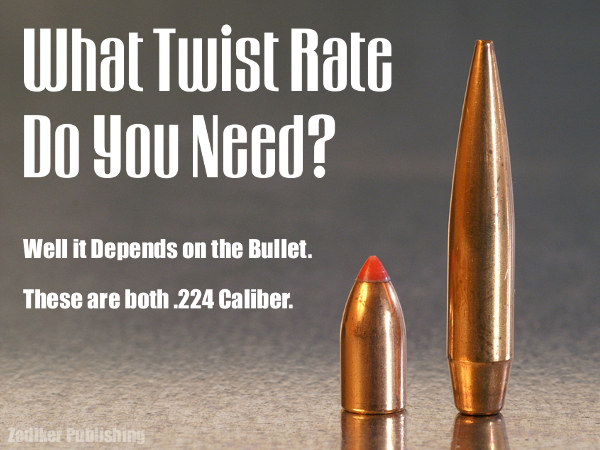
Here’s an extreme range of .224-Caliber bullets: 35gr varmint bullet and 90gr match bullet. Of course, along with bullet length/design, you need to consider MV when choosing twist rate.
Even with the same caliber (and same bullet weight), different bullet types may require different rates of spin to stabilize properly. The bullet’s initial spin rate (RPM) is a function of the bullet’s muzzle velocity and the spin imparted by the rifling in the barrel. You want to ensure your bullet is stable throughout flight. It is better to have too much spin than too little, according to many ballistics experts, including Bryan Litz of Applied Ballistics. The late Glen Zediker put together some basic tips concerning barrel twist rates and bullet stability. These come from Glen’s book, Top Grade Ammo.
Choosing the Right Twist Rate
I’d always rather have a twist too fast than not fast enough. Generally… I recommend erring toward the faster side of a barrel twist decision. 1:8″ twist is becoming a “new standard” for .224 caliber, replacing 1:9″ in the process. The reason is that new bullets tend to be bigger rather than smaller. Don’t let a too-slow twist limit your capacity to [achieve] better long-range performance.
Base your next barrel twist rate decision on the longest, heaviest bullets you choose to use, and at the same time realize that the rate you choose will in turn limit your bullet choices. If the longest, heaviest bullet you’ll shoot (ever) is a 55-grain .224, then there’s honestly no reason not to use a 1:12″. Likewise true for .308-caliber: unless you’re going over 200-grain bullet weight, a 1:10″ will perform perfectly well.
Bullet Length is More Critical than Weight
Bullet length, not weight, [primarily] determines how much rotation is necessary for stability. Twist rate suggestions, though, are most usually given with respect to bullet weight, but that’s more of a generality for convenience’s sake, I think. The reason is that with the introduction of higher-ballistic-coefficient bullet designs, which are longer than conventional forms, it is easily possible to have two same-weight bullets that won’t both stabilize from the same twist rate.
Evidence of Instability
The tell-tale for an unstable (wobbling or tumbling) bullet is an oblong hole in the target paper, a “keyhole,” and that means the bullet contacted the target at some attitude other than nose-first.
Increasing Barrel Length Can Deliver More Velocity, But That May Still Not Provide Enough Stability if the Twist Rate Is Too Slow
Bullet speed and barrel length have an influence on bullet stability, and a higher muzzle velocity through a longer tube will bring on more effect from the twist, but it’s a little too edgy if a particular bullet stabilizes only when running maximum velocity.
My failed 90-grain .224 experiment is a good example of that: I could get them asleep in a 1:7″ twist, 25-inch barrel, which was chambered in .22 PPC, but could not get them stabilized in a 20-inch 1:7″ .223 Rem. The answer always is to get a twist that’s correct.
These tips were adapted from Glen’s popular 2016 book, Top-Grade Ammo. That work, now getting harder to find, has numerous helpful articles on technical topics. Berger Bullets also has a FREE online Twist Rate Stability Calculator, developed by Applied Ballistics.
Here is a simple technique that can potentially help you load straighter ammo, with less run-out (as measured on the bullet). This procedure costs nothing and adds only a few seconds to the time needed to load a cartridge. Next time you’re loading ammo with a threaded (screw-in) seating die, try seating the bullet in two stages. Run the cartridge up in the seating die just enough to seat the bullet half way. Then lower the cartridge and rotate it 180° in the shell-holder. Now raise the cartridge up into the die again and finish seating the bullet.
Steve, aka “Short Range”, one of our Forum members, recently inquired about run-out apparently caused by his bullet-seating process. Steve’s 30BR cases were coming out of his neck-sizer with good concentricity, but the run-out nearly doubled after he seated the bullets. At the suggestion of other Forum members, Steve tried the process of rotating his cartridge while seating his bullet. Steve then measured run-out on his loaded rounds. To his surprise there was a noticeable reduction in run-out on the cases which had been rotated during seating. Steve explains: “For the rounds that I loaded yesterday, I seated the bullet half-way, and turned the round 180 degrees, and finished seating the bullet. That reduced the bullet runout by almost half on most rounds compared to the measurements from the first test.”
Steve recorded run-out measurements on his 30 BR brass using both the conventional (one-pass) seating procedure, as well as the two-stage (with 180° rotation) method. Steve’s measurements are collected in the two charts above. As you can see, the run-out was less for the rounds which were rotated during seating. Note, the change is pretty small (less than .001″ on average), but every little bit helps in the accuracy game. If you use a threaded (screw-in) seating die, you might try this two-stage bullet-seating method. Rotating your case in the middle of the seating process won’t cost you a penny, and it just might produce straighter ammo (nothing is guaranteed). If you do NOT see any improvement on the target, you can always go back to seating your bullets in one pass. READ Forum Thread..
Here’s a helpful, time-saving tool for handgun owners. MidwayUSA’s online Holster Finder lets you quickly find the right holsters for virtually all popular makes and models of pistols and revolvers. The wide variety of carry styles, materials, and features can make finding the right holster difficult or confusing. Drawing on a database of over 125,000 gun/holster combinations, the MidwayUSA Holster Finder turns that complex task into an easy three-step process.
The selection process is simple: 1. Choose Pistol or Revolver; 2. Select Make and Model of Handgun (and barrel type/length); 3. Click to view results. Just choose your gun type, select your make, model and barrel, then view the results. All major holster types are included: Ankle, Belly Band, Belt (outside waistband), Chest, Competition, Drop Leg, Inside Waistband (IWB), Paddle, Pocket, and Shoulder. Check out the MidwayUSA Holster Finder at MidwayUSA.com/holster-finder.
Peterson Cartridge Company (“Peterson”) has released a lengthy, authoritative guide to the 22 Creedmoor cartridge, a popular wildcat based on the 6.5 Creedmoor or 6mm Creedmoor necked down to .224 caliber. We think the .22 Creedmoor would be a great long-range varmint cartridge, similar to the .22-250 Rem, but with a more modern, efficient cartridge design. In addition, some PRS/NRL competitors may turn to the .22 Creedmoor because it has less recoil and is flatter-shooting than the 6mm Creedmoor. In addition, .224-caliber match bullets are typically less expensive than heavier 6mm and 6.5mm projectiles. Less recoil, and less cost — what’s not to like?*
Along with load data, this article has specific sections dedicated to: Primers, Rifling Twist Rates, and Reloading Supplies. If you are considering building a .22 Creedmoor, we recommend you download the full Peterson .22 Creedmoor article, which is available in PDF format.
Peterson states, “Since its inception in 2007… the 6.5 Creedmoor has seen some pretty meteoric growth in popularity. That growth continues as of this writing, as the cartridge has now gone mainstream with hunters and shooters alike. As the popularity of the 6.5 Creedmoor has increased, so has the number of wildcat cartridges based off of it. Some of those popular wildcat cartridges are the 6mm Creedmoor, the .25 Creedmoor, and now the .22 Creedmoor. This data sheet will cover the .22 Creedmoor.
To help our customers, and anyone else who shoots .22 Creedmoor, we decided to create this Data Sheet and distribute it. [In this LOAD DATA Document] you will find four (4) common bullets, and four (4) common rifle powders used when handloading the .22 Creedmoor cartridge. We then took the different bullet and powder combinations and loaded them up to the SAAMI Maximum Average Pressure (MAP) for the 6.5 Creedmoor and 6mm Creedmoor cartridges, which is 62,000 PSI. [O]ur goal was to provide a wide spectrum of bullet weights and the powders used with them.
All of the following data was gathered by our ballistician in our indoor ballistics lab located in our factory in Pennsylvania. Although we were able to gather pressure and velocity data in our lab, we have NOT tested these loads for accuracy. Again, these loads are just designed to give shooters information regarding what velocity, a given bullet and powder charge combination, will produce the SAAMI Maximum Average Pressure (MAP) of 62,000 psi.”
Sample 22 Creedmoor LOAD DATA
IMPORTANT — Pressures can vary significantly with different Cartridge Overall Lengths (COAL). In addition, ANY change to ANY load components — primers, bullets, brass, powder — can affect pressure. Always load conservatively. In addition, because of variances in bore dimensions, some barrels may show higher pressures than others. Again, always start with conservative loads, well below MAX pressures.
*Actually there IS a potential downside — reduced barrel life. We expect that a .22 Creedmoor running hot varmint loads would experience shorter useful barrel life compared to a 6.5 Creedmoor. This is based on what we’ve observed with .22-250 and .22-250 Ackley barrels compared to our 6.5 CM barrels.
Here’s inspiration for rimfire shooters out there. The video below shows some mighty impressive .22 LR iron sights lever gun shooting by a very talented young lady. In this video, Kirsten performs a classic Annie Oakley trick shot, cutting a playing card in half with a bullet. We hope this display of marksmanship brings a smile to our readers.
Kirsten Joy Weiss is a phenomenal off-hand rifle shooter. Splitting a playing card would be hard enough with a scoped rifle shot from the bench. But Kirsten makes this amazing shot from standing position, shooting over iron sights, with an inexpensive rimfire lever gun. Trust us, that’s not easy. It did take Kirsten three tries, but we’re still impressed.
To accomplish this trick shot, Kirsten’s horizontal aim had to be ultra-precise. A playing card is only 0.25mm thick (about 1/100th of an inch). That leaves almost no room for error.
GIF Animation Shows Bullet Slicing Card in Half:
We know top benchresters can put five shots in one ragged hole at 100 yards, used a scoped rifle sitting on a stable rest. But make those folks stand on their hind legs, hold the rifle, and aim over primitive iron sights, and some of those benchrest aces would be lucky to hit a dinner plate at 100 yards. Kudos to Kirsten for making this great shot.
Looking for a fun, DIY project this winter? Here’s a useful project — a handy ammo caddy you can craft at home pretty easily. And your shooting buddies will be impressed with your ingenuity. Plus the wife won’t mind having a spare knife-holder for the kitchen.
Forum member Alex W. (aka “zfastmalibu”) came up with a clever adaptation of an item you may already have on your kitchen counter. By drilling a few strategically-placed holes in a wood knife-holding block, Alex created a handy, 20-round ammo holder for the bench. We’re not sure the wife will appreciate the new holes in her kitchen accessory, but we think this is a smart invention. Alex asked fellow Forum members: “What do you think, is there a market for it?” We think there is. Of course, with a ruler and an electric drill you could probably make your own version easily enough.


 Flame Graphics by Camo Creek Hydrographics


 About Jesse Kaufmann, Master Engraver
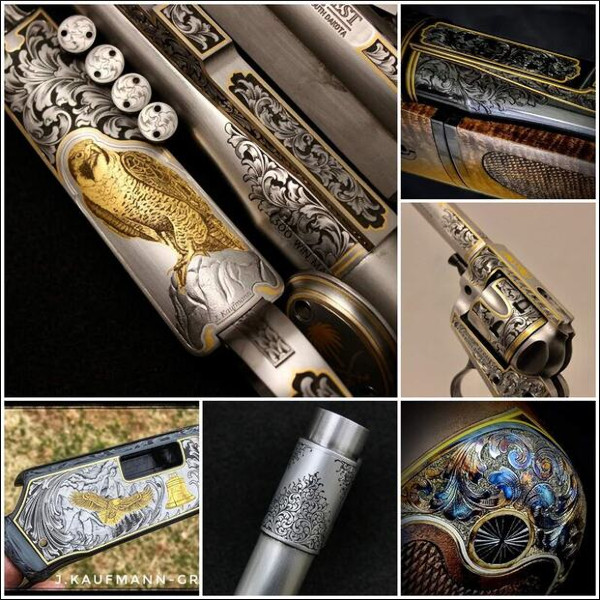


 Increasing Barrel Length Can Deliver More Velocity, But That May Still Not Provide Enough Stability if the Twist Rate Is Too Slow


