Can you form a wildcat cartridge such as the 6 Dasher without expending primer, powders, and bullets? Absolutely. Using the hydro-forming method you can form improved cases in your workshop with no firing whatsoever, so there is no wear on your precious barrel. Watch this video to see how it’s done:
6 Dasher Case Hydro-Forming Demonstration:
Forum member Wes J. (aka P1ZombieKiller) has produced a helpful video showing how to form Dasher cases use the Hornady Hydraulic forming die kit. This includes a two-part die (body and piston), and a special shell holder. To form the case, you insert a primer in your virgin brass, top the case off with with a fluid (water or alcohol), then run the case up into the Hydro-forming die. A few stout whacks with a hammer and your case is 95% formed.
Hydro-Forming Procedure Step-by-Step:
1. Insert spent primer in new 6mmBR brass case.
2. Fill with water or alcohol (Wes prefers alcohol).
3. Wipe excess fluid off case.
4. Place case in special Hornady shell-holder (no primer hole).
5. Run case up into Hydraulic forming die.
6. Smack top piston of forming die 3-4 times with rubber mallet or dead-blow hammer.
7. Inspect case, re-fill and repeat if necessary.
8. Drain alcohol (or water) into container.
9. Remove primer (and save for re-use).
10. Blow-dry formed case. Inspect and measure formed case.
Wes achieves very uniform cartridge OALs with this method. He measured ten (10) hydro-formed 6 Dasher cases and got these results: two @ 1.536″; 2 @ 1.537″; and 6 @ 1.538″.
Three or Four Whacks Produces a 95%-Formed Case
With a Hornady hydro-forming die, hydraulic pressure does the job of blowing out the shoulders of your improved case. The process is relatively simple. Place a spent primer in the bottom of a new piece of brass. Fill the case with water, and then slip it into a special Hornady shell-holder with no hole in the middle. Then you run the case up into the forming die. Now comes the fun part. You gently insert a plunger (hydraulic ram) from the top, and give it three or four stiff whacks with a mallet (or better yet, a dead-blow hammer). Remove the plunger and you have a 95% formed case, ready to load.
Special Shell-Holder
Hornady supplies a shell holder made specifically for the hydro die; there’s no hole in the bottom of it. Just insert a spent primer into the primer pocket and you’re ready to go. The spent primer, combined with the solid shell holder, keeps the water from seeping out of the primer pocket. The primer pushes out a little bit during this process, but it’s impossible for it to come out because of the way the shell holder is designed. The shell holder has a grove which allows the case to slide out of the shell holder even when the primer protrudes a bit.
Story tip from Body Allen. We welcome reader submissions.
Never had a chance to hunt prairie dogs in the American west? Then check out this video. Dan Eigen, host of the We Love It Outdoors Television series, ventured to South Dakota for some varmint hunting. Dan teamed up with Varmint Hunter Association President Jeff Rheborg to patrol some South Dakota Dogtowns where things get serious. In the video, you’ll see p-dog hits at distances from 70 yards to roughly 450 yards. The hunters were shooting from portable, wood-topped swivel rests, using AR-platform rifles on X-type sandbag rest. (Rifle zeroing session is shown at the 5:30+ mark.)
Multiple cameras were employed so you can see both the shooter’s POV and close-ups of the prairie dogs downrange. Watch the shooters having fun with a prairie dog cut-out and some Tannerite at the 9:00-minute mark. This guys are having a grand old time sending critters to Prairie Dog Heaven — we think you’ll enjoy the video.
Prairie Dog Hunting Starts at 2:20 Time-Mark in Video:
NOTE: This video actually covers three sequences: 1) Three-gun training; 2) Prairie Dog Hunting; and 3) Coyote Hunting. The Prairie Dog segment runs from 2:20 to 15:15. If you wish, you can slide the controls forward or back to watch the other segments.
Video found by EdLongrange. We welcome reader submissions.
Are laser sights really useful on a handgun? Yes, and not just in low-light situations. That said, many folks who own laser-equipped handguns do not train effectively with the laser. For many gun-owners, the laser is just a toy, a gimmick that is used a few times and then ignored. Those gun-owners miss out on some of the most important advantages of a laser sights, benefits you can get from formal training with your laser-equipped pistol.
Crimson Trace has produced a series of training videos that may change your mind about lasers. If you shoot a handgun you should watch these videos. They show how laser sights can help diagnose and correct common handgun-shooting errors (such as flinching and anticipating the shot). The videos also show how to improve sight alignment and get your sights on target quickly.
Training with Laser Sights, Full 12-minute Video
Covers Muzzle Awareness, Sight Alignment, Target Acquisition, Trigger Control
This video shows how training with laser sights can: 1) improve muzzle direction awareness; 2) aid with sight alignment; 3) speed up target acquisition; and 4) improve trigger control. The video also demonstrates the obvious advantage of laser sights in low light conditions. Numerous firearms experts are featured in this video filmed at Arizona’s Gunsight Academy.
Training With Lasers — Trigger Control
Training with laser sights helps diagnose and improve trigger control errors by showcasing the importance of “surprise break” and follow-through. Lasers quickly diagnose errors such as recoil anticipation, jerking the trigger, and breaking the wrist.
Training with Lasers — Sight Alignment
Training with laser sights can improve/correct alignment. The laser provides a visual indicator of proper sight alignment, allowing shooters to quickly see any errors before taking a shot. Additionally, lasers can enhance sight alignment on popular sub-compact carry guns with small, low-profile sights.
Muzzle Awareness — All-Important for Safe Shooting
Training with laser sights improves a shooter’s muzzle awareness. A daylight-visible laser shows the gun operator where his or her muzzle is pointing at all times. This helps teach proper safety practices.
Watch this Video — It’s one of the best Custom Rifle Build Videos ever produced!
This video, produced for the folks at S&S Precision in Argyle, Texas, shows a full custom 6.5×47 Lapua bench rifle being crafted from start to finish. It is a fantastic video, one of the best benchrest gunsmithing videos you’ll find on YouTube. It shows every aspect of the job — action bedding, chambering, barrel-fitting, muzzle crowning, and stock finishing.
You’ll be amazed at the paint job on this rig — complete with flames and four playing cards: the 6, 5, 4, and 7 of spades. Everyone should take the time to watch this 13-minute video from start to finish, particularly if you are interested in stock painting or precision gunsmithing. And the video has a “happy ending”. This custom 6.5×47 proves to be a real tack-driver, shooting a 0.274″ three-shot group at 400 yards to win “small group” in its first fun match. NOTE: If you have a fast internet connection, we recommend you watch this video in 720p HD.
There is a great multi-part episode of ShootingUSA on the Outdoor Channel this week. This week’s show covers the Bianchi Cup, AR rifles from Colt and S&W, the historic Model 1903 Springfield, Smith & Wesson 10mm Model 610 Revolvers. Plus there is a bonus Pro Tip segment on how to mount and align riflescopes. If you receive the Outdoor Channel, you can see this excellent hour-long show today (5/13/2020) at 9:00 pm Eastern/Pacific, or 8:00 pm Central.
If you miss the show, or don’t get Outdoor Channel on cable, all ShootingUSA episodes are available “on demand” through Vimeo.com. You can subscribe for $3.99/mo, or watch any specific episode for a modest $0.99 fee. Under a buck for an hour’s entertainment? That’s a lot cheaper than going to the cinema.
Lead Feature: Bianchi Cup
27 years ago Doug Koening, who has won the Bianchi Cup 18 times, set the standard with a 1920 score. Since then, every Open shooter knows that he or she must “clean” this match (i.e. score a “1920”) to have a chance to take the title of “Champion”. The X-Count is the tie-breaker.
Feature: M1903 Springfield Rifle
The M1903 Springfield served in both WWI and WWII. The accuracy and quality and service life have clearly made the ’03 Springfield one of History’s Guns.
Feature: Smith & Wesson Model 610
The Smith and Wesson Model 610s are back and now chambered in 10mm. The Model 610 is a N frame, all stainless-steel construction, in a choice of barrel length – four inch, or six-and-a-half-inch.
Pro Tip — Mounting a Scope
In this episode, John Paul from JP Enterprises shows his method of Truing a Riflescope. He says: “If you’re going to be successful you need to lay down a solid foundation. One of those basic foundation blocks is making sure that your scope is true to the rifle.”
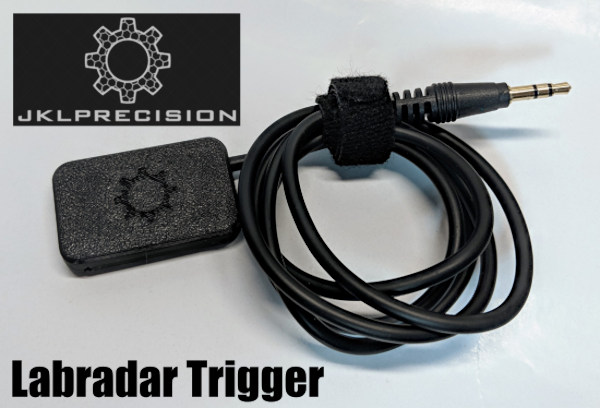
SUMMARY: This article reviews a device that “triggers” the LabRadar chronograph to register bullet speed. Rather than activate by sound or Doppler reading, this $35 JKL Inertial Trigger works from the rifle’s instantaneous recoil pulse when a shot is fired. After some frustration with his LabRadar when shooting at a range with reflective surfaces, our tester is now reporting that 100% of his actual shots are being captured correctly by his LabRadar chrono equipped with the JKL Inertial Trigger. He won’t use his LabRadar without it now. Other users have become instant fans of this inertial LabRadar trigger as well. It is very affordable and it works great. VIEW LARGE PHOTO.
JKL Inertial Trigger for LabRadar Chronograph
Product Review by F Class John
The LabRadar chronograph has been one of the most revolutionary tools in the shooting world because of how it collects velocity data, how it reports (and stores) that data, and, ultimately, the ease with which it can be positioned and operated. However, it’s not a perfect system. A majority of the complaints come from users whose LabRadar’s sometimes fail to record all the shots fired in a string. For the average plinker, this may not be an issue. But for serious shooters trying to do ladder tests or load development requiring all shots to be reported, it can be frustrating when a shot is missed.
Traditionally, LabRadar has recommended trying different settings that compensate for the gap between the unit and muzzle as well as well as having different options for how the unit recognizes a shot fired. While these options work to some degree, they aren’t a guaranteed fix especially when shooting at ranges with concrete baffles or with roofs, walls, and dividers that can alter sound waves. While nobody can precisely explain why shots are lost under certain circumstances, the fact remains it DOES happen. In addition, the default system can sometimes pick up stray shots from nearby rifles.
Not willing to give up on this sophisticated chronograph, many shooters have looked for a foolproof way to prevent such failures from happening. In fact, for this shooter, the frustration was so high that I actually sold my first LabRadar and went back to another chronograph before ultimately buying another LabRadar almost a year later. But I made that repeat purchase only after vowing to finding a way to make the LabRadar work — EVERY time, for EVERY shot.
See How JKL Inertial Trigger Works in this Video
JKL Inertial Trigger — Outstanding Product That Works Great
Enter the JKL Trigger for the LabRadar. This is an easy-to-use, inertial-driven trigger that activates simply from the recoil of your gun. The unit consists of a small rectangular pad attached to a long audio cable. All you do is plug in the audio cable, attach the pad to your gun with the provided hook and loop (Velcro) material. Then (important), you must change the LabRadar trigger settings from “Doppler” to “Trigger”. The unit works great and is easy to set up. In my experience, the unit will activate no matter where you place it on a stock. However the recoil of every gun is slightly different, so you will need to make sure you find a location that doesn’t interfere with your shooting setup.
An unexpected benefit of using the JKL trigger is that it gives you a larger area in which to place your Labradar unit, making it more convenient to setup on benches or range stations. I found this a welcome relief since the LabRadar originally seemed somewhat fussy about where I placed it. Now I can place the LabRadar in more convenient locations — as long as it’s still near my gun and pointed at the target correctly, I get consistent bullet speed data.
Are There Issues with “False Positives”?
If there is any downside to using the JKL Inertial Trigger, it’s that a very hard bump or aggressive working of the action can trigger a false reading. However these are easy to identify in your data, because the speed value is way lower than true fired shot values. Simply remove that low entry or otherwise ignore it in your calculations. To be fair, this “bump activation” really doesn’t happen very often once you get used to using the inertial trigger.
SUMMARY — Outstanding Accessory for LabRadar Users
Bottom line — if you own a LabRadar, then definitely get a JKL Inertial Trigger. Priced at just $35.00 this device is not expensive, yet it’s one of the most effective accessories you can buy for the LabRadar. I’ve recommended these inertial triggers to dozens of shooters. Every one of those guys who did buy a JKL trigger says they can’t imagine using a LabRadar without one. If you love what the LabRadar can do, but have been frustrated with shots not getting recorded 100% of the time, then definitely get yourself a JKL Inertial Trigger. It turns a good system into an amazing system. JKL Industries states that its inertial trigger “will work on anything from a .22 LR to a suppressed system or with standard rifle and brake.”
We like AR-style .22LR rigs for Rimfire Tactical Matches and 3-Gun cross-training. With an AR-style rimfire rifle you can train with low-cost ammunition while enjoying the same ergonomics, controls, and sighting systems found on your centerfire ARs.
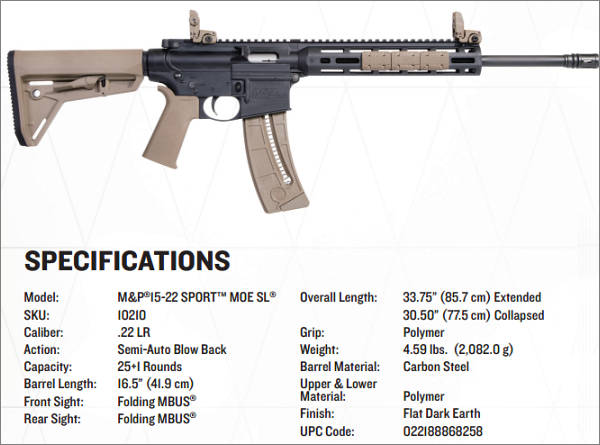
Smith & Wesson offers an upgraded version of its M&P 15-22, a fun rifle that we’ve praised in the past. The enhanced M&P 15-22 Sport MOE SL model (Magpul Original Equipment Slim Line) features a more comfortable handguard, an improved grip, and an adjustable Magpul buttstock. The dedicated .22 LR M&P rifle retains the look and features of the company’s popular M&P rifle line, with the enhanced ergonomics of Magpul furniture. The M&P 15-22 Sport MOE SL model is offered with either Flat Dark Earth (Tan) stock and grips, or with Matte Black components. MSRP is $505.00, with street price around $450.00.
Click Image for full Spec Sheet.
Here is an interesting Long-Term Test of the M&P 15-22 Sport MOE SL:
IMPORTANT: If you are considering buying an M&P 15-22, then definitely watch this video. It explains which types of ammo (CCI, Browning) work well, and which caused issues (Federal bulk). In addition the video explains how best to clean and maintain the rifle.
The M&P 15-22 Sport MOE SL features a high-strength polymer upper and lower receiver. In addition to the standard features of the M&P 15-22 Sport rifle, which include front and rear MBUS folding sights and the M&P Slim M-LOK handguard, the new MOE SL version comes with a Magpul mil-spec carbine stock, SL Grip, and Magpul Type2 M-LOK rail covers. The M&P 15-22 SPORT MOE SL is available in matte black or flat dark earth finishes and comes with a 25-round .22 LR magazine.
S&W 15-22 MOE SL Notable New Features:
— Adjustable stock with improved sloped comb profile.
— Shielded ambidextrous release lever prevents snagging and accidental adjustment.
— Push button QD socket and sling loops.
— Grip is slimmer with more vertical grip angle and Beavertail backstrap.
— Heavily textured grip contact surface.
COVID-19 stay-at-home orders have created abundant free time at home for millions of Americans. To fill otherwise empty hours, we know many readers have been reloading ammo — LOTS of ammo. And quite a few of you folks are thinking of getting a progressive press to increase output. Because multiple operations take place with a single pull of a lever, a progressive press can produce way more ammo in a given period of time than any single stage press. With a progressive, on the ram up-stroke, the multiple stations can simultaneously remove spent primer, full-length size case, drop powder, seat bullet, and crimp (if desired). Most progressives are also set up to prime cases with the ram in the lower position — though some guys prefer to prime manually.
Progressive presses aren’t just for high-output pistol ammo or bulk rifle ammunition. Good progressives can be adapted to do certain reloading tasks for top-on-the line match ammo. You might use a progressive for decapping, priming, and sizing, then throw powder and/or seat bullets separately. Some Champion shooters do use progressives to load their match ammo! For example 5-Time National Long Range Champion John Whidden and 2020 Berger SWN F-Open Champion Jay Christopherson both use progessive presses for some (but not all) operations.
To help you get started with progressive presses, here are five videos from UltimateReloader.com that cover six popular machines, from the elite Mark 7 Evolution to the inexpensive Lee Pro 1000. With many of these machines you can add separate vertical bullet feeder systems that further increase loading efficiency.
Mark 7 Evolution Press — Distributed by Lyman
Dillon XL-650 vs. Dillon XL-750
RCBS Pro Chucker 7 with Bullet Feeder
Dillon 550C with 6mm Creedmoor and 9x19mm
Lee Pro 1000 Features and Operation
Better Safe Than Sorry — the RCBS Lock-Out Die
RCBS Makes a “Lock-Out Die” that senses the powder charge. This will halt the Progressive press if you have a double charge, or an undercharge. Your Editor has the Lock-Out Die on his RCBS Pro 2000. It has “saved his bacon” a half-dozen times over the years. It can be used on Dillon and Hornady progressives as well as RCBS machines.
Turn on your TVs and break out the popcorn — it’s a big week on Shooting USA. A full hour of SHOT Show coverage runs tonight (5/6/20) at 9:00 pm ET. This episode provides a “first look” at the new guns, optics, and gear introduced for 2020. Shooting USA’s team looks at over 65 new products.
2020 SHOT Show Highlights: Colt Python, Hornady A-Tip bullets, Manners PRS Stock, Volquartsen Summit .17 WSM, Ruger-57 Pistol, Pinnacle Precision Rifle, HK SP5, Impact Sport Muffs, Laugo Arms Alien Pistol, Vortex 1-10X Scope, Glock 44 Pistol, Hornady Rapid Safe and more.
This SHOT Show 2020 episode airs on the Outdoor Channel Wednesday, May 6 at 9:00 pm ET and Thursday, May 7 at 3:00 pm ET. If you miss those broadcasts, you can watch this and ALL episodes of Shooting USA on Vimeo.com by subscription. The SHOT Show 2020 edition is just $0.99.
Great Shooting USA Episodes
For our Bulletin followers, here are two of our favorite full-length Shooting USA episodes, and well as two excellent instructional segments, one with past NRA High Power Champion SGT Sherri Jo Gallagher.
Texas Varmint Silhouette Match — 200 Meters to 750 Yards
We love shooting reactive targets. This Texas varmint silhouette match features multiple target shapes, 10 at each distance: Tiny Prairie Dogs at 200m, 3″x3″ Armadillos at 300m; 3″x5″ Coyotes at 385m; 5″x4″ Hogs at 500m; Chickens (on swingers) at 600 yards; and Pigs (on Swingers) at 750 yards. Competitors are allowed 10 rounds and 10 minutes to hit each set of targets.
EDITOR: We strongly recommend you take the time to watch this Shooting USA feature — it shows some top-flight benchrest rifles, and also covers the origins of benchrest varmint silhouette in Pennsylvania. There are even some AccurateShooter Forum members on screen. John Scoutten also does a nice job explaining the challenges of shooting this discipline with a PRS rig. We think any benchrest or tactical shooter will really enjoy this video.
Travis Frazier of Field & Cave Outfitters says shooters love the reactive targets: “The most exciting thing is seeing your hits — these [targets] really go airborne”. Yep, that’s the best thing about Varmint Silhouette matches — hits deliver instant gratification. Travis designs and produces these steel targets.
Vintage Sniper Match and GAP Grind PRS Match
Historic Rifles are on the firing line! It’s the Vintage Sniper Match in Talladega for collectors competing with classic rifles and historically accurate optics from the two World Wars. A team from the U.S. Army Marksmanship Unit also takes the challenge with a reproduction 03A4.
Plus, John Scoutten welcomes a new shooter to Precision Rifle (PRS) Competition. The two team up to take on 25 grueling stages at the Bushnell GAP Grind in Tennessee. With a special Pro/Am format, the GAP Grind is one of the most popular tactical matches in the country
Reading the Wind — SGT Sherri Jo Gallager (USAMU)
This segment, created when Sherri Jo was shooting with the USAMU team, explains how to evaluate wind conditions and adjust your hold for long range.
Minute of Angle (MOA) Defined with Jim Scoutten
Minute of Angle (MOA) — what does it actually mean? And what do you get when a rifle manufacturer guarantees one-half MOA accuracy? Jim Scoutten answers these questions and explains MOA basics. One MOA is an angular measurement equivalent to 1.047″ at 100 yards.
Leveling your scope can be a time-consuming and tedious process. The Fix It Sticks folks have changed that with the introduction of the Scope Jack. This simple unit levels a scope through contact with the flat on the bottom of the scope (opposite the elevation knob). You can do this quickly, with one hand, leaving the other free to tighten your rings once the scope is aligned. This really is a clever, effective, easy-to-use tool, as you can see in this video:
You attach the Scope Jack to the Picatinny rail on your rifle, then lossen the rings so the scope can rotate. Then simply elevate the Scope Jack with a quick twist, using a 1/4″ driver. The Scope Jack’s horizontal roller will contact the scope’s bottom flat, rotating the scope it into proper alignment, square to the rail.
Operating Instructions from Manufacturer Fix It Sticks
The Scope Jack works with any 1/4 inch driver to quickly and easily level your scope to your rail. Just mount the scope jack to the pic rail under your scope and turn the drive handle until the lifting arm engages with the flat section under your turrets. Once the scope is level, maintain pressure while tightening your ring screws to keep optic level throughout the process.
Requirements:
1. Scope much have a central flat section under turrets
2. Needs a minimum of 1/4″ clearance between rail and scope
3. Picatinny Rail must be accessible under optic
TECH TIP: You Still Must Check the Reticle Orientation INSIDE Your Scope
The Scope Jack works fast, but it is NOT the “final solution”. Why? Some scopes have a reticle that is not perfectly aligned with the turrets and/or bottom flat. We have seen scopes with vertical reticle line off as much as three degrees (3 °) from true plumb. With such a scope, you CAN set the reticle square, but then your turrets will be canted relative to the receiver. That creates issues when shooting at long range. Accordingly, if your scope has a badly canted reticle, you should send it back to the manufacture for warranty repair. Three degrees may not sound like much, but it is actually quite noticeable:
For all scopes, AFTER using the Scope Jack, we recommend you test your reticle with a plumb line. You can hang this line from a door or ceiling fixture with a weight on the bottom. Important — when using a plumb line make sure your rifle is 100% level or your results may be off. We recommend using a bubble level to help align your rifle properly.


 Hydro-Forming Procedure Step-by-Step:
Special Shell-Holder

 Never had a chance to hunt prairie dogs in the American west? Then check out this video. Dan Eigen, host of the


 This video, produced for the folks at