+ONE Program to Encourage New Shooters
August is National Shooting Sports Month. As part of this effort, the NSSF encourages firearms owners to take one novice to the range this one. This +ONE Movement will help strengthen the ranks of shooters, which, in turn, can help protect our Second Amendment freedoms. The NSSF states: “If just one in three of America’s recreational shooters adds one new person to the shooting sports, we’ll secure a strong future for generations to come. So be the one. For all the thrills and excitement recreational shooting has given you, join the +ONE movement and invite someone to the range today. Share your experience on social media.”
The +ONE campaign seeks to build the ranks of shooters. The NSSF says: “If just one in three of America’s recreational shooters adds one new person to the shooting sports, we’ll secure a strong future for generations to come.” Learn more at LetsGoShooting.org.
As part of the +ONE Movement, the NSSF encourages all participants to practice gun safety and proper firearms handling and storage practices. This video covers basic gun safety procedures:
Today we feature a modern switch-barrel PRS chassis rifle set up for quick changes between 6mm Creedmoor and 6.5 Creedmoor barrels. The owner, Forum member Jeff Cosgrove (aka “Punkur67″) uses the 6 CM barrel for competition, favoring the reduced recoil over its 6.5 mm big brother. He does use the 6.5 CM barrel for practice (given its better barrel life). The 6.5 CM barrel also gives him the chance to shoot a variety of factory 6.5 Creedmoor ammo.
- Terminus Zeus action with Quick Change (QC) barrel option.
– 6mm Creedmoor Pre-Fit Bartlein Heavy Varmint 400MODBB barrel for matches
– 6.5 Creedmoor Pre-Fit Benchmark Heavy Palma barrel for training
– MPA BA Competition chassis with full weight kit
– Zero Compromise Optic ZCO 5-27x56mm FFP scope
– TriggerTech Diamond trigger
This rifle represents an evolution for Jeff. Each step along the way in his PRS journey, he has learned more about what he wants and needs in a competition rifle. And what you see here, from the $3760 ZC527 scope to his high-tech reloading equipment, represents pursuit of excellence. Jeff even created a modern, spacious man cave/reloading center in his new house (photos below).
Quick-Change Barrel System with Terminus Zeus QC Action
This rifle has two pre-fit barrels that work with the Terminus Zeus QC Action for fast and easy barrel swaps. To remove a barrel, you simply release two tension screws on the front of the action and then unscrew the barrel. To swap in a different pre-fit barrel, reverse the process and then tension the screws. The Terminus Zeus is 3-lug receiver with 60° bolt and integral recoil lug. Both the receiver and bolt are DLC-treated. Jeff reports this action is extremely smooth and has met all of his expectations. Some other Zeus features are threaded trigger pins for quick/easy trigger installation, and a roller-tipped cocking piece.
PRS Discipline Offers Fun, New Challenge for Long-Time Shooter
My name is Jeff Cosgrove, I live in Winchester, California and do commercial heating and air conditioning. I have shot for 20+ years but I found my interest in shooting was dwindling over time. I got somewhat bored with shooting paper at 100 yards or plinking cans out in the desert. About 18 months ago I decided I wanted to shoot long range. I picked up a used MPA in .300 Winchester Magnum and started shooting long range with a new buddy. That day I fell in love with guns all over again with more intensity than ever.
How I Got Started in PRS
With that new .300 WM I soon found my reloads were not up to my expectations (high ES/SD), so I purchased all new reloading hardware. One of my purchases was a used Benchsource Annealer. The guy I bought that from asked if I had ever tried PRS and he invited me to check out a match. So I went to a local PRS event as a spectator. I looked at many rigs on the firing line and took notes. By the end of the day I knew this was something I really wanted to do. I then acquired a used chassis rifle that I thought would work well for PRS. I went to a PRS match the following month but shot poorly.
After working with that first PRS rifle, a 6.5 CM with Stiller Tac30 action, MDT chassis, and Proof Carbon-wrapped barrel, I quickly learned that gun did not handle and balance the way I hoped.* It was too light in the front, the ergos were poor, and scope eye relief was not optimal. So I decided to build my own GEN 2 PRS rifle. This is the story of how I put together my new switch-barrel rig that I now use in competition.
PRS Rifle and Gear Selection — Learning What Works
Barrel availability was limited given the current shortages. Luckily I was able to obtain a 6mm Creedmoor pre-fit Bartlein Heavy Varmint 400MODBB from Southern Precision Rifles. The 6mm Creedmoor is notorious for being a barrel burner cartridge so I went with the special 400MODBB metal. Bartlein says that barrel life expectancy is 1.5 to 2 times longer than the standard 416 grade steel. I also purchased a 6.5 Creedmoor pre-fit Benchmark Heavy Palma barrel for training (Source: Straight Jacket Armory). With the Terminus Zeus quick change system I am able to swap from my match barrel to my trainer barrel in just a couple minutes. I loosen two set screws, unthread the barrel, thread the new barrel on, and torque the set screws to 10 inch-pounds. This also affords me caliber options in case I’m in a pinch for ammo. If I have some 6.5 CM loaded up and don’t have time to load 6mm Creedmoor for a match, then I’m covered.
For the trigger, I went with a TriggerTech Diamond Pro curve model. I have Timney, Jewell, and TriggerTech triggers in other rifles. I like them all but I liked the feel of the TT Diamond the best so that is what I used on this build. I set my triggers around 18-20 oz. — I am not a fan of ultra-light trigger pulls.
MPA BA Competition Chassis with Added Weight
I went with an MPA BA Comp chassis with full internal and external weight kit. I also have Gray Ops external weight on the handguard. I had the same chassis on my .300 WinMag and felt very comfortable with it. I took a PR1 class and found that, with a different gun, I had to force a comfortable hand position for proper trigger pull. After that class I grabbed my MPA and my hand fell in to the perfect position. I did not need to hunt or index my hand with the MPA. The built ARCA rail (RAT) lowered the rifles center of gravity more than my old setup with the ARCA rail bolted to the bottom of the handguard. With the current configuration, the rifle weighs in at 24 lbs. and balances three inches in front of the magwell. I now have the flexibility to add, subtract, or move approximately 6 lbs. of weight.
The Attraction of PRS/NRL Practical Competitions
I really enjoy PRS-style shooting because there seems to be a new challenge every time you compete — no matter what. With PRS I am shooting many different positions and ranges with the pressure of a stopwatch. This keeps things interesting for me. I have taken a few training classes to help establish good, clean fundamentals.
Jeff says it is hard to practice for the many unconventional shooting positions at PRS matches.
My biggest challenges so far have been: 1) building stable shooting positions that I have not practiced enough; 2) proper equipment selection; and 3) time management. Regarding the shooting positions — PRS/NRL is not like F-Class where you can always practice from one position. And it’s hard to practice for unusual set-ups (barriers and positions) you’ve not encountered before. Concerning equipment — you need some experience in the game to determine what really works best for you.
Innovative Zero Compromise Optic — Optimized for the Tactical Game
The scope is a Zero Compromise ZC527 (5-27x56mm FFP) with MPCT2 reticle. Zero Compromise Optic is a relatively new manufacturer, but their scopes are top-flight. The First Focal Plane ZCO has excellent glass that is extremely bright and clear. With a big 36mm main tube, the ZC527 offers 35 Mils Elevation and 21 Mils Windage adjustment. The field of view is 21 feet at 100 yards — one of the widest in the industry. The ZC527 also offers illuminated reticle and locking turrets. When I was at my first PRS match I looked through several different scopes. When I got behind a ZCO scope I knew this was what I wanted — the ZCO scope was super clear, super sharp, with very positive controls.
I put a protective wrap on the scope because with some of our PRS stages it is easy to scratch or dent the scope tube. You don’t want to bang up an expensive scope — the ZC527 retails for $3760.
Reloading for 6mm Creedmoor and 6.5 Creedmoor
When starting out with a new cartridge I like to search places like AccurateShooter.com and UltimateReloder.com for popular recipes used by knowledgeable shooters. I am all about paving your own way on certain things but with the consistency, higher cost, and limited supply of components these days I try to stick with the most common loads. I also want to limit barrel wear and get through load development quickly. I don’t want to chase loads for 300 rounds to ultimately land in the same place that so many other people have already found.
I start my new barrels with virgin brass and load three rounds at each charge weight in 0.2 grain increments. I put the most popular charge weight (for my chosen bullet) in the middle of my load range and load above and below to find a good node while paying close attention for pressure signs along the way. I use the 6.5 Guys spreadsheet (see below) to help analyze my results. With those results I like to re-test a narrower range with 5-10 rounds each charge weight in 0.2 grain increments. I again use the 6.5 Guys spreadsheet to make a final charge weight selection and then I move on to seating depth. I will load different depths to tighten the groups up.
Load Development Using 6.5 Guys Custom Spreadsheet
To hold and analyze my load development data I use the spreadsheet from 65Guys.com. It helps a ton with making a decision on your final load. This Excel spreadsheet works great and makes it simple to analyze your data. You can even copy and paste your chronograph data if your chrono logs on to a SD card.
In this 6.5 Guys video Steve provides an overview and tutorial for using the Excel load development analysis model that he has developed. The Excel Load Development Analysis Spreadsheet version 2.0 is FREE. Download from the 6.5 Guys Website.
In this video Steve explains some key statistical concepts for performing load data analysis. He also provides tips and guidance for determining the optimal load for your rifle as you analyze the load data you’ve collected.
New House, New Man Cave/Reloading Room
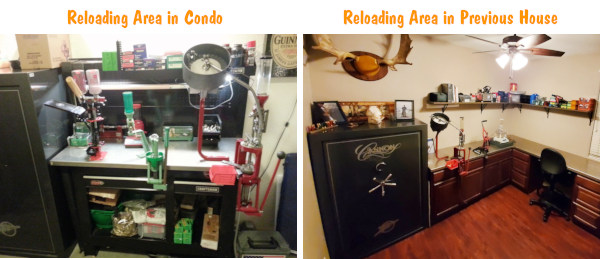
Jeff recently moved with his family into a great new house. One bonus of this move was that he upgraded from a cramped reloading area to a dedicated “Man Cave” that has ample space for his gun safes, multiple presses, and all his reloading components. Large upper and lower cabinets plus a dedicated “gun closet” provide plenty of storage. Read all about this move in this AccurateShooter Forum Thread.
Here is Jeff’s first reloading area years ago: “My first reloading setup was smashed in my two-bedroom condo so I had a very small bench that was very cluttered. I had to deal with the limited space I had but I made it work. Then in our first house I had a larger bench/cabinet, but it was still not ideal.”
Here is the new Man Cave in the new house — very open, spacious, with plenty of storage.
This animated GIF shows the new Man Cave move-in process start to finish:
Examples of Guns & Gear Videos from GunTalk YouTube Channel Guns & Gear is a leading gun-centric resource with hundreds of informative videos. Produced by Tom Gresham, Ryan Gresham, and the Gun Talk team, Guns & Gear showcases new products in the firearms industry. Each episode features interviews with industry experts/instructors, range demonstrations, tips, and training techniques. Guns & Gear content is all FREE — you can watch hundreds of videos from Guns & Gear past seasons via the Guns & Gear Archive on GunTalkTV.com. And there are 900+ Guns & Gear videos on YouTube as part of the GunTalk Media YouTube Channel.
Savage 110 Precision Field Test and Review — 6.5 Creedmoor
Looking for an accurate, value-priced chassis rifle for PRS/NRL production class competition? Or would you like to shoot a big magnum in ELR matches? The Savage Arms 110 Precision is a good choice. These Savage 110 chassis rifles show excellent accuracy, and the barrel nut system allows easy installation of pre-fit barrels. Priced at $1649 MSRP, the Savage 110 Precision features an aluminum MDT LSS XL Cerakoted chassis and a 24″ barrel with factory muzzle brake. Chamberings offered are: 6.5 Creedmoor, .308 Win, .300 PRC, .330 Win Mag, and .338 Lapua Magnum.
Colt King Cobra Target .22 LR Rimfire Revolver
We think all serious shooters should have a .22 LR rimfire pistol in their collection, and a rimfire revolver is a smart choice, offering great accuracy and reliability. Colt relaunched the .357 Magnum King Cobra in 2019, and Colt later launched the .22 LR King Cobra Target family of rimfire revolvers. The King Cobra Target rimfire series includes 2″, 3″, 4.25″ and 6″ barrel versions. In this video, Justin Baldini joins Guns & Gear’s Kevin “KJ” Jarnagin reviews the features of the rimfire King Cobra Target. Then Team Colt’s Jalise Williams joins Guns & Gear’s Chris Cerino for a range demo.
Reloading Basics with Gavin Gear of UltimateReloader.com
In this Range Ready Tip, Gavin Gear of UltimateReloader.com explains the basic equipment one needs to reload rifle cartridges. Whether you’re an experienced reloader, or aspire to be one, you’ll find Gavin’s explanations helpful. He covers the key procedures — case sizing, priming, powder dispensing, and bullet seating. This Range Ready Tip features Hodgdon powders and Nosler bullets, with Lyman reloading presses and tools.
How to Improve Organization of Your Gun Safe
Many gun owners can benefit from this video which shows how to arrange the long guns and handguns in your gun safe. The video shows how to use rifle rods and handgun hangers to organize your gun safe contents in the most efficient manner. This can both make it easier to access your guns and can also help protect your valuable firearms from scraping and contact damage. Note: We recommend you put both rifles and pistols in rust-blocking sleeves for long-term storage.
Best Tripods for Hunting and Precision Shooting
This video explains how to select the best tripod for your hunting mode/match discipline and gun type. This video compares tripods from BOG, Two Vets, and Tricer. 1. The BOG DeathGrip (aluminum & carbon versions is good for hunting blinds, but is heavy and not ideal for mobility. 2. The Budget Spotting Scope Tripod is conveniently light but optimized for glassing, not for rifle support. 3. The Two Vets Recon V2 is a match-grade tripod ideal for long-range and precision shooters. 4. The Tricer HK Kit is a lightweight, inverted design with ball head and gun clamp. This may be the best all-around option for both hunting and tactical matches.
Guns & Gear Goes to GAP Grind — Leading Pro/Am PRS Match
For this video, Gun Talk’s Kevin “KJ” Jarnagin attended the Bushnell GAP Grind, a huge PRO-AM PRS match held annually in Tennessee. The GAP Grind, the largest, most popular PRS match in the world, draws nearly 400 amateur and pro shooters. Recognized as the premier PRO-AM precision rifle match with both individual and team competition, the GAP Grind has introduced thousands of new shooters to the sport since its inception. This 2-day, multi-stage PRS match is known for being very challenging.
Popperpalooza — Shooting 100 Steel Popper Targets with AR15
This fun video shows the ability of a modern sporting rifle (MSR) to drill a host of reactive steel targets with speed and efficiency. Using a Springfield Armory Saint AR-15, top action shooter Rob Leatham takes on “Popperpalooza” — a set-up with multiple rows of 100 steel “popper” targets. Shooting reactive targets is fun because you get instant gratification with the sound of the hit and the movement of the target as it falls down, swings, or spins.
Optics — Angled and Straight Spotting Scope Designs Compared
Spotting scopes come in two basic styles — straight and angled. The angled version is the most common because it can be used from all shooting positions — even prone (just rotate the spotter around its centerline). If you are spotting from a sitting or standing position, with the spotting scope on a tripod, a straight spotter may work best. That way your head/neck/torso is not bent down and you can instantly see a full view ahead just by moving your head slightly away from the lens. In this video, Gun Talk’s Kevin “KJ” Jarnagin covers the pros and cons of Straight vs. Angled spotting scopes. KJ uses Leupold SX-4 Pro Guide HD15-45x65mm spotting scopes in both straight and angled configurations.
Below are links to five past Guns & Gear shows we recommend. These feature some impressive rifles and pistols, notable new optics, and good travel advice for gun owners. Click a link below to open the show list for a particular season. Seasonal show previews will then display top to bottom in numerical order. Then look for the particular show number and click on it.
Season 13, Episode 7: Colt Anaconda, Frankford Arsenal X-10 Progressive Press, SIG Sauer Red Dot optics
Here’a useful article by Sierra Bullets Media Relations Manager Carroll Pilant. This story, which originally appeared in the Sierra Bullets Blog, covers some of the more common ammo problems that afflict hand-loaders. Some of those issues are: excessive OAL, high primers, and improperly-sized cases. Here Mr. Pilant explains how to avoid these common problems that lead to “headaches at the range.
I had some gentlemen at my house last fall getting rifle zeros for an upcoming elk hunt. One was using one of the .300 short mags and every 3rd or 4th round would not chamber. Examination of the case showed a bulge right at the body/shoulder junction. These were new cases he had loaded for this trip. The seating die had been screwed down until it just touched the shoulder and then backed up just slightly. Some of the cases were apparently slightly longer from the base to the datum line and the shoulder was hitting inside the seating die and putting the bulge on the shoulder. I got to thinking about all the gun malfunctions that I see each week at matches and the biggest percentage stem from improper handloading techniques.
One: Check Your Cases with a Chamber Gage
Since I shoot a lot of 3-gun matches, I see a lot of AR problems which result in the shooter banging the butt stock on the ground or nearest solid object while pulling on the charging handle at the same time. I like my rifles too well to treat them that way (I cringe every time I see someone doing that). When I ask them if they ran the ammo through a chamber gage, I usually get the answer, “No, but I need to get one” or “I didn’t have time to do it” or other excuses. The few minutes it takes to check your ammo can mean the difference between a nightmare and a smooth running firearm.
A Chamber Gauge Quickly Reveals Long or Short Cases
Size Your Cases Properly
Another problem is caused sizing the case itself. If you will lube the inside of the neck, the expander ball will come out a lot easier. If you hear a squeak as the expander ball comes out of a case neck, that expander ball is trying to pull the case neck/shoulder up (sometimes several thousandths). That is enough that if you don’t put a bulge on the shoulder when seating the bullet … it can still jam into the chamber like a big cork. If the rifle is set up correctly, the gun will not go into battery and won’t fire but the round is jammed into the chamber where it won’t extract and they are back to banging it on the ground again (with a loaded round stuck in the chamber). A chamber gage would have caught this also.
Oversizing cases also causes problems because the firing pin doesn’t have the length to reach the primer solid enough to ignite it 100% of the time. When you have one that is oversized, you usually have a bunch, since you usually do several cases at a time on that die setting. If the die isn’t readjusted, the problem will continue on the next batch of cases also. They will either not fire at all or you will have a lot of misfires. In a bolt action, a lot of time the extractor will hold the case against the face of the breech enough that it will fire. The case gets driven forward and the thinner part of the brass expands, holding to the chamber wall and the thicker part of the case doesn’t expand as much and stretches back to the bolt face. If it doesn’t separate that time, it will the next time. When it does separate, it leaves the front portion of the case in the chamber and pulls the case head off. Then when it tries to chamber the next round, you have a nasty jam. Quite often range brass is the culprit of this because you never know how many times it has been fired/sized and in what firearm. Back to beating it on the ground again till you figure out that you have to get the forward part of the case out.
Just a quick tip — To extract the partial case, an oversized brush on a cleaning rod [inserted] and then pulled backward will often remove the case. The bristles when pushed forward and then pulled back act like barbs inside the case. If you have a bunch of oversized case that have been fired, I would dispose of them to keep from having future problems. There are a few tricks you can use to salvage them if they haven’t been fired though. Once again, a case gage would have helped.
Two: Double Check Your Primers
Another thing I see fairly often is a high primer, backwards primer, or no primer at all. The high primers are bad because you can have either a slam fire or a misfire from the firing pin seating the primer but using up its energy doing so. So, as a precaution to make sure my rifle ammo will work 100% of the time, I check it in a case gage, then put it in an ammo box with the primer up and when the box is full, I run my finger across all the primers to make sure they are all seated to the correct depth and you can visually check to make sure none are in backwards or missing.
Three: Check Your Overall Cartridge Length
Trying to load the ammo as long as possible can cause problems also. Be sure to leave yourself enough clearance between the tip of the bullet and the front of the magazine where the rounds will feed up 100%. Several times over the years, I have heard of hunters getting their rifle ready for a hunt. When they would go to the range to sight in, they loaded each round single shot without putting any ammo in the magazine. On getting to elk or deer camp, they find out the ammo is to long to fit in the magazine. At least they have a single shot, it could be worse. I have had hunters that their buddies loaded the ammo for them and then met them in hunting camp only to find out the ammo wouldn’t chamber from either the bullet seated to long or the case sized improperly, then they just have a club.
Four: Confirm All Cases Contain Powder
No powder in the case doesn’t seem to happen as much in rifle cartridges as in handgun cartridges. This is probably due to more handgun ammo being loaded on progressive presses and usually in larger quantities. There are probably more rifle cartridges that don’t have powder in them than you realize though. Since the pistol case is so much smaller internal capacity, when you try to fire it without powder, it usually dislodges the bullet just enough to stick in the barrel. On a rifle, you have more internal capacity and usually a better grip on the bullet, since it is smaller diameter and longer bearing surface. Like on a .223, often a case without powder won’t dislodge the bullet out of the case and just gets ejected from the rifle, thinking it was a bad primer or some little quirk.
For rifle cases loaded on a single-stage press, I put them in a reloading block and always dump my powder in a certain order. Then I do a visual inspection and any case that the powder doesn’t look the same level as the rest, I pull it and the one I charged before and the one I charged after it. I inspect the one case to see if there is anything visual inside. Then I recharge all 3 cases. That way if a case had powder hang up and dump in the next case, you have corrected the problem.
On progressive presses, I try to use a powder that fills the case up to about the base of the bullet. That way you can usually see the powder as the shell rotates and if you might have dumped a partial or double charge, you will notice as you start to seat the bullet if not before. On a progressive, if I don’t load a cartridge in one smooth stroke (say a bullet tipped over sideways and I raised the ram slightly to reset it) Some presses actually back the charge back adding more powder if it has already dumped some so you have a full charge plus a partial charge. When I don’t complete the procedure with one stroke, I pull the case that just had powder dumped into it and check the powder charge or just dump the powder back into the measure and run the case through later.
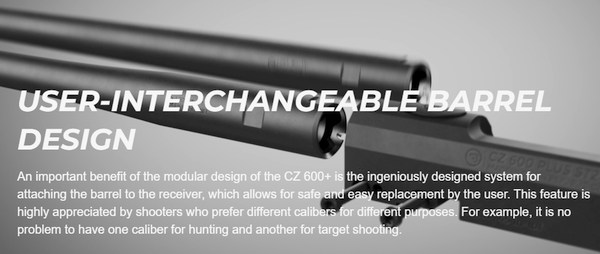
CZ has announced its new CZ 600+ bolt-action rifle series. These new rifles are offered in various formats for hunting, PRS/NRL, and target shooting. Notable features include and fast barrel swap system, a shorter bolt throw, and a wide selection of stocks. CZ offers 3-shot accuracy guarantees: Most models have guaranteed sub-MOA accuracy at 100 yards (three-shot groups), while the RANGE model offers guaranteed sub-0.75 MOA accuracy in five-shot groups.
“The CZ 600+ represents the future of hunting and precision rifles,” said Tom Taylor, CZ-USA’s Chief Marketing Officer. The CZ 600+ series features a groundbreaking modular design highlighted by patented innovations. These include an advanced Silent, Ergonomic, and Ambidextrous (S.E.A.) safety, a quick 4-position adjustable trigger, and an innovative interchangeable barrel system. The series guarantees unmatched precision accuracy, supported by CZ’s lifetime barrel warranty. For detailed information about the CZ 600+ series, visit CZFirerms.com.
Interchangeable Barrel System for Versatility
With the interchangeable barrel system, shooters can easily and safely swap barrels, allowing one rifle to adapt to multiple calibers, from hunting to sport shooting, seamlessly.
Innovative Features and Design — CZ 600+ Rifles Include:
Advanced S.E.A. Safety: Silent, Ergonomic, and Ambidextrous cross-bolt design for secure handling.
Quick Adjustable Trigger: Easily adjusted to suit personal preferences without disassembly.
Controlled Feeding System: Smooth bolt operation with 100% controlled feeding.
Lifetime Barrel Warranty: Cold hammer-forged barrels with exceptional durability and precision.
Robust Construction: Available with lightweight aluminum alloy receivers with integrated Weaver rails or steel receivers with Remington 700-style mounting interfaces.
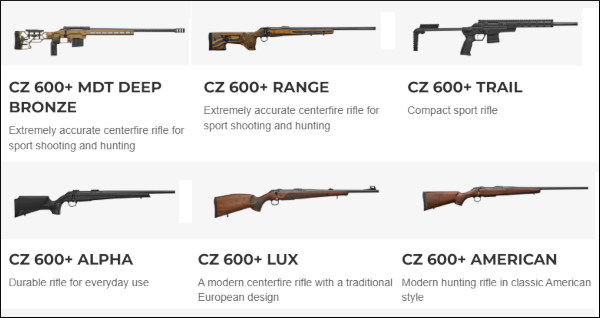
The CZ 600+ Series — SIX Models
CZ 600+ MDT: Tactical Rifle with MDT Stock for PRS/NRL.
CZ 600+ RANGE: Optimized for precision shooting with adjustable stock features.
CZ 600+ TRAIL: Compact model with retractable stock and compatibility with AR and CZ mags.
CZ 600+ ALPHA: Rugged polymer stock designed for reliable performance in all conditions.
CZ 600+ LUX: Classic European walnut stock with fiber optic adjustable iron sights.
CZ 600+ AMERICAN: Timeless American styling combined with modern enhancements.
Are you in the market for your first handgun, for target use or for self-defense? The Winchester Blog has a good article for handgun buyers. This story, “Things You Should Know When Purchasing Your First Pistol”, provides many smart tips that can help you choose the right handgun, and save money in the process. In addition, the article explains how to train with your new pistol and handle it safely. READ Full Article.
If possible, you should test a variety of different pistols, to determine which works best for you. Check the feel, the ergonomics, the sight picture, and the controls. And, if possible, test the pistols with live-fire at a range which rents samples.
How do you know if your choice is right for you?
Once you’ve narrowed down choices, try to get time shooting the pistol(s) you are considering. You can usually rent guns at commercial ranges. This is an excellent way to “try before you buy.” NSSF has a list of places to shoot[.] When looking for a range that rents firearms, an online search and then a phone call to confirm what options are available is a solid plan. If you have friends and family who own a model you are interested in, ask if they will go to the range with you so that you can try it.
Take pistols for a test drive
First, dry-fire and manipulate the pistol. Can you easily lock the slide open? Are the sights suited to your vision? Then, fire a magazine or two of ammo [in a supervised range facility]. — Winchester Blog
The Winchester Blog article lists techniques that can help you get the “feel” for a particular firearm:
1. Practice the 4 Rules of Firearm Safety and make sure the gun is empty.
2. [After confirming the gun is empty] manipulate the slide, safety, magazine release, and dry-fire.
3. Perform a dry or empty magazine change — make sure you can hit the release and also reload a new magazine easily.
4. Perform a draw, or if you’re at a range where that is not allowed, simply pick the pistol up off the table and bring it up to your eye level and align the sights. Do this a few times. Can you acquire the sights quickly?
5. How does the backstrap fit your hand? Can you get both hands on the gun with enough “purchase” that you can really grip it well?
This Winchester Blog article is by Becky Yackley. Becky has competed in 3-Gun, Bianchi pistol, Service Rifle, NCAA air rifle, smallbore and air pistol events around the world since 1989.
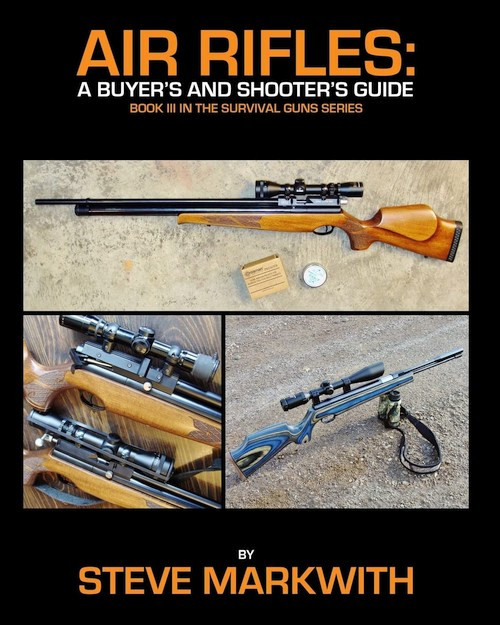
We like air rifles both for fun shooting and for competition. However, so many options are now available that is easy to get overwhelmed with the choices. Thankfully, there is a good book that helps air rifle shooters make informed decisions about air guns and accessories. Steve Markwith’s comprehensive resource, Air Rifles: A Buyer’s and Shooter’s Guide offers a wealth of useful information. This 154-page book is now available for $14.48 (paperback) or $9.95 (Kindle)..
“This is a very informative book explaining the ins and outs of air rifles, their capabilities and limitations. I highly recommend this book to anyone considering purchasing an air rifle for marksmanship practice or small game hunting.” – L. Stanek, Verified Amazon Reviewer
Read Free Sample Chapters Online
If you go to Amazon.com and look right below the book cover photo, you’ll see a “READ SAMPLE” button. Click that to view a FREE preview with extensive samples from many chapters. The book covers all the most important types of air rifle systems, both pre-charged pneumatics and other self-charging guns. Markwith reviews the wide variety of pellets available, offering suggestions for particular applications. You’ll also find a useful discussion of Airgun Power, Range, and Accuracy. This will help you pick the right air rifle.
Markwith explains the many attractions of airguns. They are not considered firearms (in most jurisdictions) so they can be purchased at local shops or mail-order outlets without FFL fees or background checks. You’ll find a huge online selection of airguns at PyramydAir.com that can ship direct to you — no FFL required. Air rifles are also quiet and very inexpensive to shoot. While .177 and .22 caliber air rifles are most common, there are also larger-caliber airguns offered for hunting or special applications.
Pyramyd Air has dozens of helpful videos about air rifles and air pistols.
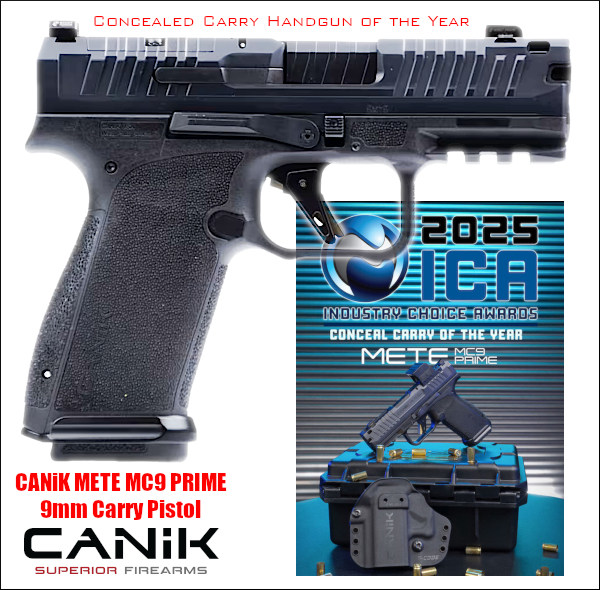
The compact CANiK METE MC9 PRIME pistol has been named the 2025 ICA (Industry Choice Awards) Concealed Carry Handgun of the Year. This compact single-stack 9mm pistol features a ported barrel and an optics-ready slide. Average retail price is $599.99.
Testers have stated the METE MC9 Prime has good ergonomics, a good trigger, and the ported barrel reduces muzzle rise compared to popular carry pistols such as the Glock 19 and Ruger American. The controls are nice and the pistol ships with 3 backstraps, so the grip can be adapted to owner hand size.
The METE MC9 Prime is equipped with an integrally-compensated slide and ported barrel, flat-faced trigger with 90-degree break, slide lightening cuts, and flared slide for smoother manipulation. The frame boasts full grip stippling for a better feel and control. The slide is optics-ready with co-witness capability. This made-in-USA CANik firearm ships in a premium hard case and includes two 17-round magazines, a G-Code IWB/OWB ambidextrous holster, 3 sizes of backstraps, tool/cleaning kits, and magazine speed loader.
Jeff Rose, CANiK Director of Marketing stated: “This isn’t just another micro-compact. The MC9 Prime delivers unmatched capacity, uncompromising control, and a trigger that redefines what you expect from a concealed carry firearm.” The METE MC9 Prime is the first pistol made in CANiK’s new facility in West Palm Beach, Florida.
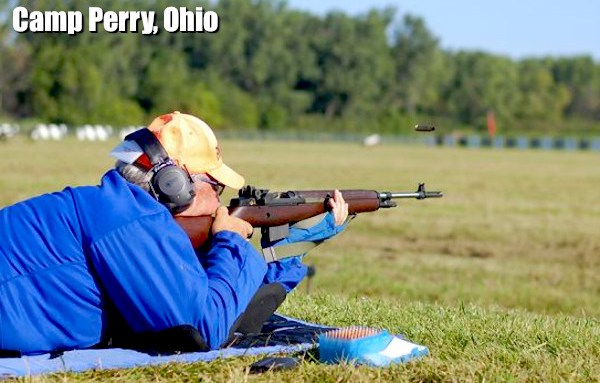
The CMP M14 Heritage Match was held Sunday, August 3, 2025 at the Viale Range at Camp Perry.
M1A rifles at M14 Heritage Match at Camp Perry
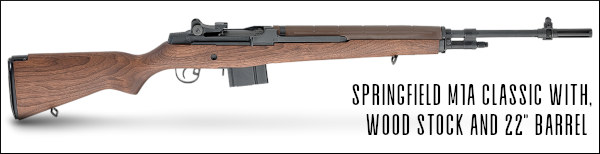
Today we feature the M1A rifle. Last week, the rugged M1A rifle, descended from the M1 Garand and M14, was the star of the show at Camp Perry. The M14 Heritage Match was held last Sunday, August 3, 2025, at the CMP 2025 National Rifle Matches.
History of the M14 Heritage Match and Springfield M1A Match
The M14 Heritage Match, previously the Springfield Armory M1A match, began with one man’s concept. Springfield Armory’s Mike Doy witnessed the waning of classic M1 Garand and M1A rifles from the competitive High Power firing lines. “I really wanted to get those M1A rifles out of safes and closets and back out onto the field. So [in 2008] I promoted the idea of running an M1A-specific match at Camp Perry. That first year we had over 600 competitors and spectators.” After running as a Springfield Armory-sponsored match (with cash prizes) for many years, the match is now the “M14 Heritage Match”.
Folks, take the time to WATCH this 3-minute video. It has great match footage of Camp Perry and interviews with M1A competitors. Well worth watching!
Nick Till in 2009 M1A Match. Nick was the 2007 Service Rifle Nat’l Champion. Photo courtesy NRA Blog.
M1A Competition at Camp Perry National Matches
For many years, the semi-auto version of the M14 was “top dog” in iron sights Service Rifle competition. Now that discipline is dominated by .223 Rem (5.56×45) AR-type rifles, but the bigger .308-caliber rifle, now sold as the M1A, remains popular. The CMP hosts a major M1A Match every year at Camp Perry now called the “M14 Heritage Match”. Significant prizes are awarded. In past years M1A Match competitors took home over $25,000 worth of cash and merchandise when the match was sponsored by Springfield Armory.
Photo courtesy Civilian Marksmanship Program.
M1A Match 2016 — Rapid Fire Sitting Stage
In the April 2018 issue of Shooting Sports USA, you’ll find a good article on the civilian version of the M14, now sold commercially as the Springfield M1A. An evolution of the battle-proven M1 Garand, the M14 was designed to shoot the 7.62×51 (.308 Win) round instead of the larger .30-06 Springfield cartridge used in WWI, WWII and Korea. While the vast majority of today’s M1As are chambered for .308 Win/7.62×51, Springfield Armory also produces a 6.5 Creedmoor version.
Dick Jones reports that accurized M14/M1As could post remarkable scores: “The accuracy potential of the M14/M1A is unquestionable. During their reign as service rifles, they produced multiple perfect 200 scores at 600 and 1000 yards in the hands of top shooters. This is a difficult feat with a modern, scoped, magnum-caliber rifle and remarkable with an iron-sighted battle rifle. Good competition rifles can group 10 shots under one MOA, and the meticulously-massaged rifles used by the top shooters during my career would consistently put up 10 shots under an inch at 200 yards off a test cradle.”
In this video, YouTube Reviewer Hickok 45 compares the M1 Garand and the M14/M1A:
“Descended from the M1 Garand, the M14 utilized multiple improvements that made it a far superior firearm for combat and a much better rifle for competition.” — Dick Jones, Shooting Sports USA.
M1A Match Equipment Rules and Course of Fire
Renewed interest in the M1A led to the first dedicated Camp Perry M1A match in 2008. That first-ever match drew over 500 shooters. Match equipment rules allow pretty much all types/grades of M1As. The one-day course of fire consists of 50 shots at 300 yards on the NRA MR-65F target, as follows: 5 sighters; 20 shots slow-fire prone; 10 shots rapid-fire prone; 10 shots rapid-fire, kneeling or sitting; and 10 shots slow-fire standing. Here are photos from the 2014 MIA match, courtesy NRA General Operations.
See how the modern M1A is built in this Springfield Armory Video:
As racing improves automobiles, competition improves firearms, and the current crop of Springfield M1As, from the Basic to the top-of-the-line Super Match and Loaded models, reflects the years of development. The M14 and its variants are … still considered by many to be the best battle rifle in the history of the U.S. Military. — Dick Jones, Shooting Sports USA
What is Parallax?
Parallax is the apparent movement of the scope’s reticle (cross-hairs) in relation to the target as the shooter moves his eye across the exit pupil of the riflescope. This is caused by the target and the reticle being located in different focal planes.
Here’s a good explanation of scope parallax. This video has been watched over 790,000 times.
Why is it Important?
The greater the distance to the target and magnification of the optic, the greater the parallax error becomes. Especially at longer distances, significant sighting error can result if parallax is not removed.
How to Remove Parallax
This Nightforce Tech Tip video quickly shows how to remove parallax on your riflescope.
While keeping the rifle still and looking through the riflescope, a slight nod of the head up and down will quickly determine if parallax is present. To remove parallax, start with the adjustment mechanism on infinity and rotate until the reticle remains stationary in relation to the target regardless of head movement. If parallax has been eliminated, the reticle will remain stationary in relation to the target regardless of eye placement behind the optic.


 +ONE Program to Encourage New Shooters








 Oversizing cases also causes problems because the firing pin doesn’t have the length to reach the primer solid enough to ignite it 100% of the time. When you have one that is oversized, you usually have a bunch, since you usually do several cases at a time on that die setting. If the die isn’t readjusted, the problem will continue on the next batch of cases also. They will either not fire at all or you will have a lot of misfires. In a bolt action, a lot of time the extractor will hold the case against the face of the breech enough that it will fire. The case gets driven forward and the thinner part of the brass expands, holding to the chamber wall and the thicker part of the case doesn’t expand as much and stretches back to the bolt face. If it doesn’t separate that time, it will the next time. When it does separate, it leaves the front portion of the case in the chamber and pulls the case head off. Then when it tries to chamber the next round, you have a nasty jam. Quite often range brass is the culprit of this because you never know how many times it has been fired/sized and in what firearm. Back to beating it on the ground again till you figure out that you have to get the forward part of the case out.