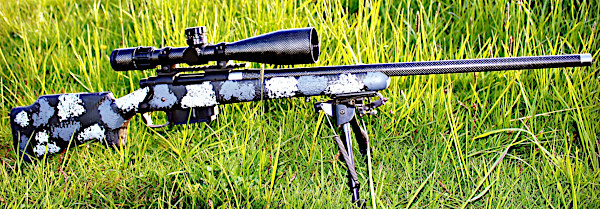
Are you looking to shave POUNDS from your hunting rig or varmint rifle? There are now multiple options for folks looking for a weight-saving, carbon fiber-wrapped barrel. You’ve probably heard about Proof Research. Yes that’s a good company that crafts good products. But now Proof Research has some noteworthy competition — Helix 6 Precision in Washington State.
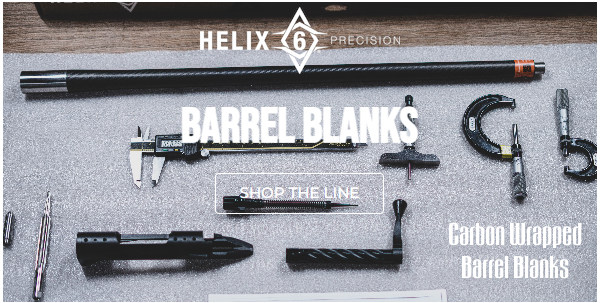
Helix 6 Precision crafts button-rifled and cut-rifled carbon-wrapped barrels in both conventional and “pre-fit” configurations. The conventional (not pre-fit) carbon-wrapped Helix 6 barrel blanks cost $979.99 for most listed chamberings. Pre-fits are offered for Savage rifles, Ruger Precision Rifle (RPR) series, Tikka T3, Aero SOLUS, Defiance Ruckus, Sig CROSS, and Zermatt rifles. These pre-fit barrels are not cheap. A 6mm Creedmoor RPR pre-fit costs $1099.99, while the Savage pre-fits are also $1099.99 for most chamberings.
While Helix 6 barrels do offer significant weight savings, the founders of Helix 6 say low mass wasn’t the number one design goal: “Accuracy was paramount and weight reduction was secondary. We’ve taken the industry’s most advanced carbon fiber engineering and pushed the technology further with our proprietary … carbon fiber process.”
The founders of Helix 6 Precision say they build some of the best carbon/steel hybrid barrels on the market: “Our unique carbon fiber-layup design dampens barrel harmonics for better accuracy. Each barrel is cut from a 416R stainless steel core, and carbon fiber-wrapped using the Helix 6 Precision’s advanced process. This creates match-grade accuracy barrels with high heat dispersion that are 30% lighter than a steel barrel of the same contour. The bores are … hand-lapped for precision accuracy.” Helix 6 claims its barrels are “lighter, stronger, and faster cooling than anything else available on the market.”
Myth vs. Reality — What Carbon Can and Cannot Do
Carbon fiber is formed using thin strands of carbon bonded together with a plastic polymer resin. The resulting material is very strong and light weight. There’s a reason Formula 1 cars are crafted with carbon-fiber composites. But is a carbon-wrapped barrel the right option for you? Here are some factors to consider:
Weight Savings — There’s no doubt that a carbon-wrapped barrel will weigh less than an unfluted stainless steel barrel with identical length and contour (outside diameters). Helix 6 claims a 30% weight reduction compared to a conventional stainless steel barrel. That’s significant.
Accuracy — Carbon-wrapped barrels are NOT commonly being used for F-Class or Benchrest competition. However, Proof Research carbon-wrapped barrels have performed well in PRS competitions in the hands of top shooters. So, we can conclude that carbon accuracy is good enough for the PRS/NRL tactical game, at least at the local club level.
Heat Dispersion — Carbon-wrapped barrel-makers claim their hybrid design disperses heat better than an all-steel barrel. Some independent testers disagree, saying: “hold on now — the carbon actually acts as an insulator, so more heat is retained in the barrel”. The jury is still out. One thing that is true is that the carbon barrels seem to generate less mirage from barrel heat. Ask yourself, “if less heat is coming OFF the barrel, where is that heat retained?” But the reduced mirage could be a function of the black woven surface which may release heat differently than polished steel.
Pre-Fit, AR, and Custom Barrel Options
Helix 6 precision barrels are available as pre-fits for a wide variety of rifle types in many popular long-range cartridges. Helix 6 can also thread and chamber a barrel for most precision rifles. And pre-fit AR barrels are available in a wide variety of chamberings and lengths. Helix 6 Precision also supplies carbon-wrapped barrel blanks which can be chambered and fitted by a professional gunsmith. Helix 6 barrel blanks, buttoned-rifled or cut-rifled, are sold in many calibers. Offered calibers are: .224, .243 (6mm), .264 (6.5mm), .257 (pending) .277 (pending), .284 (7mm), .308, .338, and .375. In addition, .22 LR rimfire carbon barrel blanks are offered.
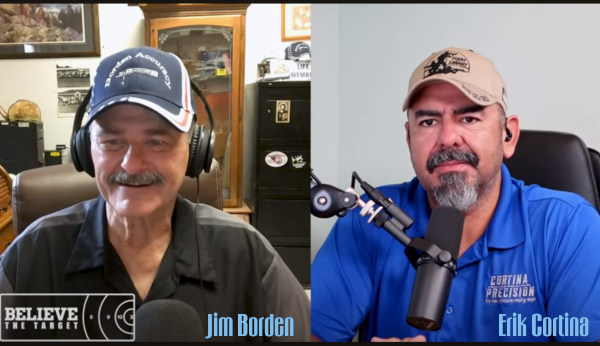
Every wondered how modern rifle actions are designed and crafted? Want to know the fine details of firing pin function and bolt lock-up? Then you should definitely watch this highly informative YouTube video. Top F-Class shooter Erik Cortina of Cortina Precision interviews Jim Borden, an engineer whose Borden Accuracy company produces some of the best rifle actions ever made. This is one of the better Erik Cortina video interviews. You’ll learn quite a bit from watching the video. The full video runs over two hours, so you may want to watch in segments over a couple of days.
Viewers have praised this interview, saying it has a wealth of information:
Gunsmith Alex Wheeler observed: “I consider Jim a friend even though we have never met. Definitely one of the guys that really gets actions. There’s not as many of them as you would think. He was the first timed action out there that had good ignition, at least in my opinion. It was a great interview. I do hope he has him on again.”
“Agreed. Jim is full of information and really does a good job on his actions. This [Cortina] interview with Jim Borden was excellent.” — Jud96
“I really like Jim’s explanations on why ductility is so important in an action. Especially in the critical areas that basically form 90 degree surfaces, such as where bolt lugs meet the bolt body. There is a lot of great info in this interview.” — Jackie Schmidt
“I have enjoyed all of Erik’s interview videos, which are very informative. But I agree [that] this interview with Jim Borden is the best. I learned a lot. Thank you Erik and Jim!” — Alexander-M
About Jim Borden and Borden Accuracy
Jim began shooting high power silhouette and benchrest matches in the mid 1970s while working for a Fortune 500 company as an engineer. In the early 1980s he began building rifles for himself and then for others. Jim has a background as a gunsmith, machinist, registered mechanical engineer, engineering instructor, project manager, hunter, and benchrest competitor.
In benchrest competition Jim has set ten world records and won 11 National Championships thereby earning induction into the Benchrest Hall of Fame. Jim also served six terms as President of the International Benchrest Shooters (IBS).
Jim operates Borden Rifles/Borden Accuracy with his wife Joan, sons Jim Junior and John, daughter Andrea Mecca and son-in-law John (Mike) Mecca. Jim is also an outstanding photographer. Below is a stunning eagle image photographed by Jim Borden.
Borden Accuracy — A Success Story
Borden Accuracy/Borden Rifles has been a source for precision benchrest and hunting rifles for many years. Jim started doing his own gunsmithing while competing in benchrest and High Power silhouette matches. Jim launched his business in 1987, working nights and weekends while still employed at P&G. The business became full-time in 1995 with Jim and his wife Joan doing the work. The business was expanded in 1999 with the construction of the new Springville, PA facility and the addition of sons Jim Jr. and John to the staff. Daughter Andrea Mecca joined the staff in May 2016 as machinist and machine operator and Son-in-law John Mecca came onboard in January 2000.
Jim and company began making Rimrock benchrest and Rimrock hunting actions in 2001. They added Borden Alpine and Timberline actions in 2006. These actions are made in an advanced manufacturing facility which has three CNC vertical machining centers, 1 CNC lathe and 2 CNC turning centers, three manual lathes, a manual knee mill, a surface grinder, a cylindrical grinder and wire EDM machine. To learn more, visit BordenRifles.com, call 570-965-2505, or send email to info [at] bordenrifles.com.
This article is part of Sinclair Int’l Step-By-Step Reloading Series. Most of the products mentioned in this article are sold through Brownells.com.
by Roy Hill, Brownells/Sinclair Copywriter
Making your own precision handloads is a meticulous journey with many steps, many important matters to consider, and many sets of measurements to calculate. For those who pursue the perfect group, the highest score, the really long accurate shot, the rewards more than outweigh the effort. Choosing the right cases, deburring the flash holes, making the primer pockets uniform, trimming the cases, and lubricating them are all familiar – and critical – steps along the journey. And now that your brass preparation is complete, you are at last ready to start running the cases through your press and fill them with primers, powder, and bullets. The very first die the brass encounters is the sizing die. You insert the case, work the press’s lever to return the case to its correct pre-fired dimensions – and the journey continues.
There are three types of sizing dies to think about: neck, full-length, and small base. All three have specific benefits and potential drawbacks, and you should choose the type of die you use by thinking very carefully about what kind of shooting you plan to do with your handloads. No matter which type you select, most sizing dies will also punch out the old spent primer with some sort of decapper assembly that uses a hardened steel rod. Many types of sizing dies use an expander ball inside the die to make sure the neck of the case will accommodate a bullet after being sized. With some size dies, the expanders are easily removable and interchangeable, letting you get exactly the neck tension you want. When sizing cases (neck of full-length), rifle cases always need lube.
Neck-Sizing Dies Neck-sizing dies resize only the neck of the case. The benefit of sizing only the neck is that the brass is “worked” very little, reducing the amount of changes to the brss. [We recommend full-length sizing for all applications after the first couple of firings, and semi-auto brass should be full-length sized every time!] Sinclair recommends that neck-sized-only cartridges should not be used any in other rifle besides the one they were originally fired from [unless they are also FL-sized], or in any action other than a bolt-action.
Full-Length Sizing Dies
Full-length sizing dies resize the full length of the case, not just the neck. Full-length sizing helps create handloads that will function in any rifle, not just the one from which the cases were originally fired. The potential downside of full-length sizing is that it may shorten case life because it works the brass more than neck sizing. But it’s possible to “tune” today’s full-length sizing dies so they barely work the brass at all, as this article by Sinclair Reloading Tech Ron Dague shows.
Illustration Shows How a Full-Length Sizing Die Works
Another way to reap the benefits of full-length sizing is to use Redding’s full-length bushing dies, which size the full length of the case but use a system of interchangeable bushings that enable you give the case neck the bare minimum of resizing needed. To see how finely adjustable bushing dies are, and how they resize the case while fully supported, CLICK HERE for Video. The neck bushing helps you precisely control the neck tension to help increase the consistency and accuracy of your handloads.
Small Base Dies
A Small Base Die is another type of full-length sizing die, but one that is typically used when reloading for semi-automatic rifles, like the AR-15, M14, or AR-style .308 rifles. (It may also work well for bolt guns that need extra sizing on the lower section of the case.) A small base die works exactly like a full-length sizing die, only it compresses the brass just a bit more, usually about .001″ more, and may even push the case shoulder back just a hair. Small base dies give that extra bit of compression to the brass to help make sure the case will properly extract from a semi-automatic firearm. The upside is that you get handloads that should work flawlessly in your semi-automatic. The downside is case life may be shortened as compared to brass used only in one bolt-action rifle, because the brass is worked more.
Shoulder Bump Gauges
A handy tool for setting up your full-length sizing dies as close as possible to your rifle’s chamber is a shoulder bump gauge. The bump gauge lets you resize the case as little as possible, to extend case life and help your handloads fit your rifle almost like a neck-sized only die. You use deprimed cases fired in your rifle and bump gauge inserts to help you set up the die so it resizes the case only about .001″ to .004″, depending on what type of rifle you’re shooting.
Video shows how to use a shoulder bump gauge to set up your full-length dies
Article Find by EdLongrange. We welcome reader submissions
Do you enjoy shooting pistols for sport, or perhaps you carry a handgun for self-defense? If you’re like most of us, you might benefit from a “refresher course” on the fundamentals of handgun shooting. The NRA has created a useful Infographic that covers important basics of handgun marksmanship — key things such as Sight Alignment, Trigger Control, and Handgun Hold.
Here are the first two (2) lessons. Click the link below to see all SIX (6) training topics: Sight Alignment, Sight Focus, Trigger Control, Breath Control, Hold Control, and Follow-Through.
Video Shows Sight Alignment, Grip, Stance, Trigger Control and More
In this USAMU video, SGT Shane Coley talks about the basics of sight alignment and trigger control. But then SGT Coley talks about other important control factors such as grip, arm position, and body stance. For rapid-fire shooting, you need to have a good arm and body positioning to control recoil and get back on target quickly. This video is a valuable complement to the NRA Infographic because it demonstrates all the important pistol fundamentals during live fire, at the range.
The NSSF 2026 SHOT Show kicks off in one week. SHOT Show (aka “Shooting, Hunting, and Outdoor Trade Show”) is the largest event in the world for the shooting/hunting/firearms industry. This year’s event runs January 20-23 at the Caesars Forum and Venetian Expo in Las Vegas, Nevada, with range day on 1/19/26. The 2026 SHOT Show will feature over 2,700 exhibitors. This massive event covers more than 830,000 square feet, with attendees and exhibitors coming from over 100 countries. Over 52,000 industry professionals and 2200+ media representatives are expected to attend.
This annual event is the largest trade show on the planet for professionals in the firearms, ammunition, hunting, and law enforcement industries. A vast collection of firearms, optics, reloading tools, training gear and other products are on display. If you plan to attend SHOT Show 2026, you can organize your days with the Event Planner linked below:
SHOT Show, the major gun industry trade show, runs this month in Las Vegas at the Venetian Expo and Caesars Forum. The event starts off with the Industry Day at the Range on Monday, January 19, 2026, and the Supplier Showcase also opens on Monday. Then the main show begins Tuesday, January 20, and runs through Friday, January 23, 2024. VIEW Event Schedule.
SHOT Show Tracker
The SHOT Show Tracker website has a wide variety of special pages that help you plan events and identify exhibitors. Tracker features are listed in the Table of Contents.
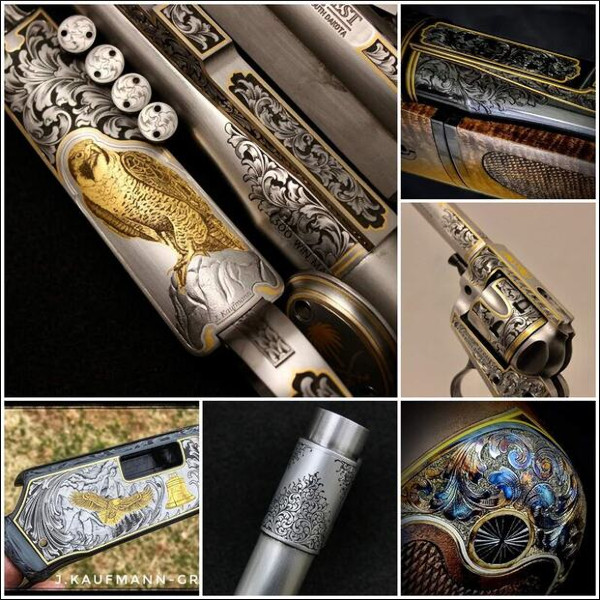
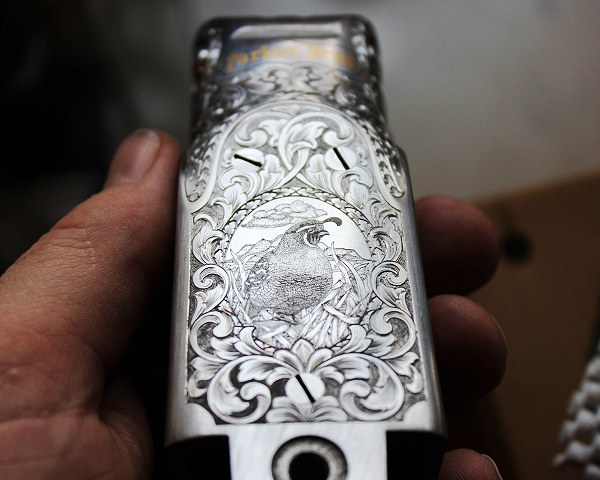
Impressive engraving by Jesse Kaufmann. Note how the scope rings have been engraved to perfectly match the engraving pattern on the Remington 547 action.
Who says fine craftsmanship is dead? There’s a modern day engraving wizard up in South Dakota, Jesse Kaufmann, who produces some of the most handsome engraving we’ve seen. Jesse, who operates Black Hills Gunstocks and Engraving LLC, is a true master at metal engraving and he also does superb stock checkering. Here are some examples of Jesse’s engraving work:
This 14-minute video showcases dozens of Jesse Kaufmann’s Engraving examples:
About Jesse Kaufmann, Master Engraver
Jesse Kaufmann was a professional stockmaker for Dakota Arms for over a decade. In 2009, he was inducted in the American Custom Gunmakers Guild as a checkering specialist. In January 2017, Jesse was awarded his Master Engraver certification by the Firearms Engravers Guild of America. With his broad skill set, Jesse is able to offer his clients a unique and complete package of stock work, finish, checkering, and engraving for a custom package that is all completed under one roof by his own hands.
Jesse Kaufmann’s work has been featured in American Rifleman, American Hunter, FEGA’s The Engraver, Sports Afield, Waidmannsheil Journal of German Gun Collectors Assn., Gun Digest 71st Edition, Modern Custom Guns Volume 2, Dangerous Game Rifles 2d. Edition. For more info, visit BlackHillsgunstocksandengraving.com, email blackhillsgunstocks [at] gmail.com, or call Jesse at (605) 499-9090 after 5:00 pm. SEE Gallery of Work.
Setting optimal bullet seating depth is very important for maximum accuracy. While some cartridges and barrels may deliver good accuracy with a wide range of bullet seating depths, other barrels may be more fussy, and may strongly prefer a specific seating depth, such as .006″ in the lands or .020″ off. To get this kind of precision, you need to know the exact position of the lands in your barrel. In addition, because barrel throats tend to move as the round count goes up, you should check the position of the lands regularly on a competition rifle.
Today’s Saturday Videos demonstrate a number of methods for finding Length to Lands in your rifle barrel. We start with the most common method — using the Hornady O.A.L. Gauge with a threaded modified case. With some practice, and a refined touch, this is actually very accurate. After this, we offer videos that have alternative methods, each with its pros and cons. You should find a method that works for you, that can achieve results within a couple thousandths for multiple measurements.
Finding Cartridge Length to Lands with O.A.L. Gauge
Probably the most common method to find length to lands is using a Hornady O.A.L. Gauge Tool with a comparator on a set of calipers. We regularly use this method with a custom modified case for our 6mmBR rifle. Using the technique described below, we can get results within .0015″ or so three out of four times. We do recommend taking multiple measurements. As explained below, be consistent and do NOT push the gray plastic rod too fast or with too much force.
During this measurement process, the modified case, with a bullet in its neck, is inserted in the chamber. Go slow, take your time. Here are FIVE TIPS that will help you get repeatable and reliable length-to-lands measurements with the Hornady O.A.L. Gauge:
1. Start with a clean chamber and clean barrel throat.
2. Make sure the modified case is fully screwed down and seated on the O.A.L. Gauge. It can sometimes unscrew a bit during repeated measurements.
3. Insert the modified case slowly and gently, but ensure the shoulder of the modified case is fully seated on the end of the chamber.
4. Push the gray plastic rod GENTLY. It is common for the bullet to be tilted a bit. You want to allow the bullet to self-center in the throat BEFORE you apply much pressure. Then tap a couple times and push until you feel resistance. Do NOT push too hard — that will jam the bullet in the lands.
5. Repeat the measurement at least 3 more times. If you follow our instructions, you should, typically, get a repeatable measurement, within 0.0015″ or so, 3 out of 4 times.
NOTE: We’ve seen some folks struggle to get repeatable measurements with this tool. In most cases, they were going too fast and pushing too hard on the gray rod, creating a hard jam.
Brownells — Using Hornady O.A.L. Gauge with Modified Case
This Brownells video shows how to use the modified (threaded) case for the cartridge your rifle shoots. Attach it to the O.A.L. Gauge, then insert a bullet into the case neck and slide the tool into the chamber. It takes a little practice to get consistent results. After getting the measurement in the barrel, you ascertain the length to lands using a Hornady Bullet Comparator attached to your calipers.
Making Your Own Modified Case — Threading the Case End
This helpful video from our friend Gavin Gear of UltimateReloader.com shows how to create a custom modified case to use with a Hornady O.A.L. Gauge. You need to drill out the primer pocket area, then tap and thread the bottom of the case.
Ultimate Reloader Shows 3 Ways to Find the Lands
This video shows three different ways to measure distance to lands. First Gavin Gear shows how to use a Hornady O.A.L. Gauge with Modified Case. The second methods shows how to use a bit of Loctite INSIDE the neck to secure a bullet. Be sure there is NO Loctite on the outside of the neck — you don’t want that in your chamber! You place the case with bullet into the chamber, then close bolt to seat the bullet. After waiting 5-10 minutes for the Loctite to set, you remove the cartridge gently. The third method (time-mark 16:50) is a Jam method using a bolt with the firing pin assembly and ejector removed (so there is no extra pressure on the case). Gavin notes: “The bullet ogive can be colored with a permanent marker if you want to indicate lands contact.”
About this third Jam method, ace F-Class shooter Erik Cortina posted: “My method is actually the last one that Travis showed. The one where you let the lands push bullet in. But it is neck tension dependent. I also put die wax in bullet ogive to prevent it from sticking in the lands. The method of seating bullet deeper and deeper until bolt closes is the Alex Wheeler method. As you said, there are a tons of ways to measure this.”
Finding Length to Lands the Speedy Way
Here is another method to find length to lands that can work with an unmounted barrel. This method is explained by Thomas “Speedy” Gonzales, a top gunsmith and ace benchrest shooter. Speedy drops a case with bullet seated into the chamber and then adjusts the seating depth with an inline seating die until there is no sticking or resistance felt. He can then adjust the true length to lands easily with his micrometer seating die. If you don’t have a modified case and do not want to partially disassemble your bolt to take measurement, you might want to use Speedy’s method.
Finding Length to Lands Using Bolt Movement — Primal Rights
This video shows how to remove the firing pin assembly in your bolt. This way the bolt can be used to advance a case with bullet smoothly into the chamber. Then the bullet seated in the case neck will move back to “first touch” contact position. Then extract the case slowly and measure.
The video host states: “Overall length gauges and modified cases tend to be close, but never as precise as we would like them to be. Here we describe how to measure the length to your lands in your rifle as precisely as possible, using a caliper and bullet comparator.” NOTE: The host says a store-bought Modified Case may not deliver that exact same length from case base to lands as your own fired case. That is true, but as long as the commercial Modified Case gives you repeatable results, you have a functional reference point which you can then use to test seating depths relative to that measurement.
Finding Length to Lands Using Bullet in Case With Split-Cut Neck
Here is a common method that requires no special tools. Simply take a fired (no primer), neck-sized case and split the necks down vertically with a Dremel. Done right, this will hold the bullet in place when you chamber the unloaded round. As the bullet touches the rifling it will move back. As the cartridge chambers, the bullet slides back into the case to give you length to lands. This is not super-accurate but it is probably good enough for finding the length to lands for a hunting rifle. The video maker explains: “No need to purchase gauges for this if you are willing to sacrifice one case. With a little time and patience you can get good results with this method.” Further Explanation.
How to Adjust Tension — Length and Number of Neck Cuts
Forum member Andris Silins, who uses this method, explains: “I made the neck cuts using a Dremel with a cut-off wheel. You can adjust tension two ways. First, you can make the cuts longer or shorter. Longer cuts = less tension. If you used only three cuts instead of four you would get more tension. The trick is to be gentle when you open and close the bolt. If you ram the bolt closed you may wedge the bullet into the lands. When you open the bolt it helps to keep a finger or two near by to guide the case out straight because the ejector wants to push it sideways.” READ MORE.
Finding the Lands with HK Rifleworks
This is another video that demonstrates how to disassemble the bolt so that the firing pin assembly and spring does not apply pressure on the empty case which would affect the bullet as it touches the lands. The video maker shows how to use a Brownells bolt disassembly tool to quickly take the bolt apart (3:20 time-mark). Once you have a repeatable measurement, you know exactly where is “first touch”. Then you can adjust your seating depth to be into the lands, or jumping the bullets. Many benchrest shooters like to load “into the lands”. PRS/NRL shooters and hunters will generally prefer to jump their bullets .0020″ or more.
For some applications, we prefer a non-bushing FL die over a bushing die. Shown here are three Forster full-length sizing dies, with necks honed to three different dimensions: 0.265″, 0.266″, and 0.267″.
The Honed Full-Length Sizing Die Option
There are many good options in full-length (FL) sizing dies. Most precision hand-loaders prefer FL dies with neck bushings. These let you adjust the “grip” on your bullet by using larger or smaller bushings. FL bushing dies are available from Whidden Gunworks, Forster, Redding and other makers.
Conventional, non-bushing full-length sizing dies can create ultra-accurate ammo with very low run-out. But many conventional non-bushing FL dies have an undersized neck diameter so you end up with excess neck tension, and you work the brass excessively.
There is another effective option, one that promises extremely low run-out. The honed FL die is a full-length sizing die that has the necked honed to provide a precise fit to the case-neck. When done right, honed FL dies produce extremely straight ammo — as there are no issues with bushing alignment (or bushings that are not perfectly concentric). This Editor owns honed dies from Forster, Redding, and Whidden Gunworks. They all perform extremely well, delivering match ammunition with extremely low run-out measured with a 21st Century Concentricity Gauge.
In one of the most popular articles we’ve ever published, Bugholes from Bipod, California shooter “Froggy” explained why he prefers honed dies for his tactical ammo.
Q: Do you FL size every time? Do you use custom dies?
Absolutely, I full length resize all of my brass every time I reload. And guess what? I’ve never had a feeding problem.
I do use a modified sizing die, without bushings. My FL resizing die has been custom-honed in the neck area to give .0015″ press fit on the bullet. I also put a slightly larger radius at the neck shoulder junction. I feel that this helps to seal the chamber. With this die, I get consistent neck tension every time–without bushings. Bushings are useful when you’re fishing around for a good load. But once you find the right amount of sizing for ideal neck tension, you can do this better with a customized FL die.
6.5 Guys Review Forster Honed Full-length Dies
The 6.5 Guys have reviewed honed FL sizing dies from Forster, explaining the pros and cons of this type of reloading die. They explained that, if you load a wide variety of bullets from different manufacturers, you many want to stick with a Bushing FL die. However, if you have settled on a particular bullet and found the “ideal” neck tension, then a honed die may make sense.
In this Gear Update, the 6.5 Guys discuss a service offered by Forster Products to custom hone the neck diameter of its full-length sizing dies to the customer’s specifications (to the thousandth). Whidden Gunworks has also crafted custom-honed FL dies for many customers, including this Editor.
Here’s inspiration for rimfire shooters out there. The video below shows some mighty impressive .22 LR iron sights lever gun shooting by a very talented young lady. In this video, Kirsten performs a classic Annie Oakley trick shot, cutting a playing card in half with a bullet. We hope this display of marksmanship brings a smile to our readers.
Kirsten Joy Weiss is a phenomenal off-hand rifle shooter. Splitting a playing card would be hard enough with a scoped rifle shot from the bench. But Kirsten makes this amazing shot from standing position, shooting over iron sights, with an inexpensive rimfire lever gun. Trust us, that’s not easy. It did take Kirsten three tries, but we’re still impressed.
To accomplish this trick shot, Kirsten’s horizontal aim had to be ultra-precise. A playing card is only 0.25mm thick (about 1/100th of an inch). That leaves almost no room for error.
GIF Animation Shows Bullet Slicing Card in Half:
We know top benchresters can put five shots in one ragged hole at 100 yards, used a scoped rifle sitting on a stable rest. But make those folks stand on their hind legs, hold the rifle, and aim over primitive iron sights, and some of those benchrest aces would be lucky to hit a dinner plate at 100 yards. Kudos to Kirsten for making this great shot.
Today’s showcase shows how CCI, Federal, and Remington .22 LR rimfire ammunition types are produced in large American factories. CCI and Federal, until very recently, were part of the Vista Outdoor Kinetic Group. In December 2024 CCI and Federal along with other Vista ammo brands were sold to a Czech company, CSG.* Most CCI rimfire is produced in Idaho, while most Federal rimfire ammo is produced in Anoka, Minnesota. Here we feature videos from CCI, Federal, and Remington ammo plants. Watch and learn how rimfire ammo is made.
The Manufacturing Process for .22 LR Rimfire Ammunition Shooting Sports USA explains: “Rimfire cartridge cases are the oldest self-contained cartridge in existence, having been in continuous production since the mid-1850s. Rimfire cases are drawn from a thin piece of brass and formed with a hollow rim. A priming compound is then forced into the case using centrifugal force, where it is charged with powder and a bullet is seated in the mouth of the case. The case is then crimped around the bullet to ensure sufficient push and pull when the round is fired. When the firing pin strikes the thin brass rim of the case, the hollow rim is crushed and the primer is ignited.” Source: SSUSA.org 9/2/2017.
.22 LR Ammo Production at Federal Ammo Plant in Minnesota
Note to Viewers — After Starting Video, Click Speaker Icon to HEAR audio!
A while back a Field & Stream writer toured the Federal ammunition production facility in Anoka, Minnesota. This large plant produces both rimfire and centerfire ammunition. While touring the plant, the reporter was allowed to capture video showing the creation of .22 LR rounds from start to finish. This is a fascinating video, well worth watching. Click speaker icon for sound.
22Plinkster Tours CCI/Speer Idaho Factory
Trickshot artist and YouTube host 22Plinkster was able to tour the CCI/Speer production facility in Lewiston, Idaho. This large plant produces both rimfire and centerfire ammunition. While touring the plant, 22Plinkster was allowed to capture video showing the creation of .22 LR rounds from start to finish.
This revealing video shows all phases of .22 LR ammo production including cupping, drawing, annealing, washing, drying, head-stamping, priming, powder charging, bullet seating, crimping, waxing, inspection, and final packaging. We really recommend you watch the video from start to finish. Well worth watching, this excellent video has logged 3.2 million views on YouTube.
Remington Factory Produces Millions of Rounds of Rimfire Ammo
Billions of .22 Long Rifle rounds are produced every year, and Remington Ammunition in Lonoke, Arkansas produces a significant share of the rimfire ammunition used worldwide. This “American Rifleman Television” feature shows the full ammo production process. At the start, brass cups are stamped out of large sheets of brass, and the cups then move on to have the headstamps applied and rims formed. Next, the rounds move on to be annealed and rinsed. Then the cases move onto priming. A wet priming pellet is then pressed into each empty .22 case, and the case is spun rapidly, spreading the pellet mix into the inner cartridge rim. The primed cartridges are then sent to a drying house, where they’ll sit for several days to allow the priming mixture to dry. The Remington factory is very efficient, with “some of the fastest rimfire-making equipment on the planet”.
*In December 2024, Vista Outdoor completed the $2.23 billion sale of the company’s “Sporting Products” division — which is known as the Kinetic Group and includes American ammunition brands CCI, Federal Premium, Hevi-Shot, Remington, and Speer — to the Czechoslovak Group (CSG), a Czech conglomerate. READ Full Story of Vista Outdoor Kinetic Group ammo brands sale.


 About Jim Borden and Borden Accuracy
 Borden Accuracy — A Success Story


 Neck-sizing dies resize only the neck of the case. The benefit of sizing only the neck is that the brass is “worked” very little, reducing the amount of changes to the brss. [We recommend full-length sizing for all applications after the first couple of firings, and semi-auto brass should be full-length sized every time!] Sinclair recommends that neck-sized-only cartridges should not be used any in other rifle besides the one they were originally fired from [unless they are also FL-sized], or in any action other than a bolt-action.


 About Jesse Kaufmann, Master Engraver